3 minute read
DIAGNOSIS
Reason:
To determine opening temperature of thermostat.
Advertisement
Equipment:
• Thermometer • Glass Container • Heating Unit
Procedure:
CAUTION
DO NOT allow thermostat or thermometer to rest against the side or bottom of glass container when heating water. Either may rupture if overheated.
1. Suspend thermostat and a thermometer in a container of water. 2. Heat and stir the water. Observe opening action of thermostat and compare temperatures with specifications. 3. Remove thermostat and observe its closing action as it cools.
Specifications: Begin Opening...............69.5 – 72.5° C (157 – 163° F) Fully Open..............................................85° C (185° F) Minimum Lift Height
Above 85° C (185° F) .....................8 mm (0.315 in.)
Results:
• If thermostat does not open according to specifications, replace. • If closing action is not smooth and slow, replace thermostat.
WATER PUMP/ALTERNATOR DRIVE BELT ADJUSTMENT
Reason:
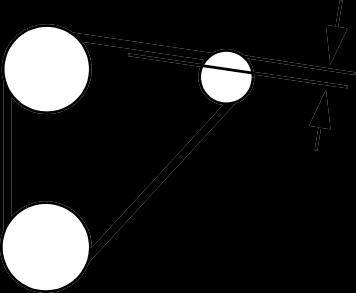
To keep proper tension on belt to drive water pump and alternator. To prevent shortened belt and bearing life.
Equipment:
• JDG529 or JDST28 BeltTension Gauge • Straight Edge
Procedure:
1. Open hood and remove left side engine cover. 2. Check belt tension between water pump and alternator using Belt Tension Gauge and a straight edge.
Belt Tightening Specifications: Applied Force.................................. 98 N (22 lb-force) Deflection . . . . . . . . . 10 – 15 mm (0.400 – 0.600 in.)
Results:
• If deflection is not within specifications:
• Loosen top and bottom alternator mounting cap screws. • Apply force only to right side of alternator housing until tension is correct. • Tighten alternator mounting hardware. • Replace engine cover.
RADIATOR BUBBLE TEST
Reason:
To determine if compression pressure is leaking from combustion cylinder into water jacket of cylinder block.

Equipment:
• JDG472 Adapter
Procedure:
1. With coolant at proper level and radiator cap tight, run engine for 5 minutes to bring to operating temperature. 2. Remove cap from recovery tank. 3. Check for bubbles coming from overflow hose at bottom of tank. If bubbles are present, isolate source of compression leak: • Remove injection nozzles. • Install JDG472 Adapter in injection port of cylinder to be tested. • Move piston to bottom of stroke with intake and exhaust valves closed. • Connect hose from compressed air source to adapter. Do not exceed rated pressure of hoses and tools being used. Do not exceed 355 psi pressure cylinder pressure. • Check for bubbles in coolant recovery tank, or air escaping from muffler, air cleaner or oil fill opening. • Repeat for each cylinder.
Results:
• If bubbles are present:
• Check for cracks in cylinder head and block. Check for damaged head gasket.
• If air escapes from muffler:
• Check for worn exhaust valve.
• If air escapes from air cleaner: • Check for worn intake valve.
• If air escapes from engine oil fill:
• Check for worn piston rings.
COOLING SYSTEM PRESSURE TEST
Reason:
To inspect cooling system for leaks.
Equipment:
• D05104ST Cooling System Pressure Pump • JDG692 Radiator Pressure Test Kit (Adapters)
Procedure:
CAUTION
Coolant may be above boiling temperature and under pressure in ---cooling system. DO NOT remove pressure cap when system is hot. Escaping steam will burn unprotected skin. Always wear protective clothing and goggles when servicing cooling system.
M87350
1. Check cooling system is cool and squeeze top radiator hose to check system pressure has dropped. 2. Remove cap. Top off coolant if low. Attach
D05104ST pressure pump to hose. 3. Pressurize system with tester to 100 kPa (15 psi). 4. Check for leaks throughout cooling system.
Results:
• Pressure should hold to specifications. If pressure decreases, check for leaks. Repair leaks or replace parts as necessary. • If leakage continues after all external leaks have been stopped, a defective head gasket, cracked block, or cylinder head may be the cause.


