
57 minute read
Safe-Use Practices


Burn only water-clear, K1 kerosene that is not yellow or contaminated. While other grades of kerosene may look like K1, they will release more pollutants into the home. Never burn gasoline or any other flammable liquids, as they dramatically increase the risk of fire or explosion. Do not use a kerosene heater in areas where explosive vapors may be present, such as in a garage.
Always store kerosene in a container intended for kerosene and marked as such, and never in a can that previously contained gasoline. Gasoline containers are typically red, while kerosene containers are usually blue. The container should have a tight-fitting lid to avoid spills. Do not store large amounts of kerosene or any other flammable liquid.
Advertisement
Never bring kerosene into the house other than the fuel in the heater, which should be filled outdoors after the heater has cooled down.
Maintain a safe clearance between the heater and furniture, drapes, and other combustibles. Do not place the heater in a high-traffic area or in the way of an exit. Instruct children to never touch the controls, and keep children and pets away from the heater at all times.
Do not let the heater operate while the house is empty
Ventilate the room by opening a door or window.
Never move or carry the heater in the event of an explosion or flare-up. In an emergency, activate the manual shut-off switch, if the heater has one.
In summary, kerosene heaters are attractive alternatives to standard heating systems, although they present certain health and safety concerns if improperly designed or operated.
Attached Garage Fire Containment
An attached garage is a garage that is physically attached to a house. Fires that begin in attached garages are more likely to spread to living areas than fires that originate in detached garages. For this reason, combined with the multitude of flammable materials commonly found in garages, attached garages should be adequately sealed from living areas. A properly sealed attached garage will ideally restrict the potential spread of fire long enough to allow the occupants time to escape the home or building.
Why are garages (both attached and detached) fire hazards?
Oil or gasoline can drip from cars. These fluids may collect unnoticed and eventually ignite. Flammable liquids, such as gasoline, oil and paint, are commonly stored in garages. Some other examples are brake fluid, degreaser, motor oil, varnish, lighter fluid, and fluids containing solvents, such as paint thinner. These chemicals are flammable in their fluid form, and some may create explosive vapors.
Heaters and boilers, which are frequently installed in garages, create sparks that can ignite fumes or fluids. Car batteries, too, will spark under certain conditions.
Mechanical or electrical building projects are often undertaken in the garage. Fires can easily start while a careless person is welding near flammable materials.
Doors
The 2006 edition of the International Residential Code (IRC) states the following concerning doors that separate garages from living areas:
R309.1. Opening Penetration:
Openings from a private garage directly into a room used for sleeping purposes shall not be permitted. Other openings between the garage and the residence shall be equipped with solid wood doors not less than 1-3/8 inches in thickness, solid- or honeycomb-core steel doors not less than 1-3/8 inches thick, or 20-minute fire-rated doors.
In addition, homeowners can check for the following while inspecting the door that separates their garage from the living areas:
While not required by the IRC, it is helpful if there is at least one step leading up to the door from the garage. Gasoline fumes and other explosive gases are heavier than air, and they will accumulate at ground level. Their entry beneath a door will be slowed by an elevation increase. Doors should have tight seals around their joints to prevent seepage of fumes into the living areas of the house. Carbon monoxide, with the same approximate density as air (and often warmer than surrounding air), will easily rise above the base of an elevated door and leak through unsealed joints.
Doors should be self-closing. Many homeowners find these doors inconvenient, but they are safer than doors that can be left ajar. While this requirement is no longer listed in the IRC, it is still a valuable recommendation.
If the doors have windows, the glass should be fire-rated.
Pet doors should not be installed in fire-rated doors. Pet doors violate the integrity of a fire barrier.
Walls and Ceilings
The 2006 edition of the IRC states the following concerning garage walls and ceilings:
R309.2. Separation Required:
The garage shall be separated from the residence and its attic area by not less than 1/2-inch gypsum board applied to the garage side. Garages beneath habitable rooms shall be separated from all habitable rooms above by not less than 5/8-inch Type X gypsum board or equivalent. Where the separation is a floor-ceiling assembly, the structure supporting the separation shall also be protected by not less than 1/2-inch gypsum board or equivalent. Garages located less than 3 feet from a dwelling unit on the same lot shall be protected with not less than 1/2-inch gypsum board applied to the interior side of exterior walls that are within this area. Openings in these walls shall be regulated by Section 309.1. This provision does not apply to garage walls that are perpendicular to the adjacent dwelling unit wall.
In addition, homeowners can check for the following while inspecting walls and ceilings:
In garages that have access to the attic, a hatch cover made from an approved, fire-rated material should protect this access at all times. Missing or opened covers should be noted, as should covers made from flammable materials, such as thin plywood. Garage attic doors must be constructed such that the 45-minute rating is maintained; any drywall edges on both the hatch and the surrounding area exposed to physical damage are protected. The cover or door is installed so that it is permanent (non-removable) with hardware to maintain it in a closed position and with latching hardware to maintain it in a closed position. This could be accomplished by the use of spring-loaded hinges, a door closer, or hardware that will not allow it to be left in an open position when not in use. A single bolt-type or hook-and-eye hardware does not provide a positive closure, since these would allow the door to be left open. Likewise, drywall screws are "fasteners" and not hardware, so they cannot be used as the only means of keeping access doors closed.
The living space is separated from the garage by a firewall that extends from the floor to the roof. If the ceiling material is fire-rated, the firewall can terminate at the ceiling. Drywall joints should be taped or sealed. Joints should be fitted so that the gap is no more than 1/20-inch, with joints backed by either solid wood or another layer of drywall such that the joints are staggered.
Ducts
The 2006 edition of the IRC states the following concerning ducts that penetrate garage walls and ceilings:
R309.1.1. Duct Penetration
Ducts in the garage and ducts penetrating the walls or ceilings separating the dwelling from the garage shall be constructed of a minimum No. 26-gauge steel sheet or other approved material, and shall have no openings in the garage.
Dryer exhaust ducts that penetrate garage walls are serious fire hazards. These ducts are generally made from plastic and will easily melt during a fire, creating a large breach in the firewall.
Floors
The 2006 edition of the IRC states the following concerning floors in garages:
R309.3. Floor Surface
Garage floor surfaces shall be of approved, non-combustible material. The area of the floor used for parking of automobiles or other vehicles shall be sloped to facilitate the movement of liquids to a drain or toward the main vehicle entry doorway.
Homeowners may also want to check for the following:
A curb is present along the perimeter of the garage floor. This curb is designed to prevent fluids from entering the living areas of the house. Curbs are often useful barriers for melted snow carried into the garage by automobiles, but curbs can also keep chemical spills contained in the garage.
Water heaters should be elevated above the floor by at least 18 inches. A pilot light may ignite spilled fluid or floor-level flammable fumes if the water heater is placed at floor level.
Concerning items placed on the floor, homeowners should check for the following:
All flammable liquids are stored in clearly labeled, self-closing containers, and in small amounts. They should be stored away from heaters, appliances, pilot lights, and other sources of heat and flame.
Propane tanks should never be stored indoors. If they catch fire, a serious explosion may result. Propane tanks are sturdy enough to be stored outdoors. The floor should be clear of clutter. Loose papers, matches, oily rags, and other flammable items are dangerous if they are strewn about the garage floor.
General Safety Tips for Attached Garages:
Use light bulbs with the proper wattage. Do not overload electrical outlets.
Tape down all cords and wires so that they’re not twisted or accidentally yanked out of the outlet.
In summary, attached garages should be sealed off from the living space so that fire may be contained.
Non-Conforming Bedrooms
A room must conform to specific requirements in order for it to be considered a bedroom or sleeping room. The reason for this law is that the inhabitant must be able to quickly escape in case of a fire or other emergency.
Why would a homeowner use a nonconforming room as a bedroom?
Some of the reasons include: to earn money from it as a rental. While they run the risk of being discovered by the city, landlords can profit by renting out rooms that are not legally considered bedrooms; to increase the value of the home. All other considerations being equal, a four-bedroom house will usually sell for more than a three-bedroom house; and lack of knowledge of code requirements. To the untrained eye, there is little obvious difference between a conforming bedroom and non-conforming bedroom. When an emergency happens, however, the difference will be more apparent. If you have any questions about safety requirements, ask your Certified Master Inspector® during your next scheduled inspection.
Homeowners run serious risks when they use a non-conforming room as a bedroom. An embittered tenant, for instance, may bring their landlord to court, especially if the tenant was forced out when the faux bedroom was exposed. The landlord, upon being exposed, might choose to adjust the bedroom to make it code-compliant, but this can cost thousands of dollars. Landlords can also be sued if they sell the home after having advertised it as having more bedrooms than it actually has. And the owner might pay more than they should be paying in property taxes if they incorrectly list a non-conforming bedroom as a bedroom. Perhaps the greatest risk posed by rooms that unlawfully serve as bedrooms stems from the reason these laws exist in the first place: rooms lacking egress can be deadly in case of an emergency. For instance, in January 2002, four family members sleeping in the basement of a Gaithersburg, Maryland townhome were killed by a blaze when they had no easy escape.
The following requirements are taken from the 2006 International Residential Code (IRC), and they can be used as a general guide, but bear in mind that the local municipality determines the legal definition of a bedroom. Such local regulations can vary widely among municipalities, and what qualifies as a bedroom in one city might be more properly called a den in a nearby city. In some municipalities, the room must be above grade and equipped with an AFCI or smoke alarm to be considered a conforming bedroom. Ceiling height and natural lighting may also be factors. The issue can be extremely complex, so it’s best to learn the code requirements for your area. Nevertheless, the IRC can be useful, and it reads as follows: o MINIMUM OPENING AREA: SECTION: R 310.1.1. All emergency escape and rescue openings shall have a minimum net clear opening of 5.7 square feet. Exception: Grade floor openings shall have a minimum net clear opening of 5 square feet. o MINIMUM OPENING HEIGHT: R 310.1.2. The minimum net clear opening height shall be 24 inches. o MINIMUM OPENING WIDTH: R 310.1.3. The minimum net clear opening width shall be 20 inches. o OPERATIONAL CONSTRAINTS: R 310.1.4. Emergency escape and rescue openings shall be operational from the inside of the room without the use of keys or tools or special knowledge.
EMERGENCY ESCAPE AND RESCUE REQUIRED SECTION: R 310.1. Basements and every sleeping room shall have at least one operable emergency escape and rescue opening. Such opening shall open directly into a public street, public alley, yard or court. Where basements contain one or more sleeping rooms, emergency egress and rescue openings shall be required in each sleeping room, but shall not be required in adjoining areas of the basement. Where emergency escape and rescue openings are provided, they shall have a sill height of not more than 44 inches above the floor. Where a door opening having a threshold below the adjacent ground elevation serves as an emergency escape and rescue opening and is provided with a bulkhead enclosure, the bulkhead enclosure shall comply with SECTION R310.3. The net clear opening dimensions required by this section shall be obtained by the normal operation of the emergency escape and rescue opening from the inside. Emergency escape and rescue openings with a finished sill height below the adjacent ground elevation shall be provided with a window well, in accordance with SECTION R310.2.
WINDOW WELLS: SECTION R310.2. The minimum horizontal area of the window well shall be 9 square feet, with a minimum horizontal projection and width of 36 inches. The area of the window well shall allow the emergency escape and rescue opening to be fully opened. Exception: The ladder or steps required by SECTION R 310.2.1 shall be permitted to encroach a maximum of 6 inches into the required dimensions of the window well.
LADDER AND STEPS: SECTION R 310.2.1. Window wells with a vertical depth greater than 44 inches shall be equipped with a permanently affixed ladder or steps usable with the window in the fully open position. Ladders or steps required by this section shall not be required to comply with SECTIONS R311.5 or R311.6. Ladders or rungs shall have an inside width of at least 12 inches, shall project at least 3 inches from the wall, and shall be spaced not more than 18 inches on-center vertically for the full height of the window well.
BULKHEAD ENCLOSURES: SECTION R 310.3. Bulkhead enclosures shall provide direct access to the basement. The bulkhead enclosure with the door panels in the fully open position shall provide the minimum net clear opening required by SECTION R 310.1.1. Bulkhead enclosures shall also comply with SECTION R 311.5.8.2.
BARS, GRILLES, COVERS AND SCREENS: SECTION R 310.3. Bars, grilles, covers, screens and similar devices are permitted to be placed over emergency escape and rescue openings, bulkhead enclosures, and window wells that serve such openings, provided the minimum net clear opening size complies with SECTIONS R 310.1.1 to R 310.1.3, and such devices shall be releasable or removable from the inside without the use of a key, tool, special knowledge, or force greater than that which is required for normal operation of the escape and rescue opening.
EMERGENCY ESCAPE WINDOWS UNDER DECKS AND PORCHES: SECTION R 310.5. Emergency escape windows are allowed to be installed under decks and porches, provided the location of the deck allows the emergency escape window to be fully opened and provides a path not less than 36 inches in height to a yard or court.
In summary, non-conforming bedrooms are rooms that unlawfully serve as bedrooms, as the occupant would lack an easy escape in case of emergency.
Window Wells
A window well is a semi-circular excavation that surrounds a basement window. It is typically constructed from a solid barrier made from corrugated galvanized metal, masonry, plastic, or pressuretreated wood.
Window wells are usually installed for the following purposes: emergency egress. If the window serves a living area as opposed to an unfinished basement with exposed utilities emergency escape at a minimum of two locations is required. Window wells allow windows to be used by escaping occupants and emergency crews attempting to enter the house; to prevent moisture damage to basement windows that are at or below grade. The window wells keep the soil away from openings in the foundation walls while still allowing proper grading and drainage away from the house; and to allow sunlight into a below-grade room that would otherwise rely solely on artificial lighting.
Window wells are often covered to prevent falls, as well as to discourage small children, pets and wild animals from entering the wells and becoming trapped. For instance, a deer fawn made the news in Utah after it was recovered safely after falling down a 12-foot-deep uncovered window well. Covers will also prevent the accumulation of twigs, grass, mulch, and blowing snow that would obscure sunlight and complicate emergency escape through the well. Covers may be locked from the inside to prevent unwanted intrusion.
Window well covers, however, can block sunlight, ventilation, and emergency egress, especially if they become covered with snow and ice. It is the homeowner’s responsibility to make sure that the cover is cleared of snow and has not been frozen shut from ice. No items, such as garden hoses, potted plants or tools, should be placed on top of window well covers. Note that covers that are locked from the inside to prevent unlawful entry will be inaccessible to fire crews and first-responders.
Construction
Regarding their strength and operability, the 2007 edition of the International Code Council (ICC), Section 3.4, states that window well covers shall support “a minimum live load of 40 pounds per square foot. The cover shall be operable from within the window well without the use of tools or special knowledge, and shall require no more than 30 pounds of force to fully open.”
Additional safety concerns include the following:
Size. According to the 2006 edition of the International Residential Code (IRC), Section R310:
The minimum horizontal area of the window well shall be 9 square feet, with a minimum horizontal projection and width of 36 inches.
Even if the well seems large enough for members of a particular household, it might be a tight fit for a fully equipped firefighter.
Structural damage to the barrier. Hydrostatic pressure and freeze-thaw cycles can exert a great deal of pressure on window wells and, over time, cause masonry to bend or crack. Check for: spalling, bowing, cracking or leaning in concrete; cracking or bowing in plastic; rust, bowing or ruptures in metal; and insect damage or cracks in wood.
Improper drainage. Waterlogged window wells can easily leak through a window into the basement, especially following a heavy rain. Water intrusion can cause a variety of undesirable conditions, such as mold growth, wood decay, corrosion, and insect damage. Check for a lack of sufficient cleaning and maintenance both in the window well and elsewhere. Homeowners should first make sure that gutters and downspouts are clear of debris, which can force water to overflow from the gutters and collect in the window well and other low areas. Dirt and debris should also be collected from the well. A qualified professional may be required to correct structural sources of drainage issues, such as soil erosion, insufficient or settled drainage stone, or the pulling away from the foundation of the barrier.
Lack of a ladder. The 2006 IRC, Section 310.2, states:
Window wells with a vertical depth greater than 44 inches shall be equipped with a permanently affixed ladder or steps usable with the window in the fully open position.
Additional Tips for Homeowners
Window well covers can be screened or barred to provide pest-free ventilation. Teach children to avoid window wells, even if they are covered and appear sturdy. Practice exiting the window, window well and window cover so that any previously unnoticed obstacles can be removed. Repair or replace any equipment that does not function properly. Speak with your local building department if you are unsure whether a window well is required in your home. Your jurisdiction may mandate special size restrictions. Metal window wells can have rolled edges for safety against cuts. Consult with your Certified Master Inspector® if you have additional concerns regarding window wells, covers, moisture problems, or emergency egress.
In summary, window wells are installed to allow emergency egress and to protect windows from damp soil, but improper installation and maintenance can lead to moisture damage and safety hazards, especially in an emergency.
Fire Extinguishers
Fire extinguishers are devices commonly found indoors and are used to douse fire and prevent its spread. They are small metal canisters that contain compressed gas (usually nitrogen) that, when activated, propel a directed spray of flame-retardant chemicals. Fire extinguishers are effective only if the users understand where and why they are used.
Fire Type
Fire extinguishers are distinguished based on the types of fires on which they are effective. These fires are classified by their fuel source and assigned identifying letters as follows:
A class: fires that result from ordinary combustibles, such as wood and paper.
B class: fires that result from combustible liquids, such as kerosene, gasoline, oil and grease.
C class: fires of an electrical nature. These result from the combustion of circuit breakers, wires, outlets, and other electrical devices and equipment. Extinguishers designed to handle this type of fire cannot use chemicals that are conductive, since conductive agents increase the risk of electric shock to the operator.
D class: fires resulting from combustible metals, such as sodium, potassium, titanium and magnesium. These fires occur mostly in chemical laboratories and are rare in most other environments.
K class: These types of fires consume vegetable oils and animal fats, and generally happen in kitchens.
NOTE: Although, technically, the letter rankings listed above refer to fire types, these symbols can also be used to identify the extinguishers themselves. For instance, an extinguisher that uses CO2 can be called a “CO2 extinguisher” or a “BC extinguisher."

Extinguisher Types
No fire extinguisher can be safely and effectively used for every type of fire. Some contain chemicals that are ineffective in certain situations and can even cause harm to the operator if misapplied. To prevent confusion, extinguishers are classified by the type of chemical agents they contain.
A few of the most common extinguisher types are listed below:
Dry Chemical: There are two types of fire extinguishers that use a dry chemical. One is called multi-purpose dry chemical and uses ammonium phosphate as the extinguishing agent, which is effective on A, B, and C class fires. This chemical is corrosive and must be scrubbed from surfaces after use. These types of extinguishers are very common and are found in schools, homes, hospitals and offices. Sodium bicarbonate is used in extinguishers known as regular dry chemical, which are capable of handling B and C class fires. These extinguishers are found in garages, kitchens and laboratories. Sodium bicarbonate is easy to clean and non-toxic.
Carbon Dioxide: These extinguishers contain liquid CO2 that is expelled as a gas. They are effective against B and C class fires. Unlike other chemicals, CO2 does not leave a harmful residue and is environmentally friendly.
It also poses very little danger to electronics and is effectively employed in laboratories, computer rooms, and other areas with sensitive equipment. Water Extinguishers: These extinguishers are most suited for A class fires. However, they cannot be used in B, C or D class fires. In B and D class fires, the water will spread the flames. In a C class fire, the water is conductive and poses a risk of electric shock to the operator. However, the misting nozzle of a water mist extinguisher breaks up the stream of de-ionized water so that there is no conductive path back to the operator. Since the agent used is water, these types of extinguishers are inexpensive and environmentally friendly.
Wet Chemical Fire Extinguishers: These devices are designed to combat K class fires and commonly use potassium acetate. They are appropriately employed in commercial kitchens and restaurants, especially around deep fryers. The chemical is emitted as a fine mist that does not cause grease to splash onto other surfaces. They can also be used in A class fires.
Extinguisher Testing and Replacement
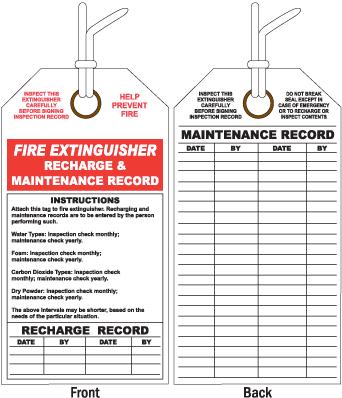
The National Fire Protection Agency (NFPA) recommends that extinguishers be tested every five or 12 years, depending on the type. The standard method of testing hydrostatic is conducted underwater where the cylinders are subjected to pressures that exceed their ratings. Vessels that fail the test are condemned and destroyed, while the rest are reassembled and put back into service.
According to the NFPA, extinguishers should be destroyed if any of the following conditions are present (and they should not be tested): a. if repairs by soldering, welding, brazing, or the use of patching compounds exist; b. if the cylinder threads are worn, corroded, broken, cracked or nicked; c. if there is corrosion that has caused pitting, including pitting under a removable nameplate or name band assembly; d. if the fire extinguisher has been burned in a fire; e. if a calcium chloride-type of extinguisher agent was used in a stainless steel fire extinguisher; f. if the shell is of copper or brass construction joined by soft solder or rivets; g. if the depth of a dent exceeds 1/10 of the greatest dimension of the dent if not in a weld, or exceeds 1⁄4-inch if the dent includes a weld; h. if any local or general corrosion, cuts, gouges or dings have removed more than 10% of the minimum cylinder wall thickness; and/or i. if the fire extinguisher has been used for any purpose other than that of a fire extinguisher.
When should a fire extinguisher be used?
Small fires can be controlled through the use of household or commercial fire extinguishers. A household extinguisher can often completely douse a very small fire and prevent the need for professional assistance. Even if a fire cannot be completely doused, a homeowner can potentially control a blaze long enough with an extinguisher for firefighters to arrive. Fire extinguishers should not be used if the operator is not sure if they have the proper type of extinguisher, if they are not sure how to use it, or if they cannot avoid smoke or are in imminent danger. If the operation of an extinguisher may place other people in danger, they should evacuate the building and wait for fire crews to arrive.
What is on an extinguisher’s label? You'll find: essential information about the types of fires they can combat. Newer devices have pictures on their labels that correspond directly to the fire types listed previously. Older models have letters that serve the same purpose; a numerical rating that designates the extinguishing potential for that particular model (Class A and B); instructions for operation; ad a tag that indicates if and when it was inspected.
Do fire extinguishers expire?
Fire extinguishers expire and they do this for a few different reasons. One common reason is that, over time, the seal on the neck will weaken and allow compressed gas to escape. Extinguishers that have lost much of their pressure will not operate properly. Pressure within an extinguisher can be conveniently checked through a pressure gauge. ABC-class (ammonium phosphate) extinguishers have the tendency to fail due to solidification of the chemical in the canister base. Homeowners can delay this process by periodically shaking the extinguisher. Expensive extinguishers that have expired, especially those designed for commercial use, can be refilled and resealed by companies that specialize in this service. Inexpensive models are disposable.
Unfortunately, an expiration date cannot be fully trusted, and there is no foolproof way to know if an extinguisher is no longer functional. Due to the extremely destructive potential of fires and the relatively low cost of extinguishers, it is advisable to replace or recharge questionable extinguishers.
In summary, extinguishers are classified based on their chemical ingredients, all of which have their own strengths and limitations. It is important to know what type of extinguisher combats what type of fire. Fire extinguishers are critical indoor safety devices that must be maintained and checked regularly.
Smoke Alarms
A smoke alarm, also known as a smoke detector, is a device that detects smoke and emits an audible sound and/or visual signal to alert residents to a potential fire.
Facts and Figures
According to the Consumer Product Safety Commission:
Almost two-thirds of reported deaths caused by home fires from 2003 to 2006 resulted from fires in homes that lacked working smoke alarms. Older homes are more likely to lack an adequate number of smoke alarms because they were built before requirements increased. In 23% of home fire deaths, smoke alarms were present but did not sound. Sixty percent of these failures were caused by the power supplies having been deliberately removed due to false alarms.
Every year in the United States, about 3,000 people lose their lives in residential fires. Most of these deaths are caused by smoke inhalation, rather than as a result of burns.
Smoke Alarm Types
Ionization and photo-electric are the two main designs of smoke detectors. Both types must pass the same tests to be certified to the voluntary standard for smoke alarms, but they perform differently in different types of fires. Detectors may be equipped with one or both types of sensors known as dualsensor smoke alarms and possibly a heat detector, as well. These sensors are described as follows:
Ionization smoke sensors are the most common and economical design, and are available at most hardware stores. They house a chamber sided by small metal plates that irradiate the air so that it conducts electricity. When smoke enters the chamber, the current flow becomes interrupted, which triggers an alarm to sound. These sensors will quickly detect flaming-type fires but may be slower to react to smoldering fires.
Photo-electric smoke sensors use a light-sensitive photocell to detect smoke inside the detector. They shine a beam of light that will be reflected by smoke toward the photocell, triggering the alarm. These sensor types work best on smoldering fires but react more slowly to flaming fires. They often must be hard-wired into the house's electrical system, so some models can be installed only in particular locations.
While heat detectors are not technically classified as smoke detectors, they are useful in certain situations when smoke alarms are likely to sound false alarms. Dirty, dusty industrial environments, as well as the area surrounding cooking appliances, are a few places where false alarms are more likely and where heat detectors may be more useful.
Location
Individual authorities having jurisdiction (AHJs) may have their own requirements for smoke-alarm placement, so homeowners can check with their local building department if they need specific instructions. However, the following guidelines can be helpful.
Smoke alarms should be installed in the following locations: on the ceiling or wall outside of each separate sleeping area in the vicinity of bedrooms; in each bedroom, as most fires occur during sleeping hours; in the basement, preferably on the ceiling near the basement stairs; in the garage, due to all the combustible materials commonly stored there; on the ceiling or on the wall with the top of the detector between 6 to 12 inches from the ceiling; and/or in each story within a building, including basements and cellars, but not crawlspaces or uninhabited attics.
Smoke alarms should not be installed in the following locations: near heating or air-conditioning supply and return vents; near a kitchen appliance; near windows, ceiling fans, or bathrooms equipped with a shower or tub; where ambient conditions, including humidity and temperature, are outside the limits specified by the manufacturer's instructions; within unfinished attics or garages, or in other spaces where temperatures can rise or fall beyond the limits set by the manufacturer; where the mounting surface could become considerably warmer or cooler than the rest of the room, such as an inadequately insulated ceiling below an unfinished attic; or in dead-air spots, such as the top of a peaked roof or a ceiling-to-wall corner.
Power and Interconnection
Power for smoke alarms may come from being hard-wired directly into the home’s electrical system, or it may come from just a battery. Hard-wired smoke detectors are more reliable because the power source cannot be removed or drained, although they will not function in a power outage. Batteryoperated units often fail because the battery can be easily removed, dislodged or drained, although these units can be installed almost anywhere. Older buildings may be restricted to battery-powered designs, while newer homes generally offer more options for power sources. If possible, homeowners should install smoke alarms that are hard-wired with a battery backup, especially during a renovation or remodeling project.
Smoke alarms may also be interconnected so that if one becomes triggered, they all sound in unison. Interconnected smoke alarms are typically connected with a wire, but new technology allows them to be interconnected wirelessly. The National Fire Protection Agency requires that smoke alarms be AFCIprotected.
Tips for Homeowners:
Parents should stage periodic night-time fire drills to assess whether their children will awaken from the alarm and respond appropriately. Never disable a smoke alarm. Use the alarm’s silencing feature to stop nuisance or false alarms triggered by cooking smoke or fireplaces. Test smoke alarms monthly, and replace their batteries at least twice a year. Change the batteries when you change your clocks for Daylight Saving Time. Most models emit a chirping noise when the batteries are low to alert the homeowner that they need replacement.
Smoke alarms should be replaced when they fail to respond to testing, or every 10 years, whichever comes first. The radioactive element in ionization smoke alarms will decay beyond usability within 10 years.
Smoke detectors should be replaced if they become damaged or wet, are accidentally painted over, are exposed to fire or grease, or are triggered without apparent cause.
Note the sound of the alarm. It should be distinct from other sounds in the house, such as the telephone, doorbell and pool alarm.
If you have any questions or concerns related to smoke alarms or fire dangers in your home, consult with your Certified Master Inspector® during your next scheduled inspection.
In summary, smoke alarms are invaluable, life-saving appliances when they are installed properly and adequately maintained.
Fire Sprinklers
In a growing trend that many say will save even more lives than smoke alarms and carbon-monoxide detectors, fire sprinklers are now available for residences.
Every year, residential fires destroy lives and property. In 2007 in the U.S., there were 414,000 residential fires that caused:
2,895 fire deaths; 14,000 injuries; and $7.5 billion in property damage.
Residential sprinklers, listed by the Underwriters Laboratories (UL), are now available to homeowners. The development of chloro-polyvinyl chloride and other listed non-metallic pipe has simplified installation, making sprinkler systems more cost-effective. Because of their improved sensitivity, they are designed to respond to fires much faster than standard commercial and industrial sprinkler systems.
Here are a few facts you might not know about fire sprinklers:
On average, they use significantly less water to extinguish a fire than would be required by the fire department. Sprinklers use just 10 to 26 gallons per minute (gpm), while fire crews use 125 gpm per hose.
Insurance premiums are often lower for homes that are equipped with fire sprinklers, which help pay for the systems.
In houses equipped with sprinklers, 90% of fires are contained by the operation of a single sprinkler head.
Newer fire sprinkler heads are designed to activate independently of one another, leaving unneeded heads in reserve, and sparing water-sensitive items.
Fire sprinklers are triggered only by temperatures that surpass a certain heat threshold, making it practically impossible to trigger them accidentally.
A recent study conducted by the UL found that house fires are getting worse; the time needed to escape some types of fires has been reduced from approximately 17 minutes to as little as three minutes, in some situations. According to the study, this change is largely due to the disuse of natural fabrics for furnishings, such as wool, cotton and rayon, in favor of more flammable synthetics, such as polyester and plastic. Sprinkler systems are thus becoming increasingly more important in residences, just as they have been relied upon in commercial buildings for decades.
Sprinklers respond to fires immediately and automatically from locations that may be dangerous for firefighters to reach. In contrast, fire departments can be quite slow to respond, given the following potential delays:
In rural areas, it may take a long time for fire trucks to reach their destination. Calls made at night are responded to more slowly than calls made during the day, as most career and volunteer firefighters are asleep.
If the 9-1-1 call comes from a cell phone, the dispatcher will have greater difficulty pinpointing the fire’s location than if the call comes from a landline.
While some fire departments are always well-prepared, in many areas, the firefighters require time to assemble, get suited up, and prepare the fire truck. Fire trucks can be slowed by traffic, and they can even get lost en route.
In residential applications, sprinklers are smaller than traditional commercial sprinklers, and they can be aesthetically coordinated with any room décor and mounted flush with walls and ceilings. They are also inexpensive, relative to the value of the structure and the potential damage inflicted by a fire. Presently, the cost of a home sprinkler system will add 1% to 1.5% to the cost of new construction, and the price will probably come down in the future. Although more expensive, it is possible to retrofit existing homes with sprinkler systems.
Tips for Homeowners:
Always make sure control valves are in the open position.
Always report damage to any part of a sprinkler system immediately.
Never paint a fire sprinkler.
Never stack items close to fire sprinklers, as this may reduce their heat sensitivity. The tops of stored items and furniture should be at least 18 inches below fire sprinklers, according to the National Fire Sprinkler Association.
Never hang anything from any part of a fire sprinkler system.
In summary, residential fire sprinklers are a valuable, cost-effective safety addition to any home, although they require periodic maintenance.
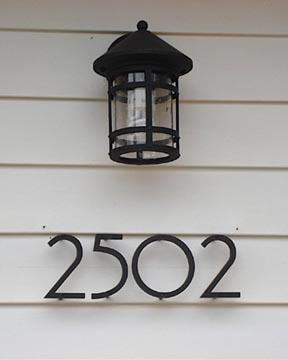
House Numbers
House numbers should be clear enough so that police, the fire department, paramedics, etc., can quickly locate properties in an emergency. House numbers are often the only way that first-responders can identify their intended destinations. A number of jurisdictions have begun enforcing laws through strict fines for homeowners who do not comply with laws that impose requirements for house numbers.
Local Regulations
Many municipalities and counties have implemented ordinances requiring property owners to standardize the display of house numbers on buildings. The city of St. Martinville, Louisiana, for instance, is considering requiring its citizens to display street numbers in block numbering that is at least 4 inches tall and is either illuminated at night or has a reflective finish. If the ordinance is passed, the city will fine offenders $200, plus hundreds more in court fees. In Florida, the cities of Clearwater, Largo and St. Petersburg have begun enforcing their own municipal codes that regulate the visibility of house numbers, imposing fines for violators.
Common Requirements
In order for house numbers to be visible from the street, Certified Master Inspectors® advise that they should: be large. Jurisdictions that regulate the size of street numbers generally require them to be 3 to 6 inches tall. Many jurisdictions require that the numbers be of a certain thickness, such as 1/2-inch, as required by New York City; be of a color that contrasts with their background. Reflective numbers are usually helpful because they are easier to see at night than numbers that are not reflective; not be obscured by any trees, shrubs, or other permanent objects; face the street that is named in the house’s address. It does emergency workers no good if the house number faces a different street than the one the workers are traveling on; be clearly displayed at the driveway entrance if the house is not visible from the road.
According to 6.5.12 of the International Standards for Inspecting Commercial Properties, inspectors should:
Inspect the address or street number to determine that it is visible from the street with numbers in contrast to their background.
Future Adjustments
Even if a house number is currently adequate, it might need adjustment in the future. The following are common reasons for future adjustments:
The numbers assigned to houses by the municipality occasionally change, and homeowners must adjust their house numbers accordingly.
The trees or shrubs in front of the house have grown so much that the number is no longer visible. House numbers installed in the winter may be visible during that season but become blocked by budding vegetation by spring or summer.
House numbers will require maintenance when they get dirty. Numbers may not be reflective or contrasting if they are covered in mud.
Snow piles created by snow plows during the winter may be high enough to cover the number. If this happens, the number should be raised so this situation does not repeat.
In summary, house numbers serve a critical function for emergency personnel and should be clearly displayed.
Electrical Safety
Aluminum Wiring
Between approximately 1965 and 1973, single-strand aluminum wiring was sometimes substituted for copper branch-circuit wiring in residential electrical systems due to the sudden escalating price of copper. After a decade of use by homeowners and electricians, inherent weaknesses were discovered in the metal that led to its disuse as a branch wiring material. Although properly maintained aluminum wiring is acceptable, aluminum will generally become defective faster than copper due to certain qualities inherent in the metal. Neglected connections in outlets, switches and light fixtures containing aluminum wiring become increasingly dangerous over time. Poor connections cause wiring to overheat, creating a potential fire hazard. In addition, the presence of single-strand aluminum wiring may void a homeowner’s insurance policy. Homeowners should talk with their insurance agents about whether the presence of aluminum wiring in their home is a problem that requires changes to their policy.
Facts and Figures
In April 1974, two people were killed in a house fire in Hampton Bays, New York. Fire officials determined that the fire was caused by a faulty aluminum wire connection at an outlet.
According to the Consumer Product Safety Commission (CPSC), "Homes wired with aluminum wire manufactured before 1972 ['old technology' aluminum wire] are 55 times more likely to have one or more connections reach fire hazard conditions than is a home wired with copper."
Aluminum as a Metal
Aluminum possesses certain qualities that, compared with copper, make it an undesirable material as an electrical conductor. These qualities all lead to loose connections, when fire hazards become likely. These qualities are as follows: higher electrical resistance. Aluminum has a high resistance to electrical current flow, which means that, given the same amperage, aluminum conductors must be of a larger diameter than that required by copper conductors. less ductile. Aluminum will fatigue and break down more readily when subjected to bending and other forms of abuse than copper, which is more ductile. Fatigue will cause the wire to break down internally and will increasingly resist electrical current, leading to a buildup of excessive heat. galvanic corrosion. In the presence of moisture, aluminum will undergo galvanic corrosion when it comes into contact with certain dissimilar metals. oxidation. Exposure to oxygen in the air causes deterioration to the outer surface of the wire. This process is called oxidation. Aluminum wire is more easily oxidized than copper wire, and the compound formed by this process – aluminum oxide – is less conductive than copper oxide. As time passes, oxidation can deteriorate connections and present a fire hazard. greater malleability. Aluminum is soft and malleable, meaning it is highly sensitive to compression. After a screw has been over-tightened on aluminum wiring, for instance, the wire will continue to deform or “flow” even after the tightening has ceased. This deformation will create a loose connection and increase electrical resistance in that location. greater thermal expansion and contraction. Even more than copper, aluminum expands and contracts with changes in temperature. Over time, this process will cause connections between the wire and the device to degrade. For this reason, aluminum wires should never be inserted into the “stab,” “bayonet” or “push-in” type terminations found on the back of many light switches and outlets. excessive vibration. Electrical current vibrates as it passes through wiring. This vibration is more extreme in aluminum than it is in copper, and, as time passes, it can cause connections to loosen.
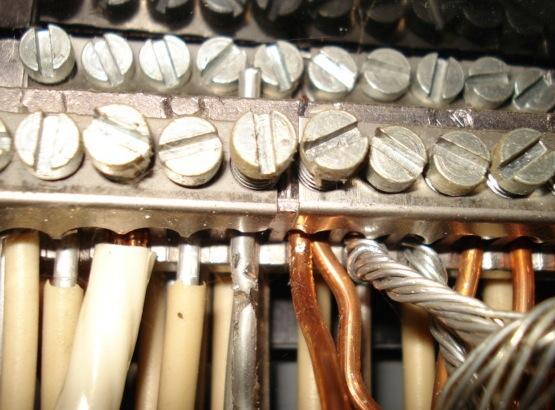
Identifying Aluminum Wiring
Aluminum wires are the color of aluminum and are easily discernible from copper and other metals. Since the early 1970s, wiring-device binding terminals for use with aluminum wire have been marked CO/ALR, which stands for “copper/aluminum revised."
Look for the word "aluminum" or the initials "AL" on the plastic wire jacket. Where wiring is visible, such as in the attic or electrical panel, homeowners can look for printed or embossed letters on the plastic wire jacket. Aluminum wire may have the word "aluminum," or a specific brand name, such as "Kaiser Aluminum," marked on the wire jacket. Where labels are hard to read, a light can be shined along the length of the wire.
When was the house built? Homes built or expanded between 1965 and 1973 are more likely to have aluminum wiring than houses built before or after those years.
Options for Correction
Aluminum wiring should be evaluated by a qualified electrician who is experienced in evaluating and correcting aluminum wiring problems. Not all licensed electricians are properly trained to deal with defective aluminum wiring. The CPSC recommends the following two methods for correction for aluminum wiring:
Rewire the home with copper wire. While this is the most effective method, rewiring is expensive and impractical, in most cases.
Use copalum crimps. The crimp connector repair consists of attaching a piece of copper wire to the existing aluminum wire branch circuit with a specially designed metal sleeve and powered crimping tool. This special connector can be properly installed only with the matching AMP tool. An insulating sleeve is placed around the crimp connector to complete the repair. Although effective, they are expensive (typically around $50 per outlet, switch or light fixture).
Although not recommended by the CPSC as methods of permanent repair for defective aluminum wiring, the following methods may be considered: application of anti-oxidant paste. This method can be used for wires that are multi-stranded or wires that are too large to be effectively crimped. pigtailing. This method involves attaching a short piece of copper wire to the aluminum wire with a twist-on connector. the copper wire is connected to the switch, wall outlet or other termination device. This method is only effective if the connections between the aluminum wires and the copper pigtails are extremely reliable. Pigtailing with some types of connectors, even though Underwriters Laboratories might presently list them for the application, can lead to increasing the hazard. Also, beware that pigtailing will increase the number of connections, all of which must be maintained. alumiconn. Although AWR believes this method may be an effective temporary fix, they are wary that it has little history, and that they are larger than copper crimps and are often incorrectly applied.
Aluminum Wiring Repair (AWR), Inc., of Aurora, Colorado, advises that pigtailing can be useful as a temporary repair or in isolated applications, such as the installation of a ceiling fan. CO/ALR connections. According to the CPSC, these devices cannot be used for all parts of the wiring system, such as ceiling-mounted light fixtures or permanently wired appliances and, as such, CO/ALR connections cannot constitute a complete repair. Also, according to AWR, these connections often loosen over time.
Replace certain failure-prone types of devices and connections with others that are more compatible with aluminum wire.
Remove the ignitable materials from the vicinity of the connections.
In summary, aluminum wiring can be a fire hazard due to inherent qualities of the metal.
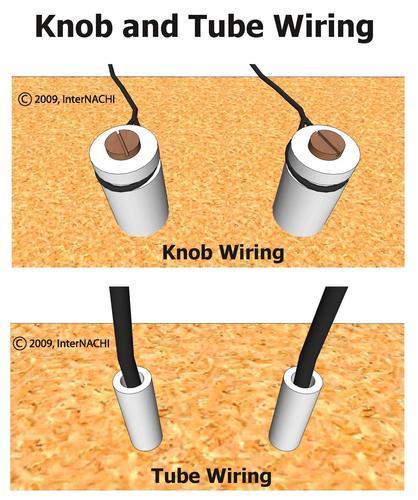
Knob-and-Tube Wiring
Knob-and-tube (K&T) wiring was an early standardized method of electrical wiring in buildings, in common use in North America from about 1880 to the 1940s. The system is considered obsolete and can be a safety hazard, although some of the fear associated with it is undeserved.
Facts About Knob-and-Tube Wiring:
It is not inherently dangerous. The dangers from this system arise from its age, improper modifications, and situations where building insulation envelops the wires. It has no ground wire and thus cannot service any three-pronged appliances. While it is considered obsolete, there is no code that requires its complete removal. It is treated differently in different jurisdictions. In some areas, it must be removed at all accessible locations, while others merely require that it not be installed in new construction. It is not permitted in any new construction.
How Knob-and-Tube Wiring Works
K&T wiring consists of insulated copper conductors passing through lumber framing drill holes via protective porcelain insulating tubes. They are supported along their length by nailed-down porcelain knobs. Where wires enter a wiring device, such as a lamp or switch, or were pulled into a wall, they are protected by flexible cloth or rubber insulation called loom.
Advantages of Knob-and-Tube Wiring:
K&T wiring has a higher ampacity than wiring systems of the same gauge. The reason for this is that the hot and neutral wires are separated from one another, usually by 4 to 6 inches, which allows the wires to readily dissipate heat into free air.
K&T wires are less likely than Romex® cables to be punctured by nails because K&T wires are held away from the framing.
The porcelain components have an almost unlimited lifespan.
The original installation of knob-and-tube wiring is often superior to that of modern Romex® wiring. K&T wiring installation requires more skill to install than Romex® and, for this reason, unskilled people rarely ever installed it.
Problems Associated with K&T Wiring:
Unsafe modifications are far more common with K&T wiring than they are with Romex® and other modern wiring systems. Part of the reason for this is that K&T is so old that more opportunity has existed for improper modifications.
The insulation that envelopes the wiring is a fire hazard.
It tends to stretch and sag over time.
It lacks a grounding conductor. Grounding conductors reduce the chance of electrical fire and damage to sensitive equipment.
In older systems, the wiring is insulated with varnish and fiber materials that are susceptible to deterioration.
Compared with modern wiring insulation, K&T wiring is less resistant to damage. K&T wiring insulated with cambric and asbestos is not rated for moisture exposure. Older systems contain insulation with additives that may oxidize copper wire. Bending the wires may cause insulation to crack and peel away.
K&T wiring is often spliced with modern wiring incorrectly by amateurs. This is perhaps due to the ease by which K&T wiring is accessed.
Building Insulation
K&T wiring is designed to dissipate heat into free air, and insulation will disturb this process. Insulation around K&T wires will cause heat to build up, and this creates a fire hazard. The 2008 National Electrical Code (NEC) requires that this wiring system not be covered by insulation. Specifically, it states that this wiring system should not be in… hollow spaces of walls, ceilings and attics where such spaces are insulated by loose, rolled or foamed-in-place insulating material that envelops the conductors.
Local jurisdictions may or may not adopt the NEC’s requirement. The California Electrical Code, for instance, allows insulation to be in contact with knob-and-tube wiring, provided that certain conditions are met, such as, but not limited to, the following:
A licensed electrical contractor must certify that the system is safe. The certification must be filed with the local building department. Accessible areas where insulation covers the wiring must be posted with a warning sign. In some areas, this sign must be in English and Spanish The insulation must be non-combustible and non-conductive. Normal requirements for insulation must be met.
Modifications
When K&T wiring was first introduced, common household electrical appliances were limited to little more than toasters, tea kettles, coffee percolators and clothes irons. The electrical requirements of midto late-20th century homes could not have been foreseen during the late 18th century, a time during which electricity was seen as a passing fad to many people. Existing K&T systems are notorious for modifications made in an attempt to match the increasing amperage loads required by televisions, refrigerators, and a plethora of other electrical appliances. Many of these attempts were made by insufficiently trained handymen, rather than experienced electricians, whose work made the wiring system vulnerable to overloading.
Many homeowners adapted to the inadequate amperage of K&T wiring by installing fuses with resistances that were too high for the wiring. The result of this modification is that the fuses would not blow as often and the wiring would suffer heat damage due to excessive amperage loads. It is not uncommon for homeowners to find connections wrapped with masking tape or Scotch tape instead of electrical tape.
K&T Wiring and Insurance
Many insurance companies refuse to insure houses that have knob-and-tube wiring due to the risk of fire. Exceptions are sometimes made for houses with such systems that have been deemed safe by an electrical contractor
Advice for Homeowners with K&T Wiring:
Have the system evaluated by a qualified electrician. Only an expert can confirm that the system was installed and modified correctly.
Do not run an excessive amount of appliances in the home, as doing so can cause a fire. Where the wiring is brittle or cracked, it should be replaced. Proper maintenance is crucial. K&T wiring should not be used in kitchens, bathrooms, laundry rooms, or at the exterior. The wiring must be grounded in order to be used safely in these locations.
Rewiring a house can take weeks and cost thousands of dollars, but unsafe wiring can cause fires, complicate real estate transactions, and make insurers skittish.
Homeowners should carefully consider their options before deciding whether to rewire their house.
The homeowner or an electrician should carefully remove any insulation that is found surrounding K&T wires.
Prospective home buyers should get an estimate of the cost of replacing K&T wiring. They can use this amount to negotiate a lower price for the house.
In summary, knob-and-tube wiring is likely to be a safety hazard due to improper modifications and the addition of building insulation.
Ungrounded Electrical Receptacles
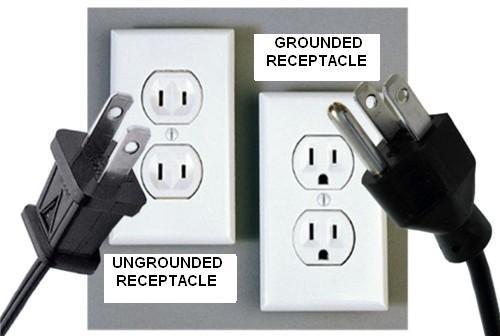
Grounding of electrical receptacles (which some laypeople refer to as outlets) is an important safety feature that has been required in new construction since 1962, as it minimizes the risk of electric shock and protects electrical equipment from damage. Modern grounded 120-volt receptacles in the United States have a small, round ground slot centered below two vertical hot and neutral slots, and it provides an alternate path for electricity that may stray from an appliance. Older homes often have ungrounded, twoslot receptacles that are outdated and potentially dangerous.
Homeowners sometimes attempt to perform the following dangerous modifications to ungrounded receptacles: the use of an adapter, also known as a "cheater plug." Adapters permit the ungrounded operation of appliances that are designed for grounded operation. These are a cheaper alternative to replacing ungrounded receptacles but are less safe than properly grounding the connected appliance; replacing a two-slot receptacle with a three-slot receptacle without re-wiring the electrical system so that a path to ground is provided to the receptacle. While this measure may serve as a seemingly proper receptacle for three-pronged appliances, this “upgrade” is potentially more dangerous than the use of an adapter because the receptacle will appear to be grounded and future owners might never be aware that their system is not grounded. If a house still has knoband-tube wiring, it is likely that any three-slot receptacles are ungrounded; and removal of the ground pin from an appliance. This common procedure not only prevents grounding but also bypasses the appliance’s polarizing feature, since a de-pinned plug can be inserted into the receptacle upside-down.
While homeowners may be made aware of the limitations of ungrounded electrical receptacles, upgrades are not necessarily required. Many small electrical appliances, such as alarm clocks and coffee makers, are two-pronged and are thus unaffected by a lack of grounding in the home’s electrical system.
However, upgrading the system will bring it closer to modern safety standards, and this may be accomplished in the following ways:
Install three-slot receptacles and wire them so that they’re correctly grounded. Install ground-fault circuit interrupters (GFCIs). These can be installed upstream or at the receptacle itself. GFCIs are an accepted replacement because they protect against electric shocks even in the absence of grounding, but they may not protect the powered appliance. Also, GFCI-protected ungrounded receptacles may not work effectively with surge protectors. Ungrounded GFCI-protected receptacles should be identified with labels that come with the new receptacles that state: “No Equipment Ground.” Replace three-slot receptacles with two-slot receptacles. Two-slot receptacles correctly represent that the system is ungrounded, lessening the chance that they will be used improperly.
Neither homeowners nor unqualified professionals should attempt to modify a building’s electrical components. Misguided attempts to ground receptacles to a metallic water line or ground rod may be dangerous.
In summary, adjustments should be made by qualified electricians not homeowners to an electrical system to upgrade ungrounded receptacles to meet modern safety standards and the requirements of today's typical household appliances and electronics
Ground-Fault Circuit Interrupters (GFCIs)
What is a GFCI?
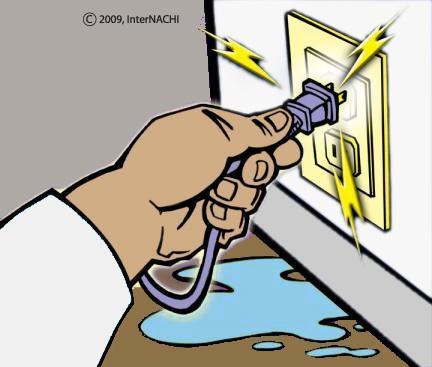
A ground-fault circuit interrupter, or GFCI, is a device used in electrical wiring to disconnect a circuit when unbalanced current is detected between an energized conductor and a neutral return conductor. Such an imbalance is sometimes caused by current "leaking" through a person who is simultaneously in contact with a ground and an energized part of the circuit, which could result in a lethal shock. GFCIs are designed to provide protection in such a situation, unlike standard circuit breakers, which guard against overloads, short circuits and ground faults.
It is estimated that about 300 deaths by electrocution occur every year, so the use of GFCIs has been adopted in new construction, and recommended as an upgrade in older construction, in order to mitigate the possibility of injury or fatality from electric shock.
History
The first high-sensitivity system for detecting current leaking to ground was developed by Henri Rubin in 1955 for use in South African mines. This cold-cathode system had a tripping sensitivity of 250 mA (milliamperes), and was soon followed by an upgraded design that allowed for adjustable trip-sensitivity from 12.5 to 17.5 mA. The extremely rapid tripping after earth leakagedetection caused the circuit to de-energize before electric shock could drive a person's heart into ventricular fibrillation, which is usually the specific cause of death attributed to electric shock.
Charles Dalziel first developed a transistorized version of the ground-fault circuit interrupter in 1961. Through the 1970s, most GFCIs were of the circuit-breaker type. This version of the GFCI was prone to frequent false trips due to poor alternating-current characteristics of 120-volt insulations. Especially in circuits with long cable runs, current leaking along the conductors’ insulation could be high enough that breakers tended to trip at the slightest imbalance.
Since the early 1980s, ground-fault circuit interrupters have been built into outlet receptacles, and advances in design in both receptacle and breaker types have improved reliability while reducing instances of "false trips," also known as nuisance-tripping.
NEC Requirements for GFCIs
The National Electrical Code (NEC) has included recommendations and requirements for GFCIs in some form since 1968, when it first allowed for GFCIs as a method of protection for underwater swimming pool lights. Throughout the 1970s, GFCI installation requirements were gradually added for 120-volt receptacles in areas prone to possible water contact, including bathrooms, garages, and receptacles located outdoors.
The 1980s saw additional requirements implemented. During this period, kitchens and basements were added as areas that were required to have GFCIs, as well as boat houses, commercial garages, and indoor pools and spas. New requirements during the '90s included crawlspaces, wet bars and rooftops. In 1996, GFCIs were mandated for all temporary wiring for construction, remodeling, maintenance, repair, demolition, and similar activities.
The 2008 NEC contains additional updates relevant to GFCI use, as well as some exceptions for certain areas. The 2008 language is presented here for reference.
2008 NEC on GFCIs
100.1 Definition
100.1 Definitions. Ground-Fault Circuit Interrupter. A device intended for the protection of personnel that functions to de-energize a circuit or portion thereof within an established period of time when a current to ground exceeds the values established for a Class A device.
FPN: Class A ground-fault circuit interrupters trip when the current to ground has a value in the range of 4 mA to 6 mA. For further information, see UL 943, standard for Ground-Fault Circuit Interrupters.
210.8(A)&(B)
Protection for Personnel
210.8 Ground-Fault Circuit Interrupter Protection for Personnel.
(A) Dwelling Units. All 125-volt, single-phase, 15- and 20-ampere receptacles installed in the locations specified in (1) through (8) shall have ground-fault circuit-interrupter protection for personnel.
(1) bathrooms;
(2) garages, and also accessory buildings that have a floor located at or below grade level not intended as habitable rooms and limited to storage areas, work areas, and areas of similar use;
Exception No. 1: Receptacles not readily accessible.
Exception No. 2: A single receptacle or a duplex receptacle for two appliances that, in normal use, is not easily moved from one place to another and that is cord-and-plug connected in accordance with 400.7(A)(6), (A)(7), or (A)(8).
Receptacles installed under the exceptions to 210.8(A)(2) shall not be considered as meeting the requirements of 210.52(G)
(3) outdoors;
Exception: Receptacles that are not readily accessible and are supplied by a dedicated branch circuit for electric snow melting or de-icing equipment shall be permitted to be installed in accordance with the applicable provisions of Article 426.
(4) crawlspaces at or below grade level.
Exception No. 1: Receptacles that are not readily accessible.
Exception No. 2: A single receptacle or a duplex receptacle for two appliances that, in normal use, is not easily moved from one place to another and that is cord-and-plug connected in accordance with 400.7(A)(6), (A)(7), or (A)(8).
Exception No. 3: A receptacle supplying only a permanently installed fire alarm or burglar alarm system shall not be required to have ground-fault circuit interrupter protection.
Receptacles installed under the exceptions to 210.8(A)(2) shall not be considered as meeting the requirements of 210.52(G)
(6) kitchens, where the receptacles are installed to serve the countertop surfaces;
(7) wet bar sinks, where the receptacles are installed to serve the countertop surfaces and are located within 6 feet of the outside edge of the wet bar sink;
(8) boathouses;
(B) Other Than Dwelling Units. All 125-volt, single-phase, 15- and 20-ampere receptacles Installed in the locations specified in (1), (2), and (3) shall have ground-fault circuit interrupter protection for personnel:
(1) bathrooms;
(2) rooftops;
Exception: Receptacles that are not readily accessible and are supplied by a dedicated branch circuit for electric snow-melting or de-icing equipment shall be permitted to be installed in accordance with the applicable provisions of Article 426.
(3) kitchens.
Testing Receptacle-Type GFCIs
Receptacle-type GFCIs are currently designed to allow for safe and easy testing that can be performed without any professional or technical knowledge of electricity. GFCIs should be tested right after installation to make sure they are working properly and protecting the circuit. They should also be tested once a month to make sure they are working properly and are providing protection from fatal shock.
To test the receptacle GFCI, first plug a nightlight or lamp into the outlet. The light should be on. Then press the "TEST" button on the GFCI. The "RESET" button should pop out, and the light should turn off.
If the "RESET" button pops out but the light does not turn off, the GFCI has been improperly wired. Contact an electrician to correct the wiring errors.
If the "RESET" button does not pop out, the GFCI is defective and should be replaced.
If the GFCI is functioning properly and the lamp turns off, press the "RESET" button to restore power to the outlet.
Arc-Fault Circuit Interrupters (AFCIs)
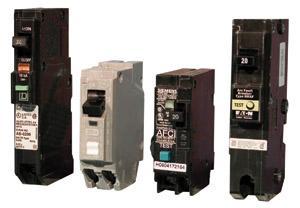
Arc-fault circuit interrupters (AFCIs) are special types of electrical receptacles or outlets and circuit breakers designed to detect and respond to potentially dangerous electrical arcs in home branch wiring.
How do they work?
AFCIs function by monitoring the electrical waveform and promptly opening (interrupting) the circuit they serve if they detect changes in the wave pattern that are characteristic of a dangerous arc. They also must be capable of distinguishing safe, normal arcs (such as those created when a switch is turned on or a plug is pulled from a receptacle) from arcs that can cause fires. An AFCI can detect, recognize and respond to very small changes in wave pattern.
What is an arc?
When an electric current crosses an air gap from an energized component to a grounded component, it produces a glowing plasma discharge known as an arc. For example, a bolt of lightning is a very large, powerful arc that crosses an atmospheric gap from an electrically charged cloud to the ground or another cloud. Just as lightning can cause fires, arcs produced by domestic wiring are capable of producing high levels of heat that can ignite their surroundings and lead to structure fires.
According to statistics from the National Fire Protection Agency for the year 2005, electrical fires damaged approximately 20,900 homes, killed 500 people, and cost $862 million in property damage.
Although short-circuits and overloads account for many of these fires, arcs are responsible for the majority and are undetectable by traditional (non-AFCI) circuit breakers.
Where are arcs likely to form?
Arcs can form where wires are improperly installed or when insulation becomes damaged. In older homes, wire insulation tends to crystallize as it ages, becoming brittle and prone to cracking and chipping. Damaged insulation exposes the current-carrying wire to its surroundings, increasing the chances that an arc may occur.
Situations in which arcs may be created: electrical cords damaged by vacuum cleaners or trapped beneath furniture or doors. damage to wire insulation from nails or screws driven through walls. appliance cords damaged by heat, natural aging, kinking, impact, or over-extension. spillage of liquid. loose connections in outlets, switches and light fixtures.
Where are AFCIs required?
Locations in which AFCIs are required depend on the building codes adopted by their jurisdiction.
The 2006 International Residential Code (IRC) requires that AFCIs be installed within bedrooms in the following manner:
E3802.12 Arc-Fault Protection of Bedroom Outlets. All branch circuits that supply120-volt, single-phase, 15- and 20-amp outlets installed in bedrooms shall be protected by a combination-type or branch/feeder-type arc-fault circuit interrupter installed to provide protection of the entire branch circuit.
Exception: The location of the arc-fault circuit interrupter shall be permitted to be at other than the origination of the branch circuit, provided that: the arc-fault circuit interrupter is installed within 6 feet of the branch circuit overcurrent device, as measured along the branch circuit conductor; and the circuit conductors between the branch circuit overcurrent device and the arc-fault circuit interrupter are installed in a metal raceway or a cable with metallic sheathing.
The National Electrical Code (NEC) offers the following guidelines concerning AFCI placement within bedrooms:
Dwelling Units. All 120-volt, single-phase, 15- and 20-ampere branch circuits supplying outlets installed in dwelling units in family rooms, dining rooms, living rooms, parlors, libraries, dens, sun rooms, recreation rooms, closets, hallways, and similar rooms or areas shall be protected by a listed arc-fault circuit interrupter, combination-type installed to provide protection of the branch circuit.
Some jurisdictions do not yet require their implementation in locations where they can be helpful.
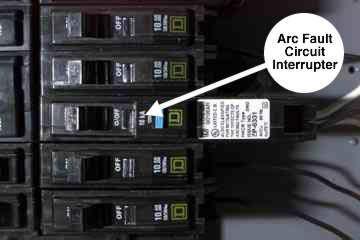
What types of AFCIs are available?
AFCIs are available as circuit breakers for installation in the electrical distribution panel.
Nuisance Tripping
An AFCI may activate in situations that are not dangerous and create needless power shortages. This can be particularly annoying when an AFCI stalls power to a freezer or refrigerator, allowing its contents to spoil. There are a few procedures an electrical contractor can perform in order to reduce potential “nuisance tripping," such as:
Check that the load power wire, panel neutral wire, and load neutral wire are properly connected.
Check wiring to ensure that there are no shared neutral connections. Check the junction box and fixture connections to ensure that the neutral conductor contacts a grounded conductor.
Arc Faults vs. Ground Faults
It is important to distinguish AFCI devices from ground-fault circuit interrupter (GFCI) devices. GFCIs detect ground faults, which occur when current leaks from a hot (ungrounded) conductor to a grounded object as a result of a short circuit. This situation can be hazardous when a person unintentionally becomes the current’s path to the ground. GFCIs function by constantly monitoring the current flow between hot and neutral (grounding) conductors, and activate when they sense a difference of 5 milliamps or more. Thus, GFCIs are intended to prevent personal injury due to electric shock, while AFCIs prevent personal injury and property damage due to structure fires.
In summary, AFCIs are designed to detect small arcs of electricity before they have a chance to lead to a structure fire.
Electric Fences
Electric fences are a "fear" barrier that use electric shock to delineate a boundary and discourage animals and people from crossing it. Primarily, they are used to protect livestock and domestic pets by preventing them from leaving a sanctioned area and by deterring predators from entering the area.
An effective electric fence involves the interconnection of the following four components:
The energizer turns low-voltage battery power, household current, or converted sunlight into a high-voltage electric shock.
The conductor is the wire that transmits the energizer’s shock to the animal or person who touches it. This is usually galvanized or aluminum-coated steel wire, or poly-tape or poly-rope wire. Manufactured in a number of configurations, all “poly” wires contain tiny stainless steel or copper wires woven into the synthetic fabric, enabling them to conduct electricity.
The post supports the conductor at the desired height, while the insulator prevents the electricity in the wire from leaking into the ground through the post. Some posts are nonconductive and thus do not require an insulator.
The ground is typically composed of metal rods driven into the soil near the energizer and are connected to it by a wire. A complete circuit occurs when an animal or person touches the conductor, allowing electricity to flow from the conductor through their body and into the soil, where moisture carries the current to the ground rods and back into the energizer. The absence of a ground circuit is how a bird can casually rest on a high-voltage power line.
In general, an electric fence should be supplied with only enough power to startle not injure so that an animal that brushes up against the fence will recoil but not suffer electrical burns or permanent injury. The feeling should be similar to the stinging sensation of a snapped rubber band. Exceptions are made for prisons, military installations, and vital utility stations to discourage escapes and vandalism attempts.
Fences that are too strongly electrified for their application, whether by accident or design, are a serious safety hazard. Aside from unnecessarily and inhumanely exposing farm animals or pets to unsafe shocks, homeowners must consider the inherent dangers that these fences may pose to firefighters, police and trespassers. Note that “trespasser” can refer to an innocent child, such as a 6-year-old Texas girl who was killed instantly when she touched a neighbor’s electric fence. The investigating police captain said the amperage was far too high, “enough to power half of a house. She didn’t have time to scream for help, close her eyes... nothing,” according to KLTV. The owner of the fence pleaded guilty to criminally negligent homicide.
Other cases of over-powered fences abound; an elderly New York woman was killed when she tried to free her pet from an electric fence. The voltage was too high and the fence lacked a regulator to pulse the shock. A Colorado man even succumbed to his own fence –- a DIY project designed to keep his dogs in the yard, yet set to deliver lethal voltage, and designed without a regulator. (He did, however, receive a posthumous Darwin Award for his efforts.)
A few Additional Tips:
Lightning is one of the main causes of electric fence fires and controller malfunction. Use the following strategies to minimize lightning dangers: o Disconnect the controller from the fence line and power source before a storm is expected. o Install a lightning diverter (commonly referred to as a lightning arrestor) between the fence and the controller. This will divert a lightning strike’s electricity to the earth before it does any damage to the controller. o Install a surge suppressor to protect the controller on the utility side. The suppressor is plugged into the outlet and the controller is plugged into the suppressor. o Install a cutoff switch as a quick way to disconnect the fence from the controller without actually getting near the fence. This switch also allows the fence to be conveniently turned off while it’s being worked on.
The energizer must be sized properly for the type of animal to be contained within the perimeter. Extra voltage may be required for sheep, for instance, as their thick wool (especially in the winter) is an effective insulator against shock. Their burned wool can wrap around the conductor and further nullify the shock against the rest of the herd, as the other sheep follow the first sheep into the road, a neighbor’s yard, or into a waiting pack of hungry coyotes. Of course, the size of the animal is also a factor, as a small dog will not need as much of a jolt as a horse. The length of the fence must be considered, too, as the potency of the shock will dissipate if it's forced to travel too far from the conductor.
Poor grounding weakens the electric shock and can interfere with radios, telephones and televisions. Multiple ground rods should be installed, each 6 to 8 feet long, and attached with adequate ground clamps. In very dry or cold climates, a ground wire may be needed to run parallel to the hot wire so that the system does not depend on insulating dry or frozen soil.
Poly-tape and poly-rope give greater tensile strength and are useful in high-voltage applications, although most electric fences are made from aluminum or galvanized steel. Never use more than one type of metal, as galvanic corrosion can occur when two different metals are hooked together, weakening the connection and the whole electric fence.
Fences should be equipped with warning signs that alert passersby to their danger, as it isn’t always obvious that a fence is electrified. In one bizarre instance that was conveniently captured by a security camera, a man was knocked unconscious when he urinated on a fence that he did not realize was electrified. Signage will also protect the homeowner against liability.
Equip the fence with a light that shines when the fence is not operational. This way, fence operators can quickly fix a malfunction before penned animals become wise to the failing. Professionals can tell if a fence is working by touching the metal end of a long screwdriver to the conductor while holding the plastic insulated end. An active fence should create a visible, audible arc. Do not use an uninsulated item for this purpose, such as a blade of grass.
Never touch a fence that may be electrified (or any live circuits of hazardous voltage) with two hands, as this will allow the current to travel through the heart and lungs. Always keep one hand in your pocket so you don’t accidentally touch something that will turn a painful but non-lethal shock into cardiac arrest.
Never electrify barbed-wire fences. It takes little imagination to picture what will happen if electrified barbs become trapped in an animal’s fur.
Keep flammable materials far from the electric fence. Small sparks and arcs can easily occur due to weather conditions, lightning strikes, vegetation brushing against the fence, and fence malfunctions.
Be sure to purchase high-quality, long-lasting insulators that will not degrade from exposure to ultraviolet light. Cheap insulators will grow weak and eventually shatter.
Plant fence posts solidly, at least 2 feet in the ground in solid earth or concrete, especially if you plan to contain large animals. Space the posts far enough apart so that the wires have room to bend, rather than forcing undue stress on the posts and insulators.
In summary, electric fences are useful and practical deterrents in a number of applications, both commercial and residential. But improperly maintained or designed electric fences can seriously injure or kill animals and humans.
Generators
Homeowners may use a generator to supply electricity to their home in the case of a power outage, either out of necessity or convenience. Homeowners may want to know about generators and the potential hazards they present when improperly wired or utilized.
Generator Types
There are two main types of generators: permanently installed standby generators; and gasolinepowered portable generators.
Standby Generators
Standby generators typically operate on natural gas or liquid propane. They remain fixed in place outside the home and are designed to supply on-site power to specified circuits through a home's electrical wiring. These generators work in tandem with a manual or automatic transfer switch, which automatically detects an interruption in gridpowered electricity and subsequently transfers over electrical input to the generator. The transfer switch suspends input from the generator once it senses that utility-powered electricity has resumed. Generators for small- to medium-size homes are typically air-cooled and employ fans to regulate the temperature inside the unit. Liquid-cooled units are used for the larger energy loads in larger homes.
Some advantages of standby generators are as follows:
They may be turned on manually, or they may be programmed to switch on automatically in the case of a power outage even when no one is home. Power may be supplied for extended periods of time. Hard-wired systems, such as a home's furnace, well pump and air conditioner, may maintain continuous power.
Uninterrupted power can be supplied to systems that must remain turned on continuously, such as home medical equipment used for breathing, etc.
Disadvantages of standby generators:
Installation may require a permit. A qualified technician, such as an electrician, is required to install the ATS and to determine the electrical load requirements for the circuits in the home.
Routine maintenance is required.
Standby generators may be prohibitively expensive for the average homeowner.
Portable Generators
Gasoline-powered portable generators are typically smaller in size and power capacity than permanently installed generators. They are designed so that corded electrical devices can be plugged directly into them.
Advantages of portable generators:
They’re versatile. They may be used at home or transported and utilized in remote locations, such as a campground or construction site. They do not require complicated installation.
They typically do not require a permit. Portable units are generally less expensive than standby generators.
Disadvantages of portable generators:
Devices that are hard-wired into a home's electrical system cannot be powered by a portable generator if no transfer switch is installed.
Hazards
Portable and standby generators produce dangerous carbon monoxide (CO) gas, which can be deadly if inhaled.
Inexperienced installers are exposed to the risk of electrical shock. Only qualified electricians should attempt to install a generator.
Overloading a generator may result in reduced fuel efficiency, damage to appliances, or fire. Standby generators and their required transfer switches that are incorrectly wired or missing may result in "back-feed" a hazardous condition in which an electrical current is fed back into the grid which could potentially electrocute and kill homeowners, utility workers, and others who are using the same utility transformer.
Connecting a portable generator directly into a home's wall outlet can also cause dangerous back-feed.
Generators that are exposed to water or that are not properly grounded can cause electrocution.
Gasoline for portable generators is highly flammable and may cause a fire when exposed to an open flame or when spilled on the hot generator.
Over-taxed cords attached to a portable generator may cause a fire.
Inspection
Homeowners should check for the following:
Generators should never be used anywhere indoors, even if the area is ventilated. Portable generators placed outside should not be near doors, vents, or open windows leading into the home.
Carbon-monoxide detectors should be installed in case CO is accidentally released into the home.
A portable generator should not be plugged directly into a home's electrical receptacle. Only a heavy-duty three-prong electrical cord that’s rated for outdoor use should be used to connect the generator to the power source.
A standby generator hard-wired into a home should have a transfer switch installed to prevent back-feeding. A Certified Master Inspector® can locate this device so that it’s situated between the generator and the main electrical panel. Generators should be properly grounded. Units should be dry and shielded from contact with liquid. Electrical cords should not have any punctures or exposed wiring. Cords running from portable generators should be kept out of the way of foot traffic and should not run underneath rugs.
The total electrical capacity of the generator should exceed the power requirements of the devices that the unit is supplying.
Fuel for portable generators should be stored away from the home (and children) in clearly labeled and durable containers.
In summary, generators can be lifesavers during a power outage, but they present serious health and safety concerns if they are not installed and used properly.


