
72 minute read
Swimming Pool Safety


Home Pools
Swimming pools should always be happy places. Unfortunately, each year thousands of American families confront swimming pool tragedies, drownings, and near-drownings of young children. At the Master Inspector Certification Board, we want to prevent these tragedies. These are guidelines for pool barriers that can help prevent most submersion incidents involving young children. These guidelines are not intended as the sole method to minimize pool drowning of young children, but include helpful safety tips for safer pools.
Advertisement
Each year, hundreds of young children die and thousands come close to death due to submersion in residential swimming pools. The Consumer Product Safety Commission (CPSC) has estimated that each year, about 300 children under the age of 5 drown in swimming pools. Hospital emergency-room treatment is required for more than 2,000 children under 5 who were submerged in residential pools. The CPSC did an extensive study of swimming pool accidents, both fatal drownings and near-fatal submersions, in California, Arizona and Florida states in which home swimming pools are very popular and used during much of the year.
Here are some of the study’s findings:
In California, Arizona and Florida, drowning was the leading cause of accidental death in and around the home for children under the age of 5.
Seventy-five percent of the children involved in swimming pool submersion or drowning accidents were between 1 and 3 years old.
Boys between 1 and 3 were the most likely victims of fatal drownings and near-fatal submersions in residential swimming pools.
Most of the victims were in the presence of one or both parents when the swimming pool accident occurred.
Nearly half of the child victims were last seen in the house before the pool accident occurred. In addition, 23% of the accident victims were last seen on the porch or patio, or in the yard.
This means that 69% of the children who became victims in swimming pool accidents were not expected to be in or at the pool, but were found drowned or submerged in the water.
Sixty-five percent of the accidents occurred in a pool owned by the victim’s immediate family, and 33% of the accidents occurred in pools owned by relatives or friends.
Fewer than 2% of the pool accidents were the result of children trespassing on property where they didn’t live or belong.
Seventy-seven percent of the swimming pool accident victims had been missing for five minutes or less when they were found in the pool, drowned or submerged.
The speed with which swimming pool drownings and submersions can occur is a special concern: by the time a child’s absence is noted, the child may have drowned. Anyone who has cared for a toddler knows how fast young children can move. Toddlers are inquisitive and impulsive and lack a realistic sense of danger. These behaviors, coupled with a child’s ability to move quickly and unpredictably, make swimming pools particularly hazardous for households with young children.
Swimming pool drownings of young children have another particularly insidious feature: these are silent deaths. It is unlikely that splashing or screaming will occur to alert a parent or caregiver that a child is in trouble. The best way to reduce child drownings in residential pools is for pool owners to construct and maintain barriers that prevent young children from gaining access to pools. However, there are no substitutes for diligent supervision.
Why the Swimming Pool Guidelines Were Developed
A young child can get over a pool barrier if the barrier is too low, or if the barrier has handholds or footholds for a child to use for climbing. The guidelines recommend that the top of a pool barrier be at least 48 inches above grade, measured on the side of the barrier that faces away from the swimming pool. Eliminating handholds and footholds, and minimizing the size of openings in a barrier’s construction, can prevent inquisitive children from climbing pool barriers.
For a solid barrier, no indentations or protrusions should be present, other than normal construction tolerances and masonry joints. For a barrier (fence) made up of horizontal and vertical members, if the distance between the tops of the horizontal members is less than 45 inches, the horizontal members should be on the swimming pool-side of the fence. The spacing of the vertical members should not exceed 1-3/4 inches. This size is based on the foot-width of a young child, and is intended to reduce the potential for a child to gain a foothold. If there are any decorative cutouts in the fence, the space within the cutouts should not exceed 1-3/4 inches.
The definition of a pool includes spas and hot tubs. The swimming pool-barrier guidelines, therefore, apply to these structures, as well as to conventional swimming pools.
How to Prevent a Child from Getting Over a Pool Barrier
A successful pool barrier prevents a child from getting over, under or through, and keeps the child from gaining access to the pool except when supervising adults are present.
The Swimming Pool-Barrier Guidelines
If the distance between the tops of the horizontal members is more than 45 inches, the horizontal members can be on the side of the fence facing away from the pool. The spacing between vertical members should not exceed 4 inches. This size is based on the headbreadth and chest-depth of a young child, and is intended to prevent a child from passing through an opening. Again, if there are any decorative cutouts in the fence, the space within the cutouts should not exceed 1-3/4 inches.
For a chain-link fence, the mesh size should not exceed 1-1/4 inches square, unless slats fastened at the top or bottom of the fence are used to reduce the mesh openings to no more than 1-3/4 inches.
For a fence made up of diagonal members (lattice work), the maximum opening in the lattice should not exceed 1-3/4 inches.
Above-ground pools should have barriers. The pool structure itself can sometimes serves as a barrier, or a barrier can be mounted on top of the pool structure. Then, there are two possible ways to prevent young children from climbing up into an above-ground pool. The steps or ladder can be designed to be secured, locked or removed to prevent access, or the steps or ladder can be surrounded by a barrier, such as those described above. For any pool barrier, the maximum clearance at the bottom of the barrier should not exceed 4 inches above grade, when the measurement is done on the side of the barrier facing away from the pool.
If an above-ground pool has a barrier on the top of the pool, the maximum vertical clearance between the top of the pool and the bottom of the barrier should not exceed 4 inches. Preventing a child from getting through a pool barrier can be done by restricting the sizes of openings in a barrier, and by using self-closing and self-latching gates.
To prevent a young child from getting through a fence or other barrier, all openings should be small enough so that a 4-inch diameter sphere cannot pass through. This size is based on the head-breadth and chest-depth of a young child.
Gates
There are two kinds of gates that may be found at a residential property. Both can play a part in the design of a swimming pool barrier.
Pedestrian gates are the gates people walk through. Swimming pool barriers should be equipped with a gate or gates that restrict access to the pool. A locking device should be included in the gate's design. Gates should open out from the pool and should be self-closing and self-latching. If a gate is properly designed, even if the gate is not completely latched, a young child pushing on the gate in order to enter the pool area will at least close the gate and may actually engage the latch. When the release mechanism of the self-latching device is less than 54 inches from the bottom of the gate, the release mechanism for the gate should be at least 3 inches below the top of the gate on the side facing the pool. Placing the release mechanism at this height prevents a young child from reaching over the top of the gate and releasing the latch. Also, the gate and barrier should have no opening greater than 1/2-inch within 18 inches of the latch’s release mechanism. This prevents a young child from reaching through the gate and releasing the latch.
Other gates should be equipped with self-latching devices. The self-latching devices should be installed as described for pedestrian gates.
How to Prevent a Child from Getting Under or Through a Pool Barrier
Many homes with pools have doors that open directly onto the pool area or onto a patio that leads to the pool. In such cases, the wall of the house is an important part of the pool barrier, and passage through any doors in the house wall should be controlled by security measures. The importance of controlling a young child’s movements from the house to the pool is demonstrated by the statistics obtained during the CPSC’s study of pool incidents in California, Arizona and Florida. Almost half (46%) of the children who became victims of pool accidents were last seen in the house just before they were found in the pool.
All doors that permit access to a swimming pool should be equipped with an audible alarm that sounds when the door and/or screen are opened. The alarm should sound for 30 seconds or more within seven seconds after the door is opened. It should also be loud (at least 85 decibels) when measured 10 feet away from the alarm mechanism. The alarm sound should be distinct from other sounds in the house, such as the telephone, doorbell and smoke alarm. The alarm should have an automatic re-set feature. Because adults will want to pass through house doors in the pool barrier without setting off the alarm, the alarm should have a switch that allows them to temporarily de-activate the alarm for up to 15 seconds. The de-activation switch could be a touch pad (keypad) or a manual switch, and should be located at least 54 inches above the threshold of the door protected by the alarm. This height was selected based on the reaching ability of young children.
Power safety covers can be installed on pools to serve as security barriers. Power safety covers should conform to the specifications in ASTM F 1346-91. This standard specifies safety performance requirements for pool covers to protect young children from drowning. Self-closing doors with selflatching devices could also be used to safeguard doors that permit ready access to a swimming pool.
Indoor Pools
When a pool is located completely within a house, the walls that surround the pool should be equipped to serve as pool safety barriers. The measures recommended above where a house wall serves as part of a safety barrier also apply for all the walls surrounding an indoor pool.
Guidelines
An outdoor swimming pool, including an in-ground, above-ground, or on-ground pool, hot tub, or spa, should be provided with a barrier that complies with the following:
1. The top of the barrier should be at least 48 inches above grade, measured on the side of the barrier that faces away from the swimming pool. The maximum vertical clearance between grade and the bottom of the barrier should be 4 inches measured on the side of the barrier that faces away from the swimming pool. Where the top of the pool structure is above grade, such as an above-ground pool, the barrier may be at ground level, such as the pool structure, or mounted on top of the pool structure. Where the barrier is mounted on top of the pool structure, the maximum vertical clearance between the top of the pool structure and the bottom of the barrier should be 4 inches.
2. Openings in the barrier should not allow the passage of a 4-inch diameter sphere.
3. Solid barriers, which do not have openings, such as a masonry and stone wall, should not contain indentations or protrusions, except for normal construction tolerances and tooled masonry joints.
4. Where the barrier is composed of horizontal and vertical members, and the distance between the tops of the horizontal members is less than 45 inches, the horizontal members should be located on the swimming pool-side of the fence.
Spacing between vertical members should not exceed 1-3/4 inches in width. Where there are decorative cutouts, spacing within the cutouts should not exceed 1-3/4 inches in width.
5. Where the barrier is composed of horizontal and vertical members, and the distance between the tops of the horizontal members is 45 inches or more, spacing between vertical members should not exceed 4 inches. Where there are decorative cutouts, spacing within the cutouts should not exceed 1-3/4 inches in width.
6. The maximum mesh size for chain-link fences should not exceed 1-3/4 inch square, unless the fence is provided with slats fastened at the top or the bottom, which reduce the openings to no more than 1-3/4 inches.
7. Where the barrier is composed of diagonal members, such as a lattice fence, the maximum opening formed by the diagonal members should be no more than 1-3/4 inches.
8. Access gates to the pool should be equipped to accommodate a locking device. Pedestrian access gates should open outward, away from the pool, and should be self-closing and have a self-latching device. Gates other than pedestrian access gates should have a self-latching device, where the release mechanism of the self-latching device is located less than 54 inches from the bottom of the gate.
The release mechanism should be located on the pool-side of the gate at least 3 inches below the top of the gate.
The gate and barrier should have no opening greater than 1/2-inch within 18 inches of the release mechanism.
9. Where a wall of a dwelling serves as part of the barrier, one of the following should apply:
All doors with direct access to the pool through that wall should be equipped with an alarm that produces an audible warning when the door and its screen, if present, are opened. The alarm should sound continuously for a minimum of 30 seconds within seven seconds after the door is opened. The alarm should have a minimum sound pressure rating of 85 dBA at 10 feet, and the sound of the alarm should be distinctive from other household sounds, such as smoke alarms, telephones and doorbells. The alarm should automatically re-set under all conditions. The alarm should be equipped with manual means, such as touchpads or switches, to temporarily deactivate the alarm for a single opening of the door from either direction. Such de-activation should last for no more than 15 seconds. The de-activation touch pads or switches should be located at least 54 inches above the threshold of the door. The pool should be equipped with a power safety cover that complies with ASTM F1346-91. Other means of protection, such as self-closing doors with self-latching devices, are acceptable, as long as the degree of protection afforded is not less than the protection afforded by the guidelines above.
10. Where an above-ground pool structure is used as a barrier, or where the barrier is mounted on top of the pool structure, and the means of access is a ladder or steps, then:
The ladder to the pool or steps should be capable of being secured, locked or removed to prevent access.
The ladder or steps should be surrounded by a barrier. When the ladder or steps are secured, locked, or removed, any opening created should not allow the passage of a 4-inch diameter sphere.
These guidelines are intended to provide a means of protection against potential drownings of children under 5 years of age by restricting access to residential swimming pools, spas and hot tubs.
Swimming Pool Barriers
An outdoor swimming pool barrier is a physical obstacle that surrounds an outdoor pool so that pool access is limited to adults. “Pool,” in this context, includes outdoor hot tubs and spas. This barrier is often referred to as pool fencing, although walls made from brick or stone are acceptable, as well. Children should not be able to get under, over or through the barrier.
Why are pool barriers important?
According to the U.S. Consumer Product Safety Commission (CPSC), approximately 250 children drown every year in residential swimming pools. In states where swimming pools are open year-round, such as Florida, Arizona and California, drowning is the leading cause of death in and around the home for children under 5 years old. Many of these deaths result when young children gain unsupervised access to swimming pools due to inadequate pool fencing.
Codes concerning pool barriers vary by jurisdiction. Some states, such as Arizona, Florida and California, have compiled their own laws concerning pool barriers, while other locations rely on the International Residential Code (IRC). The CPSC has thoroughly researched pool-related hazards and has compiled its own set of codes for pool fencing. The Australian government, too, has placed tremendous emphasis on the development of pool barrier codes in an attempt to reduce the number of deaths due to drowning in that country. The code below is taken mostly from the 2006 edition of the IRC and is substantially similar to the other codes previously mentioned. A few helpful parts of the Australian code are also listed
2006 International Building Code Pool Barrier Requirements:
AG105.2. Outdoor swimming pool. An outdoor swimming pool, including an in-ground, above-ground or on-ground pool, hot tub or spa, shall be surrounded by a barrier which shall comply with the following:
1. The top of the barrier shall be at least 48 inches above grade measured on the side of the barrier which faces away from the swimming pool. The maximum vertical clearance between grade and the bottom of the barrier shall be 2 inches measured on the side of the barrier which faces away from the swimming pool. Where the top of the pool structure is above grade, such as an above-ground pool, the barrier may be at ground level, such as the pool structure, or mounted on top of the pool structure. Where the barrier is mounted on top of the pool structure, the maximum vertical clearance between the top of the pool structure and the bottom of the barrier shall be 4 inches.
2. Openings in the barrier shall not allow passage of a 4-inch-diameter sphere.
3. Solid barriers which do not have openings, such as a masonry or stone wall, shall not contain indentations or protrusions, except for normal construction tolerances and tooled masonry joints.
4. Where the barrier is composed of horizontal and vertical members and the distance between the tops of the horizontal members is less than 45 inches, the horizontal members shall be located on the swimming pool side of the fence. Spacing between vertical members shall not exceed 1-3/4 inches in width. Where there are decorative cutouts within vertical members, spacing within the cutouts shall not exceed 1-3/4 inches in width.
5. Where the barrier is composed of horizontal and vertical members and the distance between the tops of the horizontal members is 45 inches or more, spacing between vertical members shall not exceed 4 inches. Where there are decorative cutouts within vertical members, spacing within the cutouts shall not exceed 1-3/4 inches in width.
6. Maximum mesh size for chain link fences shall be a 2-1/4 inches square unless the fence has slats fastened at the top or the bottom which reduce the openings to not more than 1-1/4 inches.
7. Where the barrier is composed of diagonal members, such as a lattice fence, the maximum opening formed by the diagonal members shall not be more than 1-3/4 inches.
8. Access gates shall comply with the requirements of Section AG105.2, Items 1 through 7, and shall be equipped to accommodate a locking device. Pedestrian access gates shall open outward, away from the pool, and shall be self-closing and have a self-latching device. Gates other than pedestrian access gates shall have a self-latching device. Where the release mechanism of the self-latching device is located less than 54 inches from the bottom of the gate, the release mechanism and openings shall comply with the following:
8.1 The release mechanism shall be located on the pool-side of the gate at least 3 inches below the top of the gate; and
8.2 The gate and barrier shall have no opening larger than 1/2-inch (13 mm) within 18 inches of the release mechanism.
9. Where a wall of a dwelling serves as part of the barrier, one of the following conditions shall be met:
9.1. The pool shall be equipped with a powered safety cover in compliance with ASTM F 1346; or
9.2. Doors with direct access to the pool through that wall shall be equipped with an alarm which produces an audible warning when the door and/or its screen, if present, are opened. The alarm shall be listed in accordance with UL 2017. The audible alarm shall activate within seven seconds and sound continuously for a minimum of 30 seconds after the door and/or its screen, if present, are opened and be capable of being heard throughout the house during normal household activities. The alarm shall automatically re-set under all conditions. The alarm system shall be equipped with a manual means, such as touch pad or switch, to temporarily de-activate the alarm for a single opening. De-activation shall last for not more than 15 seconds. The de-activation switch(es) shall be located at least 54 inches above the threshold of the door; or
9.3. Other means of protection, such as self-closing doors with self-latching devices, which are approved by the governing body, shall be acceptable, so long as the degree of protection afforded is not less than the protection afforded by Item 9.1 or 9.2 described above.
10. Where an above-ground pool structure is used as a barrier, or where the barrier is mounted on top of the pool structure, and the means of access is a ladder or steps:
10.1. The ladder or steps shall be capable of being secured, locked or removed to prevent access; or 10.2. The ladder or steps shall be surrounded by a barrier which meets the requirements of Section AG105.2, Items 1 through 9. When the ladder or steps are secured, locked or removed, any opening created shall not allow the passage of a 4-inch-diameter sphere.
AG105.3 Indoor swimming pool. Walls surrounding an indoor swimming pool shall comply with Section AG105.2, Item 9.
AG105.4 Prohibited locations. Barriers shall be located to prohibit permanent structures, equipment or similar objects from being used to climb them.
AG105.5 Barrier exceptions. Spas or hot tubs with a safety cover, which complies with ASTM F 1346, as listed in Section AG107, shall be exempt from the provisions of this appendix.
The 1994 edition of Australia’s Building Code offers the following suggestions concerning fence gaps:
If a fence has gaps, they should be of such a size that a young child is prevented from slipping through, but the gaps also need to have dimensions such that any part of a young child's body cannot be trapped.
Currently, the IRC makes no mention of regulations for “danger” or CPR signs that should be attached on pool barriers. The Australian Building Code offers the following concerning CPR signs:
The CPR sign needs to be durable, and placed in a conspicuous place near the pool. It must detail the procedures necessary to undertake cardiopulmonary resuscitation.
In summary, homeowners should try to spot and correct defects in pool fencing.
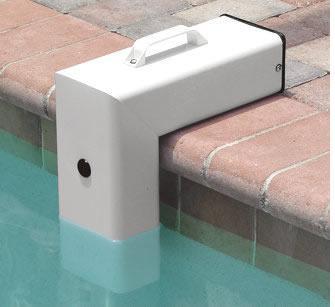
Pool Alarms
A pool alarm is a safety feature designed to alert adults when unsupervised children enter a pool. There are many different designs available, but none is foolproof. Pool owners should become acquainted with these innovations, the main types available, and the potential dangers of doing without.
Drowning remains the second leading killer of children under the age of 14 and, in many Sunbelt states, drowning tops the list.
Approximately 350 children under the age of 5 drown in swimming pools annually, mostly in residential settings. Many of these deaths occur when unsupervised children enter a pool and are unable to swim or exit, resulting in drowning or near-drowning within minutes. In these situations, pool alarms may have reduced the response time of adults, perhaps saving the child.
In December 2007, the Virginia Graeme Baker Pool and Spa Safety Act took effect, which created a voluntary grant program that encourages states to pass legislation for pool and spa safety. The bill requires states to write laws that call for pool alarms, as well as door alarms, pool covers, and selfclosing/self-latching gates. Currently, however, only California, Connecticut and New York have passed such legislation.
Pool Alarm Types
Surface wave sensor: This type of sensor floats on the water and incorporates an electrical circuit that includes two contacts. One of these contacts rests in the water, while the other is adjusted to remain above the water's surface. When a surface wave touches the above-surface contact, the electrical circuit is completed, causing an alarm to sound. Sensitivity can be increased or decreased by moving the above-surface contact closer to or further away from the water’s surface.
Sub-surface disturbance sensor: Mounted to the pool wall below the water’s surface, this type of sensor is activated by wave-induced pressure changes. One design relies on the movement of a magnetic float below a magnetic sensor, while another design relies on a pressure-sensitive switch. Sub-surface alarms can also be used in conjunction with solar covers, whereas the surface wave-sensor alarms cannot.
Wristband: This device is worn around the child’s wrist and it cannot be removed without a key. The alarm will activate when the wristband becomes wet, which creates opportunities for false alarms, such as when the child washes his or her hands, or walks in the rain.
In 2000, the U.S. Consumer Product Safety Commission (CPSC) staff conducted a review of commercially available swimming pool alarm systems designed to detect water disturbance or displacement. The CPSC staff evaluated surface wave sensors, sub-surface disturbance testers, and the wristband. The testers concluded that the sub-surface pool alarms generally performed more consistently for true alarms than the other designs, which were more likely to emit false alarms.
Since pool alarms are not foolproof and they rely on someone remembering to activate them, they should not be depended upon as a substitute for supervision, or for a barrier completely surrounding the pool. Pool alarms should also be used in conjunction with other types of alarms, such as gate alarms, perimeter alarms, and window and door alarms. Even some pet doors come equipped with alarms, owing to the recent attention given to the 100 or so documented accidents when a child escaped to a pool through a pet door. Pool alarms are thus one protective layer of many, none of which is sufficient as a sole preventative measure against child drowning.
Pool alarms can be used to save dogs and cats, too. Data show that one out of every 1,027 pets drown in pools each year, which is a statistically higher risk than the drowning threat for small children. The reason here is obvious: pets are more likely to be allowed to roam free and unsupervised compared to small children, especially in rural areas where nearby traffic is not a danger. Also, pool fences may thwart children, while dogs and cats can jump or climb their way to the other side. Not all dogs are good swimmers, though, and even healthy dogs that are used to swimming in ponds might not be able to lift themselves out of a pool when they’re tired
In summary, pool alarms are useful safety features to be used strictly in conjunction with other strategies.
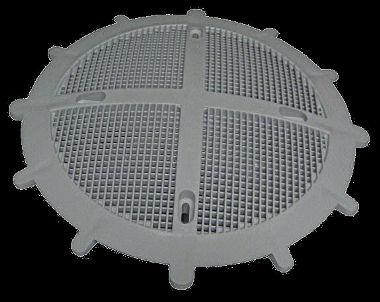
Pool Drain Hazards
While drowning is a well-publicized danger associated with swimming pools, comparatively little has been reported about injuries and deaths caused by pool drains. Water rushing out of the drain creates a suction that can ensnare swimmers, usually small children, causing debilitating injuries and death. These drains come standard in swimming pools, hot tubs and wading pools, and while they appear harmless, parents should understand the potential dangers they pose.
Drain covers can break or be removed by people who are unaware of the possible repercussions. When this happens, a swimmer playing with the drain may become stuck to it in a way similar to how a vacuum will stick to the palm of the hand, but with much more force; 350 pounds of pressure is normal for a pool drain, and public pools are even more powerful. This “suction entrapment” can hold the bather in the drain's grasp until the person drowns or escapes, often seriously injured.
In July of 2007, a 6-year-old Minnesota girl was hospitalized after being severely injured when she sat over an open drain in a wading pool. The suction from the drain, which did not have a cover, pulled out her small intestine, requiring her to be fed intravenously. She died months later, joining the 36 other people, mostly children, who are known to have been killed in similar accidents since 1990. The actual numbers are likely much higher, as physicians often do not distinguish drowning caused by drainage suction from ordinary drowning.
The Consumer Product Safety Commission (CPSC) distinguishes between five types of drain entrapment:
1. body entrapment, where a section of the torso becomes entrapped. The CPSC is aware of 74 cases of body entrapment, including 13 confirmed deaths, between January 1990 and August 2004. The deaths were the result of drowning after the body was held against the drain by the suction of the circulation pump;
2. limb entrapment, where an arm or leg is pulled into an open drain pipe;
3. hair entrapment or entanglement, where a person’s hair is pulled in and wrapped around the grate of the drain cover. The CPSC is aware of 43 incidents of hair entrapment or entanglement in pools, spas and hot tubs between January 1990 and August 2004. Twelve of the incidents resulted in drowning deaths;
4. mechanical entrapment, where jewelry or part of the swimmer’s clothing gets caught in the drain or grate; and
5. evisceration, where the victim’s buttocks come into contact with the pool suction outlet and he or she is disemboweled. While these accidents are rare, they result in lifelong impairment.
While laws regulating swimming pools are complex and vary by state, it is still helpful for homeowners to learn the following ways in which pool drains can be made safer:
Make sure that a drain cover is present and firmly attached to the drain. If the drain cover is missing or damaged, no one should be allowed to enter the pool, and a professional should be contacted immediately. As of December 2008, the CPSC required anti-entrapment drain covers to be installed in all public pools
Make sure there is a safety snap fitting serving the ground pool cleaner. These devices automatically suck away dirt and leaves, but if they become disconnected from the suction fitting at the pool wall, a hazardous situation can develop. A safety snap fitting is a spring-loaded stopper that will end any suction through the port if any disconnection occurs.
Check to see if there is a safety vacuum-release system. This device will cause the drainage to automatically cease if any entrapment occurs.
Check for an anti-entanglement drain cover. This type of fitting is molded in a particular way so as to prevent hair entanglement.
Use no drains at all. Gutters and overflows can be used to provide water to the pump without the need for a drain.
Install an additional drain. According to the CPSC, “providing multiple outlets from the pool to the suction-side of the pump allows flow to continue to the pump, and reduces the likelihood of an entrapping suction from being generated when a body blocks one of the outlets.”
In summary, accidents caused by pool drains are often gruesome, but they can be prevented when the appropriate pool safety devices are installed and children are adequately supervised.
Pool Water Pathogens
Germs from other swimmers and unsafe water supplies can easily contaminate pool water, especially if it isn’t properly disinfected. Contaminated recreational water can cause a variety of ailments and diseases, such as diarrhea, and skin, ear and upper respiratory infections, particularly if the swimmer's head is submerged. Homeowners should be familiar with the problems caused by contaminated pool and spa water and the ways to prevent them.
Viruses, bacteria and protozoa are the culprits in most swimming pool-related sickness outbreaks. The mucus, saliva, blood and skin of infected swimmers can directly contaminate pool and spa water with sufficient pathogens to cause infections in other swimmers who come in contact with it. Feces are a particular danger in pools, as the pathogens they contain are typically present in enormous numbers, approaching a million per gram of feces. A single fecal release in a pool could contaminate millions of gallons of water, according to the University of Arizona's College of Public Health. Large outbreaks of disease are uncommon and they don’t typically happen in residential settings, but they should alert homeowners to just how contagious pathogens are when they’re waterborne.
Consider the following such cases:
In 1998 in Georgia, 26 people were sickened after swimming in a pool with a child who had E. coli. Seven people were hospitalized and one was killed by the outbreak. The pool’s chlorine level had not been adequately maintained.
In New Mexico in 2008, a competitive swimmer who ignored symptoms of diarrhea caused 92 swimmers, including other competitive swimmers, coaches and lifeguards, to contract the illness.
In 2001 in an Illinois water park, 358 people contracted diarrhea, despite adequate chlorine and pH levels. Swimmers can add up to several pounds of feces per day in a typical water park.
Homeowners can benefit from learning about the basic pathogens that are commonly found in swimming pools: bacteria, such as E. coli, shigella (which causes dysentery), campylobacter, and salmonella. Bacteria are generally killed quickly by chlorine disinfectant in properly maintained swimming pools at a concentration of 1 part per million. E. coli, for instance, will be inactivated in less than one minute if exposed to typical disinfectant concentrations; protozoa, such as cryptosporidium (which causes diarrhea), and giardia, also known for its severe gastrointestinal effects. Some of these pathogens are highly resistant to chlorine and can survive for days in typical chlorine concentrations; and hepatitis A and noroviruses.
Pool disinfectants can kill most germs in less than an hour, but for others, it can take longer. Cryptosporidium, for instance, can survive for up to 10 days in a properly chlorinated pool, and other pathogens are completely resistant to chlorine. In addition, the unique circulation patterns found in pools may allow poor water circulation in some areas, making it unlikely that all pathogen activity can be fully prevented. The unfortunate truth is that chlorinated swimming pools can and do transmit disease. Swimmers should not rely solely on the pool's chemical treatments and should heed the following precautions:
Don’t ever swallow pool water. Children sometimes jokingly spit pool water back into the pool or at their friends, but this is dangerous, as some of it may be swallowed. Shower with soap and water before and after swimming. Wash your hands with soap and water after using a toilet or changing diapers. Remove small children from pools for bathroom breaks, and check infants’ diapers often. Change diapers in a bathroom, not beside the pool. Wash children, especially their rear ends, thoroughly with soap and water before they enter a pool.
Don’t swim when you have diarrhea. Diarrhea can be transmitted in pool water weeks after symptoms cease.
In summary, pathogens can easily permeate an entire pool. Some are resistant to chlorination. Pool owners should know that chemical treatments for pools and spas are best supplemented with good hygiene.
Saunas
A sauna is a small, sealed room, typically constructed of wood, designed to safely increase the user’s body temperature through a combination of heat and well-controlled humidity. Saunas are used recreationally and therapeutically, as users find them relaxing and health-promoting.
Facts and Figures
“Sauna” is the only Finnish word in the English dictionary. Traditionally, the Finns used the sauna as a place to clear the mind, give birth, and prepare the dead for burial. They were not used for weight loss or as part of an exercise regimen, which are newer concepts for their use today.
Saunas can be divided into two basic styles: o infrared saunas directly warm occupants and other objects (much like the sun) using charcoal or other objects; and o conventional saunas heat the room indirectly by warming the air. One of the earliest sauna designs is the smoke sauna, in which stones warm the room after being heated by a fire, which is extinguished before the room is ready for bathers. The smoke is vented from the sauna, but its aroma lingers. The concept was nearly abandoned but has seen a revival over the past few decades.

Safety Tips
Saunas stimulate the cardiovascular system and should not be used by anyone with high blood pressure, diabetes, heart disease, or while under the use of antibiotics or other drugs. Never stay in a sauna longer than 30 minutes. While it may be fun to see who can stay in the sauna the longest, this sort of game is extremely dangerous and has led to injury and even death. One experienced sauna devotee died in a sauna competition in August 2010.
Never wear jewelry in the sauna, as the metal and stones may heat up and burn exposed skin. Use a towel as a barrier between yourself and the seat in a public commercial sauna to protect yourself against disease. Strains of antibiotic-resistant bacteria, known collectively as methicillinresistant Staphylococcus aureus, have been shown to inhabit excessively humid and poorly cleaned public saunas and steam rooms. Reducing the humidity can also control the risk of transmission.
Children should not use saunas because their immature bodies and metabolism have trouble thermo-regulating to stave off hyperthermia.
Recommended Sauna Design Features
Adequate ventilation is perhaps the most overlooked sauna design feature. Outgoing ventilation expels stale air and reduces humidity-spawned mildew and moisture, which can cause wood decay. Incoming ventilation brings in fresh air, ensuring the safety and comfort of the users. Saunas typically have a vent behind the stove and another on the opposite wall near the ceiling. While the sauna may vent to the outside of the building, this is not required in residential saunas, and many systems utilize interior ventilation to heat the adjacent living space.
Some other essential design features include the following:
Freestanding saunas must have a solid foundation. Sauna doors should be sealed and insulated.
The sauna door should swing outward and should not be equipped with a latching mechanism. If the user is in distress, he should be able to easily push his way out of the sauna.
Saunas should be constructed from a decay-resistant species of tree, such as cypress, redwood, spruce, cedar, or Douglas fir.
Any electrical wiring should be moisture-proof and able to resist high temperatures. Metal, especially screw heads, should not be exposed where people sit, lean or walk. Metal will get excessively hot and could burn exposed skin.
The ceiling height should be between 6½ to 7½ feet, but not higher, as heat will uselessly pool above the user’s head. Also, undue stress will be placed on the heater, which will be forced to work harder to heat the room.
The temperature should not exceed 195° F, as recommended by the Underwriters Laboratories. Saunas heated by wood-burning stoves may be capable of exceeding this temperature, but this is not advisable, as it can endanger the users' safety. Saunas that utilize excessive amounts of steam should be set to a lower temperature, as wet heat can cause scalding.
The floor can be made from concrete, vinyl or tile, but not carpet, which will deteriorate from the heat and humidity and create moisture-caused health hazards. Carpet is also a fire hazard. To best utilize the space and to achieve a balanced temperature throughout the sauna, the shape of the sauna room should be nearly square.
The sauna should be regularly inspected for mildew and wood decay around its exterior.
In summary, saunas are sealed, heated rooms used for therapeutic purposes and relaxation, but they must be used and maintained properly to ensure the health and safety of their users.
Home Security
Burglar-Resistant Homes
There are a number of measures that homeowners can take to ensure that their homes are not attractive to burglars.
Some interesting statistics concerning break-ins in the United States:
The Master Inspector Certification Board estimates that theft makes up more than threequarters of all reported crime.
In 2005, law enforcement agencies reported more than 2 million burglary offenses.
According to a survey, burglars tend to enter homes through the following locations:
81% enter through the first floor;
34% enter through the front door;
23% enter through a first-floor window;
22% enter through the back door;
9% enter through the garage;
4% enter through the basement;
4% enter through an unlocked entrance;
2% enter through a storage area; and
2% enter from somewhere on the second floor.
Some interesting statistics (2002) concerning break-ins in Canada:
The burglary rate in Canada (877 per 100,000 people) is seven times higher than that of the country with the fewest break-ins, Norway.
The burglary rate in Canada is slightly higher than that of the United States (746 per 100,000 people), but significantly less than the burglary rate in Australia (2,275 per 100,000 people).
Exterior Doors
Doors should be made of steel or solid-core wood construction. Hollow-core wood doors are more easily broken than heavy, solid-core doors.
Doors should be free of signs of rot, cracks and warping. Doors should be protected by quality deadbolt locks. Chain locks are not adequate substitutes for deadbolt locks, although chain locks may be used as additional protection.
If a mail slot is present, it should be equipped with a cage or box. Mail slots that are not equipped with cages or boxes have been used by burglars to enter homes. Burglars can insert a contraption made of wire and cord into the mail slot and use it to open the lock from the inside, if no box or cage is present.
If a door is equipped with glass panes, they should be installed far from the lock. Otherwise, burglars can smash the glass and reach through to unlock the door.
Spare keys should not be hidden in obvious locations. Burglars are very good at finding keys that homeowners believe are cleverly hidden. The best place for a spare key is in the house of a trusted neighbor. If keys must be hidden near the door, they should not be placed in obvious locations, such as under a doormat, rock or planter.
A peephole can be installed in doors so homeowners can see who is on their doorstep before they open the door.
Homeowners should consider installing bump-resistant locks on their doors. “Bumping” is a technique that can open almost any standard lock with less effort than is required by lockpicking.
This technique uses "bump keys," which are standard house keys with slight modifications. Lock companies, including as Schlage®, Primus® and Medeco®, manufacture a number of locks that offer some bump-resistance.
Pet Doors
Pet doors can be used by burglars to enter homes. Some burglars have reached through pet doors in order to unlock the door. It is advisable to not have a pet door, but if one is necessary, it should be as small as possible and installed far from the lock.
A crafty burglar may convince or coerce a small child to crawl through a pet door and unlock the door. Also, some burglars are children.
Electronic pet doors are available that open only when the pet, equipped with a signaling device in its collar, approaches the door. These doors are designed to keep stray animals out of the home, and may provide protection against burglars, as well.
Sliding Glass Doors
They should be equipped with locks on their tops and bottoms. They should not be able to be lifted from their frames. A cut-off broom handle, or a similar device, can be laid into the door track to prevent it from being opened all the way.
Illumination
Lights should be installed on the exterior of all four sides of the house. Burglars prefer darkness so they cannot be seen by neighbors or passersby. When building occupants are not home, a few lights should be left on inside It is helpful to install exterior lights that are activated by motion sensors. Burglars that are suddenly illuminated may flee.
Windows
All windows should be composed of strong glass, such as laminated glass, and be in good operating order. They can be installed with bars, grilles, grates, or heavy-duty wire screening. Barred windows must be equipped with a quick-release mechanism so occupants can quickly escape during a fire.
Windows should not be hidden by landscaping or structures. If landscaping or structures cannot be moved, lighting can be installed around the windows.
Landscaping and Yard
Shrubs and trees should not obscure the view of entrances. Shielded entrances can provide cover for burglars while they attempt to enter the residence. Fences are helpful burglar deterrents, although they should not be difficult to see through.
While the house is vacant:
A loud radio can be used to make burglars think someone is home. Timers can be used to activate radios and lights to make the home seem occupied. A car should always be parked in the driveway. A neighbor’s car can be parked there so that it appears as if someone is home. The lawn should be mowed regularly. Uncut grass is a clue that no one is home.
Other Tips
Dogs are excellent burglar deterrents. For homeowners who cannot own dogs, they can place "Beware of Dog" signs around the yard for nearly the same effect. If no security system is installed, the homeowner can post security alarm stickers around the yard.
In summary, there are many tactics that homeowners can implement to help safeguard their homes from break-ins.
Bump Keys
What Is a Bump Key?
Most people think a locked door affords them security, but to anyone who knows how to use a bump key, a door lock is just a minor inconvenience.
Bump keys are keys cut to a special design that will allow them to be used for picking pin-tumbler locks. Pin-tumbler locks are the world's most popular lock, and these include exterior door entry locks for homes. The process of gaining entry using a bump key is called “bumping,” and it can be very effective.
All the cuts on a bump key are made to the maximum depth, so any key blank can be made into a bump key. Bump keys are manufacturer-specific. A Kwikset® lock requires a bump key made from a Kwikset® key. The same is true for other lock brands. So, a full set of bump keys would include one for each of the major lockset manufacturers.
How Do They Work?
Keys operate by aligning tiny spring-loaded pins inside the lock. Once the pins are correctly aligned, the cylinder will turn and the lock can be operated.

To use a bump key, the "pull-back" method is common. With this method, the key is inserted all the way in, and then pulled back out one notch. While keeping rotational pressure on the key, it is then bumped into the keyway with the heel of the hand or with a device of some sort.
The "bumper" needs to bump the key hard enough to jar the pins, but not so much that the lock or key is damaged. Bumping the key causes the pins to jump slightly. Even this slight amount of motion is enough to allow the bump key to turn the cylinder, unlocking the lock.
The image above-left shows the condition just before the key is bumped. The image above-right is just after the key has been bumped. The driver pins (in blue) have bounced above the shear line, while the key pins (in red) are still below the shear line. As long as the shear line is unblocked, the cylinder can turn and the lock will open.
Another method for using a bump key, called "minimal movement," is slightly more sophisticated than the pull-back method. Bump-key performance can be improved by filing away an additional 0.25 to 0.5 mm from the key tip and shoulder, allowing the key to be inserted slightly farther into the lock.
How Effective Are Bump Keys?
The success of the bumper depends on practice. Very little skill is required, and the learning curve is short. Success will also vary with the type of lock and quality of the key. Keys made from soft metal won’t last long. Bumping tends to work better on more expensive locks, since the hard, high-quality parts work more smoothly.
Bump keys sometimes deform when they’re hit, causing them to jam in the keyway. They can be difficult to remove.
How Can I Tell if a Lock Has Been Bumped?
You can sometimes spot a lock that has been opened with a bump key if you see a small indentation just above the keyway. Some older, softer locks will have dents even though they have not been bumped.
It’s also possible to make bump keys that are protected from leaving indentations. You may be able to tell that a lock has been bumped, but don’t count on it.
Above: a typical bump key
Can I Buy a Bump Key?
Owning or possessing a bump key is not currently illegal, and bump key sets, and videos on how to use them, are available online. To acquire a bump key, all that’s needed is the identification of the manufacturer of the lock.
How Can I Improve My Home's Security?
At least two companies, Schlage® and Baldwin, make locksets designed to defeat bump keys. But many locks that use a key and the pin-tumbler system are vulnerable to bumping. No standards exist that demonstrate resistance to bumping. The resistance to bumping a deadbolt lockset varies with the manufacturer. Electronic locks that have a key override are also vulnerable.
Bump-proof locks are rare and expensive. Bump-resistant locks are much more common. Some (but not all) lockset manufacturers include bump-resistant features in their newer locks.
Without buying a new, bump-resistant lock, consumers have two options. Usually, for less than $20, a locksmith can replace the original lock pins with "mushroom" pins, sometimes called spool pins, depending on the manufacturer. While these pins will improve the resistance of the lock, they will not make it bump-proof.
Medeco® is a company that makes high-end locks. They can provide bump-proof lock cylinders for which a duplicate key is available only through Medeco®-authorized dealers. Their cylinders start at around $100, although their less-expensive cylinders may not be bump-proof.
Will Insurance Cover Theft?
If a home is burglarized using a bump key, the theft may or may not be covered by insurance, depending on how the policy is written. If proof of forced entry is required, the theft may not be covered. Be sure to consult your insurance agent with questions about this.
Although bump keys have been around for more than 50 years, their existence has become more widely-known with the advent of the Internet. Consumers should be aware of this potential danger to their home's security.
In summary, homeowners should make sure their door locks are sufficiently secure to prevent unauthorized entry by someone using a bump key. Taking extra safety precautions, such as installing an alarm system, can provide homeowners with enhanced protection of their property.
The 10 Best Places to Hide Valuables in Your Home
Burglary is a crime of opportunity. And burglars don’t want to spend a lot of time looking through a home to find things of value to steal, which is why there are obvious locations that they always check. That means that there are ways to outsmart them by hiding your valuables in not-so-obvious places, and sometimes even in plain sight.
Depending on the size and type of item, the best places to hide valuables are those that burglars don’t want to search through or wouldn’t bother with, including places that are inconvenient or difficult to search, messy, or uninteresting.
Here Are the Top 10:
1. Hollowed-out books. Criminals tend to be uneducated, which is why they’ve turned to crime to make their living. They’re practically allergic to books! But if you have only a couple of books on a bookshelf, this may be a clue that they’re actually hiding places for your valuables, so make sure your library is large enough to serve as a tedious place to search.
2. A false VHS tape or VHS carton. Who watches VHS tapes anymore? Again, follow the rules above for books. A few can be a clue, but many can be a time-consuming distraction.
3. False containers in the kitchen cupboard, under the sink, and in the bathroom, such as fake food cans and boxes, false cleaning product bottles, and personal hygiene items, and even in a heavy tub of "cat litter." Some false containers available on the market today actually look like false containers, so you might want to save yourself the expense and create your own.
4. In the false bottom or under the plastic liner of a bathroom or kitchen trash can. No one wants to go pawing through your trash in the slim hope of finding something worth pawning.
5. Wrapped in plastic and aluminum foil and stored in the back of the freezer. This is also a good place to store documents and paper currency in case of a house fire.
6. In a floor safe in the bedroom closet. While this location may be obvious, a burglar would have to exert a lot of time and energy and create a lot of noise trying to break into a floor safe, which is also generally of the heavy variety, making it not only hard to open, but hard to steal whole, if the thief had plans to break into it later.
7. Inside a house plant. Using the same method as for trash containers, a plant’s soil can be contained in a waterproof liner that can be lifted up to hide items underneath. Just make sure the items you’re hiding are in a waterproof container, too.
8. Inside a false wall outlet. Make sure it’s not a live receptacle or in the way of any electrical wiring.
9. Within hollowed-out/removable building components, such as wainscoting, floor panels, door jambs, window sills, and cabinet doors.
10. In the garage inside boxes marked with mundane labels, such as “Xmas Ornaments,” “Kid’s Clothes,” “School Projects,” etc. Again, the more boxes you have, the longer the burglar will have to search—if he’s so inclined—to find something worth stealing.
Hiding Places to Avoid:
1. Areas that can damage your valuables with water or invasive matter, such as the water tank of a toilet, inside a mayonnaise jar that still has mayonnaise in it, or a paint can filled with paint. There are high-quality waterproof containers on the market that will allow you to hide items in water (and possibly other places), but err on the side of caution. Documents, jewelry and electronics that become wet or permeated with chemicals or food matter may be damaged beyond repair in your zeal to outsmart a tenacious burglar.
2. A jewelry box. This is a good place to store jewelry that you can afford to lose, but not your diamond tennis bracelet or your grandmother’s antique wedding ring.
3. Your desk drawer, bedside drawer, or underwear drawer. Too obvious.
4. Inside CD cases. It’s true: burglars still prefer CDs to MP3s.
5. Inside DVD cases. DVDs and Xbox®-type games are worth between $2 and $10 at pawn and resale shops; count on being cleaned out of your collection during a home burglary, regardless of the titles.
6. A wall safe. Unless it’s high-end and professionally installed, a wall safe can be dislodged by cutting the drywall seam around it, and wall safes are typically small and light enough to easily transport off site to be opened later. Opt for the heavier and harder-to-access floor safe.
7. Inside picture frames with false backs/interiors. These tend to be thicker than typical picture frames, so they’re easy to spot as a hiding place.
8. A cookie jar. Put cookies in it, not your grocery money.
9. An electrical item or heated area, such as a lamp base, toaster oven, or HVAC duct. You could accidentally ignite your valuables and put your entire home at risk for a house fire.
10. Any locked box or locking file cabinet. A box that has a lock on it will be stolen regardless of what’s inside, and the lock on a file cabinet can be popped out with the right tool and a little effort.
Other Precautions
For valuables that you can’t hide or lock up, such as a flat-screen TV, stereo system, and computers, make sure they’re insured through your homeowner’s or renter’s insurance. Unless you invest in a home security system (and sometimes even if you do), it’s not possible to protect every item in your home. But you can take precautions to password-protect and GPS-activate laptops and smartphones so that their recovery is more likely, should they be stolen.
Also, firearms should be properly locked in an approved gun safe that is stored out of reach for the safety of the home’s occupants, as well as to deter theft.
Place a pole in the bottom track of your sliding glass patio doors so that they can’t be forced open wide enough to permit the entry of an intruder. Install burglar-proof window locks that will allow you to leave your windows open slightly for fresh air, but not wide enough to allow a person to get through.
Remember that burglary is a crime of opportunity, so don’t tempt fate by leaving any exterior doors unlocked (including sliding glass patio doors, and the door between the garage and the living area), hiding a spare house key outdoors (under the “Welcome” mat, a large potted plant, statuary, or a solitary or fake rock), leaving the doors to your attached garage open (even when you’re home), or leaving the curtains or drapes open so that your valuables are in full view of prowlers and passersby. Your personal safety is at risk as much as your personal property.
Also, don’t over-share personal information with the world by advertising your absence from home on social media. When leaving on vacation, have a trusted neighbor, friend or family member monitor your home and bring in the newspaper, mail, and random take-out menus hung on your doorknob. Install light timers indoors, and security/motion detectors outdoors to illuminate your property’s exterior. And go ahead and apply security company stickers to your windows/doors that advertise that your home is professionally protected, even if it’s not.
In short, do what you can to make your home a difficult, inconvenient, and time-consuming target that will force a would-be burglar to move on. And do your part to keep your neighborhood safe by reporting suspicious activity on your street to the police.
Window Bars
Window bars (also called safety bars and security bars) are metal bars that are installed to prevent intruders from entering a building. As an unintended consequence, window bars can slow or prevent egress during an emergency.
Facts
Roughly 25 people die or are injured annually in fires where escape is hindered by window bars. According to the National Fire Protection Agency, the number of deaths caused by fire related to security bars is on the rise.
The fear of burglary, theft and/or physical attack presents a greater perceived risk than the threat of fire.
Seventy people died in a hotel fire on August 18, 2001 in the Philippines. The victims were trapped inside the six-story hotel by window bars.
Advantages of Window Bars
They are a deterrent to potential burglars. They are mostly used in ground-floor windows, which are most vulnerable to intrusion. They provide a sense of security to building occupants. They can prevent children from falling out of the window.
Disadvantages of Window Bars
They can block the exit for occupants during an emergency, such as a fire. The occupants may feel secure from burglary, but they have severely limited their avenues of egress. Ironically, it is possible for occupants to become trapped behind window bars while trying to escape from an intruder who has managed to enter the home.
They can potentially block the entry point for firefighters.
Houses equipped with window bars can potentially decrease the home’s property value. Window bars can make a neighborhood appear unsafe to potential home buyers.
Requirements for a Quick-Release Mechanism
According to the 2006 International Residential Code (IRC), basements and sleeping rooms should have at least one operable emergency escape and rescue opening. Windows that are equipped with bars and which are intended for emergency egress should have a quick-release mechanism installed. If a room’s egress requirements are already satisfied by another window or door, it is still helpful for window bars to be equipped with a quick-release mechanism.
Where window bars are installed in windows that are part of a building’s means of egress, the IRC requires that they be equipped with a quick-release mechanism that complies with the following requirements:
It should be accessible from the inside of the house. Although not addressed by the IRC, the device should not be accessible from outside the house if the window were to be broken. It should not require a key or combination. Likely reasons for this requirement are as follows: o During an emergency, occupants may become too panicked or confused to remember the combination or where they put the key. o Fire and smoke may prevent access to the key or obscure view of the lock. o Occupants may not know the combination or know where the key was placed. It should not require any special tools, such as a screwdriver. The mechanism should be able to be operated with relatively little force. Children and the elderly should be strong enough to operate the release mechanism. Operation of the mechanism should not require special knowledge.
In summary, window bars are valuable anti-burglary features in residences, but they should be able to be easily disengaged so occupants are not trapped during an emergency.
Safe Rooms (Panic Rooms)
A safe room, also known as a panic room, is a fortified room that is installed in a private residence or business to provide a safe hiding place for inhabitants in the event of an emergency.
Safe Rooms Around the World
In Mexico, where kidnappings are relatively common, some people use safe rooms as an alternative (or a supplement) to bodyguards.
In Israel, bullet- and fire-resistant security rooms have been mandated for all new construction since 1992.
Since the 1980s, every U.S. embassy has included a safe room with bullet-resistant glass.
Perhaps the world’s largest safe room will belong to the Sultan of Brunei. The planned 100,000square foot room will be installed beneath his 1,788-room, 2,152,782-square foot residence.
Why are safe rooms used? Some reasons include: to hide from burglars. The protection of a safe room will afford residents extra time to contact police; to hide from would-be kidnappers. Many professional athletes, actors and politicians install safe rooms in their houses; protection against natural disasters, such as tornadoes and hurricanes. Underground tornado bunkers are common in certain tornado-prone regions of the United States; protection against a nuclear attack. While safe rooms near the blast may be incinerated, those far away may be shielded from radioactive fallout. This type of safe room, known as a fallout shelter, was more common during the Cold War than it is today; to provide social distancing in the event of a serious disease outbreak; and fear of an abusive spouse.
A Brief History of Safe Rooms
Safe rooms can be traced as far back as the Middle Ages. Castles had a "castle keep," a room located in the deepest part of the castle, which was designed so the feudal lord could hide during a siege. In the United States, safe rooms were used in the Underground Railroad during the 1800s, where secret rooms hid escaping slaves. In the 1920s, hidden rooms stored Prohibition-banned liquor. Safe rooms designed for weather protection have their origins in storm cellars. The features of the modern safe room are mostly derived from fallout shelters popular during the 1950s, which were created in response to the fear of nuclear attacks.
Various events of the past decade have spurred a rise in the popularity of safe rooms, including New Year's Eve during “Y2K," the terrorist attacks in New York City in 2001, and the subsequent anthrax poisonings that led to fears of civil unrest and war. Yet, it was the 2002 film Panic Room, starring Jodie Foster, that heightened public awareness of safe rooms and their perceived need. In fact, the term "panic room" became the popular name for what were previously known as "safe rooms" as a result of the movie, although companies that create the rooms still prefer to call them "safe rooms."
Today, they have become a status symbol in wealthy areas, such as Bel Air and Manhattan, where it is believed there are thousands of such rooms. However, it is difficult to estimate the number of safe rooms because many homeowners will not publicize the existence of their safe rooms. Even real estate agents tend to hide the location of safe rooms, or even the fact that a house has one, until they know a buyer is serious about purchasing the house.
Location
The safe room’s location must be chosen carefully. It should not be located in the basement, for instance, if intruders are likely to enter the house from that area. Ideally, occupants will be closer than the intruders to the safe room at the time that the intrusion has been detected. This way, the occupants will not be forced to cross paths with the intruder in order to reach the safe room, such as in a stairway.
Occupants can plan multiple routes to their safe room to avoid detection by the intruder who is blocking the main route.
Design
Safe-room designs vary with budget and intended use. Even a closet can be converted into a rudimentary safe room, although it should have a solid-core door with a deadbolt lock. High-end custom models costing hundreds of thousands of dollars boast thick steel walls, video banks, computers, aircleaning systems, bulletproof Kevlar®, and protection against bacterial and chemical infiltration.
Recommendations for specific design elements include the following:
Doors: These are one of the most critical components of the safe room design. A bulletresistant door with internal steel framing can weigh several hundred pounds, yet it must operate smoothly, easily, and without fail in an emergency. The hardware must be selected to provide substantial, secure locking without compromising the smooth operation of the door itself. Most importantly, it must allow the door to be secured quickly, preferably from a single control point. The hardware should not be capable of being overridden or tampered with from the outside.
Floors: Concrete is an adequate material for the floor. In other forms of floor construction, such as wood, it is important to provide supplementary protection suitable to the anticipated type of emergency. As safe room construction often uses heavy materials, it is important to ensure that the floor can support a heavy load.
Sound insulation: The attackers may try to verbally coerce the occupants to leave the safe room. Effective sound insulation will limit the ability for such unwanted communication. Also, sound insulation will prevent the intruders from hearing phone conversations between the occupant and police.
Walls and ceilings: Wall construction that spans from floor to ceiling is generally preferred because of the structural continuity of the framing. Bricks and blocks, while bullet-resistant, can become dislodged from repeated sledgehammer battering. Steel stud walls, braced with additional reinforcing ties, can be faced with steel sheet or bullet-resistant materials, such as Kevlar®. These, in turn, may be covered with tile, sheetrock or other decorative finishes. Steel and Kevlar® panels are available in large sheet sizes. This helps minimize the number of joints that can be potential weak points of an assembly. It is important to not overlook penetrations that may be made for light fixtures, power points and plumbing pipes. Ductwork that passes through protected walls should also be carefully considered to ensure that the security is not breached and that they are not used to transfer poisonous gases into the safe room.
Cameras and monitors: Concealed cameras located outside the room enable its occupant to secretly monitor the movement and numbers of intruders. Effective camera systems may incorporate one visible camera outside the room so that an intruder disabling the exposed camera may not think to look for hidden cameras.
Generator: A self-contained power system is standard in most higher-end safe rooms.
Items to keep in a safe room:
Bottled water and non-perishable foods: There should be a small provision of bottled water and non-perishable foods (such as dried trail mix);
Communication devices: Ideally, all three of the following devices should be stored in the safe room: o a cell phone and charger, which are convenient, but they may not operate through thick safe room walls. The charger will not work if no electrical receptacles are installed, so those are required, too; o a land-line phone: Since cell phones may not work in a safe room, or because they may lose power, a land-line phone is recommended. It should, however, be on a separate line from the rest of the house so that intruders are less likely to disable it; and o a two-way radio.
Blankets: Occupants may be there for a while, so they might as well be comfortable; First aid kit: Even if occupants make it to the safe room, they may have been injured by the intruder en route. It is unlikely that he will allow the occupants to re-enter the room after they leave it to look for bandages;
Prescription medication: Small quantities of necessary medications should be stored in the safe room, or else occupants may be forced to surrender their position during a medical emergency. Having a hundred cans of tuna and a flat-screen TV does little good if your only asthma inhaler is left on the kitchen table;
Flashlights: Severe weather can knock out electricity to the house, or intruders may intentionally cut the power;
Sanitation supplies: Safe rooms built on a budget often don't have a toilet. A bucket can be used as a low-cost alternative;
Weapons: If the intruders manage to enter the safe room, occupants should be prepared to defend themselves. Pepper spray is a common choice, and firearms are certainly no less effective; and
Gas masks, which may become necessary in the event that the intruders force poisonous gas into the safe room. Where an odorless gas might be used, an electronic device may be installed to detect any noxious fumes or poisons.
In summary, safe rooms are increasingly popular rooms designed to protect occupants from various types of emergencies.
Fire Safety
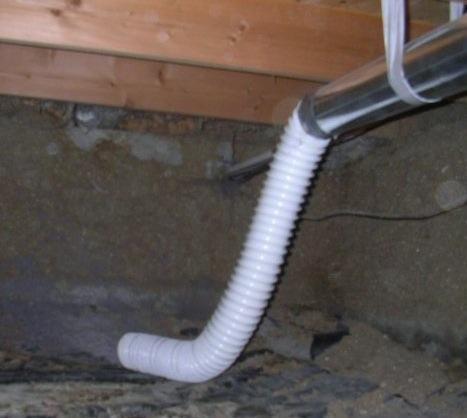
Dryer Vent Safety
Clothes dryers work by evaporating the water from wet clothing by blowing hot air past them while they tumble inside a spinning drum. Heat is provided by an electrical heating element or gas burner. Some heavy-garment loads can contain more than a gallon of water, which, during the drying process, will become airborne water vapor and leave the dryer and home through an exhaust duct, more commonly known as a dryer vent.
A vent that exhausts damp air to the home's exterior has a number of requirements:
1. It should be connected. The connection is usually behind the dryer but may be beneath it. Look carefully to make sure it’s actually connected.
2. It should not be restricted. Dryer vents are often made from flexible plastic or metal duct, which may be easily kinked or crushed where they exit the dryer and enter the wall or floor. This is often a problem, since dryers tend to be tucked away into small areas with little room to work. Vent hardware is available which is designed to turn 90 degrees in a limited space without restricting the flow of exhaust air. Air flow restrictions are a potential fire hazard.
3. One of the reasons that restrictions are a potential fire hazard is that, along with water vapor evaporated out of wet laundry, the exhaust stream carries lint – highly flammable particles of clothing made of cotton and polyester. Lint can accumulate in an exhaust duct, reducing the dryer’s ability to expel heated water vapor, which then accumulates as heat energy within the machine. As the dryer overheats, mechanical failures can trigger sparks, which can cause the lint trapped in the dryer vent to burst into flames. This condition can lead to a house fire. Fires generally originate within the dryer but spread by escaping through the ventilation duct, incinerating trapped lint, and following its path into the building wall.

The Master Inspector Certification Board believes that house fires caused by dryers are far more common than are generally believed, a fact that can be appreciated upon reviewing statistics from the National Fire Protection Agency. Fires caused by dryers in 2005 were responsible for approximately 13,775 house fires, 418 injuries, 15 deaths, and $196 million in property damage. Most of these incidents occur in residences and are the result of improper lint cleanup and maintenance. Fortunately, these fires are very easy to prevent.
The recommendations outlined below reflect International Residential Code (IRC) “Section M1502 Clothes Dryer Exhaust” guidelines:
M1502.5 Duct construction.
Exhaust ducts shall be constructed of minimum 0.016-inch-thick (0.4 mm) rigid metal ducts, having smooth interior surfaces, with joints running in the direction of air flow. Exhaust ducts shall not be connected with sheet-metal screws or fastening means which extend into the duct.
This means that the flexible, ribbed vents used in the past should no longer be used. They should be considered a potential fire hazard if discovered.
M1502.6 Duct length.
The maximum length of a clothes dryer exhaust duct shall not exceed 25 feet from the dryer location to the wall or roof termination. The maximum length of the duct shall be reduced 2.5 feet for each 45-degree bend, and 5 feet for each 90-degree bend. The maximum length of the exhaust duct does not include the transition duct.
This means that vents should also be as straight as possible and cannot be longer than 25 feet. Any 90degree turns in the vent reduce this 25-foot limit by 5 feet, since these turns restrict air flow.
A couple of exceptions exist:
1. The IRC will defer to the manufacturer’s installation instructions, so if the manufacturer’s recommendation permits a longer exhaust vent, that’s acceptable.
2. The IRC will allow large-radius bends to be installed to reduce restrictions at turns, but confirming compliance requires performing engineering calculations in accordance with the ASHRAE Fundamentals Handbook.
M1502.2 Duct termination.
Exhaust ducts shall terminate on the outside of the building or shall be in accordance with the dryer manufacturer’s installation instructions. Exhaust ducts shall terminate not less than 3 feet in any direction from openings into buildings. Exhaust duct terminations shall be equipped with a backdraft damper. Screens shall not be installed at the duct termination.
Homeowners may see many dryer vents terminate in crawlspaces or attics where they deposit moisture, which can encourage the growth of mold, promote wood decay, or create other material problems. Sometimes they will terminate just beneath attic ventilators. This is a defective installation. They must terminate at the exterior and away from a door or window.
Also, a screen may be installed at the duct termination to prevent birds and other small animals from building nests in the protected and warm tunnel of the vent, but a screen can prevent the expulsion of lint, which can accumulate, along with other debris. This is an improper and dangerous situation, so the screen should be removed and replaced with a movable damper.
M1502.3 Duct size.
The diameter of the exhaust duct shall be as required by the clothes dryer’s listing and the manufacturer’s installation instructions. Look for the exhaust duct size on the data plate.
M1502.4 Transition ducts.
Transition ducts shall not be concealed within construction. Flexible transition ducts used to connect the dryer to the exhaust duct system shall be limited to single lengths not to exceed 8 feet, and shall be listed and labeled in accordance with UL-2158A.
Pilot Lights
A pilot light is a small flame that is kept constantly lit in order to serve as an ignition source for a gas burner. It’s used on many natural gas and propane appliances, such as water heaters, clothes dryers, central heating systems, fireplaces and stoves.
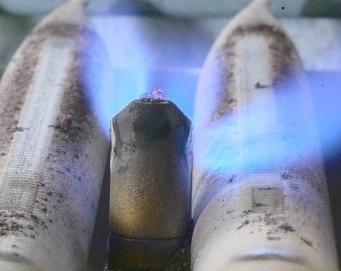
The pilot light is fueled by a small amount of gas released from the gas pipe. When the appliance is turned on, a valve releases more gas, which is ignited by the pilot light. The light may need to be re-lit from time to time after being extinguished on purpose or by accident. Modern alternatives to the pilot light include a high-voltage electric arc between two electrodes placed close to the gas flow, and a red-hot surface made from silicon carbide, silicon nitride, or another material that can withstand prolonged heat exposure. While most commercial kitchens still rely on pilot lights for ovens and grills, their residential counterparts typically use electronic ignitions.
Safety
If a pilot light is accidentally extinguished, there exists a danger that the gas used to keep the flame lit will continue to vent, possibly into the living space. If this leak continues, its concentration may reach a point where a spark – such as that from a cigarette lighter, static electricity, or even the pilot light itself as it is being re-lit – will cause a fire or even an explosion. As a precaution, the flow of gas to the pilot light is maintained by electrical circuitry that relies on the detection of the flame by a sensor.
Modern appliances that use pilot lights should be equipped with one or more of the following sensor types: a photo-resistor, which detects the light emitted by the pilot light; a thermometer, which detects the heat created by the pilot light; or a voltmeter, which detects the electrical current created by the heat of the flame as it warms a thermocouple. A thermocouple is a device that creates a voltage related to the temperature difference at the junction of two different metals.
Natural gas and propane can usually be detected by a home’s occupants by their odor, which is added to these naturally odorless fuels specifically to alert people to a lurking danger. Numerous injuries have been reported, however, when homeowners have tried to re-light a pilot light after the appliance’s malfunctioning sensor failed to stop the flow of gas into the room. Thermocouples are degraded by continued exposure to the pilot light’s flame, which increases their electrical resistance and reduces their effectiveness as flame sensors. Periodic testing and replacement of these devices will mitigate the safety hazards posed by pilot light-equipped appliances.
While many homeowners may not be aware of the danger, a number of houses are destroyed every year when a pilot light ignites the explosive gases released from insecticide "bug bombs" and foggers. A fire erupted in a Newburgh, Ohio house after a man placed a roach fumigator under his kitchen sink and the fumes reached his oven’s pilot light. Even worse, when homeowners employ a recklessly large number of these foggers, they can generate enough gas to create a catastrophic explosion, and the determination of homeowners driven mad by cockroaches and fleas is occasionally enough incentive for them to employ such overkill. In one case, 19 foggers were unleashed in a 470-square foot San Diego home, filling the building with so much gas that the pilot light destroyed the home and launched shrapnel into the street. Fortunately, foggers are typically used in buildings that have been vacated. However, three men were hospitalized when an oven's pilot light in a Thai restaurant in Perth, Australia ignited the gas released from 36 foggers – enough to blow the roof off the building in a massive explosion that rocked the suburban neighborhood, causing $500,000 in damages.
Energy Waste
Pilot lights are not needed for the majority of the time that they’re lit, which is how they waste a large amount of fuel. The exact amount of energy wasted depends on the unit, but various studies report that a pilot light burns $7.50 to $18 per month of natural gas, and even more for propane-fueled appliances. They waste more than 20% of the gas used in the United States, according to Cornell Environmental Health and Safety. A constantly burning pilot light also adds heat to the house, which may be convenient in the winter, but adds to the heat load in the summer and places an unnecessarily greater burden on the air-conditioning system. Even in the winter, the appliance may be located in a utility room or other area that doesn’t require heating. Also, a typical pilot light can generate 450 pounds of carbon dioxide –a greenhouse gas over a six-month period.
If an appliance isn’t needed for a long period of time, its pilot light may be extinguished to save energy, reduce greenhouse gas emissions, and reduce the risk of a fire or explosion. Concerned homeowners can also purchase appliances equipped with the aforementioned alternatives to the pilot light. If they have any additional issues or concerns related to pilot lights or fuel-burning appliances, they should consult with their Certified Master Inspector® during their next scheduled inspection.
In summary, pilot lights are a somewhat antiquated technology plagued by fears concerning fire and energy waste, but safer and more energy-efficient alternatives are available.
Hearths and Hearth Extensions
A fireplace hearth is the floor area within a fireplace. It is made from noncombustible materials, such as brick or stone. The hearth extension is the noncombustible material in front of and at the sides of a fireplace opening. Hearths and hearth extensions are designed to prevent sparks that leave the fireplace area from igniting nearby combustibles.
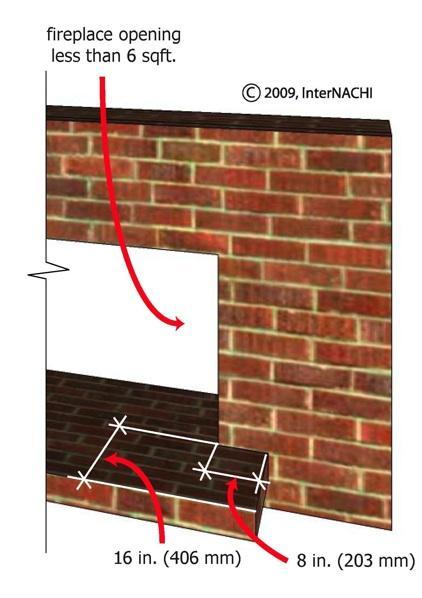
Guidelines for sufficient thickness and size of hearths and hearth extensions can be found in the International Phase I Standards of Practice for Inspecting Fireplaces and Chimneys and in the manufacturer’s instructions.
The following guidelines are from the International Phase I Standards of Practice for Inspecting Fireplaces and Chimneys, which are also useful for homeowners to know:
The inspector should inspect for hearth extensions that have a thickness of less than 2 inches.
The inspector should inspect for hearth extensions that are less than 16 inches in front or less than 8 inches beyond each side of fireplace openings that are 6 square feet or less.
The inspector should inspect for hearth extensions that are less than 20 inches in front or less than 12 inches beyond each side of fireplace openings that are greater than 6 square feet.
The inspector should inspect the hearth, hearth extension, and chambers for joint separation, damage and deterioration.
The 2006 International Residential Code (IRC) offers the following exception to the 2 inch-thick rule: When the bottom of the firebox opening is raised at least 8 inches above the top of the hearth extension, a hearth extension of not less than 3/8-inch thick brick, concrete, stone, tile, or other approved noncombustible material is permitted.
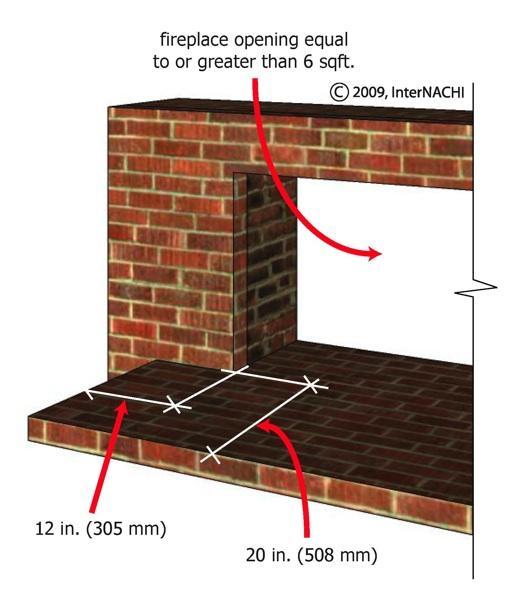
Homeowners should note that carpet or tile may obscure the hearth extension so that it may be difficult to tell how thick it is.
In summary, hearths and hearth extensions are noncombustible surfaces designed to prevent fires from spreading beyond the fireplace. If they are not large and thick enough, they might not be sufficient to prevent the spread of fire.
Holiday Safety
The winter holidays are a time for celebration, and that means more cooking, home decorating, entertaining, and an increased risk of fire and accidents. The Master Inspector Certification Board recommends that you follow these guidelines to help make your winter holiday season safer and more enjoyable.
Holiday Lighting
Use caution with holiday decorations and, whenever possible, choose those made with flameresistant, flame-retardant, and non-combustible materials. Keep candles away from decorations and other combustible materials, and do not use candles to decorate Christmas trees.
Carefully inspect new and previously used light strings, and replace damaged items before plugging lights in. If you have any questions about electrical safety, ask your Certified Master Inspector® during your next scheduled inspection.
Do not overload extension cords.
Don't mount lights in any way that can damage the cord's wire insulation. To hold lights in place, string them through hooks or insulated staples don't use nails or tacks. Never pull or tug lights to remove them.
Keep children and pets away from light strings and electrical decorations. Never use electric lights on a metallic tree. The tree can become charged with electricity from faulty lights, and a person touching a branch could be electrocuted.
Before using lights outdoors, check their labels to be sure they have been certified or UL-Listed for outdoor use.
Make sure all the bulbs work and that there are no frayed wires, broken sockets, or loose connections.
Plug all outdoor electric decorations into circuits with ground-fault circuit interrupters to avoid potential shocks.
Turn off all lights when you go to bed or leave the house. The lights could short out and start a fire.
Decorations
Use only non-combustible and flame-resistant materials to trim a tree. Choose tinsel and artificial icicles of plastic and non-leaded metals. Never use lighted candles on a tree or near other evergreens. Always use non-flammable holders, and place candles where they will not be knocked down.
In homes with small children, take special care to avoid decorations that are sharp and breakable, and keep trimmings with small removable parts out of their reach. Avoid trimmings that resemble candy and food that may tempt a young child to put them in his mouth.
Holiday Entertaining
Unattended cooking is the leading cause of home fires in the U.S. When cooking for holiday visitors, remember to keep an eye on the range. Provide plenty of large, deep ashtrays, and check them frequently. Cigarette butts can smolder in the trash and cause a fire, so completely douse cigarette butts with water before discarding. Keep matches and lighters up high, out of sight and out of reach of children (preferably in a locked cabinet).
Test your smoke alarms, and let guests know what your fire escape plan is.
Trees
When purchasing an artificial tree, look for the label "fire-resistant."
When purchasing a live tree, check for freshness. A fresh tree is green, needles are hard to pull from their branches, and when bent between your fingers, they will not break.
When setting up a tree at home, place it away from fireplaces, radiators and portable heaters. Also, place the tree out of the way of foot traffic, and don’t block any doorways.
Cut a few inches off the trunk of your tree to expose the fresh wood. This allows for better water absorption, which will help keep your tree from drying out and becoming a fire hazard. Be sure to keep the tree stand filled with water. Heated rooms can dry live trees out rapidly. Make sure the base is steady so the tree won't tip over.
Fireplaces
Before lighting any fire, remove all greens, boughs, papers, and other decorations from the fireplace area. Check to see that the flue is open. Use care with "fire salts," which produce colored flames when thrown on wood fires. They contain heavy metals that can cause intense gastrointestinal irritation and vomiting if eaten. Do not burn wrapping paper in the fireplace. A flash fire may result as wrappings ignite suddenly and burn intensely.
Toys and Ornaments
Purchase age-appropriate toys for children. Some toys designed for older children may be dangerous for younger children. Electric toys should be UL-Listed and approved. Toys with sharp points, sharp edges, strings, cords, and parts small enough to be swallowed should not be given to small children.
Place older ornaments and decorations that might be painted with lead paint out of the reach of small children and pets.
Children and Pets
Poinsettias are known to be poisonous to humans and animals, so keep them well out of reach, or avoid having them in the house
Keep decorations at least 6 inches above the child’s reach. Avoid using tinsel. It can fall on the floor and a curious child or pet may eat it. This can cause anything from mild distress to death.
Make sure that any ribbons on gifts and tree ornaments are shorter than 7 inches. A child could wrap a longer strand of ribbon around his neck and choke. Avoid mittens with strings for children. The string can get tangled around the child’s neck and cause him to choke. Use clips instead. It’s easier to replace a mitten than a child.
Watch children and pets around space heaters or the fireplace. Never leave a child or a rambunctious pet unattended.
Store scissors and any sharp objects that you use to wrap presents out of your child’s reach. Inspect wrapped gifts for small decorations, such as candy canes, gingerbread men, and mistletoe berries, all of which are choking hazards.
Security
Activate your home’s burglar alarm system. If you plan to travel for the holidays, don’t discuss your plans with strangers or on social media. Have a trusted friend or neighbor keep an eye on your home.
Firestops
A firestop is a passive fire-protection method designed to reduce the opportunity for fire to spread through unprotected openings in a rated firewall. Such openings are found around the perimeter of pipes and wiring that penetrate firewalls.
Places where firestops are required:
Firestops must seal all unprotected openings in firewalls. In homes, firewalls are found in the following locations: between the garage and the living space, including the overhead ceiling; between the attic and the living space. Homeowners should be on the lookout for fireplace and wood stove flues that lack adequate fire-rated sheetrock or metal flashing firestopping; firewalls that separate condominium units are often penetrated by utilities that serve multiple units. These utilities are sometimes contained inside chases that should be sealed where they pass through the firewall between units. Firewalls between units must be continuous, all the way to the roof. Homeowners should have their CMI check in attics of multi-family dwellings to make sure that the firewall has not been violated in the attic space.
Common Problems with Firestops
Homeowners should look for any instances where firestops are missing, damaged, or otherwise inadequate. Some descriptions of firestop deficiencies are as follows:
Missing firestop: Unsealed pipe penetrations will greatly reduce the ability for a firewall to contain a fire. This situation is more common in old buildings than in new ones due to changes in building code.
Cable or pipe replacement: Electricians and plumbers may partially remove a firestop in order to install new cables and plumbing. A firewall’s fire-resistance rating will be compromised if the opening created by this removal is not filled.
Improper installation: Firestops will be effective only if they are installed correctly. For instance, firestop mortars are sometimes smeared into place unevenly and lack the required thickness at certain points. Also, firestops that are installed on only one side of a penetration may not be sufficient to prevent the spread of fire through the opening.
Common Firestop Materials
Firestop mortar: Cements made from lightweight aggregates, such as vermiculite or perlite, can be used as firestopping. They are typically colored to distinguish them from other types of cement that lack firestopping characteristics. For example, firestopping mortar made by Nelson is colored red, and 3M™ Fire Barrier Mortar is bluish-gray.
Intumescent: Any substance that expands as a result of heat exposure is considered an intumescent. Intumscents used as firestops can be made from a variety of flame-retardant materials, such as graphite, hydrates, and sodium silicates. They are especially useful firestopping materials for electrical cables, which can completely melt or burn away in a fire. The expanding intumescent will partially or completely cover the exposed opening created by a melted wire.
Firestop pillows: These items contain various flame-retardant and intumescent substances, such as rockwool and graphite. They are filled loosely inside of a fiberglass fabric case that resembles a small pillow. Firestop pillows can be inserted into openings in firewalls and used in conjunction with other firestopping materials.
Sheet metal.
Fire-rated sheetrock.
In summary, firestops are designed to prevent the spread of fire through unprotected openings in rated firewalls.
Clothes Closet Lighting
People don’t often think about the fire risks posed by the light in their clothes closet, but it’s one of the few places in the house where a source of high heat can get too close to flammable materials. Lighting must be installed safely with adequate separation from clothes, boxes and other flammables stored in the closet. Additionally, the quality of the light, as well as bulb efficiency, will influence your lighting choices.
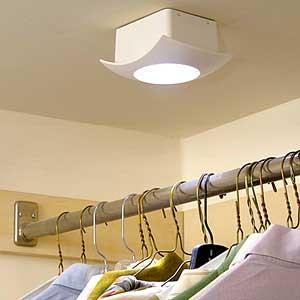
The 2009 International Residential Code (IRC) on "Permitted Luminaires and Clearance from Clothing"
The IRC defines a "luminaire" as follows: a complete lighting unit consisting of a lamp or lamps, together with the parts designed to distribute the light, to position and protect the lamps and ballast (where applicable), and to connect the lamps to the power supply.
Types of luminaires permitted by the 2009 IRC include: surface-mounted or recessed incandescent luminaires with completely enclosed lamps, surfacemounted or recessed fluorescent luminaires; and surface-mounted fluorescent or LED luminaires identified as suitable for installation within the storage area.
Luminaires not permitted by the 2009 IRC:
Incandescent luminaires with open or partially enclosed lamps and pendant luminaires or lampholders are prohibited.
Clearances permitted by the 2009 IRC:
The minimum distance between luminaires installed in clothes closets and the nearest point of a storage area shall be as follows:
1. Surface-mounted incandescent or LED luminaires with a completely enclosed light source shall be installed on a wall above the door or on the ceiling, provided that there is a minimum clearance of 12 inches between the fixture and the nearest point of a storage space.
2. Surface-mounted fluorescent luminaires shall be installed on the wall above the door or on the ceiling, provided that there is a minimum clearance of 6 inches
3. Recessed incandescent luminaires or LED luminaires with a completely enclosed light source shall be installed in the wall or the ceiling, provided that there is a minimum clearance of 6 inches
4. Recessed fluorescent luminaires shall be installed in the wall or on the ceiling, provided that there is a minimum clearance of 6 inches between the fixture and the nearest point of storage space.
5. Surface-mounted fluorescent or LED luminaires shall be permitted to be installed within the storage space where identified within this use.
Also, metal pull chains may be dangerous; if the base cracks, the chain can become electrified.
Color Rendering Index (CRI)
CRI is a quantitative measure of the ability of a light source to reproduce the colors of various objects faithfully, in comparison with an ideal or natural light source. The closer the CRI of a lamp is to 100, the more "true" it renders colors in the environment. Poor CRI is the reason that a shirt and pants that seemed to match at home now clash in the restroom at work. For clothes closets lighting, the CRI should be as high as possible. Incandescent lights are inefficient but they have a CRI of 100, making them the most aesthetic lighting choice. Compact fluorescents lights (CFLs) are far more efficient and have a longer life than incandescent bulbs, but they have a CRI in the low 60s, making them a poor choice for clothes closet applications. Low-voltage halogen and LED lights are relatively efficient, long-lasting, and have a high CRI, although not as high as incandescent bulbs.
In summary, homeowners should replace lighting in their clothes closets if the light has the potential to ignite flammable materials in the closet.
Barbeque Safety
During barbeque season, homeowners should heed the following safety precautions in order to keep their families and property safe.
1. Propane grills present an enormous fire hazard, as the Consumer Product Safety Commission (CPSC) is aware of more than 500 fires that result annually from their misuse or malfunction. The following precautions are recommended specifically when using propane grills: a. Store propane tanks outdoors and never near the grill or any other heat source. In addition, never store or transport them in your car’s trunk. b. Make sure to completely turn off the gas after you have finished, or when you are changing the tank. Even a small gas leak can cause a deadly explosion. c. Check for damage to the tank before refilling it, and only buy propane from reputable suppliers. d. Never use a propane barbecue grill on a terrace, balcony or roof, as this is dangerous and illegal. e. No more than two 20-pound propane tanks are allowed on the property of a one- or two-family home. f. To check for a leak, spray a soapy solution over the connections and watch for bubbles. If you see evidence of a leak, reconnect the components and try again. If bubbles persist, replace the leaking parts before using the grill. g. Make sure connections are secure before turning on the gas, especially if the grill hasn’t been used in months. The most dangerous time to use a propane grill is at the beginning of the barbeque season. h. Ignite a propane grill with the lid open, not closed. Propane can accumulate beneath a closed lid and explode. i. When finished, turn off the gas first, and then the controls. This way, residual gas in the pipe will be used up.
2. Charcoal grills pose a serious poisoning threat due to the venting of carbon monoxide (CO). The CPSC estimates that 20 people die annually from accidentally ingesting CO from charcoal grills. These grills can also be a potential fire hazard. Follow these precautions when using charcoal grills: a. Never use a charcoal grill indoors, even if the area is ventilated. CO is colorless and odorless, and you will not know you are in danger until it is too late. b. Use only barbeque starter fluid to start the grill, and don’t add the fluid to an open flame. It is possible for the flame to follow the fluid’s path back to the container as you're holding it. c. Let the fluid soak into the coals for a minute before igniting them to allow explosive vapors to dissipate. d. Charcoal grills are permitted on terraces and balconies only if there is at least 10 feet of clearance from the building and a water source immediately nearby, such as a hose (or 4 gallons of water). e. Be careful not to spill any fluid on yourself, and stand back when igniting the grill. Keep the charcoal lighter fluid container at a safe distance from the grill. f. When cleaning the grill, dispose of the ashes in a metal container with a tight lid, and add water. Do not remove the ashes until they have fully cooled. g. Fill the base of the grill with charcoal to a depth of no more than 2 inches.
3. Electric grills are probably safer than propane and charcoal grills, but safety precautions need to be used with them, as well. Follow these tips when using electric grills: a. Do not use lighter fluid or any other combustible materials. b. When using an extension cord, make sure it’s rated for the amperage required by the grill. The cord should be unplugged when not in use and kept out of a busy foot path to prevent tripping. c. As always, follow the manufacturer's instructions.
Safety Recommendations for General Grill Use:
Always make sure that the grill is used in a safe place where kids and pets won't touch or bump into it. Keep in mind that the grill will still be hot after you finish cooking, and anyone coming into contact with it could be burned.
If you use a grill lighter, make sure you don't leave it lying around where children can reach it. They will quickly learn how to use it.
Never leave the grill unattended, as this is generally when accidents happen. Keep a fire extinguisher or garden hose nearby.
Ensure that the grill is completely cooled before moving it or placing it back in storage. Ensure that the grill is only used on a flat surface that cannot burn, and well away from any fencing, shed, trees and shrubs.
Clean out the grease and other debris in the grill periodically. Be sure to look for rust and other signs of deterioration.
Don't wear loose clothing that might catch fire while you're cooking. Use long-handled barbecue tools and flame-resistant oven mitts. Keep alcoholic beverages away from the grill; they are flammable!
In summary, homeowners should exercise caution when using any kind of grill, as they can harm life and property in numerous ways.
Kerosene Heaters
A kerosene heater, also known as a paraffin heater, is a portable, unvented heating appliance that runs on the controlled burning of kerosene. In the U.S., it is used mainly for supplemental heating and for emergency heat during a power outage. In Japan and other countries, it is used as the primary source for home heating.
Kerosene burners operate in a manner similar to kerosene lamps: a fabric wick draws kerosene from a tank via capillary action into a burning chamber mounted above. Once lit, the wick warms nearby objects through radiation and convection. The user may control the burner’s heat by raising or lowering the wick's height inside the burning chamber. The heater is turned off by fully withdrawing the exposed wick into a cavity beneath the burner.
Kerosene heaters are favored for their portability, efficiency, and lack of reliance on electricity. They also lack a pressure-fed fuel system, which is a significant safety advantage over standard heating systems.
However, the following problems plague kerosene heaters:
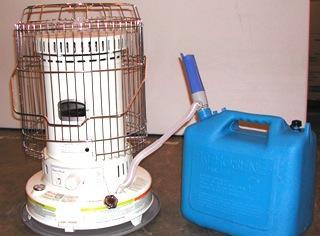
Odor. While newer kerosene heaters do not present as much of a problem, all such heaters emit a smell when they are being fueled. Odors typically cease after the heater begins burning normally. If the odor does not dissipate, the cause may be because the wick may be too thin for the heating unit, allowing kerosene vapors to pass through the wick gap and vent into the room. Odors and excess smoke may also result from the combustion of low-grade fuel or contaminated kerosene.
Inadequate ventilation. Kerosene heaters, like ventless fireplaces, vent soot, sulfur dioxide, carbon dioxide, and carbon monoxide directly into the living space. In modern well-insulated homes, an improperly adjusted, improperly fueled, or poorly maintained kerosene heater can pose a serious health hazard.
Fire hazard. Highly flammable liquids are burned within the living space, creating vulnerability to mechanical and human-caused problems.
The aforementioned safety concerns can be addressed by inspecting for the presence of the following safety design features: an Underwriters Laboratory (UL) seal, guaranteeing that it has passed certain safety requirements; a push-button, automatic starter, which eliminates the need for matches; a low center of gravity, which makes accidentally tipping the burner over less likely; an automatic cut-off device to turn the heater off in case it is tipped over. This device also prevents kerosene from spilling during a tip-over; a grille attached to the front to prevent contact burns; placement of the heater on a large, fireproof surface; a model that is equipped with a wick this makes flooding of the burner impossible; all components made from heavy, durable metal; a sturdy fuel tank, sealed and installed beneath the burner; and a fuel gauge to prevent inadvertent over-fueling.


