6 minute read
H. Soil Testing Field Method Manual


SÃO PAULO CAPSTONE-STUDIO 2017: SOIL TESTING FIELD METHODS
**Note, please use caution if any of these methodologies are used in the final report as many of the directions are lifted from kit methods and online methods. Sources are noted at the bottom.
Methodology for obtaining data related to soil type and quality is covered in this packet. This information gathered will be important to inform our final deliverable recommendations and designs.
There are two sections of the soil testing field methods: SOIL TYPE AND TESTING.
Minimally this test requires one person, however the sections can be done concurrently so two or more people would finish the tests in the least time.
Materials Required for all the Water Testing: ● Clean Water ● iPhone ● Rapid Test Soil Test Kit ● Spoon to Dig Sample ● Plastic Tupperware ● Ziplock Bags ● Tissue
SOIL TYPE EVALUATION
General Information
This test will aim to determine soil type in the field. It is modified from a document made by University of Kentucky College of Agriculture, Food and Environment called “Determining Soil Texture by Feel.”
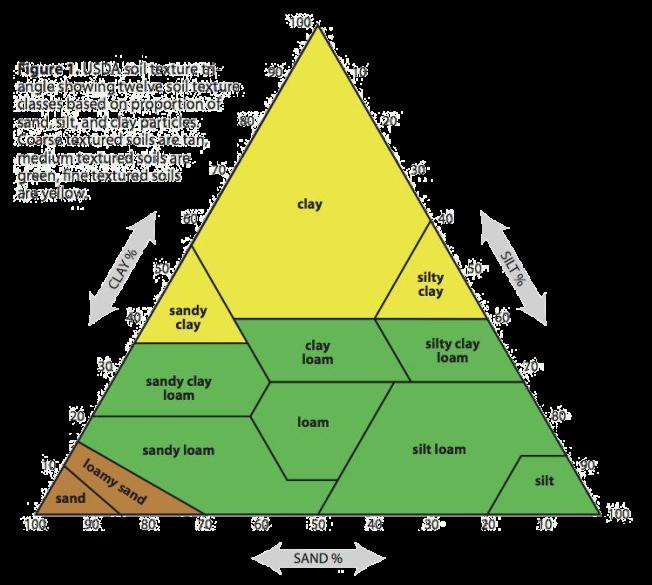
Basically we are looking for broad categories of soil either sandy, loam, and clay. Definitions as followed are from the Soil Test Kit: ● Sandy Soil - a light, coarse soil comprise of crumblin and alluvial debris
● Loam Soil - a medium friable soil, consisting of a blend of coarse (sand) alluvium and fine (clay) particles mixed within fairly broad limits with a little lime and humus ● Clay- a heavy, clinging, impermeable soil, comprised of very fine particles with little lime and humus and tending to be waterlogged in winter and very dry in summer
Below is an in depth chart of soil type - which conceptually outlines what we are looking for in this analysis:
Materials Required:
● Clean Water ● iPhone
Site Selection:
This test is not limited in how many times it can be conducted. Judgement can be used for what is practical and useful. Feel free to use visual observation to notice PHYSICAL and VISUAL transitions in soil type. Be sure to document every site the sample is taken from to geolocate the sample.Also use results from the soil type evaluation to inform the soil testing (second step).
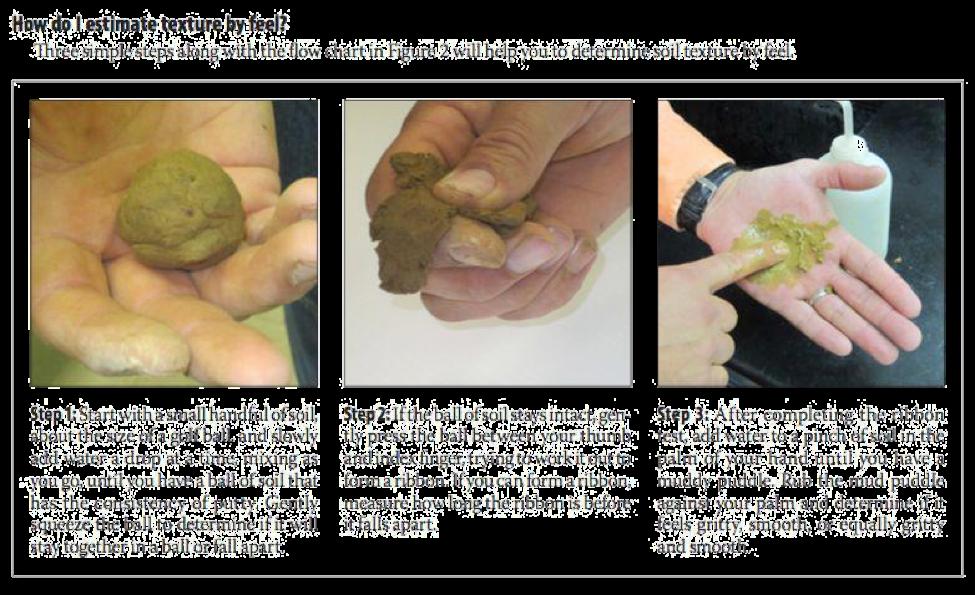
Testing Processes:
This test will comprise of three simple processes, outlined below:
This process diagram can be used to better help decision making for this process:
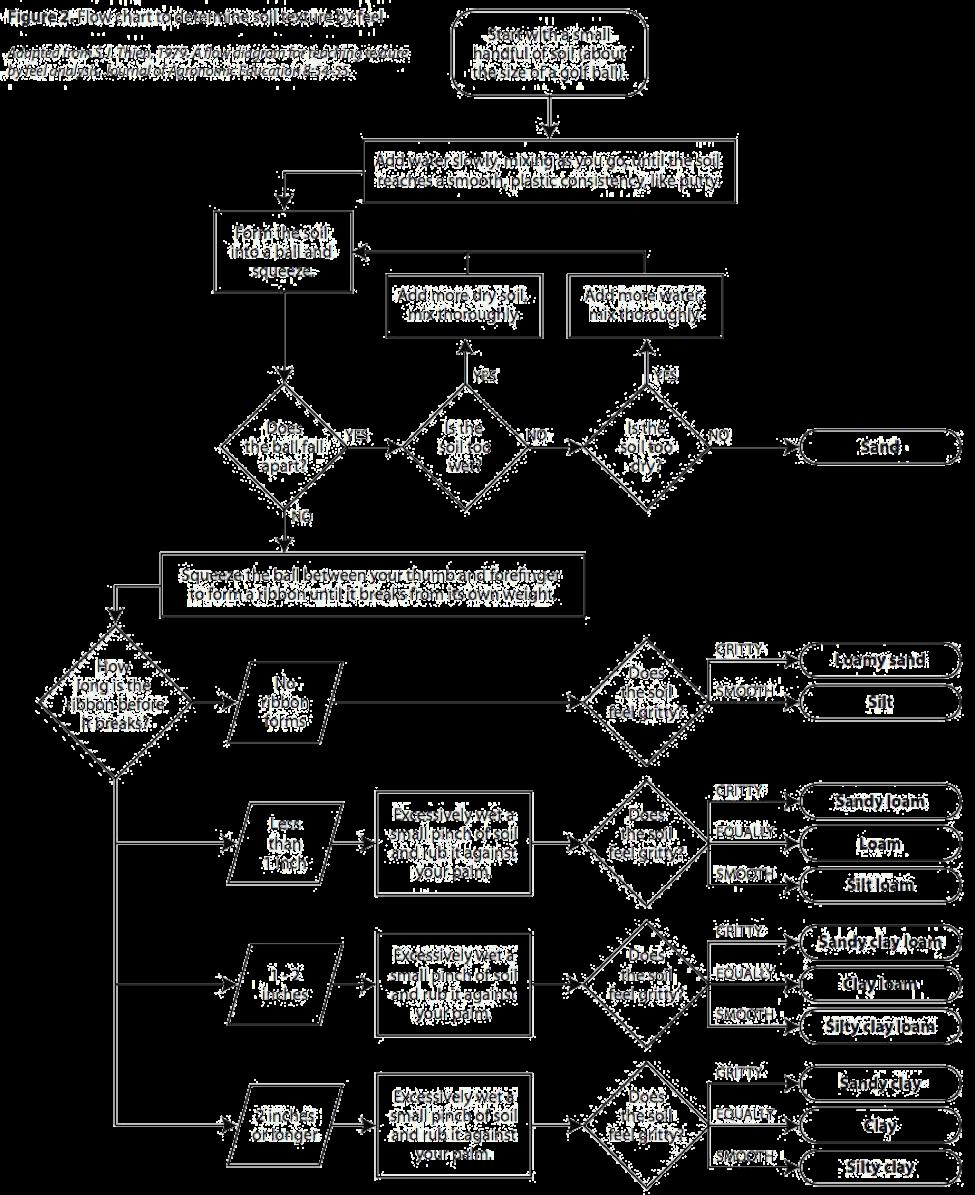
Please record the type of soil in the results chart provided and take an iPhone picture to geolocate the sample.
SOIL TEST KIT
(Directions obtained from: http://www.domyownpestcontrol.com/msds/1601_instruction1.pdf)
Overview:
This test uses 4 color comparators - one each for pH, Nitrogen, Phosphorus and Potash. Each comparator has a removable film color chart and color coded top. Capsules for each test are also color-coded. This test is not designed for our specific scenario so we have modified it slightly - we will be doing the pH soil testing in the field and collecting samples of soil to test in the hotel for the nitrogen, phosphorus, and potash tests.

Materials Required: ● Rapid Test Soil Test Kit ● Spoon to Dig Sample ● Plastic Tupperware ● Ziplock Bags ● iPhone ● Tissue ● Clean Water
Site Selection
Test soil from only one sample site at a time. Use information from the soil type evaluation to help explore the quality of a variety of types of soil on the site (it would be useful to evaluate the soil type of the soil sample site). Consider where the proposed interventions will be located and test relevant areas. There are enough areas to test 5 samples in each site.
Field Testing Steps
1. Take soil sample from approximately 4 in. deep- avoid touching the soil with your
hands
2. Place the sample into a tupperware container a. Break the sample up with the spoon and allow it to dry out naturally (if possible) b. Remove any small stones, organic matter (e.g. grass, weeds or roots), or hard particles c. Crumble the sample fines and mix it thoroughly
3. pH Test:
a. Remove the cap from the green comparator and take out the package of capsules i. Make sure the color chart (film) is in place b. Fill test chamber to soil fill line with soil sample. c. Holding the capsule horizontally over the test chamber, carefully separate the two halves of the green capsule and pour powder into the test chamber. d. Using the dropper provided, add water (preferably distilled) to water fill line. e. Fit the cap onto comparator, making sure it is seated properly and caps tightly. Shake thoroughly. f. Allow soil to settle and color to develop for about a minute. g. Compare color of solution against pH chart. For best results allow daylight (not direct sunlight) to illuminate the solution. h. Record the results on the results chart
4. Put the remaining portion of the soil sample into a plastic ziplock bag labeled with the name of the settlement, testing location and sample number (if applicable). Take a picture of the label to geolocate the testing location.
5. Clean the container of soil (use tissue if neccessary)
Hotel Testing Steps
6. Nitrogen, Phosphorus & Potash Tests: a. Fill a clean tupperware with 1 cup of soil and 5 cups of water. i. Larger or smaller quantities may be tested as long as the 1 part soil to 5 parts water proportions are maintained.) ii. For best results use bottled or distilled water (water needs to be drinkable for sure). b. Thoroughly shake or stir the soil and water together for at least one minute; then
allow the mixture to stand undisturbed until it settles (30 minutes to 24 hours, dependent on soil). A fine clay soil will take much longer to settle out than a coarse sandy soil. The clarity of the solution will also vary, the clearer the better, however cloudiness will not affect the accuracy of the test. c. Select the appropriate comparator for the test you wish to make.
Remove the cap and take out the capsules which should be the same color as the cap. Make sure the color chart (film) is in place. Do not interchange color charts between comparators. d. Using the dropper provided, fill the test and reference chambers to the fill mark on the chart with solution from your soil sample. Solution is added to the reference chamber to compensate for any discoloration in the tested sample caused by the soil. Avoid disturbing the sediment. Transfer only liquid. e. Remove one of the appropriate colored capsules from its poly bag. Holding the capsule horizontally over the test chamber, carefully separate the two halves and pour the powder into the test chamber. f. Fit the cap on the comparator, making sure it is seated properly and caps tightly.
Shake thoroughly. g. Allow color to develop for 10 minutes. h. Compare the color of the solution in the test chamber to the color chart. For best results, allow daylight (not direct sunlight) to illuminate the solution in both the test and reference chambers. Judge colors, if necessary, and note your results for future reference.


