
7 minute read
G. Water Testing Field Method Manual


SÃO PAULO CAPSTONE-STUDIO 2017: WATER TESTING FIELD METHODS
**Note, please use caution if any of these methodologies are used in the final report as many of the directions are lifted from kit methods and online methods. Sources are noted at the bottom.
Methodology for obtaining data relating to water quality, quantity, and accessibility is covered in this packet. This information gathered will be important to inform our recommendations and design for the final deliverable this semester.
There are three sections of the water testing field methods: WATER QUALITY, FLOW TESTING, AND WATER ACCESSIBILITY.
Minimally this test requires two people, however the sections can be done concurrently so four or more people would finish the tests in the least time.
Materials Required for all the Water Testing: ● Sharpie Marker ● First Alert Drinking Water Testing System (9) ● 1 Full Bottle of Water ● Clear lastic water bottle (8) ● Sharpie Marker ● String ● Stakes (4) ● Float ● Iphone ● Results table
WATER QUALITY TESTING
Materials required: ● First Alert Drinking Water Testing System (9) ● 1 Bottle of Water (use as control) ● Clear plastic water bottle (8) - TWO per day of testing ● Sharpie Marker ● Results table
Site selection:
2 Sites for the water testing should be selected in both Paraisópolis and Ocupação Anchieta. One should be as far upstream as possible (in Ocupaçao Anchieta this should be direct spring water if possible) and the other should be as far downstream as possible. Efforts should be made to make the repetition of these tests in the same location. Be sure to document the site where you are getting the water from.
Testing Process:
First, you will make a qualitative assessments on turbidity and odor.
1. Use the clear empty plastic water bottle to take a water sample from the chosen site a. Label the test vial (with the name of the settlement, testing location and sample number) b. Take a picture using an iphone to geolocate the sample.
2. Odor - begin by smelling the top of the bottle and record any distinctive smells. (Potential smells could include: bleach, chemical, medicinal, rotten eggs, sewage-like, musty, moldy, earthy, grassy, fishy, petroleum, gasoline, turpentine, fuel-like, solventlike, detergent, or methane if there is no smell, record this information too.)
3. Turbidity - use the diagram below to estimate turbidity. a. Turbidity = relative clarity of the water b. You should describe the color (e.g. Dark brown, yellow, tan), opacity (e.g. Impossible to see through), and/or term (i.e. murky). The next portion of the water quality testing is to use the First Alert Drinking Water Testing System.
This system will be testing bacteria, lead, pesticides, nitrates, nitrites, pH, hardness and chlorine. This water test will not give us guaranteed water quality, but will imply problems with pollution (e.G. Sources or potential contaminants) and allow for recommendations for further testing. The majority of this test will be done in field - one portion however needs to be done when we return to the hotel. In addition the control test will be done when we are in the hotel.
1. Unpack kit and examine the contents a) Be sure to choose the best area available to conduct the testing - consider somewhere clean, clear, and somewhere the materials won’t get knocked over b) Contents should include: i) One bacteria test vial ii) One Lead/Pesticide test packet iii) One nitrate/nitrite test packet iv) One pH/Hardness/Chlorine test packet c) Note, you should be using the water bottle as your water sample still
2. Lead/Pesticide Test instructions
a) The Lead Test can detect dissolved lead at levels below the EPA Action level of 15 parts per billion (ppb). The Pesticide Test detects two of the most common pesticides used in the US at or below the EPA Maximum Contaminant Level (atrazine - 3 ppb and simazine - 4 ppm). b) Open Lead/Pesticide packet and take out all contents. The packet contains a test vial, a dropper pipette, two test strips, and a desiccant (to be discarded) c) Using a dropper, place exactly TWO dropperfuls of water sample into the test vial. i) To pick up sample, tightly squeeze the bulb at the end of the dropper and place the open end into water sample. Release the bulb to pick up sample, then squeeze again to expel sample into the vial. d) Swirl vial gently for several seconds. Place on a flat surface. e) Place both test strips into the test vial, with arrows point DOWN. f) Wait 10 minutes. Do not disturb strips or vial during this time. Blue lines will appear on the strips. g) Take the strips out of the vial and read results; record these results in the chart (the strips are labeled with either the pesticide or lead tests) i) NEGATIVE - bottom line (next to number 1) is darker than top line (next to number 2); if you only see one line ii) POSITIVE - top line (next to number 2) is darker than bottom line (next to number 1), or lines are equally dark iii) If no lines appear, the test did not run properly (draw a line through the box on the results page)
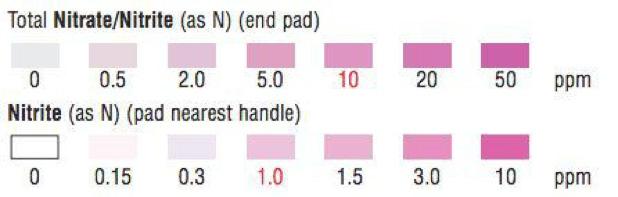
3. Nitrate/Nitrite Test Instructions
a) Carefully open nitrate/nitrite test packet and take out test strip b) Immerse the reagent pads into water sample for 2 seconds, remove, and after 1 minute match colors to the chart below (also in the instructions of the packet) and record your results in the table.
c) Colors are stable for one minute, so determine the results quickly
4. pH/Hardness/Chlorine Test Instructions
a) Carefully open the pH/Hardness/Chlorine test packet and take out test strips b) Immerse the reagent pads into water sample and remove immediately hold the strip level for 15 seconds c) Match pH, total hardness and total chlorine pads (in that order) to the color chart below (also in the instructions of the packet) and record the results on the table

At the hotel -
1. Bacteria Test Instructions (for site samples)
a. Take out the Bacteria Test vial, label the test vial (with the name of the 1. Settlement 2. Testing location 3. Sample number - this should match the water bottle you are doing the test for), and set upright on a flat surface (be sure that the vial will not get knocked over!) b. Carefully twist off cap and fill vial to ½ inch below the top (to the 5 ml line) i) DO NOT OVERFLOW ii) DO NOT SPILL iii) DO NOT KNOCK OVER d) Replace the cap and twist on tightly - Shake the vial vigorously for 20 seconds e) Place the capped vial upright where it cannot be disturbed for 48 hrs f) After 48 hrs (BEFORE 50 HOURS) observe the color of the liquid without opening the vial i) PURPLE - negative Result (write NEGATIVE) in the results table ii) YELLOW - positive Result g) Add bleach and pour down toilet h) Discard the vial in the trash
2. Repeat the test kit process completely once using clean bottled water as a control
STREAM AND FLOW TESTING
Materials Required: ● Four stakes ● String ● Tape measure ● Float ● Iphone ● Results table
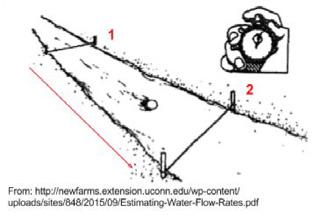
For this test we will be using the average cross section method for understanding the stream size and flow rate. In summary we will use the cross sectional area of the stream and a float to later calculate the flow rate. A basic diagram of this methodology is shown below:
1. Find approximately equal sections of the stream that is around 50-100 ft apart (if this is not, then as far apart as possible) a. Put two stakes at point 1 and put a string across the stream b. Measure the width and approximate depth of the stream (in the middle of the stream bed) at point 1 c. Put two stakes at point 2 and put a string across the stream d. Measure the width and approximate depth of the stream (in the middle of the stream bed) at point 2 e. Take a picture of the setup to record and geolocate the test
2. Assign the jobs to the two people in the test: a. Person 1 is assigned to Point 1 i. Required materials: Float ii. Job: Drop float and shout to start timer b. Person 2 is assigned to Point 2 i. Required materials: Timer ii. Job: Stop timer when the float reaches the string for point two
3. Record the time that the float takes to get from point one to point 2 (using phone) 4. Repeat step 3 five times.
WATER ACCESSIBILITY
The last information gathered for the water management methodologies is an estimation of access to the water. This will be a qualitative response - please respond to the difference between distance and time taken to access water. For example, you could note things like - access from steep slope, only accessible from the south side, very accessible, took 30 minutes to hike down etc….


