


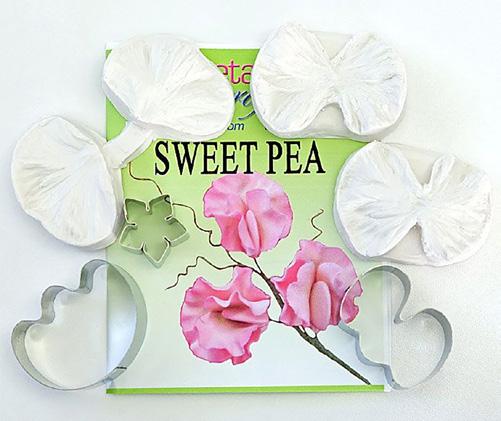
JAN FEB 2023 • ISSUE 442 MASTERING THE ART OF ROMANTIC CAKES PAGE 16 PAGE 46 PLUS: 14 TUTORIALS AND RECIPES BACK-TOBASICS TIPS 2023 CAKE COMPETITIONS Sweetest T hing THE LEARN A NEW SUGAR SHORTCUT Make this gum-paste sweet pea faster.
FROM OUR PARTNER

ACD READERS & FANS Hello


LETTER FROM THE EDITOR
Happy 2023! I’m so excited to start another year with our amazing cake community. In this issue, we look forward to new trends and new ideas. Our incredible cover star Arati Mirji teaches a master class on a classic sweet pea flower with a new technique. It’s hard to call it a shortcut when the end result looks so good!
We also take the time to get back to basics. For those who may need refresh or are just starting out, we have a simple sprinkle birthday cake, a go-to buttercream perfect for piping, and a look inside a new book on buttercream flowers. And, of course, we had to include lots of Valentine’s Day ideas. It’s one of the sweetest holidays, after all! We have a sweet bear couple made of cupcakes and a cloud that would happily shower any event with love, but my personal favorite might just be Scott Bradshaw’s wayward Cupid. And, as we start a new year, I would love to hear what you want to see more of in 2023. We have a lot in the works, including new trends and features, but I want to know what you want to see most. Drop me a line any time!
From my kitchen to yours,

like to meet you… Join our incredible community of cakers on your favorite platform, and don’t forget to sign up for our newsletter to stay up to date on all things cake! Want to pitch an idea or just want to say hello? Email annmarie@americancakedecorating.com. americancakedecorating.com/blog americancakedecorating.com instagram.com/americancakedecorating facebook.com/groups/ACDCakeTalk facebook.com/americancakedecorating FROM OUR TEAM January | February 2023 americancakedecorating.com 1
We’d
Publisher/CEO Grace McNamara
Associate Publisher Ania McNamara-Munzer
Managing Editor AnnMarie Mattila
Creative Director Brenda Drake Lesch Copy Editor
Social Media Coordinator
Contributors
Maude Campbell
Corina E. Buzdugan
Ms. Candy Blog, Kala Boulard, Scott Bradshaw, Mayra Estrada, Olivia Gadwah, Margarita Golden, Lisa King, Seri Lopez, Juliana Manno, Arati Mirji, Cydni N. Mitchell, Laura Newhouse, Christina Ong, Beth Rush, Aaisha Sumbul, Valeri Valeriano, Leslie Vigil, Sandrine Wallace
Subscriptions 651-330-0574; 1 Year $19.95
Correction: We mistakenly credited a photo on page 7 of our July/August 2022 issue to the incorrect cake maker. The correct photo credit is Joyce Ng at cakesinabox.com
AmericanCakeDecorating.com
Editorial Director: Please direct all correspondence, photos, and press releases to AnnMarie Mattila, annmarie@americancakedecorating.com, or mail to American Cake Decorating, 4707 Hwy 61 N #255, St Paul, MN 55110.

Subscription Questions & Changes: Send address changes to, New Mailing Address: American Cake Decorating, 4707 Hwy 61 N #255, St Paul, MN 55110 or email contact@ americancakedecorating.com. Please notify us of address changes four to six weeks ahead of time. The post office is under no obligation to forward your magazine. If the postal authorities notify us that your magazine is undeliverable, we have no further obligation unless we receive a corrected address within one year. We cannot be responsible for non-delivery. The staff of American Cake Decorating magazine and AIM Communications LLC have reviewed contributions and advertising materials with the understanding that the information is original, accurate, and reliable, but we cannot be held responsible for such content. Please note that some of the techniques may be suitable for private home use, but are not necessarily appropriate for cakes destined for sale. American Cake Decorating magazine (ISSN 1094-8732) published bimonthly by AIM Communications, LLC, 4707 Hwy 61 N #255, St Paul, MN 55110. Tel: 651-330-0574; Fax: 651-756-8141. Visit our website at www.americancakedecorating.com Periodicals postage paid at St. Paul, MN, and additional mailing offices. Postmaster: Send address changes to American Cake Decorating magazine, 4707 Hwy 61 N #255, St Paul, MN 55110. Allow 60 days for address change. Copyright ©2023 by AIM Communications, LLC. Reproduction in whole or part without written permission prohibited.
January | February 2023. Issue 442.
americancakedecorating.com January | February 2023
2
CAKE TALK | 4 News, events, and more.
YOU MADE IT! | 6 Featuring the latest Instagram trend.
SHOPPING | 43 Pantone’s color of the year is Viva Magenta.
SWEET BOSS | 44 Cyd Mitchell recaps the best lessons from the pandemic.
THE CAKE ALCHEMIST | 57 Cupid had a bit too much to drink with Scott Bradshaw.
LAST BITE | 70 Zesty and creamy lemon curd.
FEATURES
TREND ALERT | 8 Ms. Candy Blog talks cartoon cakes.
ASK THE EXPERT | 22 Find your inspiration with Lisa King.
ASK THE EXPERT | 32 Beth Rush explains why baking is good for your health.
CAKE FIESTA MANILA | 66 Travel to the largest cake show in the Philippines.
2023 CAKE SHOWS | 68 Find out about all the competitions this year.
RECIPES & TUTORIALS
THE SWEETEST
THING | 10
LET IT SNOW | 16 Build a wintry gnome with Laura Newhouse.
TEXTURED FLORALS | 24
Mayra Estrada repurposes a tool for a whole new look.
WAFER-PAPER
BIRCH TREE | 27 Create a woodsy scene with Aaisha Sumbul.
BACK TO BASICS BIRTHDAY CAKE | 34 Olivia Gadwah shows a beginner sprinkle cake.
POM-POM DAHLIA | 40
Look inside Leslie Vigil’s new book on piping flowers.
LOVE IS IN THE AIR | 46 Margarita Golden will have you floating on clouds.
BEARY MUCH IN LOVE | 52 The cutest cupcakes from Juliana Manno.
PIÑA COLADA CAKE | 60
This recipe is a taste of the tropics.
PERFECTING THE MACARON CAKE | 62 Sandrine Wallace shares her secrets.
Arati Mirji’s master class on the sweet pea flower.
CAKE DIFFICULTY
PERFECTLY PIPABLE BUTTERCREAM | 38
Use Kala Boulard’s recipe for decorating success.
CHOCOLATE HEART BOXES | 64 Create adorable edible vessels with Seri Lopez. BEGINNER: INTERMEDIATE: ADVANCED:
January | February 2023 americancakedecorating.com 3
AMERICAN CAKE DECORATING JANUARY/FEBRUARY 2023 ISSUE 442
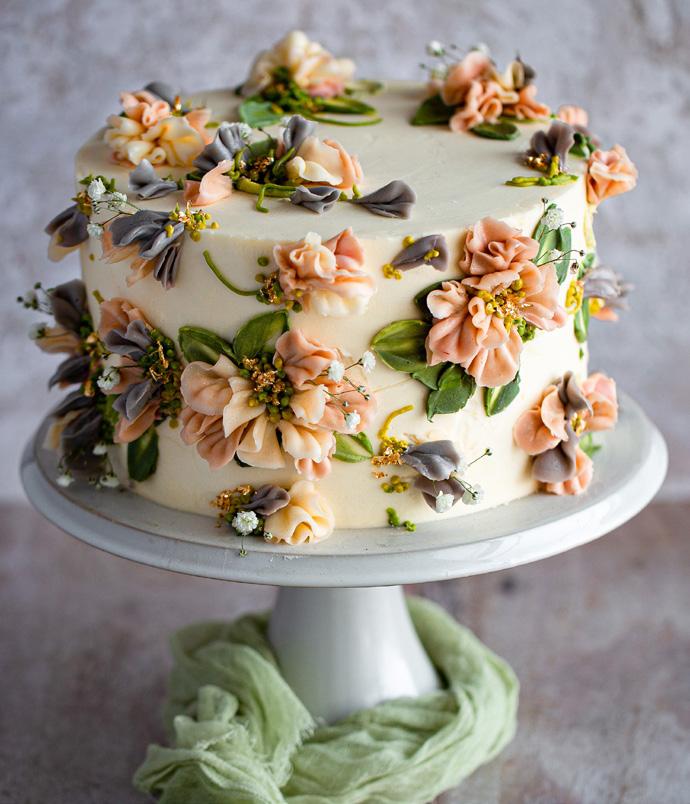
10 24 38 52 ON THE COVER
IN THIS ISSUE
KEY EXPERT:
CAKE Talk
Connect with the community here and on social media for irresistible cake inspiration, sweet giveaways, essential news, and exclusive offers.
EVENTS
THAT TAKES THE CAKE March 31–April 2, 2023 Round Rock, TX

A sugar-art show is a multifaceted event that brings sugar enthusiasts of all skill levels together from all over the country and all over the world. Competitors bring decorated cakes and sugar arts of all forms to enter into the judged competition. Instructors offer a variety of classes to beginner and advanced students who are interested in learning new techniques. Events throughout the weekend are scheduled to be informative and interesting to attendees of all ages. Attendees include pastry chefs, sugar artists, business owners, hobby bakers, and the general public. There is truly something sweet for everyone. For more information, visit thattakesthecake.org
Want more cake show coverage?
Check out all the 2023 shows on page 68.
ICING SMILES BAKER OF THE MONTH
December
JENNIFER TYLER
CAKE ARTIST OF THE MONTH


November December
November
4 americancakedecorating.com January | February 2023 NEWS, REVIEWS, & GIVEAWAYS
SHAHANA BAIG
JULIE MCALLISTER
ERIN DELATORRE
BOOK
New Releases in Cake Baking and Decorating
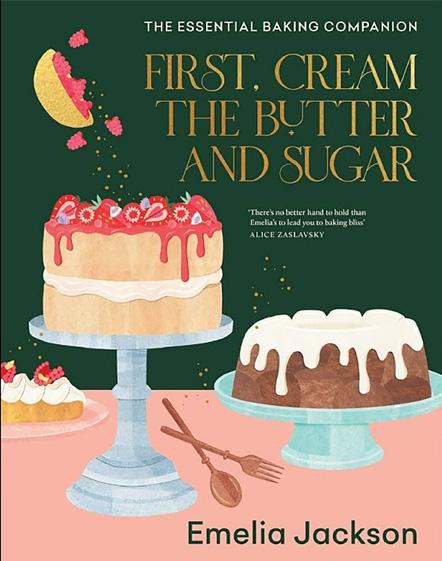
First, Cream the Butter and Sugar: The Essential Baking Companion
 By Emelia Jackson Murdoch Books (January
3, 2023)

Make baking your happy place. It’s not so much a science; it’s practice plus play, which becomes instinct and then art. And even the failures are delicious. Welcome to First, Cream the Butter and Sugar, the ultimate guide for everyone who loves cake. Whether you’re setting your sights on conquering an opera cake, a raspberry passion fruit tart, or becoming a choux-master, Emelia Jackson has done the homework on behalf of us all. For those who love a good homemade cake but don’t love sifting flour and icing sugar and enjoy a shortcut, Emelia breaks down the steps that truly matter and dispenses with those that don’t. Packed with advice for every level of home baker, this is the modern baking reassurance you need, whether it’s the night before the birthday party or just a Sunday afternoon baking something sweet to get you through the week.
Anyone Can Cake: Your Complete Guide to Making & Decorating Perfect Layer Cakes
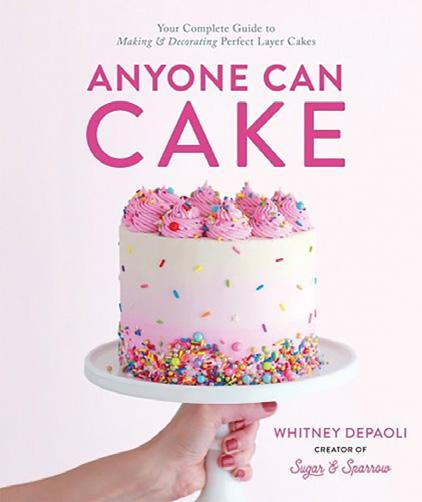 By Whitney DePaoli Page Street Publishing (February
28, 2023)
Many professional cake artists appear to have a magical touch where every cake they make looks equally perfect and effortless, so it can be intimidating to home bakers. Whitney DePaoli is here to help. As a self-taught cake artist who has been baking cakes from her home kitchen for more than a decade, Whitney shares her best tips and hard-won knowledge to answer all of your cake baking questions, help you avoid common mistakes, and master the building blocks that make a great cake. Discover the pride and joy of achieving the perfect consistency buttercream, the right way to crumb-coat your cake, and beginner-friendly methods for popular decorating techniques.
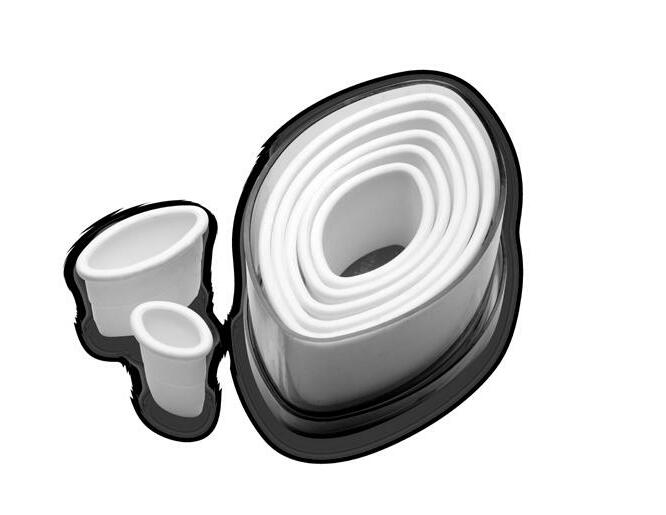
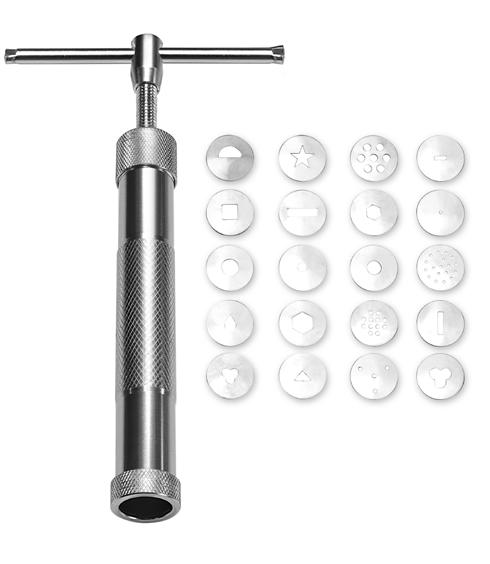
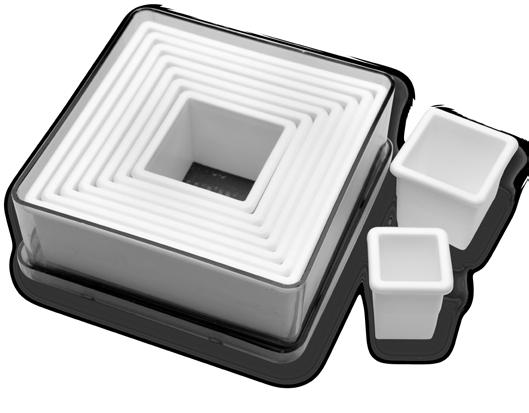
January | February 2023 americancakedecorating.com 5 NEWS, REVIEWS, & GIVEAWAYS www.atecousa.com Visit the Ateco website for all of our latest cake decorating tools and products. 7 Piece Plain Football Set No. 5755 7 Piece Plain Heart Cutter Set No. 5751 5 Piece Plain Star Cutter Set No. 5750 9 Piece Fluted SquareCutter Set No. 5703 7 Piece Plain Oval Cutter Set No. 5754 9 Piece Plain Square Cutter Set No. 5753 9 Piece Plain Round Cutter Set No. 5757 4 PIECE MODELING BALL TOOL SET No. 4213 FONDANT EXTRUDER WITH 20 DESIGN PLATES No. 558 ACD_V3_2.25.22.indd 1 2/28/22 3:14 PM
BUY THE
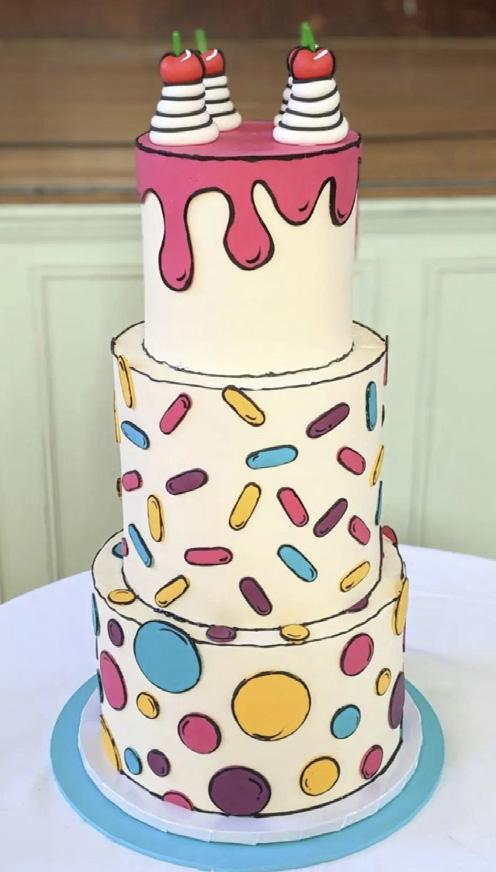
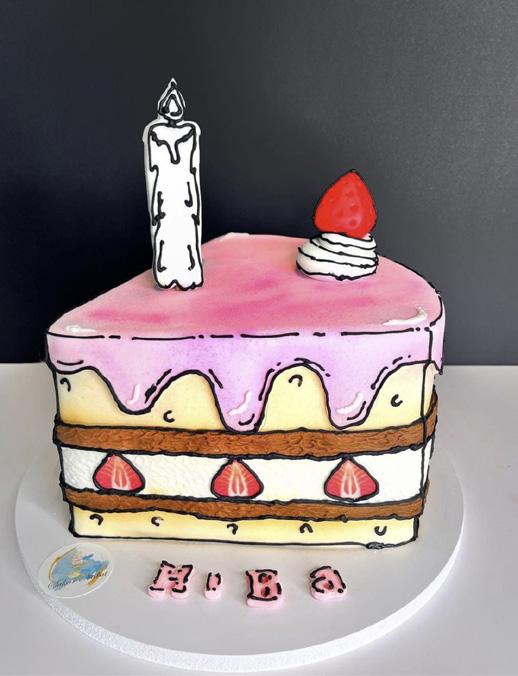
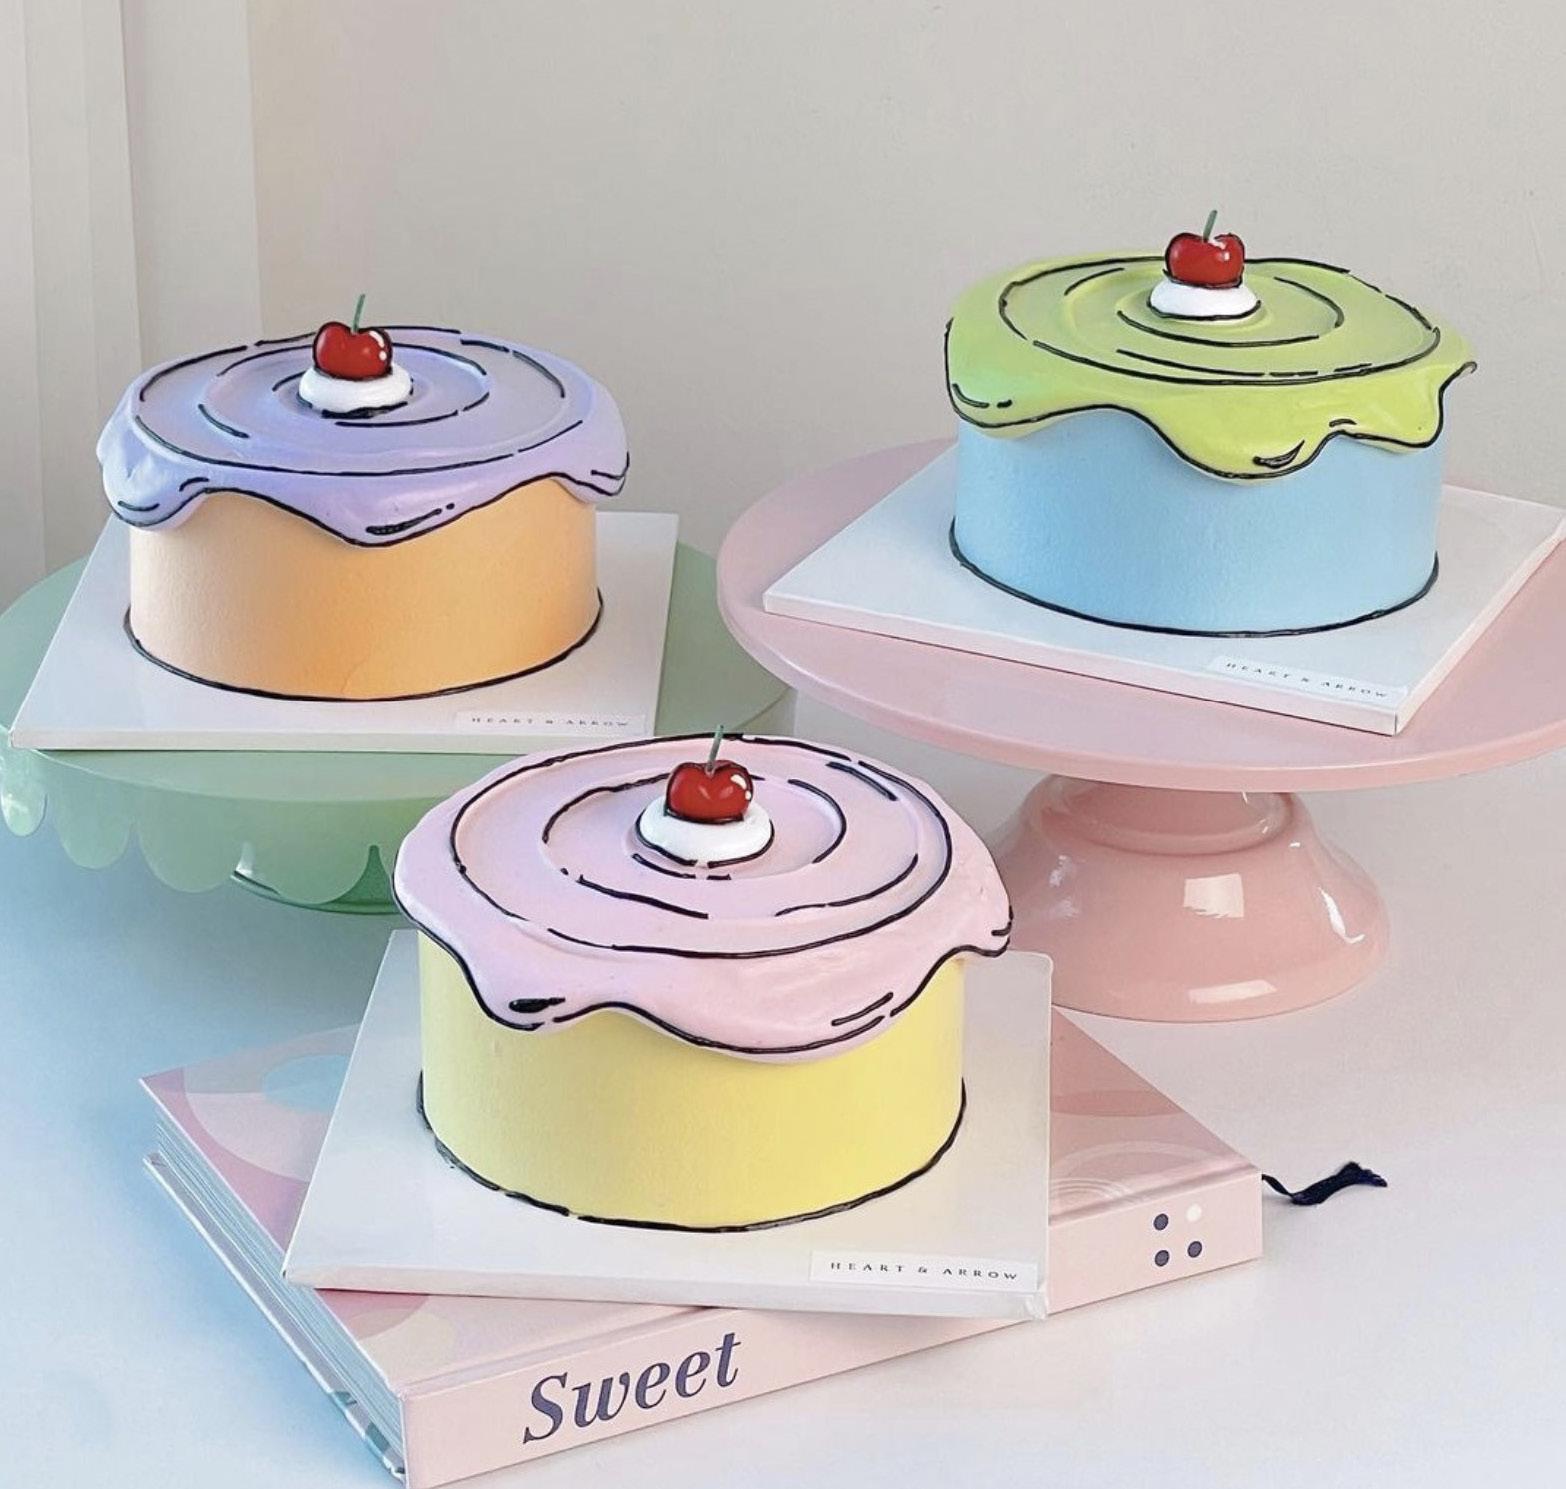
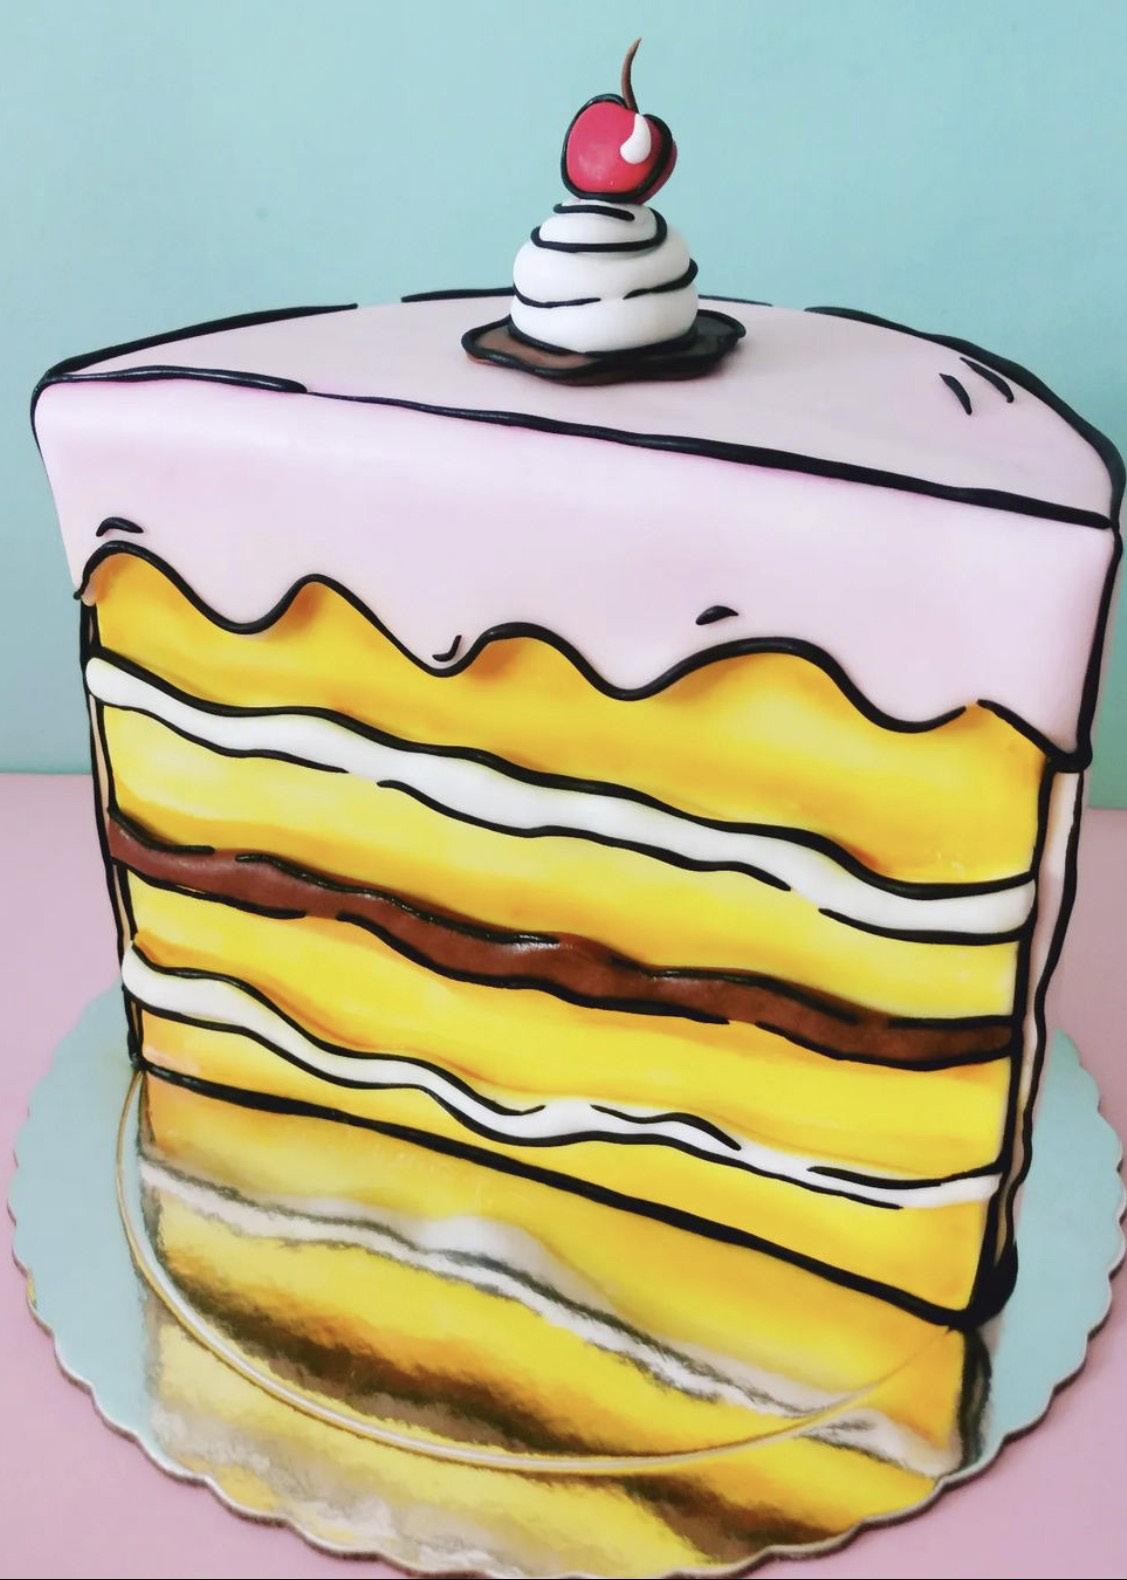
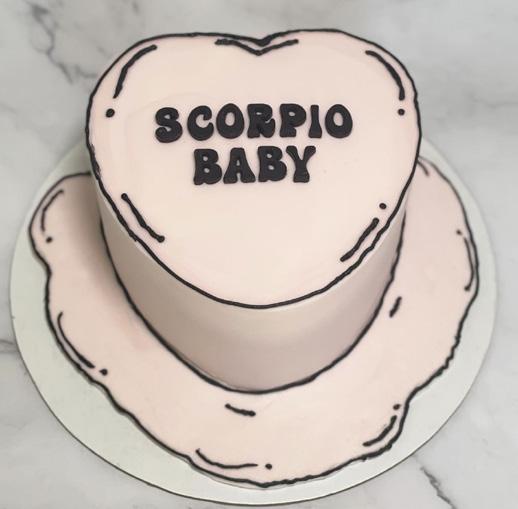
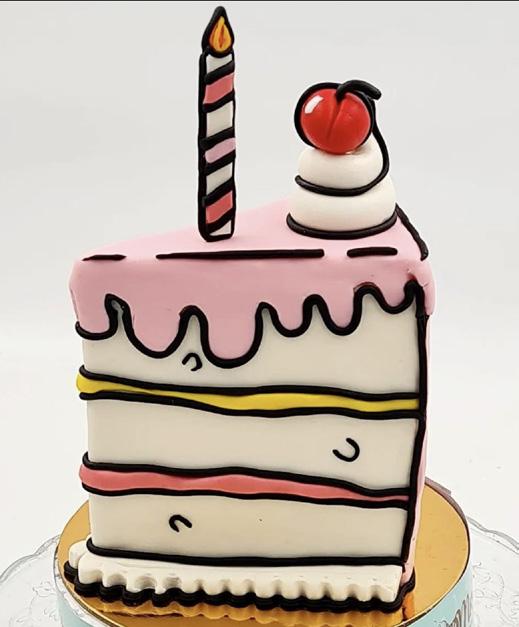
The cartoon cake trend is taking over social media—and artists are showing they are as real as can be!

And remember: Don’t forget to tag us on social media to possibly be featured in an upcoming issue.
6 americancakedecorating.com January | February 2023 READER GALLERY
Iced Bakery Piece of Happiness
Glance Bakery
Carla Feitosa
Fresh Bakery Dona
Terninha
Chez
Didi

January | February 2023 americancakedecorating.com 7 READER GALLERY facebook.com/AmericanCakeDecorating instagram.com/AmericanCakeDecorating
Natali’s Bakery Sukarnabat Cakes Moolita Cake
Cakes by Estee
Leonardo Espinoza
Heart and Arrow
Amy’s Little Cakery
Bites by M.E.
Paradisal Bite
Passion et Gourmandise
Sweet Studio
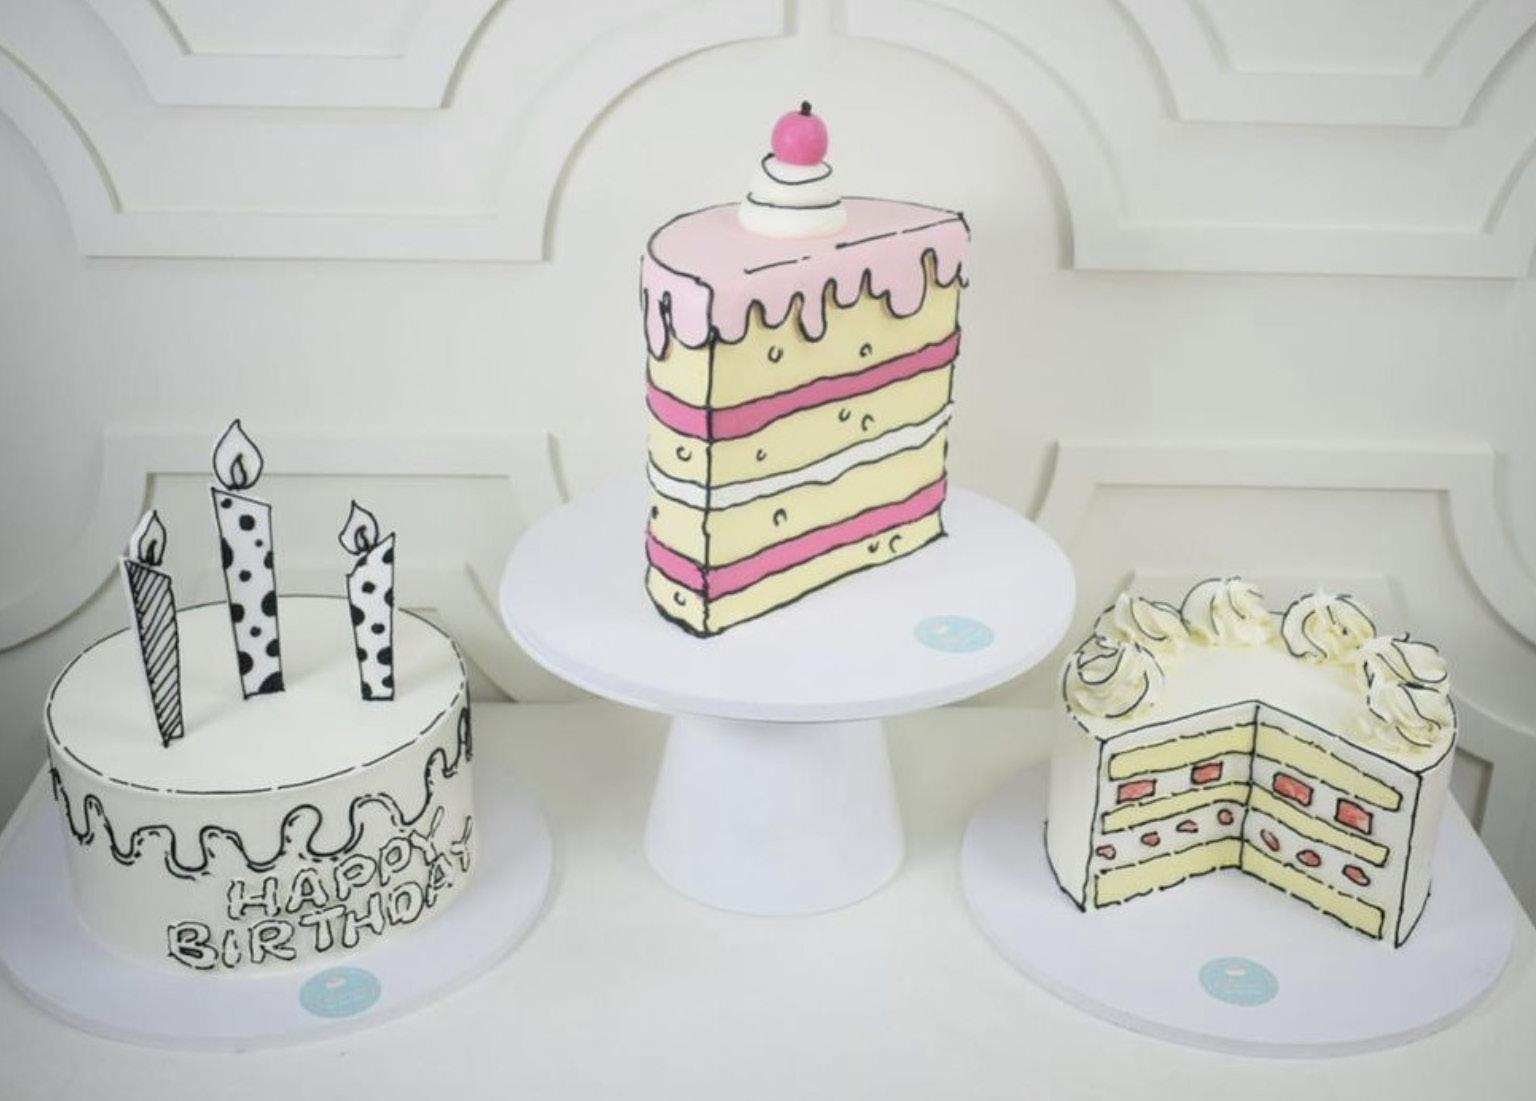
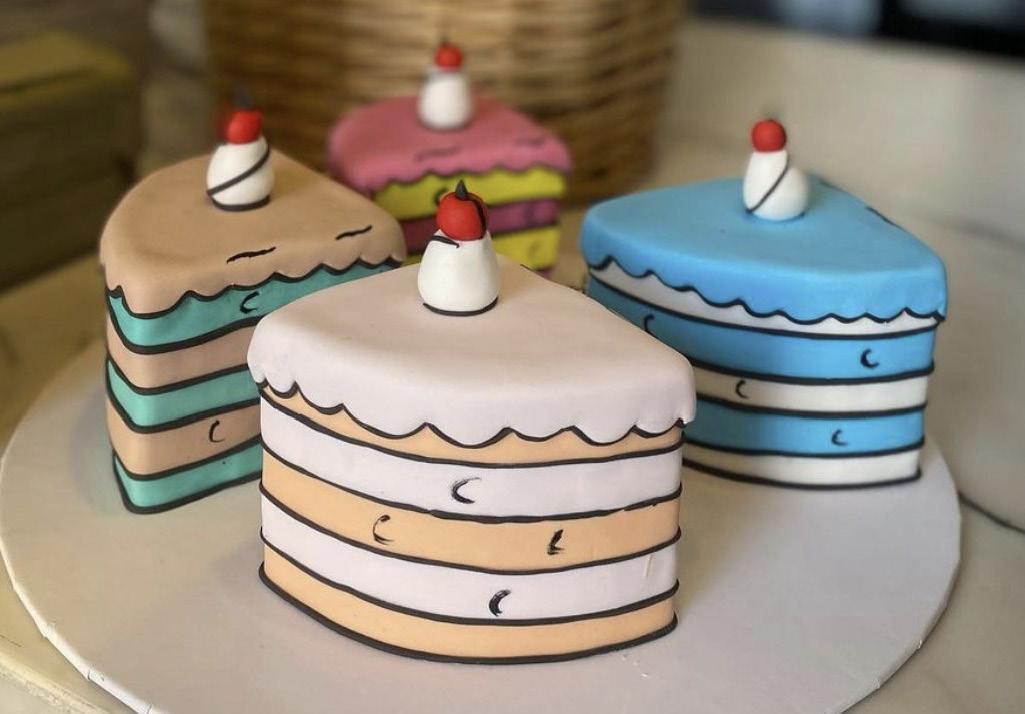
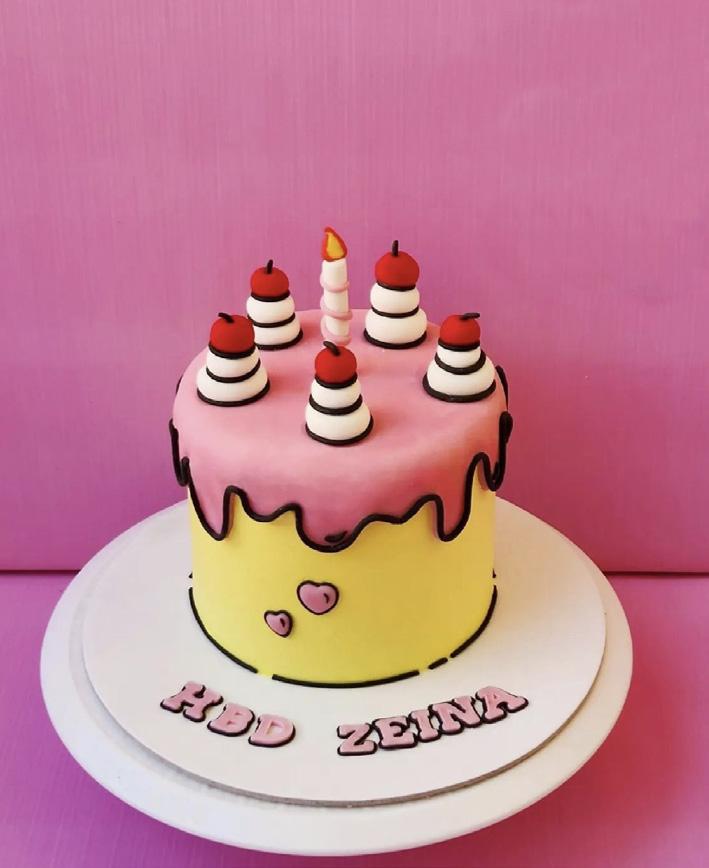
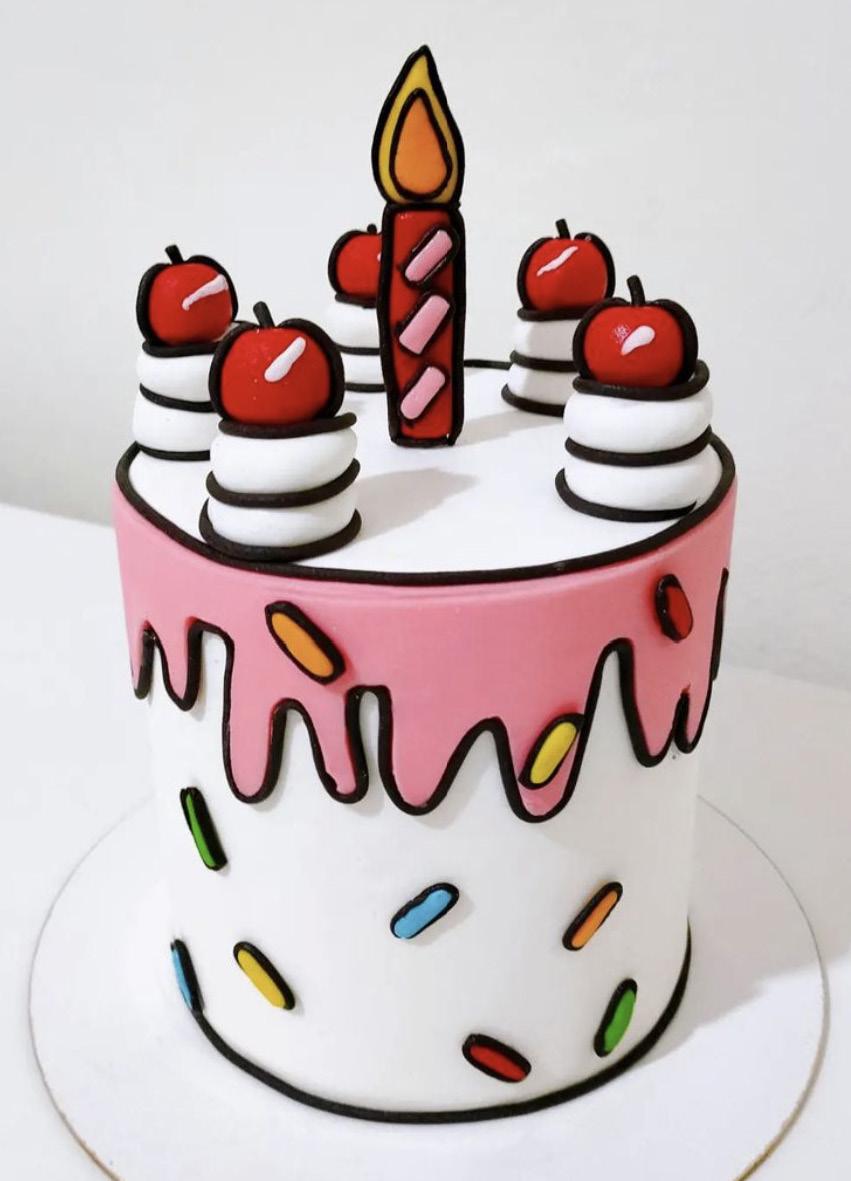
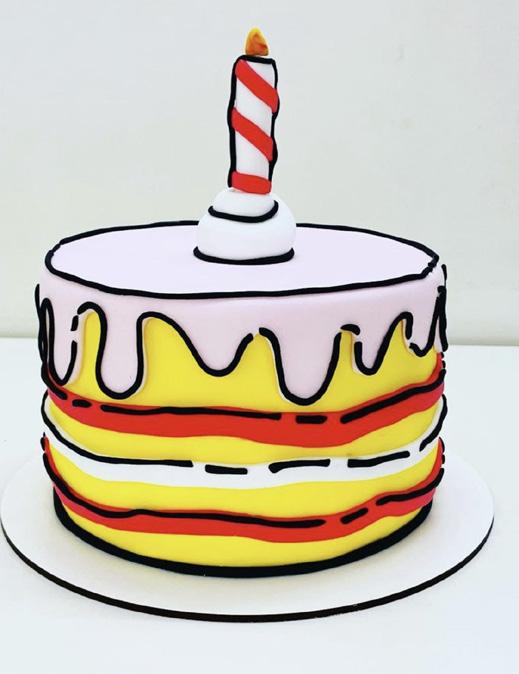
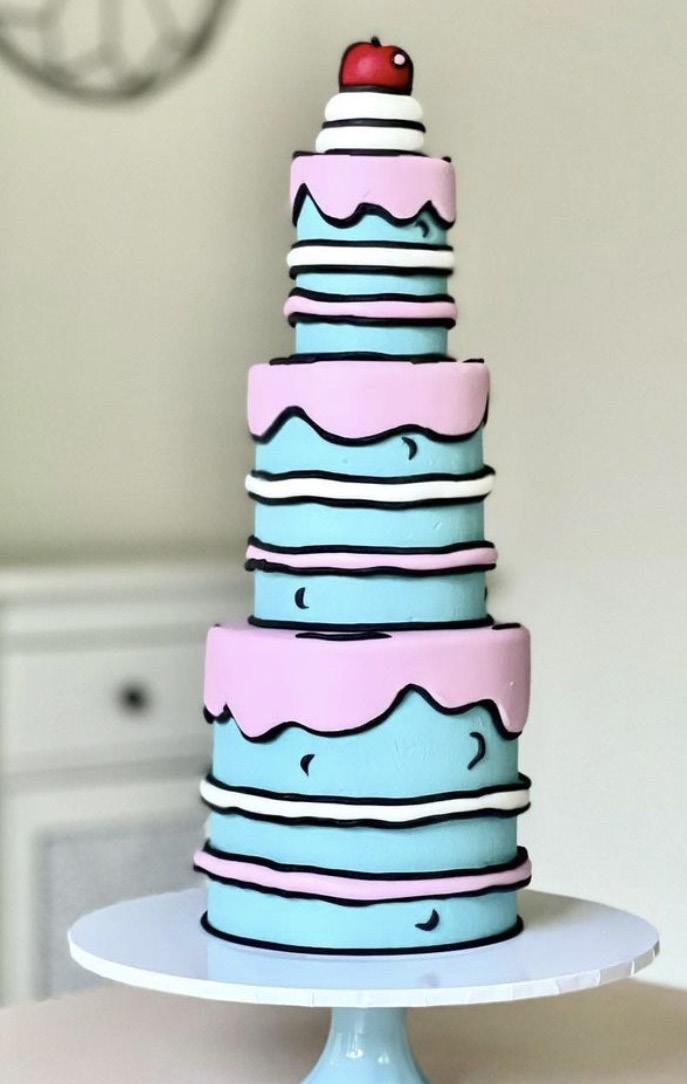
CARTOON CAKES
BY MS. CANDY BLOG
Differently Drawn Sweets
The Birth of the Cartoon Cake
One of the hottest cake trends currently making the rounds on Instagram and Pinterest is comic or cartoon cakes. The trend started to catch on thanks to cake artist Mopmuku on Instagram. On February 16, 2022, the user shared a video showing the assembly and decoration of a strawberry cake without naming or tagging it. As of mid-November 2022, the video had 600,000 views. Not much is known about this account that calls
itself a “community,” a label often reserved for accounts which serve as “aggregators,” or curators which repost other creators’ work.
Technique
The cartoon cake is a rather easy creation. Simply craft a cake as you normally would. Then, fill a piping bag with a dark frosting—chocolate could easily work. Outline your cake and its decoration with the frosting. A two-dimensional visual will occur, giving your creation a cartoon or comic effect.

MEET THE TRENDSETTERS
Ms. Candy Blog is Klout’s number one female livestreamer and a World of Wonder (the Emmy-winning production company of RuPaul’s Drag Race) award-nominated YouTuber. With a degree in English and two in theater, coupled with a background in corporate training and instructional design, she has worked for such brands as Google/YouTube, Yahoo!, J.P. Morgan, and American Express. Featured in The New York Times, Huffington Post, Vice, and The Guardian, she has appeared as a subject-matter expert on NBC and FOX. Her latest venture comes in the form of mind-blowing pastries from Blow Your Mind Bakery.

instagram.com/mscandyblog tiktok.com/@mscandyblog instagram.com/blowyourmindbakery tiktok.com/@blowyourmindbakery
Georgia Green of Georgia’s Cakes
“I saw this trend on Instagram and just had to try it myself. It was my birthday and I thought [it would be] a great cake to make to celebrate! I used to study animation, so making a comic cake made sense! I went straight for a three-tiered cake and absolutely loved the outcome!”
8 americancakedecorating.com January | February 2023 TREND ALERT
Mira Sleiman of Yummy Bakes
“It’s a super-fun and unique style! It truly looks like it’s coming out of a comic or cartoon show. Any cake can be turned into a comicstyle cake!”


Lori Baker of Sweet Dreams NY
“I always challenge myself to create illusion and gravity-defying cakes, so this was very exciting for me, transferring from 3D to 2D. To get the best results, I use a combination of materials and techniques: handsculpting with fondant, piping buttercream, and royal icing. And the best thing about it? The more imperfections the comic cake decoration has, the cuter it looks!”
What do you think of the comic cake trend? Is this something you’re currently creating or do you think you’ll incorporate them into your practice or business? ACD

January | February 2023 americancakedecorating.com 9 TREND ALERT
Thecakethat trendstartedthe from Mopmukucakeartiston Instagram.
the sweetest thing
BY ARATI MIRJI
Sweet peas are delicate and, dare we say, sweet additions to your sugar-flower repertoire. Follow along for some new quick techniques for creating these pretty little blooms.
LEVEL:
Arati Mirji is a sugar-flower artist from Bengaluru, India. She creates realistic and naturallooking sugar flowers with edible flower paste and has won numerous awards for her work. She also enjoys experimenting with materials, tools, and new techniques. In her studio, she is in in her happiest space, and the joy of re-creating some of nature’s wonders gives her immense pleasure. As a tutor, her practice helps grow this unique craft into an art form and she shares all the skills, old and new techniques, and personal experiences with others.

aratimirji.com facebook.com/arati.mirji instagram.com/arati.mirji
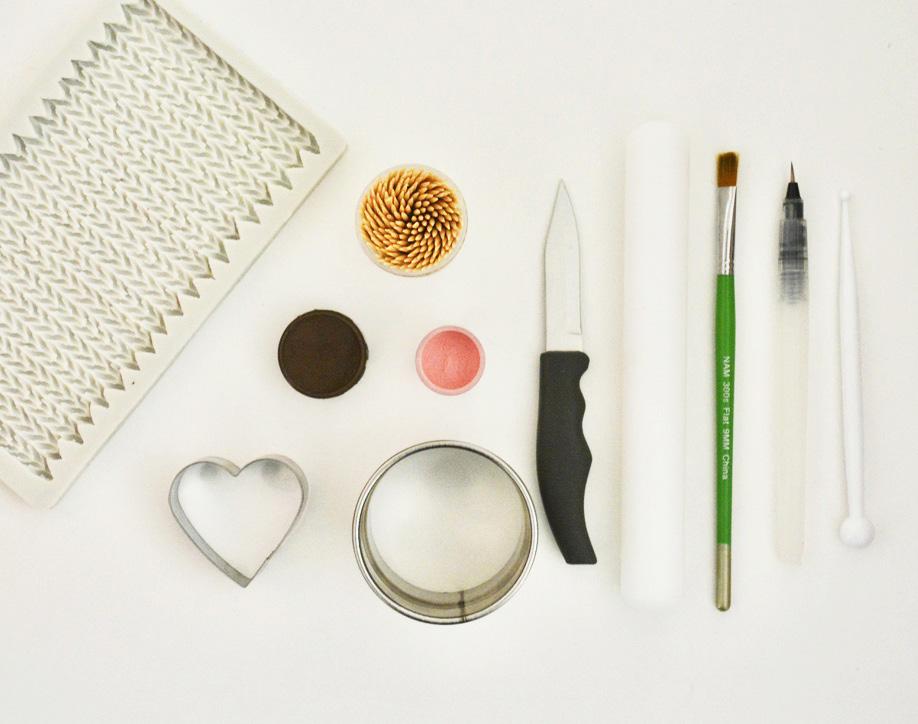
COMPONENTS
Edibles: Flower or gum paste: white and green Sweet pea flower veiners (Sugar Delites by Robert Haynes)
Water (optional)
Petal dust colors: buttercup, white, dusty pink, autumn green, and woodland green

Equipment: White floral wire: 18, 22, 26, and 35 gauge
Blunt-nose pliers Scissors
Quick Twiddle Tool (Arati Mirji) Foam pad (PME)
Paintbrushes
Rolling pin
Sweet pea cutters (FMM)
Petal protector
CelStick Needle tool
Soft sponge
Hockey stick tool
Bumpy foam
Calyx cutter
Dresden tool
Veining board
Teardrop cutter
Sweat pea leaf veiners
Green floral tape
10 americancakedecorating.com January | February 2023 MASTER CLASS

MASTER CLASS
WHAT YOU NEED CREATE THE KEEL PETAL
1. Take a 2-inch section of 22-gauge floral wire and make a hook with blunt-nose pliers.


2. Take a small chickpea-size ball of white flower or gum paste and place the hook into it, making it into a teardrop shape. Secure it to the wire by pinching it at the base.


3. Press the paste into the depression of the sweet pea keel veiner to shape it. Press the top of the veiner onto it. Cut out any extra paste with scissors.
4. Allow the finished keel petal to dry.
1
2 3 4
COVER THE WIRES
1. Take the Quick Twiddle Tool (QTT) with disc number 4 and fill with green flower or gum paste.


2. Holding the tool close to the foam pad, extrude the noodles so that they come out neatly without sticking to each other.
3. Take 1 of the noodles about 2 inches in length and place it right next to the wire to which the keel has been attached.
4. With the heel of your palm, give it a swift push away from you, so that the noodle gets attached to the wire by friction. You should get a neat, uniform, and consistent twiddle in a matter of seconds. If your noodle is a bit dry, you can apply a little water with a brush to the noodle or the wire and then use the same technique. There is no need to use any glue.
5. Allow the covered wire to dry completely. Repeat this process for as many buds and flowers you decide to make.
1 2 3
12 americancakedecorating.com January | February 2023 MASTER CLASS
Tip: THIS TWIDDLE IS CALLED THE AQT TECHNIQUE OR ARATI’S QUICK TWIDDLE TECHNIQUE.
3. Place the thinned-out outer petals into the veiner and press.
4. Repeat the veining with the inner petals as well.
5. Use a needle tool to exaggerate the frills by holding the petal on the bony portion of your index finger and rolling the needle tool back and forth.


4 5 2
FORM THE INNER AND OUTER PETALS
1. Using a rolling pin, roll out the white flower or gum paste, not too thinly, and cut out the inner as well as outer petals with the sweet pea cutters.


2. Place them inside a petal protector, dust liberally with cornstarch so that they don’t stick to the plastic, and thin out to extend the petals on all sides except the base with a CelStick.
6. Snip the inner petal in the middle to separate the 2 petals, ¾ of the length down.
7. Use a soft sponge and a hockey stick tool to curl the edges of the inner petal.
8. Dry the petals on the bumpy foam.
1 3
BUILD THE FLOWERS
1. Make a stronger glue by mixing a bit of the petal or paste in water to form a gel.
2. Apply the glue to the base of the keel petal and attach the inner petal.
3. Using the glue, attach the
January | February 2023 americancakedecorating.com 13 MASTER CLASS
4 5 6 7 8
outer petal as well and give it movement.
4. Take some of the green flower paste and roll it onto the second-smallest hole in the PME foam pad to make a cone shape.
5. Using the cutter, cut out the calyx.
6. Using the broad end of a Dresden tool, cup the sepals.
7. Using the narrow end of the Dresden tool, make a central ridge on the sepals.
8. Use the glue and attach the calyx at the base. Let it dry. 1
DUST THE FLOWERS
1. Mix buttercup petal dust with some white and apply it to the inner base of the keel, the inner portion of the inner petals, as well as that of the outer petals. Apply some at the base where the calyx meets the flower on the back.


2. Apply a bit of dusty pink petal dust on the outer edge randomly for the keel, inner base, as well as outer petals.
3. Apply autumn green petal dust on the calyx and the stem and highlight with woodland green. You can also highlight with a bit of dusty pink on the sepals and the stem.
MAKE THE TENDRILS AND LEAVES
1. Using the QTT extruder, disc number 2, and green flower or gum paste, cover 35-gauge floral wire cut in half with the same AQT technique used to cover the wire with paste for the stems.

2. Using the end of a paintbrush, curl the tendrils randomly.
3. Roll out green flower or gum paste on a veining board.


4. Cut out a leaf with a teardrop cutter, one big and one slightly smaller. Squish the cutter to get a more elongated leaf shape.

14 americancakedecorating.com January | February 2023 MASTER CLASS
1 2 3 3 7 8 4 2 5 5
5. Using 26-gauge floral wire, insert it into the leaves.


6. Thin out the edges with a Dresden tool on a foam pad.

7. Press the leaves into the veiners. Dry the leaves on the foam pad. 8. Color the leaves with autumn green and woodland green petal dust.


ASSEMBLE THE FLOWERS
1. Using green floral tape and 18-gauge floral wire, tape the flowers, buds, and tendrils together. I used 3 to 4 flowers and buds for each stem. Tape the length of the wire a couple of times to thicken the stem.

2. Similarly, tape the leaves, tendrils, and buds. ACD

January | February 2023 americancakedecorating.com 15 MASTER CLASS
1 3 4 2 2 5 6 7 8
1
Tip: YOU CAN EITHER STEAM OR GLAZE YOUR LEAVES IF YOU WANT. Interested intheQTT? Keepaneyeoutfor ittogoonsaleat aratimirji.com.
Let It LetSnow! It Snow!
Celebrate the winter season with the cutest sculpted gnome.
BY LAURA NEWHOUSE
LEVEL: COMPONENTS
Laura Newhouse always loved baking. In 2012, after having her first child, she thought it would be a fun hobby to learn to decorate cakes. After teaching herself to decorate, she started working at a couple of bakeries and then a local venue making custom wedding cakes. After welcoming her third child, she started her own business, Cakes by Laura Newhouse. To her, there is nothing more satisfying than a smooth buttercream canvas. Perfecting her sharp buttercream edges has become her specialty. She enjoys creating anything from fondant figures to intricate buttercream flowers and she loves sharing her tips and tricks with other cake artists to help them improve their skills. She looks forward to someday teaching her own classes. instagram.com/cakesbylauranewhouse
Edibles: Three 5-inch cakes Buttercream 4-inch cake 3-inch cake Rice cereal
Fondant: dark gray, light blue, white, ivory, medium blue, and brown (Renshaw)
Edible glue
Petal dust: pink, dark brown, light brown, and white (Petal Crafts) Tylose powder (Wilton)
Royal icing Wafer paper
Pearl luster dust (Sunflower Sugar Art)
Equipment: Dowels
Cardboard rounds Sharp knife Flexible smoother Rolling pin Dresden tool Paintbrush
Knit impression molds (Marvelous Molds)
Cocktail sticks Tape
Let It Snow stencil Straight edge Snowflake cutter Food processor Cake drum
TUTORIAL
16 americancakedecorating.com January | February 2023

TUTORIAL
BUILD THE GNOME
1. Start off by stacking and filling three 5-inch cakes with buttercream. Add 3 dowels and a 3-inch cardboard round off center toward the back of the cake. Stack the 4-inch cake on top of the cardboard, followed by the 3-inch cake.

2. Press a center dowel through the cake and into the board, leaving 2 inches exposed. Use a sharp knife to carve the top edge of each layer, carving it into a cone shape.


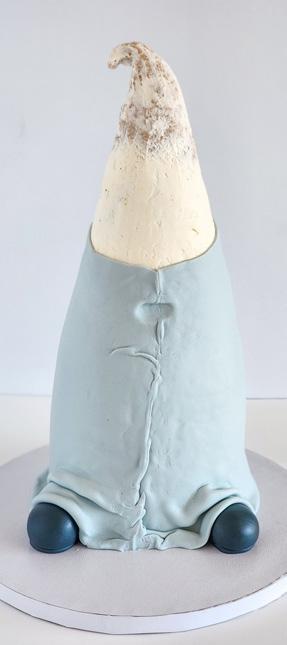
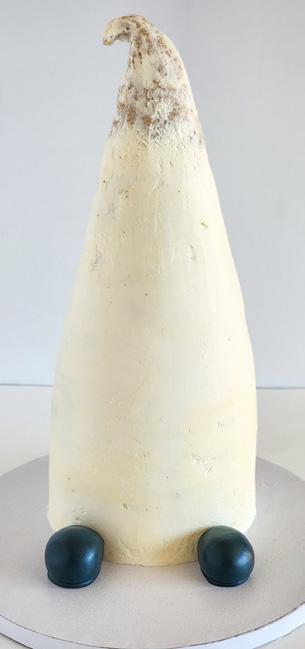
3. Roll rice cereal treats into a teardrop shape and curl the point over. Press this onto the top of the center dowel.
4. Cover your cake in a thin layer of buttercream, using a flexible smoother to smooth it out.
4
attach them to each side of the nose indent. Use the Dresden tool to score the hair.

7. Roll out ivory fondant into a ball to make the nose and attach it with edible glue. Using a paintbrush, dust the nose with pink petal dust.

1
ADD THE DETAILS
1. For the boots, roll out dark gray fondant into a sausage shape. Press it down in the center and then cut it to make the boots. Using a Dresden tool, score a line around the bottom of each boot.
2. Place the boots on either side of the cake, leaving room in the middle for the beard.
3. Roll out a large rectangle of light blue fondant. Center your rectangle at the back of your cake, bringing each end to the front. Fold your fondant around the boots, making sure all of your cake is covered. Pinch the seam to the center and trim it. The beard will be covering the seam, so it doesn’t have to be perfect.
1 5 2&3
4. Make an indent where your nose will be. Roughly shape your beard out of white fondant, making sure it’s long enough to go from the nose to the board. Using edible glue, attach the beard underneath the nose indent.
5. Use the Dresden tool to score the hair.
2 3 4
18 americancakedecorating.com January | February 2023 TUTORIAL
6. Roll out white fondant into 2 long teardrop shapes and
CREATE THE HAT
1. For the hat, press medium blue fondant into a knit mold and repeat 2 more times.


2. Place the first piece of fondant on the front of the cake, directly above the nose. Add the other 2 pieces of fondant. Fold the knit mold in half and gently press on the seams to blend them in.

3. Roll out some white fondant into a large noodle to wrap around the bottom of the hat. Attach it with edible glue. Using 5 cocktail sticks taped together, make little swirls in the white fondant to give it a fluffy look.
4. For the pom-pom, roll out a ball of white fondant. Use cocktail sticks to fluff it. Using a cocktail stick with edible glue, attach it to the side of the hat. Press the point of fondant coming off of the hat into the top of the ball.


FORM THE SIGN
1. Roll out some brown fondant mixed with tylose powder. Use dark brown, light brown, and white petal dust and brush them back and forth to give it a worn wood look. Hold your stencil firmly and spread a thin layer of royal icing across it.

2. While your icing is still soft, immediately cut your sign out. Use your straight edge to score lines horizontally to make it look like wood boards.
3. Cut a long rectangle for the post of your sign. Brush it with petal dusts from step 1 and attach to the bottom of the sign. Insert a dowel through the post and into the bottom of the sign. Set it aside until completely dry and firm.
January | February 2023 americancakedecorating.com 19 TUTORIAL
1
2a
4b
6&7
2b
3
4a
1
MAKE THE MITTENS
1. Roll out an oval of medium blue fondant. Using your finger, press halfway down to make an indent. Roll the piece below the indent between your fingers to make a thumb.


2. Press your glove into the knit impression mat. Fold the mat in half and press it into the sides.

right under the hat and bend it slightly so the bottom is just starting to go over the beard.
2. For the other arm, bend it halfway down and use cocktail sticks to keep it in place. You want an inch or so to be sticking straight out to hold the sign. Using a cocktail stick, attach your glove and score it halfway down. Bend the glove around the handle of the sign and attach it with edible glue.
3. Roll out a small amount of white fondant into a noodle. Wrap it around each glove and use cocktail sticks to fluff it.
FINISH THE CAKE
1. Using your snowflake cutter, cut out 15 to 20 snowflakes. Using edible glue, attach them to the hat and press o1 on to the top of each glove and either side of the sign.

2. Run 4 sheets of wafer paper through a food processor. Sprinkle in some pearl luster dust to give it a shine. Cover your board in royal icing and then sprinkle the crushed wafer paper over top. ACD

ADD THE ARMS
1. Mix some of your light blue fondant with tylose powder. Roll it into 2 logs roughly 3 inches long. Using cocktail sticks and edible glue, place 1 of the arms along the beard


20 americancakedecorating.com January | February 2023 TUTORIAL 2&3
3
1 1 2
1 2 2


TUTORIAL MASTER THE ART OF AMOROUS CAKES, BAKES, & SWEETS JAN FEB 2022 • ISSUE 436 Add lacetextured using a silicone mat. Love Love WITH LUXURIOUS LACE BUTTERCREAM PLUS, SCENESBEHIND-THELOOKS AT: A ROYAL WEDDING NEXT-GEN BAKERS MONEY MANAGEMENT IS IN THE AIR PAGE 22 30th ANNIVERSARY f 12 ROMANTIC TUTORIALS Make your own chocolate sculpture. AmericanCakeDecorating.com/shop Grab a P rint or D igital Issue! MASTER THE ART OF AMOROUS CAKES, BAKES, & SWEETS JAN FEB 2022 • ISSUE 436 Add textured lace using a silicone mat. Love Love WITH LUXURIOUS LACE BUTTERCREAM PLUS, BEHIND-THESCENES LOOKS AT: A ROYAL WEDDING NEXT-GEN BAKERS MONEY MANAGEMENT IS IN THE AIR PAGE 22 30th ANNIVERSARY f 12 ROMANTIC TUTORIALS Make your own chocolate sculpture.
FINDING INSPIRATION FINDING INSPIRATION
I have a confession: I was struggling. I wasn’t creating art because I was caught in a tangle of self-imposed, misguided, and limiting thoughts. I was searching for inspiration and thinking I had to develop my very own technique that had never been done before. I thought if I didn’t accomplish being completely original, I’d risk being labeled a copycat or, worse yet, a thief. In the hopes of freeing myself from this mental entrapment, I decided to have discussions with some friends who are well respected in the sugar-art world. I sought their advice and thoughts on the subjects of inspiration and originality.
Lisa King is a national teacher, a certified judge, and an awardwinning sugar artist who fell in love with the sugar arts 14 years ago. She’s the owner of Cake Frolic, LLC. Lisa enjoys working with many types of sugar-art mediums in creating her cakes, cookies, and other sweet creations. Her latest endeavor is focusing on her new educational blog cakefrolic.com and creating online content and video classes.
facebook.com/CakeFrolic instagram.com/cakefrolic
BY LISA KING
EVERYTHING HAS BEEN DONE BEFORE
One of the most eye-opening discussions I had occurred one evening while having dinner with friends and family. I explained my dire situation: How can I create something new and original when I didn’t have an idea of what that could possibly be? Would I need to create something brand new, an unheard-of technique that others don’t incorporate into their own work?
Chef Nicholas Lodge reassured me that I didn’t need to develop a new technique or product. He said, “Everything has already been done before.” He explained I just needed to use the techniques I know and create new things from those. What?!
I don’t have to develop a product or technique no one has seen or done
before? And just like that I was free, released into a world of limitless possibilities.
When you begin the journey of learning how to decorate cakes and cookies or creating sugar art in the mediums you enjoy, you first begin by taking classes. The teacher has particular designs and you learn the techniques by copying the projects you’re taught. You’re copying the project in class because you’re learning the techniques.
So, how do you create something original after you have learned the various techniques? After learning new skills, you first look for inspiration.
INSPIRATION IS EVERYWHERE
The awesome thing is that inspiration is everywhere! Once I have an idea,
22 americancakedecorating.com January | February 2023 ASK THE EXPERT
I begin by doing some research. I do an internet search on my idea. I look at clip art, paintings, drawings, real images, and anything else that brings me joy. I collect the things I love from each. I tend not to look at other people’s sugar art for inspiration while in research mode. When I’m not in research mode and I see something that someone has done that I love, I make a note of it and add that particular aspect of it to the things that I love and inspire me.
I then give thought to how I could
represent the parts I love and create my piece using techniques I know. Before you get to the hands-on work of it, design your art on paper or using technology. This will help you fully realize all the tools in your chest, utilizing what you know and the skills you have. It allows for less frustration while creating because you won’t have to make things up as you go. It also leads to a more complete realization of your vision because you’ll have included the things that you love and were inspired by. Trust in yourself and the
process of creation.
My hope is that these ideas free you from feeling like you’re not creative and that you’re only capable of completely replicating another person’s creation. You have it within you to be original too. It just takes some extra work and imagination to develop your design. Through this process, you’ll learn about yourself and what you are drawn to. This is how you develop your voice and your very own style.
Now, get to it! You are free! The world needs you! ACD
>> Collect things you love that inspire you. These could be ideas, photos, feelings, etc.
>> Practice the techniques you learn and use them to create your own works of art.
>> Be free and create the art you want to see in the world.
Believe in yourself.
January | February 2023 americancakedecorating.com 23 ASK THE EXPERT
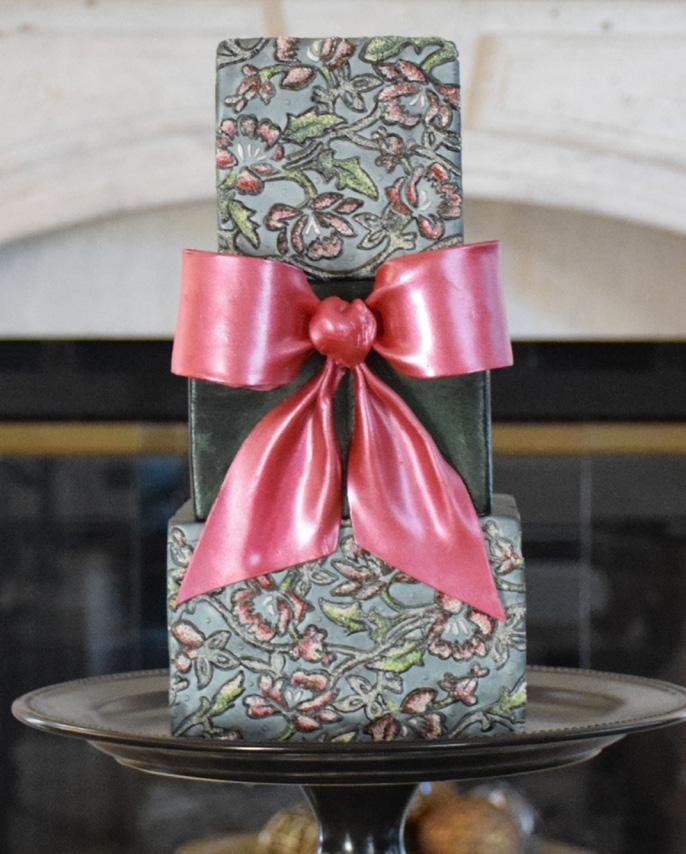
textured florals textured florals
MAYRA ESTRADA
Mayra Estrada is the owner of Cake Creations by Mayra Estrada, a home licensed bakery located in Granada Hills, CA. After taking the Wilton courses in 2010, she pursued her passion and continued to teach herself. She specializes in fondant techniques and sculpting. Today, she can proudly say that she is a multiaward winner for her wedding cakes and has been featured in worldwide magazines. She freelanced for Charm City Cakes West in Los Angeles owned by Chef Duff Goldman and has competed on the Food Network, with her first appearance on Holiday Wars in 2018. In 2019, she launched Zeoto Pen, a heat decorating pen for cakes. In 2020, she competed for the second time on the Food Network in Cakealikes, creating a life-size version of Lady Gaga, and won!
zeotopen.net facebook.com/CakeCreationsByME facebook.com/zeotopen instagram.com/cakecreationsbyme instagram.com/zeoto_pen
LEVEL:
COMPONENTS
Edibles: Fondant (Satin Ice) Cornstarch


Vegetable shortening Royal icing Various gel food colors Vodka
Airbrush colors: pearl sheen and red (AmeriColor)
Gum paste (Satin Ice) Piping gel Melted chocolate
COVER THE TOP AND BOTTOM TIERS
1. Thinly roll out a piece of fondant using the same color as the fondant already on the cakes. Sprinkle it with cornstarch
Equipment: Rolling pin
Floral die (Spellbinders) Fondant smoother Cake board X-Acto knife Piping bags Airbrush Paper towel tube
to keep it from sticking to the die.
2. Place the die onto the fondant and apply medium pressure using a fondant smoother or a rolling pin. In order to cut the correct size needed, use a cake board
24 americancakedecorating.com January | February 2023 TUTORIAL
There are so many tools you can use to create texture for unique and beautiful designs. This cake is made using a die and royal icing to create a delicate floral pattern.

the same size of the cake and cut it a bit larger than the board.
3. Using vegetable shortening, prep the surface of the cake to apply the design. Once the piece of fondant is applied, trim off the excess using an X-Acto knife and blend in the edges.
4. Repeat Steps 1 through 3 on all sides of the top and bottom tiers.
Tip: WHEN APPLYING LARGER PIECES OF FONDANT, USING SHORTENING MAKES IT EASIER TO ADJUST THE PLACEMENT IF NEEDED (RATHER THAN PIPING GEL OR WATER).
CREATE TEXTURE ON THE TIERS
1. Make royal icing with a medium consistency. Color some of the royal icing with gel food color.
2. Using black royal icing, pipe the outline of the die design to create a border.
3. After the entire outline is completed, use white royal icing to pipe lots of tiny beads to create a textured look. Set the cake aside to dry and repeat Steps 1 and 2 on the second tier using the same method.
4. Once the royal icing is completely dry, use various gel colors to paint the beads. If your gel colors are a bit thick, use a little vodka to dilute them so they can dry fast. It’s important to keep out as much moisture when painting to avoid your royal icing from dissolving. Allow to dry completely.
5. For the final touch, airbrush the entire cake with pearl sheen airbrush color.
ADD THE MIDDLE-TIER BOW
1. Mix gum paste with some fondant to create flexibility, aiming for about 20% of the mixture to be fondant.
2. For the top portion of the bow, cut out 2 strips of fondant and use a paper towel tube to hold the shape. Use piping gel to secure the ends and pinch them.
3. For the ribbons, cute out 2 large strips, pinch them on 1 end, and cut them at an angle on the bottom. Allow them to set overnight to dry.
4. Airbrush the bow with red mixed with pearl sheen for a beautiful luster.
5. Once the bow is dry and ready, apply a small portion of melted chocolate on the back and hold it in place until it’s dry. ACD

Tip: WHEN COLORING ROYAL ICING, MAKE SURE TO ALWAYS USE GEL OR POWDER FOOD COLORS.
26 americancakedecorating.com January | February 2023 TUTORIAL
Wafer-Paper Birch Tree
BY AAISHA SUMBUL

TUTORIAL
Use wafer paper and gum paste to create a woodland scene.
LEVEL: Edibles:
COMPONENTS
10-inch square cake, covered in white fondant
6-inch round cake, covered in white fondant
Airbrush colors: autumn gold, brown, green, and red Gum paste

Petal dust: leaf green, red, dark brown, and pale yellow
Equipment:
Wafer paper
Water
Airbrush
Paintbrushes
Circle cutters
Floral wire: 26 and 30 gauge
Paper towel
Floral tape: white and brown
Small Styrofoam buds
Soft foam pad

Dresden tool
CREATE THE BIRCH TEXTURE
1. Roughly tear strips of wafer paper approximately 1 inch in width. Size may vary to give a more natural look.
2. Brush the fondant-covered cakes with water and place the strips on the fondant vertically around both cakes. Make sure to leave the edges slightly open to give a more natural bark look.
3. Using an airbrush, color the space between the strips with autumn gold, followed by brown. Then, highlight some parts with green on the bark to give a more natural look.

4. Using a fine paintbrush, highlight the edges with more brown and add detailing texture.
5. For the tree trunk front, cut wafer paper the same circumference as your round cake, apply water, and stick it onto the front.
6. Airbrush with autumn gold and use brown to highlight and give a texture look.
7. Using circle cutters of different sizes, make markings on the cake so it looks like a wood rings and paint it brown. 1 3 4a
Aaisha Sumbul is an award-winning cake artist, chocolatier, sugar florist, and the owner of Choconest and Edible Bouquet. Previously based in Nairobi, Kenya, she won several awards at The Cake Festival Cake competitions. Aaisha is the brand ambassador of the Cake Collective for India and East Africa. She loves hosting cake collaborations that have some message to society like tribal culture, women’s rights, melanite, and Ocean Day. She has done many online and offline demos, classes, and workshops internationally on her forte: sugar flowers. Her love for waferpaper flowers is beyond imagination and she loves modeling and trying new things in sugar craft. Aaisha owns a food-grade brass stamp line called Impressions by Aaisha Sumbul and routinely gets featured internationally for her work and tutorials in different magazines and newsletters. Aaisha is also the Kenyan Cake Festival Igniting Skillshare Ambassador and has enabled the 2022 novel global skill-share series that will hopefully grow exponentially and impact baking and decorating skills in Kenya.

facebook.com/ashisumbul
facebook.com/impressionsbyaaishasumbul
facebook.com/Choconests
28 americancakedecorating.com January | February 2023 TUTORIAL
MAKE THE SEEDED EUCALYPTUS
LEAVES
1. Between your palm and forefinger, roll a tiny piece

of white gum paste into a teardrop shape. Insert a hooked 30-gauge floral wire dipped in edible glue and pinch it at the bottom to make sure it is secured. The seeds should be dry in 2 hours or less depending upon the humidity.


2. When dry, dust the bottom part of the seeds with leaf green petal dust on a paper towel. Make a bunch of 3 to 4 seeds and secure them with white floral tape.


3. For the leaves, airbrush wafer paper a soft green.


4. Cut 30-gauge floral wire into 1½-inch-long segments with pliers.
5. Cut a strip of the green wafer paper around 8 inches long. Brush a light coat of water on the white side of the wafer paper and place the wires on one side, about ¾ of an inch up from the bottom. Carefully fold the second half over, press firmly to make sure they adhere together, and set them aside to dry.
6. After drying, cut the strips in the shape of eucalyptus leaves.

7. Arrange the leaves and bunch of seeds on a 24-gauge floral wire with white floral tape.
3, 4, &5

January | February 2023 americancakedecorating.com 29 TUTORIAL
1 6 7 2a 2b 4b 7 6 5
ROLL THE BERRIES
1. Airbrush wafer paper red and cut it into small square pieces.


2. Gently brush the back side of the squares with water and cover round Styrofoam buds. Cover each bud with 1 to 2 layers.
3. After they dry, dust the buds with red petal dust and cover the wire with brown floral tape.

Dresden tool and starting on the center of the leaves, put gentle pressure on the leaves and press toward the pointed ends to give them shape and character.
5. Apply a little water with the paintbrush on the bottom edge of a sepal and place it against the wire of 1 of the Styrofoam buds. Repeat the process 3 more times.
6. Take another strip of browncolored wafer paper, apply water on the white side, and fold it horizontally to have a thick strip with brown on both sides. Cut semicircles out of the strip, slightly more elongated on 1 side.
7. Apply a little water at the bottom and place them in between the buds.
8. For the center, cut a small shape similar to the sepal and make 3 to 4 incisions halfway down and fold them.
CREATE THE COTTON FLOWERS


1. Cut wafer paper into square pieces, gently brush them with water on the plain side, and cover round Styrofoam buds. Repeat the same process to create 2 layers per bud.

2. To form a flower base, join 4 buds together and wrap them with brown floral tape.
3. Color some wafer paper with brown airbrush color and cut them into leaf shapes.

4. Turn the leaves over and place them on a soft foam pad. With the help of a
9. Apply a little water to the bottom and insert it into the center of the 4 buds.
10. Dust the bottom of the sepals and the tips with dark brown and the inside of the sepals with pale yellow.
30 americancakedecorating.com January | February 2023 TUTORIAL
1&2 3 1 5 2 6 7 3 4


January | February 2023 americancakedecorating.com 31 TUTORIAL 1 8 2 9 10 ASSEMBLE THE SPRAY
To
tape. 2. Create
and
ACD Tip: YOU CAN PLAY AROUND WITH DIFFERENT ARRANGEMENT OPTIONS.
1.
create twigs, cover floral wire with brown floral
a spray with all the various twigs, leaves, buds,
flowers as desired.
7 7WAYS BAKING CAN BOOST YOUR MENTAL HEALTH

 BY BETH RUSH
How does baking help with mental health? Baking is an art and a science— and the process can be healing when you feel down. Creativity, concentration, and socialization come into play when working in the kitchen. The psychology of baking can be a powerful tool to boost your mood on bad days or as part of a greater treatment plan. You can certainly visit your local bakery, but baking these foods yourself can make you feel much better. Here’s why.
1IT RELEASES STRESS.
You might be wondering, “How does baking help with stress?” If you’ve never taken out your anger on some bread dough, you should try it. Bread and other baked goods need tough love to activate the gluten and form their desired texture before entering the oven. Did you have a bad day? Make some dough that you can punch and knead to release your frustrations. The bonus is the delicious treat that comes afterward.
Beth Rush, the content manager and managing editor at Body+Mind, is well-respected in the mental health, nutrition, and fitness spaces. In her spare time, Beth enjoys trying out new recipes and going for runs with her dog.

facebook.com/bodymindmag instagram.com/bodymindmag/ twitter.com/bodymindmag linkedin.com/in/beth-rush-writer/
2YOU USE YOUR CREATIVITY.
Using your creativity helps occupy your mind when it goes to negative places, boosting your mood and energy levels. You can get creative with your recipes, adding different flavors, fillings, and toppings until you have a creation that’s all your own. Also, have fun decorating your products with sprinkles and frosting and use cookie cutters that make you happy. Be sure to brag about your baking skills to your friends and family, even if it’s not perfect. Just taking the time to heal in a healthy way is something to take pride in.
32 americancakedecorating.com January | February 2023 ASK THE EXPERT
3IT BOOSTS YOUR CONFIDENCE.
Making an enjoyable treat for you or others can help boost your confidence and self-esteem. Take pride in using ingredients to create something that can fuel you or someone you care about and bring joy. Knowing you can make something delicious can make you feel better after a gloomy day.
4YOU’RE DOING GOOD FOR OTHERS.
Research shows
that doing a good deed makes you happy. Baking for others can help you feel more positive when you’re feeling down. It doesn’t matter how fancy it is—making something that someone else can enjoy can bring you happiness. That’s especially true when you get positive feedback.
5IT IMPROVES FOCUS.
Adverse mental health leads to poor concentration. Focusing on conversations, work, and other daily tasks can be hard. With a recipe you must follow to get your desired results, baking simplifies things. Doing so lets you work on easily building your concentration. You have to follow the instructions—or you’ll end up with a bad-tasting, burned, or undercooked dish.
6IT CAN MAKE YOU MORE SOCIAL.
Joining a baking class or a social media group can help you feel less alone if you isolate yourself from others due to your mental health. Baking isn’t a controversial topic, so it’s an easy subject to broach with others who enjoy the hobby. Share recipes, ask for advice, and plan events. Before you know it, you’ll make a group of new friends. You can also welcome someone new to work or events by baking them something. Cookies and pies make great icebreakers for conversation. If you have family or friends nearby, consider inviting them over for a night of baking to help you reconnect.


7IT HELPS YOU REMAIN IN CONTROL.
Stress and anxiety often come from a lack of control. It’s hard for the mind to cope when you can’t manage the outcome of something that affects you or someone you care about. Baking helps by giving you something to have control over. When you make a dish, you are in charge of the outcome. How it looks and tastes is up to you. If you mess up, you can make changes until it’s right. This process can relieve some of the stress you feel by giving your mind focus and purpose when things get overwhelming.
Baking is great for anyone, especially if you’re experiencing negative mental health symptoms. Next time you feel overwhelmed, try pulling out a recipe. At the very least, you can end up with something tasty to help soothe your soul. ACD
January | February 2023 americancakedecorating.com 33 ASK THE EXPERT
BACK TO BASICS
BIRTHDAYCAKE BIRTHDAYCAKE
A great refresher for adult beginner bakers or a perfect project for kids, there’s something so deliciously perfect about a basic birthday cake.
BY OLIVIA GADWAH
Olivia Gadwah runs a womanowned business, Liv’s Sweets and Treats Bakery, in the beautiful White Mountains of New Hampshire. She grew up always having a passion for baking and, during the COVID-19 pandemic, she decided to start her own business. She works as a registered nurse full time and baking is a great escape from the stressful nursing environment. Over the last few years, her business has continued to grow and she has truly found a passion for specializing in weddings.
LEVEL: Edibles: 2 layers of cake Frosting Rainbow sprinkles Equipment: Cake board
COMPONENTS

Cake leveler (Wilton)
Offset spatula (Wilton)
Icing smoother (Wilton) Rubber spatula
Piping bag
Tip #1M (Wilton)
Candles
livssweetsandtreatsbakery.com facebook.com/livssweetsandtreatsbakery instagram.com/livssweetsandtreatsbakery
34 americancakedecorating.com January | February 2023
TUTORIAL
Tip: THE ULTIMATE GOAL OF A CRUMB COAT IS TO TRAP ANY STRAY CRUMBS FROM THE CAKE, MAKING THE FINAL LAYER OF FROSTING AN EASIER STEP.

TUTORIAL
WHAT YOU NEED
FILL AND STACK YOUR CAKES

1. Place 1 cake layer on your cake board and use a cake leveler to make it level. This makes frosting the cake easier.

2. Using an offset spatula, cover the top of the cake with frosting.
3. Place the second layer of cake on top of the frosted layer, making sure the edges line up.
4. Using the offset spatula, begin to crumb-coat the cake sides and top.
5. Using an icing smoother, smooth the frosting on the side of the cake. You can use your spatula to assist with smoothing the top of the cake. Once completed, place the cake in the refrigerator or freezer for 15 minutes to allow the frosting to harden.


FINISH FROSTING THE CAKE
1. Using a rubber spatula, place more frosting onto your cake.


2. Using the icing smoother and offset spatula, add and smooth a final layer of frosting.
3. Cut ½ inch off the end of a piping bag and insert the #1M piping tip. Fill the bag about ¾ full with frosting.

4. Slowly squeeze the bag while moving your hand in a circular motion to create rosettes on the top of the cake. Repeat this process until the top of your cake has a border.


36 americancakedecorating.com January | February 2023 TUTORIAL
1 1 2a 4 2b 2 3 4 5
DECORATE THE CAKE
1. Add the sprinkles to the top of the cake.
2. Add sprinkles to the side of your cake by taking a scoop of sprinkles in your hand and gently pressing them into the side of the cake. Repeat until the sprinkles cover the bottom of the cake all the way around.


3. Lastly, add the candles to the center of the cake. ACD

January | February 2023 americancakedecorating.com 37
1 2 3
Tip: THE EASIEST WAY TO FILL A PIPING BAG IS BY PLACING IT INTO ANY CUP YOU MAY HAVE AND SPOONING THE FROSTING INSIDE.
PERFECTLY PIPABLE SWISS MERINGUE BUTTERCREAM
 BY KALA BOULARD

Ingredients
6 large egg whites, room temperature
1¼ cups granulated sugar
2¾ sticks salted butter
1 teaspoon vanilla extract
Instructions
1. Add the egg whites and sugar to the bowl of a stand mixer set over a double boiler. Stir constantly until the egg whites reach 140144°F. Remove from the heat and let it sit for 10 minutes.
2. Using the whisk attachment, whip the egg white and sugar mixture on high speed until medium-stiff peaks form. Turn the mixer down to the lowest speed and
slowly add the softened butter in chunks.
3. Add the vanilla and whip on high speed for 8 minutes.
4. Place the bowl back over your double boiler to soften the butter a bit more, about 30 to 60 seconds until small puddles form at the bottom of the bowl. This is called tempering.
5. Transition to the paddle attachment and beat for 5 more minutes on low speed until it’s shiny and completely smooth. ACD
ip: DOUBLE THIS RECIPE IF YOU WANT MORE BUTTERCREAM FOR CAKE DECORATING.
Kala Boulard is a cake designer and recipe developer who adapted her love for art into cake creations. She has always considered herself an artist before a baker. Painting local murals and holiday windows allowed her an artistic outlet before discovering cakes. Kala creates all her cake art with different variations of buttercream and uses a palette knife to paint with buttercream as if it were oil or acrylic paints. She built a thriving home-baking business, which specializes in wedding and bridal cakes. She also runs a dessert blog, where she shares delicious seasonal dessert recipes and photography. Kala resides in Idaho with her husband and their daughter. Some of her favorite things include drawing digital art, photographing her sweet treats, and being a mom.
almondsandapricots.com instagram.com/almonds_and_apricots
38 americancakedecorating.com January | February 2023 RECIPE
T

RECIPE
WIPE DOWN THE MIXING
ATTACHMENTS, AND
ENSURE THERE
ANYTHING
Tip:
BOWL, WHISK
ALL OTHER EQUIPMENT WITH WHITE VINEGAR TO
IS NO FAT RESIDUE ON
BEFORE STARTING.
Pom-Pom Dahlia
This variety of dahlia is known as a pom-pom for its round, fluffy structure. Dahlias are some of the most diverse flowers with hundreds of varieties and come in shades of white, red, pink, orange, yellow, purple, and combinations of these colors. The pom-pom dahlia is a playful addition to any buttercream arrangement, contributing lots of texture and interest.
BY LESLIE VIGIL
LEVEL: Edibles: Buttercream Equipment: Piping bag #102 petal tip Flower nail
COMPONENTS
ring. This will be a guide to help keep your dahlia round and provide a platform for the petal layers.
3. Starting on the outside of the ring, pipe a circle of short, arced petals, using the same technique as with the previous petals. Repeat several times to produce a complete circle, creating the first layer of petals.
PIPE THE DAHLIA
Excerpted from Buttercream Botanicals for Beginners: Simple Techniques for Creating Stunning Flowers, Foliage, and More by Leslie Vigil. Copyright 2022. Published with permission from Quarry Books.

1. Prepare a batch of your chosen shade of buttercream and fill a piping bag fitted with the #102 petal tip. Place the widest end of the piping tip in the center of the flower nail with the piping bag parallel with the flower nail.
2. Squeeze the piping bag and turn the flower nail to pipe a
4. Turn the flower nail and reposition the piping bag as in Step 1, with the widest end of the piping tip at the center of the petal ring.
5. Repeat Step 3, creating another set of petals on top of the first. Make the petal arcs shorter to produce a smaller, more narrow petal. Complete another ring of petals.
6. Continue making layers of
40 americancakedecorating.com January | February 2023 BAKE THE BOOK

BAKE THE BOOK
ringed petals until there are a total of 4 or 5 layers, with each layer being slightly smaller than the previous one to produce a domelike shape.


7. To finish the dahlia, deposit 5 to 6 small petals in the center. ACD

42 americancakedecorating.com January | February 2023 TUTORIAL
4
Tag us in Your Photos! FOR A CHANCE TO BE FEATURED ON OUR INSTAGRAM FEED @americancakedecorating
2 3
7 5 6
Viva Magenta Edit
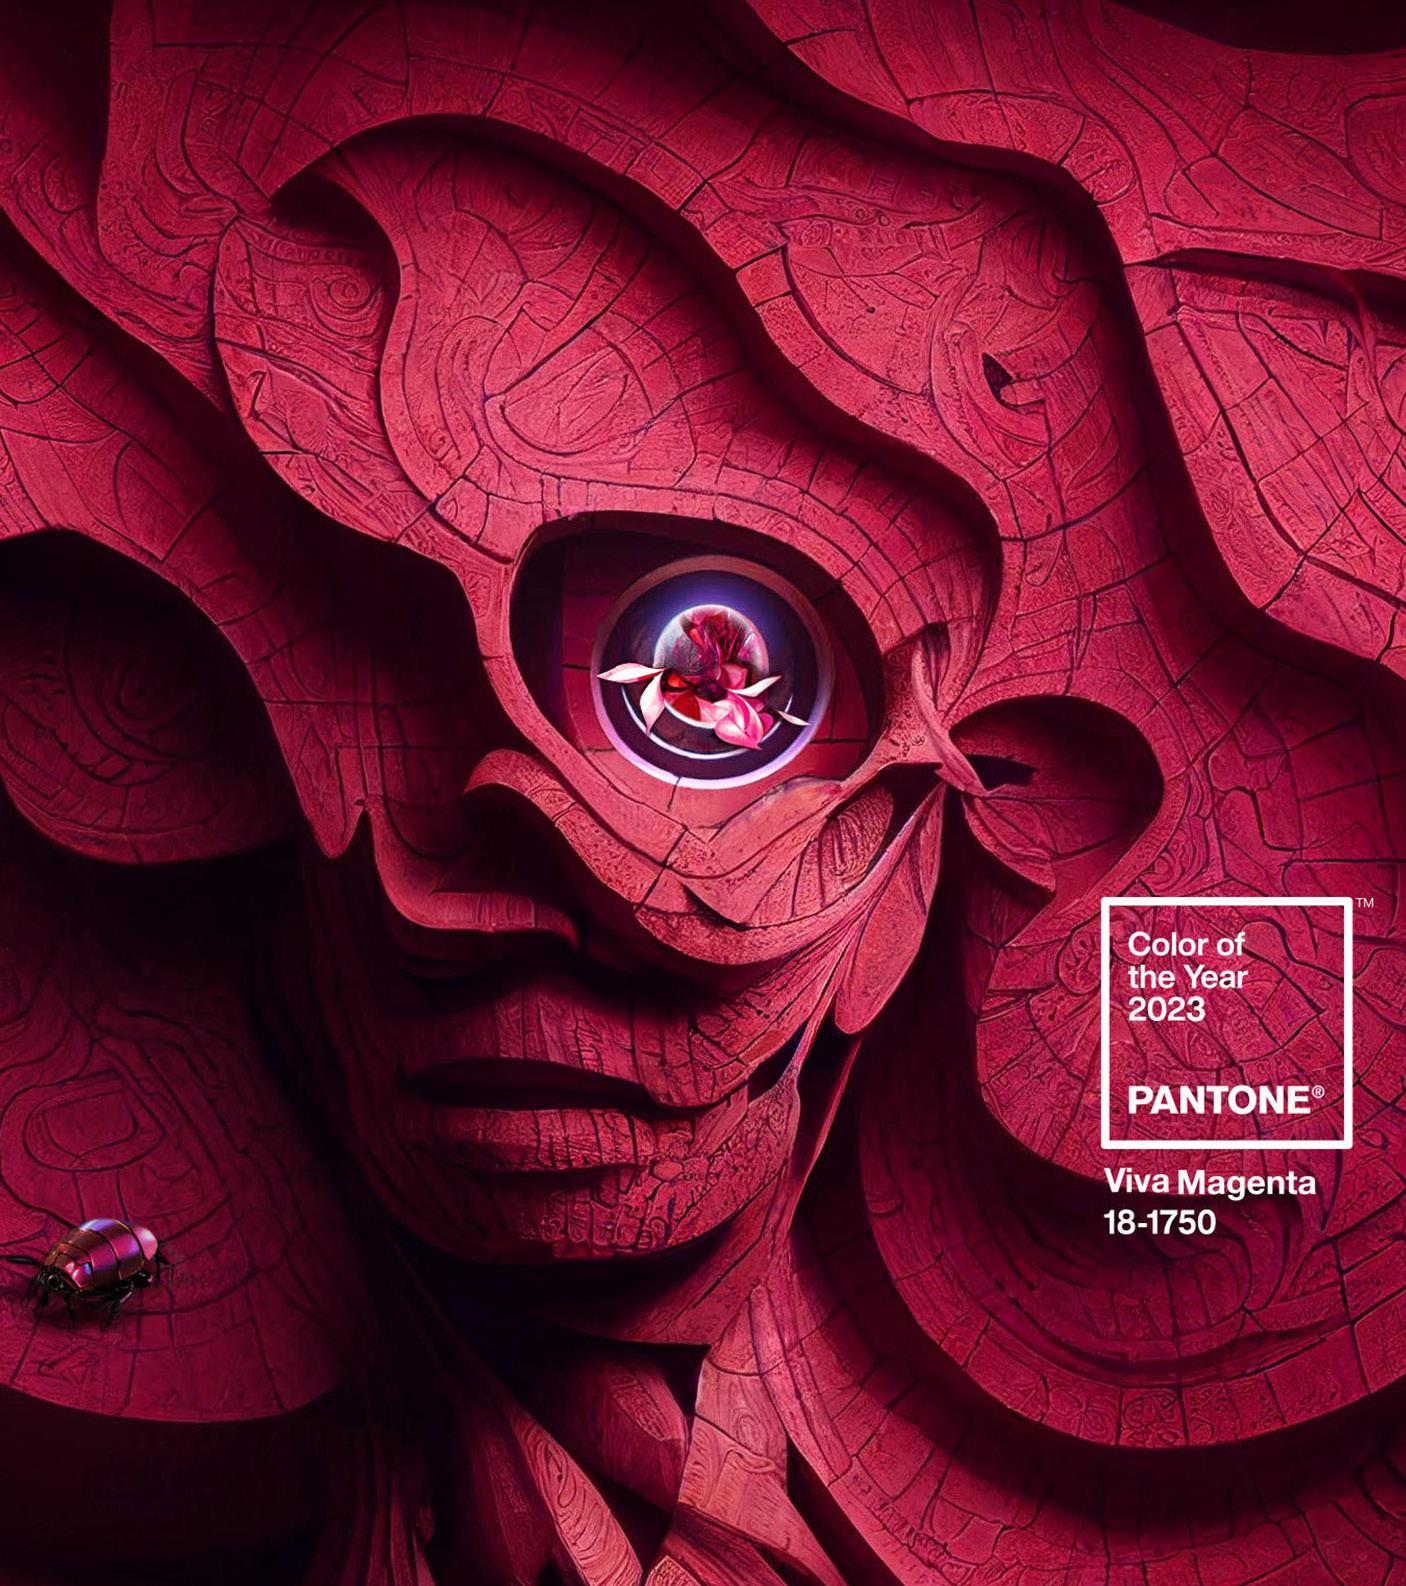
Pantone’s color of the year promotes a joyous and optimistic celebration, perfect to kick off 2023.
Fuchsia Cake Party Favor Gift Boxes, $24, efavormart.com
Wayfair Basics 10-Piece Napkin Set, $21, wayfair.com
Sweet Pea Cutter and Veiner Set, $28, evilcakegenius.com
The perfect width for standard-size cakes and the perfect color for Valentine’s Day too!
Valentines Color Heart Cutters, $15, williams-sonoma.com

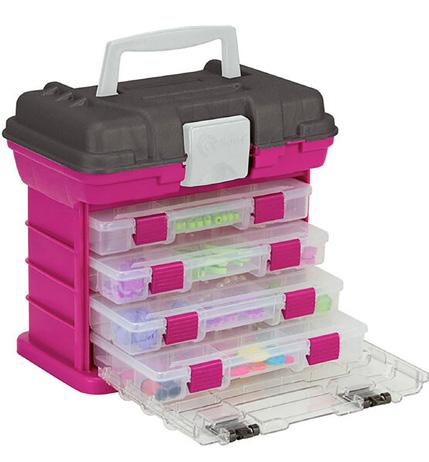
Creative Options
Grab’n Go Storage System, $27, joann.com
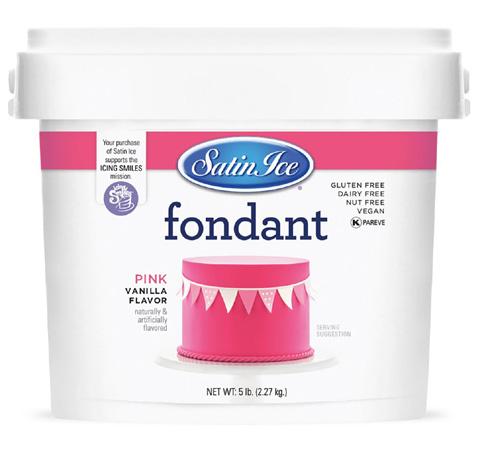
Satin Ice Pink Vanilla Fondant, $29, bakedeco.com
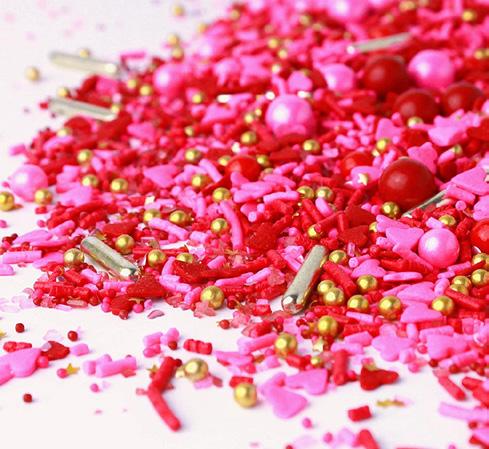
Sprinkle Pop Cupid’s Arrow Sprinkle Mix, $7, sprinklepop.shop
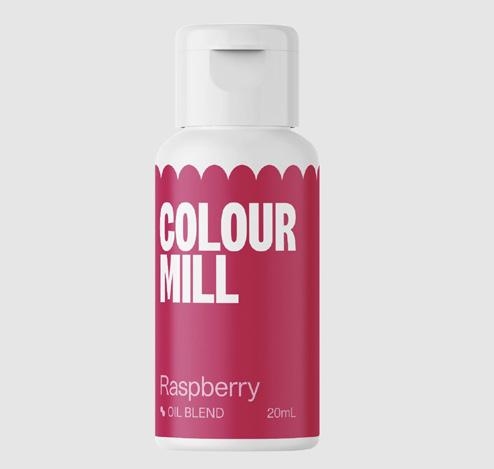
Colour Mill Raspberry Oil Blend Coloring, $8, colourmill.com.au
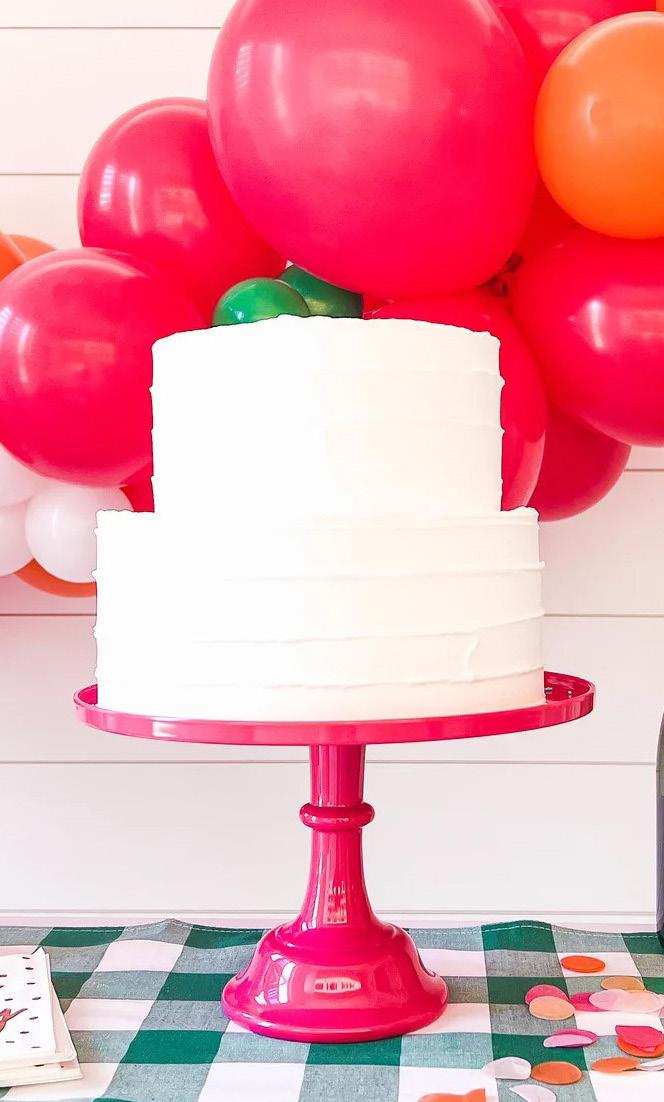
Hot Pink Cake Stand, $35, sprinklesandconfetti.com
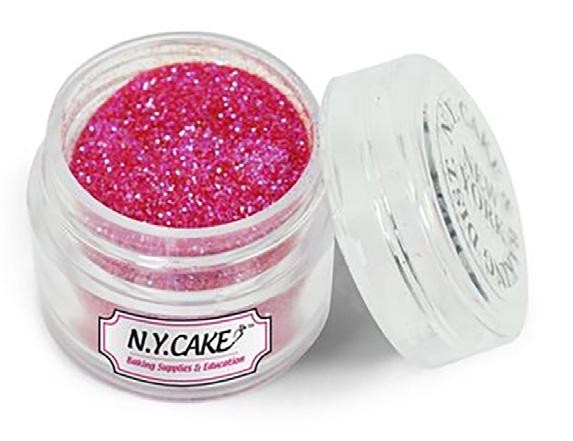
Apple Red Disco Powder, $6, nycake.com
Easy Bake 4-Piece Set, $100, greatjones.com
January | February 2023 americancakedecorating.com 43 SHOPPING
THREE YEARS LATER
Lessons from the Pandemic
BY CYDNI N. MITCHELL
Although it feels like yesterday, can you believe that the global pandemic that shook the world happened almost three years ago? The pandemic changed so much about how we live our daily lives and it has definitely changed the way a lot of us run our businesses. As we emerge into another year of unknown possibilities, I want to take a moment to reflect on four major lessons that we, as Sweet Bosses, should have learned from the pandemic.
Sweet Boss, it is your responsibility to remain open to new opportunities and to be willing to try new methods of reaching customers. Being flexible when it comes to new tools, resources, and policies will help your business continue to grow and survive during challenging times.
2. PLAN FOR THE UNEXPECTED.
1. BE FLEXIBLE.
The businesses that did well during the pandemic were the ones that quickly adapted to change. When we were asked to socially distance, the food businesses who developed contactless delivery policies or took advantage of delivery apps were able to keep their businesses going with very little slowdown. Very few
of us can actually tell the future; however, we can read the writing on the wall and take actions based on our best guesses.
Although none of us could have ever imagined that life would change so quickly because of a pandemic, there is no denying that food delivery apps were already gaining in popularity before 2020. As a

When you run a thriving business, it can be easy to lose sight of certain expenses. Splurging on a larger workspace or financing expensive equipment feels like a great idea when times are good and the money is flowing; however, the pandemic taught us to expect the unexpected.
I’m a huge advocate for investing in your business, but you must make sure that every move you make in business is strategic. Build a cushion of savings to help cover your basic monthly expenses for a certain length of time, like six to 18 months. Then, make specific purchases after you’ve built a level of comfort that you can afford to make the investment.
44 americancakedecorating.com January | February 2023 SWEET BOSS
When times are good, make sure to focus on keeping your cash safe and building and retaining good credit. This will help you in the long run if times ever take a turn for the worse.

3. DON’T PUT ALL YOUR EGGS IN ONE BASKET.

Over the years, many popular entrepreneurs have pushed the idea of having seven or more streams of income to grow wealth. The pandemic taught us that this may not be such a bad idea. If you focused on weddings or celebration cakes, your business was likely hit pretty hard during the pandemic. Those businesses who diversified their income by providing other services or menu items were able to
expand their businesses during the pandemic in ways they may not have previously dreamed.
I recall seeing bakeries offer “sponsored lunch boxes” to support frontline workers during the height of the pandemic. I saw other bakeries offer and deliver treat boxes to party guests who attended virtual birthday parties. Although these ideas may not have extended much beyond the shelter-in-place period of the pandemic, being flexible and open to providing other services allowed many businesses to stay afloat and even thrive during the pandemic.
Being open to multiple streams of income will only help round out your business and reduce the risk to your revenue in times of uncertainty.
4. TECHNOLOGY
IS YOUR FRIEND.
Who knew virtual tastings and parties were even an option?
From e-signed contracts to online meetings, the world really opened up while we were locked inside.
Although some of the ways that we interact with our customers will go back to the old normal now that the worst is behind us, it’s nice to know that there are tools out there that will help us stay connected and
the business moving forward. Delivery apps, online store platforms, and text message marketing are not going away anytime soon. Keep an eye out for other resources that will continue to make your business run efficiently in the future.
We all just experienced a once-ina-generation event as a society and I know that most of us will be forever changed. As your business continues in these next few years, don’t forget these lessons and others that you learned during the pandemic. Stay flexible and ready for whatever life throws your way. As long as you prepare during the good times and keep an open mind in the tough times, you’ll be able to weather any storm! ACD
Cydni N. Mitchell (a.k.a. Cyd) is a bakery consultant and the sweet business coach behind Sweet Fest®. Based in Atlanta, GA, Sweet Fest® is an online company that supports the business needs of the sweets community in the areas of professional development, marketing, branding, and web design. By trade, Cyd is an accountant and financial analyst with a master’s from the Kenan-Flagler Business School at the University of North Carolina at Chapel Hill. She is the co-founder of the Sugar Coin Academy, an online business academy for business owners in the baking and sweets industry, and she is also the organizer of The Ultimate Sugar Show, Georgia’s largest annual baking and sweets expo in Atlanta.
thesweetfest.com facebook.com/thesweetfest instagram.com/sweet_fest
January | February 2023 americancakedecorating.com 45 SWEET BOSS
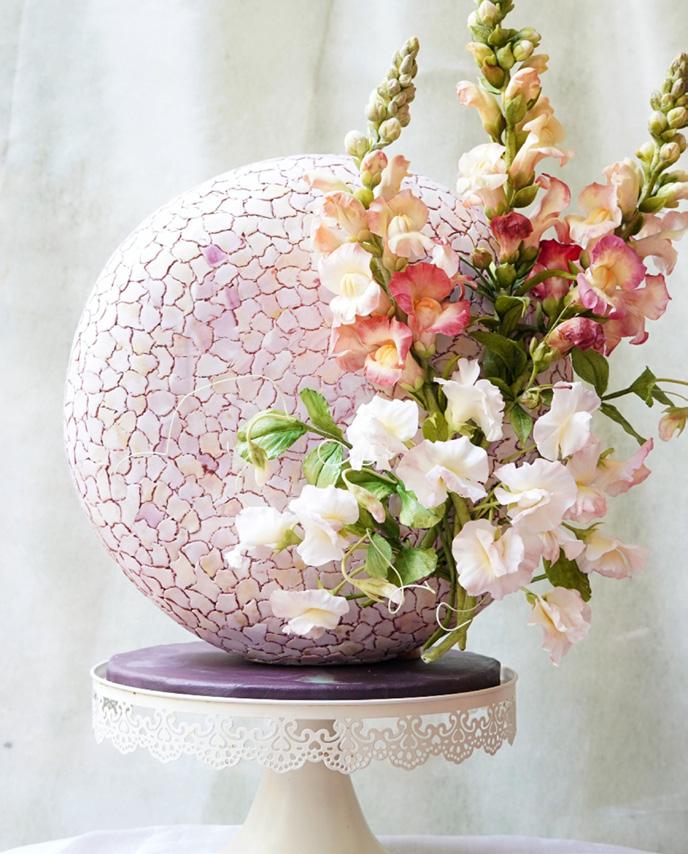
L VE is in the air
BY MARGARITA OLIVERO GOLDEN
LEVEL:
Margarita Olivero
Golden is a graduate of the University of Texas at Austin with a bachelor’s degree in journalism and the Institute of Culinary Education in New York. She worked for various culinary publications such as La Cucina Italiana before becoming a personal chef in Manhattan. Her real love has always been baking, so she moved to London and graduated from Le Cordon Bleu in pastry. After stints at 1880 at the Bentley Hotel in pastry and the Fairmont Hotel in San Francisco in food and beverage management, she moved back to the Houston area in 2008 to be closer to family. Margarita officially launched Confectionary Home in 2015 and specializes in custom cakes and cake pops for weddings, birthdays, milestones, showers, and more. confectionaryhome.com facebook.com/confectionaryhome instagram.com/confectionaryhome
Edibles: Marshmallows Rice cereal treats
COMPONENTS
Three 8-by-6-inch cakes Buttercream Ganache
Fondant: white, black, and 3 shades of pink Chocolate candy melts FlexFrost sheets Water
Petal dust: pink and gold Nonpareils
Everclear
Equipment: Hot glue Hot-glue gun
Four 2-inch wood squares
12-by-14-inch wood board Drill 5/16-inch threaded rod 4 nuts 4 bolts Wrench
4-by-6-inch wooden rectangle. Two 4-by-2-inch cake boards
8-by-6-inch cake board 4 wooden skewers Aluminum foil
Offset spatula Sugar shapers Ball tool Paintbrushes Heart cutters Silicone bow mold
46 americancakedecorating.com January | February 2023 TUTORIAL
Spending the time to build a sturdy base is the key to this adorable sculpted cake.

TUTORIAL
BUILD THE CAKE STRUCTURE
1. Using hot glue, affix the 2-inch wood squares underneath the 12-by-14-inch wood board about 2 inches in from the corners to create a balanced and sturdy cake stand.

2. Using a drill fitted with an attachment, drill a hole into the center of the wooden board. Place your threaded rod through the center hole and secure it underneath the board with 1 washer and bolt and a second washer and bolt on top of the wooden board. Tighten them with a wrench until secure.


3. Drill a hole through the center of the 4-by-6-inch wooden rectangle. Secure it onto the threaded rod using a washer and bolt underneath and a second set on top at the desired height. Tighten the bolts to secure.
4. Using hot glue, secure the two 2-by-4-inch cardboard rectangles onto the small wooden board on either side of the washer and bolt to even out the height of the washer and bolt.

5. Using hot glue, secure the larger cardboard cake rectangle on top of the smaller ones to create a sturdy 8-by-6-inch cake board.
6. Drill 4 holes fitted with a 7/64 attachment to secure the 4 skewers in a staggered pattern. Dip the tip of the skewers into a bit of hot glue before placing them into each hole underneath the small wooden rectangle.
7. Wrap the threaded rod, the cardboard, and the suspended wood surface in aluminum foil. 4 5 6
1, 2, &3
BUILD DIMENSION ONTO THE CAKE STAND
1. Heat 8 marshmallows in the microwave until puffed up, about 25 seconds.
2. Using an offset spatula, spread the marshmallow “glue” onto the underside and edges of the suspended cake base. This will help the rice cereal treats stick to the underside.
3. Heat another 8 marshmallows until puffed up, about 25 seconds. Add the rice cereal treats and mix until incorporated. Allow it to cool for 5 minutes.
4. Begin pressing the rice cereal treats to the underside of the suspended base, forming a rounded underside and rounding out any sharp corners. Make sure to press the rice cereal firmly so the marshmallow “glue” really holds on to it. Refrigerate and allow the rice cereal to set up, approximately 30 minutes.
48 americancakedecorating.com January | February 2023 TUTORIAL
T
ip: YOU CAN ALSO COVER THE SURFACE IN CHOCOLATE TO MAKE IT FOOD SAFE.
2a
BUILD THE CAKE
1. Place 1 cake layer on the cake board and layer with buttercream. Repeat for a total of 3 cake layers or to your desired height.

2. Carve the cakes until they become rounded cloudlike shapes. It helps to use an inspiration photo to imitate the curves of the cake, preferably a cartoonlike image.
3. Mix the carved cake scraps with buttercream to make “cake clay” and press it onto the cake to create rounded shapes. Once you’re happy with the shape, crumb-coat it in buttercream, and place it in the refrigerator to set up.
4. Cover the cake in ganache and refrigerate once more.
ADD THE FONDANT AND DETAILS
1. Roll out white fondant large enough to drape over and cover the cloud cake. Cut around the bottom edges and tuck it over the rice cereal treats underneath.

2. Using sugar shapers, press into the rounded indentations to try and highlight the roundness of the cloud.


3. Cover the base with a thin layer of melted chocolate candy.
4. Cut out 5 or 6 strips of FlexFrost sheets and lightly brush the back sides with water. Wind the strips around the skewers and around the central rod until covered.
5. Using a ball tool, make 2 round indentations for the eyes. Brush the indentation lightly with water.

6. Press a small round ball of black fondant into each indentation to form eyes. Make a small white ball of fondant and press it into the upper right area of the black eye to make a little glimmer. Roll a thin strip of black fondant to make small eyelashes.
7. Using soft pink petal dust, lightly dust blush around the cheek area with a soft brush.
January | February 2023 americancakedecorating.com 49 TUTORIAL
Tip: PUT SHORTENING ON YOUR HANDS SO THE RICE CEREAL DOESN’T STICK. 2b 4 1 2 3
ADD THE FINISHING TOUCHES
1. Using pink fondant, make a fondant bow to top her off.
2. Roll out the 3 shades of pink and cut out 2 hearts in each color. Lightly brush the back of each heart with water and gently press them onto the center rod and the 4 skewers as though the hearts are hanging from the cloud.

3. Spread a thin layer of buttercream on the cake base, then cover it in nonpareils.
4. Roll 6 balls of fondant into different sizes.

5. Stack the balls next to and on top of each other to form what looks like a mini cloud, then cover it with white


fondant, tucking the edges in underneath. Create a second one the same way.

6. Decorate the mini clouds as you did the larger cloud. Use a silicone bow mold to make mini bows.
7. Using pink petal dust, lightly brush in the rounded creases to lightly accentuate them.


8. Using gold petal dust diluted in Everclear, brush some of the edges of the hearts and bows to add a little glitz and dimension. ACD

50 americancakedecorating.com January | February 2023 TUTORIAL
1 1 4 2 5 3 4 2 6


January | February 2023 americancakedecorating.com 51 TUTORIAL 5a 5b 6 7 Tip: THE HEARTS LOOK BEST STAGGERED, SO KEEP THAT IN MIND WHEN YOU’RE BUILDING THE BASE.
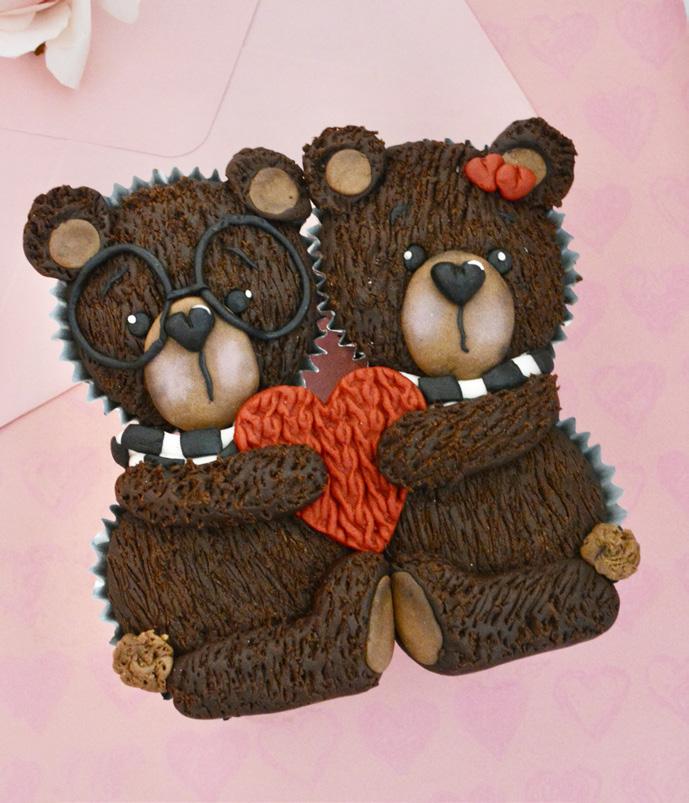
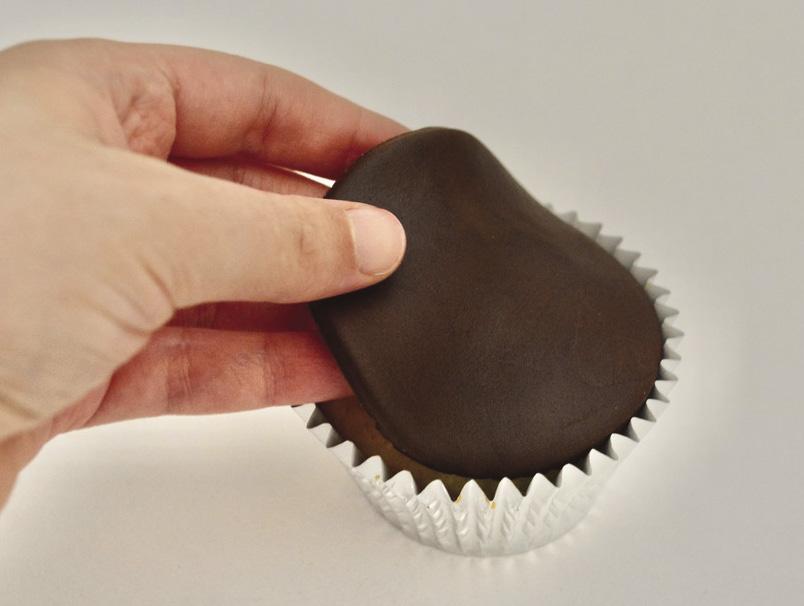
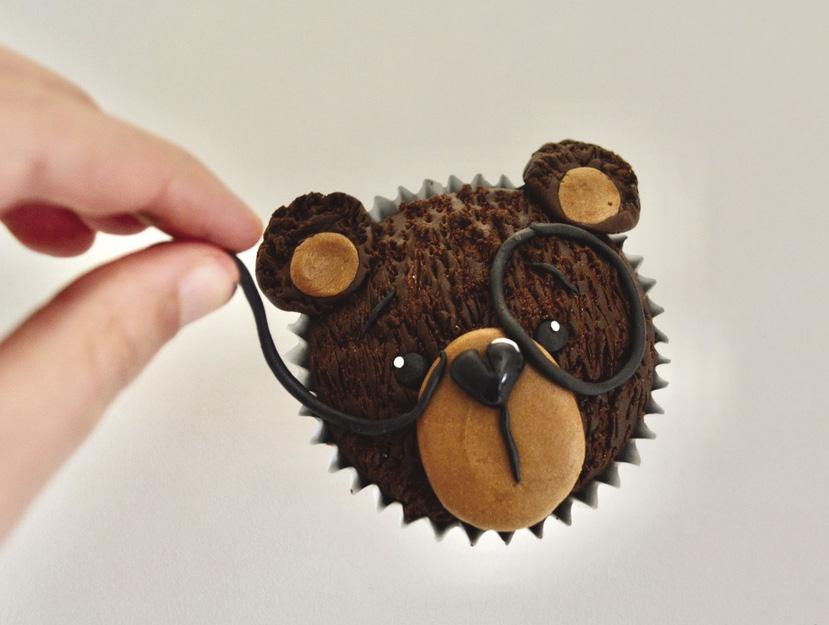
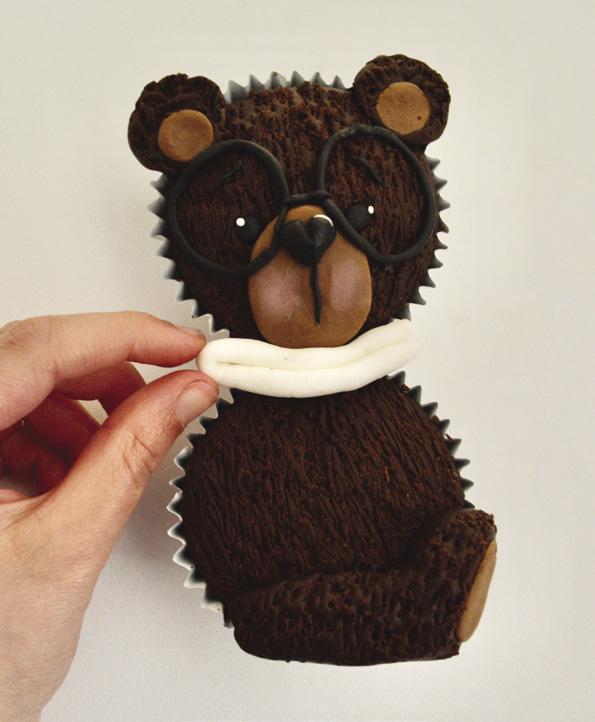
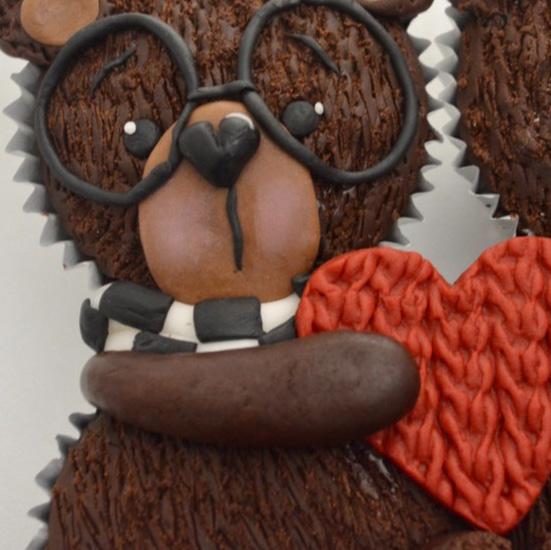
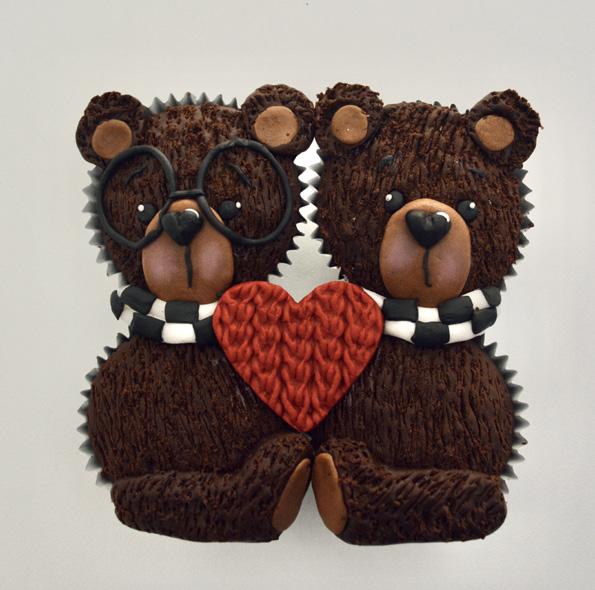
BEARY MUCH BEARY MUCH CUPCAKES CUPCAKES inLove
Create an adorable Valentine’s Day treat with only four cupcakes.
BY JULIANA MANNO
Juliana Manno grew up with a love of arts and crafts but found her true passion when she completed a beginner’s cake decorating course in 2012. Science student by day, she spent every spare moment between her studies teaching herself new cake decorating techniques and baking cakes for family and friends. Her passion is for designing cute and unique cupcakes, inspired by children’s illustrations and soft toys. Her business, Juliana’s Cake Laboratory, is based in Melbourne, Australia.
instagram.com/julianascakelaboratory

LEVEL:
COMPONENTS
Edibles: Confectioners’ sugar Fondant: red, dark brown, light brown, black, and white 4 cupcakes Buttercream or ganache Water
Petal dust: brown and pink Equipment: Knitting silicone mold Heart cutter Rolling pin Circle cutter Toothpicks Ball tool Sharp knife Dusting brush
WHAT YOU NEED
MAKE THE HEART
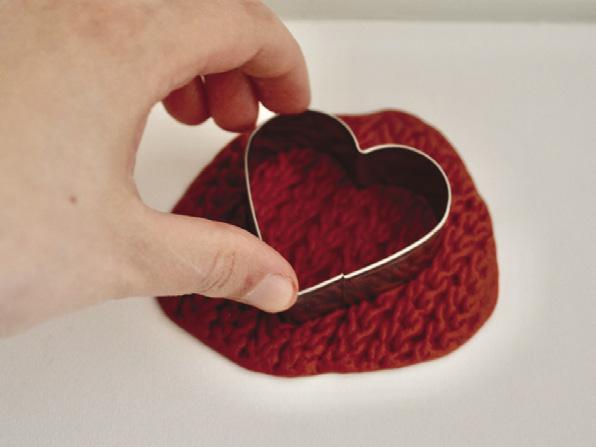
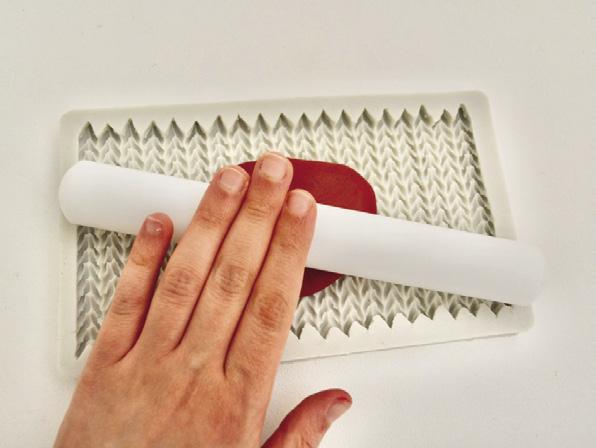
1. Lightly dust the knitting silicone mold with confectioners’ sugar to prevent the fondant from sticking. Roll out a piece of red fondant and place it into the silicone mold. Use your rolling pin to roll over the fondant with even, firm pressure to indent the knitting pattern. Gently
TUTORIAL
52 americancakedecorating.com January | February 2023
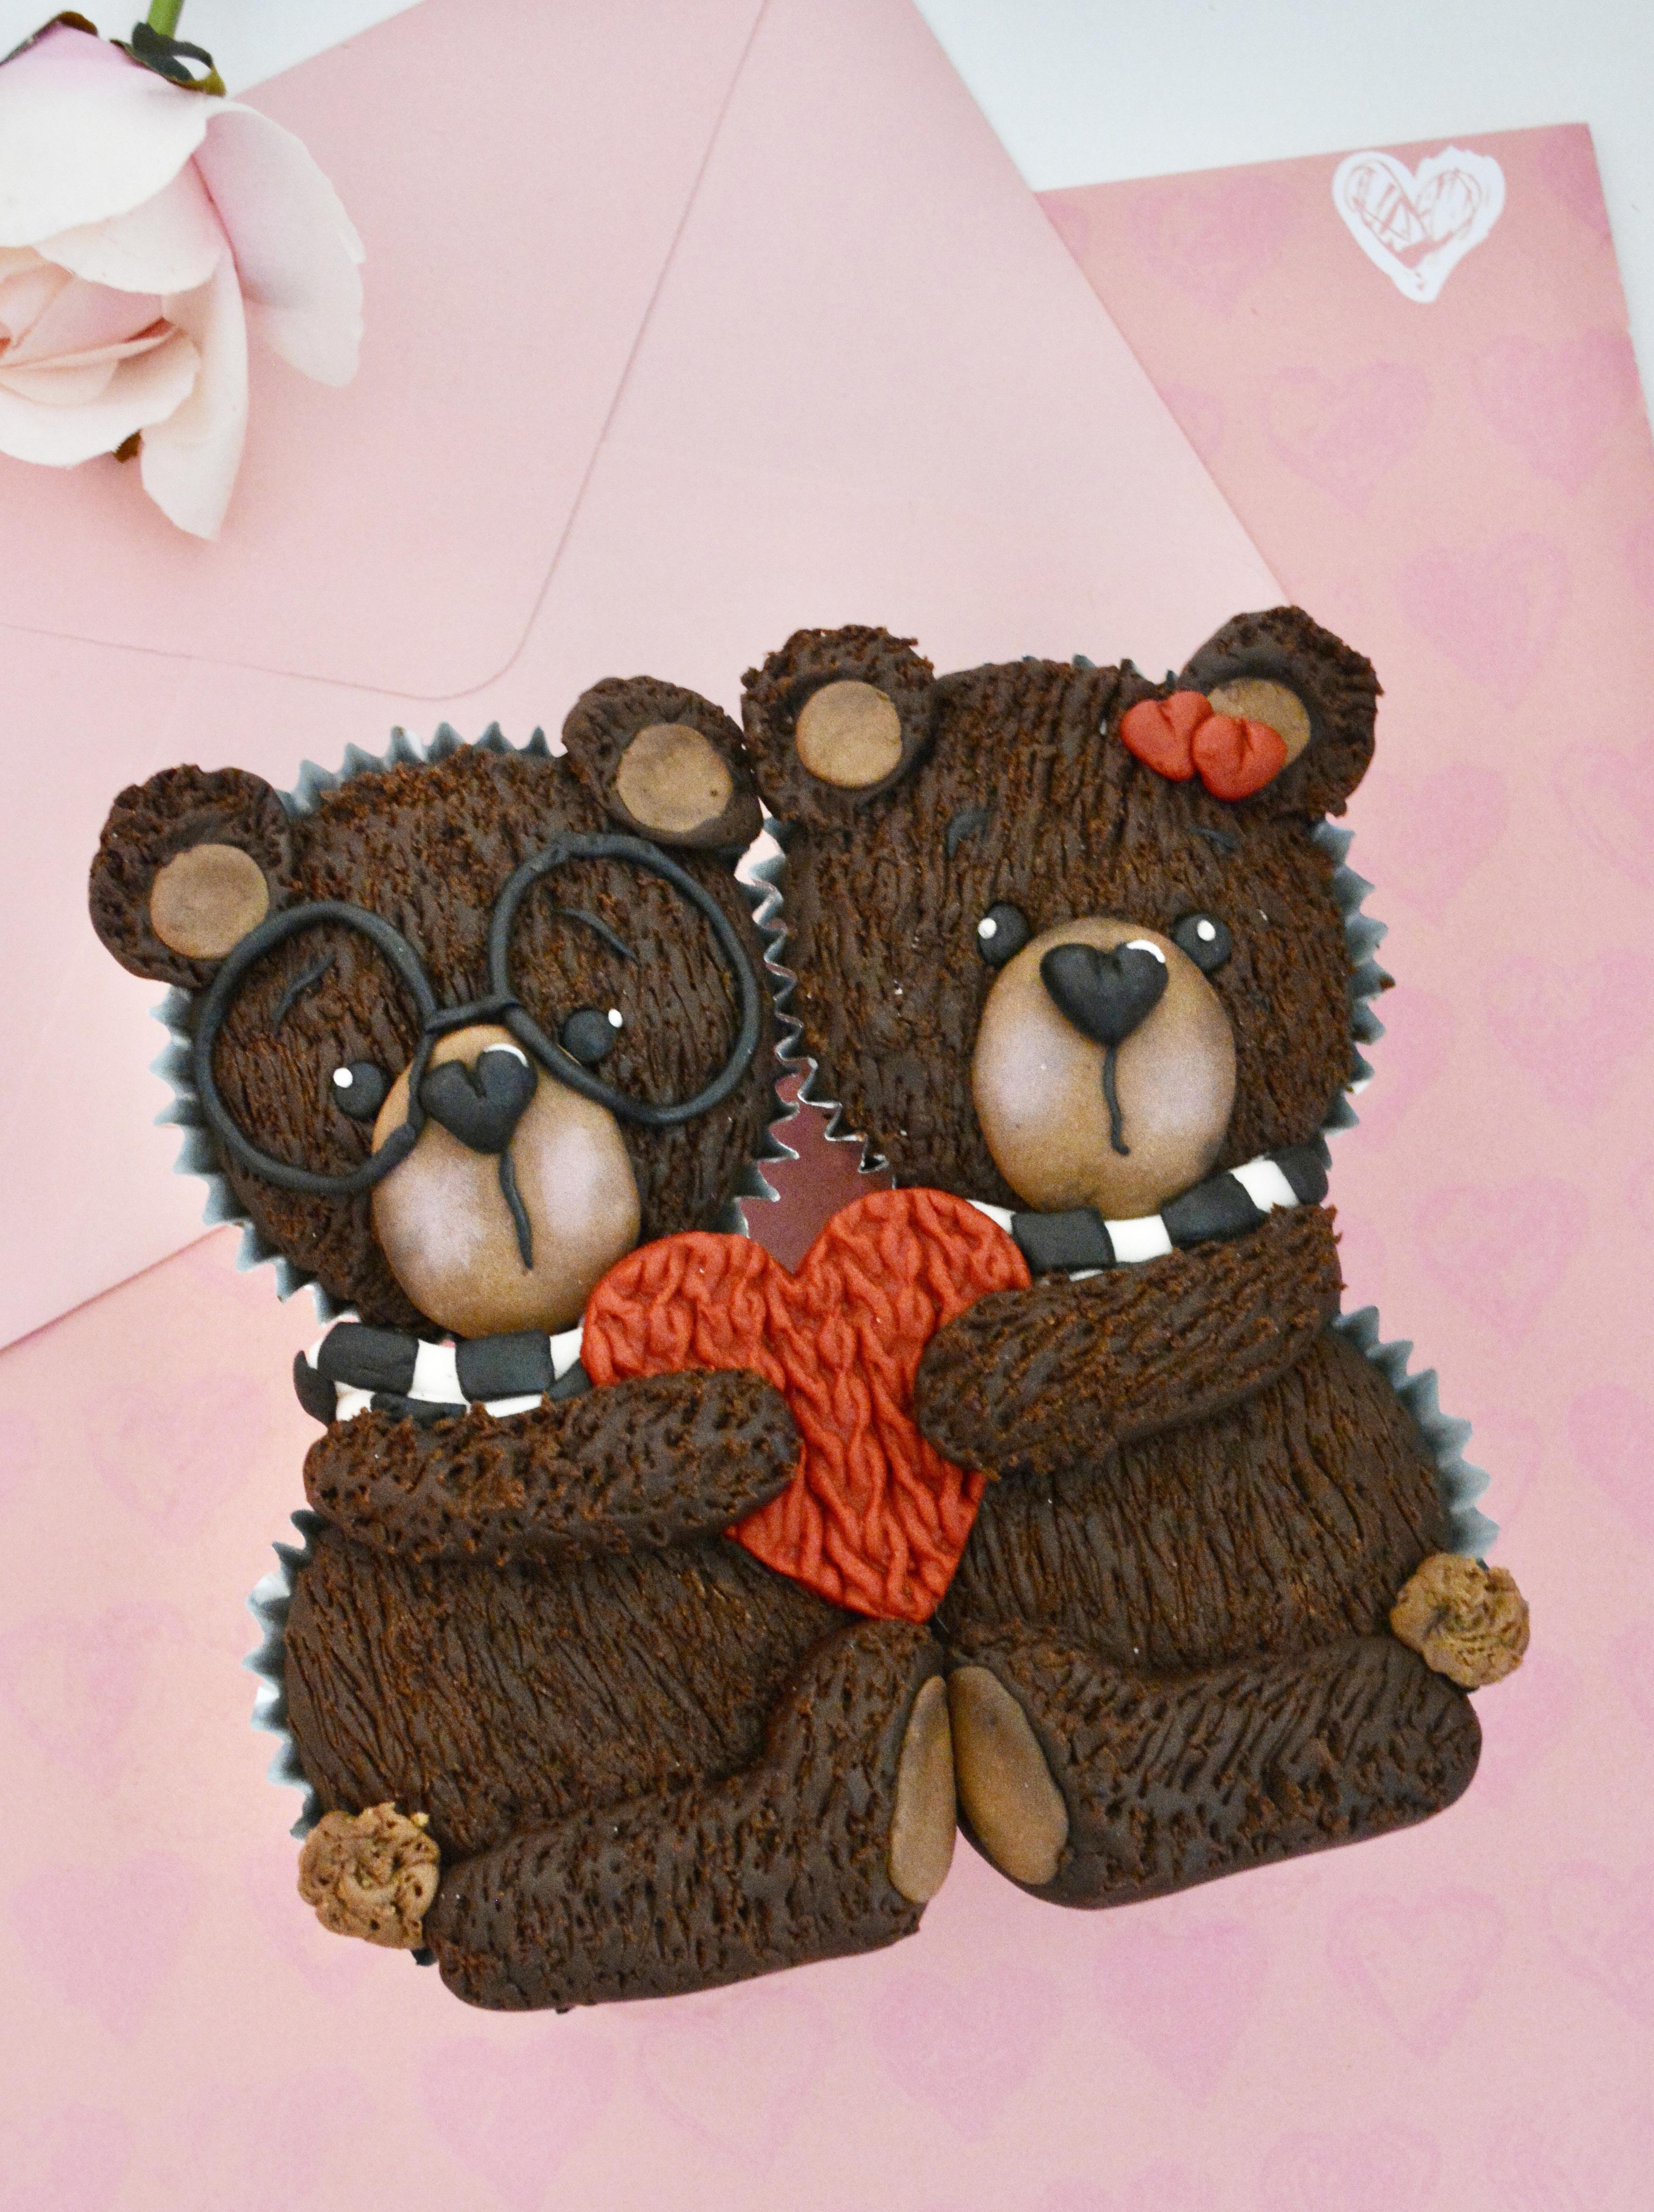
TUTORIAL
peel the fondant off the mold.
2. Using the heart cutter, cut out a heart shape from the fondant. The stitches should be oriented vertically.
1
2
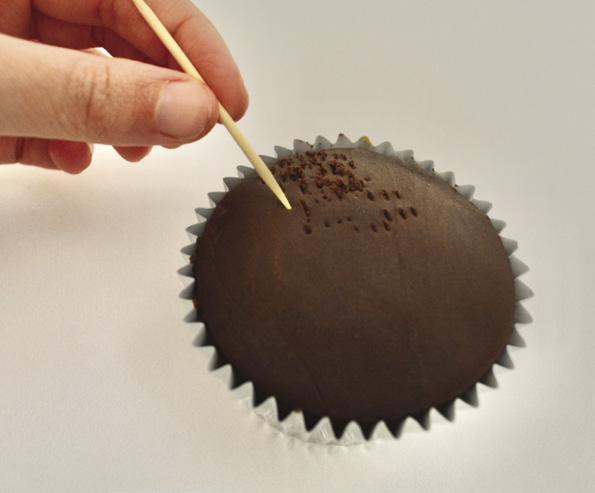
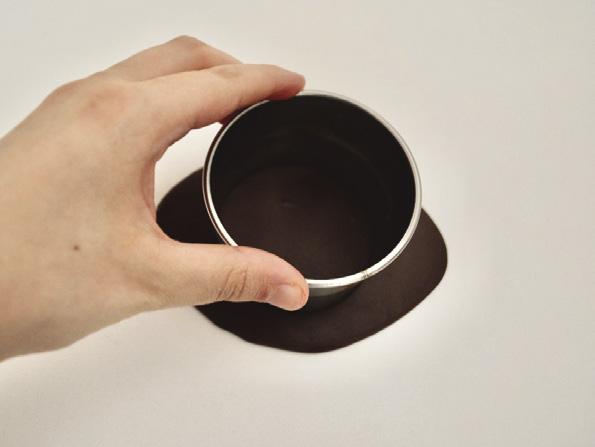
COVER AND TEXTURE THE CUPCAKES
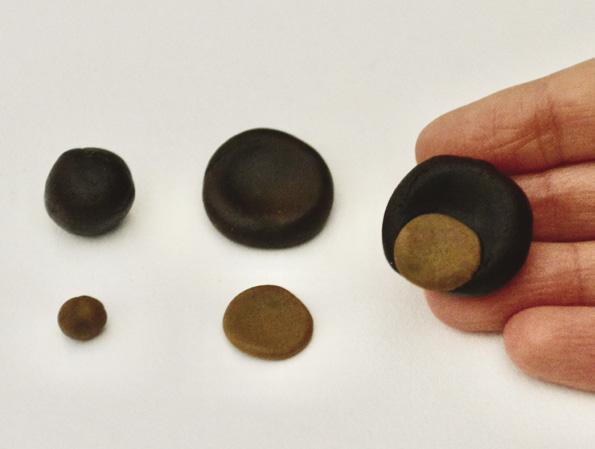
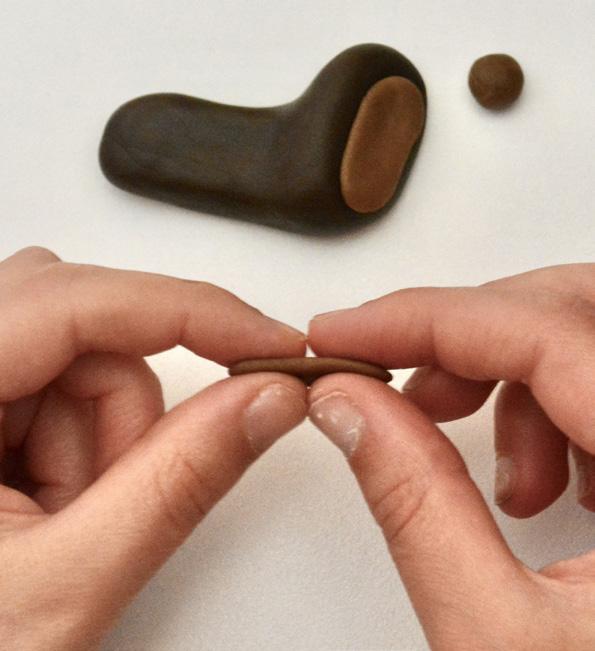
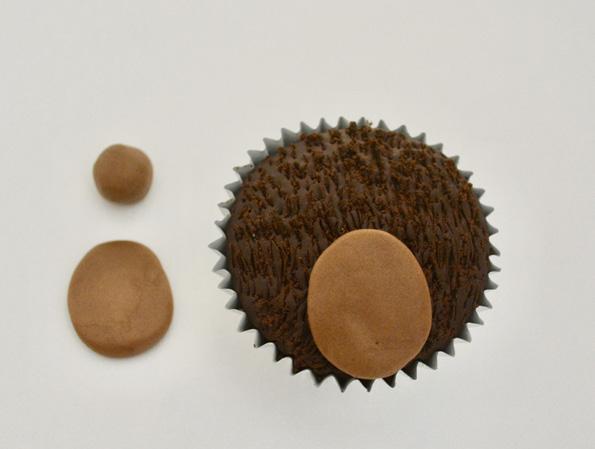
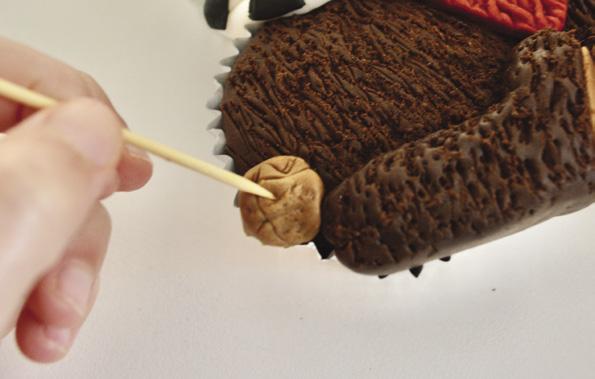
1. Spoon a small amount of buttercream or ganache onto each cupcake and spread it to form a flat surface, being careful not to touch the cupcake liners. Knead and roll out a piece of the dark brown fondant. Cut out 4 circles to fit the tops of your cupcakes.
2. Lay the fondant circles onto the prepared cupcake tops.
3. Press into the fondant with a toothpick, using short dragging motions to create
the fur effect. For neaterlooking fur, drag the fondant in the same direction with each stroke.
1 3
Tip: ALTERNATIVE METHODS FOR CREATING FUR ARE TO SNIP OVER THE SURFACE OF
2
MAKE THE FACIAL FEATURES
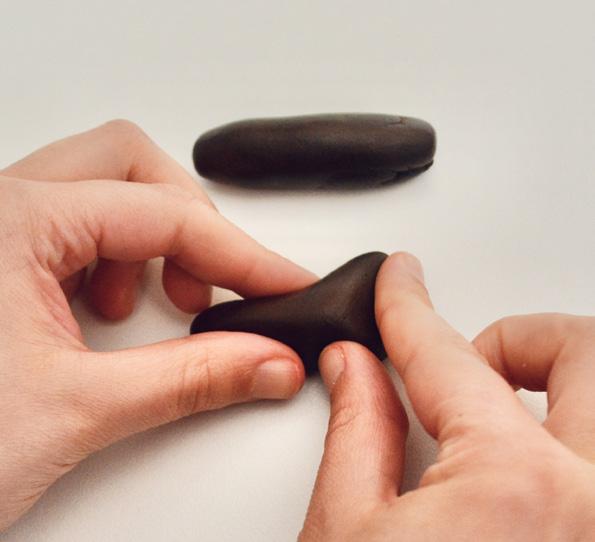
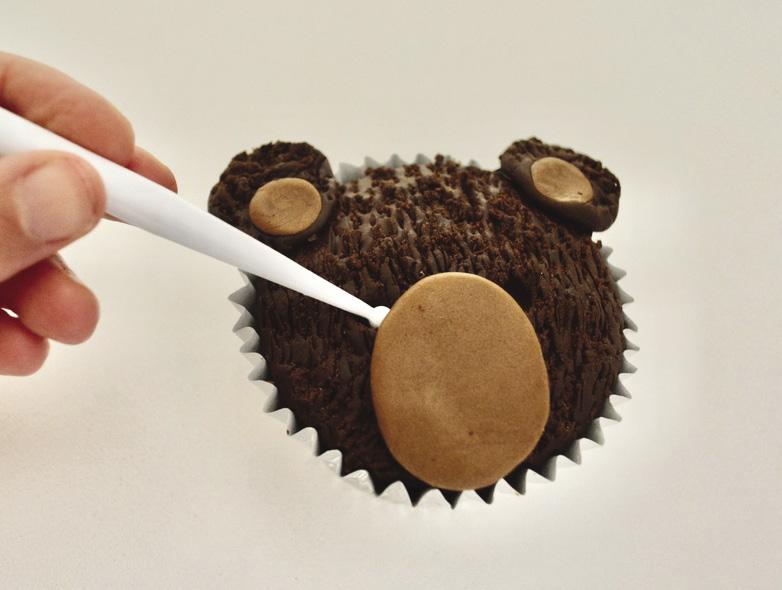
1. To make the teddy’s snout, take a piece of light brown fondant and roll it into a ball. Roll over the ball with a rolling pin to form an oval shape approximately 1 inch wide. Using a little water, adhere the snout to the bottom of the cupcake.
PAIR OF FINE SCISSORS OR, USING A GRASS PIPING TIP, PIPE BROWN BUTTERCREAM.
2. To make an ear, roll a piece of dark brown fondant into a ball. Press it between your thumb and index finger to flatten it slightly into a thick disc approximately 1 inch wide. Repeat using a smaller ball of light brown fondant but pressing it to form a thin circle. Adhere the light brown circle off-center at the edge of the ear to form the inner ear. Texture the dark brown fondant with a toothpick.
3. Using a little water, attach the ears to the cupcake, with the inner ear closest to the cupcake. Use your small ball tool to indent 2 rounded eye sockets on either side of the top of the snout as shown.
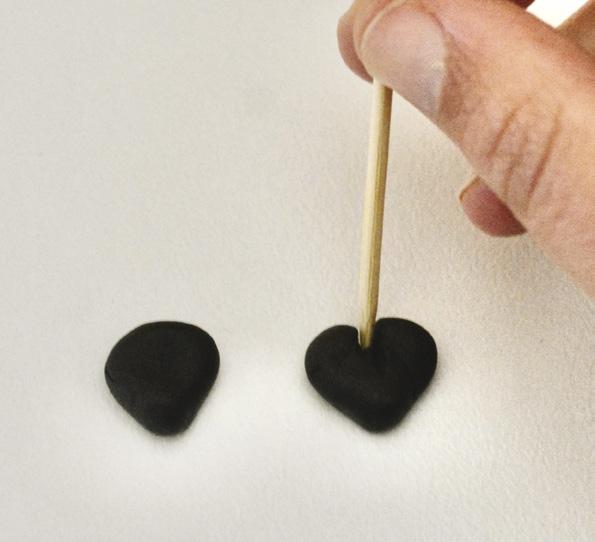
Tip: IF YOU DON’T HAVE A HEART-SHAPED CUTTER, YOU CAN CREATE YOUR OWN TEMPLATE BY PRINTING OR DRAWING A HEART ONTO THIN CARDSTOCK AND CUTTING THE FONDANT WITH A SHARP KNIFE.
54 americancakedecorating.com January | February 2023 TUTORIAL
THE FONDANT WITH A CLEAN
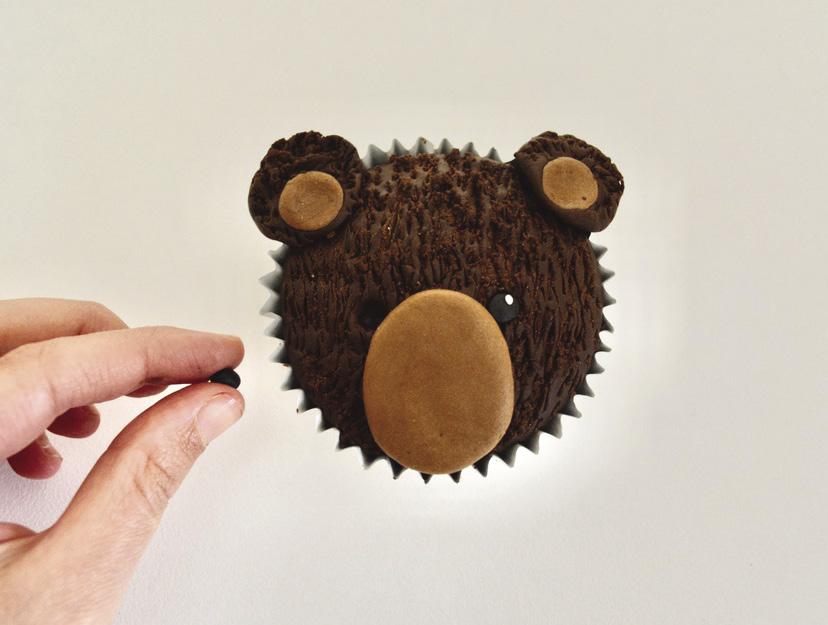
4. Roll 2 tiny balls of black fondant for the eyes and adhere them into the eye sockets with a little water. Roll 2 smaller balls of white fondant and adhere them to each eye. To make the eyebrows, roll black fondant into a thin sausage and cut it into 2 short segments. Adhere them onto the face at an upsloping angle to give the teddy a cute facial expression.
5. To make the nose, roll a piece of black fondant into a rounded teardrop shape. Press to flatten it slightly. Indent a groove in the rounded edge of the fondant with a toothpick to create the heart shape.
6. Roll a tiny piece of white fondant into a thin sausage. Adhere it to the right side of the nose following the curvature of the rounded edge. Using a little water, adhere the nose to the snout. Roll a thin sausage of black fondant and attach it vertically to the base of the heart nose to form the mouth.
7. Repeat Steps 1 to 6 for the second teddy face cupcake.

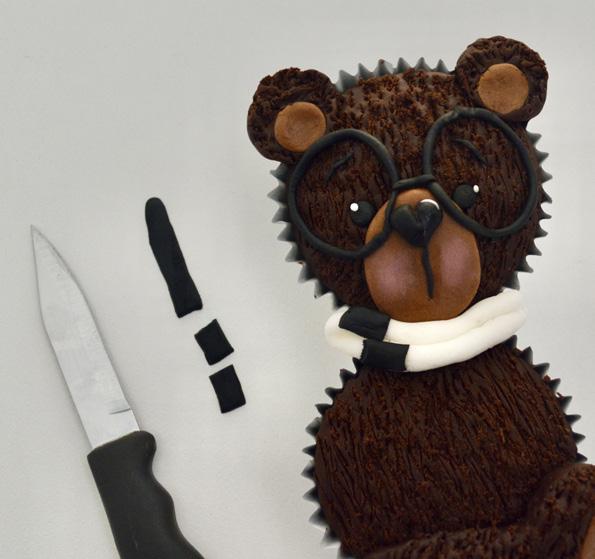
8. To make the glasses, roll 2 long and thin sausages from the black fondant. Arrange them onto the cupcake to form a large circle around each eye. Cut away any excess fondant with a sharp knife. Gently press the 2 ends to hide the join of each circle. Attach a small segment above the snout to join the 2 lenses.
MAKE THE LEGS
1. Roll dark brown fondant into a thick sausage. Bend 1 side of the sausage upward to form the foot. Repeat for the other leg, with the foot facing in the opposite direction.
2. Press the base of each foot to flatten them. Roll light brown fondant into a ball and press it between your fingers to form a flat oval shape slightly smaller than the base of the foot. Adhere them in position. Texture the dark brown fondant with a toothpick. Adhere the legs to the body cupcakes.
January | February 2023 americancakedecorating.com 55 TUTORIAL 1
7&8 4 3 6 2 2 5
1
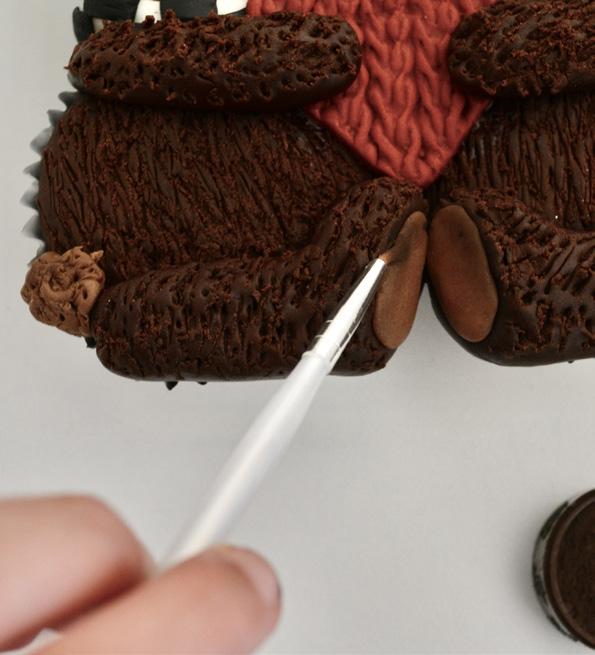
CREATE THE SCARVES
1. Arrange the cupcakes with each head and body adjacent to each other. Roll white fondant into a sausage about ⅓ inch thick and 4 inches long. Bend the sausage in half and adhere it over the join between each head and body cupcake pair, following the face curve of the cupcake. Repeat for the other cupcake pair.
2. Roll out a piece of black fondant and cut a long rectangle approximately the same width as the white sausage. Cut the rectangle into small pieces. Adhere the pieces onto the sausages in a checkerboard pattern.
3. Adhere the heart to the center of the 4 cupcakes, overlapping the scarves.
MAKE THE TAILS AND ARMS
1. Roll a small piece of light brown fondant into a ball. Adhere it to the teddy’s bottom adjacent to the leg. Texture the tail by making swirling motions on the surface of the fondant using a toothpick. Repeat for the other body cupcake.
2. Roll dark brown fondant into 2 thick sausages, with one side slightly narrower to form the shoulder. Bend them slightly.
3. Press the arms to flatten them slightly. Adhere them to the cupcakes, with the shoulder overlapping the scarf and the hand overlapping the heart. Texture the fondant with a toothpick.
ADD THE FINISHING TOUCHES
1. Create 2 red hearts for the bow and adhere them to the teddy’s ear.
2. Dust the edges of all the light brown pieces with brown petal dust and the cheeks with pink petal dust. ACD
56 americancakedecorating.com January | February 2023 TUTORIAL
1
1 3 3 2 2 T
1
ip: MAKING THE GLASSES OVERSIZED WILL GIVE YOUR TEDDY A CUTER LOOK. PLUS, IT'S EASIER!
Have you ever been in love?
Blame this guy. He’s to blame for all that. He’s grumpy and surly, and I can practically hear him asking “What do you want for dinner?” from here. You’ve had enough Cupid. Go to bed.
I wanted to make a tutorial for everyone on how to make this fun guy, but I completely forgot I’m horrible at teaching or showing how to do anything. I’m self-aware enough
CURM
UDGEONLY
C C P D U U I
BY SCOTT BRADSHAW
to know I can’t compete with the giants of cake tutorials. So, you want to make a gravity-defying showstopping fun cake? Great! Learn from someone else! I want to talk about the creative process and where to start. The success or failure or even the “next level-ness” of a cake design hinges on the creativity and planning you put into the project way before you even turn on the oven and start creaming the butter for the cake.
MEANING INMY
THE

LIFE. YOUR THE INSPIRATION.” —Chicago
A quick image search online will give you lots of different hits. The term “drunk cupid” gave me the pages to choose a few different images from that I liked. Be mindful of copyright infringement. Copyright is an entire complicated ball of wax. My general rule is if I recognize the character or art, it’s probably copyrighted and I avoid using it. Chances are you will encounter some naughty or bawdy images, too, and if they fit the situation or mood you’re trying to make with your cake, go for it. The amazing thing about life in the 2020s is that if you make a cake and don’t post a picture of it, did it really happen? Who’s to say?
An amazing thing happens when you cake for a while: You immediately start building the cake structure in your head when you see an image you want to cake. You evaluate and choose between threaded rods

January | February 2023 americancakedecorating.com 57 THE CAKE ALCHEMIST
“YOU’RE
and PVC pipe, cantilevering the weight and shape and size of the base. (I’m team threaded rod.) I also evaluate my inspiration image for how much cake I can get into it. People generally get excited about eating cake from the most dramatic parts of the cake, but never forget that the base cake board can usually hold a lot of cake. Incorporate it into the design. If by this point in the process you still can’t decide on an image, use it! I use my indecision for social media views and interactions. Post images and ask for feedback. It fosters investment
You can see my plan for structure for this cake. The black is threaded rods and the orange is ¾-inch plywood. I decided to go with ½-inch threaded rod for Cupid’s bow so it could hold the weight of the cake, which leads to my first tip. Imagine things are ten times heavier than they are, because they are. Cake adds up. Ganache adds up. Modeling chocolate and fondant add up. The key to a successful gravity-defying cake is that it, oddly enough, defies gravity … and that includes a superbumpy ride in the back seat of a car while your spouse hits EVERY BUMP THEY CAN POSSIBLY FIND WHILE THEY DRIVE YOU TO DELIVER THE CAKE.
Now that you’ve decided on your image and a rough idea of the structure, the hard part can begin. You must imagine what the 2-D image looks like in 3-D. What does it look like from above? It’s important to think about because that shape determines the cake-holding board. That shape dictates the shape of the cake. The shape I came up with is quite rude and I know you saw it. That’s why we’re friends.

Sketch It Out

All the cake weight will be coming off my Cupid’s one arm, so I drew one arm and then a roundish shape for Cupid’s belly off the arm, then another roundish shape for Cupid’s other arm and back where it met back up with his long arm (marked A in the doodle plan). In retrospect, this arm needed to be longer to make the entire thing a better match to the image, but I was worried about that one arm holding the entire weight of the cake.

Get your structure assembled, sanded, and sealed. HVAC aluminum tape is what I learned to use. If you’re using Styrofoam for any shapes that hang off the bottom of the board (knees and belly on my Cupid for example), the aluminum tape is a great way to keep the Styrofoam from contaminating any edible parts with Styrofoam cottage cheese curds. If you’re using rice cereal treats, they stick nicely to the aluminum tape too.
Manage your nuts. Inevitably, you’ll need to cut your threaded rod to fit a design. Nuts will not go onto a cut end of a threaded rod unless you rethread the rod. Build your cake structure from the bottom up, keeping the cut ends of the threaded rod down. Nuts will not screw down on a bent rod, so keep that in mind too.
58 americancakedecorating.com January | February 2023 THE CAKE ALCHEMIST
“COME WITH ME INA WORLD OFPURE IMAGINATION.”
—Willy Wonka
AND YOU’LL BE
STRUCTURE
Speaking of using your imagination, what does Cupid’s butt look like? You’re going to have to decide. The inspiration image doesn’t tell us. It’s up to us to decide what Cupid’s butt looks like. Luckily, I have some built-in inspiration. Now, I’m not saying that my body type resembles the inspiration image and I’m not suggesting that my butt might have influenced this cake’s butt. I’m saying props to all you people out there posting butt pics online. Taking a pic is difficult and it also can be awkward asking for help getting a photo. “No honey, it’s for a cake, I swear.”
While the image suggests it might be kind of flat, I decided he needed some junk in that trunk. He is Cupid after all. Cupid’s cake butt needs to be cakey after all. Decide if you’re going to skin Cupid’s butt or leave it bare ganache. Skinning a cake is the process of building most of the design elements with a firm ganache (either 4:1 ratio or 5:1), then covering the designs with a thin layer of modeling chocolate or fondant to finish. I chose to skin the ganache cake with a modeling chocolate finish.

As you sculpt and mold the butt, keep in mind that another layer of skin will go over the top and some details will get bulked up. Also, the

smoother and less dimply you can get the ganache, the smoother the final skin will go on. Being a cake sculptor means you’ll need to get all up in places you never suspected you’d be, like Cupid’s butt and Elsa’s boobs. Oh, the Places You’ll Go! never covered this. Where Dr. Suess lets you down, I’m here to tell you.
REAR VIEW
SCULPTING
“WORK, WORK, WORK, WORK, WORK, WORK
Rihanna
Now that you have your image and structure and plan in place, it’s time to get to work. Bake the cakes and make the ganache and the modeling chocolate or fondant. Be sure you’re flexible enough in your plan to compensate for scale issues or for design choices. I made my Cupid a bit more imp-looking and a bit more surly-looking just for fun. I also covered the cake board base with nip bottles. This is an adult cake with an alcohol theme, so why not? Have fun with your cake and enjoy watching all your art get demolished. It’s the transient nature of beauty. ACD

COMPARISON

Scott Bradshaw is the owner of sevenravensbakehouse. com, an entertaining blog which strives to get people to look at food and recipes in a twisted way … as twisted as an old phone cord. Scott grew up in Texas, and has lived in Arizona, Nevada, and Missouri. He makes Plainville, MA, his home these days with his saintly husband and a bossy little Pomeranian.
sevenravensbakehouse.com tiktok.com/@goosecaboose70

January | February 2023 americancakedecorating.com 59 THE CAKE ALCHEMIST
. ”
PIÑA COLADA CAKE
Coconut and pineapple have long been flavor profiles associated with cake, but this recipe takes those traditional ingredients and kicks it up a notch. Inspired by the classic piña colada cocktail, this moist, rum-infused coconut cake is layered with pineapple compote and coconut-rum buttercream.
Ingredients
COCONUT CAKE
1¾ cups all-purpose flour 1½ teaspoons baking powder ½ teaspoon salt ½ cup unsalted butter, softened 1½ cups granulated sugar 3 large eggs 2 tablespoons rum or 1 teaspoon rum extract ¾ cup coconut milk, room temperature
COCONUT-RUM BUTTERCREAM
2 cups unsalted butter, softened 2 pounds confectioners’ sugar ¼ cup coconut cream 1 teaspoon rum extract
PINEAPPLE CRUSH COMPOTE
14-ounce can crushed pineapple, drained ¼ cup granulated sugar ¼ cup coconut rum 2 teaspoons cornstarch
DECORATION
7 ounces sweetened coconut flakes
Instructions
MAKE THE CAKE
1. Preheat the oven to 350°F. Grease and flour three 6-inch cake pans.
2. In a medium bowl, whisk the flour, baking powder, and salt to combine. Set aside.
3. In a separate bowl, beat the butter until smooth and pale. Add the sugar and beat on medium-high until pale and fluffy, about 3 to 4 minutes.
4. Add the eggs 1 at a time, making sure to fully incorporate after each addition. Add the rum or the extract and incorporate.
5. Alternate adding the flour mixture and the coconut milk, beginning and ending with the dry ingredients. Mix until just combined.
6. Spread the batter evenly into the prepared pans and smooth the tops with a spatula. Bake for 30 to 35 minutes, or until a toothpick inserted comes out clean.
7. Cool the cakes in the pans for 10 minutes and then place the cakes on a wire rack to cool completely.
MAKE THE BUTTERCREAM
1. Beat the butter in a large bowl for 5 minutes until smooth and very pale.
2. Slowly add the confectioners’ sugar and beat after each addition until smooth.
3. Add the coconut cream and rum extract and beat until pale and fluffy.
MAKE THE PINEAPPLE COMPOTE
1. Place the pineapple, sugar, rum, and cornstarch into a medium saucepan, stirring fully to combine. Cook over medium heat, stirring constantly, until the mixture thickens, about 1 to 2 minutes. Cool completely before using.
60 americancakedecorating.com January | February 2023 RECIPE
ASSEMBLE THE CAKE
1. Level and trim the cake layers.
2. Place 1 layer of cake onto a cake round. Top it with a thin layer of buttercream and pipe a dam around the outside using a large round tip to
hold the filling. Add the pineapple filling inside the dam and spread it evenly.
3. Repeat with the next layer until all layers have been added and crumb-coat the outside. Chill to set.
4. Add a final layer of buttercream and use a bench scraper to even the sides.
5. Cover the outside of the cake with the coconut, pressing it into the sides to fully adhere. ACD

January | February 2023 americancakedecorating.com 61
Tip: YOU CAN ALSO TOAST THE COCONUT FOR THE OUTSIDE. SPRINKLE IT EVENLY ONTO A SHEET PAN AND BAKE FOR APPROXIMATELY 7 MINUTES AT 350°F.
PERFECTING the MACARON CAKE
BY SANDRINE WALLACE LEVEL:

Sandrine Wallace is the founder and owner of French Pastry by Sandrine in the Midwest. Since 2018, the bakery offers traditional and authentic French desserts, including the incomparable French macarons. Sandrine grew up in Southern France and has been baking for years. She shares her love of creating authentic French pastries, but puts all her authentic savoir faire in developing an original and unique range of macarons flavors, more than 120, available all year long. The birthday macaron cake has become Sandrine’s signature cake.
frenchpastrybysandrine.com instagram.com/frenchpastryby

62 americancakedecorating.com January | February 2023
TUTORIAL
Macaron cakes are popular and versatile. They can be in the shape of digits for birthdays, monograms for weddings, or simply roundshaped for any occasion. Here are some pro tips to create one for yourself or your clients.


CHOOSE YOUR FLAVORS.
Pick two favors or three, maximum. Too many flavors is overwhelming. Some combinations are really popular, like pear and almond, lime and coconut, strawberry and banana, and dark chocolate and peppermint. But there’s really no rules for combinations here. All the cakes are filled for a soft and moist texture.
ASSEMBLE THE CAKE. Slice your completely cooled cake with a long knife. Fill a piping bag fitted with a star tip like Wilton #8B with the flavored filling of your choice such as ganache, cream cheese frosting, or buttercream. Dollop the filling over your cake base, add sliced fruit or berries, and cover with the second half of the cake. Repeat the piping step on top of the cake, covering all the surface again with dollops.
DECORATE THE CAKE. This is when your creativity comes into the picture! Fruit, chocolate balls, little French meringues, candies, doughnuts, French macarons, and flowers are all great options. When it comes to toppings, anything is possible, but keep the following guidelines in mind.


1. Pick two or three colors. Like too many flavors is overwhelming for the palate, too many colors is overwhelming for the eye. An exception to this rule is a rainbow cake.
2. Coordinate the color of your frosting with the natural color of the fruit used as toppings. You can stay monochromatic or go with a complementary palette.
3. For fruit like bananas and kiwis, only place them inside the cake, as oxidation will turn them brown very quickly. Pick fresh fruit in season or used canned fruit.
4. Focus on each section of the cake to make sure they are each as detailed.
5. Use all kinds of floral items like different types of greenery and both small and large flowers.
6. Adjust the theme to the season or to the personality of the recipient. Don’t be afraid to be bold!
7. Remember, harmony is the key: harmony of the colors and harmony of the flavors. ACD
January | February 2023 americancakedecorating.com 63 TUTORIAL
1 2 3 5 7
Chocolate Heart Boxes Chocolate Heart Boxes
Such a sweet gift, these edible boxes can be filled with your favorite candies or small cookies.
 BY SERI LOPEZ
own Pampered Chef business, Lopez took a cake-decorating class and her new career began. She was certified by taking classes at local cake-decorating supply shop in 2002, made her first wedding cake in 2004, and started her business in 2006. She honed her skills in sugar art through master classes under very well-known sugar artists over the years. She has been a Food Network competitor and a winner at both the Oklahoma State Sugar Art Show and Oregon State Fair. She loves making cakes and working with her hands to create.

seriouscake.com facebook.com/SeriousCakecom-155812504431839 instagram.com/seriouscakecom/
spatula. Do not overheat the chocolate or it will burn.
2. Pour the chocolate into very clean molds. Tap them lightly on the counter until all air bubbles have come up. You can hold up your mold and see through the chocolate underneath a lamp to see if the chocolate has filled into all the crevices of your molds.
3. Place the molds onto a tray and place a small item under the lid side of the molds to keep them level on the tray. Place them in the refrigerator
64 americancakedecorating.com January | February 2023 TUTORIAL
Various luster dusts Lemon extract or vodka Equipment: Heart molds Paintbrushes
ip: YOU CAN TEST YOUR COLORS ON THE BOTTOM SIDE OF YOUR BOX OR POUR EXTRA CHOCOLATE ONTO PARCHMENT PAPER, ALLOW IT TO DRY, AND THEN TEST YOUR COLOR SELECTION.
for 15 minutes, then place the molds into the freezer for 15 more minutes.

4. Once the chocolate has set, take the molds and gently flip them over onto a piece of parchment paper to release the hearts from the molds. They should just fall out. If they don’t, you may have to put them back into the freezer.


5. Repeat Steps 1 through 4 with other colors. If you would like to color your chocolate, use oil-based colors so you do not seize the chocolate.
6. Using various luster dusts mixed with lemon extract or vodka, paint the lids of the boxes. Let dry. ACD
1 5 2 6a 3 6b 4 TUTORIAL
January | February 2023 americancakedecorating.com 65
T
Cake Wars heard the loudest cheers of the entire expo, as crowds gathered to watch fearless competitors race to finish.
>> Cakes from all around the world were entered in the eight different display categories.

CAKE FIESTA MANILA 2022
Cake Fiesta Manila, which prides itself on being the first and the biggest international cake show in the Philippines, returned on November 24, 2022. For three days, the show hosted top cake artists and 108 soldout vendor booths from around the globe to share their skills and expertise with thousands of aspiring cakers and bakers.

The show remains the largest and most prestigious international display cake competition in the country. There were a total of 247 cakes and eight categories in which to compete. Cakers of all levels were welcome to enter, with cakes being judged on seven criteria: general appearance, proportion, number of techniques used, creativity, difficulty of techniques, neatness, and precision.
In addition, Cake Wars, the nation’s first live cake decorating competition, once again was a huge success. Teams from all over the country showcased their talent through a one-hour decorating challenge. ACD

66 americancakedecorating.com January | February 2023
Buttercream Cake Winners
First Place: Faith Ileto
Second Place: Alicia Alwin Alterado
Third Place: Jeaniffer Arnaiz Prichard
1st
Cupcake Winners
First Place: Madelane Maddagan
Second Place: Catherine Recato
Third Place: Alfred Nimo
1st
Celebration Cake Winners
First Place: Faith Ileto
Second Place: Madelane Maddagan Third Place: Thi Phuong Nguyen Nguyen
1st
Sugar Flower Winners

First Place: Daisy Flor Parreno
Second Place: Jairuz Bon Edano
Third Place: Angie Parina
Sculpted Cakes Winners


First Place: Khristine Marie Sablon
Second Place: Alvin Gomez Third Place: Patrisha Anne Bautista
Cookie Winners
First Place: Marie Mae Tacugue

Second Place: Stacy Taljaard Third Place: Gizelle Roa
1st
Wedding Cake Winners

First Place: Shiela Olivo
Second Place: Sofia Ulloa
Third Place: Juncelle Resurreccion
Sugar Figure Winners

First Place: Madelane Maddagan
Second Place: Rowena Torres
Third Place: Marie Rachelle Canave
January | February 2023 americancakedecorating.com 67 SPECIAL FEATURE THESAVEDATE
will be back in 2023!November
Cake ManilaFiesta
1st
1st
1st
2nd
Cake Show Schedule
While the Ultimate Sugar Show will return in 2024 and IBIE will be back in 2025, we still have plenty of other shows to look forward to in 2023!
SOFLO CAKE & CANDY EXPO


April 28–30, 2023 Miami, FL
THAT TAKES
THE
CAKE
March 31–April 2, 2023 Round Rock, TX
A sugar-art show is a multifaceted event that brings sugar enthusiasts of all skill levels together from all over the country and all over the world. Competitors bring decorated cakes and sugar arts of all forms to enter into the judged competition. Instructors offer a variety of classes to beginner to advanced students who are interested in learning new techniques. Events throughout the weekend are scheduled to be informative and interesting to attendees of all ages. Attendees include pastry chefs, sugar artists, business owners, hobby bakers, and general public. There is truly something sweet for everyone.
For more information, visit thattakesthecake. org.
Going on its seventh year, South Florida is home to the largest and most interactive cake and candy expo. In its short existence, SoFlo Cake & Candy Expo has already proven to be one of the most dynamic and engaging events for cake and candy industry professionals, enthusiasts, and hobby bakers. It is the trendsetter for offering a shopping and learning experience during one weekend like no other show! Join us and be a part of the industry’s most highpowered and influential cake and candy convention. For more information, visit soflocakeandcandyexpo.com
68 americancakedecorating.com January | February 2023 SPECIAL FEATURE
2 0 2 3
ZOE CAKES SUGAR ART SHOW
September 29–October 1, 2023 Tulsa, OK
Zoe Cakes Sugar Art Show is proud to host their first annual sugar-art competition. All ages and skill levels are welcome to compete and all skills are welcome. Medals, prizes, and cash will be awarded to the winning entries.

For more information, visit zoesugarartshow.com
ARTISAN BAKERY EXPO EAST

October 1–2, 2023 Atlantic City, NJ
The second annual Artisan Bakery Expo East (previously Atlantic Bakery Expo) is the only event in the Eastern United States focusing on the specific needs of the retail-artisan bakery community. Every year, ABEE will provide the opportunity to network with your peers and connect with the industry. You’ll learn the latest baking techniques and business practices as presented by some of the most successful bakers in the region. Included in the events is Cake Decorating Extravaganza, a cake competition with three categories.
For more information, visit artisanbakeryexpoeast.com
CAKE INTERNATIONAL

November 3–5, 2023 Birmingham, England
Cake International is the original and world leading competition for the sugarcraft community, attracting thousands of entries each year! Cake enthusiasts must experience this unique event that brings together the latest trends and supplies, cutting-edge workshops and demos, and the world-famous Cake International competition display. Details on the 2023 show will be posted in the upcoming months. ACD
Stay tuned for more information at cakeinternational.co.uk.
Have the 4-1-1 on other cake shows in 2023? Send us a message at annmarie@americancakedecorating.com with more details.
January | February 2023 americancakedecorating.com 69 SPECIAL FEATURE
CREAMY LEMON CURD
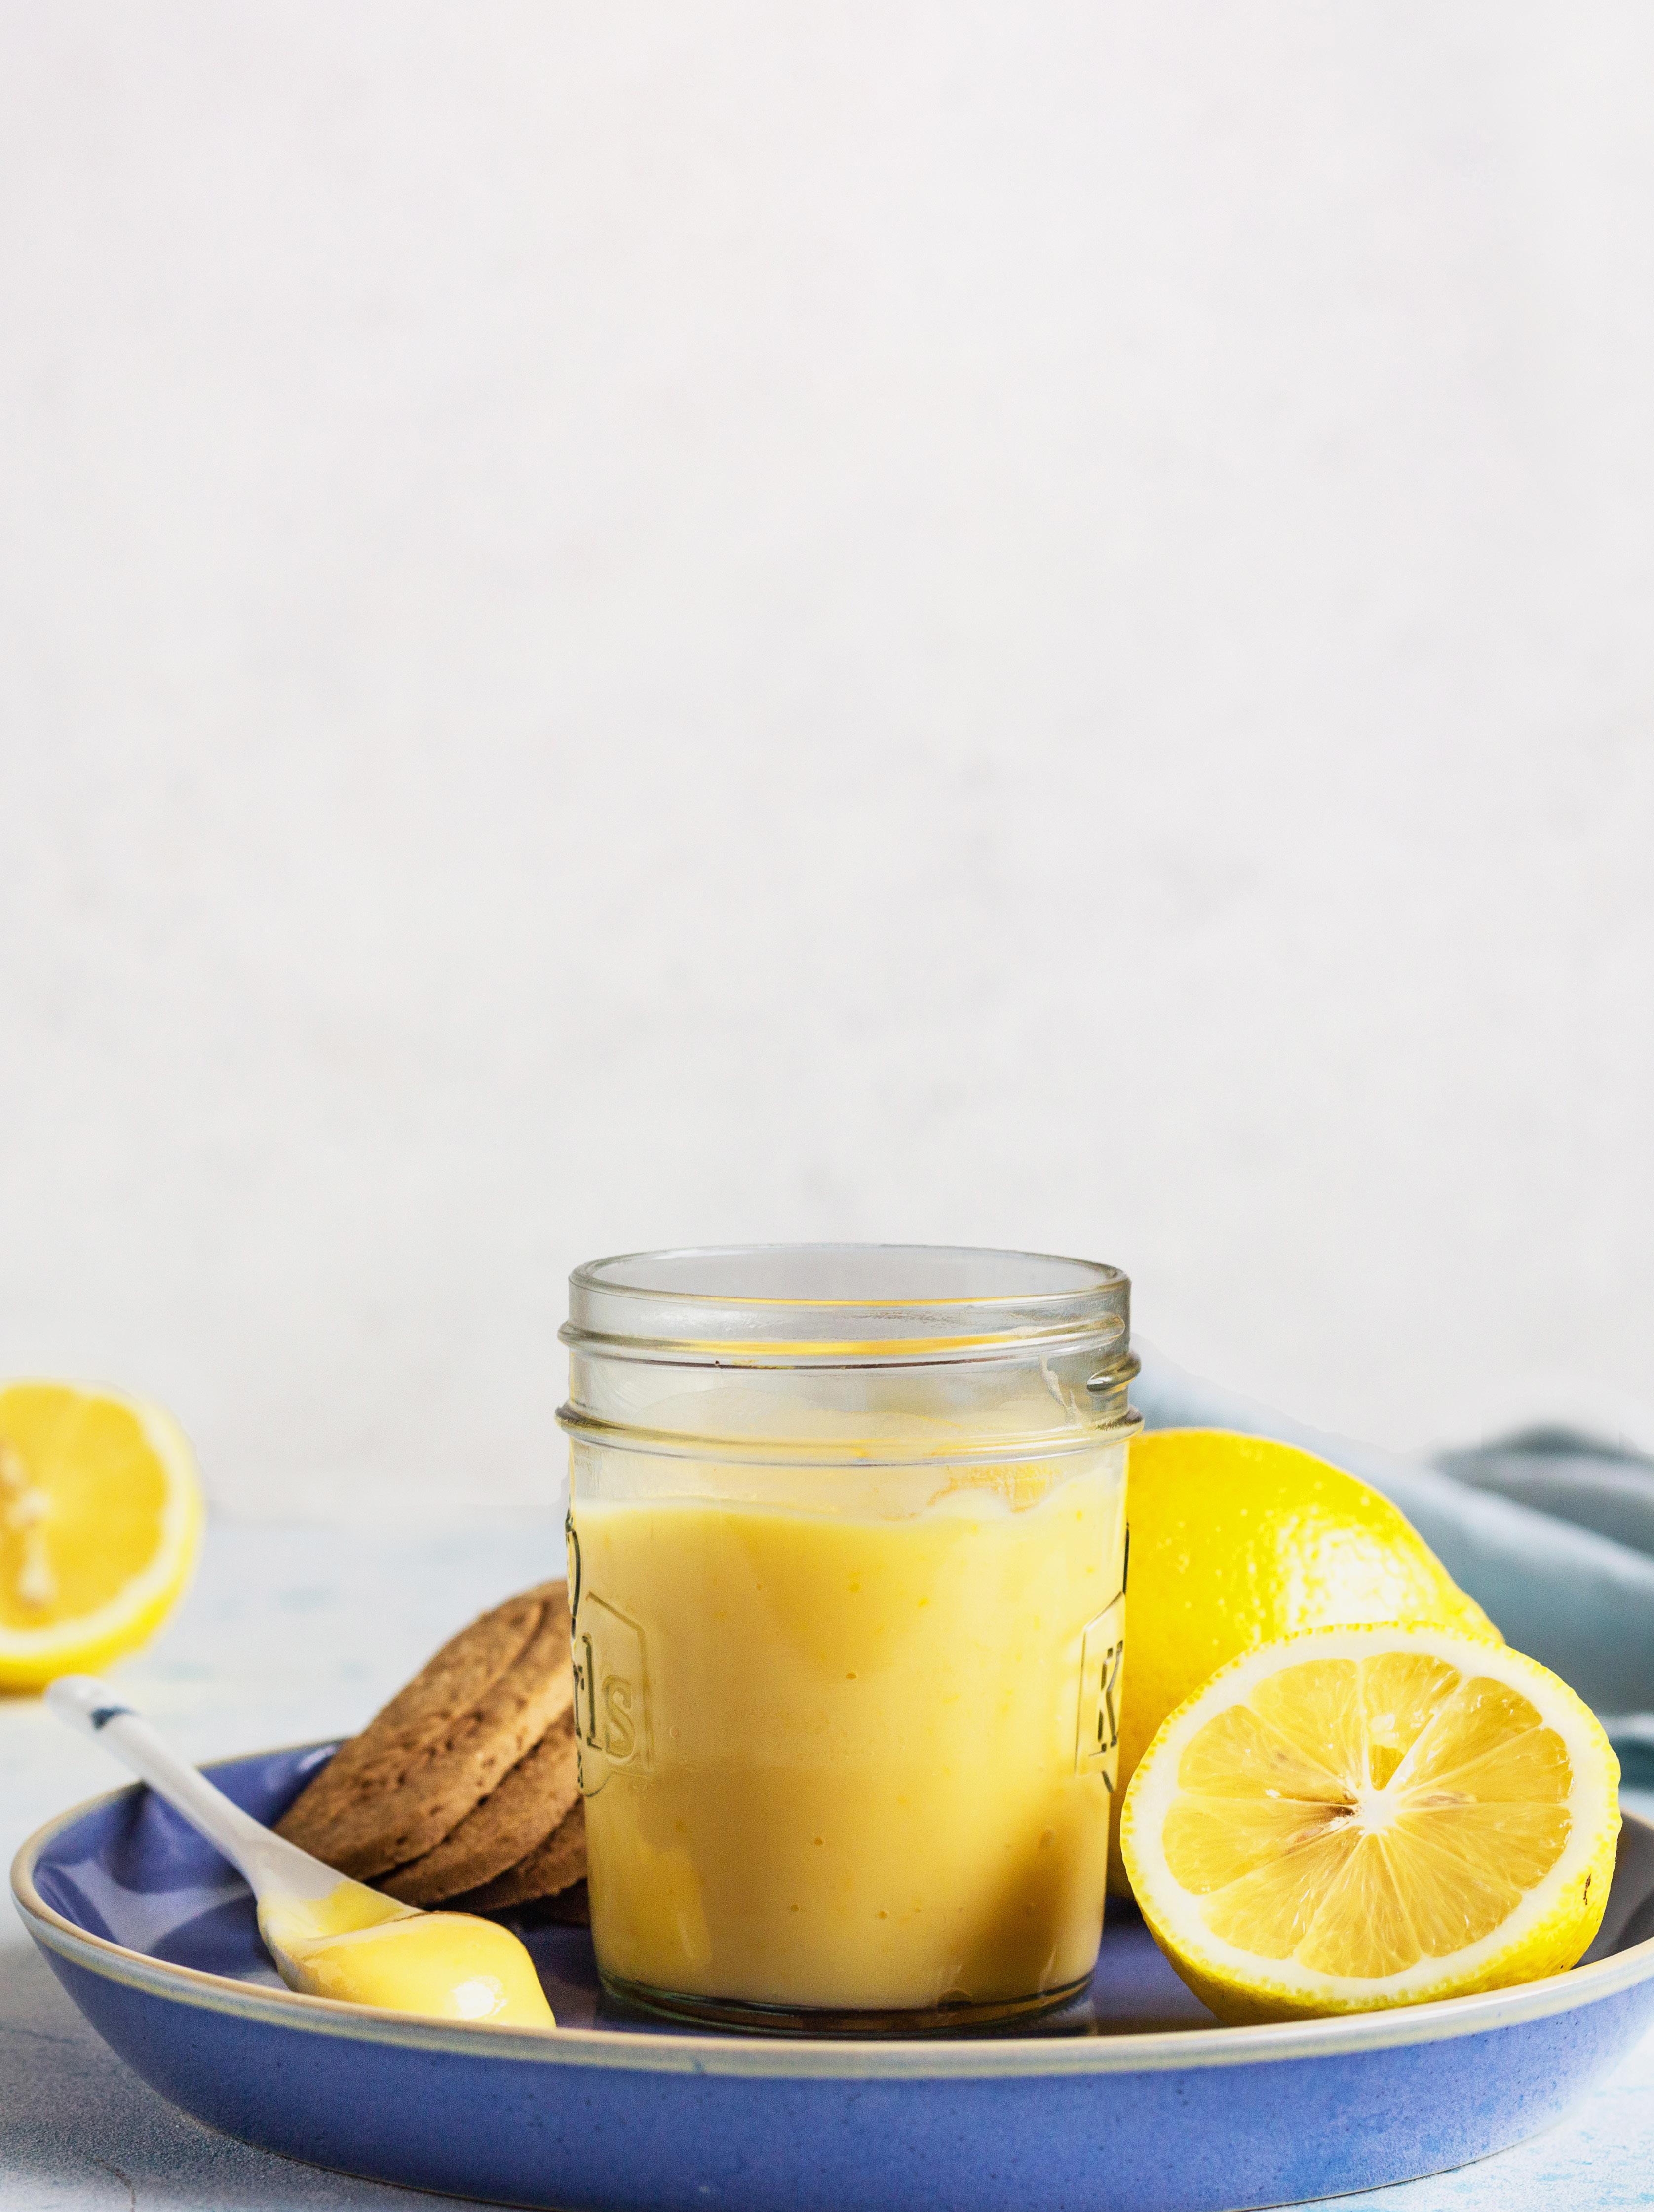 BY ANNMARIE MATTILA
Ingredients
2 large eggs
2 egg yolks
¾ cup granulated sugar
2 teaspoons lemon zest
½ cup lemon juice
2 tablespoons heavy cream 8 tablespoons unsalted butter, softened
Instructions
1. In a medium heatproof mixing bowl, add the eggs, egg yolks, sugar, lemon zest, lemon juice, and heavy cream and whisk to combine.
2. Set the mixture over a saucepan of simmering water and whisk constantly until the mixture becomes thick and the temperature registers 170°F, about 12 to 15 minutes.
3. Remove the mixture from the heat and add the butter chunks a few at a time, whisking to melt and combine. Once the mixture is creamy and consistent, press through a sieve into a separate clean bowl and cool completely to room temperature before using. ACD
A good basic lemon curd can be used as a filling for all kinds of pastries, from cakes to pies to cookies.
LAST BITE
Tick one thing off your bucket list in 2023: Get yourself published in a leading world cake magazine. Getting published raises your profile and helps to showcase your skills, and personality, which can lead to all kinds of exciting opportunities, including teaching at international shows, online tutorial commissions, brand ambassadorships, and more.
The first step is easy: Simply get in contact with our editor to discuss which submission opportunities are open, You Made It! themes coming up, and what ACD can do for you. Get in touch: annmarie@americancakedecorating.com
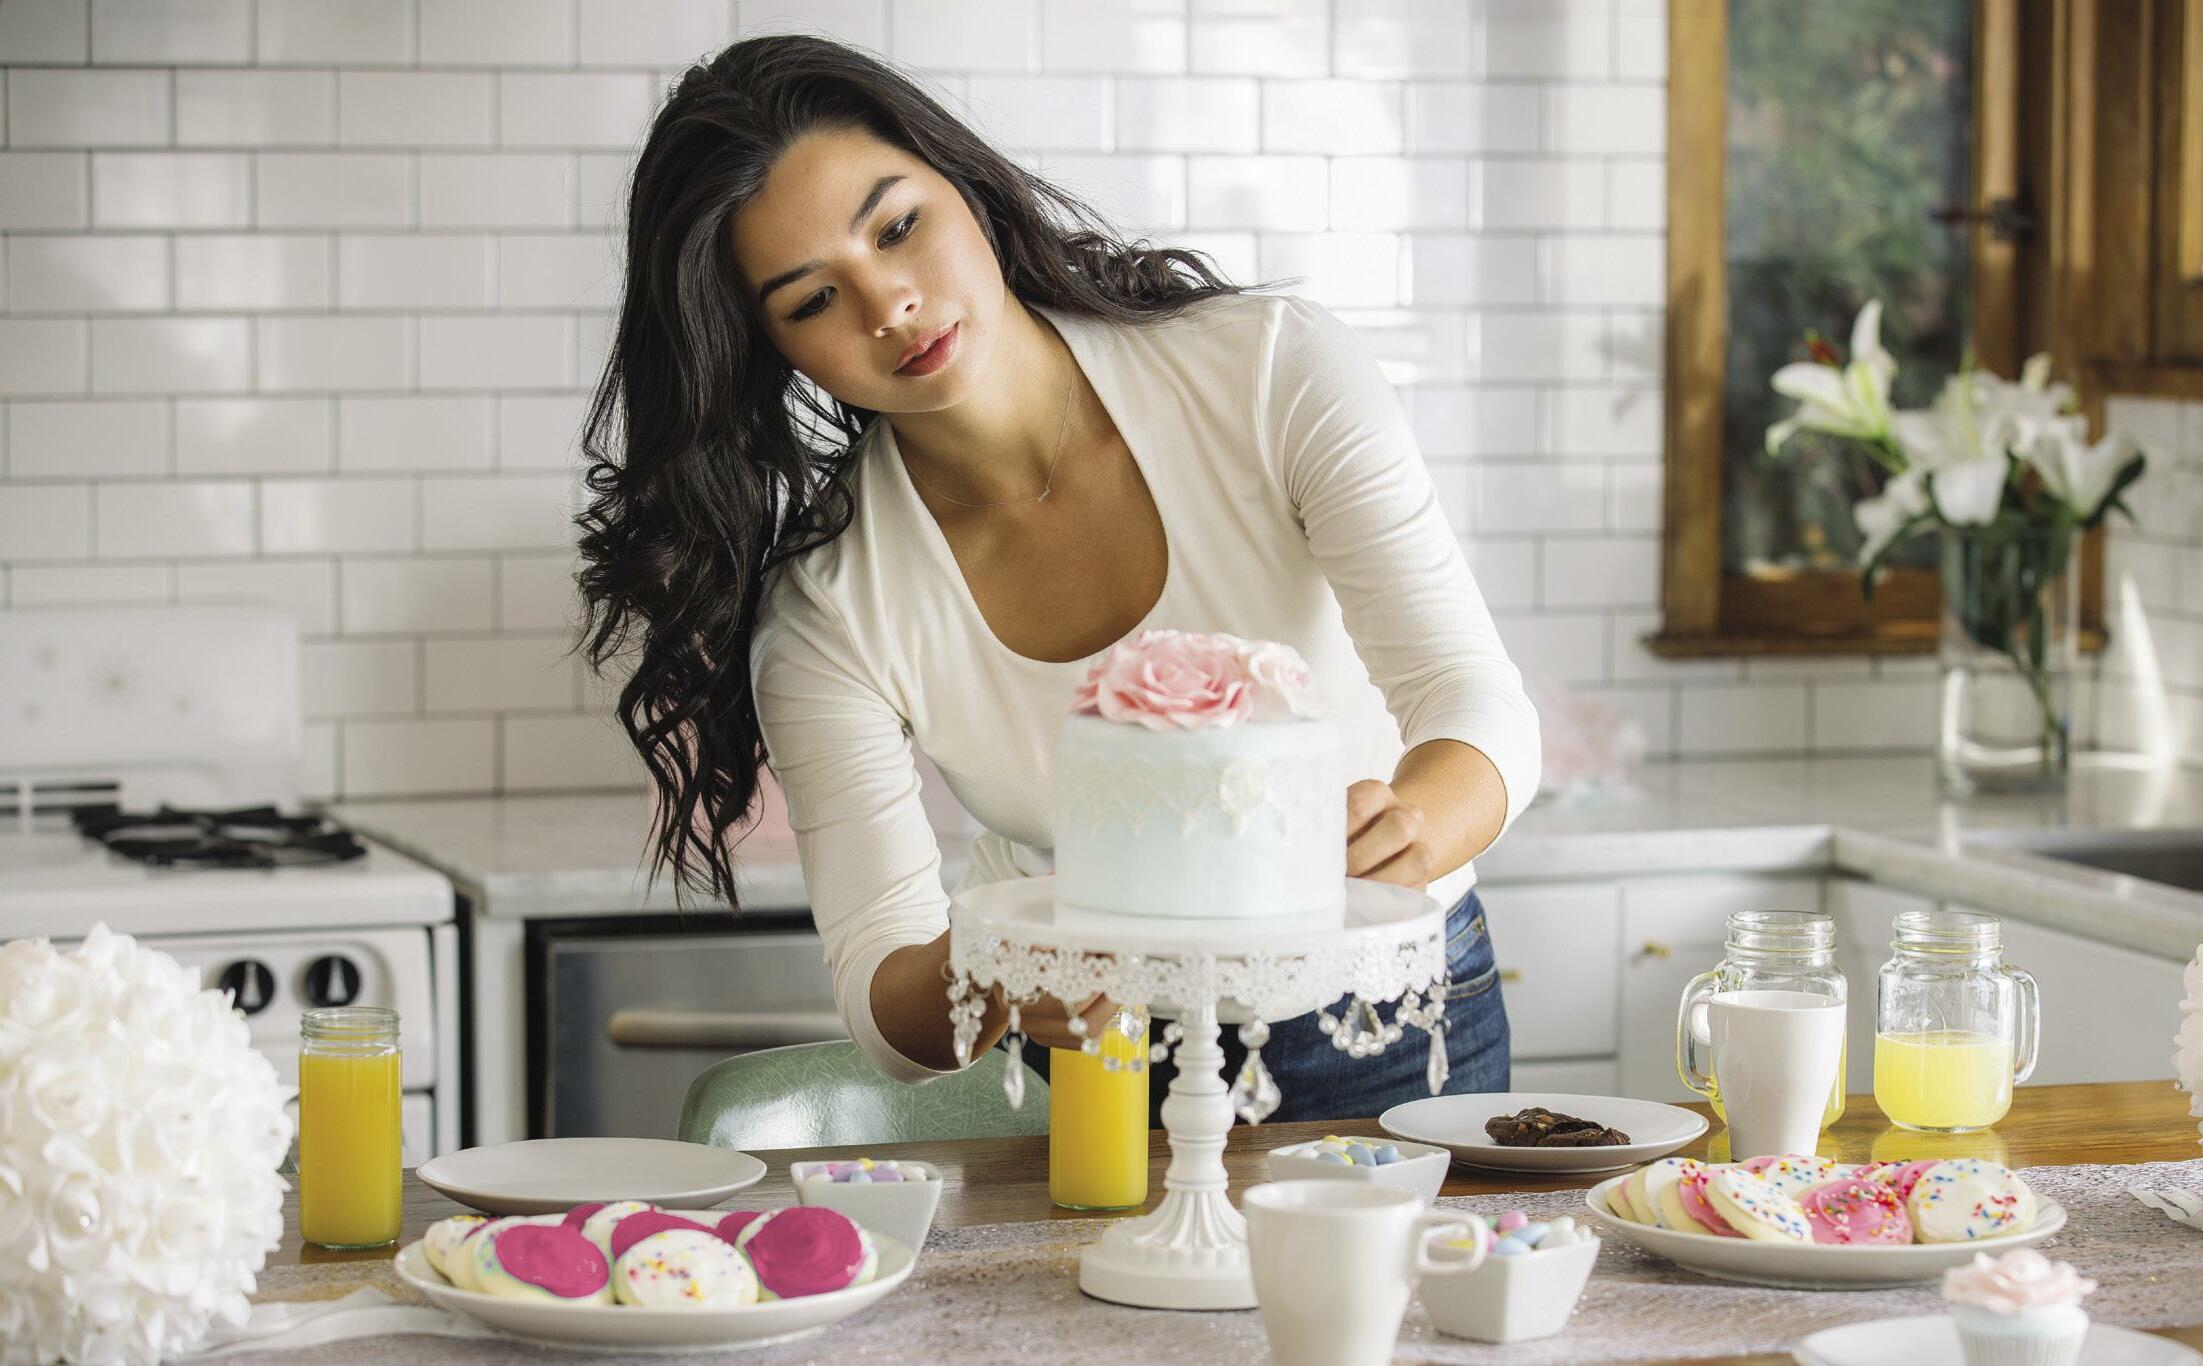
CAKE CASTING CALL!
WE WANT TO PUBLISH YOU!
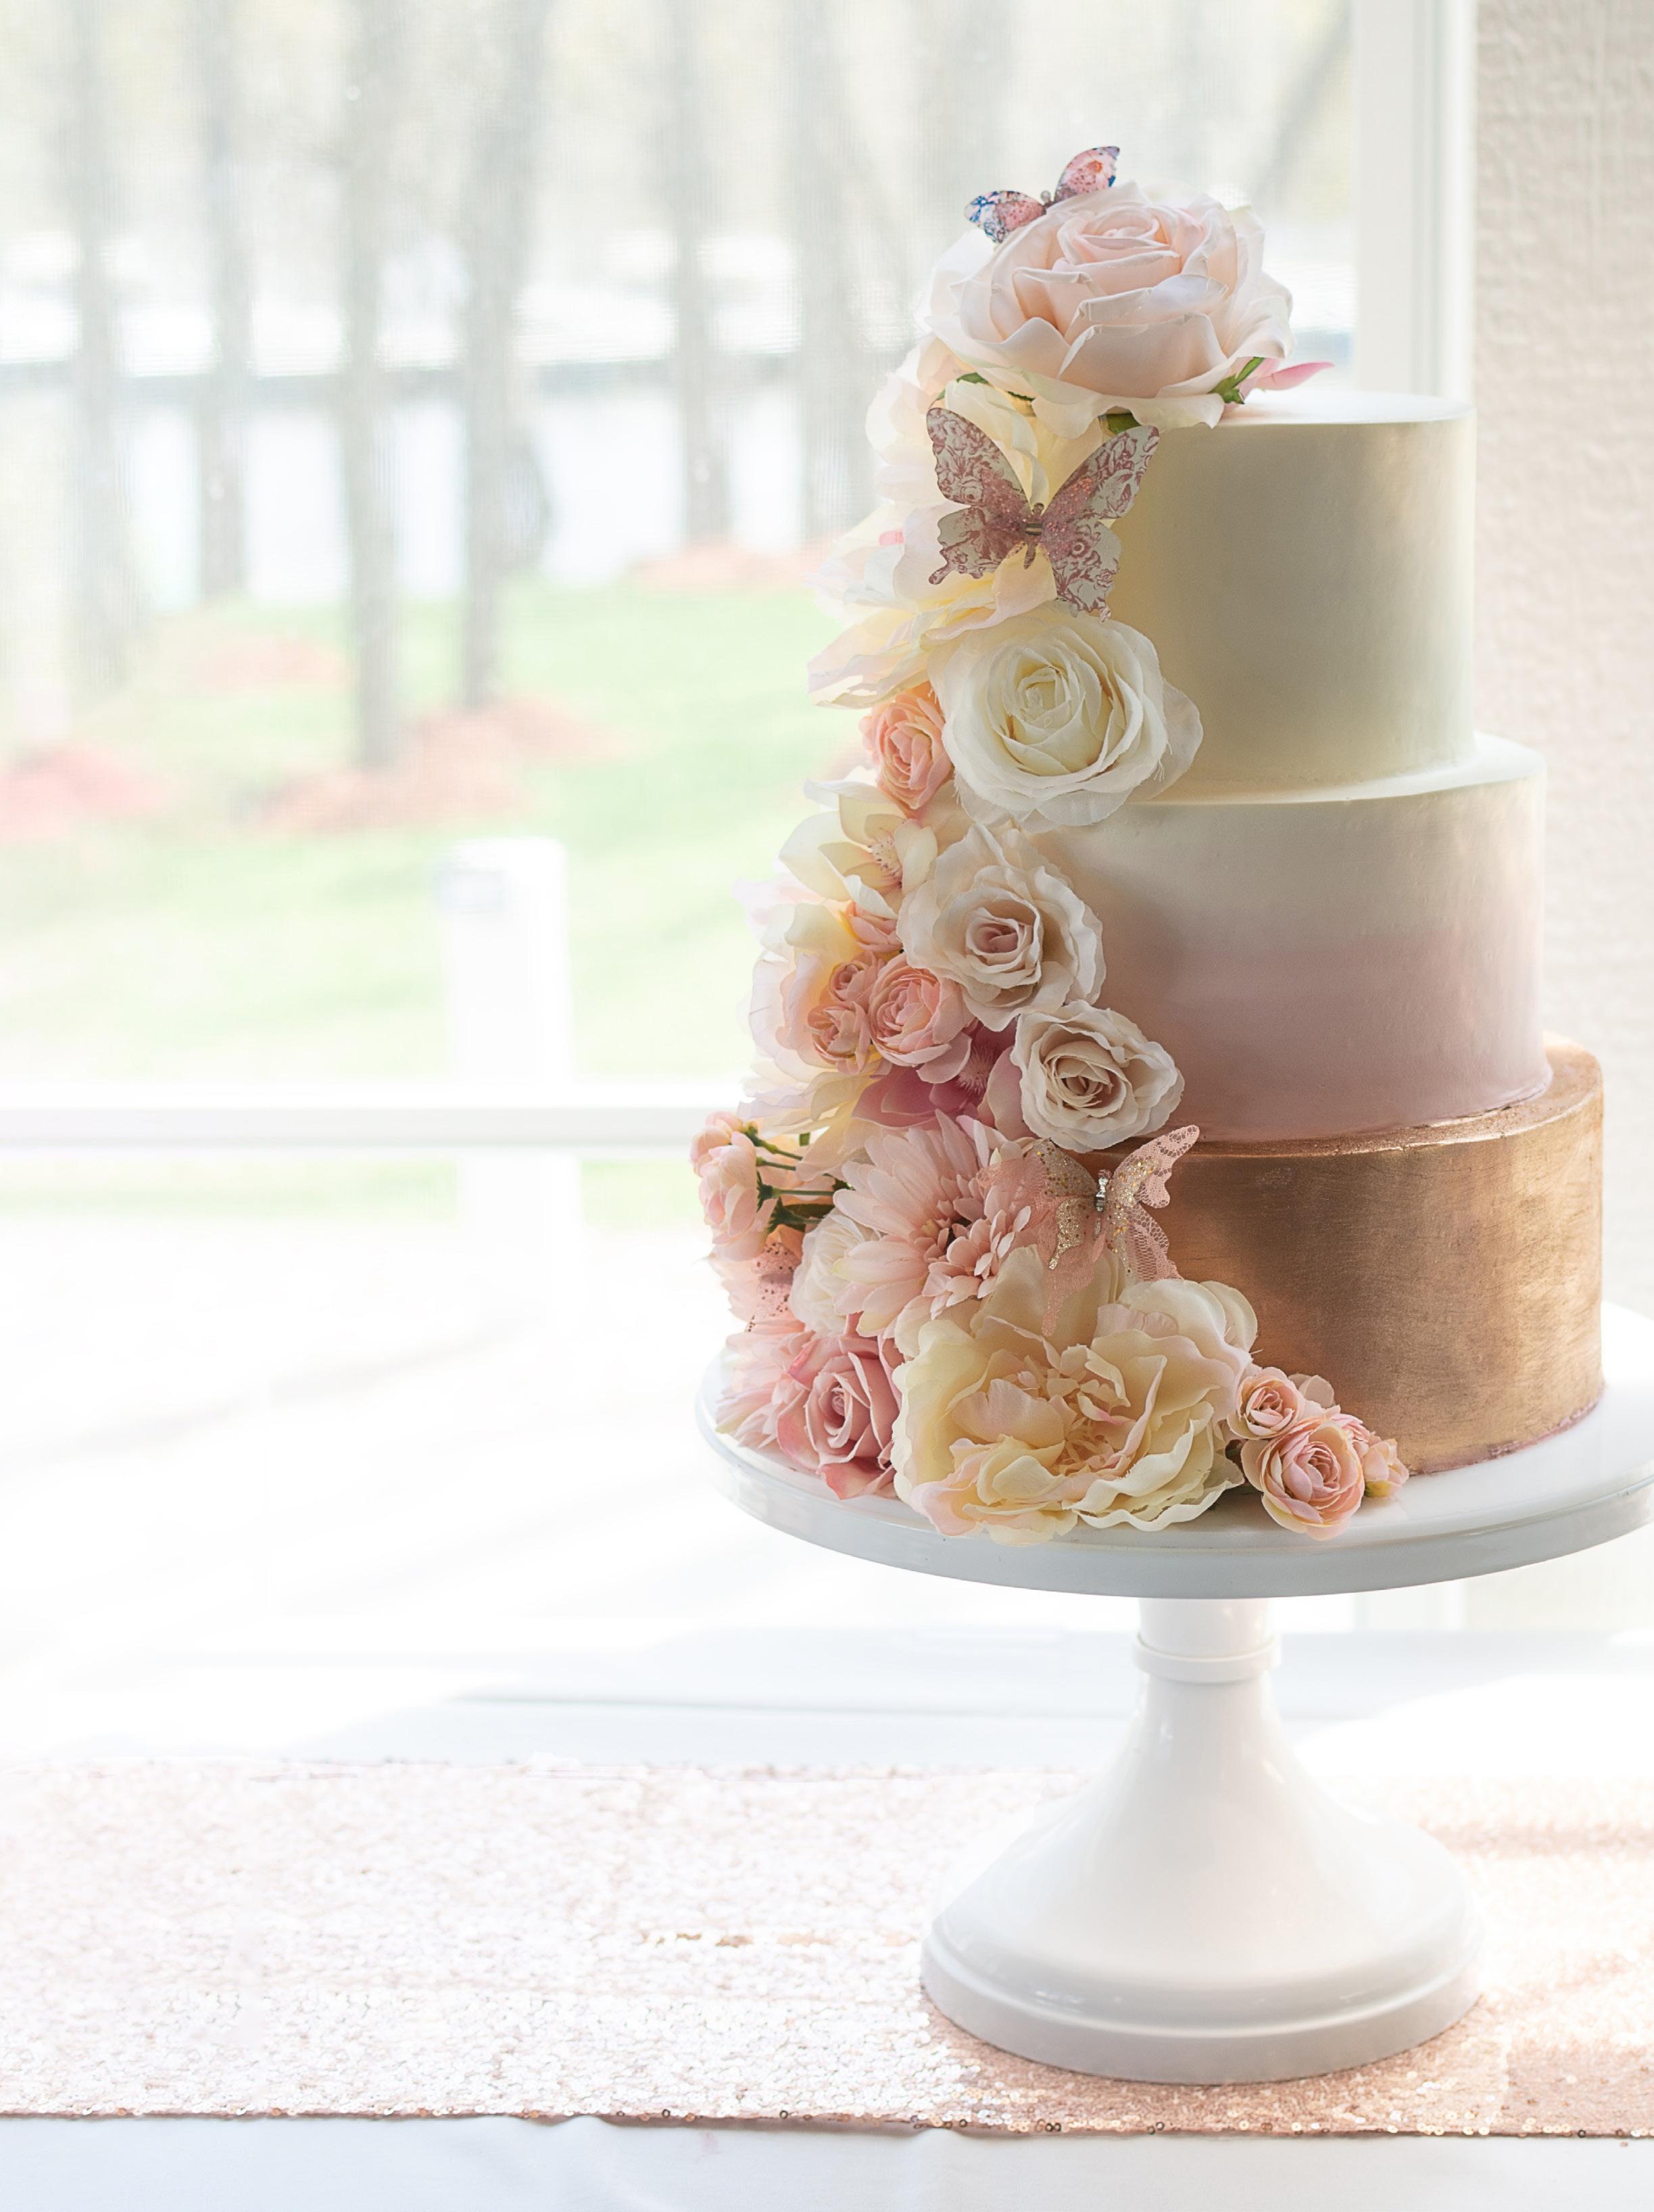


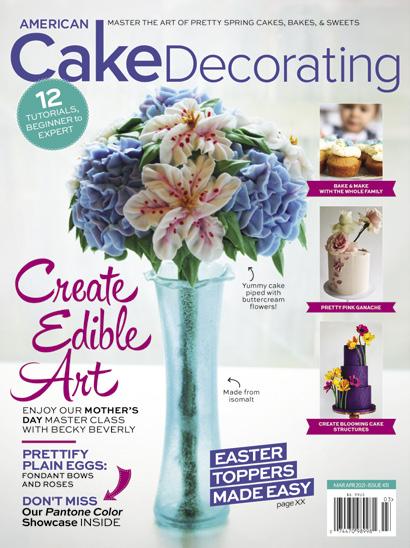


americancakedecorating.com IDEAS THAT INSPIRE SUBSCRIBE TO ACD & GET THE CONTENT DIGITAL SUBSCRIPTIONS AVAILABLE WORLDWIDE! You Crave! NOW ACCEPTING PayPal

