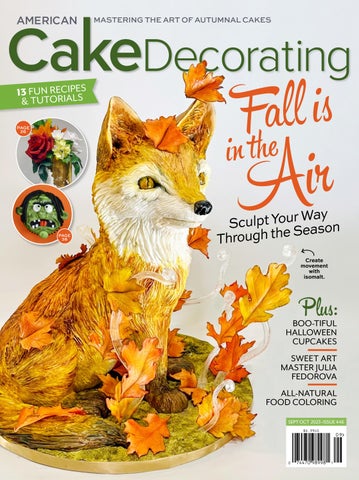

SEPT OCT 2023 • ISSUE 446 MASTERING THE ART OF AUTUMNAL CAKES Create movement with isomalt. Fall is in the AirSculpt Your Way Through the Season BOO-TIFUL HALLOWEEN CUPCAKES SWEET ART MASTER JULIA FEDOROVA ALL-NATURAL FOOD COLORING Plus: 13 FUN RECIPES & TUTORIALS PAGE 26 PAGE 38
FROM OUR PARTNER

ACD READERS & FANS Hello


LETTER FROM THE EDITOR
I love fall. I could probably just end this letter right now, because for those of you who agree with me, there’s little else to be said. But since the changing of the seasons may not be everyone’s cup of tea, hopefully the contents of this new issue will give you a little insight into our autumn-loving brains. For one, how irresistible is cover star Tammy Varela’s little fox? It requires a lot of skill, which plenty of you have, no doubt. Plus, if you have a helper like she does, it’s worth the effort.
Of course, you don’t have to be an expert to level up your fall decorating skills. Try using all-natural food coloring for an elegant waferpaper flower or create layers of gum-paste leaves that evoke all the brilliant colors of the season. Or skip right to Halloween! I know it’s pretty much every decorator’s dream holiday, so we’ve got plenty of inspo for you there too. We’ve got boo-tiful little cupcakes, a creepy special delivery, and even a talking Disney creation. (You know Scott Bradshaw always steps it up during spooky season!)

We’re also so lucky to have words of wisdom from our friend and contributor, Julia Fedorova. If you’ve ever been interested in making detailed, competition-worthy creations, she’s your go-to! Plus, she gives us a sneak peak at her new show next year. So, get ready, my little ghouls and goblins! This fall is going to be fab-boo-lous!
From

We’d like to meet you… Join our incredible community of cakers on your favorite platform, and don’t forget to sign up for our newsletter to stay up to date on all things cake! Want to pitch an idea or just want to say hello? Email annmarie@americancakedecorating.com. americancakedecorating.com/blog americancakedecorating.com instagram.com/americancakedecorating facebook.com/groups/ACDCakeTalk facebook.com/americancakedecorating September | October 2023 americancakedecorating.com 1 TUTORIAL
my kitchen to yours,
Publisher/CEO Grace McNamara
Associate Publisher Ania McNamara-Munzer
Managing Editor AnnMarie Mattila
Creative Director Brenda Drake Lesch
Copy Editor
Social Media Coordinator

Maude Campbell
Corina E. Buzdugan
Contributors Scott Bradshaw, Courtney Cowan, Julia Fedorova, Jewel Johnson, Eszter Kanyári, Juliana Manno, Karla Marro, Cydni N. Mitchell, Aparnashree Mishra, Rich Myers, Lala Olivo, Allison Reiss, Sharon Siriwardena, Tammy Varela
Subscriptions 651-330-0574; 1 Year $19.95
AmericanCakeDecorating.com

Editorial Director: Please direct all correspondence, photos, and press releases to AnnMarie Mattila, annmarie@americancakedecorating.com, or mail to American Cake Decorating, 4707 Hwy 61 N #255, St Paul, MN 55110.


Subscription Questions & Changes: Send address changes to, New Mailing Address: American Cake Decorating, 4707 Hwy 61 N #255, St Paul, MN 55110 or email contact@ americancakedecorating.com. Please notify us of address changes four to six weeks ahead of time. The post office is under no obligation to forward your magazine. If the postal authorities notify us that your magazine is undeliverable, we have no further obligation unless we receive a corrected address within one year. We cannot be responsible for non-delivery. The staff of American Cake Decorating magazine and AIM Communications LLC have reviewed contributions and advertising materials with the understanding that the information is original, accurate, and reliable, but we cannot be held responsible for such content. Please note that some of the techniques may be suitable for private home use, but are not necessarily appropriate for cakes destined for sale. American Cake Decorating magazine (ISSN 1094-8732) published bimonthly by AIM Communications, LLC, 4707 Hwy 61 N #255, St Paul, MN 55110. Tel: 651-330-0574; Fax: 651-756-8141. Visit our website at www.americancakedecorating.com Periodicals postage paid at St. Paul, MN, and additional mailing offices. Postmaster: Send address changes to American Cake Decorating magazine, 4707 Hwy 61 N #255, St Paul, MN 55110. Allow 60 days for address change. Copyright ©2023 by AIM Communications, LLC. Reproduction in whole or part without written permission prohibited.
September | October 2023. Issue 446.
2 americancakedecorating.com September | October 2023
ON THE COVER
IN THIS ISSUE
CAKE TALK | 4
News, events, and more.
YOU MADE IT! | 6 Stained glass–inspired cakes. EVENTS | 23

Cake shows you can still attend this year.
MEET THE MAKER | 24
Learn all about sugar master Julia Fedorova.
SHOPPING | 33
Everything you’ll want this fall.
CAKE ALCHEMIST | 43
Scott Bradshaw goes spooky with Disney.
SWEET BOSS | 54
Cyd Mitchell’s blogging tips.
CAKE COLLABORATION | 67
A colorful ode to pop art.
LAST BITE | 70
Bake seasonal pumpkin cake.
RECIPES
& TUTORIALS
ALL-NATURAL FOR FALL | 8
Allison Reiss creates a cake without chemicals.

CHOCOLATE CHIP COOKIE CAKE | 14
A simple, tasty recipe from Courtney Cowan’s book.
CAKE DIFFICULTY KEY
FANTASTIC FALL FOX | 16 Tammy Varela’s stunning sculpted creature.

FALL IN LOVE WITH FOLIAGE | 26
A classic autumnal design from Julia Fedorova.
CHOCOLATE AND PISTACHIO VERTICAL CAKE | 30
Take a look inside The Chocolate Spoon.
WHITE BAT ORCHID | 34 Eszter Kanyári’s unique idea for Halloween.

THE BOO CREW | 38
Create creepy yet fun cupcakes with Juliana Manno.
BEGINNER: INTERMEDIATE: ADVANCED:
SPECIAL DELIVERY | 46
Jewel Johnson’s surprise in a box.
EVERY ROSE HAS ITS THORN | 50
Add realistic details with Lala Olivo.
LEMON RASPBERRY CELEBRATION CAKE | 56
Learn the secrets to Rich Myers’ viral cake recipe.
THE NIGHTMARE BEFORE CHRISTMAS | 60
Aparnashree Mishra builds Jack Skellington.
EXPERT:
September | October 2023 americancakedecorating.com 3
AMERICAN CAKE DECORATING SEPTEMBER/OCTOBER 2023 ISSUE 446
16 34 46 50
CAKE Talk
Connect with the community here and on social media for irresistible cake inspiration, sweet giveaways, essential news, and exclusive offers.
NEW PRODUCT RELEASES
Meet the Pen That Draws in Sugar
3Doodler, the maker of the world’s first 3D-printing pen, announced the launch of their latest innovation, ChefDoodler, the pen that lets you draw in sugar. This cuttingedge culinary tool makes it fun and simple to turn sugar into beautiful, edible creations. Users can simply load the ChefDoodler with colorful isomalt capsules, choose a speed setting, and start drawing eye-catching sweet treats in seconds. The possibilities are endless, including decorating in sugar, connecting pieces to form a sturdy structure, creating custom edible shapes, experimenting with stencils, elevating store-bought goodies, piecing together crumbled creations, or just having fun with the family. For more information, visit chefdoodler.com.

BUY THE BOOK
New Releases in Cake Baking and Decorating

The Chocolate Spoon: Italian Sweets from the Silver Spoon
 By The Silver Spoon Kitchen Phaidon
(September 6, 2023)
The Silver Spoon Kitchen is known throughout the world as the authoritative voice on Italian cuisine and the leading Italian culinary resource. This new book on everyone’s favorite ingredient features 100 of the best Silver Spoon chocolate recipes, accompanied by all-new photography and design, as well as 30 core recipes for working with chocolate, each with step-bystep photography. Featuring dark, milk, ruby, and white chocolate, every aspect of this beloved ingredient is covered in depth in this book: its history, composition, various types, and the secrets behind working with chocolate successfully. The basic techniques are accompanied by step-by-step images, guiding cooks through the various necessary processes and providing valuable tips for tackling more complex preparations, such as tempering, glazing, and creating shapes and decorations in chocolate.
Bake
Your Heart Out:
Foolproof Recipes to Level Up Your Home Baking
By Dan Langan Union Square & Co.
(October 3, 2023)
Like many of us, Dan Langan learned young that if you want to make someone smile, all you need to do is give them a cookie. Dan channeled his natural creativity into baking alongside his mother and grandmother, and soon became obsessed with making and remaking his favorite recipes until they were the tastiest and prettiest versions of themselves. Since then, Dan has become a trusted source for delicious, foolproof bakes and has connected with home bakers via social media, television, and digital videos, and through his website, Baked by Dan. In his debut cookbook, Dan shares 100 recipes for his game-changing versions of familiar classics, such as a Red Velvet Layer Cake and Creamy Lemon Chess Squares, as well as unique creations like Seriously Sesame Brownies and a Ricotta and Pistachio Cannoli Tart. This beautiful and instructive book will become a go-to for bakers both seasoned and beginner.
4 americancakedecorating.com September | October 2023 NEWS, REVIEWS, & GIVEAWAYS


NEWS, REVIEWS, & GIVEAWAYS www.atecousa.com Visit the Ateco website for all of our latest cake decorating tools and products.
7
5
4
FONDANT EXTRUDER
20
ACD_V3_2.25.22.indd 1 2/28/22 3:14 PM May June July ICING SMILES BAKER OF THE MONTH
7 Piece Plain Football Set No. 5755
Piece Plain Heart Cutter Set No. 5751
Piece Plain Star Cutter Set No. 5750 9 Piece Fluted SquareCutter Set No. 5703 7 Piece Plain Oval Cutter Set No. 5754 9 Piece Plain Square Cutter Set No. 5753 9 Piece Plain Round Cutter Set No. 5757
PIECE MODELING BALL TOOL SET No. 4213
WITH
DESIGN PLATES No. 558
Raicelina Ramos
Christina New
Julie Harris
YOU MADE IT! YOU MADE IT!
ACD contributor Tammy Varela recently organized a stunning cake collaboration inspired by stained glass. Using edible mediums, roughly 40 artists participated. Check out our favorites!


And remember: Don’t forget to tag us on social media to possibly be featured in an upcoming issue.

6 americancakedecorating.com September | October 2023 READER GALLERY
Samantha Faraglia
Spring Day
Neetha Venkatesh
Michaela Rences
Raksheeta Vora
Yazmin Rodriguez
Tammy Varela
Katarzyna Koczorowska


September | October 2023 americancakedecorating.com 7 READER GALLERY facebook.com/AmericanCakeDecorating instagram.com/AmericanCakeDecorating
Nivitha Ambikha Maggy Morales
Vanesa Graneros
Sakshi Maheswari
Cristina Arevalo
Cassandra Fairbanks
Chris Duron
Anandita Ganguly
ALL NATURAL
Fall
BY ALLISON REISS
LEVEL:
COMPONENTS
Allison Reiss began baking as a little girl by helping her mom and nanas in the kitchen, baking everything from scratch. She’s always been obsessed with food but went to college to study environment and business and ended up with an MBA. She loved whenever her work in marketing crossed paths with food styling, photography, recipes, and product development. But it was her young daughters that inspired her to explore new ways to make colorful cakes for them without all the artificial stuff. For her, it’s not about baking as much as creating, finding new ways to design beautiful bakes and challenging herself to create Insta-worthy edible art naturally.

instagram.com/buttercreambreakfast
Edibles:
Wafer paper
Water
Glycerin
Cocoa powder
Cake
Buttercream
Butterfly pea flower powder
Milk
Orange gel food color (Chefmaster Natural)
Beet juice
Nonpareil sprinkles (Baking Time Club)
Gold leaf
Equipment: Scissors
Tip:
Food processor
Floral wire
Tweezers
Parchment paper or silicone mat
Paintbrushes
Semi-sphere silicone mold
Funnel
Glass
Aluminum foil
Cake drum
Turn table
Offset spatulas
Cake scraper
Spatulas
Cake stencil
Palette knife
TO MAKE SMALL FLOWERS, ELIMINATE THE EXTRA-LARGE PETALS.
8 americancakedecorating.com September | October 2023 TUTORIAL
This cake proves that decorating is totally possible using all-natural ingredients.
for

TUTORIAL
WHAT YOU NEED
3. Create a stem by cutting floral wire to your desired length. Use tweezers to bend 1 end into a hook. On a piece of parchment paper or a silicone mat, brush the glue on both sides of a small rectangle of wafer paper. Using the paintbrush, lift and place it onto the hook end of the wire. Rotate the wire and use your hands to gently wrap the wafer paper around the wire to form an oval shape at the end. This gives the first petals something more to stick to.

START THE WAFER-PAPER FLOWER
1. Use scissors to cut the following shapes from wafer paper: 1 small rectangle, 2 extra-small teardrop petals, 4 to 6 small teardrop petals, 4 to 6 medium teardrop petals, 4 to 6 large teardrop petals, and 4 to 6 extra-large teardrop petals for each flower you want to make. Also, cut 10 to 12 pointed oval shapes for leaves. To save time, cut small rectangles around the same size and cut a few petals at the same time.


2. Make wafer-paper glue by cutting the wafer-paper scraps into very small pieces with scissors or a small food processor. Add 1 tablespoon of the wafer-paper scraps to 2 tablespoons of water and mix until the wafer paper dissolves. Add a pinch more water if needed, then mix again to form a paste. Cover and refrigerate when not in use.

4. To color and shape the petals and leaves, mix 3 drops of glycerin with ½ teaspoon of water and a pinch of cocoa powder. Mix with a paintbrush and then paint both sides of a petal on a small piece of parchment paper. Work quickly or the petal will become overly soft, sticky, and difficult to transfer.

5. Use the brush to lift and transfer the petal to a semisphere silicone mold to shape. Repeat for all petals and leaves. You can adjust the shape when partially dry or reshape it by brushing lightly with water and adjust how it’s resting. Once dry, the petals and leaves should hold their shape. Ensure petals are completely dry before assembling.
6. Paint the flower stems with the same water and cocoa mixture as the petals and leaves. Also paint 4 to 6 additional wires for leaf stems.
10 americancakedecorating.com September | October 2023 TUTORIAL
1 2 3 4
FINISH THE FLOWER
1. To assemble the flowers, lightly brush the pointed ends of 2 extra-small petals with the glue. Wait a few seconds for them to soften.
2. Attach 1 of the extra-small petals to the end of the flower stem. Lightly pinch and hold the petal in place for a few seconds until it sticks.
3. Attach the second extra-small petal to the other side to hide the end of the stem.

4. Paint the pointed ends of 4 to 5 small petals with waferpaper glue. Attach the petals, ensuring they overlap slightly.


5. Continue adding petals, from smallest to largest, using 4 to 5 of each petal size per layer. Hold the flower upside down to help while attaching the petals.


6. Let the flower dry in a funnel held upright in a glass. You can use crumpled aluminum foil around the flower to hold the petals in place if necessary.
7. To assemble the stems and leaves, gently shape the painted wire stems with your hands. Brush 1 end of each leaf with the glue and pinch and hold in them place until they stay. Use the silicone molds or mat to prop while drying if necessary.


September | October 2023 americancakedecorating.com 11 TUTORIAL
3 4 5 6 1 2 5 6 T
i
p: DON’T PAINT TOO MUCH OF THE PETAL OR YOU’LL LOSE YOUR SHAPE.
DECORATE THE CAKE
1. Fill and crumb-coat the cake layers with buttercream on a cake drum. Using a cake scraper, smooth the sides and fill any air pockets. Chill the cake in the refrigerator until firm.
2. To naturally color buttercream blue, add ½ teaspoon butterfly pea flower powder to 1 teaspoon of hot whole milk. Use a small spatula to mix and smooth even the smallest lumps until it becomes a dark blue paste.

3. Add the desired amount of the blue color to thick buttercream and mix. Coat the bottom ⅔ of the cake. Form the line where you want to stop first, then fill in the rest. Smooth with the cake scraper. Chill the cake in the refrigerator until the buttercream is firm.
4. To naturally color buttercream orange, add a few drops of orange gel food color to some buttercream and mix. Add a pinch of beet juice to obtain more of a peach tone. Coat the bottom ⅓ of cake close
to, but not exactly, following the line of the blue coat. Scrape the cake smooth and chill it in the refrigerator until the buttercream is firm.

5. Lightly but firmly hold your cake stencil against the orange layer of buttercream and, using a straight spatula, coat it with more orange buttercream. Start at 1 end of your stencil, applying it from the bottom to the top, stopping just before the edge of the orange layer. The buttercream will help the stencil stick to the cake while you apply more. Scrape away any extra buttercream and slowly remove the stencil, starting from the end. If your stencil isn’t large enough to cover the whole cake, chill to firm the buttercream again before stenciling the rest.
6. Add the flowers to the top of the cake by pushing the wire stems into the cake. For this design, I placed the largest flower first, then the second, smaller flower, and then the leaves.
7. To apply nonpareil sprinkles and gold leaf, brush the specific area of buttercream very lightly with water. Use tweezers to place sprinkles, pressing them very lightly into place. Use a dry paintbrush to tear and place the gold leaf.

8. To add texture to the sides of the cake, use a small palette knife to dab a small amount of buttercream to the chilled cake surface. ACD
: YOU CAN ALSO USE PINS TO KEEP THE STENCIL IN PLACE.

12 americancakedecorating.com September | October 2023 TUTORIAL 7 1 2 3
T
ip
MORE TIPS FOR NATURAL COLORS:


• Butterfly pea flower and beet powder also work well to color wafer paper (blue and pink, respectively), but not all powders are created equal. An ultrafine powder is best. If your powder is coarse, add a small amount of boiling water and pour it through a coffee filter.
• For deeper colors, use more powder or let it steep longer in the boiling water. Let cool before adding glycerin and applying to your wafer paper.
• If necessary, you can thin your buttercream after the desired color has been reached. Because using natural color can affect consistency, I always thin it with milk as the last step. The color will darken slightly after the buttercream crusts.


• I add a small amount of natural purple color to help whiten my buttercream. To make your own, wash and chop half of a red cabbage, put in a pot, cover it with water, and simmer on low until the cabbage pales. Remove the cabbage with a slotted spoon and, using a coffee filter, strain the liquid. Simmer on low to reduce the liquid as much as possible, cool, portion, and freeze.
• Fresh beet juice should be a vibrant pink whereas oxidized beet juice is a dull red. I used fresh. You could also add a small amount of sifted cocoa powder to mute the color.
September | October 2023 americancakedecorating.com 13 TUTORIAL 4 5 6 7 8
CHOCOLATE CHIP COOKIE CAKE
 BY COURTNEY COWAN
BAKE THE BOOK
Makes two 9-inch cakes
LEVEL:
Excerpted from Milk Jar Cookies
Bakebook: Cookies, Cakes, Pies, and More for Celebrations and Every Day by Courtney Cowan. Copyright 2020. Published with permission from Rizzoli.

INGREDIENTS
4 cups all-purpose flour
11 tablespoons (⅔ cup) unsalted butter, cold and cubed
11 tablespoons (⅔ cup) shortening, room temperature
1 cup sugar
1 cup packed light brown sugar
½ teaspoon baking soda
1 teaspoon table salt
2 extra-large eggs, cold
1½ teaspoons pure vanilla extract
2 cups (16 ounces) semisweet
chocolate chips
INSTRUCTIONS
1. Preheat oven to 350°F and butter and line two 9-inch springform pans with parchment paper.
Alternatively, butter and flour the pan, making sure you remove all the excess flour.
2. In a medium bowl, measure out the flour. Set aside.
3. In a large mixing bowl or the bowl of a stand mixer, combine butter, shortening, sugar, brown sugar, baking soda, salt, eggs, and vanilla extract and beat on mediumlow speed until combined with small chunks of butter remaining, approximately 1 minute. After each mix, scrape down sides of bowl with a spatula to be sure all ingredients are included in the mix—every bit matters! Add half of the dry ingredient mixture and mix until just incorporated and no flour is visible. Add half of the remaining dry ingredients and mix until flour is incorporated and all butter chunks are gone. Add remaining dry ingredients and mix until dough pulls away from the sides of the bowl and is not sticky to the touch. Be careful not to overmix, as this could result in flatter cookies. Stir in chocolate chips.
4. Divide the dough in half and transfer to the pans. Using your fingers, firmly flatten down evenly. Place the pans in the oven on the middle rack and bake for 28–30 minutes, until edges are golden brown. Note that the middle will still be a bit doughy. Remove and allow to cool completely. Run a knife around the edge before removing the outside of the springform pan.
5. Frost and decorate as you wish using the White Frosting. Store in an airtight container at room temperature for up to 4 days or freeze for up to a month.
Note: If you’re living a life free from gluten, this is an easy recipe to make gluten-free! Simply substitute the flour for 4 cups, plus 2 tablespoons of gluten-free baking flour (I prefer Cup4Cup) and reduce the chocolate chips to 1¾ cups. One trick to get the cookies to bake perfectly is to mix the dough about 20 seconds longer on the last flour mix, before adding the chocolate chips.
WHITE FROSTING
INGREDIENTS
12 tablespoons (¾ cup) unsalted butter, softened
1 teaspoon pure vanilla extract
1 tablespoon whole milk
1 pound (3⅔ cups) powdered sugar
INSTRUCTIONS
1. Using a hand mixer or a stand mixer with the paddle attachment, cream the butter. Add the vanilla extract and milk and mix. Slowly beat in the powdered sugar until all of it is completely incorporated.
2. Use immediately or store in an air-tight container in the refrigerator for up to 3 days. Allow to return to room temperature before using. ACD
September | October 2023 americancakedecorating.com 15
BAKE THE BOOK

TUTORIAL
BY TAMMY VARELA
Fantastic
LEVEL:
COMPONENTS

WHAT YOU NEED
Edibles:
Cake
Ganache
Piping gel
Rice cereal treats
Modeling chocolate (Satin Ice)
Isomalt: clear and white (Simi Cakes)
Gel food colors: yellow, amber, black, gray, olive green, and orange
Equipment:
Cake drum
Threaded rebar
Drill
Nuts
Washers
Cake boards
Screws
Styrofoam
Knife
Sculpting tools (Sugarworks)
Silicone bowl
Tammy Varela is a well-known awardwinning cake and sugar artist from Atlanta, GA. She’s a master at combining both sugar and cake to create some of the most unique pieces of edible art in the industry. She also recently won the ACA 2023 Rising Star Award.

artisticcakedesigns.com facebook.com/artisticcakedesigns instagram.com/artisticcakedesigns1
Edible glaze
Oil paint: white, tan, yellow ochre, burnt orange, brown, ivory, and olive (Karen Portaleo)

Water or edible glue
Fondant (Satin Ice)
Slow dilution solution (Simi Cakes)
Flower paste (Smartflex)
Petal dust: yellow, green, orange, red, and brown (The Sugar Art)
Small eye molds (Simi Cakes)
Kitchen torch
Paintbrushes
Scissors
Teflon mat (Simi Cakes)
Heat lamp
Fan
Rolling pin
Maple leaf cutter
Leaf veiner mold
Sponge pad
Ball tool
Wavy foam
September | October 2023 americancakedecorating.com 17 TUTORIAL
Using advanced techniques, you can create a realistic and stunning autumnal creature.
BUILD THE STRUCTURE
1. Use a cake drum as the base. Mark where to place the rebars, then use a drill to make the holes and place the rebars. Use a washer and a nut on both the top and bottom to secure them. Then, place the precut cake board with predrilled holes for the rebar to go through.

2. Secure the part of the board that’s not attached to the rebar by drilling 2 screws down to secure it to the cake drum. Then, cover it with a piece of precut Styrofoam for the fox’s rear. To secure the board to the rebar, use 2 nuts underneath and 2 nuts on top.

CARVE THE CAKE
1. Cut out a piece of cake board the shape of the body. Then, assemble the cake on top by trimming and filling it with ganache. Put it in the refrigerator to chill for about an hour.
2. Attach the cake to the wood base with ganache. Then, start sculpting the cake body with a knife. Be sure to do it a little at a time until you get the desired shape.


3. Take ganache and completely cover the entire cake. Then, set it in the fridge to chill.
4. Add some piping gel to the underside of the board and then add some rice cereal treats to shape the belly. Use more rice cereal treats to shape the head around the rebar poles. Be sure to add some piping gel to make sure they adhere. Then, put it in the refrigerator to firm.
SCULPT THE CAKE

1. Roll out some modeling chocolate to about ¼ inch thick. Start with the face, then work your way down. Mark where to place the eyes.
2. After covering the entire piece, use your pointed chisel sugar shaper sculpting tool to make the fur. Be sure to go in the direction the fur should be going.
3. Add modeling chocolate to areas that may need some bulk like the joints, paws, and
18 americancakedecorating.com September | October 2023 TUTORIAL
1 1 2 3 4 2 Tip
: YOU CAN ALSO USE WARM MARSHMALLOW TO ADHERE THE CEREAL TREATS.
chest, then continue with the fur sculpting.
4. The fur on the chest is thick and goes in various directions. Use the pointed chisel tool to carve out some deep and shallow areas to give depth. Be sure to sculpt down and in a curved shape.


5. Add a roll of rice cereal treats to make the base of the tail and cover it with modeling chocolate before sculpting the fur.

6. Add ears by putting a triangle of modeling paste with a thin triangle on top. This will be sculpted and trimmed to become the ear hair. The outer thin triangle will become the actual ear.
MOLD THE EYES
1. In a silicone bowl, heat clear isomalt in the microwave until it bubbles. Let it sit at room temperature until the bubbles subside. Then, pour it into the eye mold until it’s full, then dump most of it back into the bowl. Let it sit for about 5 minutes to cool.

2. For the eyes, use gel food colors to paint on the isomalt. Use a mix of yellow and amber for the eyes and black for the pupils. Be sure to make a long triangle for the pupils. Let them sit for 5 minutes to dry.
3. Once dry, heat some white isomalt and pour it on top of the painted surface. Let it sit for about 5 minutes to cool. Take it out of the mold and lightly torch out the bubbles so the eyes come out clear and crisp. Spray them with edible glaze.
4. Core out where to place eyes on the sculpture. Put a little piping gel on the back of the eyes and then place them on the sculpture. Then, roll out some modeling chocolate pieces to put around the eyes.
5. Use sculpting tools to define the details around the eyes. Be sure to have the fox’s hair going in the right direction.
6. To enhance the eyes, paint around them with some gray and black gel food colors.
September | October 2023 americancakedecorating.com 19 TUTORIAL
1 1 2 3 4 5 6
PAINT THE FOX
1. Start with your lightest colors of oil paint first, which is white followed by tan. Use white on his mouth, chest, and underbelly. Then, cover the other areas with tan. Be sure to add some white to the tan in some areas to create depth and dimension.

2. Add a layer of yellow ochre, then some burnt orange. Be sure to highlight the fur with light and dark colors for depth. For darker areas, add some brown to the burnt orange.


CREATE THE WIND
1. Take about 5 ounces of clear isomalt and put it in a microwave-safe silicone bowl. Start at 30 seconds, then heat at 15-second intervals until the isomalt is completely melted and bubbling. Let the isomalt sit at room temperature for about a minute until the bubbles dissipate. Then, pour it onto a Teflon mat.


2. Fold the mat back and forth until the isomalt is thicker and becomes more of a solid form. This is called pulling isomalt. Once pulled, use the scissors to cut a piece of isomalt off and put the rest under a heat lamp. Lightly stretch your piece until the desired length and thickness is achieved. Then, curl the tip and shape the entire piece as desired and place it under a fan to cool.
3. Be sure to spray the isomalt with spray glaze before placing it on the cake drum. Dip the base in hot liquid isomalt and place it on the cake drum to cool.
20 americancakedecorating.com September | October 2023 TUTORIAL 2 3 4 1 2 5 1 2 6
FINISH THE BASE
1. Lightly cover the cake drum with water or edible glue. Take some fondant and color it with olive green gel food color. Then, take patches of it to place on the drum.

2. To add some texture, wrap some crumpled aluminum foil around a brush. Press and continue to press hard in some places and then lightly in others.


3. Add color with ivory, olive, white, and brown oil paints mixed with a slow dilution solution.
CREATE THE LEAVES
1. Take some flower paste and divide it into 2 amounts. Color 1 light yellow and the other light orange. Then, roll each of them out flat and thin.
2. Use a maple leaf cutter to cut out the leaves.


3. Use 2 silicone leaf veiners and press the leaves inside.
4. Place the leaves on the square sponge and use a ball tool to soften the edges.
5. Place the leaves on wavy foam to dry for 24 to 48 hours.

6. Dust the leaves. Start with your lightest petal dust color yellow, followed by green, orange, and red, then line the edge of the
leaf with brown. Be sure to blotch the colors on so it looks like a variation of colors.
7. To seal the petal dust colors, spray them with spray glaze.
8. Strategically place the leaves on the cake base and isomalt wind. To attach the leaves to the isomalt wind, use some fondant and piping gel, then press it and hold for a minute.

September | October 2023 americancakedecorating.com 21 TUTORIAL 1 2 3 1 2 3
3
I’d like to introduce you to Mia Whitlow, an aspiring bakery shop owner. She’s 16 years old and loves to bake and decorate cakes. In between school, sports, and schoolwork, she helps me out from time to time, as well as learning tips and techniques. Mia is a natural, plus this was actually her first time creating fondant autumn leaves. She did such an amazing job!


22 americancakedecorating.com September | October 2023 TUTORIAL 4 5 7 8 6
cake shows UPCOMING
Think you missed all the cake shows in 2023?
Think again! There are still so many events to attend.
Cake Fiesta Manila

November 16–19
Manila, Philippines
Jersey Shore Cake & Cookie Convention
September 22–24
West Long Branch, NJ
The Jersey Shore Cake & Cookie Convention is an event where attendees can meet with industry leaders, shop supply vendors, enter a competition, learn new skills, and connect with other like-minded people. Whether you are a professional, novice, or never made a cake before, this two-day event at the OceanFirst Bank Center at Monmouth University, just 1.7 miles from the iconic Jersey Shore, promises to be an experience everyone can enjoy! For more information, visit jerseyshorecakeshow.com

Zoe Cakes Sugar Art Show
September 29–October 1
Tulsa, OK
Artisan Bakery Expo East

October 1–2
Atlantic City, NJ
The second annual Artisan Bakery Expo East (previously Atlantic Bakery Expo) is the only event in the Eastern United States focusing on the specific needs of the retail-artisan bakery community. Every year, ABEE will provide the opportunity to network with your peers and connect with the industry. You’ll learn the latest baking techniques and business practices as presented by some of the most successful bakers in the region. Included in the events is the Cake Decorating Extravaganza, a cake competition with three categories. For more information, visit artisanbakeryexpoeast.com.
Cake Fiesta Manila prides itself on being the first and the biggest international cake show in the Philippines! The show boasts the top cake artists from around the globe, who will share their skills and expertise to aspiring cakers and bakers. This show is not just for bakers or cake decorators. Anyone who loves making cakes, who’s interested in learning about making and decorating cakes, or just simply likes to eat cakes, then come celebrate! Participate in amazing demos, classes, competitions, and more! For more information, visit cakefiestamanila.com
Cake International

November 3–5
Birmingham, England
Cake International is the original, world-leading competition for the sugarcraft community, attracting thousands of entries each year! Cake enthusiasts must experience this unique event that brings together the latest trends and supplies, cutting-edge workshops and demos, and the world-famous Cake International competition display. For more information, visit cakeinternational.co.uk.
Zoe Cakes Sugar Art Show is proud to host their first annual sugar-art competition. All ages and skill levels are welcome to compete and all skills are welcome. Medals, prizes, and cash will be awarded to the winning entries. For more information, visit zoesugarartshow.com

September | October 2023 americancakedecorating.com 23 EVENTS
JULIAFEDOROVA JULIAFEDOROVA
time when I thought I should enjoy my life and relax a little. It was the time all my dreams were destroyed in one day. My hometown is the town of Luhansk in Ukraine. Right now, it is known to the world as an epicenter of the war with Russia. Somehow, my family miraculously survived the shells that hit our house. We lost all we had and were forced to flee to protect our lives.
In just a few short years, this Sweet Art Master has established herself as the premier sugar-flower expert and judge. Learn more about our friend and collaborator.
American Cake Decorating:
How did you start cake decorating?
Julia Fedorova: I was raised by two amazing people: my grandparents. My grandma had baking as her main hobby and my grandpa had a big garden full of beautiful flowers. I can remember the day my grandma taught me how to work with yeast dough like it was yesterday. If I close my eyes, I can still feel the softness under my fingers and smell the heady vanilla, nutmeg, and cinnamon. Flour sparkled in the air like magic back then, and I was under its spell. Flash forward to 2014. I was happy; I was a wife, a mother, and a successful businesswoman. It was the
On a cold January night in 2015, our plane landed at JFK in New York. A new chapter of our life had begun. My cake decorating journey started as a creative outlet and connection to my lifelong passion for baking and flowers instilled in me by my Ukrainian grandparents. I worked hard, seven days per week, 10 to 12 hours each day. I improved my skills little by little. I learned English from learning sugar craft.
ACD: What inspires you?
JF: Mother Nature is a constant source of inspiration for me. Making botanically correct sugar flowers is an art! I would highly recommend doing research on flowers before you create them. Take the time to study their structure, the positioning of their leaves, and the arrangement of their petals. Once you study flowers and plants, then you can make a perfect replica. Doing your best to copy Mother Nature is the only way to become a successful sugar-flower maker. I spend a great deal of time in Central Park, the Flower District, and the Botanical Gardens. This time brings me true
facebook.com/JuliaFedorovaCakes facebook.com/sweetartmaster instagram.com/juliafedorovacakes instagram.com/sweetartmaster
joy! When I am there, I am sure to take many pictures and notes. Some of my previous notes became my first book, and some will become my next.
ACD: What is your biggest piece of advice for new cake decorators getting into the industry?


JF: Every lesson, I start by telling my students three things: don’t do sloppy work, pay attention to detail, and always have extras. It sounds simple, but it helps establish a solid base for future knowledge.
My biggest piece of advice for new decorators is to compete as much as possible, when you still fit the beginner category. This will help you establish yourself in the industry, and learn a lot, while having a good time. My early competitions were an amazing experience for me. Keep in mind that you may not be successful at first, but medals and accolades will come with knowledge and experience. Recognition is not the main goal of participation in cake competitions. Challenge yourself, set achievable goals, and absorb the judges’ recommendations and comments. The experience is more valuable than any medal!
24 americancakedecorating.com September | October 2023 MEET THE MAKER
ACD: You’re such a master at gum-paste flowers! Do you have plans to try other mediums?
JF: Thank you so much! That means a lot to me. Botanically correct flowers are my specialty. I have a wedding bakery in NYC, and I conduct classes and demos on the topic. I am also a good painter and I enjoy working with royal icing. One of the conditions of being an International Certified Judge is to constantly learn new techniques and mediums. It is also important to be aware of new trends. The best mentors and judges are constantly learning.
ACD: What is your favorite current cake decorating trend?

JF: This year, I have two favorites, but I cannot pick one because they
are extremely different. The first is a comic-style cartoon cake. When I see these cakes, I am transported to a special time, when my son was a little boy many years ago. We watched nothing but cartoons together, and I think of him every time I see one of these cakes.
The second one is a vintage cake. Call me old-fashioned, but I like this style. Beginners, this is a great place to start your journey in the industry! Back when I was a competitor in cake shows (I sound like my grandma), piping skills were mandatory. In my opinion, each cake decorator should know how to pipe, and it does not matter if you will use this skill or not. It is crucial to know how to do this properly.
ACD: What are your future plans?
JF: I have exciting news to share! I am hosting the Sweet Art Master Sugar Show & Cake Competition from March 9–10, 2024, in New York! The theme of the show is hydrangea. The show will include a cake competition, a vendor hall, a cake challenge, a cupcake challenge, a fashion show, classes, and demos. Two days packed full of fun and joy!


The website already contains a lot of information, but keep checking in, because I am constantly adding new information! I plan to make some interesting innovations, such as paperless entry forms. I can say without a doubt that the Sweet Art Master Competition has one of the best teams of judges in the U.S. From my experience, judges’ advice is one of the most important aspects of competing onstage. Along the way, I have met many great judges who have helped me become who I am today. Now, it is my turn to help others grow. Let’s make, compete, and learn with the Sweet Art Master Show! ACD

September | October 2023 americancakedecorating.com 25 MEET THE MAKER
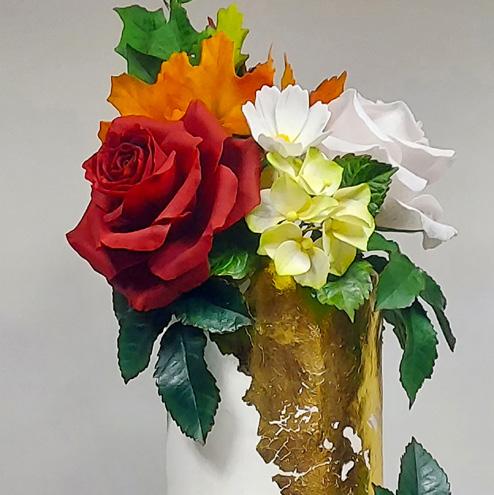
FALL INLove WITH FOLIAGE
BY JULIA FEDOROVA
Julia Fedorova is the owner of Julia Fedorova

Cakes, Sweet Art Master supply, and Sweet Art Master sugar flower making school, all located in New York. She is also a founder and head judge of the Sweet Art Master Sugar Flower competition. Julia started her cake-decorating journey in 2015. She is self-taught, but her hard work and persistence allowed her to achieve high results in a fairly short period of time, earning her top honors at Cake Expo, National Capital Area Cake Show, and more. In 2021, Julia was named one of the top ten wedding bakers in New York City. She also authored Sweet Botany, a book about botanically correct sugar flowers.
LEVEL: Edibles:
COMPONENTS
Assorted colors of gum paste
Petal dust: yellow, green, red, lime green, sage, rain forest, brown, green, soft pink, soft yellow, and soft green
Gum-paste roses: red, pink, and white
Gum-paste hydrangeas
Edible gold leaf
Equipment:

Maple leaf cutter and veiner
Oak leaf cutter and veiner
Virginia creeper leaf cutter and veiner
Rose leaf cutter and veiner
Ivy leaf cutter and veiner
Paintbrushes
Floral tape
Steamer
Cotton gloves
CREATE THE FOLIAGE
1. Using various colors of gum paste, make maple, oak and Virginia creeper leaves with cutters and veiners.
2. Prepare a lot of leaves, as they will play the same role as flowers.
3. Dust the leaves with a mix of yellow, green, and red petal dusts.
4. Make rose leaves out of green gum paste. When dry, dust them with a mix of lime green and sage petal dusts for the pink and white roses. For the red roses, dust the leaves with rain forest petal dust to make them darker.
5. Create ivy leaves with green gum paste. When dry, dust them with a mix of green and sage petal dusts and then dust the edges with a mix of yellow and
TUTORIAL
An autumnal cake is a very good opportunity to practice your petal-dusting skills.
facebook.com/sweetartmaster instagram.com/juliafedorovacakes instagram.com/sweetartmaster 26 americancakedecorating.com September | October 2023
facebook.com/JuliaFedorovaCakes

TUTORIAL
brown. For darker ivy leaves, dust them with a mix of rain forest and green petal dusts, then add a mix of red and brown to the ends.


p: USE A VERY GOOD QUALITY RED GUM PASTE WHEN CREATING ROSES.


DUST AND ADD THE FLOWERS
1. To create a realistic red rose, you need a lot of different shades of red petal dust for dimension. Also, do not over-steam them if you plan to set the color.


2. Dust the bases of the white roses with soft pink, soft yellow, and soft green petal dusts.
3. For the hydrangeas, dust some petals with a mix of yellow and lime green petal dusts and emphasize the edges with brown.
28 americancakedecorating.com September | October 2023 TUTORIAL
1a
3a
3b
3b
4a
4b
1b
T
1c Tip: REMEMBER TO REMOVE THE EXCESS PETAL DUST FROM THE SURFACE OF THE LEAVES BEFORE STEAMING OR GLAZING.
i
ASSEMBLE THE CAKE
1. Cover each cake with white fondant evenly, without scars, dents, or elephant skin. I suggest covering them a day prior.
2. Use a steamer to slightly wet the surface of the fondant
3. Wearing cotton gloves, partially cover the cake with edible gold leaf. You can use your fingers or a soft flat brush. ACD

Tip: COSMOS FLOWERS AND ACORNS ALSO MAKE EXCELLENT FILLERS.
MORE PRO TIPS FROM A SUGAR ART MASTER
• Always have extras. Make additional leaves and petals because having them available for the assembly stage will add confidence and provide more flexibility to play with your arrangement.

• Assembly is very timeconsuming. I recommend having a precise sketch of your cake before you start to add your flowers and greenery as guidance.
• Cover the cake board with fondant and add a ribbon. Please do not leave the board uncovered. The small details matter!
• Do not forget to wear gloves if you work with a real cake instead of dummies.
• Make sprays with flowers and leaves. Tape them tightly with floral tape. Each spray should be put into a straw or tube before you insert it into a cake.
September | October 2023 americancakedecorating.com 29 TUTORIAL
2&3
CHOCOLATE & PISTACHIO VERTICAL CAKE
BY THE SILVER SPOON KITCHEN PHOTOGRAPHY BY LUCA COLOMBO AT STUDIO XL
SERVES 10
LEVEL:
SAVOY SPONGE
4 ounces/1 stick/120 grams unsalted butter
12 eggs
12¼ ounces/scant 1⅔ cups/360 grams superfine sugar
Pinch of salt
8¾ ounces/1 cup/240 grams self-rising flour
4 ounces/1¼ cups/120 grams pistachio flour
BUTTERCREAM
7 ounces/200 grams 60% dark chocolate
7 ounces/1¾ sticks/200 grams unsalted butter
14 ounces/3¼ cups/400 grams confectioners’ sugar
INSTRUCTIONS
1. Preheat the oven to 350°F/180°C/160°C Fan/ Gas 4 and line the baking pan with parchment paper.
2. Melt one-third of the butter in a bain-marie or double boiler. Break four of the eggs into the bowl of a stand mixer fitted with the whisk attachment, or use a mixing bowl and electric whisk. Add one-third of the sugar and a pinch of salt to the bowl, and beat until very pale, and fluffy. Add one-third of the flour, sifted, one-third of the pistachio flour and the melted butter, and mix to combine.
Excerpted from The Chocolate Spoon: Italian Sweets from the Silver Spoon by The Silver Spoon Kitchen.

Copyright 2023. Photography
by Luca Colombo at Studio
XL.
Published with permission from Phaidon.
7 fluid ounces/scant 1 cup/200 milliliters heavy cream
DECORATION
1⅓ ounces/⅓ cup/40 grams chopped pistachio nuts
Chocolate fans made with 60% dark chocolate (see as follows)
3. Pour the batter into the baking pan, level the surface, and bake in the preheated oven for 12 minutes. Remove from the oven and invert the pan onto a sheet of parchment paper. Peel off the parchment from the sponge, so that it is no longer
30 americancakedecorating.com September | October 2023 BAKE THE BOOK

BAKE THE BOOK
attached to it, and replace it back on top of the sponge. Starting with the short side of the sponge towards you, roll up the sponge while still warm, holding it sandwiched between the two sheets of parchment paper. Set aside to cool completely.
4. Repeat the process described above with the remaining ingredients to make two more sponge rectangles, but allow them to cool without rolling them up.
5. To make the buttercream, finely chop the chocolate. Place the butter, confectioners’ (icing) sugar, cream, and chocolate in a saucepan and place over a low heat until the butter and

chocolate have melted and the mixture is glossy and smooth. Transfer to a bowl and set aside to cool to room temperature, then chill in the refrigerator for 1 hour until it has the desired consistency for spreading.
6. Unroll the rolled-up sponge, remove the parchment paper, and use a palette knife to spread with a thin layer of buttercream. Roll up the sponge again, without using parchment paper. Spread one of the two remaining sponge rectangles with buttercream and wrap it around the rolled sponge, starting at the outer edge, to create a larger roll. Repeat with the third rectangle, then stand the roll upright on a serving plate.
Spread the entire surface of the cake with the remaining buttercream, and decorate, as desired, with the chopped pistachios and chocolate fans, and chill in the refrigerator for 4 hours before serving.


7. If you want to make a shorter cake, cut the sponge rectangles in half lengthwise.
VARIATION
There is a much simpler way to prepare chocolate curls for use in decorating cakes and frozen desserts, although it is less versatile. Place a block of chocolate kept at room temperature on a clean, dry chopping board. Hold it steady with one hand, and quickly shave the top of the block with a widemouth vegetable peeler held with the other hand. ACD
Tag us in Your Photos!
32 americancakedecorating.com September | October 2023 BAKE THE BOOK
@americancakedecorating
FOR A CHANCE TO BE FEATURED ON OUR INSTAGRAM FEED
Feelin’ FallEdit
Halloween Mini Spatula and Spoonula Set, $6, joann.com

Boo to You Baking Cups, $8, getgatherings.com

Satin Ice ChocoPan Ivory Modeling Chocolate, $47, bakedeco.com

Heirloom Pumpkin Towels, $30, williams-sonoma.com

Maple, Ivy, and Ginkgo Leaves Mold and Veiner Mold, $25, katysuedesigns.us.com
Makin’s Clay Maple Leaf Cutter Set, $2, bakedeco.com


Halloween Luster Dust Edible Combo Pack, $29, bakell.com


House of Hackney Peacock Cake Stand, $88, anthropologie.com

Butterfly Pea Flower, $14, amazon.com

Colour Mill Outback Pack Oil Blend Coloring, $40, colourmill.com.au

Fall Sprinkle Party Pack, $40, sprinklepop.shop

Nuts and Berries
Silicone Mold, $13, sweetdegreeskitchen.com
September | October 2023 americancakedecorating.com 33 SHOPPING
It’s in the air; it’s all around. Let’s go all in on that fall feeling!

TUTORIAL
BY ESZTER KANYÁRI
WHITE BATFLOWER
The white batflower (Tacca integrifolia) is a unique flower with long, hanging tendrils and two white bracts, which give the plant its “bat wings.”
LEVEL:
COMPONENTS
Edibles:
Gum paste: white and green
Edible glue or water
Petal dust: dark purple, green, and brown
Alcohol
Equipment:
Floral wire: 26, 28, and 30 gauge
Dresden tool
Paintbrushes
Rolling pin
Nonstick surface
Simple rose petal cutters
Foam pad
Ball tool
Silicone petal veiner

Banana leaf veiner
Color pen
Floral tape
WHAT YOU NEED
BUILD THE BUDS
1. Cut 28-gauge floral wires into 3 or 4 parts and bend little hooks at the end.
2. Roll a pea-size piece of white gum paste and make a cone shape. Brush the hooked end of the wire with edible glue or water, then insert it into the gum paste. Use your fingers to roll the paste at the base of the cone to thin it down and secure it to the wire.


3. With the help of a Dresden tool, make a hole on the top of the cone.
4. Create 4 to 5 similar pieces with a hole and make 4 to 5 more pieces without a hole at the top of the cones. Some of the pieces can be peaked and differently shaped.
5. After drying, dust the buds with dark purple color. You may also add some green dust inside of the holes.
September | October 2023 americancakedecorating.com 35 TUTORIAL
1 2
CREATE THE PETALS
1. Thinly roll out some white gum paste on a nonstick surface. Cut out 2 pieces of petals with a medium-size petal cutter.

2. Insert 28-gauge floral wires into the petals. At the bottom part of the petal, start to roll the paste on the wire to thin it down with your finger and create a 1-inch-long neck.


3. Place the petals on a foam pad and soften and stretch the edges with a ball tool.


4. Use a silicone veiner to get a long, fine veining petal texture and frill the ends of the petals with the ball tool to get some waves. Let them dry.

5. Repeat Steps 1 through 4 with the smaller petal cutter.
6. With dark purple petal dust, dust the medium petals at the bottom and neck strongly in an upward direction and add a little green on the top edges. When you dust the smaller petals, use more green dust plus a little brown for a wilted effect.
MAKE THE LEAVES
1. Roll out some green gum paste on a nonstick surface.
2. Cut out 2 to 3 leaves with the large petal cutter and insert 26-gauge floral wires into them.
3. Use a banana leaf veiner to get a deep veining texture. Let them dry.
4. Use dark purple and dark green petal dusts to color the leaves.

FORM THE TENDRILS
1. To create the short tendrils, cut a minimum of five 30-gauge floral wires into 4 parts. To create long tendrils, cut a minimum of five 30-gauge floral wires in half.
2. Apply dark purple petal dust to the short tendrils. To get a darker base color on the long tendrils, use liquid-paint alcohol with petal dust or a color pen. After drying, add additional dust too.

ASSEMBLE THE FLOWER
1. Using floral tape, wrap the buds together and then add the short tendrils.
2. Dust the bottom part of the assembled bunch with green and dark purple petal dusts.
3. Bend the long tendrils and tape them to the previously assembled parts.
4. Place and secure the 2 larger flower petals to the back side
36 americancakedecorating.com September | October 2023 TUTORIAL 3 2 3&4 1&2 3 5 1 1
Inspired by the cakes and sugar flowers by Maggie Austin back in 2013, Eszter Kanyári decided she wanted to do something similar but struggled to find resources to learn. Finally, in 2018, the designer, economist, and event planner working at a multinational company found Petra Hajnal’s workshop where she could acquire the basics of sugarcraft and develop her style with the help of various training videos, books, and magazines. Eszter now wants to teach and share her acquired sugar knowledge.


sugarcraft.hu facebook.com/sugarcraftbyeszterkanyari instagram.com/sugarcraftbykanyarieszter

September | October 2023 americancakedecorating.com 37 TUTORIAL 1 2 3 4 6
of arrangement with floral tape near each other.
5. Add the 2 smaller petals and secure them in a vertical 180-degree position with floral tape.
6. Dust the bottom part of the assembled bunch with green and dark purple petal dusts. ACD
THE BOO CREW Create
slightly creepy but super-fun cupcakes, perfect for a Halloween party.
BY JULIANA MANNO
LEVEL:
COMPONENTS
Edibles:
Fondant: orange, dark green, white, green, pale green, black, red, yellow, beige, brown, and pale yellow
Cupcakes
Water
Food coloring: green and black
Petal dust: brown, dark green, pink, and black
Equipment:
Rolling pin
Circle cutter
Ball tool
Dresden tool
Knife
Paintbrushes
MAKE MR. PUMPKIN
1. Knead and roll out a piece of orange fondant. Cut out a circle using a circle cutter the same size as the top of your cupcake. Gently pull on 1 side of the circle to lengthen it slightly, forming an oval pumpkin shape. Carefully place the fondant onto your prepared cupcake top, with the elongated side overhanging slightly.
2. To make the nose, roll a small piece of orange fondant into a ball. Press 1 side to a point to form a teardrop shape and press the pointed end between your thumb and index finger to flatten. Adhere it onto the center of your cupcake.
3. Use a small ball tool to indent 2 oval eye sockets on either
side of the bridge of the nose. Use a Dresden tool to indent lines into the orange fondant to form the mouth and wrinkles. Indent a deeper hole at the top of the cupcake in preparation to place the stalk.
4. To make the stalk, roll a piece of dark green fondant into a ball. Press it between your thumb and index finger to shape it into a stalk. Use your Dresden tool to indent vertical lines into the stalk and place it into the prepared socket, adhering it with a little water. Indent additional lines in the orange fondant extending out from the base of the stalk.
5. Roll a piece of white fondant into 2 oval balls and press each to flatten slightly. Place them in each of the eye sockets and adhere them using a little water. Paint an
Juliana Manno grew up with a love of arts and crafts but found her true passion when she completed a beginner’s cake decorating course in 2012. Science student by day, she spent every spare moment between her studies teaching herself new cake decorating techniques and baking cakes for family and friends. Her passion is for designing cute and unique cupcakes, inspired by children’s illustrations and soft toys. Her business, Juliana’s Cake Laboratory, is based in Melbourne, Australia.
instagram.com/julianascakelaboratory

38 americancakedecorating.com September | October 2023 TUTORIAL

iris in the center of each eye with green food coloring. Wait for the irises to dry and paint the pupils and the inside of the mouth with black food coloring.
6. To make the eyebrows, roll 2 sausages from the orange fondant and adhere 1 above each eye.


7. To make the teeth, thinly roll out white fondant. Use a sharp knife to cut 3 small rectangles of differing lengths. Adhere them adjacent to the mouth. Dust the cupcake and the stalk with brown petal dust.

BUILD MR. ZOMBIE
1. Cut out a circle from the rolled green fondant to fit the top of the cupcake and place it onto the prepared cupcake top. Use your ball tool to indent an upside-down rounded sausage shape into the green fondant for the mouth.
2. To make the nose, roll green fondant into a medium-size teardrop shape. Roll 2 small balls of green fondant and adhere them to either side of the nose. Roll a larger ball of green fondant for the chin. Flatten the pieces sightly before adhering them in position with a little water. Use your ball tool to indent 2 eye sockets on either side of the nose.
3. To make the eyes, roll 2 pieces of white fondant into balls and adhere them in the eye sockets. For the irises, roll 2 small balls of pale green fondant and press to flatten them into discs. Adhere them to the eyeball closer to the nasal side. Repeat with 2 smaller balls of black fondant for the pupils. Roll the black fondant into a thin sausage and adhere them above both eyes to form eyebrows.
4. Paint the inside of the mouth with black food coloring. Paint tiny strokes above the eyebrows to give the impression of little hairs.
5. Use your Dresden tool to indent lines in the fondant as shown to give the impression of wrinkles.


6. To make the ears, roll 2 small balls of green fondant and flatten them. Use your ball tool to indent a small hole off-center in each ear to form the inner ears. Adhere them to either side of the face.

40 americancakedecorating.com September | October 2023 TUTORIAL 1 2 4 5 6 7 3
T
ip: DUSTING WITH PETAL DUST IS OPTIONAL, BUT IT ADDS EXTRA DIMENSION AND CHARACTER TO YOUR CUPCAKES.
7. To make the hair, roll thin sausages of black fondant and adhere to the cupcake, starting from the center top and draping down the left and right sides as shown. Repeat with 2 shorter sausages and adhere them in position on the forehead.
8. Create teeth like Mr. Pumpkin and adhere them inside the mouth. To make the tongue, roll a small ball of red fondant and flatten it. Adhere it to the mouth and indent a line in the center with a knife.
9. To make the warts, adhere small balls of green fondant around the face. Dust the face with dark green petal dust.


CREATE THE CANDY CORN BOY
1. Thinly roll out orange fondant. Using a sharp knife, cut out a triangle with rounded edges slightly larger than your cupcake top. Press the corners to form neat curves.
2. Roll out yellow fondant into a rectangle approximately ⅓ of the height of the rounded edge of the triangle. Place it over the triangle in line with the base, using it as a template to cut the yellow fondant so it fits exactly.
3. To create the candy corn, repeat the above process to form an orange stripe in the center and a white stripe at the top of the triangle. Use a small circle cutter to cut out a circle in the center of the candy corn. Place the candy corn onto the cupcake. Use the same circle cutter to cut a circle from beige fondant for the face and place it inside the candy corn.
4. To make the nose, roll a ball of beige fondant and adhere it onto the center of the cupcake. Create the ears out of beige fondant like Mr. Zombie and adhere them to either side of the face. Use your ball tool to indent 2 eye sockets and an open mouth.


5. Create eyes like Mr. Zombie and adhere them in the eye sockets. Paint the inside of the mouth with black food coloring.
6. Adhere 2 small sausages of black fondant above the eyes for the eyebrows. Roll brown fondant into small
September | October 2023 americancakedecorating.com 41 TUTORIAL 1&2 4 5 6 7&8 9 3 T
ip
: BLACK EDIBLE FOOD PENS WOULD ALSO WORK WELL
TO DRAW FACIAL FEATURES.
teardrop shapes and adhere them to the top of the head for hair.
MAKE MR. MONSTER
1. Roll out brown fondant and cut out a circle the same size as the top of your cupcake. Gently pull 1 side to elongate it. Indent the top center of the elongated portion with your Dresden tool to make a groove. Indent random freehand vertical lines to cover the entire fondant piece. Adhere it onto the cupcake, with the elongated portion overhanging slightly.
2. Use your ball tool to indent 2 eye sockets. Dust the inside of the eye sockets with black petal dust. Roll 2 balls of pale yellow fondant for the eyeballs and adhere them in position. Create the eyes like Mr. Zombie and adhere them.
3. To make the eyebrows, roll brown fondant into elongated teardrop shapes and bend to curve them slightly. To make the mouth, roll brown fondant into a sausage and curve them into shape. Adhere them with water. Texture the pieces by making vertical lines with your Dresden tool.
4. To make the nose, roll a small piece of black fondant into a ball. Adhere it onto the center of the face between the eyes. Indent 2 nostrils at the base of the nose with your Dresden tool.


5. To make the teeth, roll 2 small pieces of white fondant into small teardrop shapes. Adhere them to the bottom of the mouth with a little water.
6. To make the ears, roll brown fondant into teardrop shapes.


Indent the ear sockets with your Dresden tool and adhere them to either side of the face. For the horns, roll white fondant into 2 larger teardrop shapes and adhere them to the top of the eyebrows. Dust the entire cupcake with brown petal dust. ACD


42 americancakedecorating.com September | October 2023 TUTORIAL
1 1 2 3 4
7. Dust the nose and cheeks with pink petal dust and the candy corn with brown petal dust, focusing the dust around the edges and between the candy corn colors.
2 3
5&6
4&5
6&7
Welcome, Mortals! Foolish
BY SCOTT BRADSHAW
Serpents and spiders, tail of a rat, call in the spirits, wherever they’re at!
Scott Bradshaw is the owner of sevenravens bakehouse.com, an entertaining blog which strives to get people to look at food and recipes in a twisted way … as twisted as an old phone cord. Scott grew up in Texas, and has lived in Arizona, Nevada, and Missouri. He makes Plainville, MA, his home these days with his saintly husband and a bossy little Pomeranian.

sevenravensbakehouse.com
tiktok.com/@goosecaboose70
Madame Leota is the star of The Haunted Mansion ride at Disneyland and Walt Disney World and Phantom Manor in France’s Disneyland Park. She was known for having been a medium, a psychic, a palm-reader, a potion-brewer, a clairvoyant, and an oracle in the Disneyland story. Following Leota’s death, her spirit haunted the manor within a crystal ball as the estate’s resident medium who used her spells to materialize the house’s 999 spectral residents.
In Disney World’s ride, Leota was originally a witch living in the town of Salem, Massachusetts, during the 1690s until she inadvertently

September | October 2023 americancakedecorating.com 43 THE CAKE ALCHEMIST
caused the notorious Salem witch trials and was forced to flee the state, relocating to a village in New York’s Hudson River Valley. She opened a store called Memento Mori Curios and Curiosities, which sold supernatural relics and potions and offered “spirit photography.” Through unknown events, upon Leota’s death, she was buried in the Gracey family plot.
Leota is an international woman of mystery, even though she’s just a misty head in a crystal ball. Never let not having a body hold you back. If she can be a star with no body, you can do anything you can dream of … including making this projection illusion showstopper of a cake.

Rap on a table—it’s time to respond. Send us a message from somewhere beyond. The challenge with this cake is getting the illusion to work right. Initially, I wanted to use a Pepper’s ghost illusion, which uses reflections to create the appearance of a floating head. I planned on using a small iPad on the top of the cake. The screen would then reflect up onto a clear reflective surface, either plastic or glass, inside the crystal ball. When you can see outside your window by looking at the glare on your TV screen, that’s an unintended Pepper’s ghost illusion— unintended and unwanted. The problems with doing this illusion
on a cake are many, though, including screen size and brightness, and concealment and operation of the screen …
Goblins and ghoulies from last Halloween, awaken the spirits with your tambourine! Disney created Madame Leota by projecting a film loop onto a static, almost featureless bust. The face belonged to Leota Toombs, a Disney artist who worked on many Disney attractions in the art department. The voice belongs to Eleanor Audley, who voiced such iconic Disney characters as Lady Tremaine (the stepmother from Cinderella) and the original Maleficent from
44 americancakedecorating.com September | October 2023 THE CAKE
ALCHEMIST
THE KEY TO GETTING THE PROJECTION TO WORK IS NOT ADDING FACIAL DETAILS BUT PROVIDING A SCREENLIKE PLACE FOR THE PROJECTED VIDEO TO WORK ON. IT WAS A STRUGGLE FOR ME. I WANTED TO ADD ALL THE DETAILS. I THINK MY BUST’S NOSE COULD’VE BEEN LESS DETAILED AND THE PROJECTION WOULD’VE LOOKED BETTER.
Sleeping Beauty. Disney has since figured out a way to project from within using fiber optics. I used a very inexpensive projector and an iPad to project the actual Disney YouTube video onto a modeling chocolate bust. The key to getting the projection to work is not adding facial details but providing a screenlike place for the projected video to work on. It was a struggle for me. I wanted to add all the details. I think my bust’s nose could’ve been less detailed and the projection would’ve looked better.
Wizards and witches, wherever you dwell, give us a hint, by ringing a bell!
Altogether, this is a very easy cake to accomplish once the fundamentals are understood. The table is a very simple threaded rod structure built up with modeling chocolate and accentuated with modeling chocolate decorations made with push molds. The chair is 100% chocolate with modeling chocolate flourishes also made with push molds. The crystal ball is glass, but I’m sure someone more talented than I could make a clear crystal ball dome using isomalt. The creepy part of this cake recipe is the amount of ground clove. Don’t be scared away. Somehow, it’s perfect. It offsets the hops of the beer and plays so nicely with the orange. It’s a delicious new take on a familiar spice cake. I’m going to make a conscious effort to simplify my recipes and keep them in a tight three-component range. I was trying to develop a beer/ orange curd recipe to act as a filling between layers and I almost got there, but, honestly, the cake doesn’t need it. It’s moist and tangy and would be great just as a Bundt cake. A nonalcoholic beer gives just as delicious results.
BEER CAKE
INGREDIENTS
4½ cups all-purpose flour
3 cups sugar
2 tablespoons plus 1 teaspoon baking powder
2 (3.4-ounce) packages instant vanilla pudding
2 cups beer
1 cup corn oil
8 eggs
2 teaspoons cinnamon
2 tablespoons ground cloves
1 teaspoon ginger
½ teaspoon allspice
INSTRUCTIONS
1. Preheat the oven to 350°F. Grease and flour 2 cake pans. Set aside.
2. In a mixer, combine all the ingredients and beat for 2 minutes. Pour the mixture into the prepared pans and bake for 50 to 60 minutes. While the cake is warm, brush on Orange Shandy Simple Syrup if desired.
ORANGE SHANDY SIMPLE SYRUP
INGREDIENTS
1 cup orange juice
1 cup beer
1 cup sugar
3–4 strips orange peel, pith removed
INSTRUCTIONS
1. Place all the ingredients in a small saucepan and stir to combine. Bring the mixture to a boil, stirring occasionally.
2. Remove the mixture from the heat and let it cool to room temperature. Discard the orange peels. Store it in
an airtight container in the refrigerator until ready to use for up to 2 weeks.
ICE CREAM BUTTERCREAM

INGREDIENTS
3 cups melted orange sherbet
½ cups all-purpose flour
1 pound (4 sticks) butter, softened
2 cups sugar
INSTRUCTIONS
1. Slowly mix the sherbet and flour together, adding the flour slowly to avoid clumps.
2. Place the mixture in a pan and simmer, whisking vigorously until thick. Transfer the mixture to a bowl or a shallow pan and cover it with plastic wrap, pushing down on the surface to prevent skin formation. Allow it to cool to room temperature.
3. In a mixer with a paddle attachment, beat the butter and sugar on high for 5 minutes, scraping the sides and the bottom of the bowl well.
4. Lower the speed to low and add the ice cream mixture. Slowly increase the mixer back to high speed and beat it for 5 minutes or until buttercream is thick and fluffy. ACD
September | October 2023 americancakedecorating.com 45 THE CAKE ALCHEMIST
BY JEWEL JOHNSON
Asimplesquarecakegetsacreepysculpted treatmentfortheultimateHalloweendelivery. Youdon’tevenneedtopayforoverfrightshipping!
DELIVERY SPECIAL
LEVEL:
COMPONENTS BUILD THE BASE
Edibles:
8-inch square cake

Rice cereal treats
Buttercream
Fondant: brown and white
Melted chocolate
Gel food colors: leaf green, brown, golden yellow, and black
Equipment:
Knife
Offset spatula
Rolling pin
Ruler
Armature wire
Dowels
Floral wire
Netting
Paintbrushes
Sculpting tools
Letter stencils
1. Square off the cake and rice cereal treats to equal thickness.
2. Layer, fill, and crumb-coat the cake and rice cereal treats with buttercream. Let them firm up in the refrigerator.
3. Roll out brown fondant and cut it into 4 panels measuring 6 by 3 inches. Allow them to dry.

CREATE THE TENTACLES
1. Attach the armature wire to the dowels with floral wire and bend it to the shape of moving tentacles, each about 8 to 10 inches long.
Jewel Johnson is a native of Harlem, NY, and currently resides in New Jersey. She attended Johnson and Wales University in North Miami to study baking and pastry. After leaving school, she pursued her dream of becoming a pastry chef in many restaurants in New York. Eventually, she opened her home-based business Green Jeans Cake. She found a love for cake sculpting, as well as wedding cakes, and has been fortunate to compete multiple times on the Food Network.

greenjeanscake.com instagram.com/ChefJ88 twitter.com/greenjeanscake

46 americancakedecorating.com September | October 2023 TUTORIAL
1 2 3

TUTORIAL
2. Wrap the armature wire with cereal treats and cover it with melted chocolate. Refrigerate to set.


3. Cover the tentacles with white fondant and create texture with netting material.


4. Paint with all the gel colors to create the look of monster tentacles.
DECORATE THE BOX
1. Roll out brown fondant and cut it to the dimensions of the cake sides.


2. Use extra buttercream to attach the fondant to the cake.
3. Add details with sculpting


tools to create dents and scratches to the box to make it look weathered.

4. Use letter stencils to detail the front of the box.
5. Use brown gel food color to create shadows and contrast on the sides of the box.
48 americancakedecorating.com September | October 2023 TUTORIAL
1a
1
2
3a
3b
1b
2a
2b
3a
3b
4a
4b
FINISH THE CAKE


1. Place the tentacles inside the top of the cake.


2. Use melted chocolate to adhere the dried fondant panels to the top.
3. Create packing peanuts with white fondant by rolling out a rope of fondant, then cutting it into smaller pieces, and shaping the pieces with tools to make irregular shapes.

4. Fill the upper cavity of the box with packing peanuts and cover the base of the tentacles and any visible buttercream. ACD

September | October 2023 americancakedecorating.com 49 TUTORIAL 4a 4b 5 1 3 4
T
i
p: WORDS LIKE “FRAGILE,” “THIS END UP,” AND “BEWARE: MONSTER INSIDE” ARE ALL GOOD LETTERING CHOICES.
EVERYROSE HAS ITSTHORN
BY LALA OLIVO
LEVEL:
COMPONENTS
Edibles:
Fondant-covered cake
Royal icing
Premade sugar roses, leaves, and eucalyptus leaves
Red petal dust
Green fondant
Shortening
Cornstarch
Brown gum paste
Tylose powder
Equipment:
Styrofoam ball
Floral wire
Wire cutters
Floral tape
Mini pliers
Paintbrushes
Steamer or pot of water
Silicone rope mold
Fondant tool

CelPin tool
ARRANGE THE ROSES
1. First, put a little bit of royal icing on top of the cake. Then, put the Styrofoam ball a little bit to the right side.
2. Take floral wire and size it to the length that you need. Then, cut it with wire cutters.
3. Wrap the wire with floral tape and insert it into the ball and cake to secure it.
4. Using wire cutters, take your premade sugar flowers and cut them to the length you need.
5. After cutting, arrange the flowers on the dummy ball with mini pliers. Also, place big and small roses on the bottom side of the cake.
Lala Olivo is the owner of WildBaker Cupcakes & Pastries Shop located in Laguna, Philippines. Cooking and making art is her passion, and when a friend introduced her to cake decorating, it felt like heaven. Her specialty as a cake artist is making tiny details and out of the ordinary but elegant cakes. Her strengths are sugar flowers, foliage, animals, and some other things, but her weakness is making human figures and facial expressions. She joined local cake competitions for a cause during the pandemic and joined Cake Fiesta Manila 2022, placing second in the wedding cake category.

facebook.com/wildbakercupcakes
instagram.com/wildbaker_cupcakes
tiktok.com/wildbakercupcakes
50 americancakedecorating.com September | October 2023 TUTORIAL
While roses are popular flowers to make, adding the thorns creates a more realistic and well-rounded presentation.
1

TUTORIAL
DUST AND ADD THE LEAVES
1. Dust the rose leaves with red petal dust. Starting from the edge, brush the leaves toward the inside.


2. Dust the eucalyptus leaves in the same manner. Steam the newly dusted leaves for a natural look and to help even out the color.


3. Place the rose bundles and eucalyptus in the spaces and in between the roses.
Tip: YOU CAN USE A STEAMER OR HOLD THE LEAVES OVER A POT OF BOILING WATER.
Tip: YOU CAN ALSO USE DOWELS AND SKEWERS TO SECURE THE BALL TO THE CAKE.


ADD THE ROPE BORDER
1. Knead a piece of green fondant until it’s pliable. Use a little shortening if it sticks to your hands. Roll it into a ball and then into a thin sausage.
2. Dust a silicone rope mold with cornstarch and slowly place the fondant. Make sure to press it all the way in so that the thickness of the rope is even. Cut the excess fondant with a fondant tool.
3. To release the rope, lift 1 side of the silicone mold and slowly push the rope out. Use edible glue to attach the rope to the bottom of the cake.
52 americancakedecorating.com September | October 2023 TUTORIAL
2 3 1 2a 3 2b 4 5
MOLD THE BRANCHES
1. Take a small amount of gum paste, knead it with shortening, and add a little bit of Tylose powder to strengthen it.
2. Roll it into a ball and then into a thick sausage. Roll the other side into a cone shape.
3. Use the fondant tool to add texture to make it look like a branch.


4. In making small branches, roll your dough into a cone shape and flatten the sides a bit and make the bottom part flat.
5. Using edible glue, stick the branches into the spaces on top of the cake.
6. Using a thin CelPin tool, poke small holes in the branches. This is where you will attach the small thorns later.
FINISH WITH THE MOSS
1. Roll a small amount of green fondant and roll it into a sausage. Flatten it out a bit and use the CelPin to poke the fondant to create a mosslike texture.
2. Attach the moss with edible glue to the spaces where you want to place it. ACD
ADD THE THORNS
1. Make a ball out of brown fondant, then roll it like a sausage on 1 end and a tiny cone shape on the other.
2. Using edible glue, attach the tiny little thorn to 1 of the holes. Make as many thorns and branches as you wish.
September | October 2023 americancakedecorating.com 53 TUTORIAL
1&2 3a 5 1&2 1&2 6 3b
REASONS YOU NEED A BUSINESS BLOG
BY CYDNI N. MITCHELL
As a Sweet Boss, there’s no doubt that you know how important it is to create stunning and delicious-tasting treats that leave your customers in awe. However, in the current digital age, a super-yummy menu and an Instagram-worthy storefront aren’t enough to guarantee success. You need an effective way to stand out, connect with your audience, and attract potential customers to your business. So, what’s the answer?
A blog!
With the rise of social media, video content, and other forms of digital marketing, some may argue that blogs have become less relevant; however, in reality, it’s the opposite. Blogs provide a unique space to engage your audience, share valuable content, and establish your expertise. In fact, according to HubSpot, a software tool for marketers, “Companies that blog have far better marketing results. Specifically, the average company that blogs has 55 percent more visitors.” With all of this in mind, let’s dive into why you should create a blog to promote your sweet business online.
1A BLOG CAN INCREASE YOUR ONLINE PRESENCE.
Having a great-looking website is wonderful, but how do you ensure that potential customers can find it? A blog can be an online traffic magnet. Search engines love fresh and valuable content. That’s why regularly updating your website’s blog with relevant posts can boost your website’s search engine rankings. Without a strong online presence, your sweet business may get buried in the search results below your competitors. A blog can work like a beacon that guides potential customers to your website.
Imagine that a local couple is planning their wedding and they want an elegant cake that reflects their unique love story. After doing

54 americancakedecorating.com September | October 2023 SWEET BOSS
5
a quick online search for “custom wedding cakes,” your blog post on “Creating an Unforgettable Wedding Cake for Your Special Day” pops up on the first page of the search results. Inspired by your expertise and design esthetic, the couple decides to schedule a consultation. As a result, you end up connecting with a potential client all because your helpful blog post boosted your online visibility.
A BLOG CAN HELP YOU PROMOTE NEW PRODUCTS OR SERVICES.
Launching a special promotion or showcasing a new seasonal menu for the upcoming holidays? A blog is the perfect platform to announce and promote exciting business updates, which creates buzz and builds anticipation around your latest products or services. This can encourage customers to place orders and try the latest and greatest from your sweet business. Your blog can act as your digital megaphone, amplifying your message to a wider audience.
As we approach the holidays and you develop a limited-edition line of holiday-themed cupcakes, consider writing a blog post with a title like “Spreading Joy with Our Festive Cupcake Collection.” Introduce your audience to the flavor and design options included in the collection. Make sure to incorporate enticing images and videos that showcase every delicious detail. Then, share a preview on your social media and direct your audience to the blog for the full rundown of this “guaranteed to sell out” menu.
3 A BLOG IS GREAT FOR SHARING CUSTOMER STORIES.
Word of mouth is a powerful marketing tool and positive customer experiences can significantly impact your sweet business’ success. Use your blog to spotlight heartwarming
stories of satisfied customers, including pictures and videos of them interacting with you or your finished product. The blog should feature glowing testimonials from those who have enjoyed your desserts. Potential customers will feel more confident in placing orders with you when they read or see real-life experiences from others who’ve worked with you and tasted your desserts.
4 A BLOG CAN SUPPORT YOUR SOCIAL MEDIA MARKETING EFFORTS.
Social media plays a critical role in online marketing—and your blog can both support and strengthen those efforts. Each blog post provides valuable content that can be shared across your social media platforms while also directing your followers back to the website. This not only drives more traffic but also enhances your social media presence, making your cake business more visible and memorable to potential customers.
Consider a scenario where you published a blog post titled “10 Things All New Parents Should Know Before Ordering a First Birthday Cake.” The post is not only informative but also includes a step-by-step guide with links to other articles that are also on your blog. You share the post on your social media channels and your followers find it so valuable that they start sharing it with their friends, creating an unexpected boost to your social media following. Because you consistently share helpful content, the influx of new followers grows into a loyal community that eagerly waits for your updates.
5 A BLOG HAS THE POWER TO HELP YOU EDUCATE.
Use your blog to inform customers about cake customizations, menu options, and other services that you
offer. Your blog is the perfect place to guide potential customers through the ordering process and to walk them through the design process. By showcasing the possibilities and highlighting your attention to detail, you can establish your expertise and professionalism in a way that will inspire a sense of comfort with your audience.
As a Sweet Boss, it’s your job to do all that you can to make your business a sweet success. Adding a blog to your website is sure to open the door to a world of amazing possibilities and unprecedented growth. I encourage you to embrace the power of blogging and let your sweet business flourish like never before! ACD
Cydni N. Mitchell (a.k.a. Cyd) is a bakery consultant and the sweet business coach behind Sweet Fest®. Based in Atlanta, GA, Sweet Fest® is an online company that supports the business needs of the sweets community in the areas of professional development, marketing, branding, and web design. By trade, Cyd is an accountant and financial analyst with a master’s from the Kenan-Flagler Business School at the University of North Carolina at Chapel Hill. She is the co-founder of the Sugar Coin Academy, an online business academy for business owners in the baking and sweets industry, and she is also the organizer of The Ultimate Sugar Show, Georgia’s largest annual baking and sweets expo in Atlanta.

thesweetfest.com
facebook.com/thesweetfest
instagram.com/sweet_fest
September | October 2023 americancakedecorating.com 55 SWEET BOSS
2
BY KARLA MARRO
LEMON RASPBERRY Celebration Cake
In honor of National Dessert Month in October, we’re pleased to bring you this incredible cake created for Miller & Lux, Chef Tyler Florence’s luxury steak house in San Francisco.
LEVEL:
LEMON CAKE
INGREDIENTS
100 grams eggs
150 grams sugar
75 grams crème fraîche
40 grams olive oil
1 lemon, zested
15 grams lemon extract
120 grams flour
2 grams baking powder
INSTRUCTIONS
1. Preheat the oven to 330°F.
2. Mix the eggs and sugar in a mixing bowl and then add the crème fraîche and olive oil.
3. Add the lemon zest and extract.
4. Sift the flour and baking powder together. Add this to the egg mixture in 3 to 4 parts.
5. Pour the batter onto half sheet pans lined with Silpat, 900 grams per sheet. Bake for 8½ minutes and cool completely.
6. Make this recipe 4 times to create all the layers.
RASPBERRY GEL
INGREDIENTS
800 grams raspberry puree
12 grams agar
100 grams sugar
100 grams water
Growing up in Chile, Karla Marro spent much of her time at her grandparent’s bakery, understanding at just eight years old that her passion for sweets would become her future career. After attending culinary school, she applied for a position at a popular restaurant but was turned down based on her lack of experience. Undeterred, she did not give up on herself and moved to Santiago to continue her quest for knowledge. She started working at a boutique bakery and was introduced to the book Macarons by Pierre Hermé. These pages fueled her fascination and quest for mastery. A brief stint as a pastry sous chef at Daniel Boulud in New York City showed her the world of fine dining and she never looked back. Invited to work at the two-Michelin-star restaurant Acquerello, she learned to create complex desserts with no less than three textures or components. Now at Miller & Lux, Karla makes desserts with visual appeal and delicacy. She emphasizes symmetry, style, and grace in all her creations.
instagram.com/ksmarro

56 americancakedecorating.com September | October 2023 RECIPE

RECIPE
RECIPE
INSTRUCTIONS
1. Bring the ingredients to a boil and pour into a half sheet pan to cool.
2. Blend until smooth.
LEMON BUTTERCREAM
INGREDIENTS
1,200 grams sugar
400 grams water
500 grams egg whites
1,800 grams butter, room temperature
30 grams lemon extract
2 lemons, zested
INSTRUCTIONS
1. In a saucepan, heat the sugar and water to a boil until it reaches a soft ball stage, 250°F.
2. Meanwhile, whip the egg whites on medium speed. Once the sugar is ready, pour it in a slow, steady stream into the egg white mixture. Increase the speed and whip until cool.
3. Whip for an extra 5 minutes before adding the butter in small portions until all incorporated. Add in the lemon extract and zest.
WHITE CHOCOLATE SHELL
INGREDIENTS
500 grams cocoa butter
500 grams white chocolate
INSTRUCTIONS
1. Melt the white chocolate and cocoa butter over a bainmarie to combine.
DECORATIONS
White cocoa butter
Red cocoa butter
Raspberries
INSTRUCTIONS
1. Cut discs of the lemon cake with an 8-inch mold.
2. Layer the lemon buttercream and then the raspberry gel on top. Repeat this process until you get 8 layers. Freeze the cake and then cut into 4 pieces.

3. Cover the pieces of cake with lemon buttercream and freeze again.
4. Fill an airbrush with the
white chocolate shell at 113°F and spray the cakes. Freeze again.
5. Mark the cake with tape to create straight, even, thin lines.
6. Melt white cocoa butter to 108°F and airbrush to create white lines.
7. Remove the tape and then cover the white lines to make space for the red lines.
8. Melt red cocoa butter and airbrush lines underneath the white lines.
9. Remove the tape and decorate with fresh raspberries. ACD
58 americancakedecorating.com September | October 2023


GRAB A PRINT OR DIGITAL ISSUE! MASTER THE ART OF BEAUTIFUL WEDDING CAKES, BAKES, & SWEETS SEPTOCT 2021 ISSUE434 Happy Fall Y'all 30th ANNIVERSARY ISSUE f MAKE YOUR FONDANT SHINE Add texture to create a rustic, agedlook BOUNTIFUL BUTTERCREAM FLORALS LET'S TALK TIKTOK plus: 5SPOOK-TACULAR HALLOWEEN Recreate Poe’s raven AmericanCakeDecorating.com/shop
BY APARNASHREE MISHRA
THE NIGHTMARE CBEFOREHRISTMAS
Build your very own Jack Skellington just in time for Halloween and Christmas!
Aparnashree Mishra started baking and cake decorating in 2012 after the birth of her first daughter. What started as a hobby took shape as a profession. She took her first cake order and named her business The Pink Ribbons. In 2016, she started teaching cakes for beginners, and in 2021, she opened a pastry café called Royal Vanilla Cakes. She is now a businesswoman, managing staff and sales and designing cakes that include sugar-art work. She also loves to teach and mentor, as it gives her the satisfaction of spreading knowledge to others.

instagram.com/aparnashree_21
LEVEL:
COMPONENTS
Edibles:
White modeling paste
Gel food color: brown, black, red, and white
Water
Equipment:
Reference photo
Ruler
Pencil
Long-nose pliers
Floral wire
White floral tape
Styrofoam dummy
X-Acto knife
Paintbrushes
Dresden tool
Smoothing tool
Rolling pin
Scissors
Ball tool
Cone tool
Skewer
60 americancakedecorating.com September | October 2023 TUTORIAL

TUTORIAL
BUILD THE FRAME
1. Use your reference photo and start marking the important joining points of the body with a ruler and pencil: the center of the feet, both sides to the waist where the legs will join the torso, at the center of the belly, at the center of the collarbones where the shoulder and neck meet, and each side of the shoulder joining with the arms.
2. Use long-nose pliers to bend the floral wire exactly as the pencil markings. Make sure to bend the wires in the correct directions.
3. To create the skeleton frame, join the wire together with white floral tape. Once it’s stable, place it on a Styrofoam dummy and mark a small dot where the shoes will begin.


WHAT YOU NEED
MAKE THE BOOTS
1. Color modeling paste with a few drops of brown gel food color and very little black to get a dark brown color.
2. Make a long sausage out of modeling paste. Shape 1 end to be rounded like the front of a boot and bend it in the center for the ankle joint. Create a second boot the same way.


3. Place the boots on the frame.
4. Take a bit of white modeling paste and make furry bands on the upper edges of both boots.
62 americancakedecorating.com September | October 2023 TUTORIAL
1 1 2 3a 3b
Tip: BE CAREFUL WHEN YOU’RE ADDING THE BLACK TO NOT MAKE THE BROWN TOO DARK.
ADD THE LEGS
Make
2. Roll the modeling paste into a thin long sausage. Match the diameter and length of the legs in the reference photo.


3. Using an X-Acto knife, cut out 2 legs and make a straight slit in the middle of each.
4. Apply both legs to the wire frames. Apply a little bit of water with a paintbrush and seal the open edges.
5. Use a Dresden tool to smooth out the uneven areas.
CREATE THE COAT
1. Build the torso with white modeling paste. Start from the waist and build up to the neck and also cover the shoulder joint areas.

2. Use a smoothening tool to blend and finish the torso.


3. Roll out red modeling paste according to the size of the reference photo.

September | October 2023 americancakedecorating.com 63 TUTORIAL
1 3 4 2 2
1.
dark red modeling paste with a mix of red, black, and white gel food colors.
3
4 5
4. Brush a little water on the torso and place the modeling paste on 1 side. Cut away the extra with scissors.

5. Smooth the edges with a Dresden tool.
6. To create the rest of the coat, repeat the process in a similar manner with the other panels.
ADD THE ARMS AND HANDS


1. Using red modeling paste, make long, thin sausages for the hands. Match the size to the reference photo and cut 2 arms accordingly.
2. Make full-length slits in the hands with an X-Acto knife and insert them onto the arm wires. Blend them into the shoulder area well.


3. Create a teardrop shape with a bit of white modeling paste. Roll 1 side with your finger to form the wrist. Press the other side of it to flatten the paste to form a palmlike shape.
4. Cut 1 side to form the thumb.
5. Make equal-size cuts for the fingers. Using your fingers, create bone-like texture on each finger. Let the hand dry for 5 minutes before attaching it to the arms with water. Repeat with the second hand.

64 americancakedecorating.com September | October 2023 TUTORIAL
6c 5 6a 6b 4 1 2 3
MAKE THE FACE AND CAP
1. Roll a ball of white modeling paste. In the middle of the face, make eyes using a ball tool. The nose will be formed automatically.


2. Create a mouth with a cone tool and nostrils with a Dresden tool.


3. Create a cone shape out of red modeling paste, making 1 side narrow and long.

4. Using your thumb, create a funnel shape on the fatter end.


5. Bend the narrow tail downward and add a small ball of white modeling paste on the end. Use scissors to create a furry look.


6. Roll another small piece of white modeling paste into a thin sausage, texture it, and attach it to the rim of the hat.

September | October 2023 americancakedecorating.com 65 TUTORIAL
2 3a 3b 4 5 2 3 6 4 5 1 1
FINALIZE THE DETAILS
1. Make a thin string out of white modeling paste. Cut very tiny pieces to make polka dots and attach them to the coat.


2. Take a small piece of red modeling paste and make pleats with a thin skewer.


3. To create a bow, make an impression in the center of the modeling paste with a Dresden tool at the center.


4. Take another small piece of red modeling paste and twist it to create a faux knot for the center. Attach it to the coat.
5. Paint the face with black gel food color. ACD
66 americancakedecorating.com September | October 2023 TUTORIAL
1 4 5 2 3
BY SHARON SIRIWARDENA
in Sugar!
This collaboration emerged out of my love for the pop art culture.
Pop art can be identified by its use of popular, consumer symbols, such as household objects. Andy Warhol’s Campbell’s Soup Cans and his interpretations of celebrity icons such as Marilyn Monroe reinforce the idea that art could be inspired by anything and everything.
In this collaboration, sugar artists attempted to give life to the pop art era. Some of them based their inspirations around the pop art culture seen during Andy Warhol’s time. Some got creative and applied those design elements to modern-day pop art creations. But, overall, all of them did a fantastic job coming up with some phenomenal pop art designs to wow their viewers!
facebook.com/Pop-Art-in-Sugar-A-Cake-Collective-Collaboration

CAKE COLLABORATION
Marce Ledesma
September | October 2023 americancakedecorating.com 67


 Michaela Rences
Shabari Ghosh
Netta Eliel
Doreen Zilske
Swati
Maheshwari
Sharon Siriwardena
Chris Durón
Michaela Rences
Shabari Ghosh
Netta Eliel
Doreen Zilske
Swati
Maheshwari
Sharon Siriwardena
Chris Durón


 Inoka Nishanthi
Ashita John
Alberta Garcia Rebollo
Bradley Lamb
Raicu Madalina
Petra Florean
Diney Hidalgo
Finashyna
Iryna
Inoka Nishanthi
Ashita John
Alberta Garcia Rebollo
Bradley Lamb
Raicu Madalina
Petra Florean
Diney Hidalgo
Finashyna
Iryna
Rita NOÈ
Rakhee Mitruka
Kara Heather
Yazmin Rodríguez
PUMPKIN CAKE
BY ANNMARIE MATTILA
Paired with classic cream cheese frosting, this cake lets the flavors of the season shine.

Makes one 8-inch cake
Ingredients
1 cup unsalted butter, melted
1 cup light brown sugar
1 cup granulated sugar
15 ounces pumpkin puree
4 large eggs
2 cups all-purpose flour
1 teaspoon baking soda
1 teaspoon baking powder
½ teaspoon salt
1 teaspoon ground cinnamon
1 teaspoon ground ginger
¼ teaspoon ground nutmeg
¼ teaspoon ground allspice
Instructions
1. Preheat the oven to 350°F. Grease and line two 8-inch cake pans and set them aside.
2. In a large bowl, whisk together the melted butter, the brown and granulated sugars, the pumpkin puree, and the eggs.
3. In a separate bowl, whisk to combine the flour, baking soda, baking powder, salt, and all the spices. Add this to the pumpkin mixture and stir until just combined.
4. Divide the batter evenly among the prepared pans. Bake for about 30 minutes or until a toothpick inserted comes out clean. Transfer the cakes to a wire rack and let them cool completely before filling and frosting. ACD
LAST BITE


Tick one thing off your bucket list in 2023: Get yourself published in a leading world cake magazine. Getting published raises your profile and helps to showcase your skills, and personality, which can lead to all kinds of exciting opportunities, including teaching at international shows, online tutorial commissions, brand ambassadorships, and more. The first step is easy: Simply get in contact with our editor to discuss which submission opportunities are open, You Made It! themes coming up, and what ACD can do for you. Get in touch: annmarie@americancakedecorating.com CAKE CASTING CALL! WE WANT TO PUBLISH YOU!


CONTENT You CRAVE Get the americancakedecorating.com Every issue of American Cake Decorating magazine is filled with the latest cake decorating info that our readers want—bringing new ideas, techniques & skills through step-by-step tutorials, themed showcases, new product information & more. ACD inspires creativity by giving all of its readers access to top-level talents from around the world! SUBSCRIBE NOW MASTER THE ART OF BEAUTIFUL WEDDING CAKES, BAKES, & SWEETS Happy Fall Y'all 30th ANNIVERSARY f MAKE YOUR FONDANT SHINE BOUNTIFUL BUTTERCREAM FLORALS LET'S TALK TIKTOK plus: 5 SPOOK-TACULAR HALLOWEEN TUTORIALS Recreate