1 minute read
PROTOTYPE Completed

from Final Folio


Advertisement
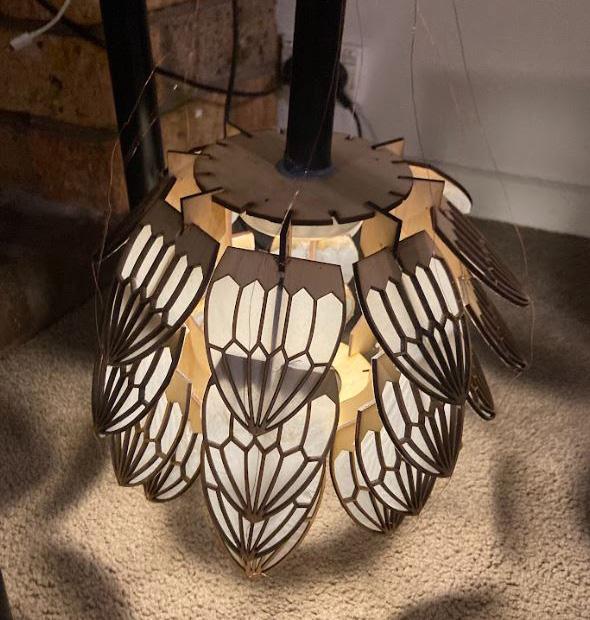
Using the Stepper control board’s switches, the model’s shades are able to move up and down using 2 buttons. First photo shows the shades closed.
This photo shows when the shades were fully open. I then pressed the button to make the motor turn Anti-clockwise making the shades go back down.
Shades returned back to closed position.

In conclusion, from this experimentation process i have learnt how to develop a design using a theme/story from start to finish. The process of creating the design prompted me to be creative and imaginative using the design skills i know.
This process started with choosing a greek themed God character and doing research on their strengths and weaknesses. From there, artificial intelligence was used to generate ideas on the chosen character which best represents them. After doing the reaearch and aquiring ideas the experimentation phase began to start designing an object/installation turning a myth into reality. Studying different materials and mechanisms helped in gaining more ideas to generate a system which represents the chosen character/theme, at this stage i created a prototype to better understand the motion of my object.
Furthermore, This initial prototype was developed using sketches and further experimentation which landed me on my final design, i then created a model out of the feedback and development which would represent the real life design showing both it’s functioning and aesthetics.
Ultimately this unit gave me the skills and knowledge on how the creative design process works, from the earlier research stages to the final model making process.
FIGURE 1 - REFERENCES (3)
FIGURE 2 - EXPERIMENTATION (4)
FIGURE 3 - EXPERIMENTATION (4)
FIGURE 4 - DESIGN CONCEPT (5)
FIGURE 5 - DESIGN CONCEPT (5)
FIGURE 6 - PRECEDENT 1 (6)
FIGURE 7 - PRECEDENT 1 (6)
FIGURE 8 - PRECEDENT 2 (6)
FIGURE 9 - PRECEDENT 2 (6)
FIGURE 10 - PRECEDENT 3 (6)
FIGURE 11 - PRECEDENT 3 (6)
FIGURE 12 - DEVELOPING THE DESIGN (7)
FIGURE 13 - DETAILING THE DESIGN (8)
FIGURE 14 - DETAILING THE DESIGN (8)
FIGURE 15 - SITUATING THE DESIGN (9)
FIGURE 16 - ATTACHING THE DESIGN (10)
FIGURE 17 - DESIGNING THE POSTERS (11)
FIGURE 18 - DESIGNING THE POSTERS (11)
FIGURE 19 - DESIGNING THE POSTERS (11)
FIGURE 20 - DESIGNING THE POSTERS (11)
FIGURE 21 - DESIGNING THE POSTERS (11)
FIGURE 22 - DESIGNING THE POSTERS (11)
FIGURE 23 - DESIGNING THE POSTERS (11)
FIGURE 24 - PROTOTYPE (13)
FIGURE 25 - PROTOTYPE (13)
FIGURE 26 - PROTOTYPE (13)
FIGURE 27 - PROTOTYPE (13)
FIGURE 28 - PROTOTYPE (13)
FIGURE 29 - PROTOTYPE (13)
FIGURE 30 - PROTOTYPE (13)
FIGURE 31 - PROTOTYPE (13)