3 minute read
Wise Package Studio


Next, click Build in the upper left corner.
Advanced Repackager Build Button The MSI file is saved in your selected build location under the folder %applicationname%SetupFiles.
Advertisement
Wise Package Studio Capture with Wise
When a setup is not an MSI, or is a hidden MSI inside the EXE setup, a capture is required.
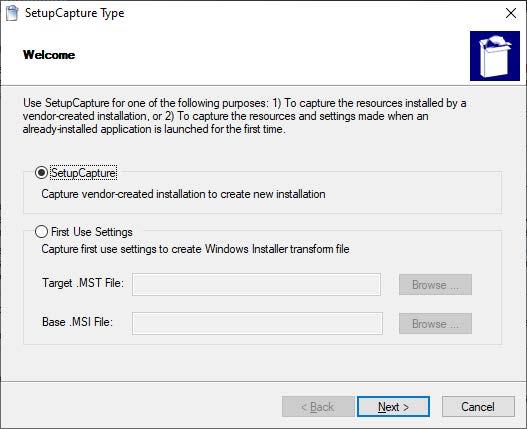
The capture is done with Wise by selecting the SetupCapture menu.

Wise Installer Editor
Double-clicking on SetupCapture brings up a new wizard which guides you through the process. For captures, the first option SetupCapture is kept and we click Next.
Setup Capture Window The First Use Settings option gives you the possibility to install an MSI file with the settings you need, and Wise outputs a transform file (MST) with those settings included. Since our intention is to convert an EXE installer to an MSI, in the next step, we need to determine the location of the capture result.

Target Installation and Output Directory
Target Installation refers to the location where the project will be outputted. You can choose between WSI and MSI. But first , it is recommended to create a WSI file. The WSI file is an intermediary step to have a Wise project from where the MSI will be built. After the settings are configured as shown in the previous image, click Next.

Additional settings for capture window Although Wise usually has all the right settings configured out of the box, it doesn’t hurt to double check that the Convert registry into an advertising info option is set. Click on Settings and perform the configurations as shown in the image below.

Additional settings for capture window Snapshot is the preferred capture method. The resulting WSI project is created by comparing system snapshots before and after a software installation.

Capture type selector
Here’s where the initial analysis of the system starts.

Initial System Snapshot After the initial system scan, the application can be installed.

App installation Browse to the EXE file you need, and click Next. The installation of your EXE will start. Once the installation is finished, press next.

Second System Capture After clicking Next, the application is installed according to the installation instructions and followed by the second analysis of the system.

Capture output
When the second analysis of the system ends, all the changes regarding files, INIs, shortcuts and registry keys are presented by Wise. It is recommended to clean the capture during this step. Still, depending on your needs, you could click Next and skip the capture clean up, choosing to perform it at a later time when the WSI project is created. Once the capture is complete, you can fill in various fields: Name, Version, Manufacturer -- as seen in the image below.

General details regarding the capture Once the capture is finished, you will have a wsi file, which when compiled, will generate our package (the MSI).

Wise Project generation
Editing / Modifying Wise captures/MSIs
For each category of information, there are some special windows you need to follow. They’re easy to use and understand. Once your capture is ready, open the .WSI project that was previously saved An .WSI project allows you to perform additional changes and output the final MSI. You can perform any changes by navigating to the specific tabs, as described in our previous chapters.
When the project is adjusted to your needs, you can save it by clicking the Save button located in the upper-left corner.

Main Window of Wise Installer Editor
Once the capture is clean, it is compiled, validated, and tested.

Compile Wise Installer Project to MSI