Control Handle
Calibrate Refer to Figure 14 for the following instructions. 1. Verify that the key switch is in the OFF position. 2. Move the jumper from P (park) to T (teach). See Figure 15. a. Ensure the leads from the Right Lift switch connects to the JP10 socket and the leads from the Right Lower switch connects to the JP12 socket. See Figure 14. b. Ensure the leads from the Left Lift switch connects to the JP14 socket and the leads from the Left Lower switch connects to the JP15 socket. See Figure 14.
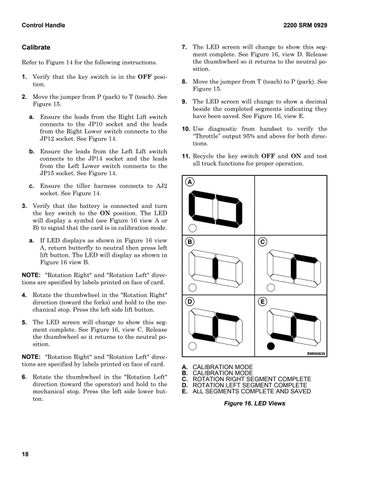
2200 SRM 0929 7. The LED screen will change to show this segment complete. See Figure 16, view D. Release the thumbwheel so it returns to the neutral position. 8. Move the jumper from T (teach) to P (park). See Figure 15. 9. The LED screen will change to show a decimal beside the completed segments indicating they have been saved. See Figure 16, view E. 10. Use diagnostic from handset to verify the “Throttle” output 95% and above for both directions. 11. Recycle the key switch OFF and ON and test all truck functions for proper operation.
c. Ensure the tiller harness connects to AJ2 socket. See Figure 14. 3. Verify that the battery is connected and turn the key switch to the ON position. The LED will display a symbol (see Figure 16 view A or B) to signal that the card is in calibration mode. a. If LED displays as shown in Figure 16 view A, return butterfly to neutral then press left lift button. The LED will display as shown in Figure 16 view B. NOTE: "Rotation Right" and "Rotation Left" directions are specified by labels printed on face of card. 4. Rotate the thumbwheel in the "Rotation Right" direction (toward the forks) and hold to the mechanical stop. Press the left side lift button. 5. The LED screen will change to show this segment complete. See Figure 16, view C. Release the thumbwheel so it returns to the neutral position. NOTE: "Rotation Right" and "Rotation Left" directions are specified by labels printed on face of card. 6. Rotate the thumbwheel in the "Rotation Left" direction (toward the operator) and hold to the mechanical stop. Press the left side lower button.
18
A. B. C. D. E.
CALIBRATION MODE CALIBRATION MODE ROTATION RIGHT SEGMENT COMPLETE ROTATION LEFT SEGMENT COMPLETE ALL SEGMENTS COMPLETE AND SAVED Figure 16. LED Views


