5 minute read
The Stalemate at 2


By Jeff Soo
American Six Wicket games often start with a familiar pattern: both sides play in and join up somewhere on the boundary, immediately followed by … a whole lot of nothing. Positional adjustments and passing, but nothing that advances the game — all clips remain on Hoop 2 with no deadness. This may end after a few rotations, but I’ve seen it go on for half an hour or more. It doesn’t take long to discover that each side is waiting for the other to make the first move: a stalemate.
This is a real dilemma for intermediate players, those with some ability at three-ball breaks but without the control to keep them going reliably. A typical attacking turn ends with the attacking ball dead on partner and one or both opponents. If partner then breaks down without scoring many wickets, that small gain has cost the player crippling deadness on one or both balls. Or if the attack itself fails, the attack has one ball with partner deadness and nothing to show for it.
The other offensive option is a two-ball break. This feels less aggressive because the turn begins with easy and familiar strokes: having set up a perfect rush, you take the rush, then approach and score the wicket. But even if you manage that, chances are you won’t have a rush to the next wicket. Now you have the dilemma of how to get both balls away from the wicket without ending the turn partner-dead. If you simply leave partner behind, you give the opponent a free three-ball break. And if you fail the wicket, not only do you have partner deadness, but you also give the opponent a four-ball break. This is why intermediate players so often fall into this stalemate: at this level, the risk/reward equation seems stacked against the player who makes the first move.
One way to rebalance this equation is to learn attack patterns that carry less risk. Two main difficulties in attacking the opponent on the boundary exist. The first is roqueting boundary balls without sending them out of bounds. The second is the problem of clearing the attacking ball, either on the attacking turn or later. Without advanced break-making skills, we can’t expect to peel partner or leave it in scoring position, so we want an attack sequence that allows us to clear the attacking ball and yet still leave a break for partner.
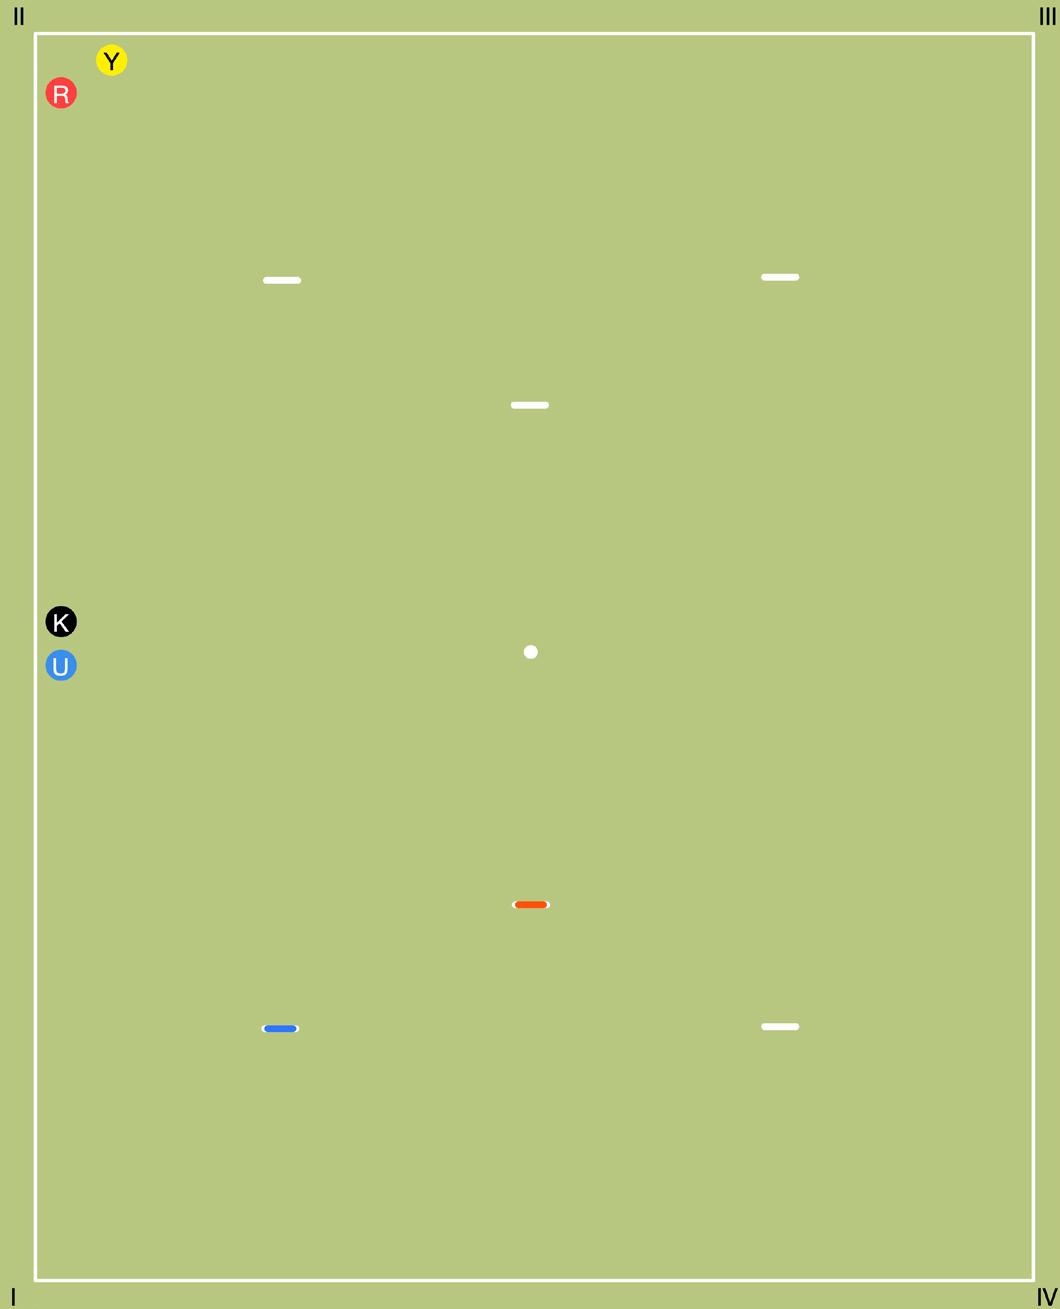
Figure 1 shows a typical intermediate-level opening, with all balls clear and for 2. UK has joined on the west boundary with a rush north. RY has joined in corner II, but slightly wide and across the corner as a defensive measure.

FIGURE 1: All balls for Hoop 2, no deadness
(A possible play here is the “rout,” short for roquet-out: U plays a hard cut-rush to send K out of bounds close to RY. U stays on the boundary with no deadness and now RY must do something. But if both sides make sensible decisions, we will be back to the Figure 1 position within a rotation or two. How and why? The answer is left as an exercise for the reader.)
As long as the boundaries are reasonably flat, each side has a fair chance at the ideal attack, setting partner for a three- ball break while clearing the attacking ball. U can make the classic “rush to the attack,” rushing K close to Y, leaving K and Y together, sending R away and leaving U at 2 as K’s pioneer. The key is that R is reasonably close to 2, offering U a manageable croquet stroke sending R to the south end of the court and U to position at 2 (see Figure 2). U should try to get one- to two-yard position at 2. Even if U jaws the subsequent shot at 2, K should be able to peel it. All players should practice this attack sequence, especially the big croquet stroke sending R away and getting position with U.
FIGURE 2: U attacks for K, sending R and taking position with U is a third roll with minimal split — manageable if not exactly easy.
If U declines the attack, RY has an even better play, especially if U has crept up the line to give K a rush to the corner. This is the “take-off to the attack:” R taps Y and takes off to the opponent balls. R should roquet K first, then play for the rush on U to 2. (This is why the play is more attractive if U has played north of K; it is easier to get this rush.) If R makes a good rush to 2, play a normal approach shot (attempting to hide U from K), score the wicket and return to R, leaving U as a pioneer for Y. If the rush is wide or short (see Figure 3), R should send U close to Y while approaching 2, then run the wicket and hide from K. Again, all players should practice this attack sequence. Both these patterns make great practice drills even if you don’t yet feel ready to try them out in games.

FIGURE 3: R has taken off to the attack. Not a great rush on U, but a fine position from which to send U to Y and R to 2.