Welcome to the Steps Into Science Teacher’s Guide a comprehensive resource designed to transform your classroom into a dynamic, engaging, and deeply enriching space for scientific exploration. This guide is tailored to support educators in delivering the Steps Into Science program with clarity, creativity, and confidence. Rooted in the principles of inquiry-based learning and aligned with the NGSS and Early Learning Standards, this program enables students to develop curiosity, critical thinking, and a foundational understanding of the world around them.
Through a balanced combination of hands-on activities, vibrant illustrations, real-world connections, and scaffolded instruction, this guide equips teachers with tools to ensure that every lesson is not only academically rigorous, but also fun and interactive. The structure of this course allows children to connect scientific ideas to everyday life, build essential vocabulary, and actively participate in their own learning journey.
The 5E Instructional Model
At the heart of this guide is the 5E Instructional Model an evidence-based approach to science instruction that encourages exploration, reasoning, and deep conceptual understanding. The 5Es represent five distinct phases of learning: Engage, Explore, Explain, Elaborate, and Evaluate. This guide integrates these phases thoughtfully across all activities and units to maximize student engagement and achievement.
1. Engage
In this phase, students are invited to connect new scientific ideas to their prior knowledge and realworld experiences. Teachers are encouraged to pose open-ended questions, present interesting scenarios, or use visuals and storytelling to spark curiosity. The goal is to stimulate interest, encourage predictions, and set the stage for learning.
2. Explore
During the exploration phase, students engage in hands-on investigations and interactive activities. This phase is student-driven and allows learners to experiment, observe, and collaborate with their peers. Teachers act as facilitators, providing materials and guidance while encouraging students to test ideas and discover patterns.
3. Explain
Once students have explored a concept, the teacher helps them make sense of their findings. In this phase, clear and accurate scientific explanations are introduced, and students are guided to articulate their understanding using appropriate terminology. Discussion, modeling, and visual representations play a key role in consolidating knowledge.
4. Elaborate
This phase extends students’ learning by encouraging them to apply concepts in new situations. Teachers may present real-world challenges, ask students to compare findings, or integrate cross-
curricular activities. The goal is to deepen understanding, strengthen connections, and foster the ability to transfer knowledge beyond the classroom.
5. Evaluate
Evaluation is an ongoing process embedded throughout the learning cycle. Teachers assess student understanding through observation, discussion, worksheets, and performance tasks. In this phase, both formal and informal methods are used to identify misconceptions, track progress, and celebrate success. Self- and peer-assessment can also be incorporated to promote reflection and ownership of learning.
Each phase of the 5E model has unique goals and instructional strategies. By structuring the lesson sequence according to this model, teachers ensure a logical progression of understanding that supports all types of learners.
Emphasis on Project-Based Learning
Steps Into Science places strong emphasis on project-based learning to enhance problemsolving, creativity, and collaboration. Throughout the course, students are invited to work on guided projects that allow them to apply their learning in meaningful ways. These projects are developmentally appropriate and encourage young learners to explore real-world concepts through inquiry and creation.
To support educators in assessing these projects, a detailed rubric is provided for each one. The rubric follows a 3-point scale based on specific performance criteria:
• 3 – Excellent: The student demonstrates a clear, complete, and creative understanding of the task.
• 2 – Satisfactory: The student completes the task with moderate understanding and effort.
• 1 – Needs Improvement: The student shows limited understanding or engagement with the task.
Teachers are encouraged to evaluate each criterion using this scale and then calculate the average score across all criteria. Based on the average score:
• A score of 2.6–3.0 is rated as Excellent
• A score of 1.6–2.5 is rated as Satisfactory
• A score of 1.0–1.5 is rated as Needs Improvement
This system ensures objective, transparent evaluation while allowing room for feedback and encouragement. The rubric also supports differentiation by helping identify areas where students may need additional guidance or challenge.
With the support of this Teacher’s Guide, the Steps Into Science course becomes a journey of discovery, wonder, and growth one that lays the foundation for lifelong scientific thinking. Thank you for guiding your students through it with dedication and heart.
Additional Teaching Resources and How to Use Them
To ensure that every educator has the tools needed to deliver this course with maximum impact and flexibility, we have developed a range of supplementary resources designed to complement the Teacher’s Guide and Student Book. These resources not only reinforce the instructional content but also support differentiated learning, assessment, and home revision.
1. Presentation PLUS
This is our all-in-one interactive teaching tool that brings each lesson to life. Designed for classroom projection, Presentation PLUS mirrors the Student Book while enhancing it with interactive activities, animations, real-life videos, and native speaker audio recordings. This creates an immersive, multisensory learning experience that strengthens both conceptual understanding and language exposure. Teachers can use it to model responses, facilitate discussions, or guide interactive wholeclass activities.
2. Assessment Package
For every chapter, a tailored assessment is provided to evaluate student learning in alignment with the chapter’s learning objectives. These assessments are graded and offer clear insights into student performance. Teachers are encouraged to use them at the end of each chapter as formative or summative tools to inform instruction and support individualized feedback.
3. Differentiated Worksheets
Each chapter includes two levels of printable worksheets:
• Worksheet A is designed for low to average achievers, with simplified tasks that support understanding and reinforce key concepts.
• Worksheet B targets high achievers, offering extended tasks and higher-order thinking challenges.
These worksheets are ideal for small-group reinforcement, homework, or independent learning stations.
4. Self-Study Mobile Application
Our dedicated mobile app is designed as a child-friendly, self-paced review tool. Students can use it at home to revisit lessons, practice concepts, and reinforce learning in a gamified, engaging environment. It aligns directly with the curriculum and allows for autonomous exploration and review, making it an excellent resource for both parents and educators to encourage revision beyond the classroom.
Unit 1: All About Us
Unit 2: Living and Non-Living Things
Chapter 1
Chapter 2
Chapter 3
Chapter 1
Chapter 2
Suggested Timeline
8–9
Unit 3: Our World
Chapter 1
Chapter 2
Unit 4: States of Matter Chapter 1
Unit 5: Forces and Motion
2
Chapter 1
2
3
Unit 1 All About Us
Unit Objectives
In this unit, the students will:
• demonstrate appropriate awareness of body parts.
• identify the five senses: sight, hearing, smell, taste, and touch.
• demonstrate understanding of each sense and its functions.
• demonstrate awareness of the relationship between the five senses and their matching body parts.
• communicate effectively to discuss sights, smells, sounds, tastes, and textures.
• demonstrate appropriate awareness of our needs as humans.
• foster creativity by expressing themselves through art.
• develop critical thinking and problem-solving skills by conducting investigatory projects.
• demonstrate awareness of physical health, hygiene, and wellbeing practices.
Framework Covered
• Actively engages in play as a means of exploration and learning
• Actively engages in problem solving
• Approaches tasks and problems with creativity, imagination, and/or willingness to try new experiences
• Exhibits curiosity, interest, and willingness to learn new things and have new experiences
• Demonstrates persistence
• Uses senses to assist and guide learning. Demonstrates eye-hand coordination and fine motor skills
• Demonstrates personal care and hygiene skills
• Demonstrates awareness and understanding of healthy habits
• Describes what humans need to survive
• Demonstrates motivation to communicate
• Demonstrates they are building background knowledge
• Demonstrates understanding of what is observed
• Demonstrates a growing receptive and expressive vocabulary
• Demonstrates their ability to represent ideas using a variety of methods
• Develops a logical argument
Introduce the Concept
Chapter 1 Body and Senses
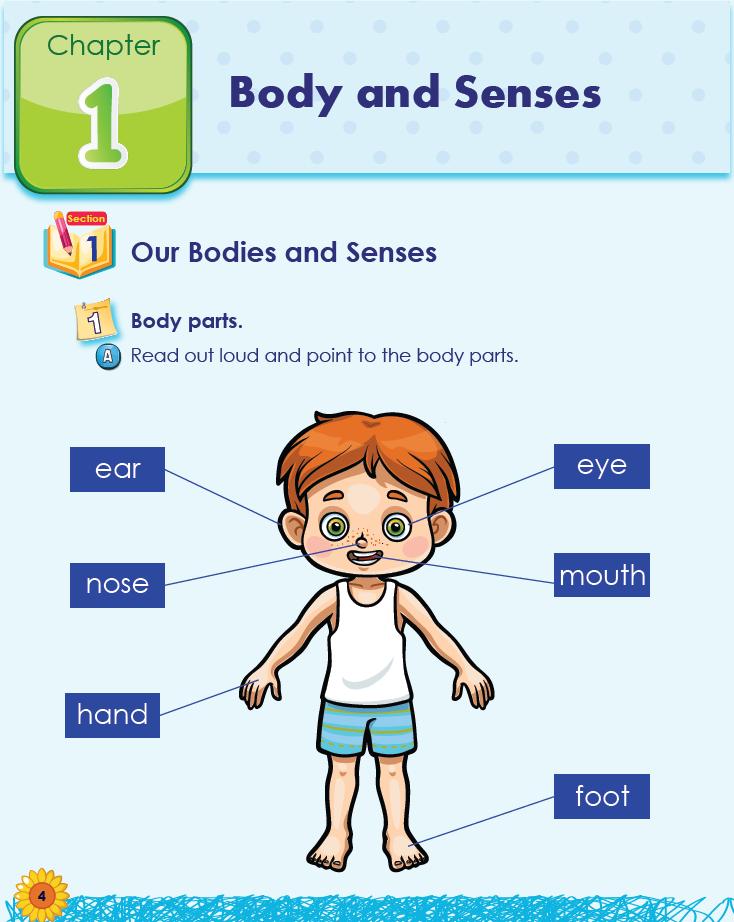
Begin with the question: “How do you know where your eyes are?” Encourage children to respond and point to their eyes. Repeat for nose, mouth, hands, feet, and ears.
1. Visual Vocabulary Walkthrough
Display the page or projected image. Point to each body part one at a time: ear, eye, nose, mouth, hand, and foot. Say each word clearly and slowly. Have students repeat each word aloud and mimic the pointing gesture on their own bodies.
2. Whole-Group Guided Practice
Say: “Touch your ear.” Pause and allow children to do it. Continue with: “Touch your nose. Touch your foot.” Reinforce vocabulary with every action.
3. Interactive Reinforcement
Write each body part name on the board as it’s introduced. Optionally, attach name tags to actual body parts using post-it notes for physical labeling games.
4. Use of Mirrors (Optional)
Have students look into a mirror to locate their features as they name them aloud: “I see my mouth. I see my hand.”
5. Discussion Prompt
Read out loud and point to the body parts
Objective:
Students will begin to identify, name, and point to key external body parts with guidance and repetition.
Teacher Instructions:
Ask: “Why do we need our hands?” or “What can you do with your feet?” Encourage short answers to develop function awareness.
and body, emphasizing correct positioning of ear, eye, hand, and foot.
2. Word Matching and Labeling
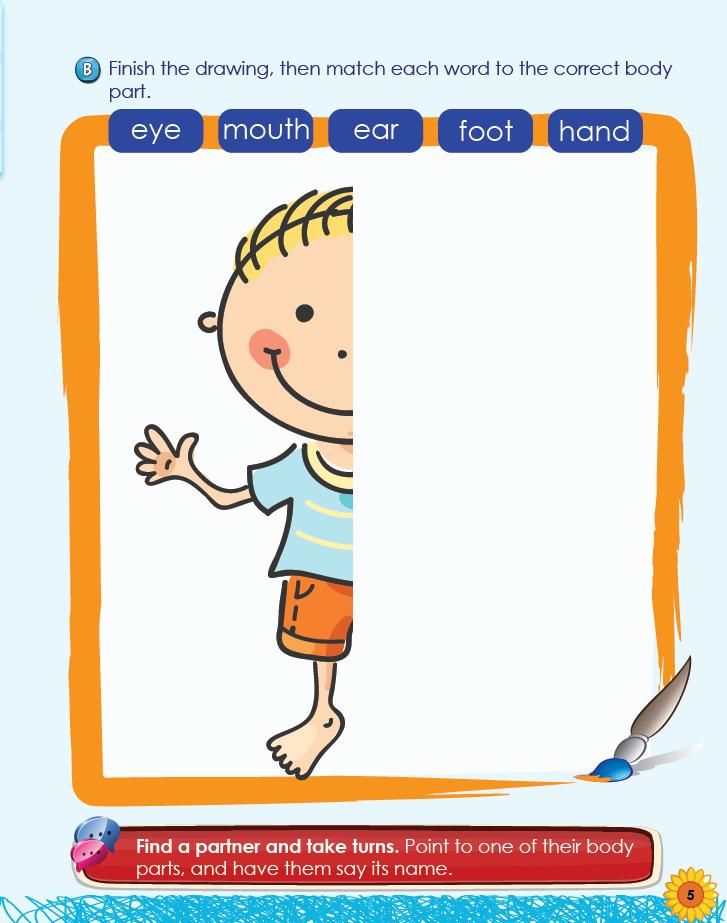
Read the words aloud at the top of the page together as a class: eye, mouth, ear, foot, hand. Point to your own parts as you say them. Then, guide students to match each word to the correct part of their drawing by drawing a line or labeling directly.
3. Partner Activity – Interactive Review
Pair students and say:
o “Point to one of your partner’s body parts.”
o “Your partner says: ‘This is my [hand].’”
Encourage use of complete sentences for speaking practice.
5E
Page 5 Activity
5E Phase: Engage
4. Class Movement Game (Optional)
Finish the drawing, then match each word to the correct body part
Objective:
Students will apply their understanding of body part vocabulary by completing an image, labeling parts, and identifying features on a partner.
Teacher Instructions:
1. Drawing and Completion
Ask students: “What’s missing from this picture?” Discuss symmetry. Model completing the other side of the face
Play “Simon Says” with body part names. This provides repetition, movement, and further reinforcement.
Assessment Tip:
Observe if students are consistently identifying and naming body parts accurately both in drawing and interaction. Provide corrective feedback gently and reinforce learning through peer repetition.
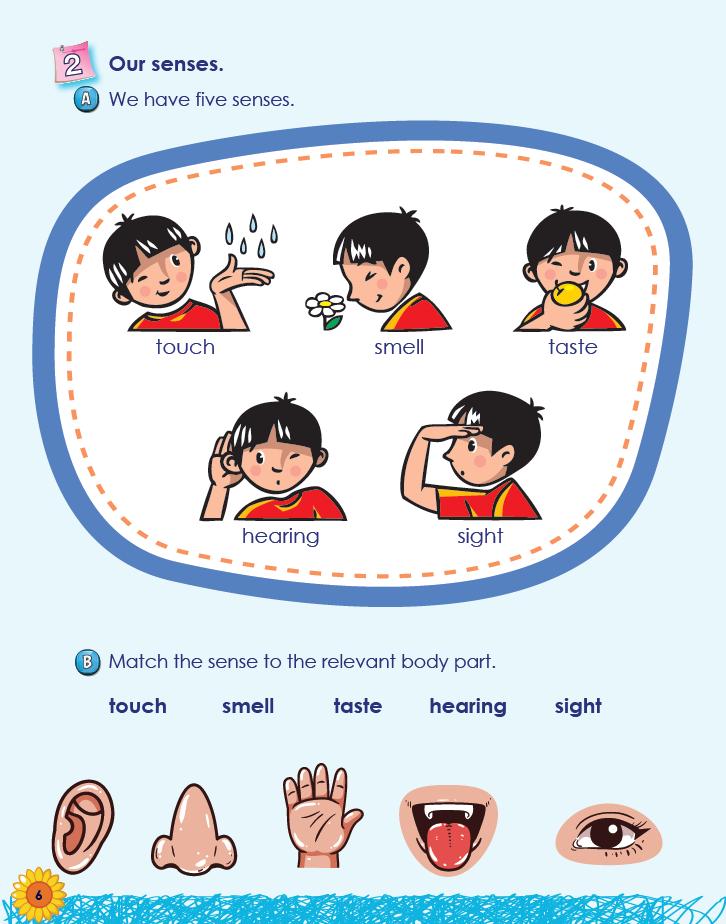
We have five senses
Objective:
1. Activate Prior Knowledge
Ask: “How do you know when something is soft? How do you know when food tastes good?” Let students share ideas. Write responses under the question: “How do we explore the world?”
2. Introduce the Senses One by One
Point to the first image (touch). Say: “This child is using her hand to touch. This is called the sense of touch.”
Do this for all five senses (touch, smell, taste, hearing, sight). For each, use a matching gesture or real-life example if possible (e.g., hold a bell for hearing or a flower for smell).
Have students repeat the sense name aloud after you and mimic the gesture or reaction.
3. Anchor with Student Examples
Students will identify the five senses and associate each with its basic function through images, movement, and discussion.
Materials:
• Page 6 of the student book
• Real objects (optional): flower, bell, soft fabric, fruit, mirror
• Chart paper or board
Teacher Instructions:
Ask students to provide a personal example for each sense:
o “What do you like to taste?”
o “What is something loud you’ve heard?”
o “What do you love to see?”
Chart their responses under each sense.
4. Reinforce Vocabulary with Rhythm and Movement
Create a rhythmic chant:
o “I see with my eyes. I hear with my ears.” (tap ears and eyes)
Have students stand and perform these as a group to lock in vocabulary.
Activity 5E Phase: Explore
Match the sense to the relevant body part
Objective:
Students will link each of the five senses to its associated body part with visual prompts and oral repetition.
Teacher Instructions:
1. Guided Matching Discussion
Point to each of the body parts shown (ear, nose, hand, tongue, eye) and ask:
o “What is this?”
o “Which sense uses this part?” Write each match as a pair on the board.
2. Visual Demonstration and Modeling
Demonstrate one match: draw a line from “hearing” to the ear. Explain: “We use our ears to hear. That’s the sense of hearing.”
3. Independent Matching
Instruct students to complete the matching exercise in their books. Encourage them to say the word aloud as they connect it.
4. Oral Pair Practice
Have students quiz each other in pairs using sentence prompts:
o “What do you smell with?”
o “What do you taste with?”
5. Extension Option
Let students label real body part diagrams with the corresponding sense
or cut out sense/body part images for a class collage.
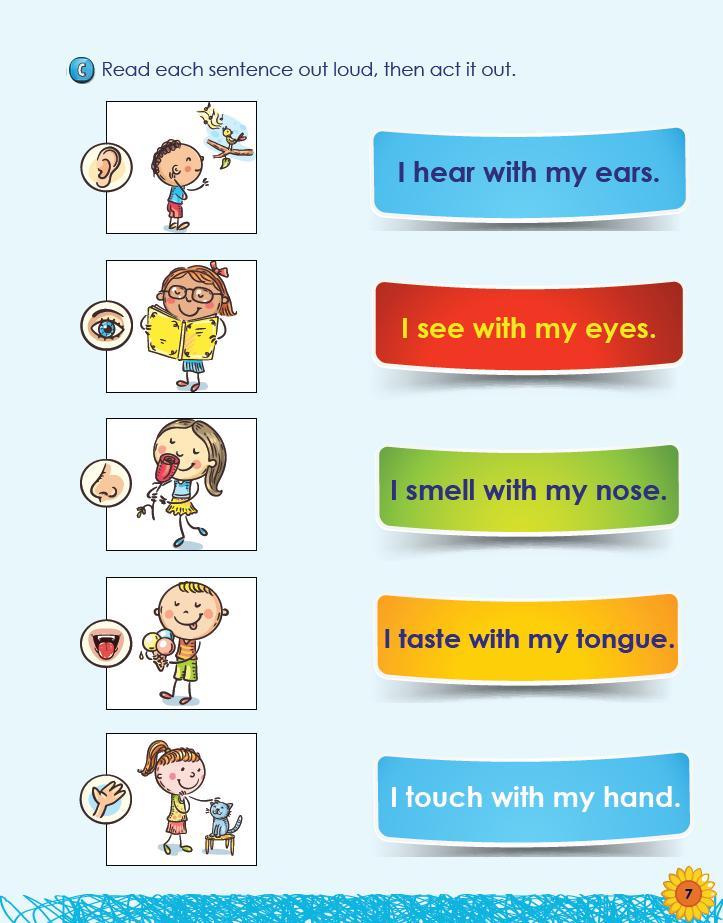
o “I touch with my hand.”
After reading each one, demonstrate the action (e.g., cup your ear, point to your tongue).
2. Kinesthetic Participation
Have students stand and perform the action for each sentence as they say it aloud. Use hand motions to cue the matching action.
3. Sentence-Action Matching Game
Hold up an image or action and have students say the sentence aloud together. Then reverse: you say the sentence, and students act it out.
4. Pair Presentation
Invite students in pairs to pick a sentence, say it aloud, and act it out for the class. Encourage use of loud, clear voice and full movements.
5. Optional Story Connection
Read each sentence out loud, then act it out
Objective:
Students will deepen understanding of each sense by associating the sentence structure with appropriate physical actions.
Teacher Instructions:
1. Choral Reading and Gesturing
Read each sentence together as a class:
o “I hear with my ears.”
o “I see with my eyes.”
o “I smell with my nose.”
o “I taste with my tongue.”
Ask: “Can you think of a time when you used all five senses in one place? Maybe at the park?” Help students recount experiences using each sentence in context.
Assessment Tip:
Observe participation in movement and accuracy in word use. Prompt with cues if students hesitate, and reinforce correct pairings.
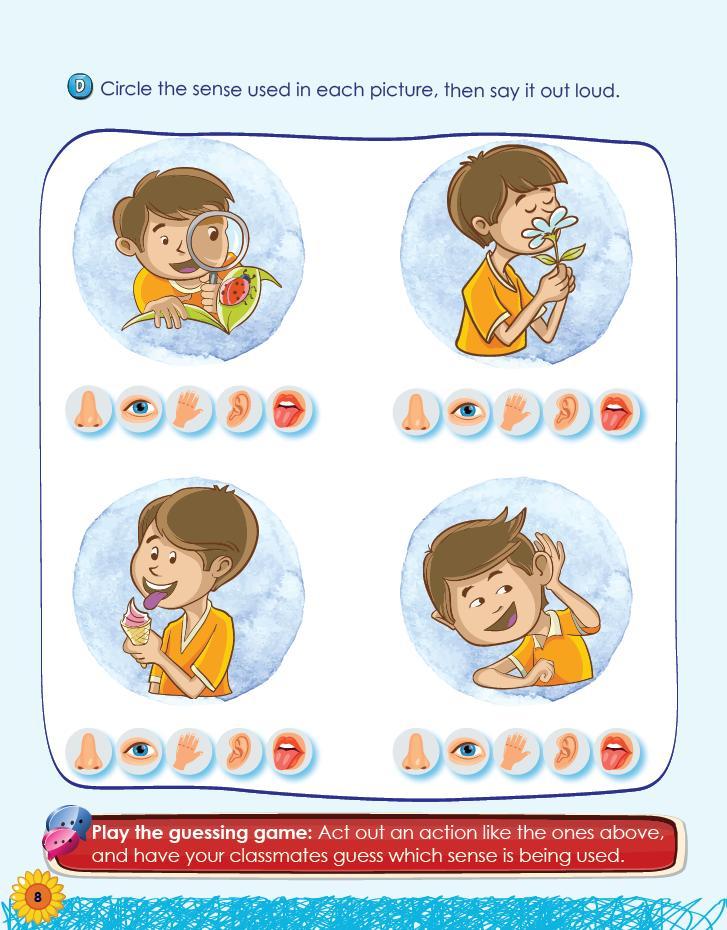
2. Picture Walkthrough
Guide students through each image on the page, one by one:
o Ask: “What is this child doing?”
o Prompt students to respond in full sentences: “He is smelling the flower.”
o Ask: “Which sense is that?” and let them choose the correct icon.
3. Circle the Sense Icons
Instruct students to look at the icons below each image and circle the one that matches the sense being used. Encourage them to say the word out loud as they do it: “Smell. I smell with my nose.”
4. Oral Reinforcement
Read each sentence aloud as a class:
o “I see with my eyes.”
Circle the sense used in each picture, then say it out loud
Objective:
Students will apply their understanding of the five senses by identifying and naming them based on illustrated scenarios.
Teacher Instructions:
1. Warm-Up Discussion
Begin by asking: “Can we use our eyes to taste? Why not?” Revisit the five senses briefly and review what each one helps us do.
o “I hear with my ears.”
o “I taste with my tongue.”
o “I smell with my nose.”
o “I touch with my hand.”
Have students repeat and point to the corresponding part of their body.
5. Guessing Game (Extension)
Use the game at the bottom of the page. Say:
“Let’s play the guessing game. I will act out something guess what sense I am using.”
Then act out a simple action like tasting, touching, or listening. Let students take turns acting out and guessing.
Group Activity Variation:
Form small groups. Each group prepares one silent action for the others to guess based on which sense is being used.
Objective:
doorknob, chair). Ask: “What should we not touch without asking?” Include items like stove, scissors, glass.
2. Personal Reflection and Drawing
Instruct students to choose one item from the safe list and draw it in the box. Encourage them to think about how it feels: soft, hard, bumpy, smooth.
3. Label and Present
Once drawings are complete, students should label the object and describe it: “This is my teddy bear. It is soft.” Assist those who need help writing.
4. Partner Share
Pair students and have them show and describe their drawing to a classmate. Ask guiding questions:
o “What sense do you use to feel that?”
o “How does it feel?”
5. Class Connection Discussion
Conclude by asking: “Why is touch important? When do we need to be careful with touch?” Reinforce safety and body awareness.
Students will extend their understanding of the sense of touch by identifying real-life safetouch experiences and illustrating them.
Teacher Instructions:
1. Class Brainstorm
Ask: “What are some things you can safely touch at home?” Write answers on the board (e.g., blanket, toy, pet,
Optional Take-Home Link:
Encourage students to ask their family what items at home are safe or unsafe to touch. They can share findings the next day.
remember what we use to hear, see, taste, smell, and touch.”
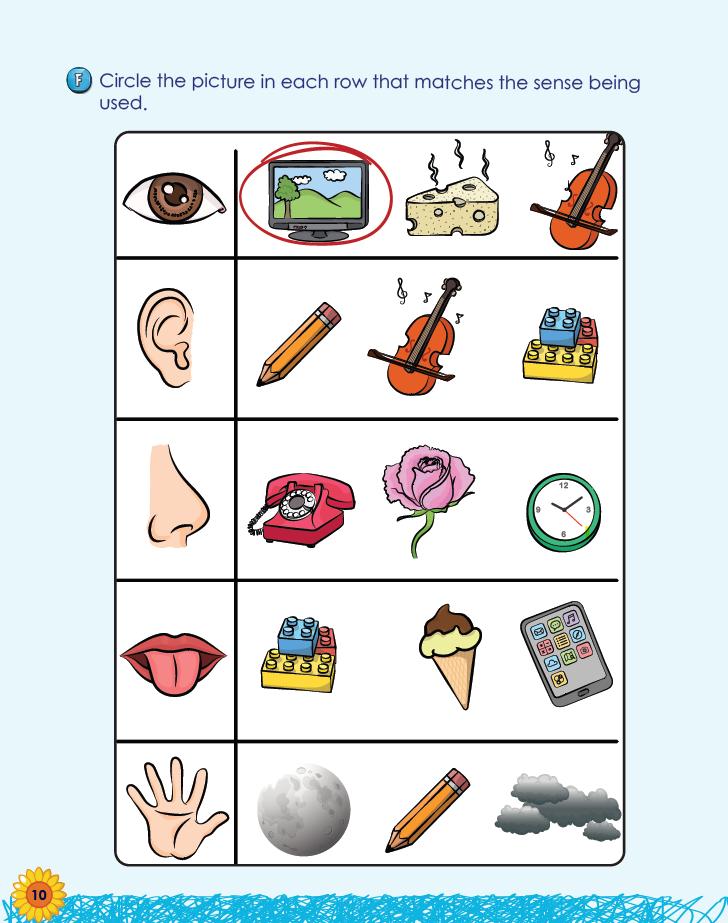
2. Model the First Row
Point to the first row. Ask, “Which picture shows something we can see?” Circle the correct image (TV) as an example and say, “We see the TV with our eyes.”
3. Guided Completion
Have students work row by row. For each, ask:
o “What sense are we focusing on?”
o “Which picture shows something we use with that sense?”
o “Say the sense and the object out loud: ‘I smell the flower with my nose.’”
4. Classroom Movement Option
Circle the picture in each row that matches the sense being used
Objective:
Students will demonstrate understanding of the five senses by identifying real-world objects associated with each one.
Materials:
• Page 10 of the student book
• Pencils or markers
Teacher Instructions:
1. Review Senses and Body Parts
Begin by reviewing each of the five senses with the class. Say, “Let’s
After completing the page, play a “sense walk.” Call out an object (e.g., bell, scarf, orange), and students point to the body part or say the matching sense.
5. Peer Check and Explain
Pair students and have them check each other’s answers and explain:
o “Why did you pick the flower for smell?”
o “Can we hear a pencil? Why or why not?”
Objective:
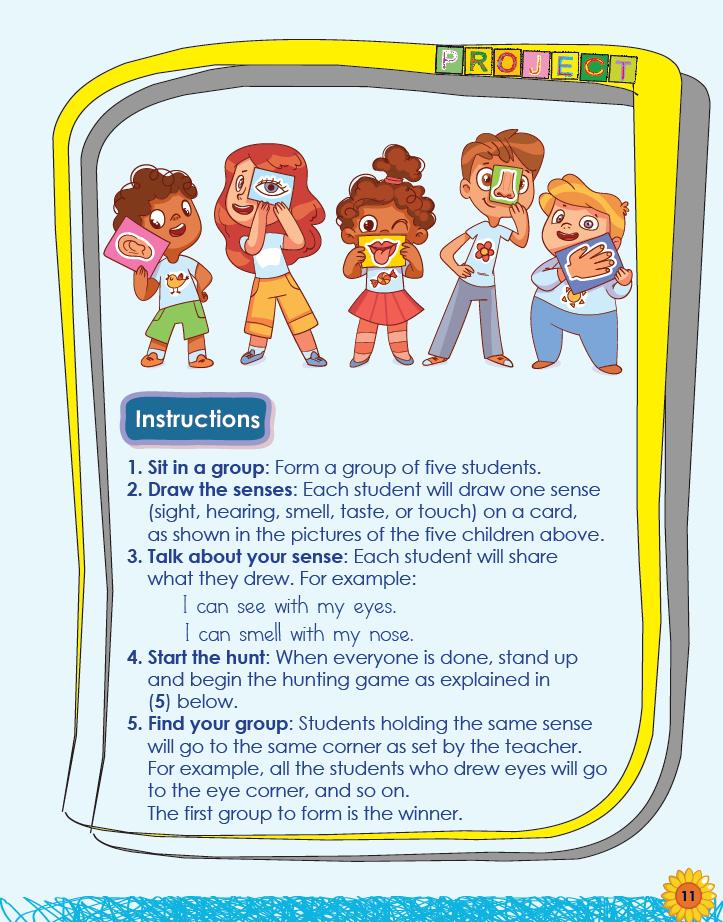
1. Group Formation
Place students into groups of five. Each student in the group is assigned one of the five senses.
2. Draw the Senses
Each student draws a simple picture representing their assigned sense (e.g., an ear for hearing, a spoon for taste).
Remind students: “Your drawing should clearly show how we use the sense.”
3. Sentence Construction
Instruct each student to say a sentence about their drawing using the structure:
o “I can [sense] with my [body part].”
For example: “I can see with my eyes.” Practice aloud before the activity.
4. The Hunt
Students will work collaboratively to represent and express understanding of the five senses using drawings, sentence formation, and group identification.
Materials:
• Blank index cards or small paper squares
• Crayons or pencils
• Large classroom space with designated “sense” corners
Teacher Instructions:
When all drawings are finished, call out, “Find your group!” Students must walk around and find others with the same sense as them, forming new sensespecific groups.
5. Winning Group and Review
The first complete group to form (all members holding the same sense card) is the winner. Once all groups are formed, have one student from each group present their sentence and drawing to the class.
Project Rubric: Senses Hunt
Participation in Group
Clarity of Drawing
Use of Vocabulary
Sentence
Team Cooperation
Sense Identification
Actively engaged, followed all steps Participated with guidance
Drawing clearly represented a sense
Spoke sentence clearly and accurately
Helped others and worked cooperatively
Correctly matched drawing to the sense
Drawing somewhat represented a sense
Spoke sentence with some support
Cooperated with some reminders
Needed some help to match correctly
Rarely engaged or needed constant help
Drawing was unclear or off-topic
Needed help to form or speak sentence
Struggled to work with peers
Did not identify or match accurately
12
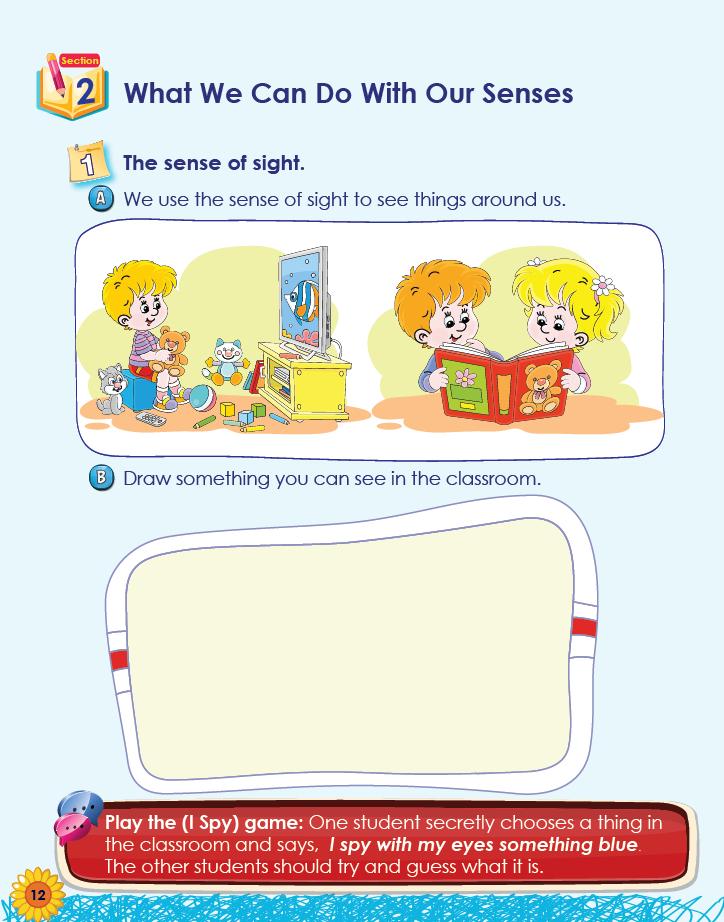
2. Visual Analysis
Discuss each picture with the class. Ask:
o “What are the children looking at?”
o “Are they using their eyes?”
o “What can you see right now in this classroom?”
3. Guided Group Practice
Point around the room and say, “Look at the clock. What color is it?”
Encourage students to describe something they see using colors, shapes, or names.
We use the sense of sight to see things around us
Objective:
Students will recognize that eyes help us observe and understand our environment.
Teacher Instructions:
1. Engage with Questioning
Begin by asking: “What do you use to see your friends? What helps you know when your teacher is writing on the board?”
Prompt: “What would happen if we couldn’t see?”
Draw something you can see in the classroom
Objective:
Students will apply the concept of sight by illustrating an item they visually observe.
Materials:
• Page 12 drawing space
• Crayons or colored pencils
Teacher Instructions:
1. Observation Prompt
Say: “Look around the classroom quietly. Pick one thing you can see and would like to draw.”
2. Model and Think Aloud
Point to something like a chair and say, “I can see the chair. It is brown and has legs. I can draw it.”
3. Independent Drawing Time
Allow students to work independently to draw something they can see. Remind them: “Use your eyes to look, then your hands to draw.”
4. Partner Share
When done, have students turn to a partner and say, “I can see [object] with my eyes.”
Extension Game: "I Spy"
Instructions:
• One student picks something in the room and says, “I spy with my eyes something [color or shape].”
• Other students take turns guessing what it is.
• Encourage descriptive guesses: “Is it the red bag?”“Is it the square clock?”
o Ring a bell gently, then firmly Ask: “Which one is soft? Which one is loud?”
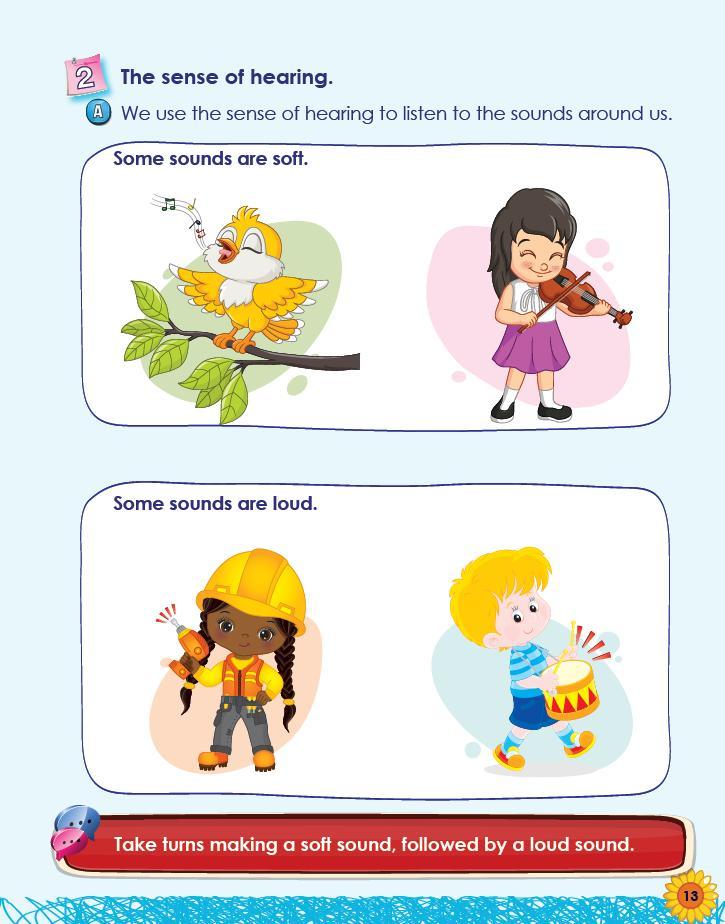
3. Picture Analysis
Refer to the images:
o Top row: “The bird sings. Is that a loud or soft sound?”
o Bottom row: “The boy plays a drum. What kind of sound is that?”
Interactive Sound Activity
Objective:
Students will produce and identify sounds of different volumes.
Instructions:
1. Take Turns Practicing
Activity A – We use the sense of hearing to listen to the sounds around us
Objective:
Students will explore the difference between soft and loud sounds and identify hearing as the function of ears.
Teacher Instructions:
1. Activate Prior Knowledge
Ask: “What do you hear right now? Are the sounds loud or soft?”
2. Introduce Concepts
Use classroom objects to model:
o Clap hands softly, then loudly
Each child makes a soft sound using their hands, mouth, or a classroom object. Then they repeat with a loud sound.
2. Class Sound Pattern
Create a pattern:
o “Soft – loud – soft – loud” Let students clap or stomp in rhythm.
3. Partner Check
Have partners take turns and guess what type of sound the other is making.
14
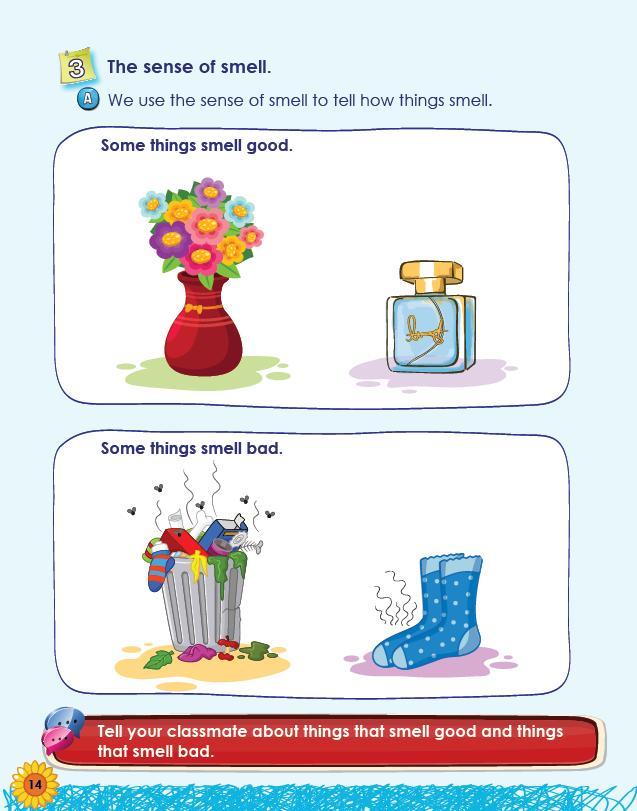
2. Picture Walk and Discussion
Show the two image sets:
o Flowers and perfume: Ask, “Would you want to smell this? Why?”
o Trash and socks: “How would you feel smelling this?”
Reinforce the idea that our nose helps us decide what smells are good or bad.
3. Tactile Optional Enhancement
If possible, bring safe-smelling items like a citrus peel or a flower and a sealed container with vinegar or coffee. Let students smell one at a time and guess what it is.
4. Group Sorting Game (Optional)
We use the sense of smell to tell how things smell
Objective:
Students will explore the use of the nose for identifying scents and describe objects that smell good or bad.
Teacher Instructions:
1. Introduction Prompt
Ask: “What do you smell when you walk into a kitchen? What about when you go near a trash can?”
Discuss that some smells are pleasant, and others are not.
Prepare laminated cards showing items (e.g., soap, old shoe, cake, garbage). Have students sort them into “smells good” and “smells bad” pockets on a board.
5. Oral Sharing
Ask: “Can you name one thing that smells good?”“Can you name one thing that smells bad?” Guide students to use full sentences:
o “I think flowers smell good.”
o “I think dirty socks smell bad.”
Provide suggestions if needed (soap, fresh bread, shampoo, flowers).
2. Drawing Time
Guide students to draw one item that smells good. Emphasize: “Draw it big and add color to show how much you like it.”
3. Oral Language Practice
After drawing, ask students to turn to a partner and say:
o “This is my [object]. It smells good.”
Model this first as needed.
4. Class Showcase (Optional)
Invite volunteers to show their drawings and describe what it is and why they like the smell.
Draw and Describe a Good Smell
Objective:
Students will recall a pleasant-smelling object from their life, represent it visually, and express their choice to a peer.
Materials:
• Student Book Page 15
• Crayons or markers
Teacher Instructions:
1. Prompt Observation and Recall
Ask: “What is something you smell at home that makes you feel happy?”
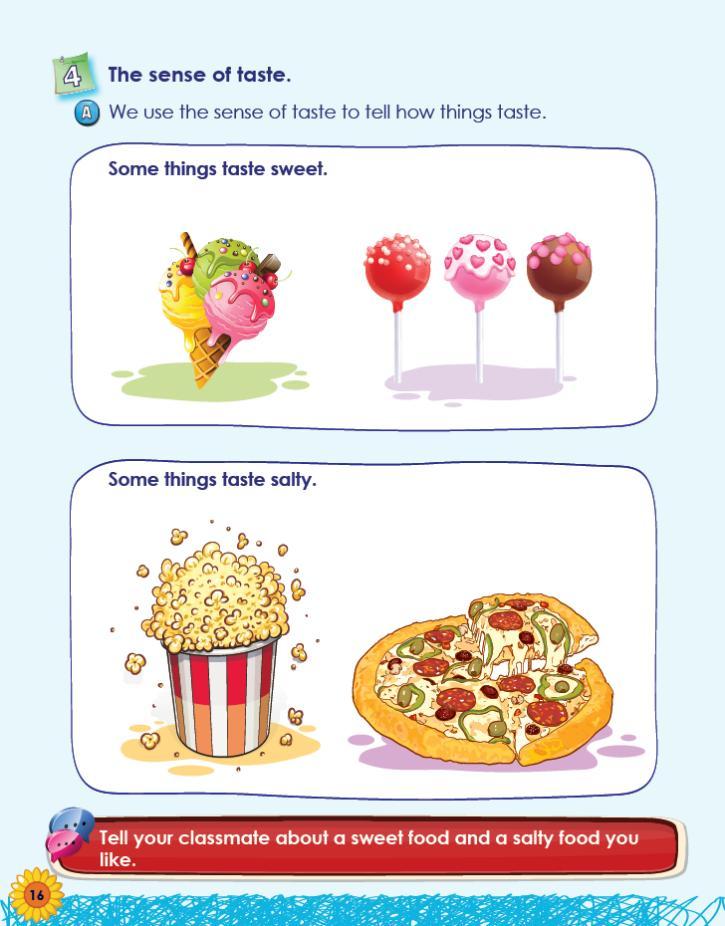
2. Taste Type Walkthrough
Use the images to lead a discussion:
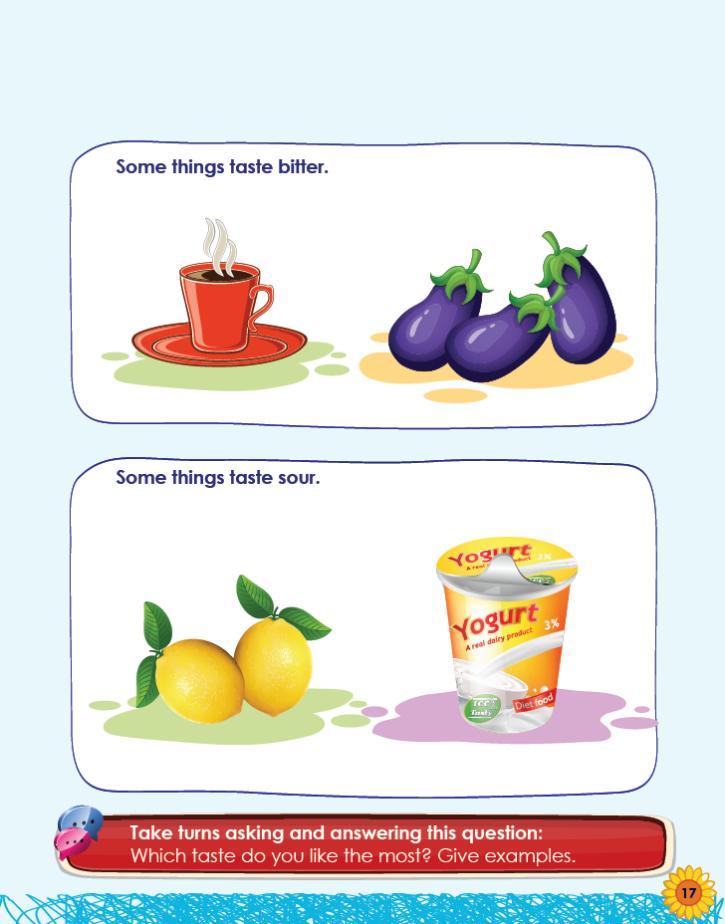
o “What kind of taste do you think lollipops have?” (sweet)
o “What about pizza?” (salty)
o “Have you ever tried coffee or eggplant? These are bitter.”
o “Lemon and yogurt are sour.”
Have students repeat each taste word after you.
3. T-Chart Activity (Optional Extension)
On the board, create a chart with four columns: Sweet, Salty, Sour, Bitter. Ask students to suggest foods for each and add to the chart together.
4. Partner Talk Prompt
Say: “Tell your classmate about one sweet and one salty food you like.”
We use the sense of taste to tell how things taste
Objective:
Students will recognize that the tongue helps us identify different tastes and will categorize foods based on flavor.
If feasible, bring small safe tasting samples (e.g., small pinch of salt, a sugar cube, lemon slice). Have students guess and name the taste. Page 16-17
Teacher Instructions:
1. Introduce the Concept
Ask: “What happens when you eat a lemon? What about a candy or pizza?”
Explain that the tongue helps us know how something tastes whether sweet, salty, sour, or bitter.
Model this: “I like chocolate. It is sweet. I like popcorn. It is salty.”
Have students take turns doing the same.
5. Optional Real-World Connection
17
Take turns asking and answering: Which taste do you like the most?
Objective:
Students will express personal taste preferences and support them with examples using complete sentences.
Teacher Instructions:
1. Review Taste Vocabulary
Quickly revisit the four taste categories with the class.
2. Think-Pair-Share Structure
Ask students to think: “Which taste do I like most? Why?”
Pair them with a classmate and guide them to ask and answer:
o “Which taste do you like the most?”
o “I like sweet taste. I like cake and ice cream.”
3. Sentence Modeling
Write a sentence frame on the board:
o “I like [taste] things. I like to eat [food].”
Practice aloud with a few students before starting pair work.
4. Group Wrap-Up
Invite 2–3 volunteers to share their answer with the whole class. Reinforce vocabulary accuracy and clear sentence structure.
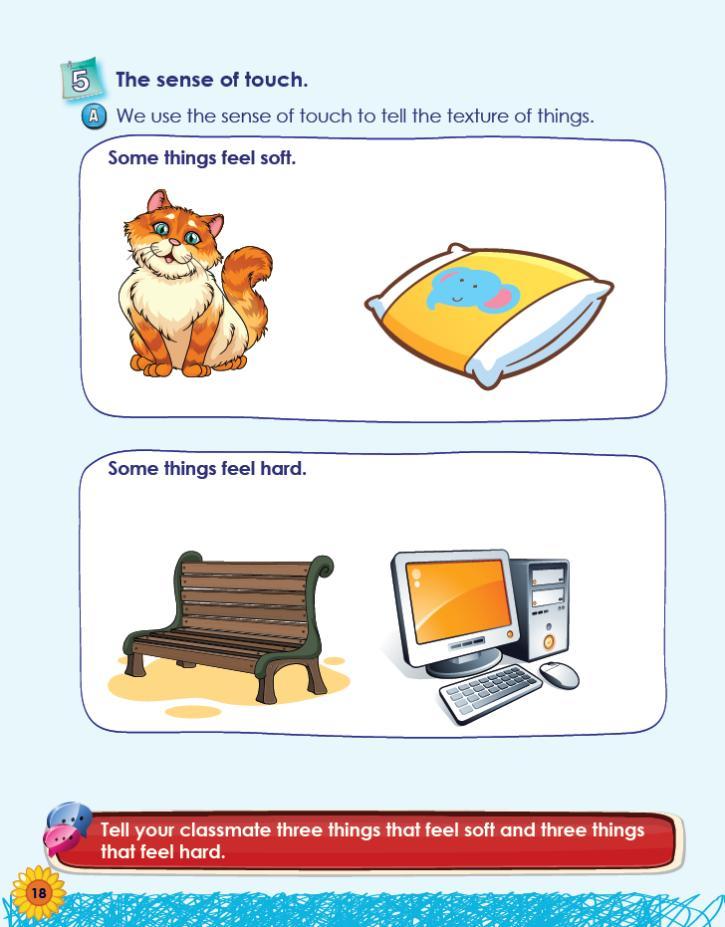
2. Image Walkthrough and Analysis
Discuss each image:
o “How would the cat feel?” (soft)
o “What about the bench or computer?” (hard)
Prompt students to give more examples: “Can you name something soft you have at home?” or “What is hard in this classroom?”
3. Touch-and-Say Activity (Optional)
Let students touch real classroom objects (book, eraser, backpack, chair).
Ask:
o “Is this hard or soft?”
o “How does it feel in your hand?”
4. Partner Talk
Have students turn to a classmate and say:
o “A pillow feels soft.”
We use the sense of touch to tell the texture of things
Objective:
Students will differentiate between textures by identifying soft and hard objects using their hands.
Teacher Instructions:
1. Introduce Concept
Ask: “What happens when you touch a pillow? What about a wooden chair?”
Emphasize that we use our hands to feel how something is soft, hard, smooth, rough.
o “A desk feels hard.”
Ask each student to name three things for each texture.
5. Optional Sorting Activity
Prepare a soft/hard sorting chart. Students bring or point to objects and place them under the correct heading.
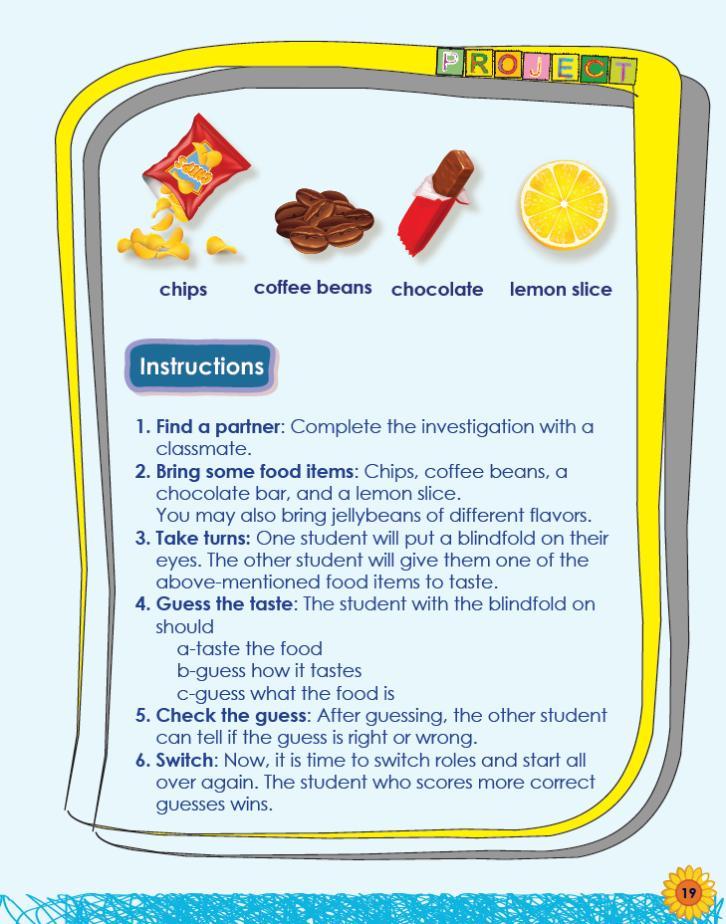
Objective:
(ensure all food is allergy-safe and preapproved). Remind students of the rule: taste only what is given, no peeking.
2. Conduct the Investigation
One partner is blindfolded. The other gives a small piece of one food to taste. The blindfolded student must:
o Taste the item
o Say how it tastes (e.g., sweet, sour, bitter)
o Guess what the food is
3. Role Switch
After the guess is confirmed, students switch roles. Continue until all food samples are tested.
4. Class Debrief
Ask:
o “Which food was the easiest to guess?”
Students will use sensory vocabulary and observational skills to describe taste and identify food items without visual clues.
Participation Fully engaged, followed all instructions Participated with reminders Reluctant or distracted during the activity
Vocabulary Use
Guess Accuracy
Cooperation with Partner
Used all sense-related words accurately Used some vocabulary with guidance
Correctly identified at least 3 out of 4 items
Shared roles fairly and worked respectfully
Reflection & Description Clearly explained what was tasted and why
Identified 1–2 items correctly
Needed occasional redirection
Gave brief or unclear explanation
Rarely used or avoided vocabulary
Needed support or couldn’t identify items
Had trouble cooperating or taking turns
Did not provide explanation or avoided sharing
Note: Use the rubric as a checklist during the activity or for brief oral feedback after the game.
Objective:
Chapter 2 Our Health
Introduction to Healthy Habits
Students will recognize that personal hygiene habits, such as bathing and brushing teeth, keep the body clean and help prevent sickness.
Teacher Instructions:
1. Engage the Class with a Discussion
Ask: “How do you feel after taking a shower? Why do we need to brush our teeth?”
Use real-life connections like “Do you shower after playing outside?” or “What happens if you don’t brush your teeth?”
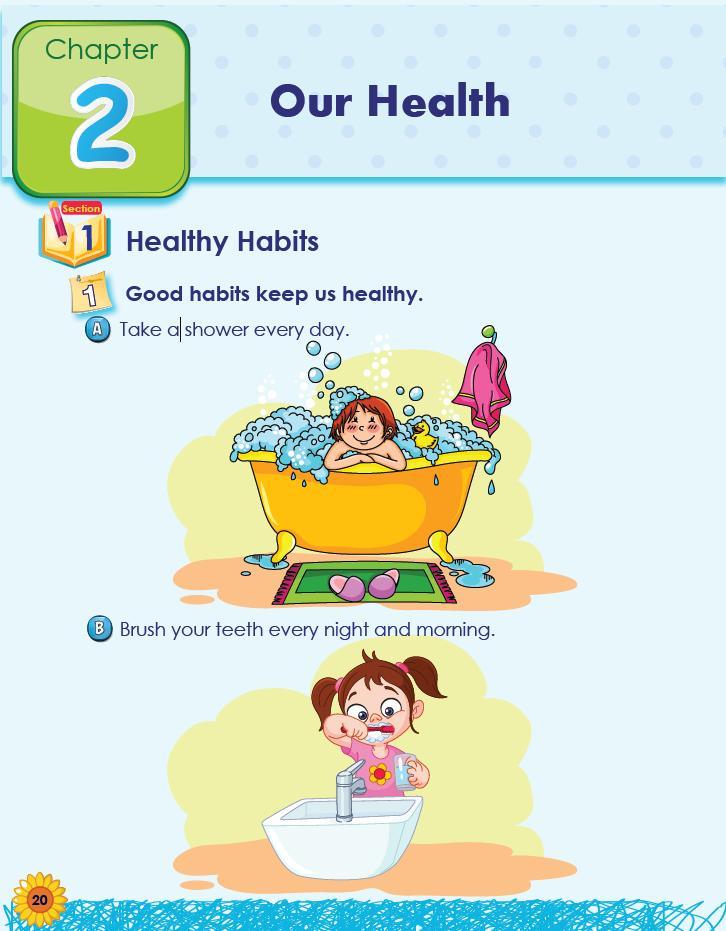
2. Picture Walk and Visual Discussion
Refer to the illustrations:
o “What is this child doing in the tub?”
o “What time of day do you brush your teeth?”
Reinforce routines: “We brush in the morning after waking up and at night before bed.”
3. Demonstration and Role Play (Optional)
Model brushing teeth using a model mouth or large illustration. Have students pretend to brush in the air as you count: “1, 2, 3... up and down.”
4. Class Routine Chart (Optional
• A: Take a shower every day
• B: Brush your teeth every night and morning
Extension)
Create a chart titled “Healthy Habits We Follow” and fill it together with student contributions.
21
Activity C,D
5E Phase: Engage +Explore
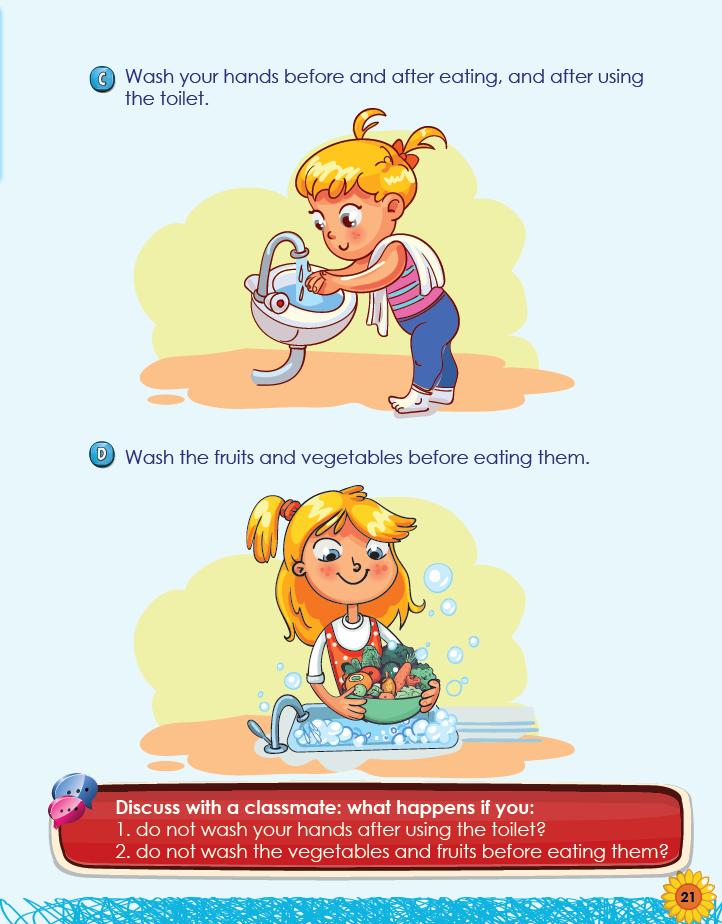
• C: Wash your hands before and after eating, and after using the toilet
• D: Wash fruits and vegetables before eating them
Objective:
Students will identify basic hygiene habits related to eating and food preparation.
Teacher Instructions:
1. Ask Questions to Prompt Awareness “When should you wash your hands?”
“Why do we need to wash fruit before we eat it?”
Use relatable contexts: “Have you ever eaten fruit right after buying it?”
2. Picture Exploration
Guide a discussion using the images:
o “Is this girl washing her hands the right way?”
o “What is the girl doing with the vegetables?”
3. Demonstration or Practice
Walk the class through a hand-washing routine using imaginary steps or a real sink. Have students mimic washing with actions: rubbing palms, rinsing, drying.
4. Partner Discussion Prompt
Use the red box prompt at the bottom of the page:
o “What happens if you don’t wash your hands after the toilet?”
o “What if you eat dirty fruit?”
Let students answer in pairs using full sentences:
o “If I don’t wash my hands, I might get sick.”
5. Classroom Hygiene Role Assignment (Optional)
Create rotating roles like “HandWashing Leader” or “Fruit Checker” to help build responsibility.
Drink plenty of water
Objective:
you drink water at school? At home? After playing?”
Emphasize: “Water helps us stay strong, clean, and cool.”
3. Hydration Routine Talk
Ask: “How many glasses of water do you drink every day?” Make a class chart to record answers.
4. Extension Idea
Give students a challenge: drink 6–8 cups of water today and draw a smiley face for each one.
Eat healthy food
Objective:
Students will understand that water is essential to stay healthy, hydrated, and energetic.
Teacher Instructions:
1. Discussion Prompt
Ask: “What do you drink when you feel thirsty?”
Then: “Why do you think your body needs water?”
2. Visual Connection
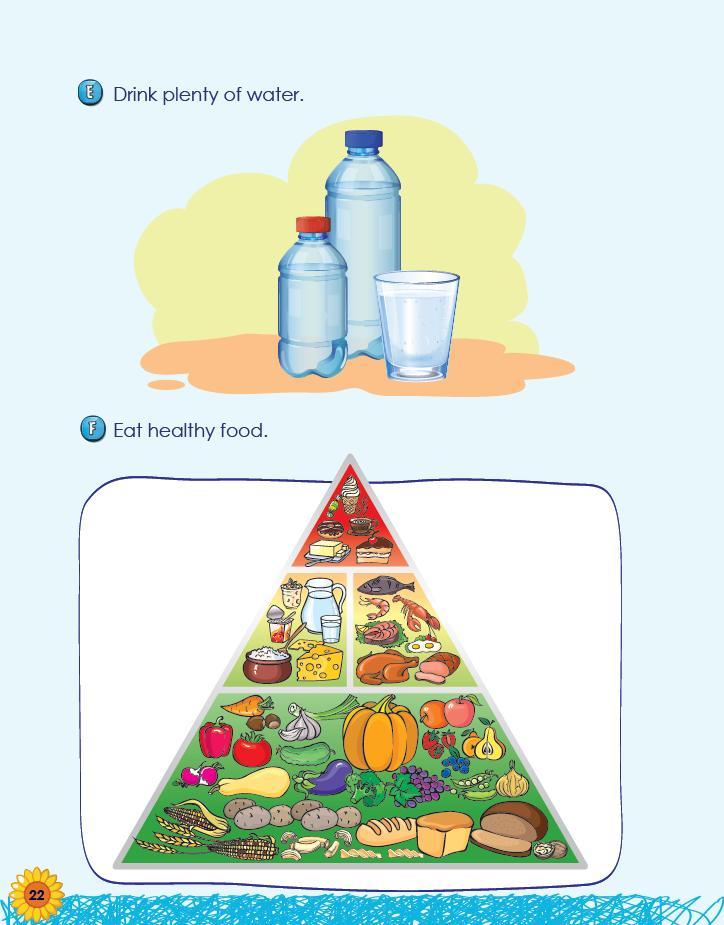
Point to the bottles and glass. Ask: “Do
Students will recognize food types that help the body grow and stay healthy, and begin to distinguish healthy from unhealthy choices.
Teacher Instructions:
1. Introduce Food Groups
Use the food pyramid image to explain the idea of balance.
Point to:
o Fruits and vegetables (bottom): “These help us grow.”
o Grains and dairy: “Give us energy and strong bones.”
o Sweets and fats (top): “We eat these only sometimes.”
2. Interactive Pyramid Sorting (Optional)
Show flashcards or pictures of food items. Ask: “Where does this go on the
pyramid?” Let students categorize them aloud or on a chart.
3. Class Reflection
Ask: “What healthy food did you eat this morning?”
Create a class list of favorite healthy foods.
4. Partner Talk
Ask students to turn to a peer and say:
o “I like [food]. It is healthy.”
Encourage use of full sentences and clear pronunciation.
23
Do plenty of exercise
Objective:
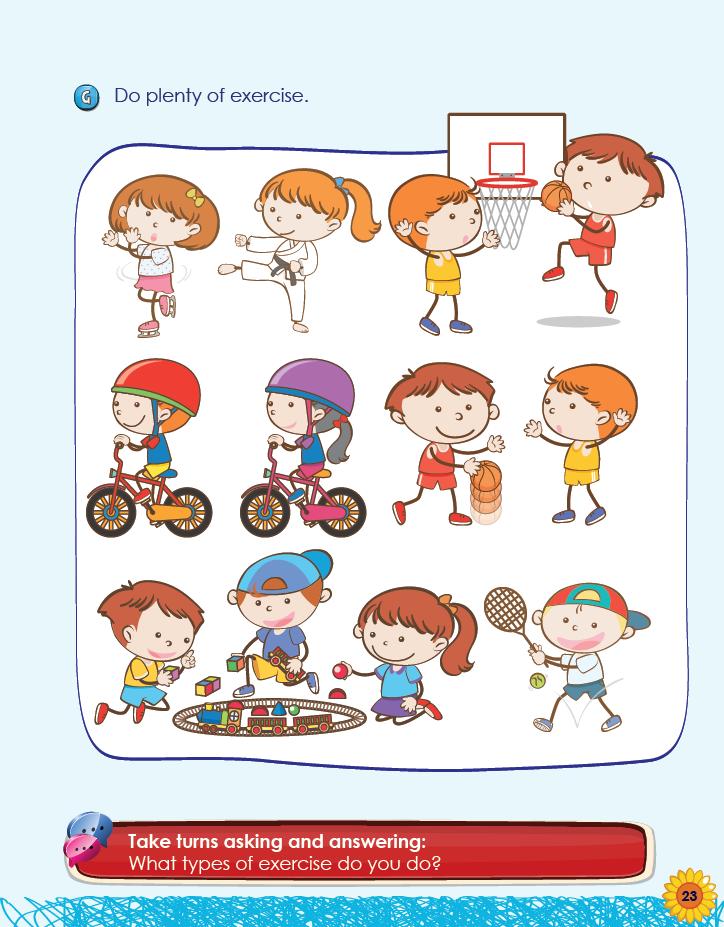
o “Is this play or exercise?” Explain that many types of play help our body grow stronger.
3. Interactive Exercise Naming
Ask: “Who here rides a bike? Who likes to run or swim?”
Raise hands and let students connect personally with each image.
4. Partner Speaking Activity
Use the prompt from the book:
o “What types of exercise do you do?”
Model: “I play soccer. I run and kick the ball.”
Have students take turns asking and answering in pairs.
5. Movement Wrap-Up
End with a class vote: “Let’s pick one fun exercise and do it together!”
Students will recognize that exercise keeps the body active and strong and describe physical activities they enjoy.
Teacher Instructions:
1. Open with Movement
Begin the lesson by stretching, jogging in place, or jumping jacks. Ask: “How does your body feel now?”
2. Image Talk-Through
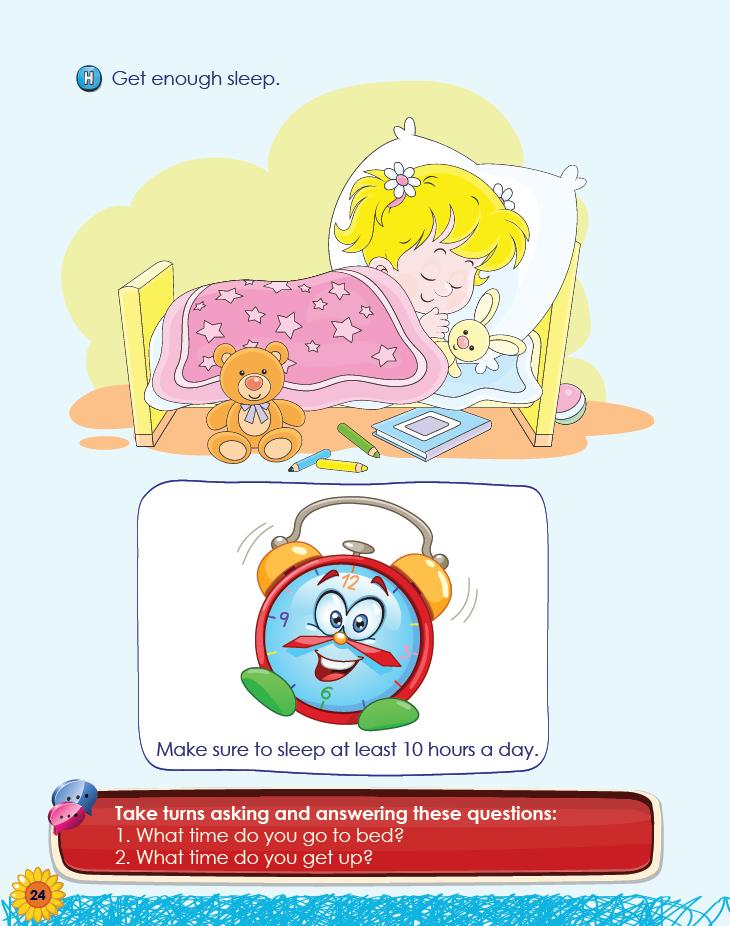
Point to each picture and ask:
o “What are the children doing?”
o “What do you see near her bed?”
o “Why is bedtime important for the body and brain?”
3. Personal Routine Chart (Optional)
Create a morning-evening class chart:
o “What time do you go to bed?”
o “What time do you wake up?” Tally responses and discuss patterns.
4. Partner Discussion Activity
Use the red box prompt:
o “What time do you go to bed?”
o “What time do you get up?”
Let students practice fullsentence responses. Page 24 Activity
The Importance of Sleep
Objective:
5E Phase: Elaborate
Students will understand the importance of rest and describe their own sleep routines.
Teacher Instructions:
1. Engaging Conversation Starter
Ask: “How do you feel when you don’t sleep well? What helps you sleep?”
Explain: “Children need about 10 hours of sleep every night to stay healthy.”
2. Visual Analysis
Discuss the illustration of the sleeping child. Ask:
Objective:
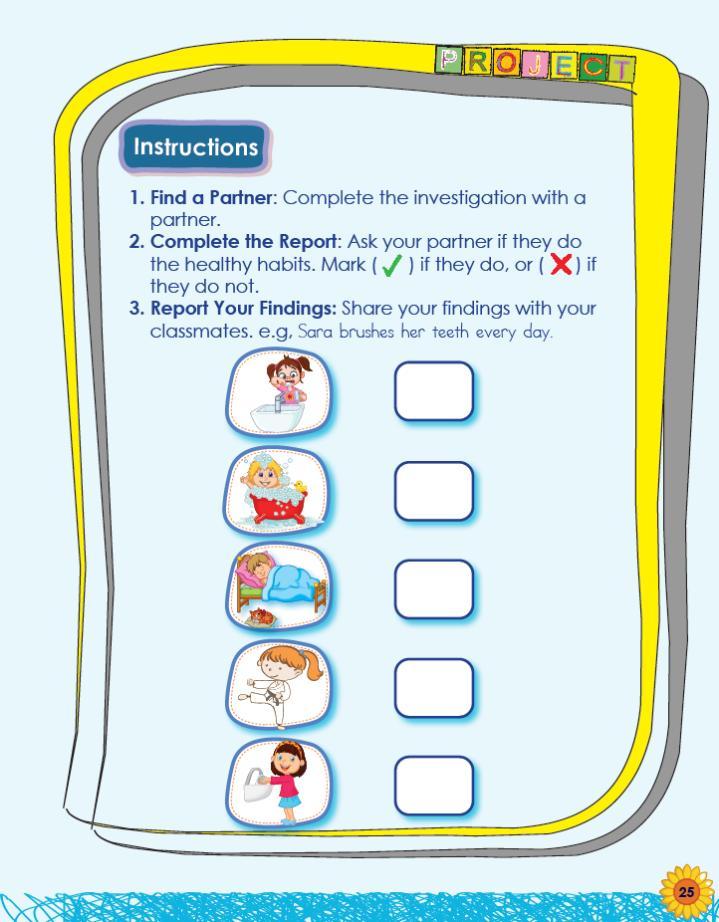
o Getting enough sleep
o Waking up on time
o Doing exercise
o Eating healthy food
2. Interview Process
Instruct students to ask one question at a time. For example:
o “Do you brush your teeth every day?”
If the partner says yes, they mark ✓. If no, they mark ✗
3. Report Findings
After the interview, students will report what they learned to the class. Model the sentence:
o “Sara brushes her teeth every day.”
o “Ali doesn’t sleep early.”
Students will investigate, record, and report on the daily healthy habits of a peer.
Materials:
• Project page in the book
• Pencil or crayon
• Optional checklists
Teacher Instructions:
1. Partner Setup and Overview
Pair up students. Each student asks their partner about five habits:
o Brushing teeth
4. Peer Presentation Practice
Allow pairs to rehearse their report before sharing in front of the class.
Project Rubric: Healthy Habits Interview
Questioning
Listening and Recording
Reporting Findings
Partner Cooperation
Understanding of Habits
Asked all 5 questions clearly and politely
Marked answers correctly and attentively
Gave complete sentences during report
Took turns, showed respect, worked independently
Identified and explained healthy habits clearly
Asked 3–4 questions, needed prompting
Missed or confused some answers
Gave partial answers or used unclear sentences
Required reminders to take turns
Understood most habits with some clarification
Asked fewer than 3 questions or was distracted
Struggled to mark or follow through responses
Did not share findings or needed help to explain
Did not participate respectfully or cooperatively
Needed support to identify or explain healthy habits
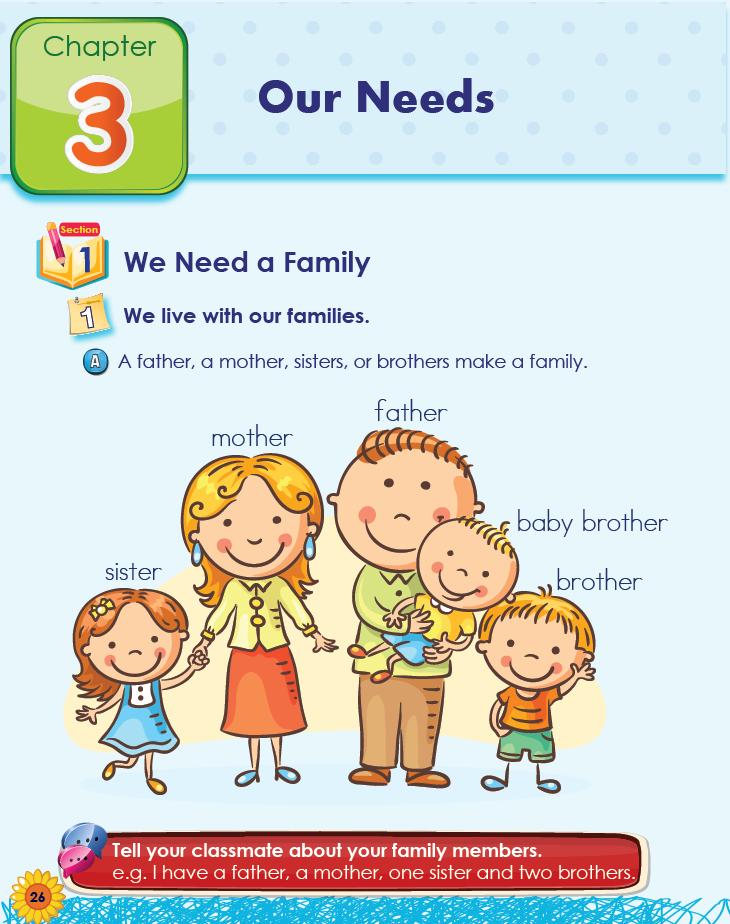
members and begin to understand family structures and relationships.
Chapter 3 Our Needs
Teacher Instructions:
1. Engage with a Warm-Up Question
Ask: “Who is in your family?” Let a few students answer. Acknowledge all answers, emphasizing that all families are important.
2. Introduce Vocabulary
Point to each labeled character in the image and say:
o “This is a mother. This is a father. This is a baby brother.”
Have students repeat each word aloud while pointing to their own pretend family on their fingers.
3. Choral Repetition
Lead students in echoing sentences:
o “I have a sister.”
o “I have two brothers.”
4. Classroom Interaction
Say: “Raise your hand if you have a brother... a sister... a baby in your family?” Count hands for each and chart on the board.
5. Partner Sharing Prompt
Use the red box prompt:
A father, a mother, sisters, or brothers make a family
Objective: Students will identify immediate family
o “Tell your classmate about your family members.”
o Model: “I have a father, a mother, and one sister.”
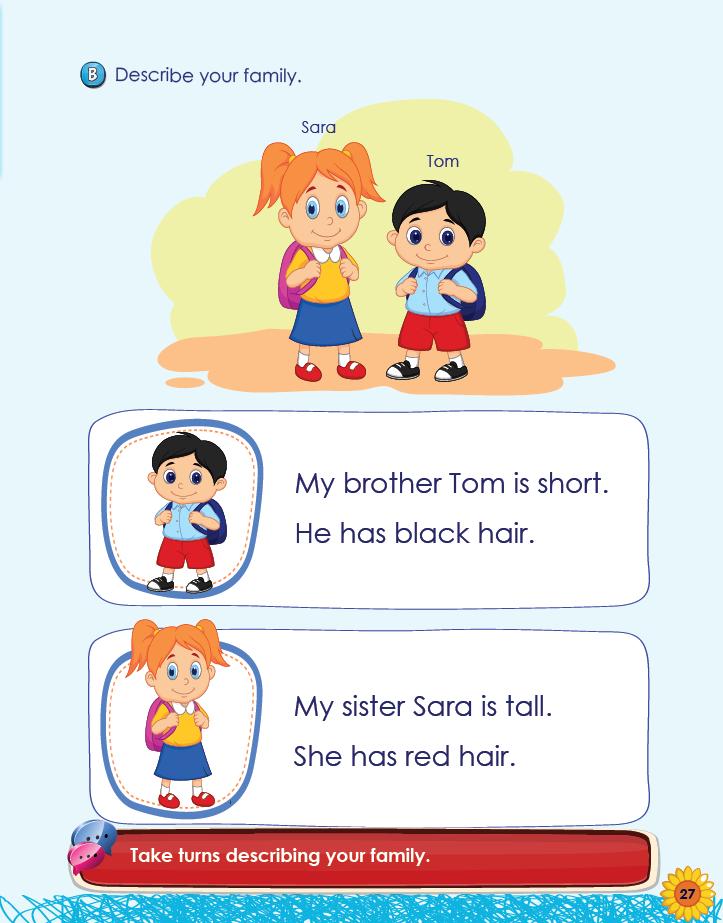
Describe your family
Objective:
o “My brother Tom is short. He has black hair.”
o “My sister Sara is tall. She has red hair.”
Write sentence frames on the board:
o “My [family member] is [tall/short].”
o “He/She has [hair color].”
3. Guided Practice
Ask students to pick a family member and describe them using the pattern. Support them in completing sentences orally.
4. Pair Work
Let students take turns describing their family members to a partner:
o “My sister is tall. She has brown hair.”
5. Class Share Option
Students will use simple descriptive language to talk about physical characteristics of family members.
Teacher Instructions:
1. Picture Prompt Discussion
Ask: “Who are Tom and Sara? How do they look different?”
Then ask: “Can you describe someone in your family?”
2. Model the Sentence Frames
Read aloud the two examples:
Invite a few students to share their descriptions aloud. Praise use of complete sentences and vocabulary.
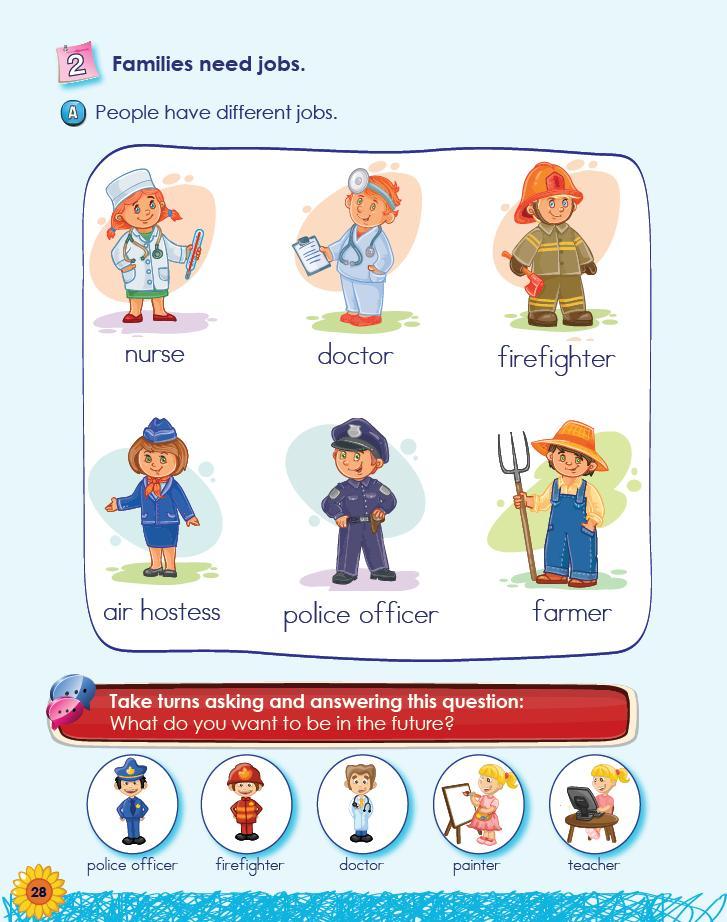
Identifying Jobs
Objective:
2. Vocabulary Introduction
Point to each picture and clearly say the job title:
o “This is a nurse. This is a doctor. This is a firefighter...”
Have students repeat after you. Emphasize clear pronunciation.
3. Job Description Briefs
Briefly describe what each worker does. For example:
o “A nurse helps people who are sick.”
o “A firefighter puts out fires.”
o “A police officer keeps us safe.”
4. Whole-Class Participation
Ask: “Who would you call if there is a fire?”“Who helps you when you are sick?” Allow students to point and answer together.
5. Partner Question Practice
Students will identify common community jobs and recognize that adults in a family work in different professions.
Teacher Instructions:
1. Introduce the Topic
Ask: “What does your mother or father do?” Help students understand that different people do different jobs to help others and earn money.
Use the red box prompt:
o “Take turns asking and answering: What do you want to be in the future?”
Model: “I want to be a teacher.”
Let students practice in pairs using complete sentences.
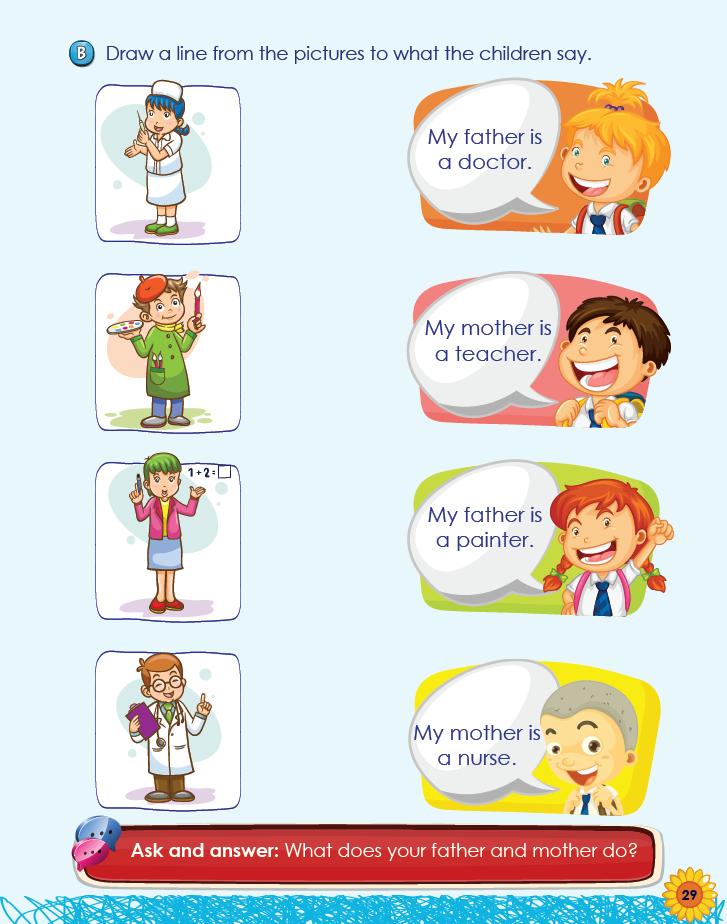
o “This girl says: My father is a doctor.”
Ask: “Which one is the doctor?”
Draw the line on the board or describe the motion if modeling.
3. Student Completion
Guide students to complete the matching activity. Read the remaining sentences aloud together and help them match images and speech bubbles.
4. Speaking Practice
Use the red prompt:
o “Ask and answer: What does your father and mother do?”
Model: “My mother is a nurse. My father is a farmer.”
Have students turn to a partner and take turns sharing.
5. Optional Extension: Community Helper Role-Play
Match the jobs to what the children say
Objective: Students will draw connections between occupations and verbal descriptions, reinforcing vocabulary and reading comprehension.
Teacher Instructions:
1. Review Occupation Names
Quickly review the jobs shown on this page (nurse, doctor, painter, teacher).
Read the sentences aloud.
2. Model the Task
Point to the first image and sentence:
Invite students to choose a job and act it out while others guess. For example:
o Pretend to paint → “Are you a painter?”
o Pretend to teach → “Are you a teacher?”
o “What is different about them?”
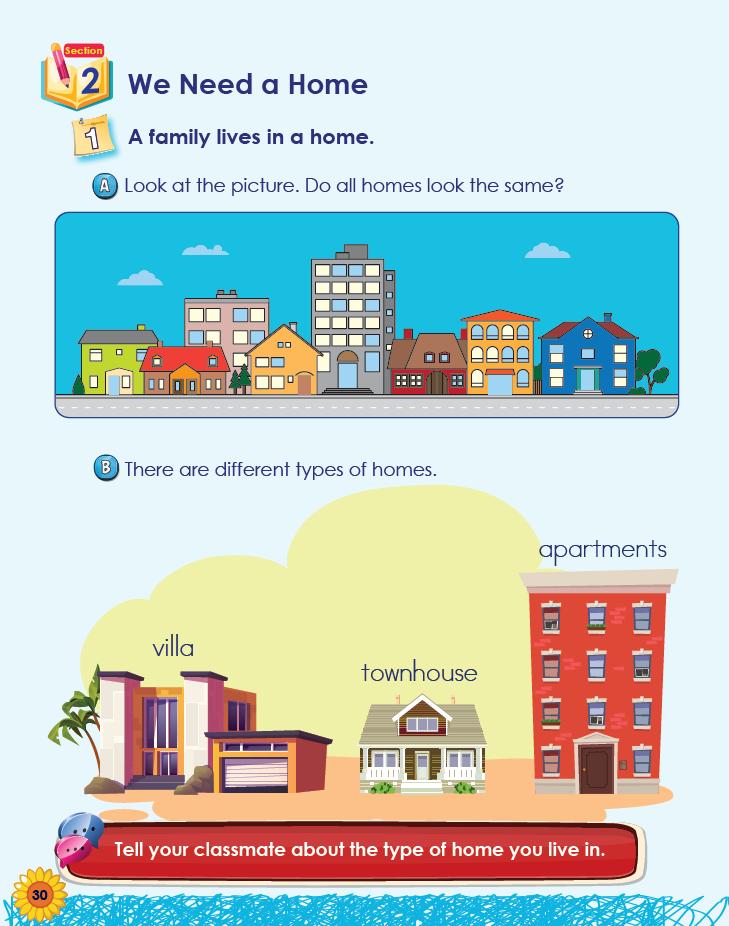
Let students describe differences in size, color, shape, or number of windows.
2. Connection to Student Experience
Say: “Some people live in tall buildings, some in small houses, and others in villas. Where do you live?”
Help students recognize that home types vary across families and cultures.
Objective:
Students will learn the names of three types of homes: villa, townhouse, and apartment.
Teacher Instructions:
1. Introduce Vocabulary
Point to each type and say the word clearly. Have students repeat each one:
Activity A – Do all homes look the same?
Objective:
Students will observe and compare different types of homes to understand that families live in many different kinds of housing.
Teacher Instructions:
1. Visual Prompt Discussion
Begin by pointing to the row of houses at the top of the page. Ask:
o “Do these homes all look the same?”
o “Villa” (big and often separate)
o “Townhouse” (in a row, often two floors)
o “Apartment” (many families in one building)
2. Guided Class Comparison
Ask questions like:
o “Which home do you think is the tallest?”
o “Which one has the most families inside?”
Encourage students to share which type they live in and describe it.
3. Speaking Practice
Use the red box prompt:
o “Tell your classmate about the type of home you live in.”
Model: “I live in an apartment. It is on the third floor.”
Allow time for student pairsharing.
Objective:
2. Whole-Class Engagement
Ask:
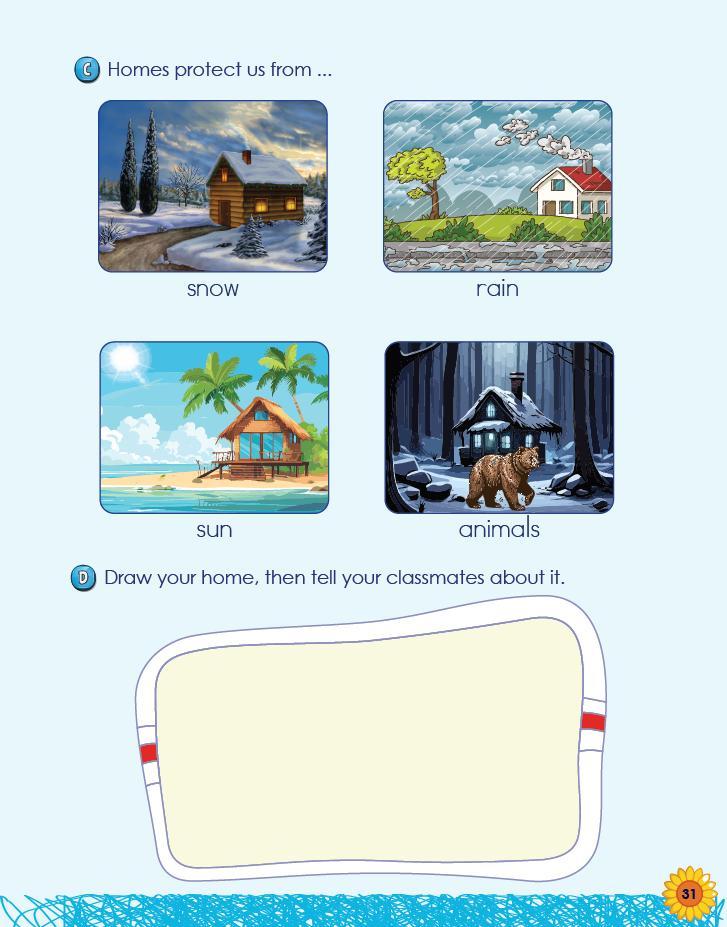
o “Can your home keep you safe from animals like bears?”
o “Does your home feel warm when it’s cold outside?”
Prompt students to reflect on their own experiences of safety.
Objective:
Students will apply their understanding by illustrating their home and describing it orally.
Teacher Instructions:
1. Visual Recall Prompt
Ask: “What does your home look like? How many windows does it have? What color is the door?”
2. Drawing Time
Students will understand that homes provide safety and protection from weather and danger.
Teacher Instructions:
1. Picture Talk and Safety Connection
Point to each image. Ask:
o “What is happening in this picture?”
o “How does the house help in the snow?”
o “What would happen if we didn’t have a roof in the rain?”
Instruct students to draw their home. Remind them to include key features like doors, windows, or plants.
3. Pair Sharing
Once drawings are done, have students turn to a partner and use full sentences:
o “This is my home. It has two windows and a brown door.”
4. Optional Gallery Walk
Display drawings on the wall and allow students to walk around and admire each other’s homes.
32
A,B
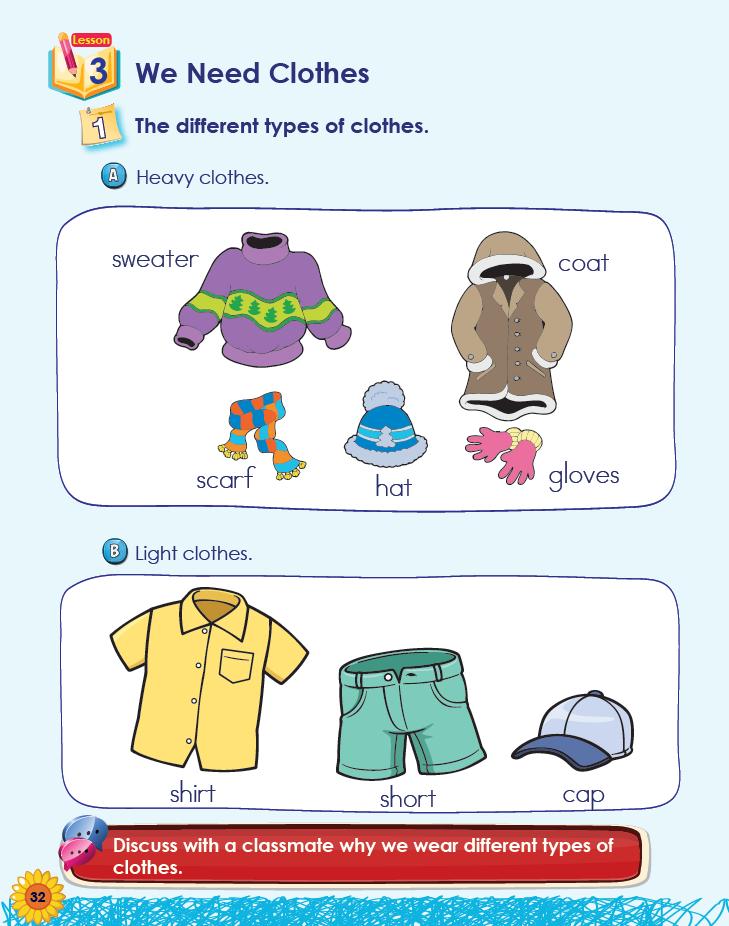
beach. Ask what children would wear in each place.
2. Picture Vocabulary Review
Point to each heavy clothing item (sweater, coat, scarf, hat, gloves). Say the names and have students repeat. Do the same for light clothes (shirt, shorts, cap).
Hold up weather cards or say: “It’s cold and snowing.” Ask: “Which clothes do we wear?”
Repeat for sunny or hot weather.
4. Tactile Real-Life Connection (Optional)
Bring in samples or photos of clothes. Ask students to touch and describe how they feel:
o “This coat is thick and warm.”
5E Phase: Explore + Elaborate
Objective:
Students will identify different types of clothing and understand when and why we wear each type.
Teacher Instructions:
1. Introduce Seasonal Clothing Concepts
Ask: “Do we wear the same clothes in winter and summer?”
Then show two weather pictures (if available): snowy scene and sunny
o “These shorts are light and cool.”
5. Partner Discussion Activity
Use the red box prompt:
o “Discuss with a classmate why we wear different types of clothes.”
Model: “I wear a coat when it is cold. I wear a cap when it is sunny.”
Allow students to take turns answering using full sentences.
Objective:
Show simple examples or draw one on the board with a pattern or cartoon.
2. Design Time
Instruct students to draw their custom T-shirt using shapes, patterns, or colors they like. Encourage them to be unique.
3. Descriptive Speaking Practice
Model: “My T-shirt is blue with stars. It has red sleeves.”
Write a sentence frame on the board:
o “My T-shirt is [color]. It has [shapes/pictures].”
4. Partner Sharing
Once finished, pair students. Each child should describe their T-shirt using the sentence frame above.
5. Optional Class Show-and-Tell Invite students to show their drawing to the class and describe it in 1–2 full sentences.
Students will apply knowledge creatively by designing a T-shirt and practicing descriptive language.
Materials:
• Drawing area on page
• Crayons, markers, or colored pencils
Teacher Instructions:
1. Prompt with Imagination
Say: “Imagine you can make your own Tshirt. What color would it be? What would be on it?”
34
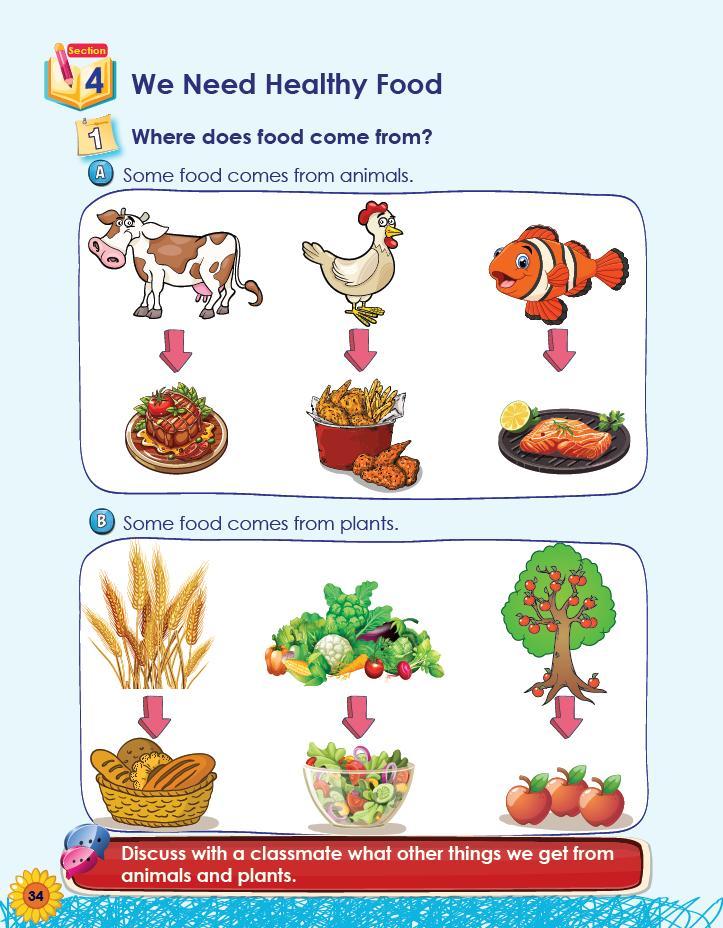
o Point to the cow → milk and meat
o Chicken → eggs and meat
o Fish → seafood
o Wheat → bread
o Vegetables → salad
o Fruit trees → fruit bowls
Say each word and ask the class to repeat it. Make sure they associate arrows with food sources.
3. Sorting Activity (Verbal or Physical)
Say a food name: “Cheese.” Ask: “Animal or plant?” Do the same for apples, salad, and bread. You can use real pictures or flashcards if available.
4. Partner Discussion Prompt
Use the red box:
5E Phase: Engage + Explore
Objective:
Students will understand that food comes from two main sources: animals and plants.
Teacher Instructions:
1. Activate Prior Knowledge
Ask: “Where do we get milk?”“Where does chicken come from?”“What about apples?”
2. Picture Walk and Vocabulary
Clarification
o “Discuss with a classmate what other things we get from animals and plants.”
Guide them to think beyond food:
o From animals: wool, leather
o From plants: wood, cotton
5. Whole-Class Reinforcement
Make a T-chart on the board labeled “Animals” and “Plants.” Let students suggest items for each column.
2. Visual Exploration
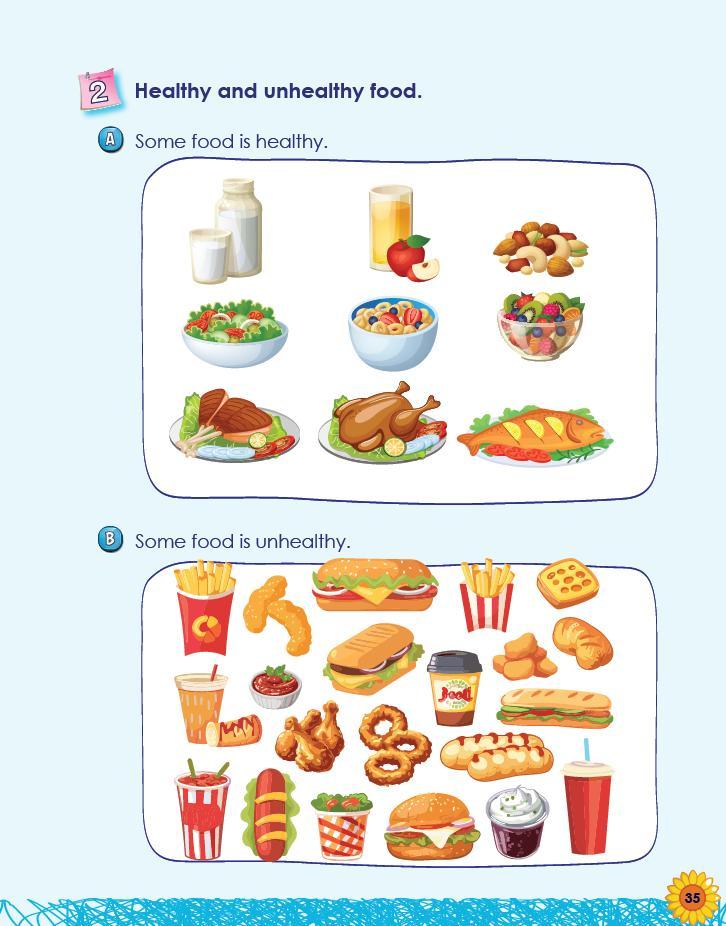
Go over each group of pictures.
o Healthy: “What can you name?” (milk, vegetables, fruit, fish)
o Unhealthy: “What do you see?” (fries, soda, donuts)
3. Classroom Sorting Game (Optional)
Place food flashcards on the table. Ask students to sort into “Healthy” and “Unhealthy” groups.
4. Partner Speaking Prompt
Have students say:
o “I eat apples. Apples are healthy.”
o “Fries are unhealthy. I eat them sometimes.”
5. Guided Conversation Wrap-Up
Ask students:
5E Phase: Explore
o “What is your favorite healthy food?”
Objective:
Students will categorize food items as healthy or unhealthy and begin to understand the impact of food on the body.
Teacher Instructions:
1. Introduce the Concept of Healthy vs. Unhealthy
Ask: “What happens when we eat a lot of candy or fast food?”
Then ask: “What food gives us strong bones and energy?”
o “Can you name one food that we should eat only sometimes?”
2. Guided Start
Begin the activity as a class. Ask:
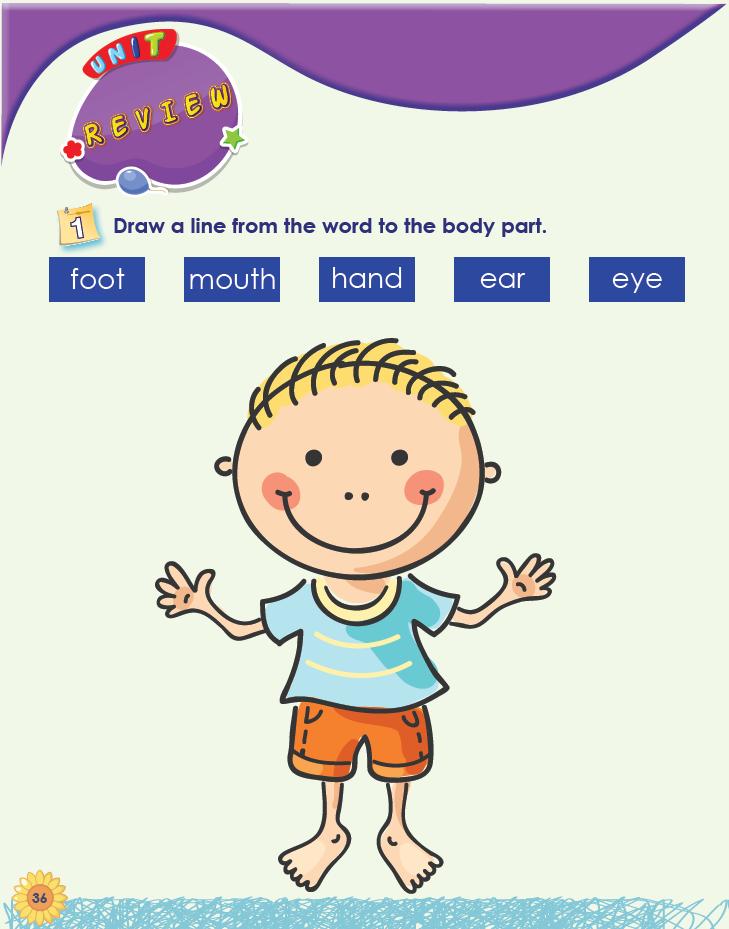
o “Who can show me their ear?”
o “Where are your feet?”
Then point to the words and have the class help you match the first one.
3. Independent Completion
Allow students to draw lines on their own to match each label to the correct body part on the figure.
4. Peer Check
Once done, ask students to check answers with a partner.
Encourage statements like:
o “I matched ‘hand’ to this part.”
o “I think this is the eye.”
5. Optional Kinesthetic Game
Draw a line from the word to the body part
Objective:
Students will demonstrate understanding of basic body part vocabulary by labeling a diagram through matching.
Teacher Instructions:
1. Review Body Part Names
Before students begin, review each word by pointing to your own foot, mouth, hand, ear, and eye. Have students repeat each word and point to their own body parts.
Play “Simon Says” with body parts for reinforcement. Example: “Touch your ear. Touch your mouth.”
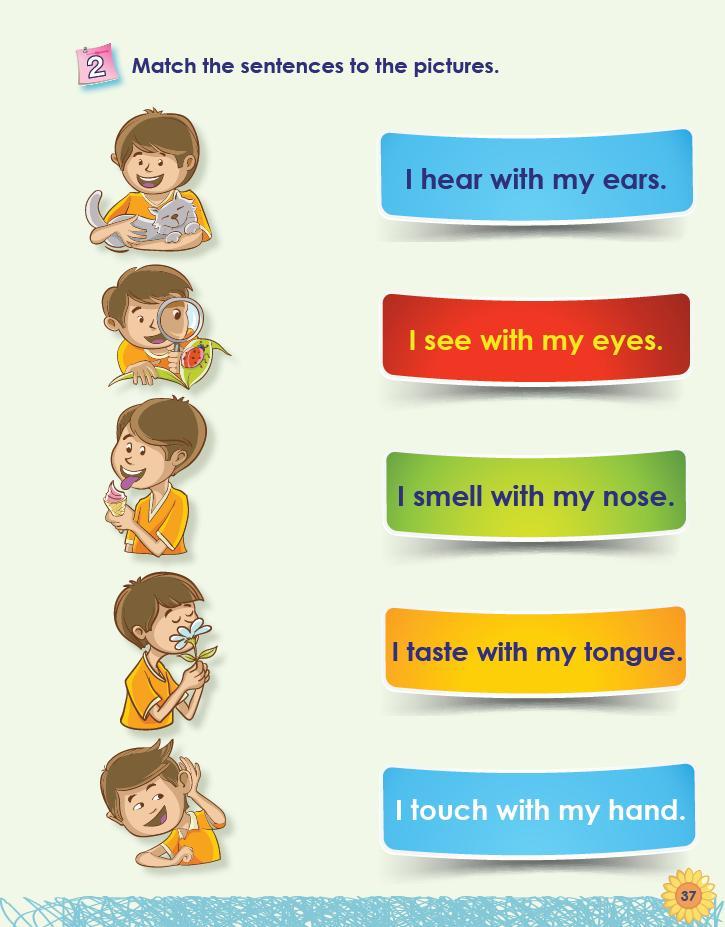
o “I touch with my hand.”
Point to the related body part while reading.
2. Image Analysis with the Class
Go through each image on the left side. Ask:
o “What is this child doing?”
o “Which sense is being used?”
3. Matching Demonstration
Model the first one by drawing or describing a line from an image to the correct sentence. Let students help with the next one.
4. Independent Matching
Instruct students to complete the rest of the activity by drawing lines. Support those who may need help with reading.
5. Pair Share Recap
When complete, ask students to explain two of their matches to a partner:
Match the sentences to the pictures
Objective:
Students will demonstrate understanding of which senses are used for specific actions by matching images to sentences.
Teacher Instructions:
1. Sentence Review and Reading Aloud
Read each sentence aloud clearly:
o “I hear with my ears.”
o “I see with my eyes.”
o “I smell with my nose.”
o “I taste with my tongue.”
o “I matched the boy smelling the flower to ‘I smell with my nose.’”
6. Review Closure
Conclude with a quick oral quiz: call out a sense and ask students to mime or point to the related body part.
2. Class Prediction
Let students vote: “Raise your hand for guitar… for drum.”
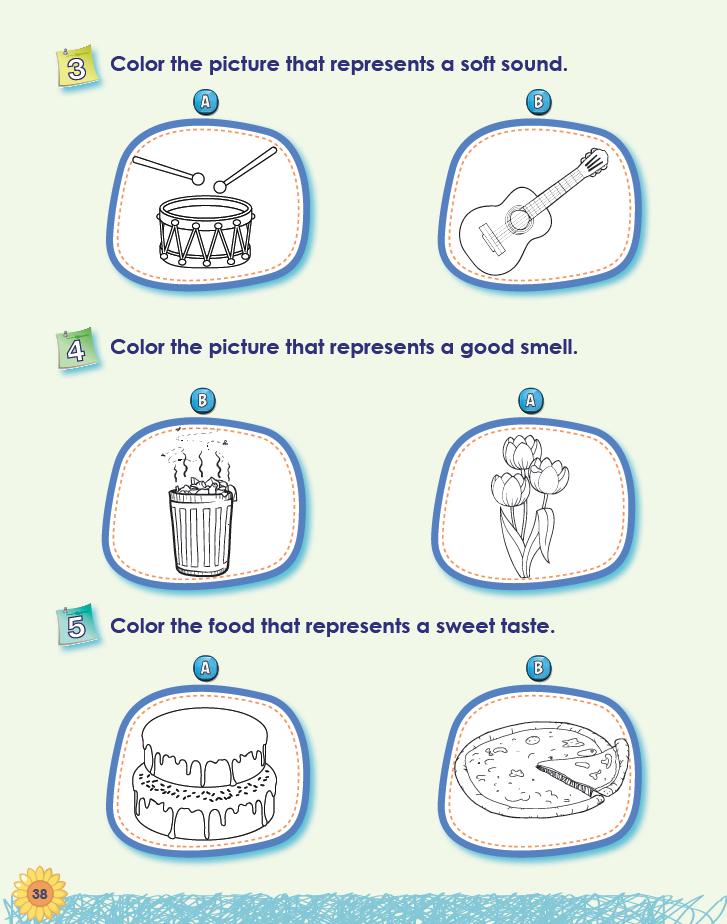
Then have them color the soft sound (guitar).
Activity 4 – Color the picture that represents a good smell
Objective:
Students will distinguish between pleasant and unpleasant smells.
Discuss both images. Confirm that flowers represent a good smell and instruct students to color them.
Activity 3 – Color the picture that represents a soft sound
Objective:
Students will demonstrate understanding of auditory senses by identifying a soft sound source.
Teacher Instructions:
1. Discuss Sound Qualities
Ask: “Which one makes a soft sound: a guitar or a drum?”
Play a short sound example if available, or tap gently vs. loudly on the desk to simulate soft and loud.
Activity 5 – Color the food that represents a sweet taste
Objective:
Students will identify foods associated with sweetness.
Teacher Instructions:
1. Ask Prompt Questions
“Which food is sweet cake or pizza?”
Clarify that both are tasty, but only one is sweet.
2. Vocabulary Emphasis
Review words like “sweet,”“salty,” and “spicy.” Allow students to color the cake.
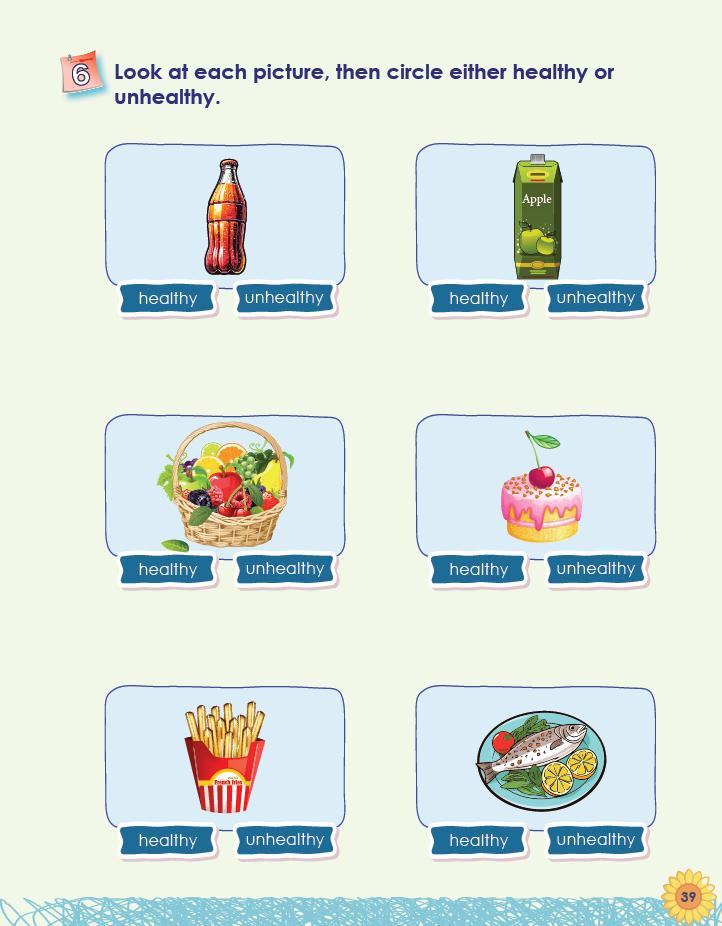
39
o Cake: “We eat it sometimes, but is it healthy?” (No)
o French fries: “Unhealthy when eaten too often.”
o Fish: “Yes, it’s healthy.”
2. Independent Work
Let students circle the correct choice (healthy or unhealthy) below each picture.
3. Partner Check
Allow students to check their answers in pairs and explain their choices:
o “I circled ‘healthy’ for fish because it helps our body grow.”
4. Wrap-Up Discussion
Ask: “What is your favorite healthy food?” and “What food should we only eat sometimes?”
Circle either healthy or unhealthy
Objective:
Students will categorize foods based on their health value.
Teacher Instructions:
1. Guided Classification Practice
Go through each food image:
o Soda: “Is this healthy?” (No)
o Juice box: “It has fruit. Is it healthy?” (Yes)
o Fruit basket: “Healthy.”
5E Phase: Elaborate + Evaluate
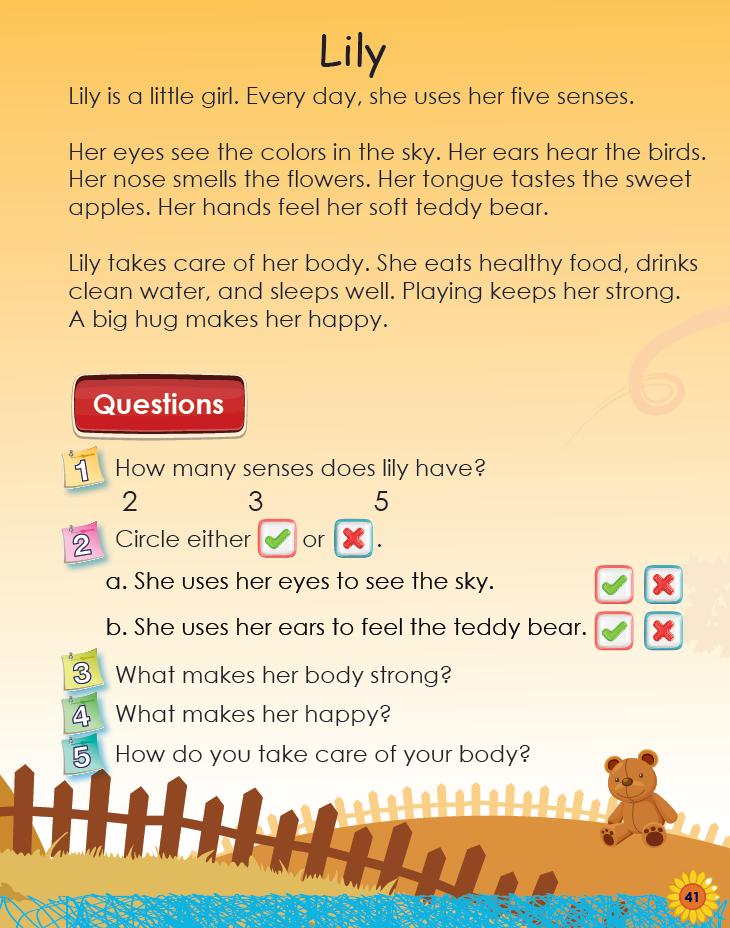
Page 40–41 – Story: Lily
Objective:
Students will synthesize unit knowledge by listening to and discussing a story that integrates the five senses, healthy habits, and emotional well-being.
Teacher Instructions
1. Story Introduction (Elaborate)
Tell students:
“Today we will meet a little girl named Lily. She uses her five senses every day and takes care of her body. Let's read and find out how.”
Read the story aloud slowly, with expression. Pause after each sentence to ask comprehension questions or act out actions (e.g., “Let’s point to our ears like Lily!”).
2. Interactive Retelling
Ask the class to help you retell parts of the story:
• “What does Lily use to see the sky?”
• “What does she smell?”
• “What does she feel?”
Optional: Display five icons (eye, ear, hand, nose, mouth) and assign one to each student group. Let each group summarize what Lily did with their assigned sense.
3. Comprehension Check (Evaluate)
Guide students through each question on Page 41:
• Q1. How many senses does Lily have? Ask: “Can we count them together?” (Sight, hearing, smell, taste, touch) Confirm: “Lily has 5 senses.”
• Q2. Which is correct?
a. She uses her eyes to see the sky
b. She uses her ears to feel the teddy bear
Have students justify answers by pointing to the related text in the story.
• Q3. What makes her body strong? Expected answers: “Eating healthy food, drinking clean water, sleeping, and playing.”
• Q4. What makes her happy? Accept: “Playing” or “A big hug.”
• Q5. How do you take care of your body?
Ask students to respond in complete sentences:
o “I brush my teeth.”
o “I drink water.”
o “I take a shower.”
Allow for paired sharing before calling on individuals to build confidence.
Optional Extensions
• Illustration Prompt
Ask: “Can you draw Lily using one of her senses?” Display drawings in a class gallery.
• Role-Play Have students act out one of Lily’s actions. Others guess which sense is being used.
Unit 2 Living and Non-Living Things
Unit Objectives
In this unit, the students will:
• explore what a variety of living organisms need to live and grow (e.g., water, nutrients, environment)
• observe the relationships between the physical and living environment
• recognize the different structures of familiar plants and animals
• observe and represent familiar plants and animals (e.g., draw pictures, build and play with toy or model animals in their habitats)
• compare baby and adult animals and plants, and recognize similarities
• foster creativity by expressing themselves through art.
• develop critical thinking and problem-solving skills by conducting an investigatory project.
Framework Covered
•Observes familiar plants and animals and describe what they need to survive
• Plans and conducts investigations to determine what plants need to grow
• Identifies that some young plants and animals are similar to, but not exactly like, their parents
• Asks questions, makes observations, and gathers information to solve problems
• Develops a simple sketch, drawing, or physical model to illustrate how the shape of an object helps it function as needed to solve a given problem
• Analyzes data from tests of two objects designed to solve problems
• Develops a logical argument
Teacher Instructions:
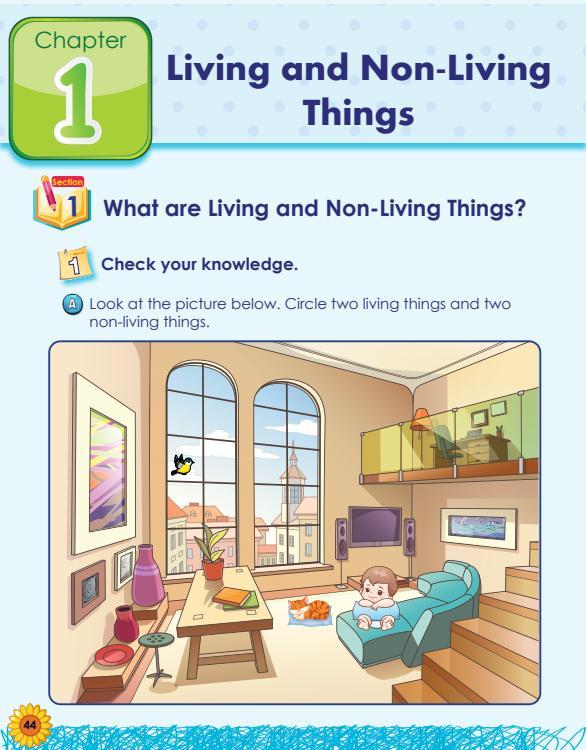
Chapter 1 Living and NonLiving Things
1. Activate Prior Knowledge (Engage) Begin with a question:
o “Is a cat living or non-living?”
o “Is a table living or non-living?” Allow quick discussion.
2. Guided Observation
Display the page and guide students through the picture. Ask:
o “What do you see that can move or grow?”
o “What do you see that cannot move or grow?”
3. Circle and Share
Students circle two living things and two non-living things (e.g., cat, baby, lamp, table).
Afterward, ask them to share:
o “I circled the baby because it is living.”
o “I circled the lamp because it is non-living.”
4. Anchor Chart Idea
Circle two living things and two non-living things
Objective:
Students will begin to distinguish between living and non-living things by observing a familiar scene.
On the board, draw two columns: Living Things and Non-Living Things. Fill it in as students call out ideas from the picture or from around the classroom.
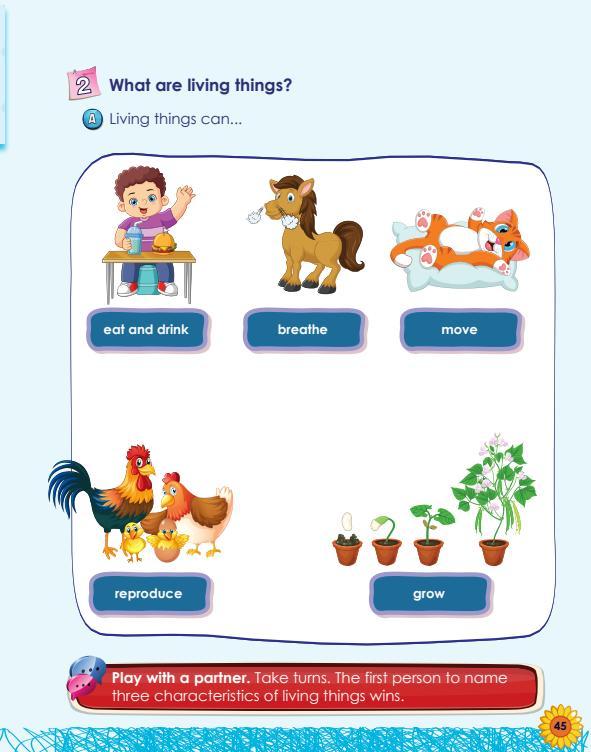
Living things can...
Objective:
o “Living things reproduce.”
Point to the pictures and act them out if possible (pretend to breathe, walk in place, etc.).
2. Real-Life Examples
Ask:
o “Do flowers grow?”
o “Does your pet eat and drink?”
o “Can a toy move by itself?”
Use these comparisons to reinforce that living things do these actions on their own.
3. Partner Game
Use the red box instructions: “Take turns. The first person to name three characteristics of living things wins.”
Model it first:
o Teacher: “Eat and drink, breathe, grow.”
Students will explore key characteristics of living things.
Teacher Instructions:
1. Introduce Vocabulary (Explore)
Read aloud each verb with a picture:
o “Living things eat and drink.”
o “Living things breathe.”
o “Living things move.”
o “Living things grow.”
o Partner: “Move, reproduce, grow.”
4. Classroom Connection
Ask students to name one living thing in the classroom and describe what it can do:
o “My friend can move and talk.”
o “The plant grows and needs water.”
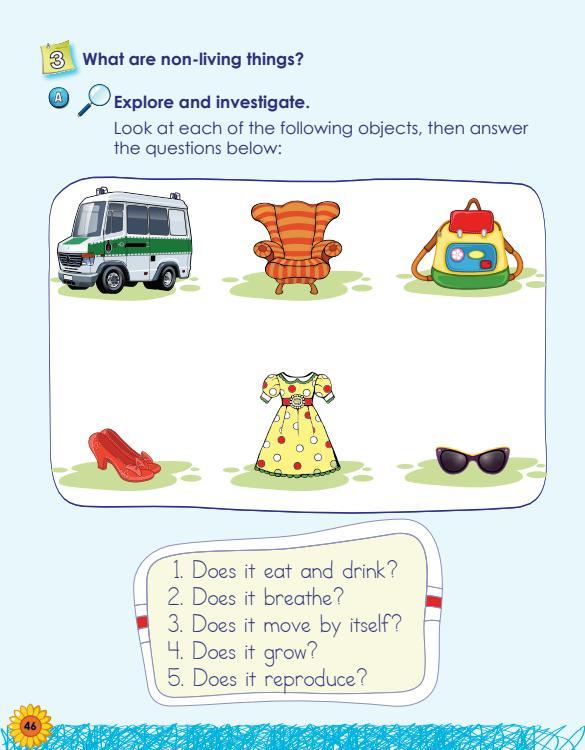
Explore and Investigate
Objective:
o Does it grow?
o Does it reproduce?
Emphasize: if the answer is "no" to all of these, it is non-living.
2. Guided Group Analysis
Point to each object on the page (bus, chair, backpack, shoe, dress, sunglasses). For each, ask the class:
o “Can it breathe?” (No)
o “Can it grow?” (No)
o Confirm all are non-living.
Consider using real or classroom objects to reinforce learning (e.g., hold up a book or pencil and ask if it moves or grows).
3. Think-Pair-Share Strategy
Pair students and assign them one object to "interview" using the five questions. Each pair presents one reason why their object is non-living.
Students will apply criteria to determine what makes something non-living.
Teacher Instructions:
1. Review the Characteristics of Living Things
On the board, list and read aloud the five questions from the page:
o Does it eat and drink?
o Does it breathe?
o Does it move by itself?
Living or Non-Living?
Objective:
o Non-living things cannot do any of these on their own.
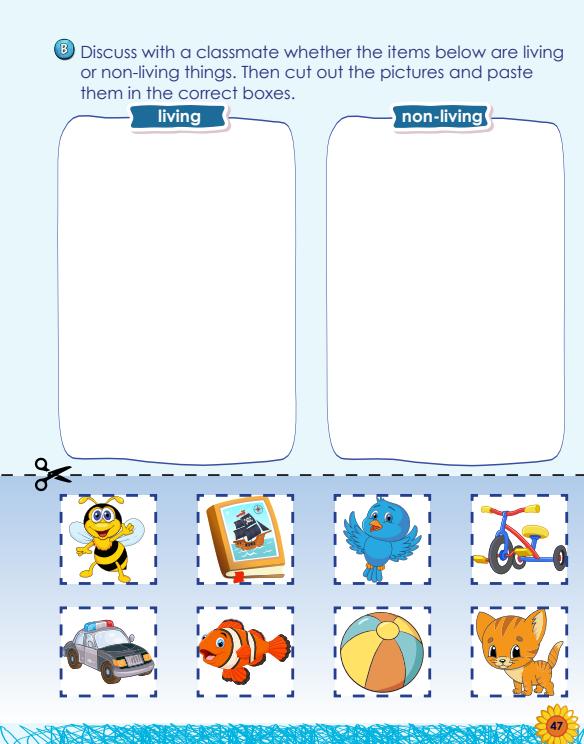
2. Preview the Images Before Cutting Name and discuss each picture together:
o Bee (living)
o Book (non-living)
o Bird (living)
o Tricycle (non-living)
o Police car (non-living)
o Fish (living)
o Ball (non-living)
o Cat (living)
3. Cut and Paste Task
Instruct students to cut the squares, sort them into the correct boxes, and paste them under “Living” or “NonLiving.”
Students will classify objects into living and non-living categories through hands-on sorting.
Teacher Instructions:
1. Review Sorting Skills (Explain)
Recall the criteria discussed. Remind students:
o Living things need food, grow, move on their own, and have babies
Encourage them to explain their choices aloud to a classmate using full sentences:
o “I put the bee in ‘Living’ because it can fly and make honey.”
o “I put the book in ‘Non-Living’ because it doesn’t eat or grow.”
4. Optional Extension: Labeling Challenge
Ask students to label each item using invented spelling or letter clues to reinforce vocabulary.
Objective:
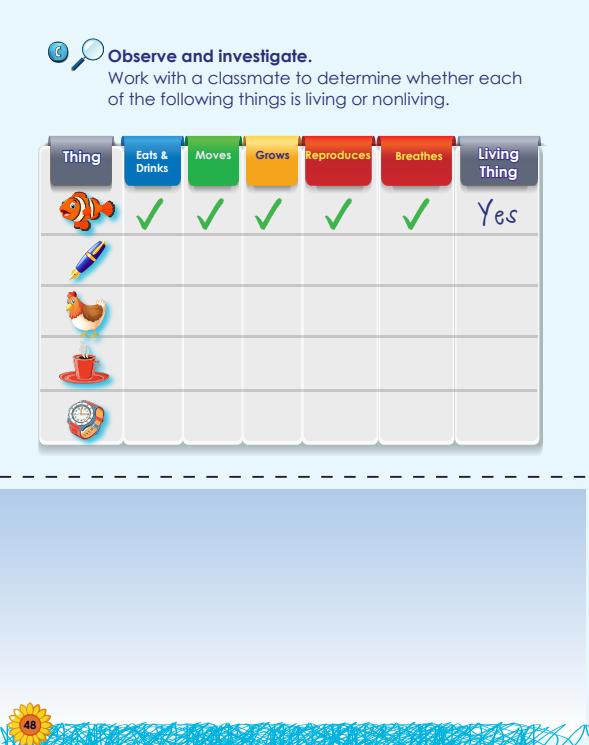
eat/drink, move, grow, reproduce, and breathe.
2. Demonstrate Using One Row:
Use the first row (the fish) as an example. Discuss with the class:
o “Does the fish eat and drink?” (Yes)
o “Does it grow?” (Yes)
o Fill in the checkmarks as a class.
3. Guide Group Work:
Ask students to work with a partner or small group. Tell them:
o “Talk about each picture and decide if it eats, moves, grows, breathes, or reproduces.”
o “Put checkmarks in the boxes when the answer is ‘yes’.”
Students will investigate and classify items as living or non-living based on observable characteristics like eating, moving, growing, reproducing, and breathing.
Teacher Instructions:
1. Introduce the Concept with a Review: Ask:
o “What are some things that are alive?”
o “What makes something a living thing?”
Review key traits: living things
4. Conclusion Column – Living or NonLiving:
After completing the chart, students decide if the thing is living.
Ask:
o “Does it have most or all of the traits?”
o “If yes, it’s living. If not, it’s nonliving.”
5. Support and Scaffold: For ELLs or younger students, use simplified language and visual gestures for each trait (e.g., hand on stomach for “eats”).
Objective:
o Living: moves, grows, eats, breathes
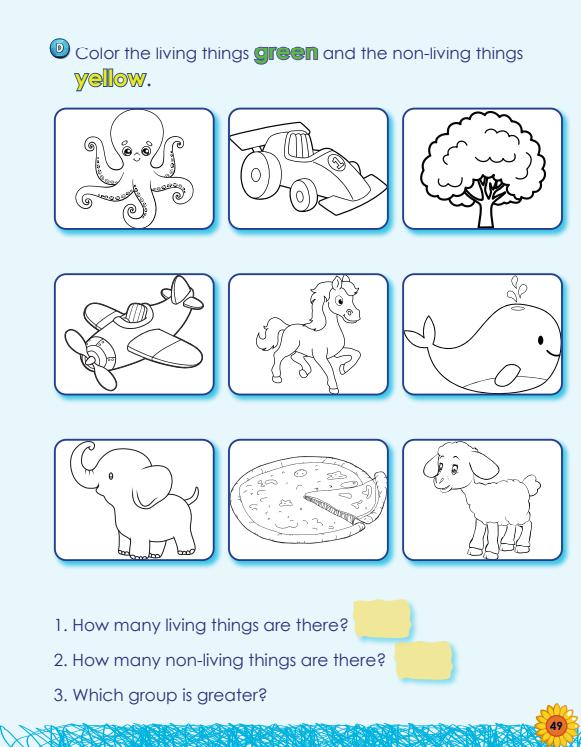
o Non-living: does not do those things
2. Guided Classification: Go through each image and ask:
o “Is this living or non-living?”
o “How do you know?”
Help the class decide before they color.
3. Coloring Instructions:
o “Color all living things green.”
o “Color all non-living things yellow.”
Remind students to stay within the lines.
4. Discuss and Compare Totals: Read the questions aloud and discuss:
5E Phase: Explain
Students will apply their understanding of the characteristics of living and non-living things to visually classify and compare them through coloring.
Teacher Instructions:
1. Review Definitions: Briefly ask:
o “What is a living thing?”
o “What is a non-living thing?” Write a simple anchor chart:
o “How many living things are there?”
o “How many non-living things?”
o “Which group has more?”
5. Extension Question: Ask:
o “Why do you think there are more of one kind?”
o “Can something non-living help a living thing?”
Page 50 Activity 5E Phase: Elaborate
Objective:
2. Model the Task
Draw a simple example (e.g., a cat) on the board. Say aloud:
o “This is my cat. It eats, moves, and grows. It is a living thing.”
3. Student Work Time
Ask students to quietly draw one living thing in the box. Encourage a variety: animals, plants, people, insects.
4. Oral Sharing and Interaction
Invite students to present their drawing using a full sentence:
o “This is my dog. It runs and eats. It is a living thing.”
Classmates may ask a question or name another living thing they know.
5. Scaffolding for ELLs or Shy Learners
Provide sentence starters on the board:
Students will demonstrate understanding of the characteristics of living things through drawing and oral explanation.
Teacher Instructions:
1. Review Key Features of Living Things
Briefly ask students:
o “What can living things do?” Elicit answers such as: “They grow, move, eat, breathe, and have babies.”
o “This is a ____. It is living because it ____.”
Objective:
2. Teacher Modeling
Draw a simple object (e.g., a ball) on the board. Say:
o “This is a ball. It cannot move by itself or grow. It is a non-living thing.”
3. Drawing Time
Students draw a non-living thing. Ensure they are selecting realistic examples, not toy animals or things that can appear animated.
4. Oral Presentations
Each student shares their drawing with a sentence like:
o “This is my chair. It does not breathe or move. It is non-living.”
5. Extension: Compare and Contrast
o “My dog is living because it grows. My bike is non-living because it does not.” Page 51 Activity
5E Phase: Elaborate
Students will apply prior knowledge to represent a non-living object and explain their reasoning.
Teacher Instructions:
1. Class Discussion: What is NonLiving?
Ask:
o “Can a chair grow?” (No)
o “Can a toy eat?” (No)
o “Why is a balloon non-living?”
Ask a few students to show both drawings and explain the differences between their living and non-living things using comparative language:
Chapter 2 Plants
Objective:
Allow for responses such as “in the garden,”“at the park,”“in pots,” etc.
2. Visual Exploration:
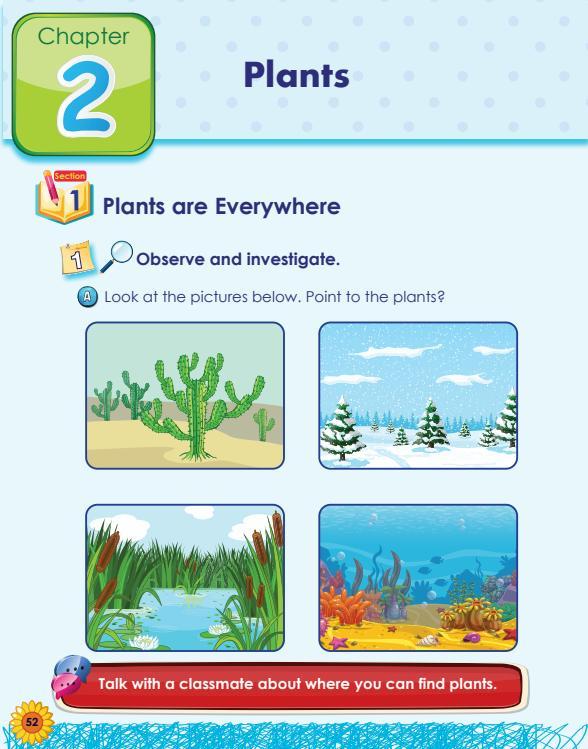
Display the book pages and ask students to describe what they see in each scene (desert, snowy forest, wetland, ocean).
Ask:
o “Can you find a plant in each picture?”
o “What do these plants look like?”
3. Explain Plant Adaptation Simply:
Introduce the idea that plants grow in many environments, not just in soil. Use words like “desert cactus,”“seaweed,” “forest trees,” etc.
4. Interactive Pointer Activity:
Have students come up to the board (if using projection) or work in pairs to point and describe the plants in each picture.
Encourage statements such as:
o “This is a cactus. It grows in the desert.”
o “These are pine trees. They grow in cold places.”
5. Peer Interaction:
Students will observe and identify the presence of plants in diverse habitats.
Teacher Instructions:
1. Activate Prior Knowledge:
Begin with an open-ended question: “Where do you usually see plants?”
Guide students in completing the prompt: “Talk with a classmate about where you can find plants.”
Use sentence starters:
o “I saw plants in ____.”
o “My house has plants in the ____.”
3. Classroom Connection:
Let students share where they plan to go and what they expect to find. Provide examples of common park plants (grass, trees, bushes, flowers).
4. Drawing Guidelines:
Instruct students to draw what they observe clearly and add features like leaves, stems, flowers, or branches.
5. Presentation (Follow-Up Activity):
When students return, hold a brief show-and-tell. Each student presents their drawing with a sentence like:
o “I saw a flower in the park. It had yellow petals.”
o “This is a tree. It had big green leaves.”
Page 53 Activity
Objective:
5E Phase: Explore
6. Scaffolding Tip:
Students will observe and record real-world examples of plant life.
Teacher Instructions:
1. Prepare for Observation Assignment: Explain that students will visit a nearby park with their parents or guardian and observe plants.
2. Set Expectations: Before sending the assignment, ask:
o “What do you think you will see?”
o “How will you know it’s a plant?”
For students unable to visit a park, allow them to describe or draw a plant they’ve seen at home or school.
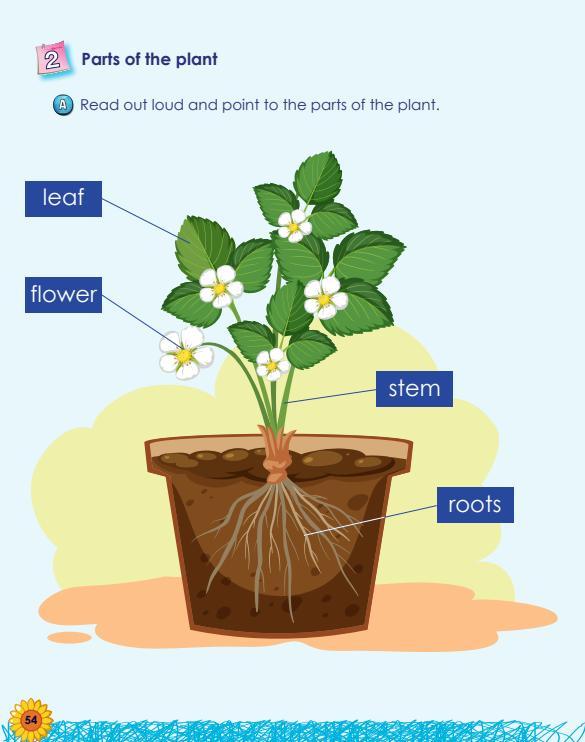
“This is the leaf. These are the roots This is the flower. This is the stem.”
Ask students to repeat after you and point to each part on their page.
3. Define Each Part
Explain the function of each plant part in simple terms:
o Leaf – helps the plant make food using sunlight.
o Flower – helps the plant make seeds.
o Stem – holds up the plant and moves water to the leaves.
o Roots – take in water and hold the plant in the ground.
4. Whole Class Practice
54 Activity
Objective:
5E Phase: Explain
Call out a part (e.g., “roots”), and have students point to it. Repeat for all four parts.
Students will recognize and name the four basic parts of a plant: leaf, flower, stem, and roots.
Teacher Instructions:
1. Engage with Questioning
Begin with a simple question: “What do all plants have?”
Guide students toward common responses like “leaves”, “roots”, or “flowers”.
2. Visual Identification
Point to the labeled diagram in the student book. Say each word clearly:
5. Partner Practice
In pairs, one student names a plant part, and the other points to it. Then they switch.
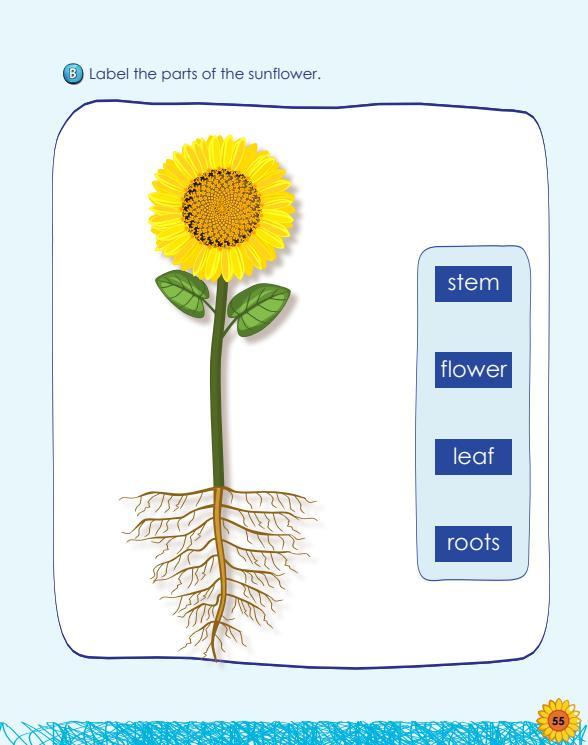
o “The long green middle is the stem.”
o “The green shapes on the sides are the leaves.”
o “And below the soil are the roots.”
3. Independent Task
Have students match the labels to the correct part on the sunflower image.
4. Check for Understanding
Circulate and ask students to point to each part and name it aloud. Prompt them with:
“What is this part called?”, “What does the leaf do?”
5. Wrap-Up Discussion
Ask:
55 Activity
Objective:
5E Phase: Explain
“Do all plants have the same parts?” Confirm that while plants look different, most have these four parts.
Students will apply understanding by labeling the same parts (leaf, stem, flower, roots) on a different plant.
Teacher Instructions:
1. Review Terms
Quickly review the four part names again, using the new image of the sunflower.
2. Think Aloud Modeling
Model how to label:
o “I see the yellow part of the sunflower. That must be the flower.”
5E Phase: Explain + Explore + Evaluate
Objective:
Students will visually identify and label basic parts of a plant: flower, leaf, stem, and roots.
Teacher Instructions:
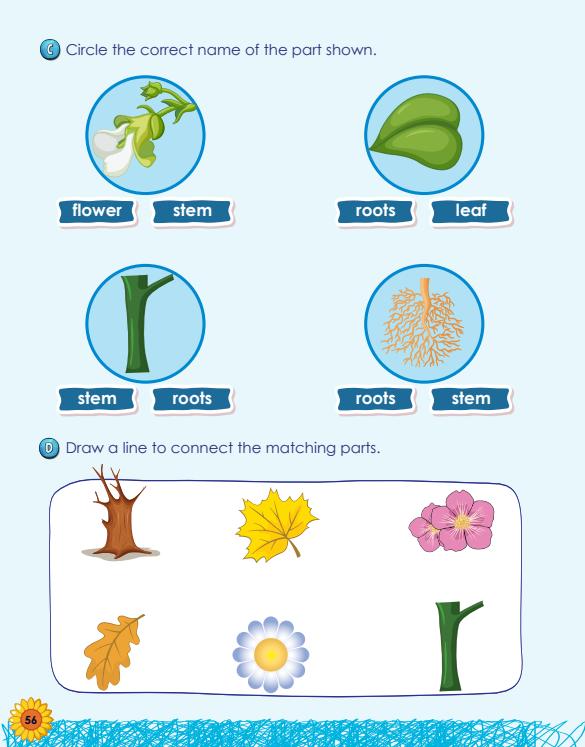
1. Visual Review and Vocabulary Recall
o Point to the illustrations and review:
▪ “This is a flower. It is colorful and smells nice.”
▪ “This is a leaf. It is green and flat.”
▪ “This is a stem. It holds the plant up.”
▪ “These are roots. They grow under the soil.”
2. Concept Linking
o Use real or plastic plant models to demonstrate. Ask:
▪ “Can we see roots above ground?” (No)
▪ “What part helps the plant stand tall?” (Stem)
3. Guided Practice
o Go through each blue circle as a class.
o Ask: “What do we call this part?” Let students respond aloud before circling the correct answer on their book.
Objective:
Students will match similar plant parts by shape, reinforcing visual discrimination and vocabulary.
Teacher Instructions:
1. Compare and Match
o Say: “This is a flower. Let’s find another flower.”
o Do this for trunk/stem and leaf as well.
2. Independent Work
o Ask students to draw lines to connect matching items.
o Walk around and assist where needed.
3. Wrap-Up Discussion
o Ask: “Which part of the plant is your favorite? Why?”
o Accept simple answers like “I like flowers. They are pretty.”
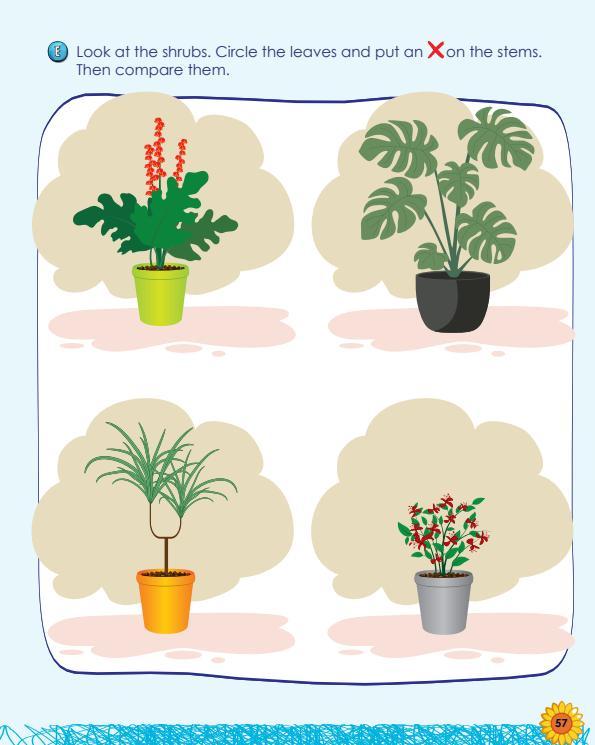
Objective:
o Show photos or bring a small shrub cutting if available.
2. Guided Observation
o Point to the potted shrubs in the student book.
o Say: “Let’s find the leaves in each shrub. What do leaves look like?” (green, flat, grow from stems)
o Ask: “Can you see where the stem is?” Help them notice different stem thicknesses.
3. Marking the Parts
o Have students:
▪ Circle the leaves in each plant.
▪ Put a red X on each stem.
Students will observe and identify stems and leaves in shrub plants, and compare their shapes and structures.
Teacher Instructions:
1. Introduce the Concept of Shrubs
o Say: “Today, we are learning about a new type of plant called a shrub.”
o Define clearly: “A shrub is a small plant with many stems. Shrubs are smaller than trees but bigger than flowers.”
o Explain clearly: “Stems can be thin or thick. They help carry water to the leaves and flowers.”
4. Compare the Shrubs
o Encourage students to describe differences:
▪ “This shrub has big leaves.”
▪ “This one has red flowers.”
o Ask questions like:
▪ “Which shrub has the longest leaves?”
▪ “Which one has more than one stem?”
5. Extension for Language Development
o Provide sentence frames:
▪ “I see a shrub with ____ leaves.”
▪ “This stem is ____.”
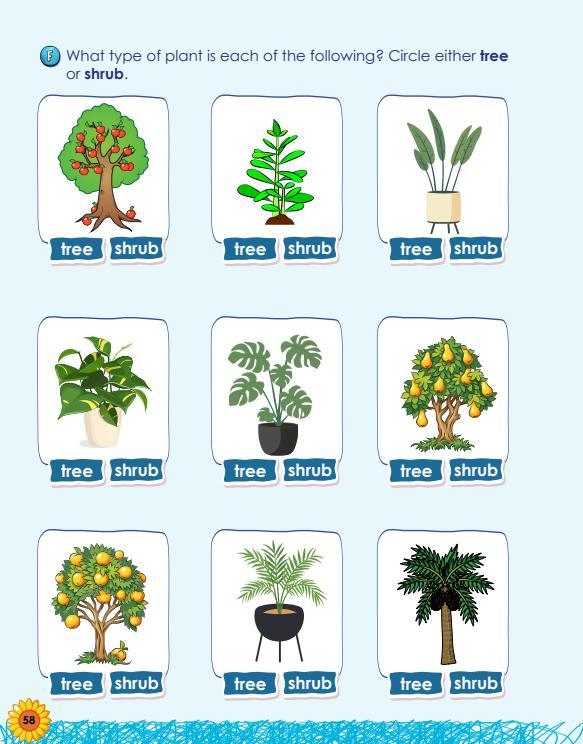
58
5E Phase: Evaluate + Elaborate
Objective:
Students will differentiate between trees and shrubs based on visual characteristics such as size, trunk thickness, and branching.
Teacher Instructions:
1. Clarify the Concepts
o Begin by reviewing:
▪ Tree: “A big plant with one thick trunk and branches at the top.”
▪ Shrub: “A smaller plant with many thin stems, usually closer to the ground.”
2. Visual Anchor Examples
o Show a picture of a real tree and a real shrub (if possible, point to ones outside).
o Ask: “Which is taller? Which has a thick trunk?”
3. Guided Classification Practice
o Look at the first picture (e.g., apple tree) and ask:
▪ “Is this a tree or a shrub?”
▪ Guide students to circle the correct word.
4. Independent Practice
o Let students complete the rest of the pictures, circling “tree” or “shrub” as appropriate.
o Support students who are unsure by prompting with questions:
▪ “Do you see one thick trunk?”
▪ “Is it short and bushy?”
5. Partner Review
o Students compare their answers with a partner and explain:
▪ “I circled shrub because it has small stems.”
▪ “I circled tree because it is tall with a trunk.”
6. Wrap-Up Discussion
o Ask: “Which do you see more in our school or neighborhood trees or shrubs?”
o Optional: Chart the answers and tally student responses.
o Provide colored paper, scissors, glue, and markers.
o Optionally: include buttons, tissue paper, popsicle sticks for stems.
2. Review Flower Parts
o Quickly review: petals, stem, leaf, and roots.
o Draw a simple flower on the board as an example.
3. Model a Craft Option
o Show a basic template or example (e.g., a round flower head with 5 petals and a green stem).
o Say: “You can use any colors or shapes, but your flower should have at least a stem and petals.”
4. Student Craft Time
o Allow students time to create their flower using materials provided.
Page 59 Activity
5E Phase: Elaborate
o Encourage creativity and careful gluing.
5. Paste and Present
Objective: Students will apply knowledge of flower structure by designing and assembling a creative flower craft.
Teacher Instructions:
1. Prepare Materials
o Students paste their completed flower craft in the space provided.
o Invite volunteers to describe their flower using a sentence:
▪ “My flower is yellow. It has six petals and a green stem.”
6. Optional Extension
o Add labels to the flower parts.
o Ask students to name a real flower their craft reminds them of (e.g., sunflower, daisy).
5E Phase: Explore + Explain
Objective:
Students will explore the basic needs of plants sunlight, water, air by observing the conditions of a healthy plant.
Teacher Instructions:
1. Introduce the Concept
Ask:
• “What do plants need to grow?”
Write student responses on the board: “sunlight, water, air, space.”
2. Explain the Experiment Setup
Say:
• “We are going to observe two plants. Plant A will get everything it needs: sunlight, fresh air, and daily water.”
3. Model Observation Skills
Show a real or drawn plant similar to Plant A. Ask:
• “What do you notice about this plant?”
Expect: “It looks healthy, green, standing tall.”
4. Daily Observation Routine
Guide students to observe Plant A each day and record findings (optional: use a simple observation chart).
Ask:
• “Is it growing new leaves?”
• “Do the petals stay bright?”
5. Classroom Discussion
Review: “What happens when a plant gets everything it needs?”
Students respond using full sentences:
• “The plant grows well.”
• “The leaves stay green.”
Page 61
Objective:
Students will observe the effects of removing light, water, and air from a plant and explain how it changes.
Teacher Instructions:
1. Predict Before Observing
Ask:
• “What do you think will happen to Plant B if we cover it with a box?”
• “Can the sun reach it? Can it breathe?”
Let students make predictions.
2. Explain the Setup
Say:
• “We’ll put a box over Plant B. It won’t get sunlight, air, or water.”
3. Daily Observations
Guide students to compare Plant B with Plant A over several days.
Ask:
• “What’s happening to the leaves?”
• “Are the flowers changing?”
4. Partner Discussion
Let students discuss in pairs:
• “What do you see?”
• “How is Plant B different from Plant A?”
5. Wrap-Up Summary
Lead the class in stating the conclusion:
• “Plant B is not healthy because it didn’t get sunlight, air, and water.”
Write a simple sentence together:
• “Plants need air, sunlight, and water to live.”
5E Phase: Explain + Elaborate
Objective:
Students will distinguish between the basic needs of plants and the parts of a plant’s body.
Teacher Instructions:
1. Introduce the Two Categories
Write the two words on the board: “Needs” and “Parts”.
Explain:
• “Needs are things a plant must have to live and grow.”
• “Parts are the pieces that make up a plant.”
2. Classify with Examples
Hold up real or drawn visuals:
• “Sunlight is it a part or a need?” (Need)
• “Leaf is it a part or a need?” (Part)
Let students respond chorally or with hand signals (e.g., thumbs up for “need”).
3. Guided Sorting Practice
Go through each image in the student book and ask:
• “What is this?”
• “Is it something the plant needs or a part of the plant?”
Encourage full sentences:
• “The leaf is a part.”
• “Water is a need.”
4. Independent Practice
Have students circle either need or part under each picture.
5. Partner Discussion
In pairs, students compare their answers and say sentences like:
• “I circled ‘need’ for water because plants drink it.”
Objective:
“Plants grow. They start small, then they grow bigger.”
Point to each numbered circle and describe:
• “This is the seed.”
• “This is the sprout.”
• “This one has leaves.”
Use hand motions to simulate growing taller and larger.
Objective:
Students will order the stages of plant growth using numbers 1 to 5 and reinforce their understanding through coloring.
Teacher Instructions:
1. Guided Sequencing
Students will recognize that plants grow in stages, from seed to mature plant.
Teacher Instructions:
1. Activate Prior Knowledge
Ask:
• “Where do plants come from?”
• “What happens after we plant a seed?”
Draw a simple five-step diagram on the board using symbols: seed → small sprout → stem and leaves → bigger plant → flowers.
2. Explain Each Stage
Read the text aloud:
Point to the images and ask:
• “What should happen first?” (Seeds)
• “Then what?” (Soil, water, sunlight…)
Model placing numbers above each box:
1 = Seeds
2 = Soil
3 = Water
4 = Sunlight
5 = Flower
2. Independent Numbering and Coloring
Students write the numbers 1–5 to show the correct order, then color each image.
3. Wrap-Up Reflection
Ask students to explain the process in their own words:
• “First we plant a seed. Then it needs soil, water, and sun. Then it grows into a flower.”
4. Optional Extension – Movement Game
Call out each stage. Have students act it out physically:
• Crouch low like a seed
• Pretend to grow tall
• Raise arms to show blooming
Objective:
plants. They will visually compare young and grown plant stages.
Teacher Instructions:
1. Introduce the Concept of Plant Reproduction
Begin with a question: “Do plants make new plants? How?”
Explain simply: “Yes! A seed grows into a small plant, which grows bigger and becomes a full plant that can make more seeds.”
2. Guided Observation
Point to the young and grown plants in the pictures. Ask:
o “What do you notice about their leaves?”
o “Which ones look alike?”
Guide students to look closely at leaf shapes and stem structures.
3. Matching Practice
Have students draw lines to match each fully grown plant on the left with its corresponding younger version on the right.
4. Discussion Prompt
Ask students:
o “How are they similar?” (leaf shape, number of leaves, color)
Students will understand that plants reproduce and young plants grow to resemble their parent
o “How are they different?” (size, flowers, fruit)
Objective:
o Step 1: Place cotton on the plate
o Step 2: Place the chickpeas on top
o Step 3: Water the seeds lightly twice a day and keep them near sunlight
o Step 4: Observe daily and note changes (roots sprouting, leaves appearing)
3. Presentation and Sharing
Once sprouts appear, invite students to bring their plants and talk briefly using this model:
o “This is my chickpea plant. I gave it water and sunlight. Now it has roots and a small stem!”
4. Optional Extension
Encourage students to draw their plant at different stages (Day 1, Day 3, Day 5).
Students will demonstrate understanding of plant growth by germinating seeds and presenting their plant growth process.
Teacher Instructions:
1. Preparation
Ask each student to bring the following:
o A small plastic plate
o Some cotton
o Raw chickpeas (or similar seeds)
2. Step-by-Step Instructions
Guide students through the experiment steps in class:
Project Rubric – Growing a Plant
Follows Instructions
All steps followed correctly and independently
Plant Growth & Care Plant shows healthy growth with daily care
Presentation Skills
Visual Clarity
Participation
Clearly explains the process and observations
Plant is clearly presented and labeled
Actively engaged and enthusiastic
Most steps followed, some teacher support needed Many steps missing or done incorrectly
Plant has started growing; care was inconsistent
No visible growth or plant was neglected
Some explanation given with prompting Struggles to explain or stays silent
Plant is visible but lacking detail
Participated with encouragement
Plant is unclear or not brought to class
Rarely engaged or needed constant prompting
Chapter 3 Animals
5E Phase: Engage + Explore
Objective:
Students will distinguish between animals and
plants by identifying and marking each accordingly.
Teacher Instructions:
1. Class Warm-Up Discussion
Begin by asking:
“What is an animal?” (Expected answers: It moves, it eats, it can make sounds...)
“What is a plant?” (Expected answers: It grows in the ground, it has leaves, it doesn’t walk...)
2. Visual Analysis
Display the page or project the image. Point to each figure and ask:
o “Is this an animal?” (Yes)
o “Is this a plant?” (No)
o “Can this move or grow by itself?”
3. Independent Work
Instruct students to circle the animals (lion, elephant, tiger) and put a red X on the plants (trees).
4. Class Check
Review responses together. Ask: “How do we know this is an animal?” “What makes this a plant?”
5. Oral Practice
Invite students to name other animals they know. Prompt with:
o “I know a cat.”
o “I have seen a camel.” Encourage vocabulary expansion.
Page 67 Activity 5E Phase: Explore
Objective:
“Do you have a pet at home? If not, what pet would you like to have?”
Let them discuss with a partner for 1–2 minutes.
3. Model the Drawing Task
On the board, draw a simple pet (e.g., a cat). Say aloud:
“This is my pet cat. It is soft and it meows.”
4. Student Work Time
Ask students to draw their favorite pet in the box. Encourage creativity (real or imaginary pets like turtles, parrots, or fish).
5. Oral Sharing
Invite students to describe their pet to the class using a sentence like:
o “This is my rabbit. It eats carrots.”
o “This is my dog. It is friendly.”
Students will express knowledge of domesticated animals by drawing a pet and explaining why it’s a pet.
Teacher Instructions:
1. Introduce the Concept of Pets
Ask the class:
“What is a pet?”
“Can a lion be a pet?” (No)
“Can a cat or dog be a pet?” (Yes)
Define: “A pet is an animal that lives with people. It is usually friendly and safe.”
2. Think-Pair-Share Prompt
Ask students:
Objective:
2. Kinesthetic Engagement
Ask students to point to their own ear, eye, mouth, etc., as you name each one. Then say:
“Animals have the same parts we do. Let’s look at them on a cat!”
3. Choral Practice
Have students read each label as a group. Practice pronunciation and recognition.
4. Optional Extension: Toy Animal Model
Encourage students to bring a small stuffed animal to class.
In pairs, they can show and say:
o “This is the nose.”
o “These are the legs.”
Students will recognize and name basic animal body parts using visual labels and oral participation.
Teacher Instructions:
1. Introduce the Body Parts
Point to the labeled image of the cat and read the labels aloud:
o “This is the ear.”
o “Here is the nose.”
o “These are the legs.”
Ask students to repeat after you for reinforcement.
Objective:
o “Point to the eyes on the goat.” Use repetition with different animals to ensure mastery.
3. Interactive Pair Practice
In pairs, ask one student to say the name of a body part and the other to point to it:
o Student A: “Mouth.”
o Student B: (Points to the mouth on any animal). Then switch roles.
4. Language Support for ELLs
Write sentence frames on the board:
o “This is the ___.”
o “The ___ is here.”
Model with visuals to support emerging speakers.
5. Wrap-Up Discussion
5E Phase: Explore
Ask:
Students will apply knowledge by identifying and naming body parts on different animals.
Teacher Instructions:
1. Visual Review
Show the page and ask:
“Can you find the goat’s ears?”
“Point to the cow’s nose.”
“Where is the mouth on the hippo?”
2. Guided Pointing Practice
Call out body parts in random order:
o “Point to the legs on the horse.”
“What body parts do all animals have?” “How are animal bodies like ours?”
Encourage students to reflect and share ideas in complete sentences.
“How is a fish different from a cow?” “Can a fish live in your backyard?”
4. Vocabulary Building
Teach the word “underwater.”
Say:
“Underwater means under the sea or in the water.”
Objective:
Students will apply knowledge by drawing a sea creature.
Teacher Instructions:
1. Brainstorm Ideas
Students will identify animals that live underwater and describe them.
Teacher Instructions:
1. Introduce the Concept
Ask:
“Where do fish live?”
“Can a crab walk on land or does it live in the sea?”
Ask:
“Who wants to draw a shark?”
“Who likes turtles or jellyfish?”
2. Model Drawing
Draw a simple fish or crab on the board.
3. Drawing Time
Allow students to draw an animal that lives underwater. Encourage use of bubbles, fins, and bright colors.
4. Oral Sharing
Have students describe their drawing: “This is my fish. It swims underwater.”
Objective:
a line to the trees.”
“The fish swims in the ocean. Let’s draw a line to the water.”
3. Student Matching
Students match the remaining animals to either the underwater or land habitat by drawing lines.
Remind them:
o Underwater animals: fish, octopus, dolphin
o Land animals: elephant, lion, buffalo
4. Wrap-Up Discussion
Ask:
“How do you know an animal lives in water?”
Look for answers like: “It has fins,”“It breathes underwater,” etc.
Students will classify animals based on their natural habitat: land or underwater.
Teacher Instructions:
1. Review Previous Learning
Ask:
“Can fish live on land?”
“Can lions swim in the ocean like dolphins?”
2. Model the Task
Choose two example animals (e.g., elephant and fish). Ask students where each lives and match them aloud.
Example:
“The elephant walks on land. Let’s draw
Objective:
o “Where does the whale live?” (Water – blue)
o “Where does the octopus live?” (Water – blue)
o “Where does the chicken live?” (Land – green)
3. Independent Work
Allow students time to color independently. Circulate and check for accuracy.
4. Partner Check
Let students swap books and review each other’s work, confirming color choice by saying:
o “This one is green because it lives on land.”
5. Class Recap
Show a chart or create a list:
5E Phase: Elaborate
Students will demonstrate understanding of animal habitats by using color-coding (green for land, blue for underwater).
Teacher Instructions:
1. Explain the Task Say:
“We will color land animals green and underwater animals blue. Let’s think where each animal lives.”
2. Go Through Each Animal One-by-One
Use these prompts:
o “Where does the horse live?” (Land – green)
Land Animals: horse, elephant, lamb, lion, chicken
Underwater Animals: fish, whale, dolphin, octopus
74
Objective:
A,B,C 5E Phase: Explore
2. Guided Sorting Discussion
Show each row and ask:
o “What does the elephant do?” (Walks)
o “What does the octopus do?” (Swims)
o “What does the duck do?” (Flies and swims – but focus on flying here)
Discuss:
o A: Walk and Run: Elephant, Giraffe, Lion
o B: Swim: Whale, Shrimp, Octopus
o C: Fly: Pigeon, Toucan, Duck
3. Visual Movement Practice
Ask students to stand and act out:
Students will observe and classify animals based on how they move: walking/running, swimming, or flying.
Teacher Instructions:
1. Introduce Animal Movement Types
Begin by showing physical examples or miming actions:
o “Let’s pretend to walk like an elephant.”
o “Can you flap your wings like a bird?”
o “Let’s pretend to swim like a fish.”
o Walk like a giraffe
o Flap wings like a bird
o Wiggle like a swimming fish
4. Wrap-Up Questions
Ask:
o “Can all animals fly?”
o “What do animals that swim have in common?”
o “What helps land animals move?”
Objective:
5E Phase: Explore
3. Partner Sorting Task
Let students work in pairs to cut out and place each animal in the correct column. Encourage them to talk to each other:
o “Where does this animal go?”
o “Does it walk or swim?”
4. Extension Vocabulary Challenge
Introduce new verbs where appropriate:
o “Gallop” for horse
o “Waddle” for duck
o “Slither” for octopus (or “glide”)
5. Interactive Wrap-Up
Ask groups to hold up one animal and say:
o “This is a shark. It swims.”
o “This is a cow. It walks and runs.”
Students will categorize animals by their movement by cutting and pasting them in the correct column.
Teacher Instructions:
1. Review Animal Names Together
Identify each animal in the cut-out section: pigeon, octopus, bird, horse, cat, clownfish, cow, shark.
2. Model Sorting Logic
On the board or chart:
o Walk & Run: Horse, Cat, Cow
o Fly: Pigeon, Bird
o Swim: Octopus, Fish, Shark
5E Phase: Explain
o “What do you think animals eat?”
2. Guided Observation
Show the cow, chicken, and lion.
Discuss:
o “Cows eat grass.”
o “Chickens eat grains.”
o “Lions eat meat.”
3. Classify Together
Write the categories on the board:
o Grass eaters (Herbivores)
o Grain eaters (Omnivores or Seed eaters)
o Meat eaters (Carnivores)
4. Class Discussion
Ask:
Objective:
Students will identify food and air as basic needs for animal survival, and distinguish between animals based on what they eat and where they breathe.
Teacher Instructions:
Activity A – Animals Need Food
1. Activate Prior Knowledge
Ask: “What do you eat to grow strong?” Then follow up:
o “Do all animals eat the same food?”
o “Which animals eat plants like us?”
Activity B – Animals Need Air
1. Introduce the Concept of Breathing
Ask: “What do you do when you run fast?” (Breathe deeply)
o “The fish breathes using gills in the water.” Page 76
Say: “Just like us, animals also need air to live.”
2. Land vs. Underwater Breathing
Compare the horse and fish:
o “The horse breathes air from the land.”
3. Demonstration Option
Blow into a balloon (air) vs. pour water into a glass (to show underwater). Emphasize both are essential but different in function.
4. Wrap-Up Questions
o “Where do fish get their air from?”
o “Can horses live underwater?”
Objective:
Teacher Instructions:
1. Intro Discussion – What is Shelter?
Ask:
o “Where do you sleep at night?”
o “Do animals also need a place to stay safe?”
Explain that shelter protects animals from weather and danger.
2. Explore Each Shelter Type with Examples
Guide students through the three examples:
o Trees: “Birds and small animals live in trees. What else can live there?”
o Caves: “Bears, foxes, and tigers use caves to hide and rest.”
o Sea Plants: “Underwater animals like fish, crabs, and octopuses hide in plants.”
3. Interactive Questioning
Ask students:
o “Where do birds build their nests?”
o “Can a crab live in a cave?”
o “Why do animals hide?”
4. Classroom Extension
Students will recognize that animals need shelter and will identify common shelter types: trees, caves, sea plants.
Create a poster with 3 shelter categories. Ask students to draw or cut out one animal and paste it under the correct shelter.
78
5E Phase: Elaborate
safe, especially at night or during bad weather.”
2. Animal Familiarity
Point to the cow, horse, and chicken images. Ask:
o “Do these animals live in trees or in barns?”
o Emphasize that barn animals are usually domestic and cared for by farmers.
Activity
Objective:
Students will demonstrate understanding by matching specific animals with their proper shelter.
Teacher Instructions:
Animal Shelters (Part 2)
Activity 4 – Explore Where Animals Live
Objective:
Students will identify different types of animal shelters and correctly associate animals with their appropriate shelter types.
Teacher Instructions:
A. Barn Shelter Discussion
1. Connect to Real-Life Context
Ask: “Have you seen a barn before? Where do animals stay on farms?”
Show the barn illustration and explain: “Farms have barns to keep animals
1. Model the First Match Together
Point to the lamb. Ask:
o “Where does a lamb live? In a barn, cave, or ocean?”
o Guide students to draw a line from the lamb to the barn.
2. Animal-by-Animal Prompt
Go through each animal:
o Ray fish: “Does this live in a tree or underwater?” (Underwater)
o Hyena: “Does it sleep in a barn or cave?” (Cave)
o Eagle: “Can an eagle live in the sea?” (No – It lives in trees)
3. Wrap-Up
Review the full set after students finish.
Ask them to explain one of their matches out loud.
Objective:
Students will sequence the stages of growth in chickens and fish, reinforcing the concept that animals grow and change over time.
Teacher Instructions:
chick. The chick becomes a bigger chicken, and finally, a full-grown hen or rooster.”
2. Ask Students to Retell
Encourage students to retell the stages using complete sentences:
o “First comes the egg...”
o “Then the chick hatches…”
B.
Fish Life Cycle Sequencing
Objective:
Students will identify and order the stages of a fish’s life from egg to adult.
Teacher Instructions:
1. Introduce Vocabulary
Teach these terms with visual aid:
o Egg → Larva → Fry → Adult fish
Use hand motions or gestures to reinforce small-to-big growth.
2. Work in Pairs
Say: “With your partner, talk about which picture shows the beginning and which one shows the end.”
Instruct them to number the pictures from 1 to 4.
A. Chicken Growth Observation
1. Storytelling Approach
Use a narrative:
“Let’s follow the life of a chicken! First, there is an egg. Then it hatches into a
3. Color and Discuss
Once ordered, allow students to color each stage. While they color, ask:
o “How does the fish look different as it grows?”
o “Which stage is your favorite and why?”
4. Optional Extension
Display a real-time growth video or time-lapse of fish eggs hatching (if classroom technology allows).
Objective:
o “A baby horse is called a foal.”
o “A baby goat is a kid.”
o “A baby sheep is a lamb.”
2. Visual Recognition Task
Guide students as they draw lines connecting adult animals to their babies. Encourage reasoning:
o “What clues help you know they are the same?” (size, color, shape)
3. Wrap-Up
Let students describe one of the animal-baby pairs aloud using a full sentence:
o “This is a goat and this is its baby, a kid.”
o “They look alike!”
Students will understand that animals reproduce and have babies that resemble them.
Teacher Instructions:
1. Class Discussion on Animal Families
Ask: “Do animals have babies like people do?”
Show real or toy animals and their babies (e.g., cow and calf). Emphasize:
o “A baby cow is called a calf.”
Objective:
2. Project Steps
o Step 1: Have students choose a pet they like.
o Step 2: In small groups, provide simple materials (paper, cardboard, straws, glue, colored paper) and guide them to design and build a shelter.
o Step 3: Let each group present their shelter to the class. Encourage them to explain:
▪ “We made a doghouse. It has a roof to protect it from the rain.”
▪ “We used straws because they are strong and light.”
3. Display
Create a small exhibition space to show all shelters with name tags.
Students will collaborate to plan and build a model shelter suitable for a pet, using creativity and basic design thinking.
Teacher Instructions:
1. Brainstorming Discussion
Ask:
o “What pets do you know?” (dog, cat, bird, rabbit)
o “Where do pets sleep?” (kennel, birdhouse, basket)
o “What do pets need in their shelter?” (warmth, protection, space)
Teamwork
Creativity
Worked well with all group members Some cooperation shown Rarely worked with others
Very creative design and materials Some creative elements Basic effort shown
Understanding of Shelter Shelter clearly meets the pet's needs Shelter meets some needs Shelter does not match the pet's needs
Presentation
Clear explanation with strong reasoning Simple explanation Incomplete or unclear explanation
breathe, move, reproduce. Then ask: “What are non-living things?” (things that do not eat, breathe, move by themselves, grow, or reproduce).
2. Visual Exploration and Think-Aloud
Project the page or show it to the class.
Model:
o “The cow is alive. It moves and eats.” Circle it.
o “The table doesn’t move or grow. It is non-living.” Draw a square around it.
3. Independent Practice
Instruct students to find and mark five living and five non-living things in the image. Monitor and provide support as needed.
4. Extension – Comparison Question (Part a)
Objective:
Students will demonstrate their understanding of the differences between living and non-living things by identifying and categorizing them in an illustrated scene.
Teacher Instructions:
1. Guided Review of Definitions
Ask:
o “What makes something a living thing?”
o “What can living things do?” Confirm traits: eat, grow,
Ask: “Which group has more – living or non-living?”
Discuss the result and circle the correct option.
5. Creative Prompt (Part b)
Ask: “What non-living thing can you draw next to the barn?” Examples: bucket, tractor, bench. Let students add their drawing.
o “Do these plants look healthy?” (Yes. Bright green, upright.)
Show Picture B and ask:
o “What do you notice about the plants?”
o “Why are they drooping?” (No sunlight or fresh air.)
2. Student Explanation
Guide students to respond in full sentences:
o “Plants in Picture A grow well because they get sunlight and air.”
o “Plants in Picture B are not growing well because it is dark and closed.”
3. Optional Writing Support
Provide sentence starters on the board:
5E Phase: Evaluate + Explain
Objective:
Students will explain why plants need sunlight and air by comparing healthy and unhealthy plant environments.
Teacher Instructions:
1. Compare the Two Scenes
Show Picture A and ask:
o “What do you see near the windows?”
o “The plants grow well in Picture A because ____.”
o “The plants in Picture B are not healthy because ____.”
4. Wrap-Up Discussion
Ask:
o “What do all plants need to grow?” (Sunlight, water, air, soil)
o “Where in your home do you see plants?”
Encourage students to share what helps plants grow well.
o “Where do chickens stay?” (In barns or coops)
2. Model the First Match
Point to the cow and draw a line to the barn as an example. Say: “Cows are farm animals. They sleep in a barn.”
3. Guided Practice
Guide students through one or two more:
o “Where do fish live?” (Sea plants, water)
o “Where do bears live?” (Caves)
4. Independent Matching
Allow students to complete the remaining matches independently. Circulate and provide assistance if needed.
5. Extension Prompt
Page 84 Activity 3 5E Phase: Evaluate
Objective:
Students will demonstrate understanding of animal habitats by matching animals to appropriate shelters based on prior knowledge.
Teacher Instructions:
1. Review Shelter Types
Ask:
o “Where do birds sleep?” (In trees)
o “Where do cows stay?” (In barns)
o “Where do bears live?” (In caves)
o “Where do fish live?” (In water)
Ask students to share additional examples from their environment:
o “Do you have pets? Where do they sleep?”
o “What shelter do you live in?”
2. Model the First Pair
Point to the adult bird and say: “This is the parent bird. Its baby is the little bird. Let’s draw a line to match.”
3. Student Matching Time
Allow students to draw lines connecting:
o Adult chicken → chick
o Adult dolphin → baby dolphin
o Adult boy → child
o Grown plant → sprout
Encourage peer discussions: “Do they look the same or different?”
4. Class Discussion
Ask:
o “How are the adult and baby alike?”
o “What changes as they grow?”
Objective:
Support answers like:
Students will apply their knowledge of reproduction by identifying baby animals and plants and matching them to their adult forms.
Teacher Instructions:
1. Visual Introduction
Ask students:
o “What is a baby chicken called?” (Chick)
o “What do we call a baby plant?” (Seedling or sprout)
o “Does a baby dolphin look like the adult?” (Yes, just smaller)
o “They look similar but smaller.”
o “Babies grow into adults.”
5. Optional Drawing Extension
Invite students to draw another animal and its baby in their notebooks and label both. Page 85 Activity 4 5E Phase: Evaluate
Objective:
Students will apply their understanding of living and non-living things through a story-based context and discussion.
Teacher Instructions
1. Story Introduction (Elaborate)
Say:
“Today, we will read about Sara. She goes to the park with her mom and learns about living and non-living things.”
5E Phase: Elaborate + Evaluate
Read the story aloud with expression. Pause to emphasize keywords like moves, eats, grows, and breathe.
Ask prompting questions during reading:
• “What do turtles do that make them living things?”
• “Can a rock breathe or grow?”
Use visuals or classroom objects to show examples of living vs. non-living items.
2. Interactive Comprehension Check (Evaluate)
Guide students through each question on Page 87:
Activity 1 – Match each sentence to the correct picture
Objective:
Students will differentiate between characteristics of living and non-living things.
• Read each sentence aloud and ask students to point to the correct picture (flower or rock).
• Confirm:
a. “It grows and needs water and air.” → (Living)
b. “It does not eat, grow, or breathe.” → (Non-living)
Activity 2 – Is the duck a living thing?
Objective:
Students will justify a living/non-living classification.
• Ask: “Does the duck move?”“Does it eat or grow?”
• Students circle YES.
• Follow-up prompt: “Why is it living?” (Accept: “It grows,”“It eats,” or “It breathes.”)
Activity 3 – Count living things in the picture
Objective:
Students practice classification and observation.
• Say: “Let’s count all the living things in the park!”
• Help them spot: turtle, duck, butterfly, flowers, people, trees, etc.
• Accept answers between 7–9 depending on interpretation.
Activity 4 – Circle correct answers
Objective:
Students demonstrate comprehension of story facts.
• a. “The rock is small.” →
• b. “There are three ducks.” → (Only one duck visible)
Activity 5 – Ask your partner a question
Objective:
Students practice inquiry and reinforce understanding.
• Model first: “What did Sara see first?” → “A turtle.” “Is the rock living?” → “No.”
• Let pairs take turns asking and answering questions.
Optional Extensions
• Drawing Prompt: “Draw a living thing you saw in the story.”
• Sorting Game: Use flashcards or classroom objects and ask students to sort them into living and non-living categories.
• Mini Play: Let students act out being a turtle or a rock to demonstrate the difference in movement.