
6 minute read
SSA55 NEW SUPERSPRING FOR VANS


by Brenda Ely, Creative Associate
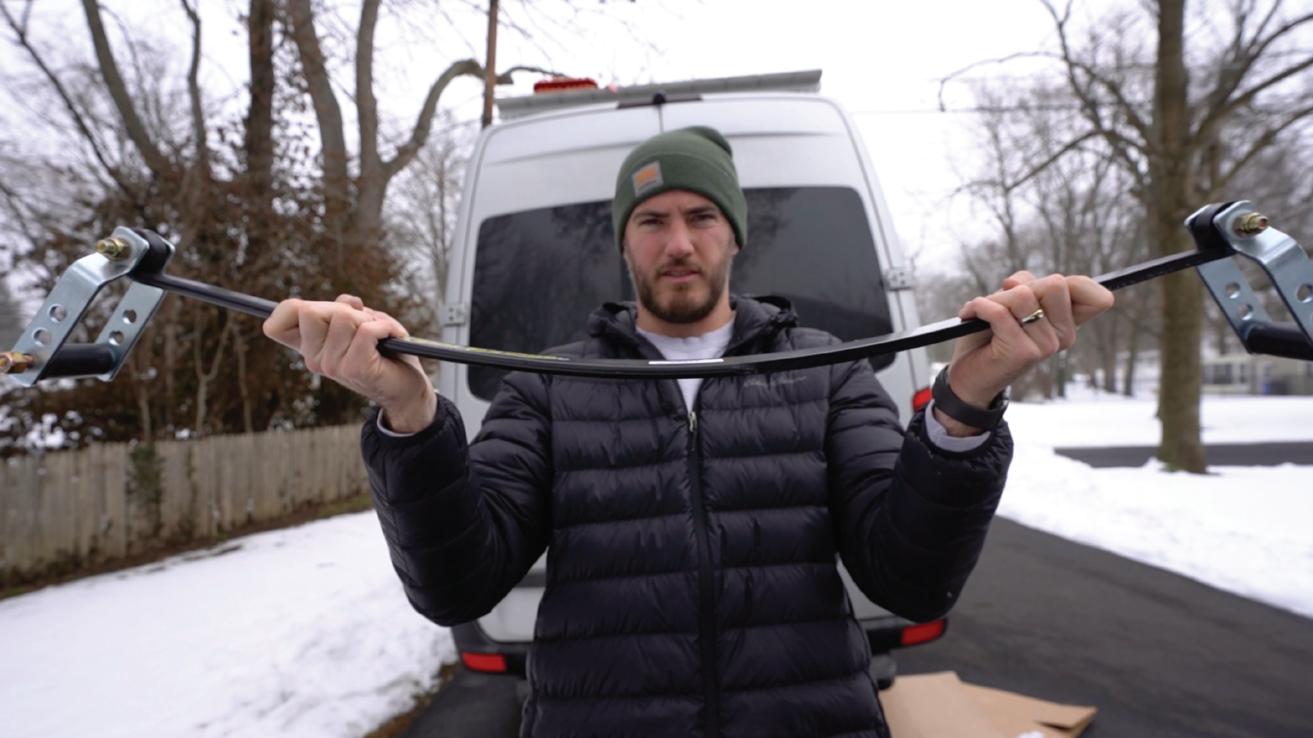
The SSA55 joined the SuperSprings product line at the beginning of the year as a new and improved design for better fitment and easier installation for Sprinter Vans. This new application is the latest in our line of steel, bolt-on, helper springs. Our self-adjusting SuperSprings are designed for stabilizing and providing greater ride control on vans, trucks, and RVs. This solution, eliminates sag and reduces body roll without ever breaking the existing springpack.
THE INTRODUCING THE SSA55
The need for the SSA55 was discovered during a similar installation in which the opportunity for a new mounting design that would make installation of SuperSprings easier on a Sprinter van.
- Chad Bussanich, SSI Engineer
The SSA55 project started back in July of 2021 with the goal of eliminating the need of an additional mounting kit and making the installation process much easier. The solution? A polyurethane spring pad on which the helper leaf spring can be installed. The spring sits directly on top of the existing leaf pack without a steel bridge for separation from the axle components like in the previous applications for Sprinter vans. Paired with longer shackles, for more pre load adjustment options, this solutions makes the installation a much cleaner process with fewer parts.
Also new to the SSA55 is the additional leaf pack compression tool. Used to clamp multi-leaf applications during installation, the compression tool will hold all the leaves together during the clamping process of the installation. A er the initial design and gathering of parts, it was test tted in late 2021 to con rm the product’s improvements and the installation proved to be much easier and cleaner.

INSTALLATION INSTRUCTIONS
With the vehicle parked on a hard, level surface, emergency brake engaged, and wheels chocked, take the SuperSprings and installation parts out of the box and disassemble any preassembled parts. Place the Spring Pad (PSP-8) on the existing leaf spring and the SSA55 spring on top of the Spring Pad. Install the Spring Clamp with the appropriate bolts and nuts insuring that the SuperSpring has clearance on both sides.
Starting at the front, rotate the shackles down and use the provided compression tool (square u-bolt, cross plate, and nuts) to compress the existing springpack, if it has more than one leaf. Using a SuperSprings Installation Tool or a C-Clamp, clamp down the SuperSpring and the existing spring until the bolt and roller can be installed onto the SuperSpring. Start with the bottom most hole on the shackle and move up to the middle or upper holes for more tension or clearance if needed. Remove the compression tool if used, and repeat the same process on the rear of the SuperSpring. Tighten the bolt on the Spring Clamp and repeat the whole process on the other side of your vehicle.

INSTALLATION BY KEVIN
Once SSA55 was released we worked with Taylor and Kevin of Mathers on the Map. They installed the SSA55 on their van and let us know what they thought.
In the video, Kevin explains the process of installing the SSA55 as he puts it on their van. He shows that the installation is easy enough that it can be done in your driveway without removing the wheels. He also detailed which directions the bolts should go and talked about the new compression tool, although he did not need to use it because his van only has one leaf.
After installing the SuperSpring on both sides, Kevin realized that the spring was barely hitting the frame of the van. To correct this he moved the roller bolt from its original place in the lowest hole to the middle hole which created enough clearance around the frame.
Overall, Kevin gave a great visual explanation of the installation and how the different parts of the system work as well as how to trouble shot the clearance of the shackles on both ends of the SuperSpring.
Although SuperSprings are not designed to give the vehicle a lift , the installation may result in ½" to 1" of lift. Kevin gained about a ¾" lift on the back of their van after adding the SuperSpring.


“IT DOESN’T REALLY BOUNCE”
THE TEST DRIVE
Once Kevin got the SSA55 installed he hit the road to test the sway and he immediately noticed a di erence in the ride quality.
Kevin noted that he could feel the strength of the springs in the back and that it was a lot tighter. He said that before when they would hit a bump they would just bottom out, now the ride feels smoother.
When Taylor joined the test drive Kevin got to experience the ride as a passenger and he was just as impressed. Both Kevin and Taylor stated that they wished they had done this sooner and had them for their previous trip in Baja.

FINAL THOUGHTS
Overall this installation is fairly easy, if you have a shop and jacks to take the wheel off, the installation is even easier but as Kevin showed it doesn’t take a shop or a lot of tools to get the job done.
For how quick the install is the results are undeniable. There was less leaning, no more getting knocked around, and height regained after loading the back of the van from the build.
This is a great simple solution for anyone with a van that has a lot of sway, is loaded up and needs to be leveled out, or just looking for a better ride quality.
As Kevin mentioned they can’t wait to get their SumoSprings so that they have the complete suspension package and can Journey Better.
ABOUT TAYLOR & KEVIN WITH MATHERS ON THE MAP

Taylor and Kevin started Mathers On The Map mainly as a travel blog, but also a blog about teaching others how to essentially travel for free. They have goal of traveling to 30 countries before they turn 30! In 2019 they started converting a 2015 Mercedes Sprinter Van, which they named Merl, and after almost a year the conversion is complete and they hope to explore all the little nooks and crannies of our beautiful country.
To follow their journey and for full blogs and videos about their van conversion, featuring our SuperSprings, follow them on Instragram and YouTube @mathersonthemap.


