6 minute read
Disassemble


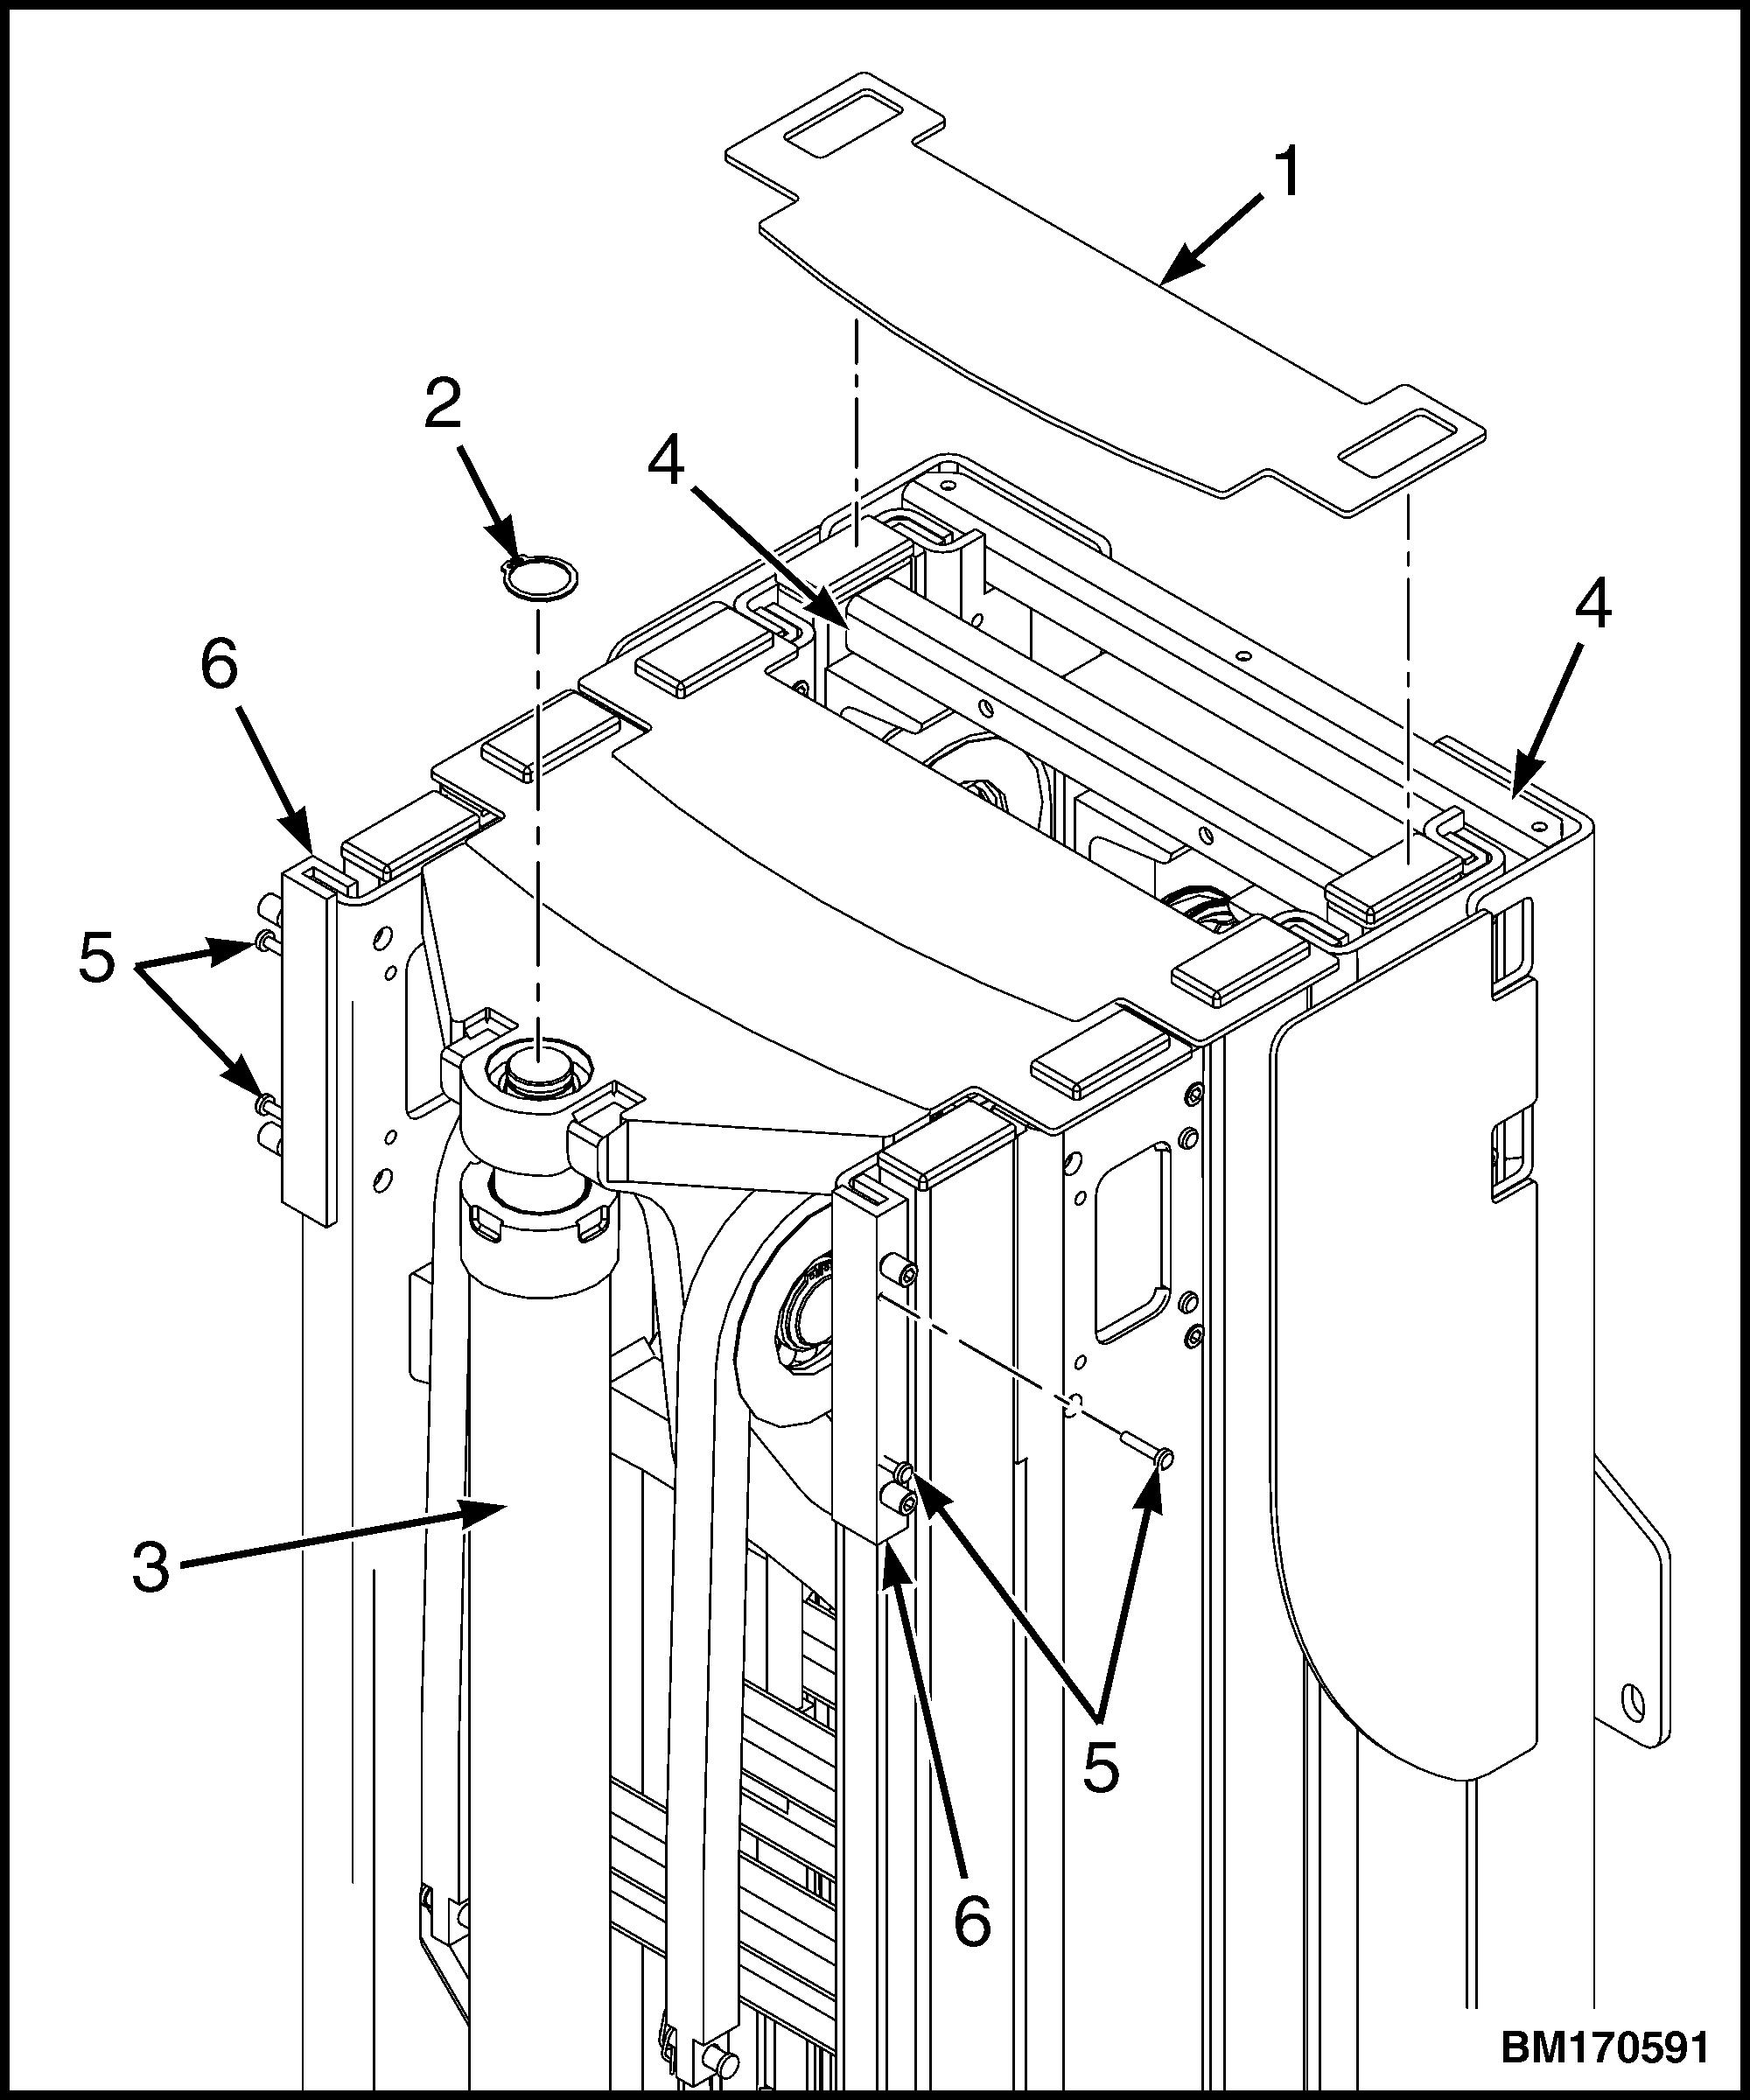
1. DUST COVER 2. SNAP RING 3. LIFT CYLINDER 4. TOP CROSS BAR 5. THREADED SCREW 6. FRAME SLIDER BLOCKS
Figure 6. Snap Ring, Dust Cover, and Frame Slider Blocks, Remove
Advertisement
NOTE: Access to cotter and chain anchor pins is from behind sail weldment, where lift cylinder is mounted.
16. Disconnect first set of lift chains by removing two cotter pins and chain anchor pins from bottom of second intermediate mast weldment. See
Figure 8.
17. Remove two cotter pins and chain anchor pins from chain anchors mounted on sail cover bracket. Remove first set of lift chains from mast. See Figure 8.
18. Using lifting device, lift mast from aerial work platform frame. Grab frame slider blocks so that they do not fall out. See Figure 6.
19. Lower mast and place in a horizontal position.
DISASSEMBLE
NOTE: Remove self-tapping screws with hand tools and not power tools. The use of power tools can strip the self-tapping screws and damage them.
1. Remove threaded end of fourth phasing cable from bracket on carriage weldment. See Figure 5.
NOTE: If thread is stripped out of slider block, replace with new slider block. See Parts Manual.
2. Remove self-tapping screws, setscrews, and mast slider blocks from top and bottom of carriage weldment. See Figure 9.
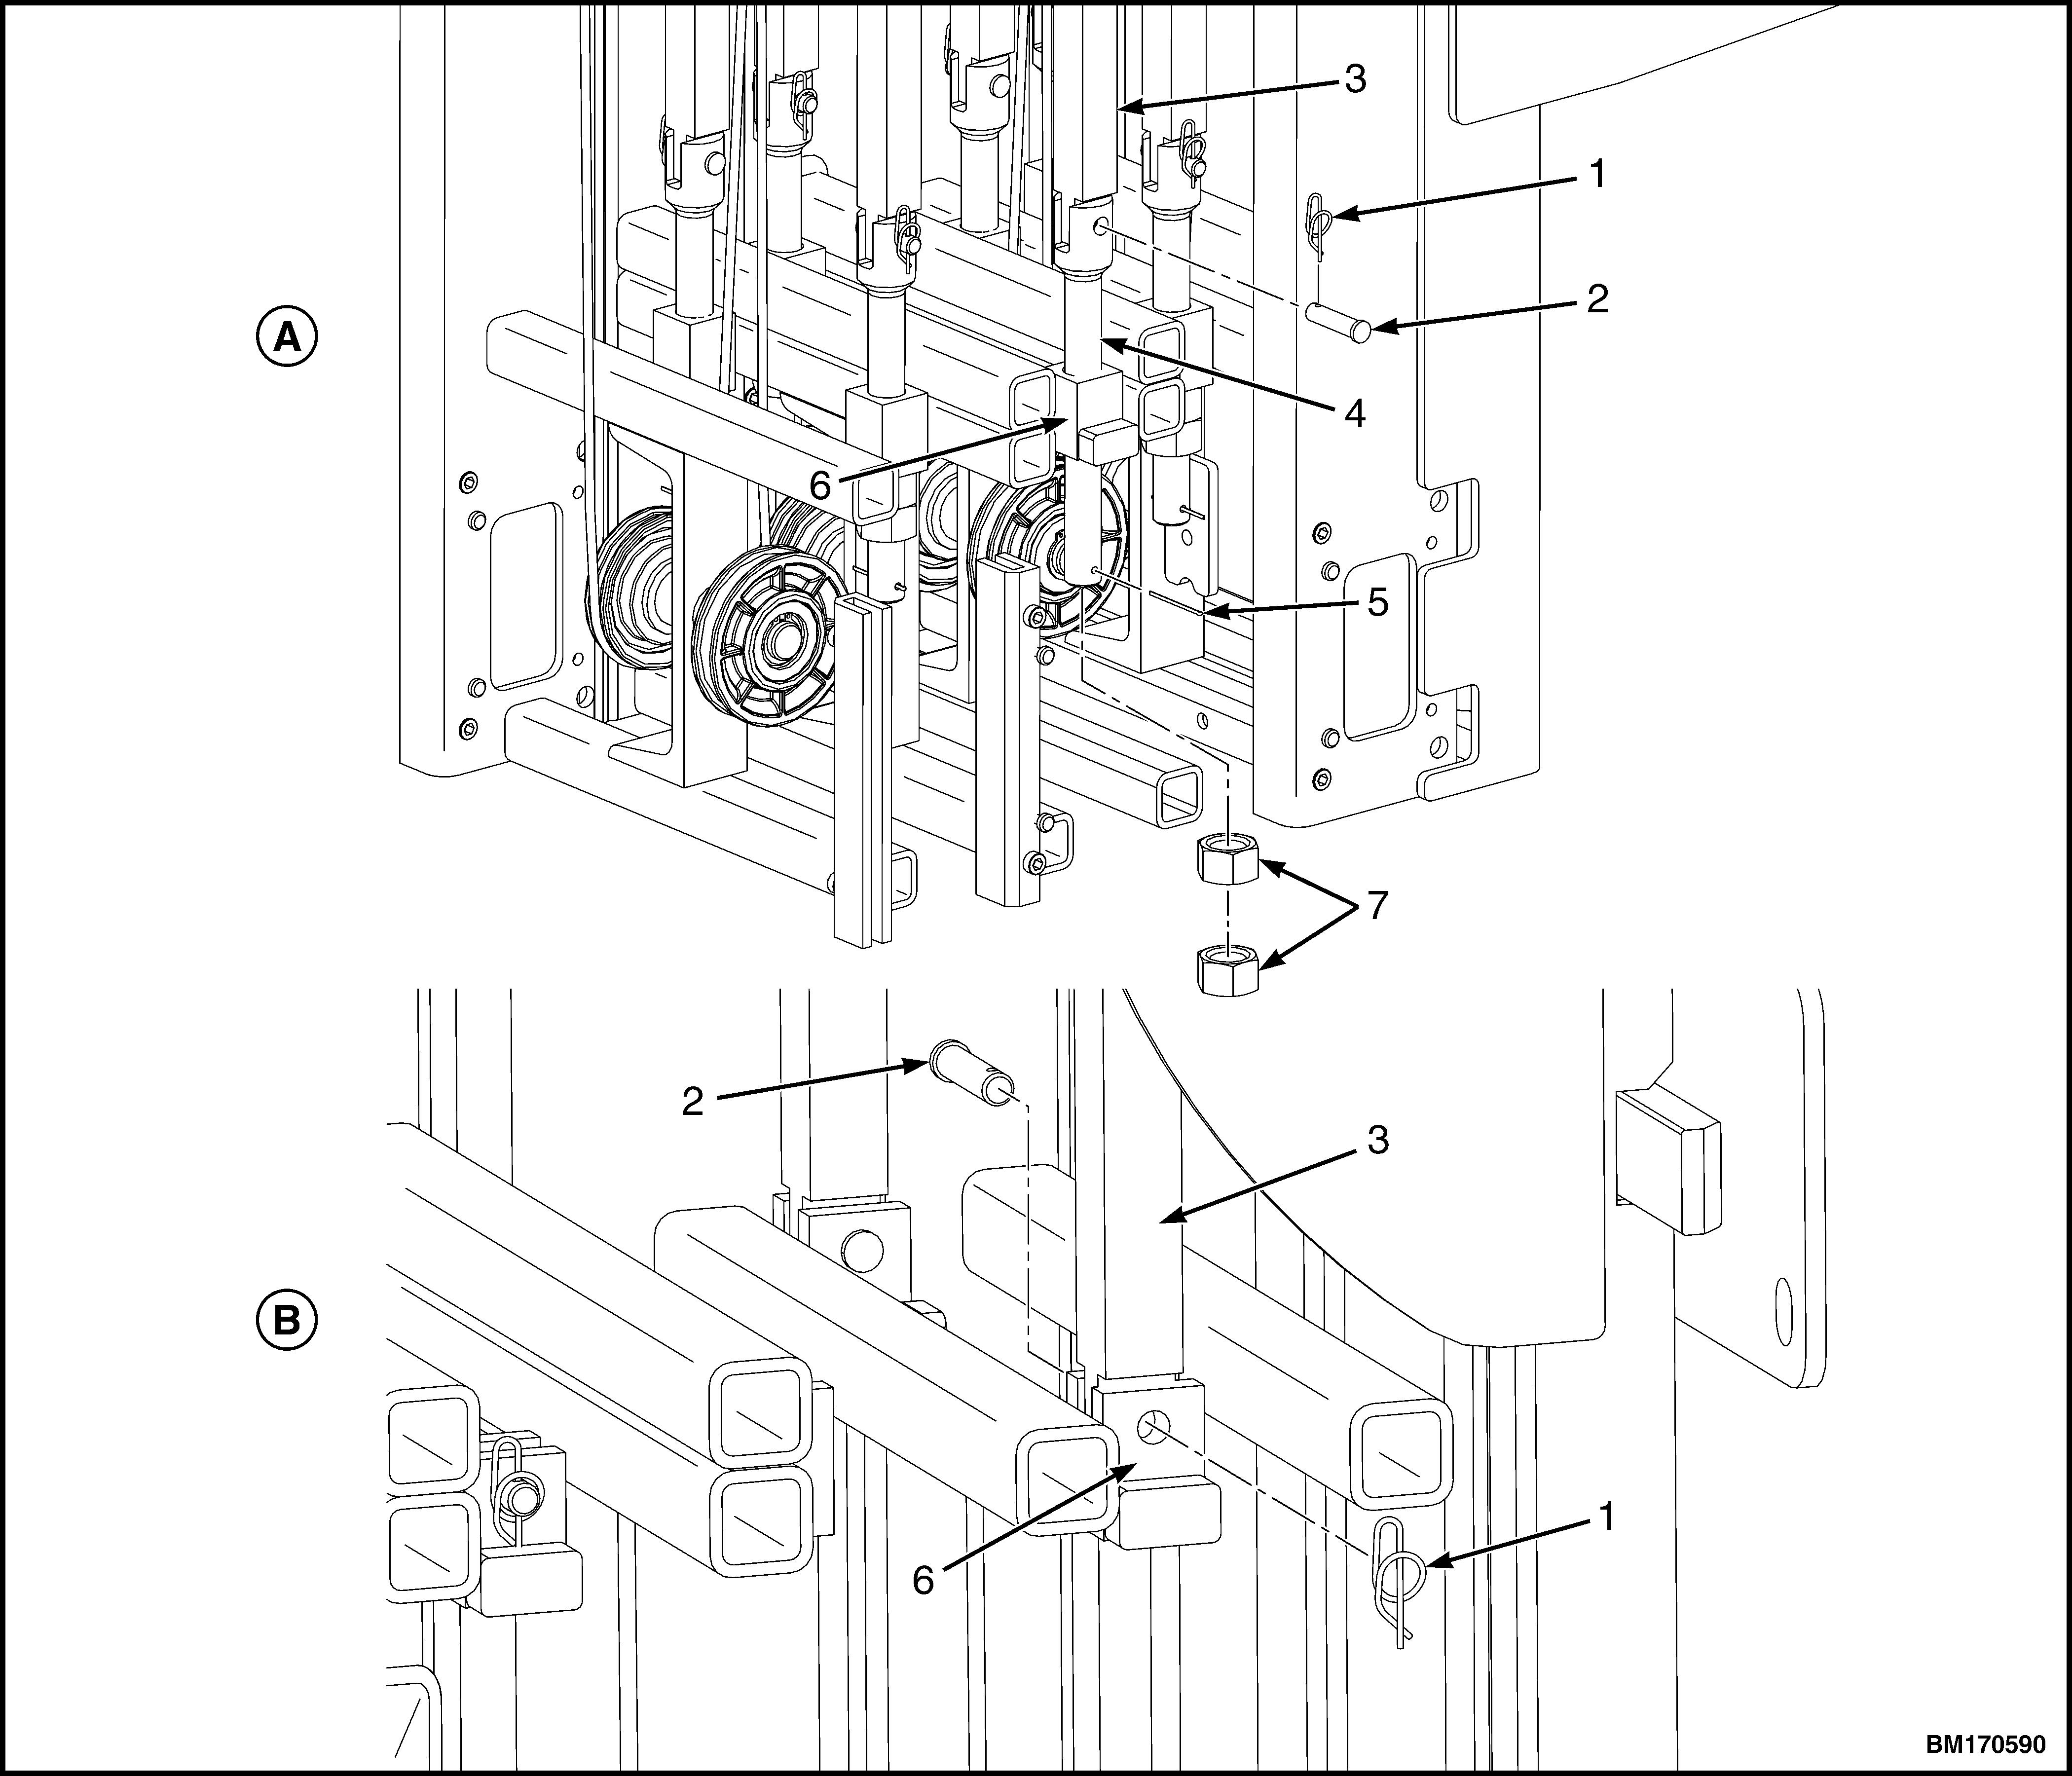
3. Remove two cotter pins and two chain anchor pins, and disconnect lift chains from bottom of carriage weldment. See Figure 10.
4. Remove two pins and four nuts from bottom of chain anchors. Remove chain anchors from chain retainer blocks and carriage weldment.
See Figure 10.
5. Remove two cotter pins and two chain anchor pins, and disconnect lift chains from chain retainer block at top of carriage weldment. See
Figure 10.
6. Using lifting device, lift carriage weldment up and slide it off of fourth intermediate mast weldment.
7. Remove nut, spring, and washer from third phasing cables. See Figure 5.
8. Remove third phasing cable from bracket on fourth intermediate mast weldment. See Figure 5.
9. Remove self-tapping screws, setscrews, and mast slider blocks from top and bottom of fourth intermediate mast weldment. See Figure 9.
10. Remove two cotter pins and two chain anchor pins, and disconnect lift chains from bottom of fourth intermediate mast weldment. See Figure 10.
11. Remove two pins and four nuts from bottom of chain anchors. Remove chain anchors from chain retainer blocks on fourth intermediate mast weldment.
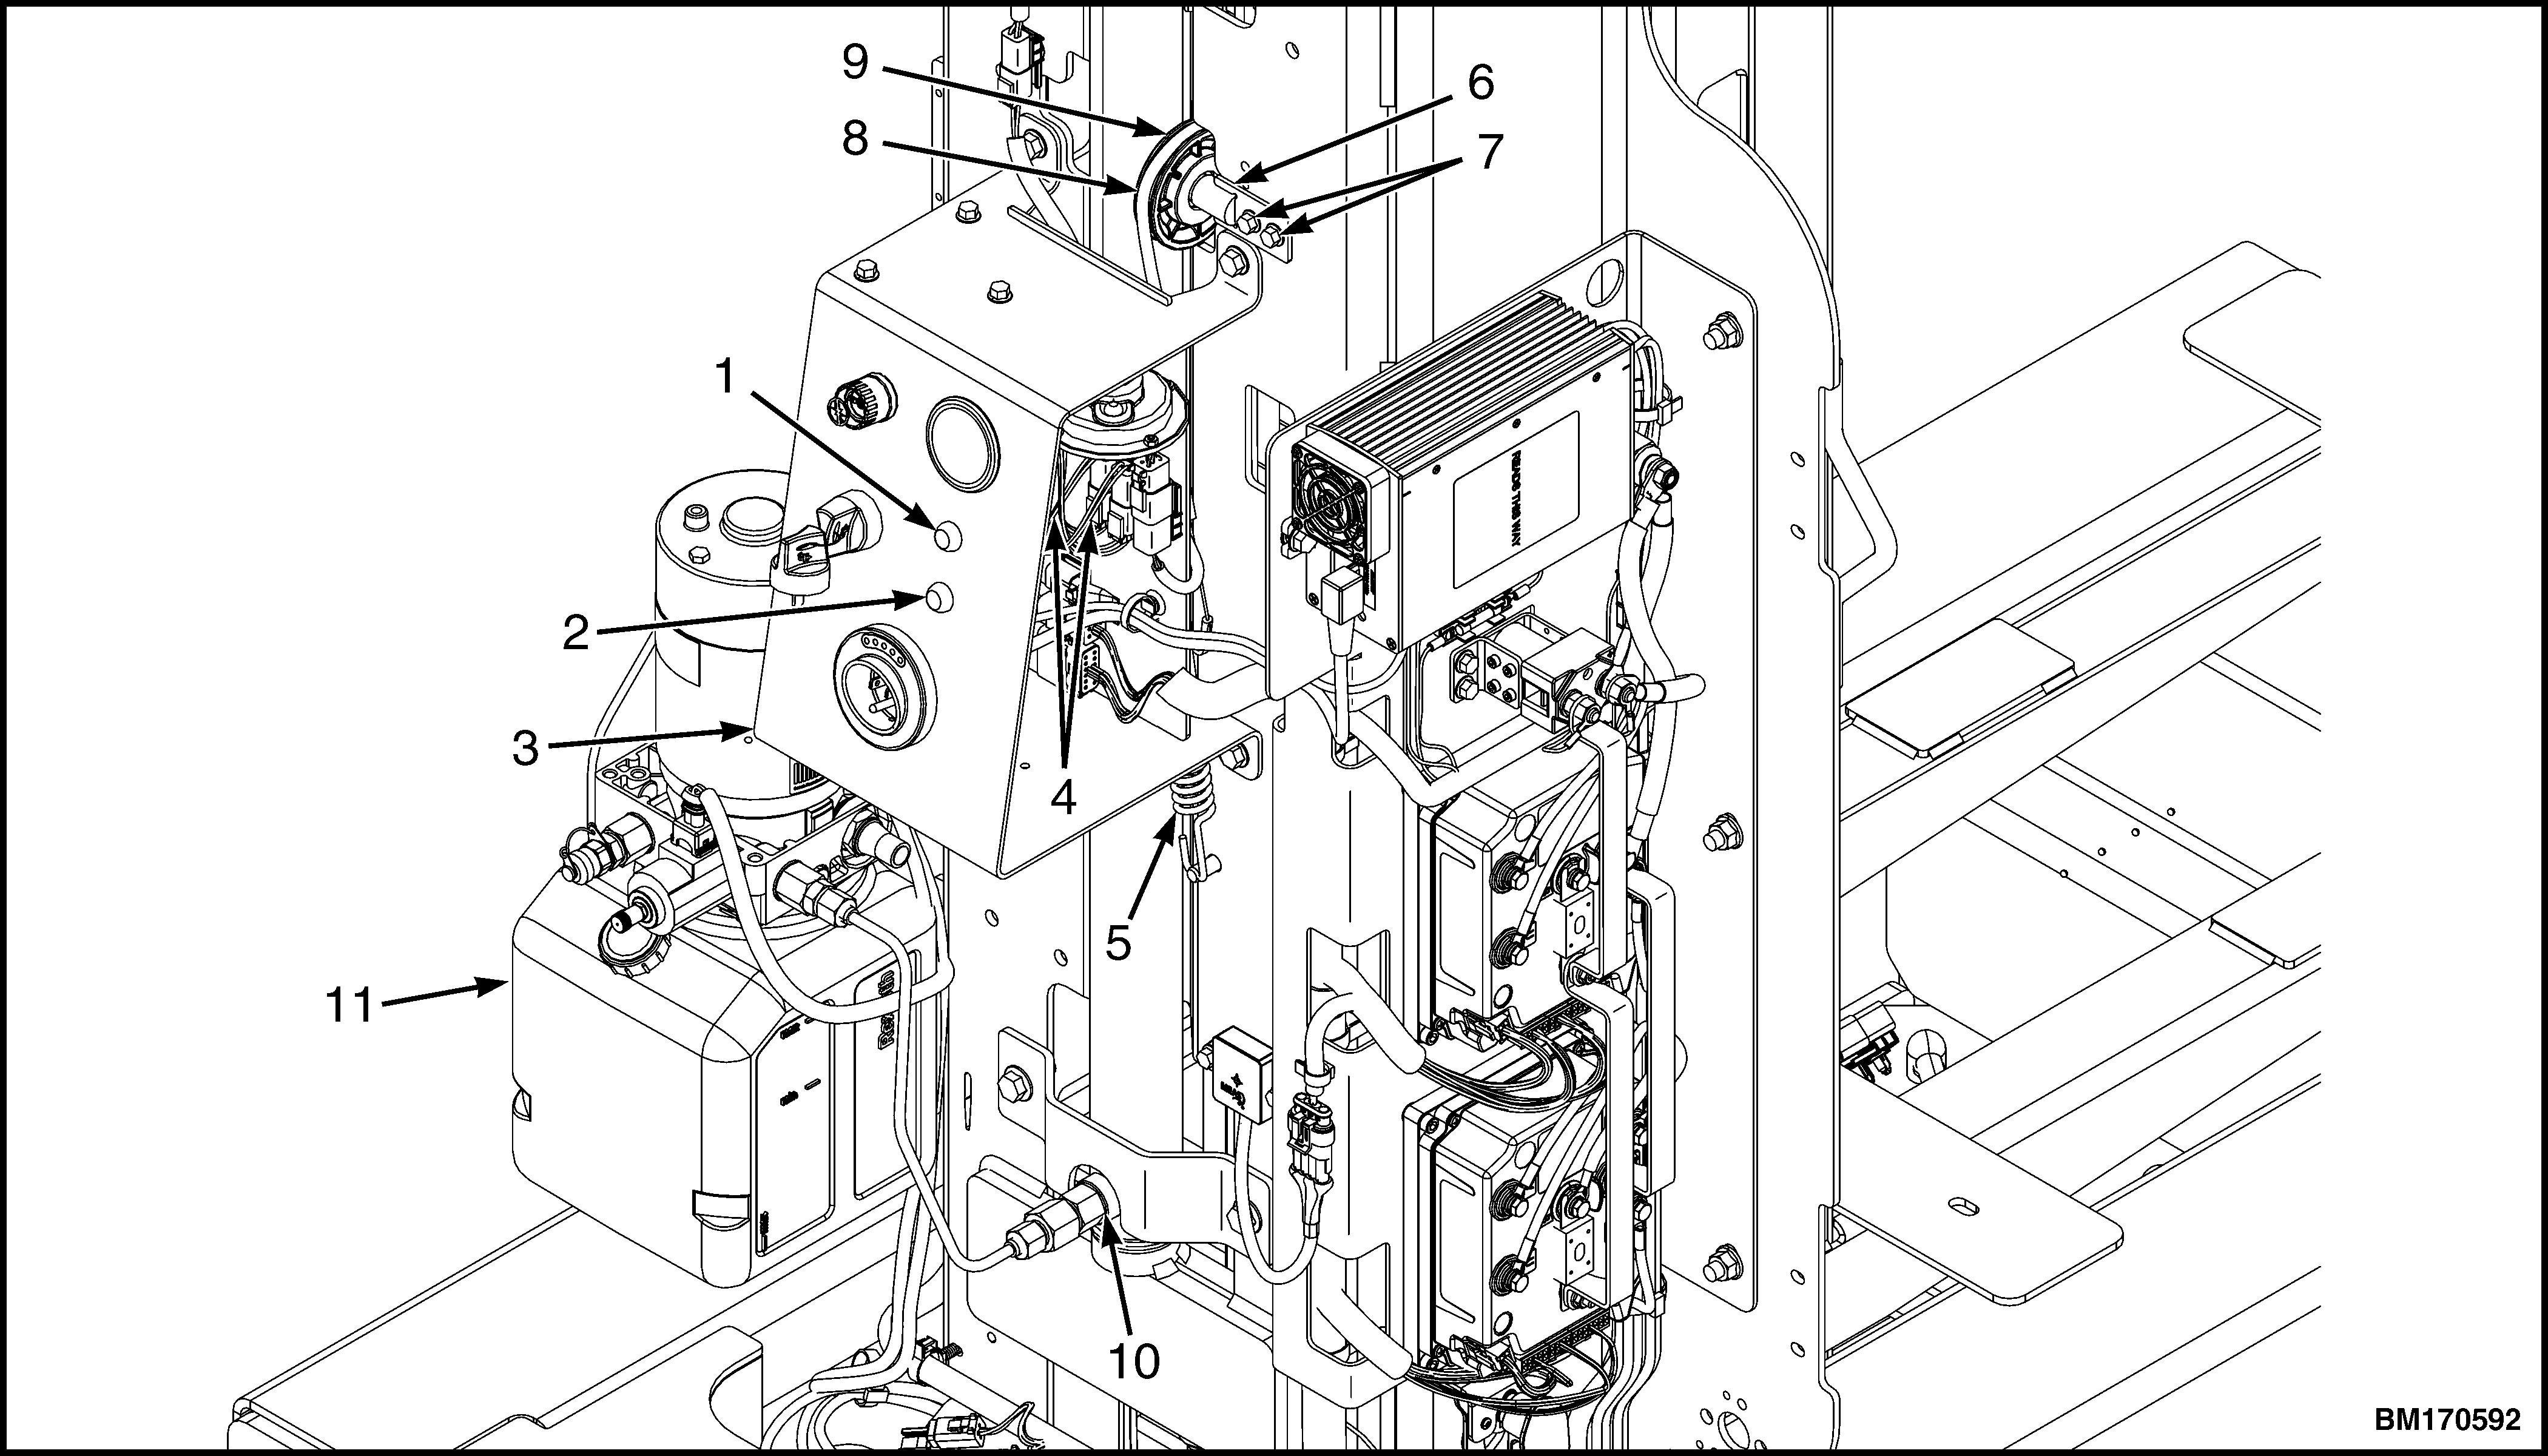
1. LIFT BUTTON 2. LOWER BUTTON 3. LOWER CONTROL PANEL 4. MAST SIGNAL CABLE 5. SPRING 6. BRACKET
7. CAPSCREWS 8. WIRE HARNESS CABLE 9. ROUND BELT PULLEY 10. HYDRAULIC TUBE CONNECTION (EXCESS FLOW PROTECTOR) 11. HYDRAULIC TANK
Figure 7. Mast Tensioning System and Signal Cable
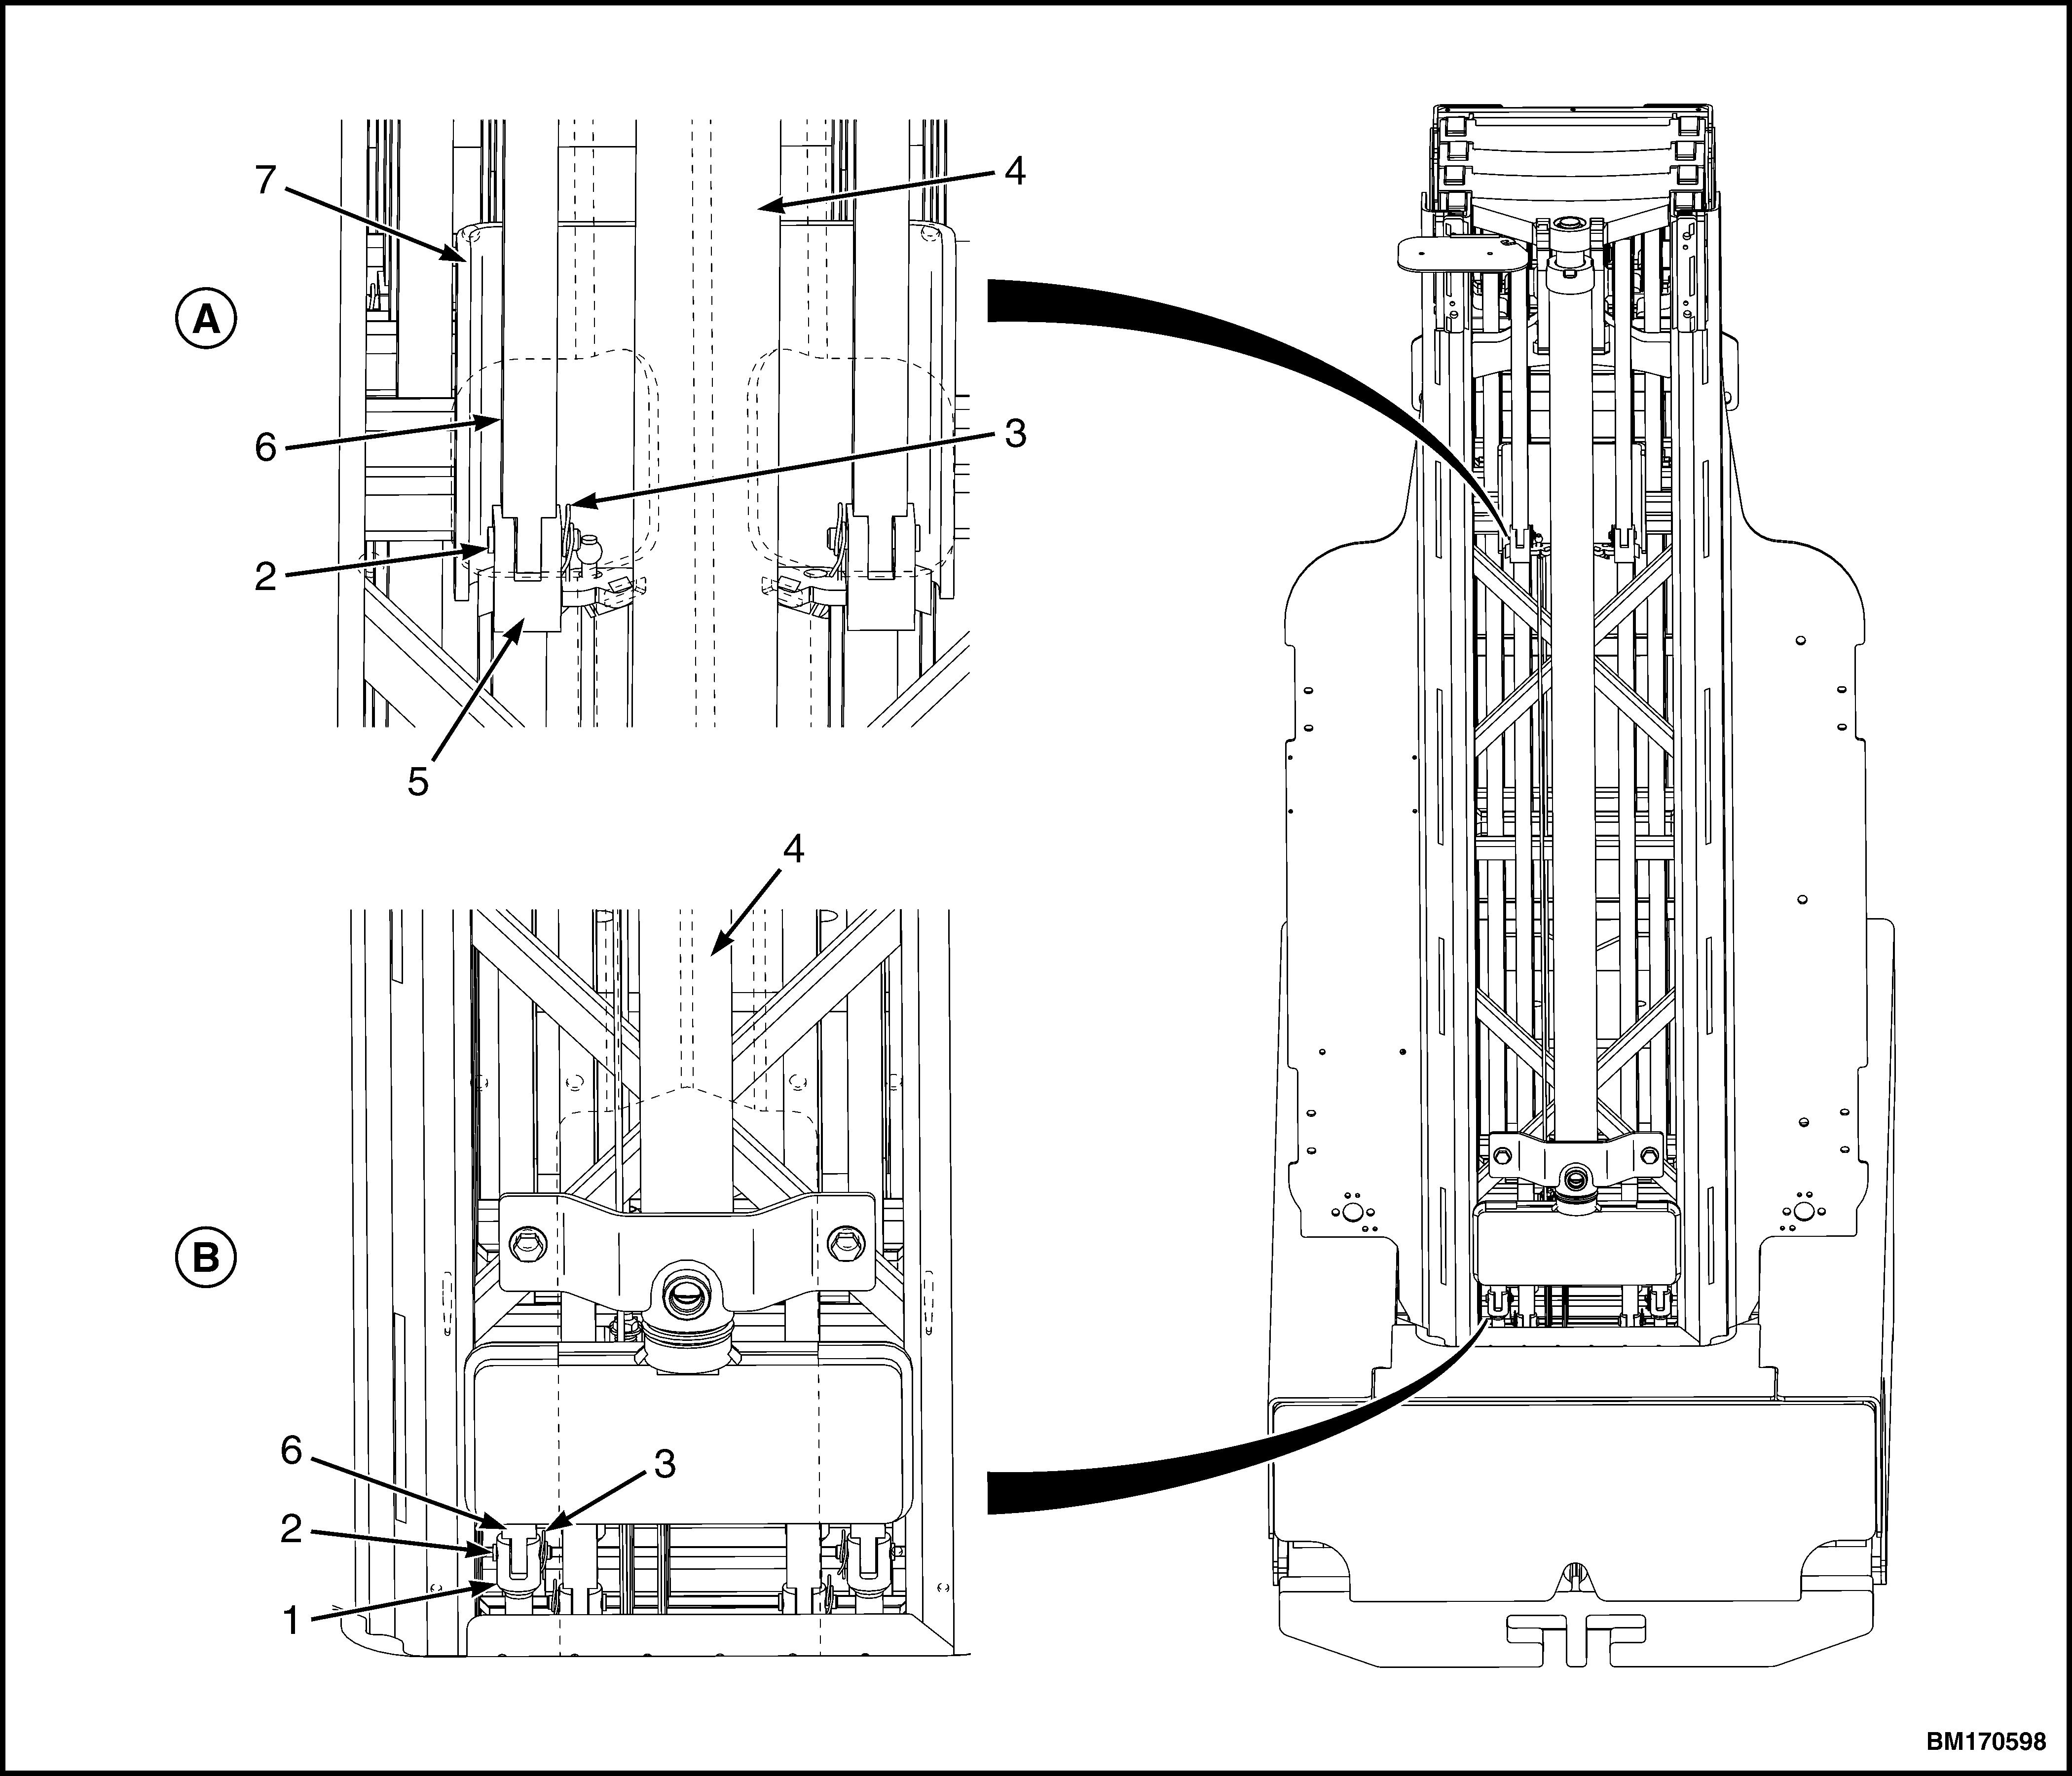
A. TOP OF MAST 1. CHAIN ANCHOR 2. CHAIN ANCHOR PIN 3. COTTER PIN 4. LIFT CYLINDER B. BOTTOM OF MAST 5. CHAIN RETAINER BLOCK 6. LIFT CHAIN 7. SAIL COVER BRACKET
Figure 8. Disconnecting First Set of Lift Chains
A. OUTSIDE VIEW 1. MAST SLIDER BLOCKS 2. SETSCREWS B. INSIDE VIEW 3. SELF-TAPPING SCREWS
Figure 9. Mast Slider Blocks Removal
NOTE: SOME COMPONENTS OF MAST OMITTED FOR CLARITY. NOTE: IN ILLUSTRATION B, TOP VIEW OF MAST, CHAIN ANCHOR PINS MUST FACE OUTBOARD SIDE OF MAST DURING INSTALLATION, AS SHOWN ABOVE. A. BOTTOM VIEW OF MAST B. TOP VIEW OF MAST
1. COTTER PIN 2. CHAIN ANCHOR PIN 3. LIFT CHAIN 4. CHAIN ANCHOR 5. PIN 6. CHAIN RETAINER BLOCK 7. NUTS
Figure 10. Remove Cotter and Chain Anchor Pins and Disconnect Lift Chains
12. Remove two cotter pins and two chain anchor pins, and disconnect lift chains from chain retainer block at top of fourth intermediate mast weldment. See Figure 10.
13. Remove snap rings, washers, and bearings from cable pulley and chain sheaves on top of fourth intermediate mast weldment. Remove cable pulley and chain sheaves from stubshafts. See
Figure 11.
14. Remove snap ring, two washers and cable pulley from bottom of fourth intermediate mast weldment. See Figure 11.
15. Using lifting device, lift fourth intermediate mast weldment up and slide it off of third intermediate mast weldment.
16. Remove nut, spring, and washer from second phasing cables. See Figure 5.
17. Remove second phasing cable from bracket on third intermediate mast weldment. See Figure 5.
18. Remove self-tapping screws, setscrews, and mast slider blocks from top and bottom of third intermediate mast weldment. See Figure 9.
19. Remove two cotter pins and two chain anchor pins, and disconnect lift chains from bottom of third intermediate mast weldment. See Figure 10.
20. Remove two pins and four nuts from bottom of chain anchors. Remove chain anchors from chain retainer blocks on third intermediate mast weldment. See Figure 10.
21. Remove two cotter pins and two chain anchor pins, and disconnect lift chains from chain retainer block at top of third intermediate mast weldment. See Figure 10.
22. Remove snap rings, washers, and bearings from cable pulley and chain sheaves on top of third intermediate mast weldment. Remove cable pulley and chain sheaves from stubshafts. See
Figure 11.
23. Remove snap ring, two washers and cable pulley from bottom of third intermediate mast weldment. See Figure 11. 24. Using lifting device, lift third intermediate mast weldment up and slide it off of second intermediate mast weldment.
25. Remove self-tapping screws, setscrews, and mast slider blocks from top and bottom of second intermediate mast weldment. See Figure 9
26. Remove two cotter pins and two chain anchor pins, and disconnect lift chains from bottom of second intermediate mast weldment. See Figure 10.
27. Remove two pins and four nuts from bottom of chain anchors. Remove chain anchors from chain retainer blocks on second intermediate mast weldment. See Figure 10.
28. Remove two cotter pins and two chain anchor pins, and disconnect lift chains from chain retainer block at top of second intermediate mast weldment. See Figure 10.
29. Remove snap rings, washers, and bearings from cable pulley and chain sheaves on top of second intermediate mast weldment. Remove cable pulley and chain sheaves from stubshafts. See
Figure 11.
30. Remove snap ring, two washers and cable pulley from bottom of second intermediate mast weldment. See Figure 11.
31. Using lifting device, lift second intermediate mast weldment up and slide it off of first intermediate mast weldment.
32. Remove snap rings, washers, and bearings from cable pulley and chain sheaves on top of first intermediate mast weldment. Remove cable pulley and chain sheaves from stubshafts. See
Figure 11.
33. Remove snap rings, washers and cable pulleys from bottom of first intermediate mast weldment. See Figure 11
34. Remove self-tapping screws, setscrews, and slider blocks from top and bottom of carriage weldment. See Figure 9.
35. If lift cylinder needs to be removed from first intermediate mast weldment for repair, see the
Lift Cylinder Repair manual listed in the
General section of this manual.
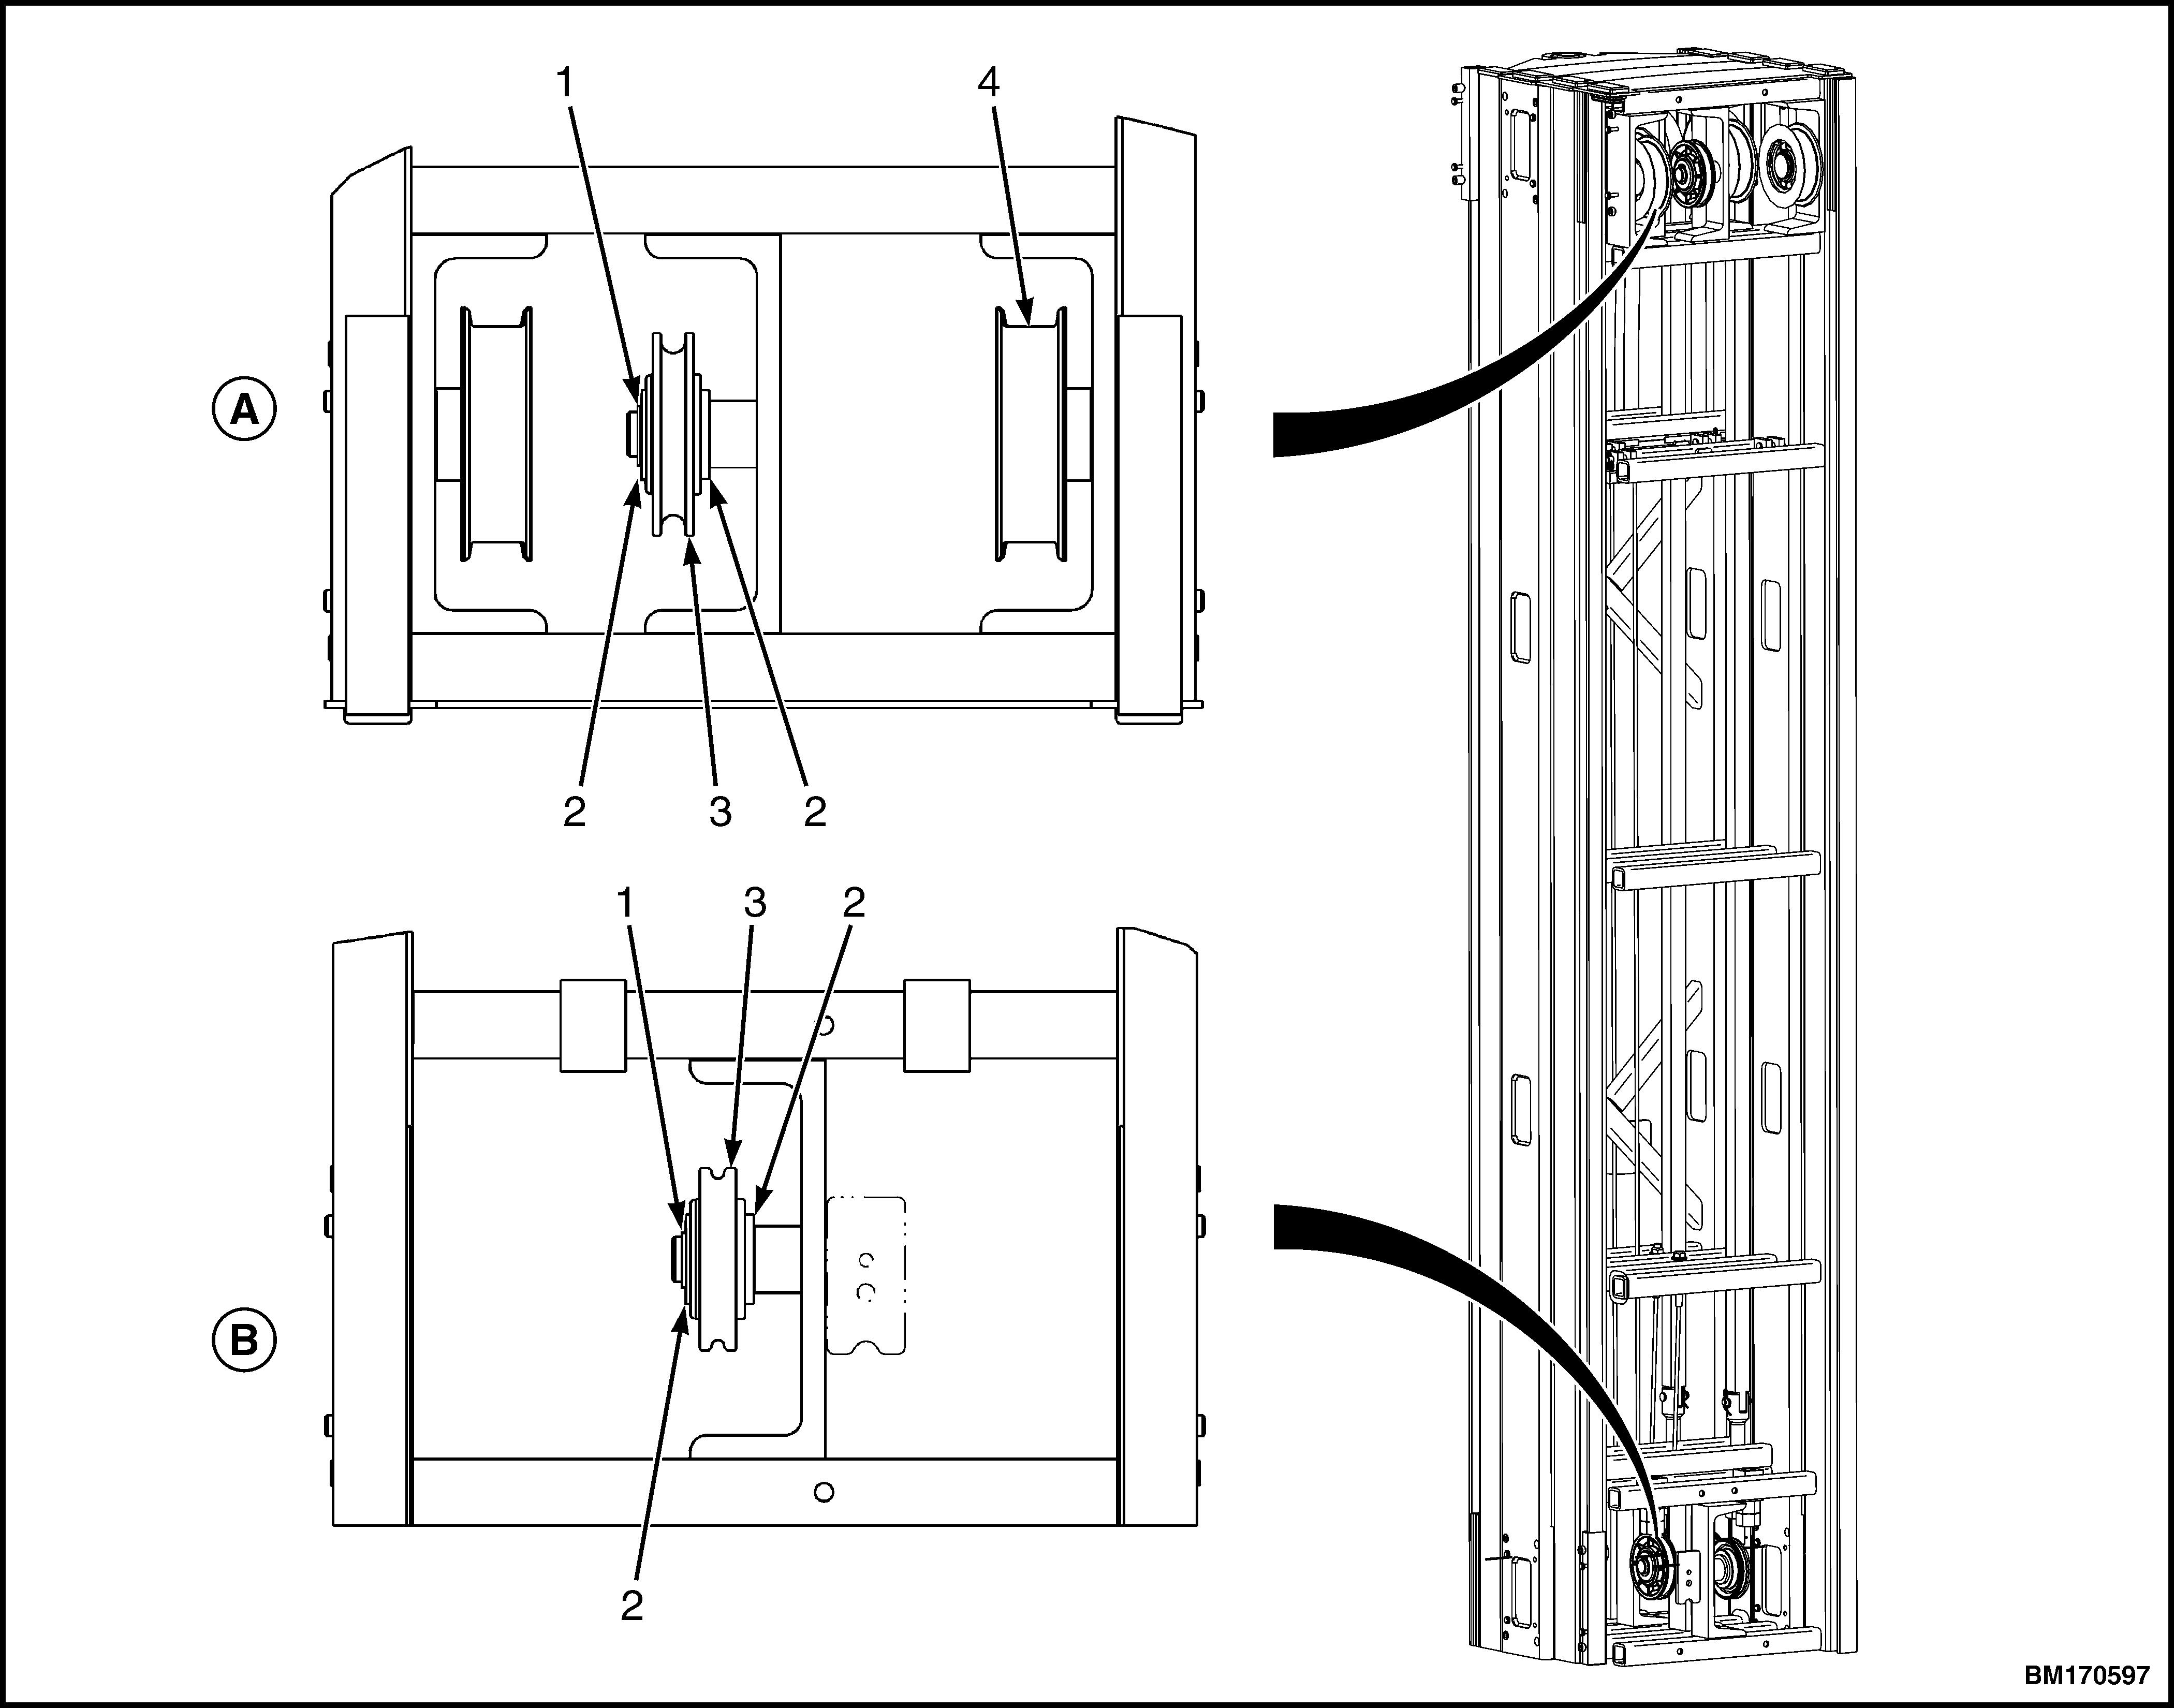
NOTE: CHAIN SHEAVES AND CABLE PULLEY ON FOURTH INTERMEDIATE MAST WELDMENT SHOWN. CHAIN SHEAVES AND CABLE PULLEYS ON ALL OTHER INTERMEDIATE MAST WELDMENTS ARE SIMILAR. A. TOP OF MAST 1. SNAP RING 2. WASHER B. BOTTOM OF MAST 3. CABLE PULLEY 4. CHAIN SHEAVE ASSEMBLY (SHEAVE, SNAP RING, AND BEARING)
