6 minute read
Set Up for Online Banking

Click Banking on the navigation bar.
Click Add account.
Advertisement
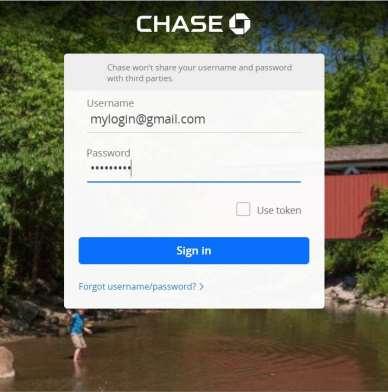
Enter your bank name or online banking URL, or select from a list of popular banks.

Enter the login information you use to access your account on your bank’s website.
Click Sign in.
Click the drop-down list next to each account you want to connect and select the bank or credit card account on your chart of accounts.
Click Connect.
The OnlineBanking Center
Connect Your Accounts
If you connect your bank account, you’ll be able to download previous transactions into your banking center. Future transactions in your bank account will be automatically downloaded into your QuickBooks Banking Center.
The Online Banking Center
After you’ve connected your bank account to QuickBooks, you’re ready to update QuickBooks with new bank activity. You manage this process through the Online Banking Center.
Note: Each connected account shows a Bank Balance and an In QuickBooks balance. These balances will often differ from each other as the Bank Balance is based on transactions that have cleared the bank account, and the QuickBooks Balance is based only on transactions that have been recorded in QuickBooks.
Online Banking Center Processes
The Bank and Credit Cards page is where you perform all your online banking tasks.
• File upload
Click File upload to upload a list of transactions from your bank. Note that you won’t need to do this if you choose to connect your bank to QuickBooks.
• Link account
Click Link account to connect a new account to QuickBooks.
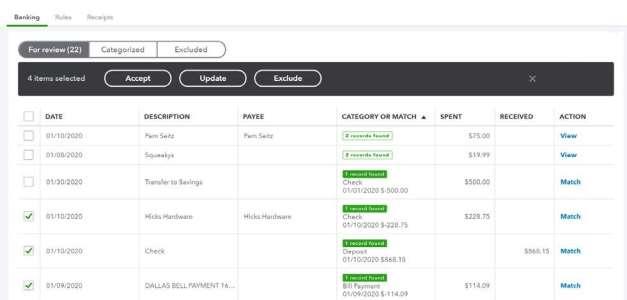
• For Review
The For Review tab lists transactions downloaded from your bank that haven’t been added or matched to existing transactions in QuickBooks. Until these transactions are added or matched, they have no impact on your accounting records.
• Categorized
The Categorized tab lists transactions you have matched or added to QuickBooks. This tab does NOT show transactions that you manually entered into QuickBooks.
• Excluded
The Excluded tab lists transactions you have chosen to exclude, such as duplicate transactions or transaction history you don’t need in QuickBooks. You can undo this action at any time.
Open the Online Banking Center
Click Banking on the navigation bar. Select an account from the top of the page.
Manage Downloaded Transactions
There are two types of downloaded transactions: ones that you have already entered into QuickBooks, and ones that have not been entered into QuickBooks.
Match- Transactions that you’ve already entered need to be verified or ‘matched’ to the downloaded expense. If QuickBooks finds that you’ve already entered something that it has downloaded, you’ll see “Match” or “View” as an option. By matching a downloaded transaction with something you’ve already entered, you ensure that the transaction is not entered twice. QuickBooks attaches the downloaded version to the version you’ve already entered.
View- If QuickBooks finds that you’ve already entered two or more transactions like the bank transaction you’ve downloaded, you’ll need to choose the exact transaction which is a match. The non-selected transaction(s) will remain in the Online Banking center until action is taken on that remaining transaction.

Review/Match Downloaded Transactions (Already Entered)
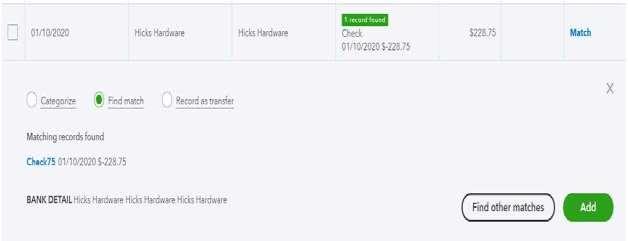
On the For Review tab, select a transaction to match. Select the appropriate match, or click Find match if the transaction was not matched correctly.
Click Match.
Batch Accept Downloaded Transactions (Already Entered)
On the For Review tab, select all matched transactions. Check the box to the left of the desired transactions and select Accept.
Add Downloaded Transactions (Not Already Entered)
New transactions that you haven’t recorded in QuickBooks yet can be “added,” which means that QuickBooks creates a new transaction for you based on the downloaded information and the information that you add into the transaction, specifically the Who, When, What and How Much. Sort the list by the column headers to help organize your work.
When dealing with a new transaction, you’ll see the date it cleared the bank (the When), how much money it was for (the HowMuch), and something called the Bank Detail, which is usually who you paid (the Who). QuickBooks cannot download the reason Why you spent the money, so you must enter the category, or account, as an explanation to QuickBooks for why the money was spent or received. In doing so, you’ll be able to track why you spent or received the money later on your financial statements.
On the For Review tab, select a transaction to add.
Correct or enter an appropriate name (optional) and account category.
Recognized Transactions
As you add information to downloaded transactions, QuickBooks ‘remembers’ the accounts and names you’ve added to previous transactions, and prefills some of this information for you. These transactions are listed together on the Recognized list. You can batch add these recognized transactions to save time.

What Gets Downloaded
You might be wondering why you would need to manually add anything into QuickBooks if your transactions are already downloaded from your connected bank account. Since online banking makes it so easy to enter transactions, it’s tempting to rely on it to record all of your transactions. However, there are some transactions that cannot be downloaded from the bank that you still need to enter manually. If you want QuickBooks to print a check, or if you want to record more specific products and services a customer purchased from you, you’ll need to enter in those details through a manually entered transaction.
Transactions You Add Through Online Banking
• Receive Payment (should still be entered manually if it applies to multiple invoices, or was deposited with other payments)
• Expenses
• Bill Payments (if a bill was paid with a check, it should still be entered manually)
• Credit Card Credit
• Transfers
Transactions You Enter Manually
• Invoices
• Estimates
• Credit Memos
• Sales Receipts
• Refund Receipts
• Delayed Credits
• Delayed Charges
• Checks
• Bills
• Purchase Orders
• Vendor Credits
• Paychecks and Timesheets (third party payroll can sometimes be downloaded as an expense)
• Deposits
Manage Downloaded Deposits
Deposits you make at the bank can be added through online banking if they’re deposits for a single transaction. For example, a refund from a vendor. But if a deposit you make at the bank is for a batch of transactions, such as customer payments on invoices, you should still record it manually in QuickBooks.
When you receive a refund from a vendor, this effectively reduces the expense you incurred with that vendor. When the refund is downloaded from the bank, select the expense account you used on the original expense with the vendor to reduce your expense account balance on your financial statement.
Review/Add Downloaded Deposits (Not Entered)
On the For Review tab, select the deposit.
(Optional) Add a vendor name.
In the Category field, select the appropriate income or expense account. Click Add.

Add Split Transactions
When an expense is downloaded that needs more than one expense account associated with it, you can do this with the Split option.
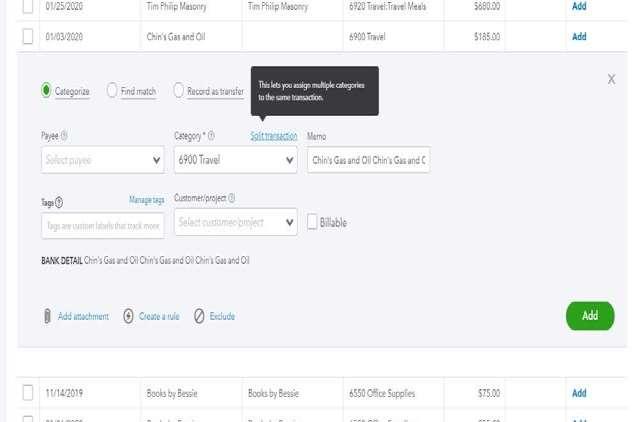
Review/Add Split Transactions

On the For Review tab, select the transaction. Click Split Transaction.
(Optional) Add a payee name.
On the first line, select an appropriate account.
On the following lines, select the appropriate expense accounts, and enter the appropriate amounts (click Add lines if necessary). Click Save and add.
Exclude Transactions
You can exclude downloaded transactions such as duplicates or transactions that took place before when you chose to start tracking an account.
Reasons to Exclude Transactions
If you are connecting an account you have used manually in QuickBooks Online and are now starting to download transactions from your bank and transactions you’ve already reconciled appear in the Banking Center
If the bank sent the transaction more than once.
If the transaction happened before the starting date/balance for the account. In other words, if it happened before the “As of” date that you entered for the account as you set it up.
Exclude New Transactions
On the For Review tab, click the box next to transactions to exclude. Click Exclude.

Transfers
Transfers are financial transactions that represent you moving money from one bank account to another. They can be downloaded and added to QuickBooks without entering them manually first. If you transfer money between two bank accounts that you’ve connected to download transactions, then you only need to Add the transfer for one account, and then Match it for the other.
Add Transfers
On the For Review tab, select the transfer.
In the Category field, select the account the money came from (if this is an increase in the bank account) or the account the money went to (if this is a decrease in the bank account).
Click Add.
Credit Card Payments
If you pay your credit card balance online or with your debit card, those payments will be downloaded to the banking center.
Add Credit CardPayments
On the For Review tab, select the credit card payment.
(Optional) Click the Payee drop-down and select a payee. In the Category field, select the credit card account to apply the payment towards. Click Add.
Note: If you have your credit card account connected as well, once you Add the transaction for the bank account, it will show up as a Match on the credit card account.