S T U D E N T- L E D C O N F E R E N C E S · T E AC H E R G U I D E
Set your students up to lead
Digital portfolios provide ongoing evidence of student learning. When students curate their own work, this builds healthy reflection and goalsetting routines!
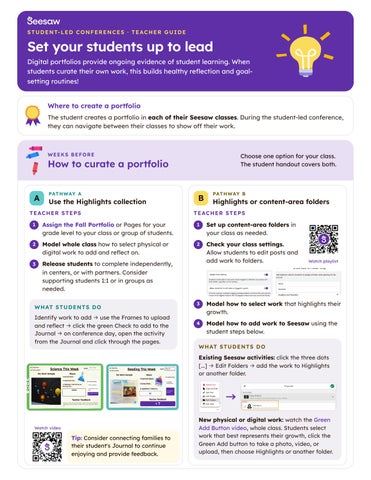
Where to create a portfolio The student creates a portfolio in each of their Seesaw classes. During the student-led conference, they can navigate between their classes to show off their work.
W E E KS B E FO R E
Choose one option for your class. The student handout covers both.
How to curate a portfolio PAT H WAY A
PAT H WAY B
A Use the Highlights collection
B Highlights or content-area folders
TEACHER STEPS
TEACHER STEPS
1
Assign the Fall Portfolio or Pages for your grade level to your class or group of students.
1
Set up content-area folders in your class as needed.
2
Model whole class how to select physical or digital work to add and reflect on.
2
3
Release students to complete independently, in centers, or with partners. Consider supporting students 1:1 or in groups as needed.
Check your class settings. Allow students to edit posts and add work to folders.
WHAT STUDENTS DO
→
Identify work to add use the Frames to upload and reflect click the green Check to add to the Journal on conference day, open the activity from the Journal and click through the pages.
→
→
Watch playlist
3
Model how to select work that highlights their growth.
4
Model how to add work to Seesaw using the student steps below.
WHAT STUDENTS DO
Existing Seesaw activities: click the three dots [...] Edit Folders add the work to Highlights or another folder.
→
Watch video
Tip: Consider connecting families to their student's Journal to continue enjoying and provide feedback.
→
New physical or digital work: watch the Green Add Button video, whole class. Students select work that best represents their growth, click the Green Add button to take a photo, video, or upload, then choose Highlights or another folder.
H OW TO S U P P O RT S T U D E N T- L E D C O N F E R E N C E S
Before, during, and after 1
DAYS B E FO R E
Before the conference Create physical or digital invitations for students to share with their guests. Remind guests that the student is leading, and that feedback and questions are appreciated at the end.
Provide paper and writing utensils so guests can take notes during the presentation.
Organize the space so guests can clearly see the student and the computer.
Have students practice logging into Seesaw and opening their Journal(s) ahead of time.
Tip: Practice presenting helps to reduce the nervous jitters!
2
C O N F E R E N C E DAY
During the conference Remind students to take a deep breath and smile. Remind them to look up. As they show their work in Seesaw, students should occasionally look up at their guests. At the end, ask guests to share their feedback and questions.
E N C O U R AG E S T U D E N T S TO S H A R E
Why they chose each activity. Was it their favorite, or did it challenge them? Their next goals and how they may work towards them. A request for support. Remind students to ask their guests to support them.
Tip: Consider creating a goal sheet to document plans to work towards each goal throughout the year. The student handout includes one.
3
AFTER
After the conference Help students reflect on how their presentation went. This could be a class discussion or an individual exit ticket.
Encourage students to write down their goals and plans. Throughout the year, check in on how they are progressing.
Pair this guide with the student handout. Students check off the same steps as they build their portfolio, get ready, lead, and reflect.