
16 minute read
Creating a Deep Cleaning Checklist

Maintaining a clean and hygienic environment is crucial for the success of any pub. Deep cleaning plays a vital role in keeping your establishment fresh, presentable, and safe for both customers and staff. To ensure a comprehensive deep cleaning process, it's helpful to create a checklist that covers all the important tasks specific to a pub setting. In this article, we will guide you through the process of creating a deep cleaning checklist for your pub, ensuring that no area is overlooked during the cleaning process.
Assess Your Pub
Before creating a deep cleaning checklist, take some time to assess your pub thoroughly Walk through each area and identify the specific cleaning challenges and areas that require deep cleaning attention. This assessment will help you understand the unique cleaning needs of your pub and ensure that your checklist covers all the necessary tasks.
Break Down the Areas
Divide your pub into different areas or zones to facilitate effective cleaning. This can include the bar area, dining areas, restrooms, kitchen, outdoor seating, and any other specific spaces within your establishment. By breaking down the areas, you can focus on one section at a time, ensuring that all areas receive the necessary deep cleaning attention.
Identify Deep Cleaning Tasks
Identify the deep cleaning tasks that need to be performed in each area of your pub. These tasks will go beyond the regular cleaning routines and target areas that may accumulate dirt, grime, or odors over time. Some common deep cleaning tasks for a pub include:

1. Bar Area:
● Thoroughly clean and sanitize the bar counter and surface.
● Clean and polish bar equipment, including taps, glassware, and utensils.
● Deep clean refrigeration units and remove any spills or residue.
● Clean and disinfect bar stools, footrests, and other seating areas.
2. Dining Areas:
● Vacuum and deep clean carpets or mop and polish hard floors.
● Clean and sanitize tables, chairs, and booth seating.
● Dust and clean light fixtures, ceiling fans, and decorative items.
● Spot clean or deep clean upholstery on chairs and booth seating.
3. Restrooms:
● Clean and sanitize toilets, urinals, sinks, and countertops.
● Wipe down mirrors and glass surfaces.
● Refill soap dispensers, hand dryers, and toilet paper holders.
● Clean and disinfect door handles, light switches, and other high-touch surfaces.
4. Kitchen:
● Deep clean and degrease cooking equipment, including ovens, grills, and fryers.
● Clean and sanitize food preparation areas, countertops, and cutting boards.
● Empty and clean out refrigerators, freezers, and storage areas.
● Scrub floors and drains to remove any buildup.
5. Outdoor Seating:
● Sweep and hose down outdoor seating areas.
● Clean and wipe down tables, chairs, and umbrellas.
● Remove any debris or trash from the outdoor space.
● Check and clean outdoor lighting fixtures.
Customize the Checklist
Once you have identified the deep cleaning tasks for each area, create a customized checklist that outlines them. Consider the frequency of each task, whether it's a daily, weekly, monthly, or quarterly task, and allocate sufficient time and resources accordingly Regularly review and update the checklist to ensure that it remains relevant and effective in meeting your pub's deep cleaning needs.
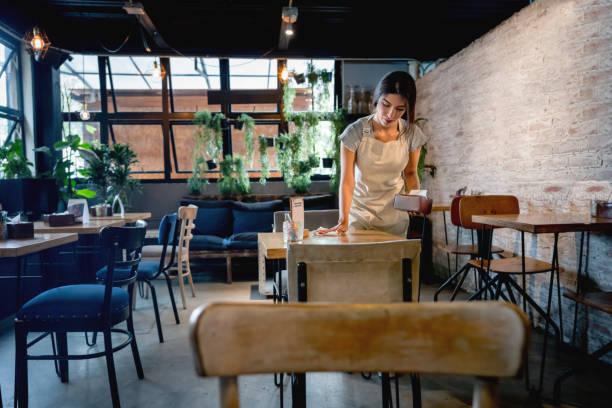
Deep Cleaning the Bar Area
The bar area is the heart of any pub, and keeping it clean and well-maintained is crucial for creating a pleasant and inviting atmosphere for your customers. Regular deep cleaning of the bar area helps ensure that it remains hygienic, presentable, and in compliance with health and safety regulations. In this article, we will guide you through the process of deep cleaning the bar area, covering essential tasks and tips to achieve a thorough and effective cleaning routine.

1. Clear and Organize
Start by clearing the bar area of any clutter, empty bottles, or unnecessary items. Remove glassware, utensils, and bar tools from the counter and organize them in designated storage areas. This step allows for easy access to surfaces and ensures a clean and organized workspace for the deep cleaning process.
2. Clean and Sanitize the Bar Counter
Thoroughly clean and sanitize the bar counter using an appropriate cleaning solution. Remove any spilled drinks, sticky residue, or debris. Pay special attention to areas where glasses, bottles, or other items are placed frequently Use a microfiber cloth or a bar towel to wipe down the counter, ensuring all surfaces are clean and free of bacteria or germs.
3. Polish Glassware and Utensils
Clean and polish glassware, utensils, and bar tools to maintain their shine and hygiene. Wash glassware using hot soapy water or a dishwasher, following proper hygiene practices. Inspect each glass for any residue or spots, and polish them using a lint-free cloth or a glass polishing cloth. Similarly, clean and sanitize utensils and bar tools, ensuring they are free from any dirt or contaminants.
4. Deep Clean Bar Equipment
Take time to deep clean the various bar equipment, including taps, beer lines, coffee machines, and blender heads. Follow the manufacturer's instructions for cleaning each specific piece of equipment. Use appropriate cleaning solutions or sanitizers to remove any buildup, grime, or bacteria that may accumulate over time. Regular deep cleaning of bar equipment not only ensures their longevity but also helps maintain the quality and taste of the beverages served.
5. Clean and Sanitize Bar Stools and Seating

Wipe down and sanitize bar stools and seating areas regularly. Use a mild cleaning solution appropriate for the material of the stools, such as wood or metal. Pay attention to any stains or spills, and address them promptly. Disinfect the seating surfaces to maintain cleanliness and promote a hygienic environment for your customers.
6. Maintain a Clean Back Bar
The back bar area often houses a variety of bottles, glassware, and other bar essentials. Regularly clean and organize this area to maintain a neat and presentable appearance. Dust the shelves, wipe down bottles, and discard any expired or damaged items. Keeping the back bar clean and organized enhances the overall aesthetics of the bar area.
7. Pay Attention to Glassware Storage
Ensure that the storage area for glassware is clean and well-maintained. Clean the shelves or cabinets where glassware is stored, removing any dust, spills, or debris. Regularly inspect glassware for chips or cracks, and replace any damaged items. Proper storage of glassware helps prevent contamination and ensures the glasses are ready for use at any time.
Refreshing the Dining and Seating Areas
The dining and seating areas of your pub play a significant role in creating a comfortable and enjoyable experience for your customers. Regularly refreshing these areas helps maintain cleanliness, visual appeal, and a welcoming ambiance. In this article, we will guide you through the process of refreshing the dining and seating areas of your pub, covering essential tasks and tips to create an inviting atmosphere for your patrons.
1. Clear and Declutter
Start by clearing the dining and seating areas of any unnecessary items, such as empty glasses, plates, or napkins. Remove any clutter that may have accumulated on tables, such as condiments, menus, or promotional materials. Clearing the area provides a clean canvas for refreshing the space and allows for easy access to surfaces.
2. Wipe Down and Disinfect Surfaces
Thoroughly wipe down and disinfect all surfaces in the dining and seating areas. This includes tables, chairs, booth seats, bar tops, and any other furniture or fixtures. Use a suitable cleaning solution to remove dirt, stains, and bacteria. Pay attention to high-touch areas, such as table edges, chair arms, and seat backs. Regular disinfection helps maintain a hygienic environment for your customers.
3. Deep Clean Upholstery and Fabrics
If your pub has upholstery or fabric-covered seating, deep clean these areas regularly to keep them fresh and inviting. Vacuum the upholstery to remove loose dirt and debris. Treat any stains or spills promptly using appropriate cleaning products or methods recommended for the fabric type. Consider professional upholstery cleaning periodically to ensure a thorough and effective deep cleaning process.
4. Refresh Table Settings
Refresh the table settings by replacing tablecloths, napkins, and tableware as needed. Ensure that tablecloths are clean, wrinkle-free, and properly sized for each table. Fold napkins neatly or use napkin holders for a polished appearance. Check tableware, such as cutlery and glassware, for cleanliness and replace any damaged or worn items. Well-presented table settings contribute to the overall aesthetic of the dining area.

5. Enhance Lighting and Ambiance
Evaluate the lighting in the dining and seating areas and make necessary adjustments to enhance the ambiance. Ensure that bulbs are working correctly and provide sufficient illumination without being too harsh or dim. Consider incorporating additional lighting elements, such as decorative lamps or candles, to create a warm and inviting atmosphere. Proper lighting sets the mood and adds to the overall dining experience.
6. Decorate and Personalize
Consider adding decorative elements or personal touches to the dining and seating areas to make them visually appealing and unique. This could include artwork, plants, or themed decor that aligns with your pub's style or seasonal themes. Personalizing the space adds character and creates a memorable experience for your customers.
7. Regular Maintenance

In addition to regular refreshing, ongoing maintenance is essential to keep the dining and seating areas in top condition. Conduct regular inspections for any repairs or maintenance needs, such as loose chair legs, wobbly tables, or damaged upholstery. Address these issues promptly to ensure a safe and comfortable environment for your customers.
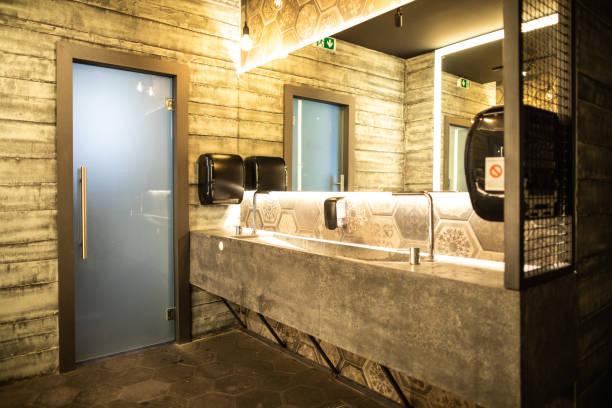
Revitalizing Restrooms and Sanitary Facilities
Restrooms and sanitary facilities are essential areas of any establishment, including pubs, that require regular attention and maintenance. A clean and well-maintained restroom not only ensures the comfort and satisfaction of your patrons but also reflects the overall hygiene standards of your pub. In this article, we will explore effective strategies for revitalizing restrooms and sanitary facilities, providing a fresh and pleasant experience for your customers.
1. Deep Cleaning
Begin the revitalization process by conducting a thorough deep cleaning of the restroom. This includes scrubbing and disinfecting all surfaces, such as sinks, toilets, urinals, countertops, and floors. Pay special attention to high-touch areas, such as door handles, faucets, and dispensers. Use appropriate cleaning agents to remove stains, eliminate odors, and sanitize the space. Regular deep cleaning ensures a hygienic and inviting restroom environment.
2. Restocking Supplies
Check and restock restroom supplies regularly to ensure they are always available for your customers. This includes toilet paper, paper towels, hand soap, and hand sanitizer
Keep an eye on the supply levels and replenish them promptly to avoid any inconvenience for restroom users. Additionally, make sure that all dispensers are in good working condition and provide easy access to the supplies.
3. Fixtures and Hardware Maintenance
Inspect and maintain restroom fixtures and hardware regularly to ensure they are functioning properly. Repair or replace any malfunctioning toilets, faucets, soap dispensers, or hand dryers. Check for leaks, loose fittings, or any other issues that may affect the functionality and appearance of the restroom. Well-maintained fixtures contribute to a positive restroom experience for your customers.
4. Freshen Up the Atmosphere
Implement strategies to freshen up the restroom atmosphere and eliminate any unpleasant odors. Use air fresheners or odor-neutralizing products to keep the air smelling clean and pleasant. Consider using automatic air fresheners that release fragrance periodically to maintain a fresh scent throughout the day. Regular ventilation and proper airflow are also crucial in preventing stagnant air and promoting a more pleasant restroom environment.
5. Enhance the Visual Appeal
Enhance the visual appeal of the restroom by paying attention to the aesthetics. Ensure that the restroom is well-lit with adequate lighting that creates a bright and welcoming atmosphere. Keep the walls and ceilings clean, and consider adding decorative elements such as artwork or mirrors to add visual interest. Use coordinated colors and quality finishes to create a cohesive and appealing restroom design.
6. Regular Inspection and Maintenance
Establish a regular inspection and maintenance routine for your restrooms to address any issues promptly. Regularly check for plumbing problems, leaks, broken fixtures, or any other maintenance needs. This proactive approach helps prevent potential problems from escalating and ensures that your restrooms remain in optimal condition for your customers' comfort and satisfaction.
7. Communication and Feedback
Encourage open communication with your customers regarding the restroom facilities. Display signs or reminders that encourage proper hygiene practices, such as handwashing. Provide an easy way for customers to provide feedback or report any concerns about the restroom's cleanliness or functionality. Actively address customer feedback to continuously improve the restroom experience.
Tackling Kitchen Deep Cleaning
The kitchen is the heart of any establishment, including pubs, where food is prepared and served. Keeping the kitchen clean and hygienic is crucial to ensure food safety and maintain a healthy environment for both staff and customers. Deep cleaning the kitchen on a regular basis is essential to remove grease, grime, and food residues that can accumulate over time. In this article, we will explore effective strategies for tackling kitchen deep cleaning, providing a pristine and sanitary space for food preparation.

1. Clearing and Organizing
Before starting the deep cleaning process, clear and organize the kitchen area. Remove all items from countertops, shelves, and storage areas. Properly store or discard any expired or unused ingredients, utensils, or equipment. This step allows for better access to surfaces and ensures that the cleaning process is thorough and efficient.
2. Degreasing Surfaces
Grease buildup is a common issue in kitchens, especially near cooking equipment and exhaust hoods. Use a degreaser to tackle stubborn grease stains on surfaces, such as countertops, stovetops, range hoods, and walls. Follow the product instructions and use appropriate cleaning tools, such as scrub brushes or scouring pads, to effectively remove the grease. Pay special attention to areas that are prone to accumulation, including behind equipment and in corners.
3. Deep Cleaning Appliances
Appliances in the kitchen, such as ovens, grills, fryers, and refrigerators, require thorough cleaning to remove food residues and prevent bacterial growth. Follow manufacturer's instructions for cleaning each appliance and use suitable cleaning agents. Take apart removable parts, such as oven racks or refrigerator shelves, and clean them separately Pay attention to hard-to-reach areas and ensure that all surfaces are properly sanitized.
4. Sanitizing Food Preparation Surfaces

Food preparation surfaces, including cutting boards, countertops, and sinks, must be sanitized to maintain food safety standards. Start by removing any loose debris or food particles. Use a food-safe sanitizer to disinfect the surfaces, ensuring that all areas come into contact with the sanitizer. Rinse the surfaces thoroughly and allow them to air dry. Regular sanitization of food preparation areas prevents cross-contamination and ensures the safety of the food prepared in your kitchen.
5. Deep Cleaning Floors
Kitchen floors can accumulate dirt, grease, and spills, making them prone to slips and falls. Begin by sweeping or vacuuming the floor to remove loose debris. Use a suitable floor cleaner or degreaser to thoroughly clean the floor, paying attention to corners and edges. Scrub the floor using a mop or scrub brush to remove any stubborn stains or residues. Rinse the floor with clean water and allow it to dry completely Regular deep cleaning of kitchen floors improves safety and maintains cleanliness in the working environment.
6. Cleaning Ventilation Systems
Proper ventilation is crucial in commercial kitchens to maintain air quality and remove cooking odors and airborne contaminants. Clean and maintain the ventilation system, including range hoods, filters, and exhaust ducts. Remove and clean or replace filters as needed to ensure proper airflow and prevent the accumulation of grease and debris. Regular maintenance of ventilation systems promotes a healthier kitchen environment and reduces the risk of fire hazards.
7. Regular Maintenance and Inspection
Establish a regular maintenance and inspection routine to address any issues promptly and prevent potential problems. Check for leaks, loose fittings, or malfunctioning equipment. Inspect and clean the kitchen on a regular basis, ensuring that deep cleaning is scheduled at appropriate intervals. A proactive approach to maintenance and inspection helps to maintain the cleanliness and functionality of the kitchen.
Cleaning and Polishing Glassware and Utensils
Glassware and utensils play a vital role in the presentation and service of food and beverages in pubs. Clean and polished glassware enhances the overall dining experience and reflects the establishment's commitment to hygiene and quality In this article, we will explore effective techniques for cleaning and polishing glassware and utensils, ensuring they are sparkling clean and ready for use.
1. Preparing the Cleaning Area
Before starting the cleaning process, set up a designated area with the necessary supplies. This area should include a sink or basin, cleaning agents, brushes or sponges, and lint-free cloths for polishing. Ensure that the area is clean and free from any contaminants that may affect the cleanliness of the glassware and utensils.
2. Pre-Rinsing
Start by pre-rinsing the glassware and utensils to remove any loose debris or food particles. Use warm water and gently rinse each item individually This step helps to loosen any stubborn residue and prepares the items for the cleaning process.
3. Washing
Fill a sink or basin with warm water and add a mild dishwashing detergent. Avoid using harsh chemicals or abrasive cleaners that may damage the glassware or utensils. Submerge the items in the soapy water and use a soft brush or sponge to gently scrub the surfaces, paying attention to any stains or spots. Ensure thorough coverage of all areas, including the bottom and handles of the utensils.
4. Rinsing
After washing, rinse the glassware and utensils under warm running water to remove any soap residue. Make sure to rinse each item individually, ensuring that no soap is left behind. Proper rinsing helps to eliminate any potential residue that may affect the taste or appearance of the food or beverages served.
5. Drying
To prevent water spots and ensure a streak-free finish, it is crucial to dry the glassware and utensils properly. Use a lint-free cloth or towel to gently dry each item, paying attention to any intricate designs or crevices. Avoid using fabric softeners or rough materials that may leave lint or scratches on the surfaces. Proper drying enhances the clarity and shine of the glassware and utensils.

6. Polishing
Polishing is the final step to achieve a flawless and sparkling finish. Use a clean, lint-free cloth specifically designed for glassware to polish each item. Apply gentle pressure and polish in a circular motion, focusing on the areas that require extra shine. For utensils with stainless steel components, use a separate cloth to polish the metal surfaces, ensuring they are free from fingerprints or smudges.
7. Inspection and Storage
After cleaning and polishing, inspect each glassware and utensil for any remaining spots or residues. Address any issues promptly, rewashing or polishing if necessary. Once fully inspected, store the glassware and utensils in a clean and dry area, away from any potential contaminants. Proper storage helps to maintain their cleanliness until they are ready for use.
