Hillwalking Skills Training and Assessment Stage 6
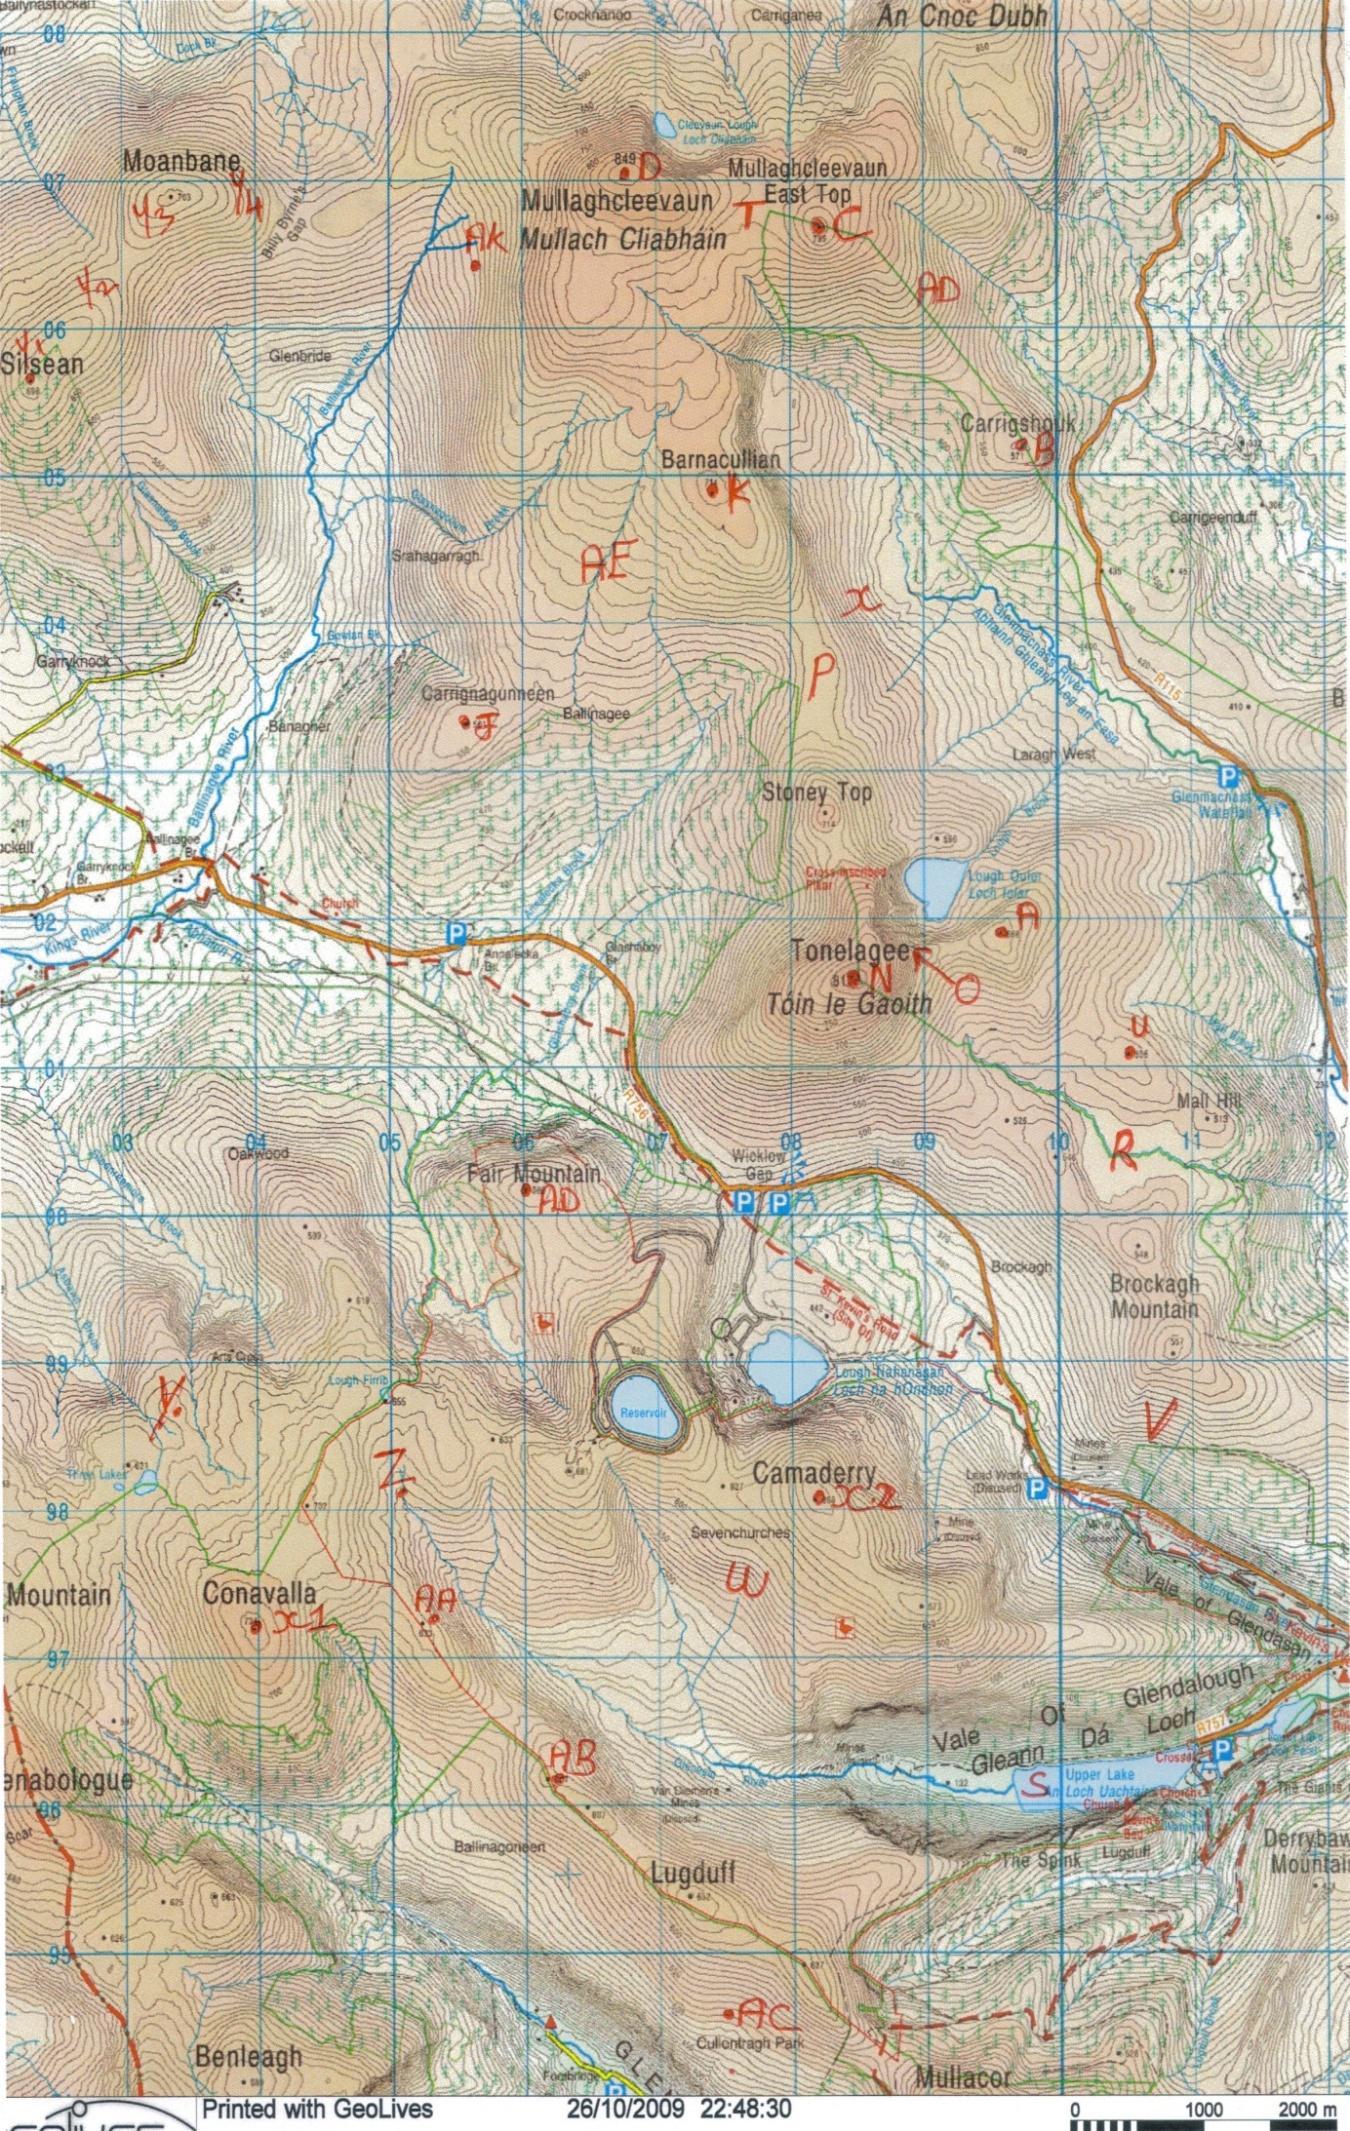
6. If you had just left AJ and were travelling on magnetic bearing 177 you would expect to be _____
a. Going straight up the slope
b. Going straight down the slope
c. Contouring
d. Crossing the slope and loosing height at the same time
e. Crossing the slope and gaining height at the same time
7. As above but you are leaving AK on magnetic bearing 269 you would expect to be ____________
8. Give the 6 figure grid reference for point X1 ___________________
9. Give the 4 figure grid reference for point X2
10. You are walking along the ridge marked Y1, Y2, Y3, and Y4. The magnetic bearing from you to point J is 146. Indicate which of the following Y1,Y2,Y3,Y4 is closest to your position ____________
11. Give a clear indication of the meaning for the following terms in relation to map reading and mountain navigation.
12. What is the Current Magnetic Variation in Wicklow Today
13. Travelling at 5 kph and 600 meters ascent per hour, how long will it take to do a leg that involves 2.2 centimetres on a 1:50,000 map with an ascent of 40 meters. _________________
15. At 7:00am on a summer‟s morning, the sun is to your left, at right angles to the direction in which you are facing. Which of the following are closest to the direction you are facing? North, South, East, West.
Mountain Equipment – Day Hike
Discussion in a semi circle with a packed rucksack with good examples of gear and perhaps the odd red herring to start a discussion and create a memory in the students (example electric razor or teddy bear) Encourage input from the students and write up their recommended gear list on a board as well as having a handout.
Mountain Clothing
Discussion in a semi circle with a packed rucksack with good examples and perhaps the odd red herring to start a discussion and create a memory in the students (example cotton t-shirt or silk underwear). Encourage input from the students and write up their recommended clothing list on a board as well as having a handout.
At this point depending on the group a laminated A6 card with recommended equipment on one side and recommended clothing on the other can be handed out, or the students can be encouraged to make their own one.
With some groups this can be demonstrated with a fashion show with some inappropriate dressed models leading up to a correctly dressed one.
Instructions for Pacing Base
Flag out a level course of 100 meters with a start and end point. It is recommended that an architect’s measure or a measured rope should be used to ensure that the course is exactly 100m.
Each participant should ‘pace’ the course 3 times counting every footfall on one or other of their feet. This is referred to as a ‘double pace’, which is the standard count for mountain pacing. The average of the three runs will establish their base line. (All three counts should be very similar). Write these up on a board for the record. Next, encourage them to repeat the exercise with heavy bags. The counts should increase, as will running it on an uphill incline.
Introduce the pace beads and explain their use
Example (all individuals are different)
Base line pace is 65 double paces per 100 meters
Heavy Bag pace is 70 double paces per 100 meters (+5 double paces)
Uphill Pace is 71 double paces per 100 meters (+6 double paces)
Uphill with Heavy Bag pace is 76 double paces per 100 meters (+5+6=11 double paces)
This exercise should be run on the hikes as well to develop the candidates’ understanding of both the principle and their own unique numbers for 100 meters.
A handy trick is to have 25m of string in your training kit so you can quickly set up a 100m (25x4 repeats) course at the start of a trip or at a lunch stop - or if your route crosses some unusual ground (i.e. peat hags)
Instructions for Compass Training Circle
This is a basic compass training exercise that can be played in any open space. The exercise helps the candidate to be able to find a direction with a compass once given a bearing. All the candidates are within the circle for the duration of the exercise.
Equipment Required:
A sighting compass such as a Silva 15 or 54 is the best for laying out the course, whilst Silva type 3,4 or 7 are all good for use on the course the recommendation is for Silva type 4 (non military) as they are the best all round map reading compass, as they have an extended base plate and roamer Eight marked stakes as below; one unmarked centre stake and a piece of 20 metre sisal/string.
Game Cards labelled 1-90 & Pencil and paper for each participant
The Hillwalking Adventure Skill team have a copy of this game that they can loan out; they also have all the card data on a spreadsheet that can be emailed, to enable a course director to manufacture their own set. There is also a Silva training pack of 28 compasses and 2 large training compasses available, as well as orienteering flags and punches.
Preparing the Circle
It is very important to place the stakes carefully as the accuracy of the cards will depend on this and also to ensure that there are no other magnetic influences in the area.
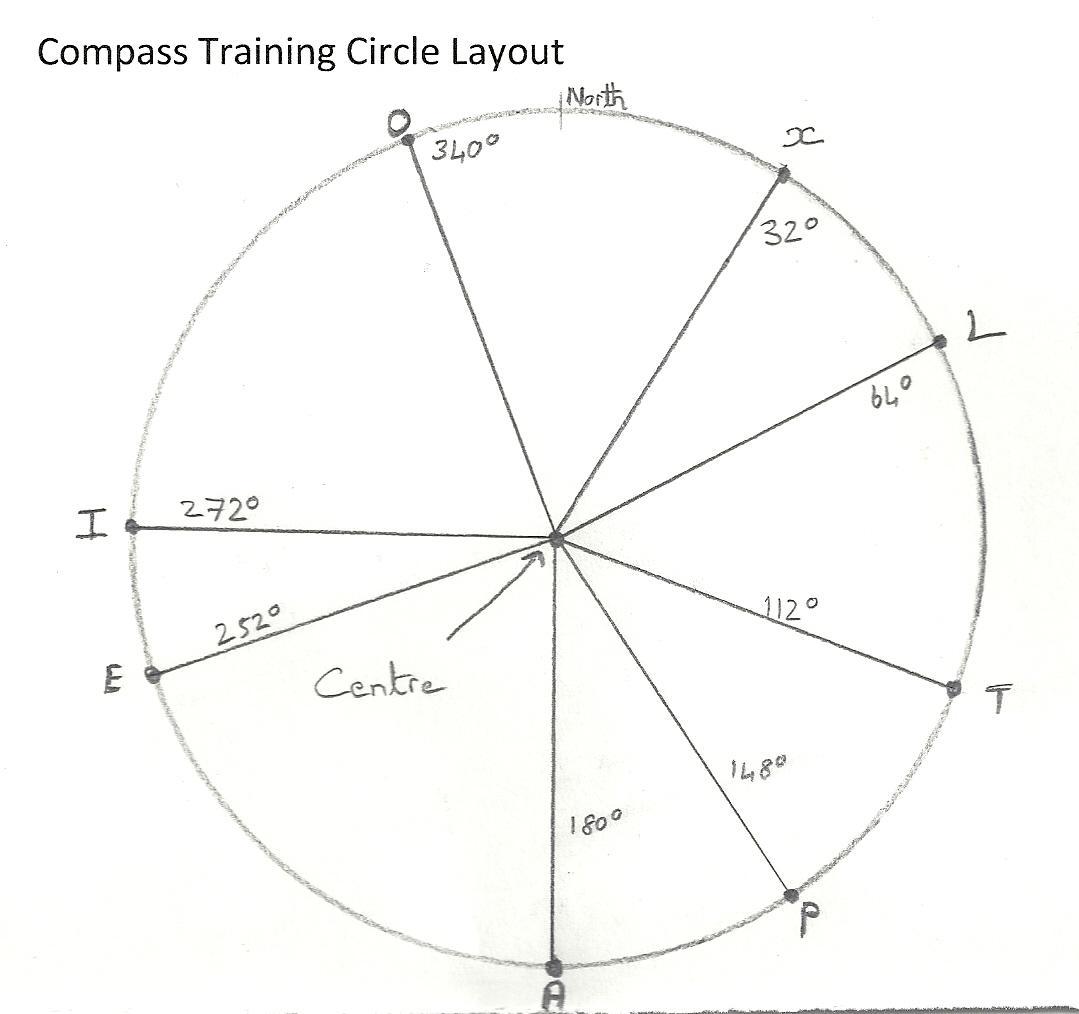
Place the unmarked stake in the centre of the area to be used. Attach the string (20m long). Working from the centre stake each time lay out the course as shown in the diagram below, the bearing is taken from the centre position and the string should be used to its full extent. The radius can be changed to either 10m for a more difficult test and 20m for an easier one.
Remove the Centre Stake before starting
Running the Exercise
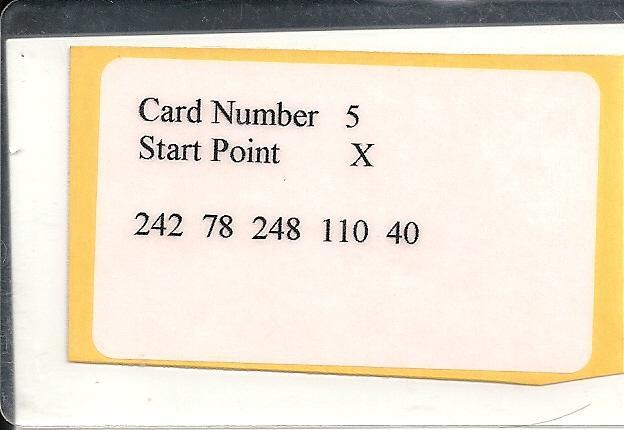
Each participant receives an instruction card as shown below
The card tells the player their starting position as well as the bearings to follow from marker to marker around the course. Each participant copies down the letters on each marker along their route (including the start one). The six letter code word is checked against the answer sheet (in the appendix) for accuracy.
It is recommended that each participant should complete three ‘clear’ rounds.
Leave No Trace Awareness Session
The Seven Principles need to be covered
Plan Ahead and Prepare
Be Considerate of Others
Respect Farm Animals and Wildlife
Travel and Camp on Durable Ground
Leave What You Find
Dispose of Waste Properly
Minimise the Effects of Fire
However as part of a hillwalking course the emphases should be placed on the
Plan Ahead and Prepare
Travel and Camp on Durable Ground
Dispose of Waste Properly
Minimise the Effects of Fire
But all principles can be covered in an appropriate manner to the age group present
It is recommended that the LNT Ireland ??? be shown at the start to get the topic going. This is available from LNT Ireland.
For ideas on instruction see http://www.leavenotraceireland.org/WaysToTeach.aspx
The Hillwalking Adventure Skill team have a full LNT training pack including the videos and additional material aimed at teenagers. This is available to loan out.
Briefing on Sunday Hike
This should be done in a clear and concise manner to ensure that every candidate understands the briefing. The importance of route preparation including memorising both the basic route and the surrounding mountains and valleys should be emphasised.
Projects
One: Mountain Weather
1. Over a five-day period, cut out the weather charts and forecasts from a daily paper or down load from the internet and put in your logbook. Write a report on the changing weather pattern over the five days. It should include information on:
Wind Speed and Direction
Sunshine
Cloud Cover
Precipitation (Rain / Snow)
Frontal movements
Temperature
Atmospheric Pressure
2. Find out about the lapse rate and how it would affect you at the summit of a 3000-foot mountain than if you were standing at sea level.
3. Find out about the wind chill factor and how it affects you when hillwalking. Is there a difference at different altitudes and does it vary in wet or dry air?
Two: Route Card
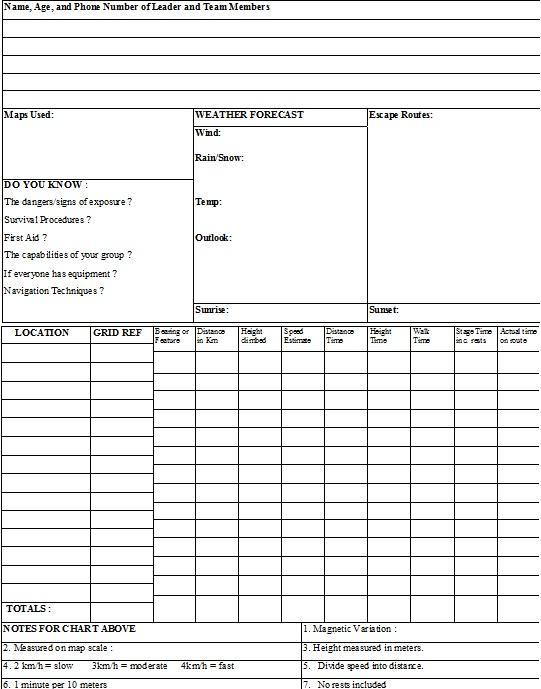
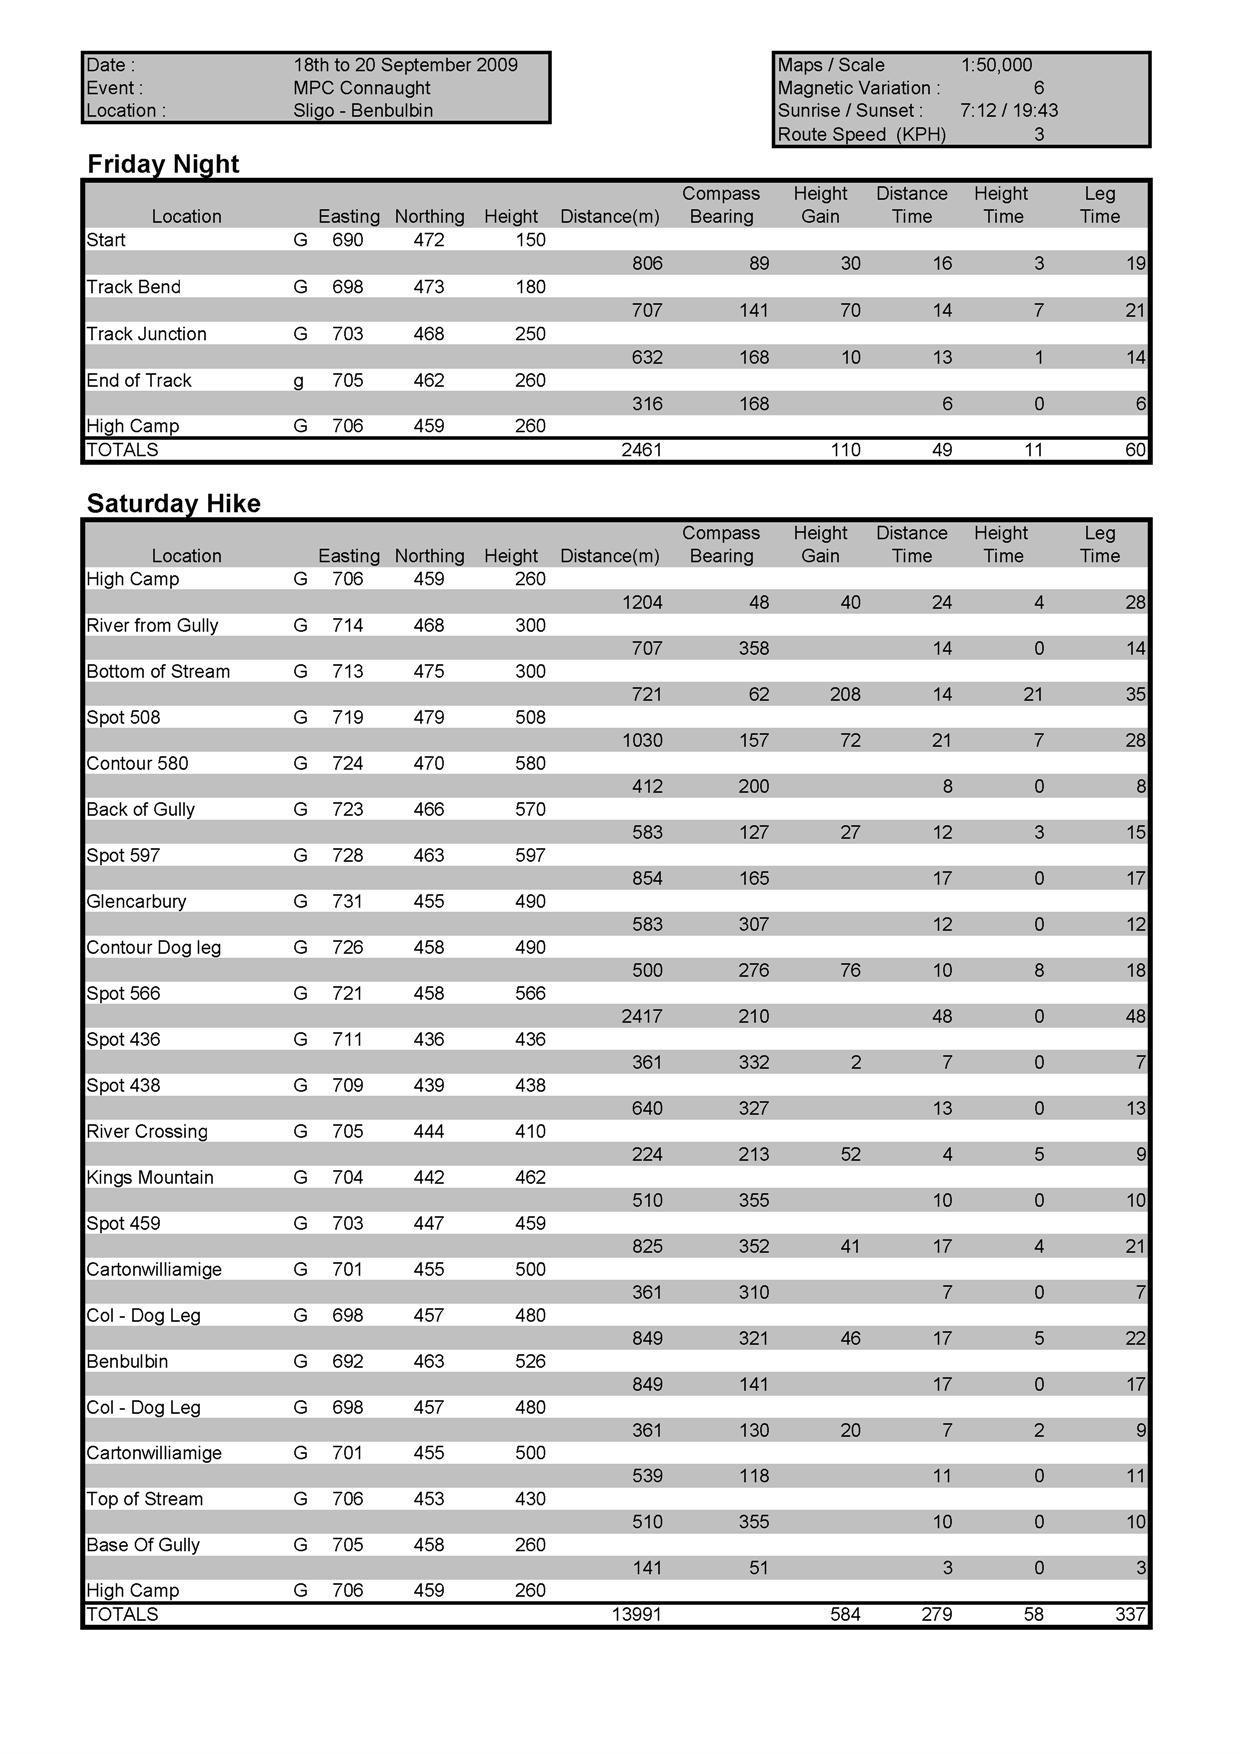
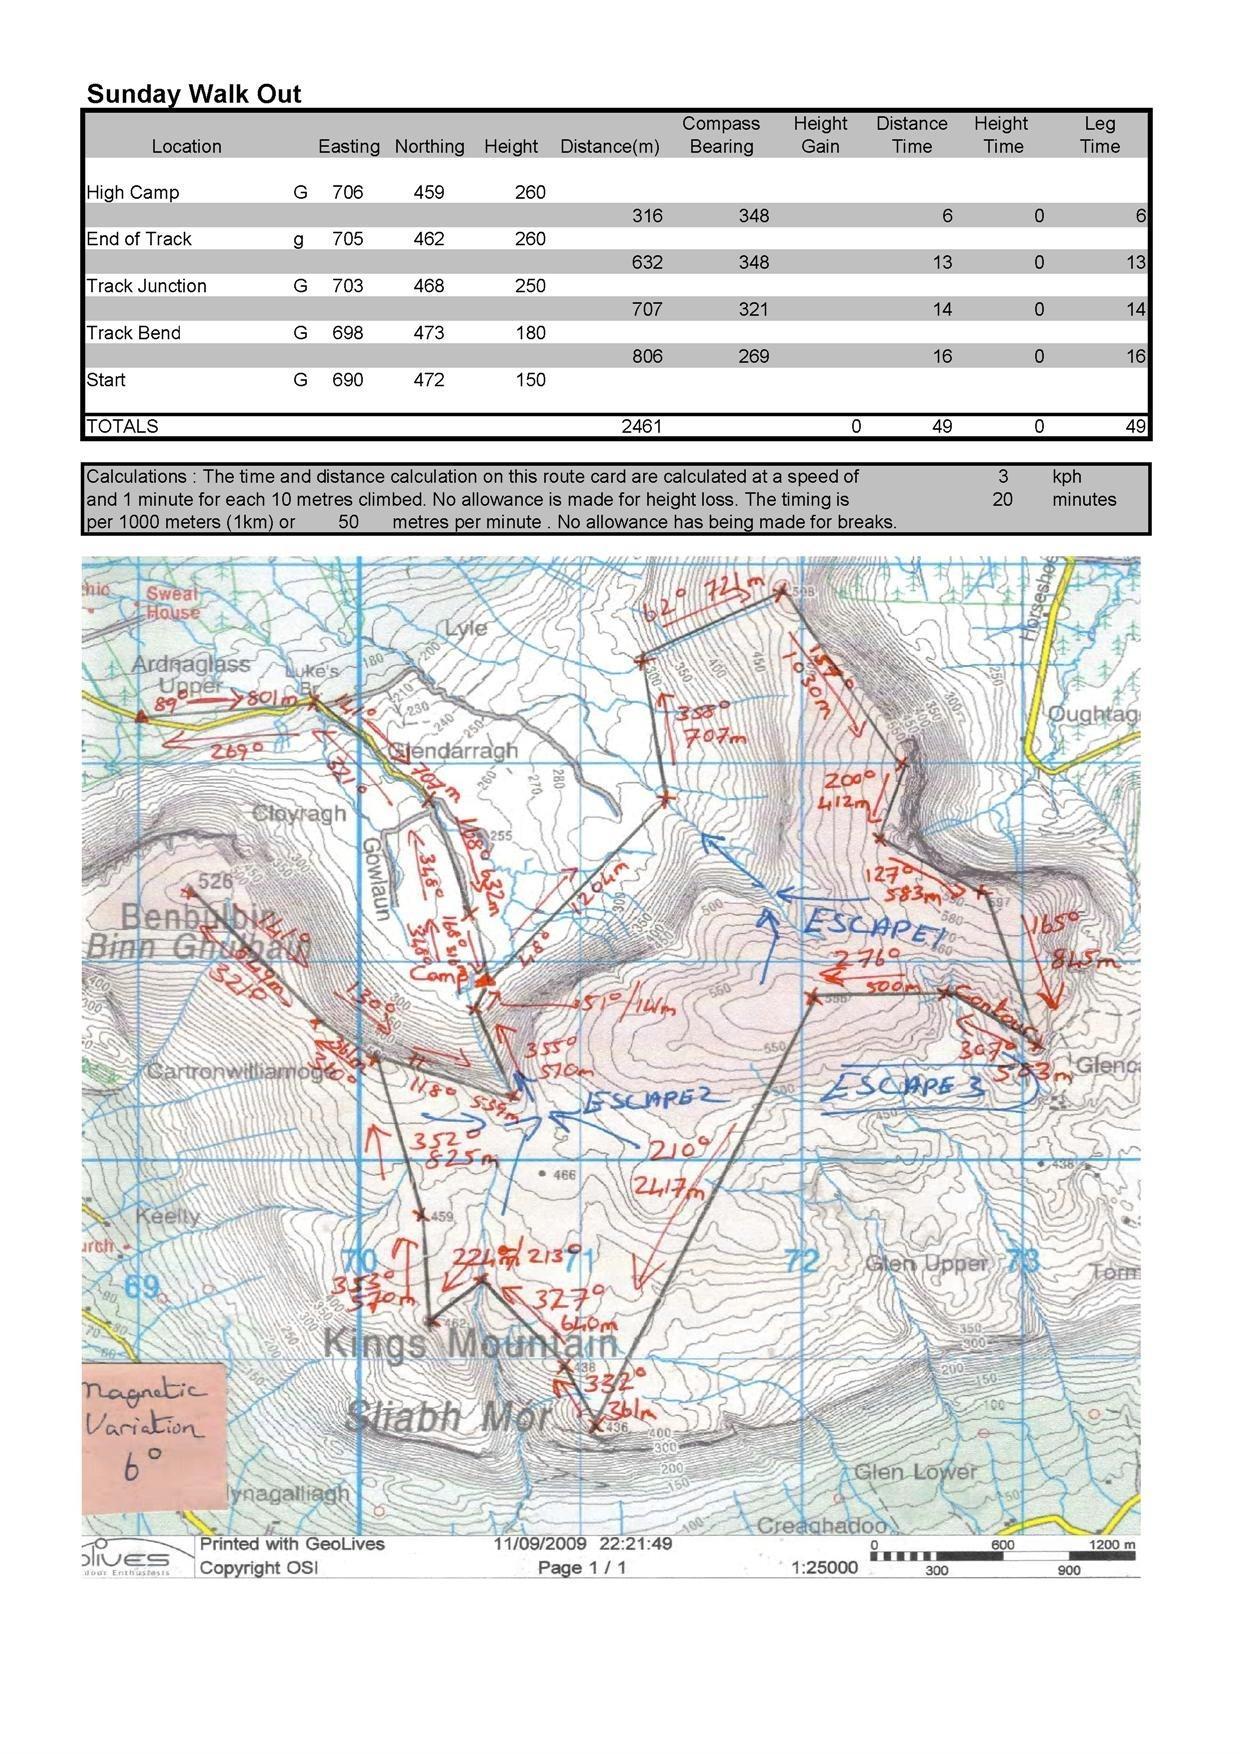
Draw up a route card using both the classic and visual methods of a MPC/Sionnach Route. The course director should choose a route with at least 20 legs. The one below is of the Connaught MPC (Benbulbin Sligo) and with the attached classic and visual formal. A handout should be given on how to do route cards so the students have a reference point. The copy below shows the technical detail and does not include the weather or group information or start / finish times.
Mountain Pursuit Challenge
Connaught 2009 Benbulbin, Co. Sligo
MAP: Discovery Series No.16. Scale 1:50000, Magnetic Variation 5º (as of 2009)
Introduction
This autumn we welcome you to the area of Benbulbin which with its impressive profile has always been an eye-catching attraction in that part of the country. The range itself consists of a large, undulating plateau, which spurs off at various points to create the summits of Benbulbin, Benwiskin, Kings Mountain, Truskmore and Tievebaun. Dramatic escarpments provide wonderful views over the surrounding counties and the Atlantic. Unfortunately, a part of the range is difficult to access due to issues of access with land-owners in the area; the Gleniff valley to the north (“the horseshoe road”) in particular has borne the brunt of this.
Our route for the weekend will consist of a standing camp on the North side of the range with a day hike on Saturday up and around the plateau (availability of water on the plateau cannot be guaranteed and the access issues and steep cliffs negate any possibility of a high camp).
If visibility is good, the route will give you a chance to see many interesting features of the area. Watch out for caves and „sink holes” and in particular the rocky „canyon‟ visible just to the South East of Kings Mountain.
In bad weather - or poor visibility due to mist - navigation on the plateau will be particularly difficult. Regardless of visibility the lack of prominent features and/or ridges on the plateau will call for careful compass work, pacing and timing and distance in order to keep on route. We would ask everyone to ensure they practise these skills in advance of the weekend itself.
FRIDAY
Instructions to Start (690 472)
Follow the main Sligo to Bundoran road (N 15) to the junction at 656 472 (sign posted for Ballinatrillick). Travel in a north easterly direction along this minor road to the junction at 677 478. Turn right here and continue on to forest at 690 472. Parking is available in the forest at your own risk. Please arrive between 20:00 and 22:00, if you arrive early do not leave until you have checked out with a member of staff.
Start to Base Camp (706 459)
After check in, follow the road to Lukes Bridge (698 472). Cross the bridge and follow the track leading off to the right as far as the bridge at 703 468. Cross this bridge and follow the path which gradually peters out into boggy ground. The base camp is at 706 459. Make sure to check in with a member of staff before settling down for the night.
SATURDAY
As this will be a day hike you should leave your tents in position and take what you need (i.e.: food and personal equipment) for the day. This should be evenly distributed among the team - it is not a good idea to bring one rucksack and pass it around.
Base camp to bottom of stream (714 475)
After checking out make your way along the base of the valley to the stream at 714 475. Take care when crossing this area as some parts are quite boggy.
Bottom of stream to Spot height 508m (719 479)
On reaching the stream, turn right and proceed to make your way up the high ground to the spot height 508. Take your time when ascending as most of your height for the day will be gained on this leg.
Spot height 508m to Spot Height 597m (728 463)
On reaching spot height 508m, make sure to take in the views (especially Benwhiskin to the North) and also plenty of water as this will be one of the last stops on the route to fill water bottles. From spot height 508m make your way up to spot height 597m, as you traverse this route care must be taken as there are sink holes across the plateau equally you must be mindful and careful of the steep drops/cliffs and a gully to the North of you. Visibility permitting you will have great views of both the Gleniff valley to your North, as well as part of the main plateau of Benbulbin itself.
Spot height 597m to Glencarbury (732 455)
On leaving spot height 597m you will observe a fence coming into view. Keeping this fence to your left you begin to make your descent to Glencarbury (732 455) care must be taken as there are areas of loose shale under foot when descending.
Glencarbury was the location of one of only two barite mines in Ireland. Barite was mined here from 1894 to 1979, with approx. 50,000 tonnes per year being extracted in the latter years of the mining operation. Barite is used as a weighing agent in paint, but in recent times as drilling mud in the oil exploration industry. There is a significant amount of the mine shafts collapsed and as a result the mines themselves are out of bounds.
Glencarbury to Spot height 566m (721 458)
This is open ground with no distinct features so care must be taken when navigating this leg. By practicing “contouring around” (pick a point in the distance of a similar height and walk to it) you will save on energy and also save you from additional height lost. Spot height 566m is marked by a small cairn.
Spot height 566m to Spot height 436m (711 436)
From spot height 566m descend to spot height 436m and again care must be taken when navigating this leg as there are no distinct features which to navigate from. Visibility
permitting there are great views of the Crockauns across the Glencar valley as you descend, while at spot height 436m, you will be able to see the famous Glencar Lake with its crannogs at either end, as well as the valley itself.
Spot height 436m to Spot height 438m (709 439)
Make your way across the river and onto spot height 438m. There is steep ground/drop to your West so care must be taken when traversing to spot height 438m.
Spot Height 438m to Kings Mountain (462m) (704 442)
There is steep ground/gully between spot height 439m and Kings Mountain so you should head in a northerly direction and cross the river at a more shallow point which will make for an easier traverse to Kings Mountain. Kings Mountain is a distinct feature and from its top makes for great viewing on a clear day.
Kings Mountain to Spot Height 459m (703 447)
Descend carefully the side of Kings Mountain and proceed to the spot height 459m, once again the ground has little if any distinctive features, so is an excellent opportunity, regardless of visibility to continue with your compass work including timing, distance and pacing.
Spot height 459m to Cartonwilliamoge (701 455)
Once again the ground between Spot Height and Cartonwilliamoge is featureless, so good navigation is essential, particularly if visibility is impaired.
Cartonwilliamoge itself is quite narrow and care must be taken as there is an escarpment/cliff to its immediate North West side.
Cartonwilliamoge to Benbulbin (692 463)
You can with great care not to get to close to the edge use the escarpment/cliff as a hand rail, to proceed towards Benbulbin. On reaching the top of Benbulbin, the ground levels out so be aware at all times of where you are on the map, especially if in poor visibility.
There is a trig point at the summit itself which is back from the cliffs giving you no sense of being on a dramatic escarpment. However, you will not be disappointed by the views from here; with good visibility you have a 360 degree panorama. To the North/North West across Donegal Bay lie the Blue Stacks and Slieve League; away to the East is Truskmore with its TV mast which the highest point in Sligo; to the South West is Knocknarea, crowned by a massive cairn (which is reputed to be the tomb containing the remains of Queen Meabh –she of the “Tain” and other exploits); to the South Lough Gill and the Curlew Mountains and northern shores of Co. Mayo. Beneath you and to the north is Streedagh Point where the Spanish Armada famously came to grief in 1592 with the loss of hundreds of lives. If the weather is fine and calm then you may wish to proceed to the top of the escarpment/cliffs a little further on at 697 465. You and your team must be very careful here and not go to close to the edge of the escarpment/cliff. If you or your team take the option to go to the top of the escarpment/cliff, you must check in with staff in the area when you return from the cliff and before proceeding back towards Cartonwilliamoge.
Benbulbin to Cartonwilliamoge (701 455)
Retrace your steps from Benbulbin to Cartonwilliamoge, you can with great care not to get to close to the edge use the escarpment/cliff to your North East as a hand rail, to proceed towards Cartonwilliamoge.
Cartonwilliamoge to Top of Stream (706 454)
From Cartonwilliamoge and continuing to keep the escarpment/cliff on your left hand side make your way around the top of the stream.
Top of Stream to Camp (706 459)
Care must be taken when making the descent to camp as the ground under foot might be slippery. When you arrive at camp be sure to check in with a member of staff.
SUNDAY
Camp to Finish (690 472)
On breaking camp pack all your gear and ensure that your site(s) are clean and completely litter free, only leave when your site(s) have been inspected and you have been checked out by a member of staff. Remember that all litter must be taken away.
Our route out is along the same route that we took in on the Friday night. Be sure to check in with a member of staff when you get back to the finish.
Well done on completing the Connaught MPC 2009.
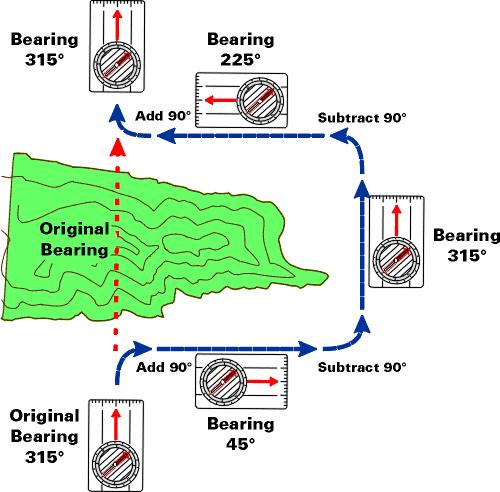
Note one of the Saturday legs is shown as going over a cliff edge. It is important for the students to realise this and learn the principle that a bearing gives a direction but that on a specific bearing that there are often obstacles that need to be bypassed as in the graphic below
Basic Route Card for Hikes and Expeditions
Day Two
Day Hike minimum of 6 hours on hillside.
The activity should not be persistent training as the Scouts should enjoy the hike. However the instructors should ensure that all participants get an opportunity to lead using map, compass, timing and pacing
The following are a list of practical exercises that should be undertaken with each group.
Map Reading
Be able to identify all major map symbols
Be able to set a map by linear features
Understand the principles of contour lines & features
Walk to a steep slope, assess the ground, and relate the ground to the map
Walk to a shallow angled slope, assess the ground, and relate the ground to the map
Walk to a spur, assess the ground, and relate the ground to the map
Walk to a re-entrant, assess the ground, and relate the ground to the map
Walk to a hilltop, assess the ground, and relate the ground to the map
Choose a distant feature (500m-1 km), Calculate distance and estimate how long the journey might take. Walk & reassess
Self-location, a systematic approach. Analyse the ground using down slope, up slope, to the left and to the right. Relate that information to the map
Choose a Col, 500m-1km distant, estimate distance, and estimate how long the journey might take. Walk & reassess
Stand on the Col, assess the ground, and relate the ground to the map
Introduction to the national grid, 1km on the side 1.5km on the diagonal
Practice rough distance measurement
Walk to a distinct change of slope, assess the ground, and relate the ground to the map
Walk to a feature out of sight using a tick list to find the way. Choose a
Collecting feature or a 'one feature too far'
Timing and Pacing
Pacing exercise on flat ground
Measurement of distance using the romer
Measure the distance to a feature on the hill; circa 200m-300m. Over easier Terrain. PACE. Instructor offers guidance to 'roughly what is 100 200 300
Measure the distance to a feature on the hill; circa 200-300m, travelling uphill. Compare to previous results
Measure the distance to a feature on the hill; circa 200-300m, travelling down hill
Introduction to timing. Easier timed legs, more than 500m.Try to keep the height time much less than the distance time
Over lunch, introduction to the compass, initially map setting then taking basic bearings.
Navigating to features out of sight approx. 500m away using timing, Pacing, map setting using the compass and using a tick list
Navigating to features out of sight more than 500m away using timing, pacing, following an elementary bearing and using a tick list. (General Direction not compass bearing)
Compass work
Revision of map reading, self-location, timing and pacing
Revision of compass work, introduction to magnetic variation
Combined navigation techniques; choosing the correct technique for a given leg
Aiming off and collecting features
Converting magnetic bearings back to grid bearings
Grid references
Weekend Two
Review of Progress to Date
This should be a brief discussion and feedback session with the opportunity to clarify any arising issues
Review Self Assessment (what I have learnt and what do I still need to learn)
Ask the students to review their sheets and in a different colour pen ask them to see if they would change any of their ticks in columns. Then have a discussion on the changes. Depending on the grouping / trainers this may well have increased towards the very competent, from a low base, as the students have learnt on the first weekend and over the projects. Or it may well have reduced because students who have self assessed at a competent level have realised that there is a lot more to the skill than they thought.
Review of Projects
Review the two projects: Weather and Route Card. Have a handout on weather available to give out and a copy of the completed route card in both classic and visual formats.
Mountain Camping Equipment
Discussion in a semi circle with a fully packed expedition rucksack with good examples and perhaps the odd red herring to start a discussion and create a memory in the students (example very heavy gas stove). Encourage input from the students and write up their recommended gear list on a board as well as having a handout.
A concentration should be made on readily available / price affordable equipment such as Trangias (gas version) and platypus drinking systems that enhance the experience on the hills by making life a lot easier for a Scout on an expedition
Students should bring their own tent (troops) and pitch it. The second pitch should be done blindfolded (to see of a student really knows their tent). The main trick here is rcognising the poles and where they go. A simple extra piece of material can be clipped to one of the peg points to allow the student to ID their position around the tent. This requires lots of space.
Cook Lunch on Mountain Stove
Students should prepare and cook their lunch on a mountain stove. This will show the limitations of the model (i.e. frying on a meths trangia will take hours), as well as what the stove is capable of. A full meal should be cooked from scratch and not a pot noodle. This also includes cleaning up. Instructors should also discuss the safety aspects of some of the commonly available stoves and fuel bottles
As part of the Equipment Talk a trangia or other stove & pot system should be shown with a pot scrub, a small bottle of washing up liquid and a rubbish bag packed inside it.
Menu Planning
This should cover the whole food pyramid, and emergency planning to deal with hypoglycaemia and hypothermia. Include the LNT concept of Plan ahead and Prepare where all rubbish is left at home, and the concept of cook at home and reheat. Also cover the number of pots and pans available and what wash up is required, important in cold weather, and also foods that taint the pots if not very well washed.
Mountain Emergencies & First Aid
Recap of Basic First Aid preferably using the REC (Rescue Emergency Care) ABCDE method. The Specific Skills required to stage 6 are:
Buddy System & following the Instruction of the leader
These should all be recapped in the session, if the student wants further knowledge then they should do an outdoor first aid cert to level 2 (2 days) at a minimum
The Hillwalking Adventure Skill team have both Mountain Leader First Aid Kits and survival shelters that are available to loan out.
Mountain Hazards & Escape Routes
Cover in some detail including when to use an escape route.
Discussion on Group Awareness
Group Discussion introducing the stage 6 requirements ‘I know the limitations of my team’
Projects
Project One – Menu Planning for Expedition
Set the project to develop the menu for the expedition weekend and to look at both the calorific intake and the cost (budget aspect of skill badge). The students should also have calculated the cook times and the required fuel needed. In an ideal situation the ‘pots & pan’ utilisation should also be calculated as well as the total weight of food / fuel carried.
Project Two – Route Card for Expedition
Give the students the route plan for the expedition in a similar format to the one for the Sligo MPC above and have them create route cards (classic and visual) for the expedition weekend.
Day Two
Day Hike minimum of 6 hours on hillside
This should be run in the same way as Day Two of Weekend One
Expedition Weekend
A two night mountain camping trip using a low and a high camp and using all the skills learned to date
The entire course is leading up to the expedition and this should be treated as the highlight of the course rather than as the assessment. The method of assessment should be based on leading legs, discussion and observation of the student over the course of the expedition. Should the assessor feel that the student needs a bit more work on a certain area they should be facilitated
This activity should be run as a training and assessment exercise for all involved and not as a test of stamina and endurance. It is therefore not recommended that full MPC / Sionnach routes should be re-run although the campsites used on these events may be useful, and modified versions of these routes may prove useful.
The Assessors should ensure that each student is capable of
Map Reading
Be able to identify all major map symbols
Be able to set a map by linear features
Understand the principles of contour lines & features
Walk to a steep slope, assess the ground, and relate the ground to the map
Walk to a shallow angled slope, assess the ground, and relate the ground to the map
Walk to a spur, assess the ground, and relate the ground to the map
Walk to a re-entrant, assess the ground, and relate the ground to the map
Walk to a hilltop, assess the ground, and relate the ground to the map
Choose a distant feature (500m-1 km), calculate distance and estimate how long the journey might take. Walk & reassess
Self-location, a systematic approach. Analyse the ground using down slope, up slope, to the left and to the right. Relate that information to the map
Choose a Col, 500m-1km distant, estimate distance, and estimate how long the journey might take. Walk & reassess
Stand on the Col, assess the ground, and relate the ground to the map
Introduction to the national grid, 1km on the side 1.5km on the diagonal
Practice rough distance measurement
Walk to a distinct change of slope, assess the ground, and relate the ground to the map
Walk to a feature out of sight using a tick list to find the way.
Choose a collecting feature or a 'one feature too far'
Timing and Pacing
Pacing exercise on flat ground
Measurement of distance using the romer
Measure the distance to a feature on the hill; circa 200m-300m. Over easier Terrain. PACE. Instructor offers guidance to 'roughly what is 100 200 300
Measure the distance to a feature on the hill; circa 200-300m, travelling uphill. Compare to previous results
Measure the distance to a feature on the hill; circa 200-300m, travelling down hill
Introduction to timing. Easier timed legs, more than 500m.Try to keep the height time much less than the distance time
Over lunch, introduction to the compass, initially map setting then taking basic bearings.
Navigating to features out of sight approx. 500m away using timing, pacing, map setting using the compass and using a tick list
Navigating to features out of sight more than 500m away using timing, pacing, following an elementary bearing and using a tick list. (General Direction not compass bearing)
Compass work
Revision of map reading, self-location, timing and pacing
Revision of compass work, introduction to magnetic variation
Combined navigation techniques; choosing the correct technique for a given leg
Aiming off and collecting features
Converting magnetic bearings back to grid bearings
Grid references
Camping and Cooking
Pick a good camp site and review the possibility of flooding and LNT principles (Durable Ground)
Pitch their tent well with attention paid to wind direction
Cook an edible and nutritious meal on a mountain stove and be able to clean up and dispose of waste properly (LNT)
Mountain Safety & Emergencies
Whilst hiking discuss with the assessor an emergency action plan for a scenario incident at that point on the route
Develop an escape route from this point
5 Celebration
Depending on the nature of the course the presentation of the awards may be done on the last morning of the expedition (MPC Style) or at a more formal occasion a few weeks later (max 3 weeks).
All logs should be submitted for signing as they are necessary for level 7
6 Instruction and Assessment Ratios
In order to assure that the best quality instruction the recommended ration of instructors to students should be 1 to 4, with an absolute maximum of 6 to one.
Where stage seven instructors are working under a stage 8/9 course director there should be no more that 2 stage 7’s per every stage 8/9. This would mean that the recommended ratio would be 12 students per stage 8/9 instructor with a maximum of 18
In order to assure that the course is not a crowd control exercise the recommended maximum number per course is 24 Students as this requires 2 stage 8/9 instructors, they should work as joint course directors.