6 minute read
exploded par ts


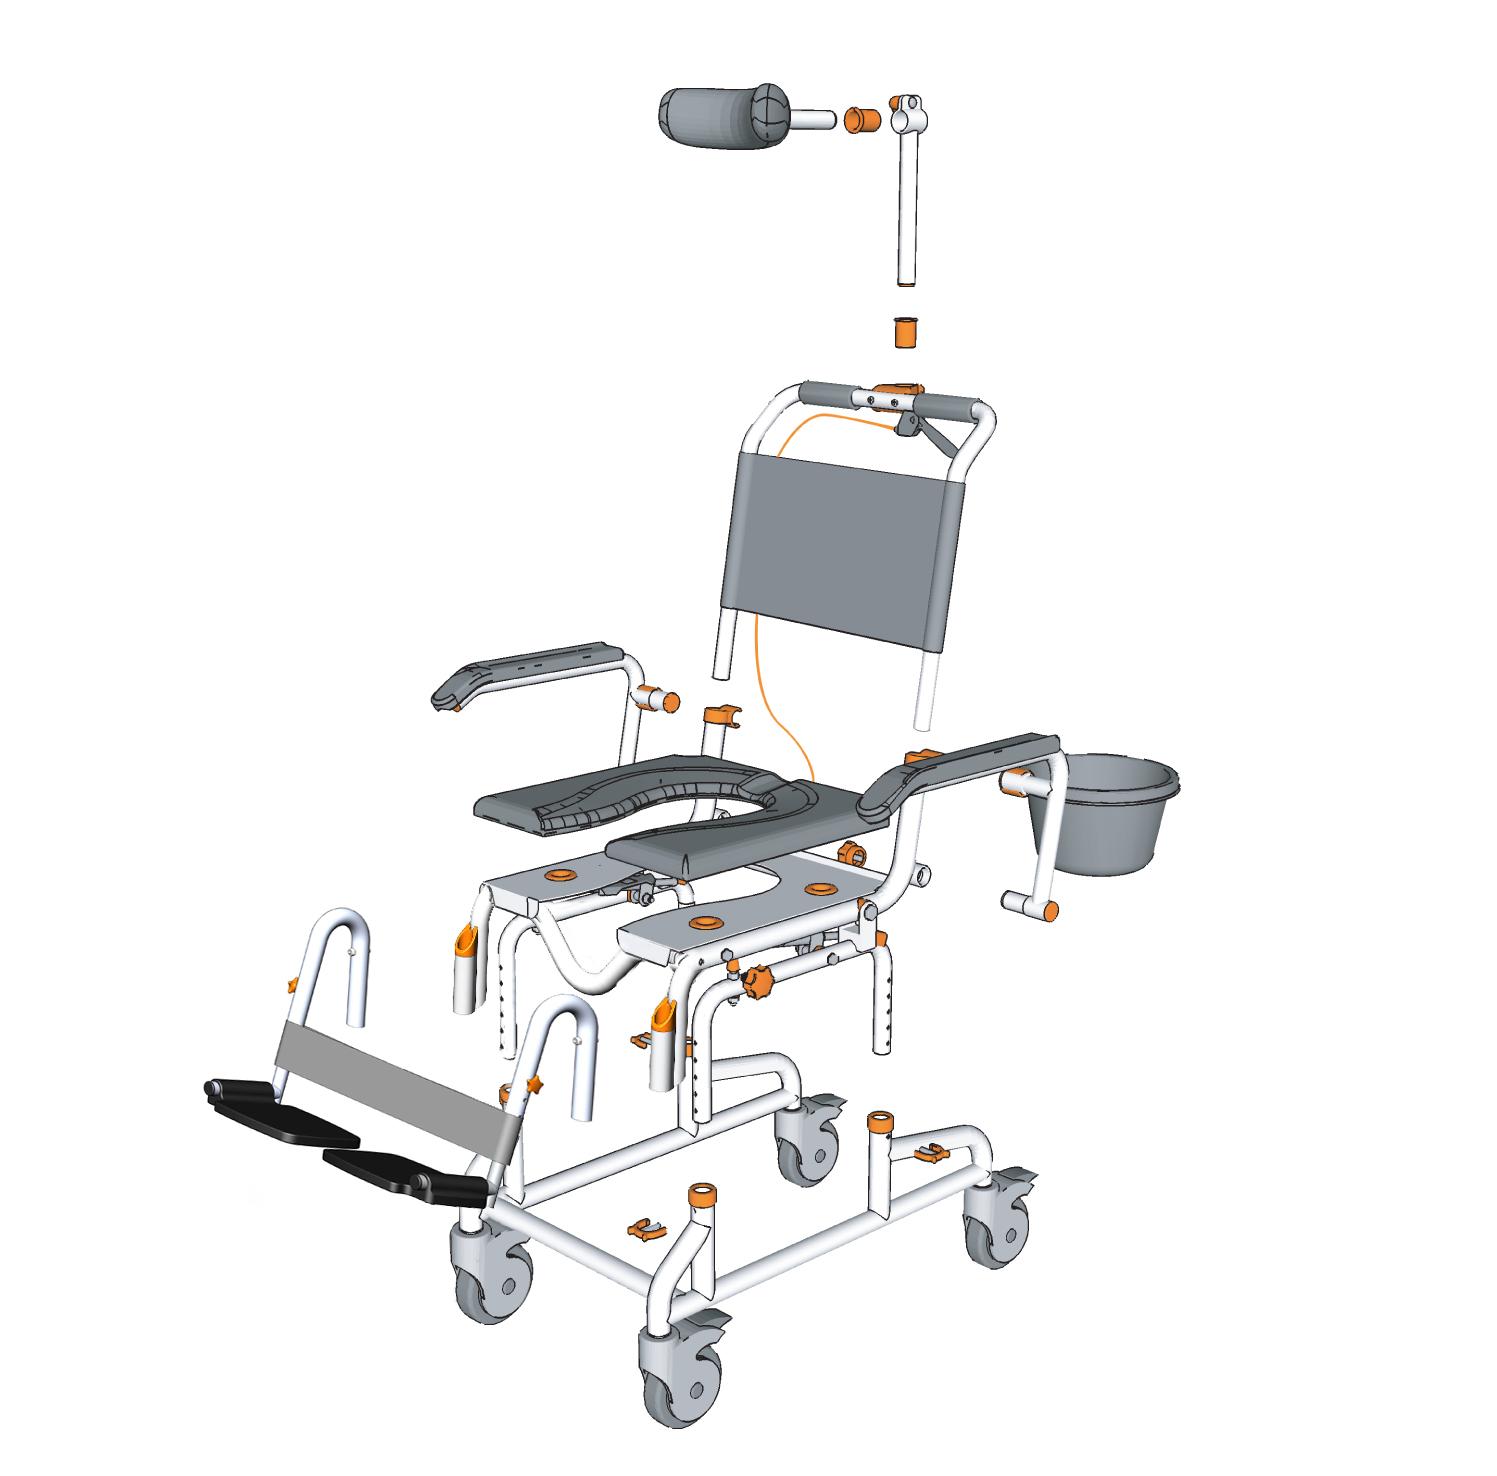
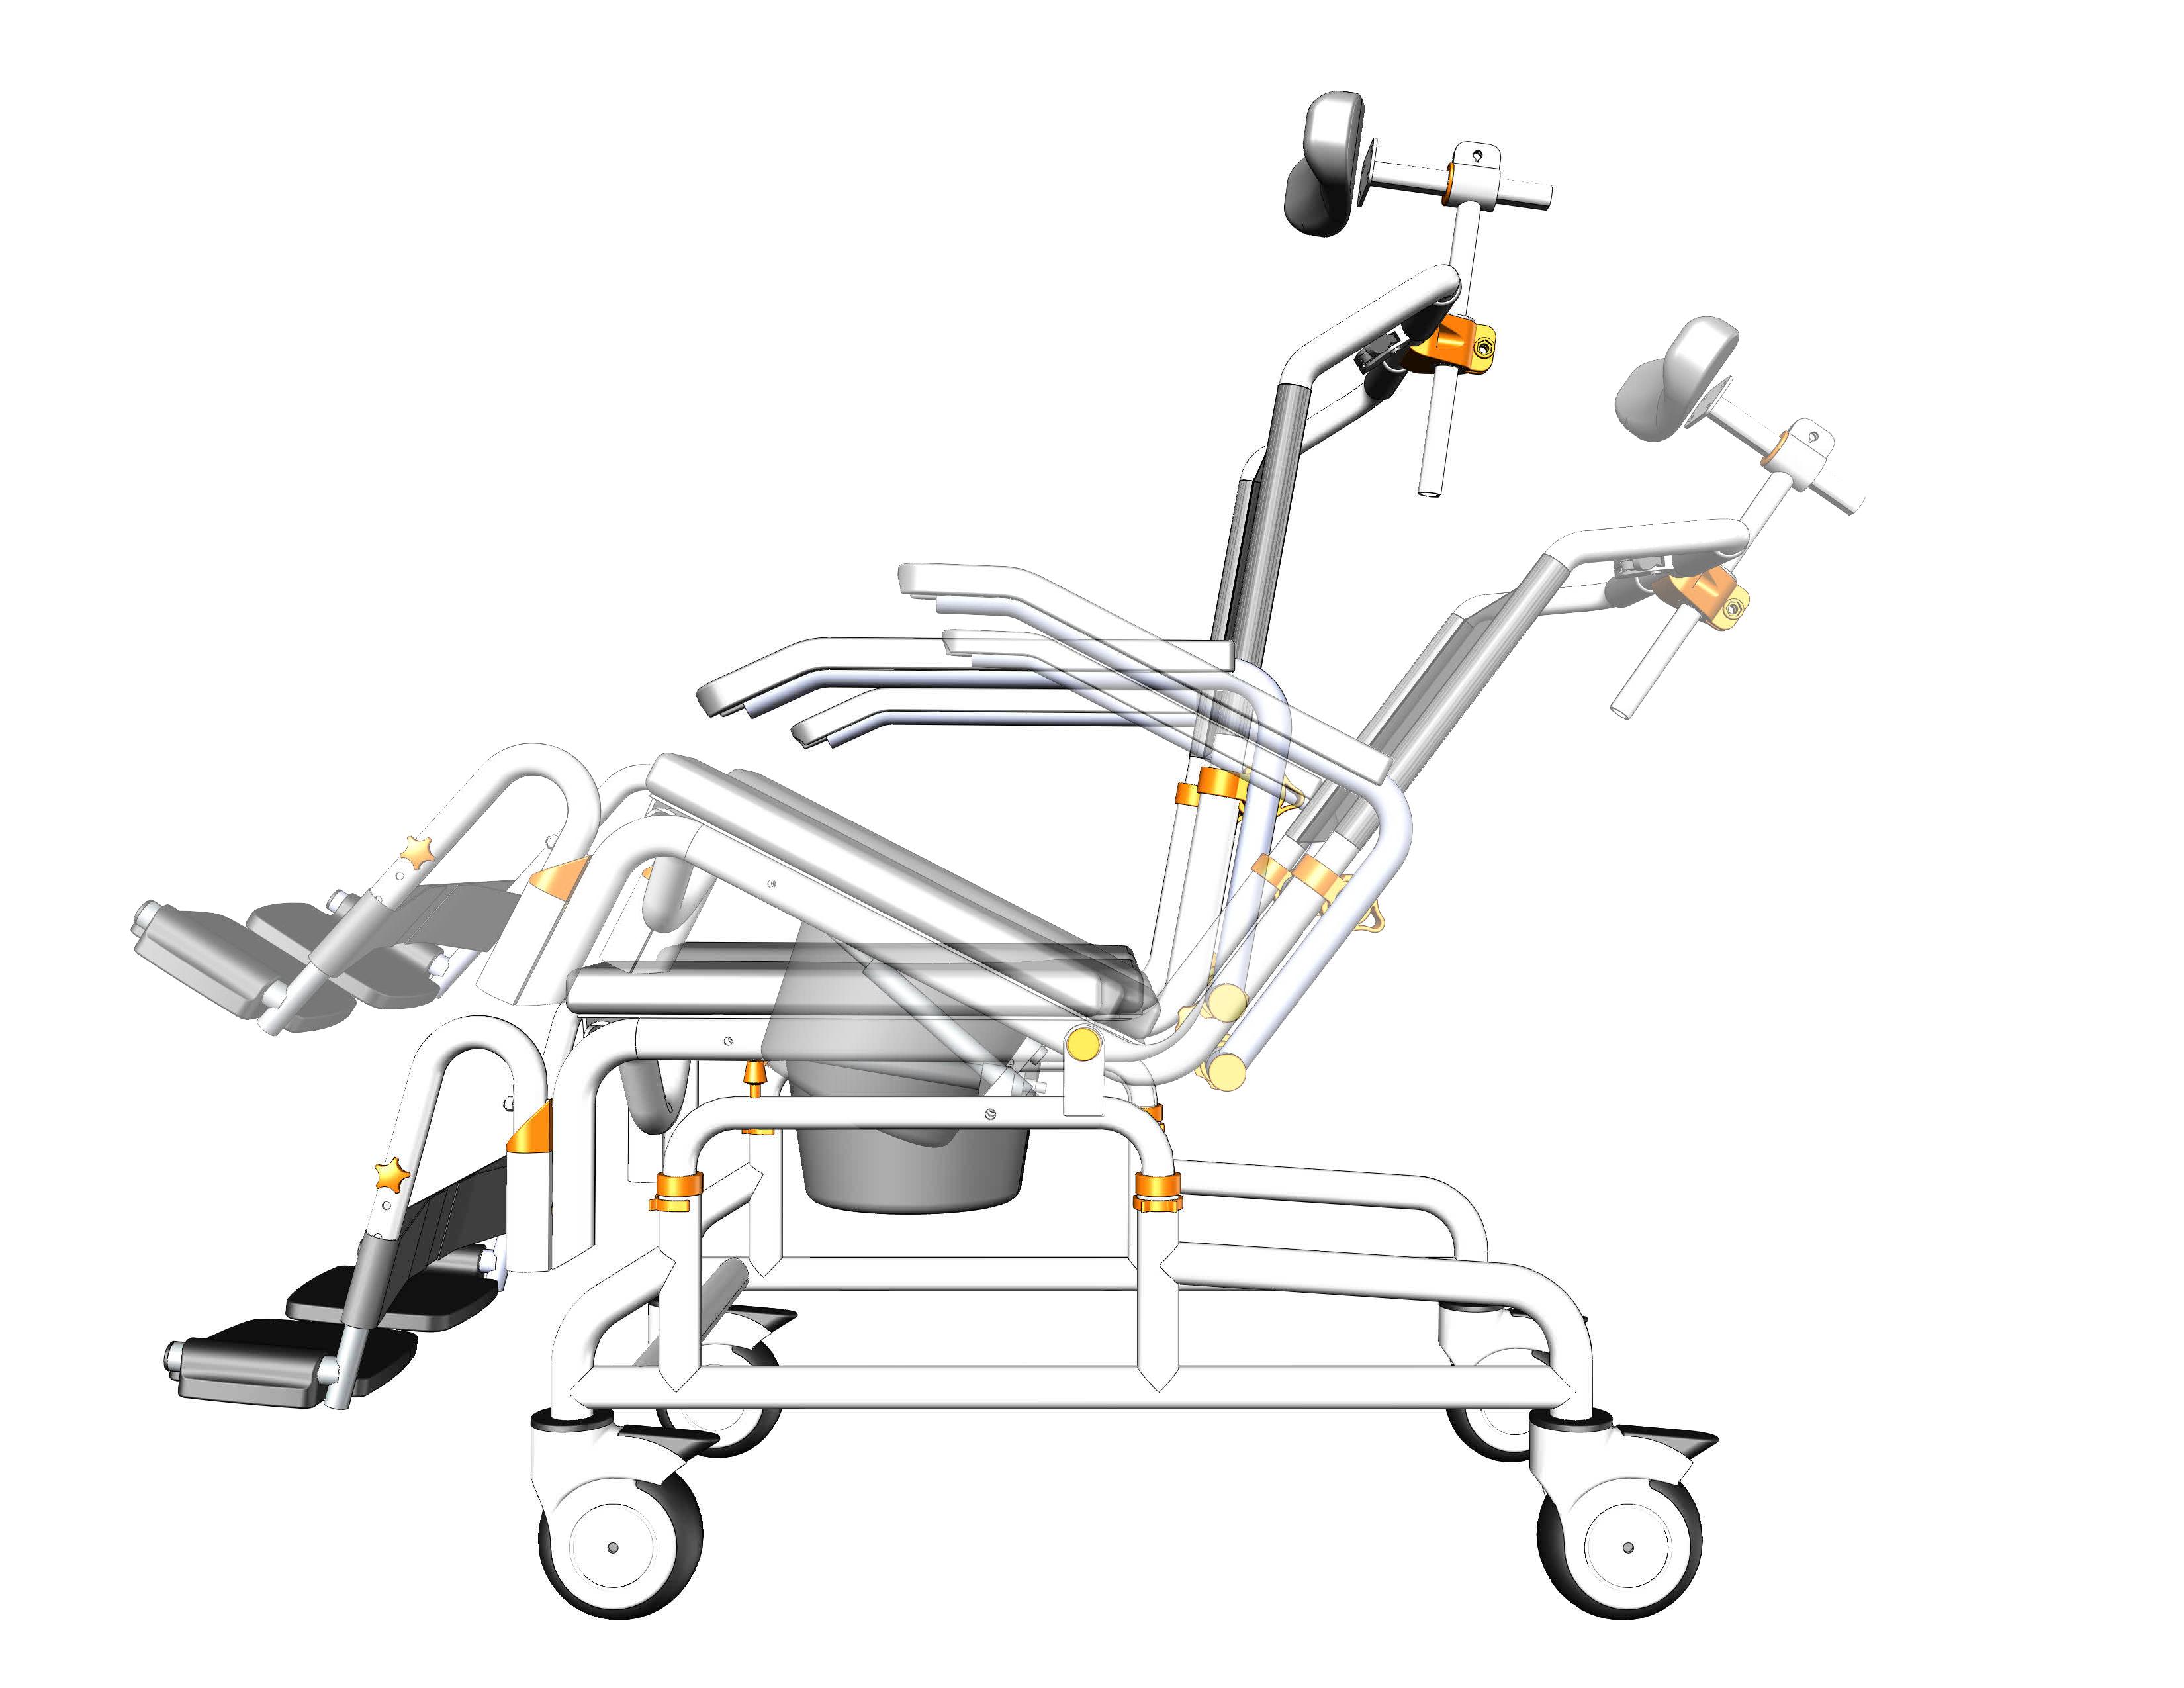
See the exploded chair image for the location of parts.
Showerbuddy SB3T page 4
Step 1
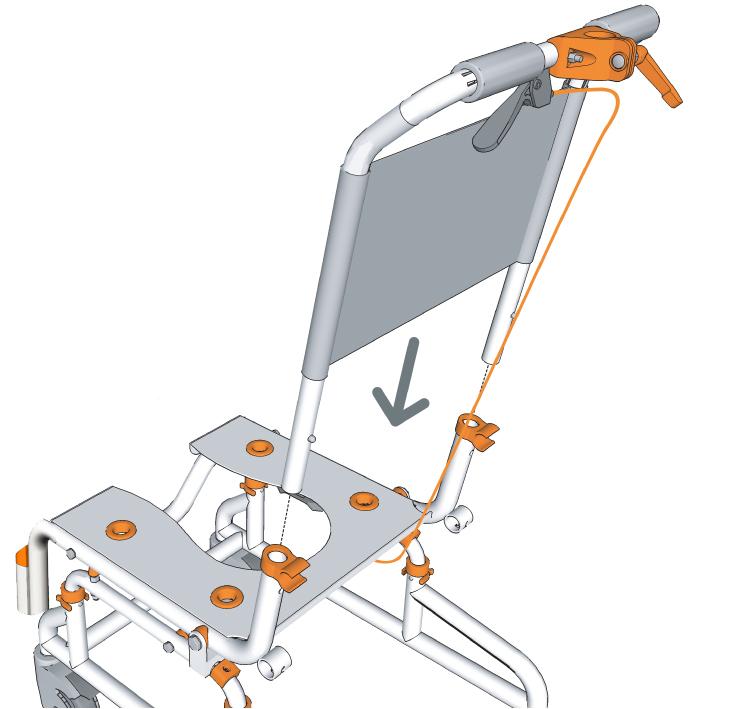
Insert the back rest frame into the seat base.
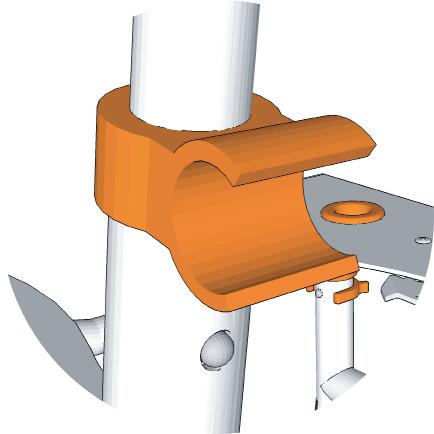
Slide the back rest frame into the seat base until the clip pins click into the holes on the seat base.
The clip pins secure the chair back frame in position.
Note
- To remove the seat back press the clip pins in and slide the seat back out of the seat base.
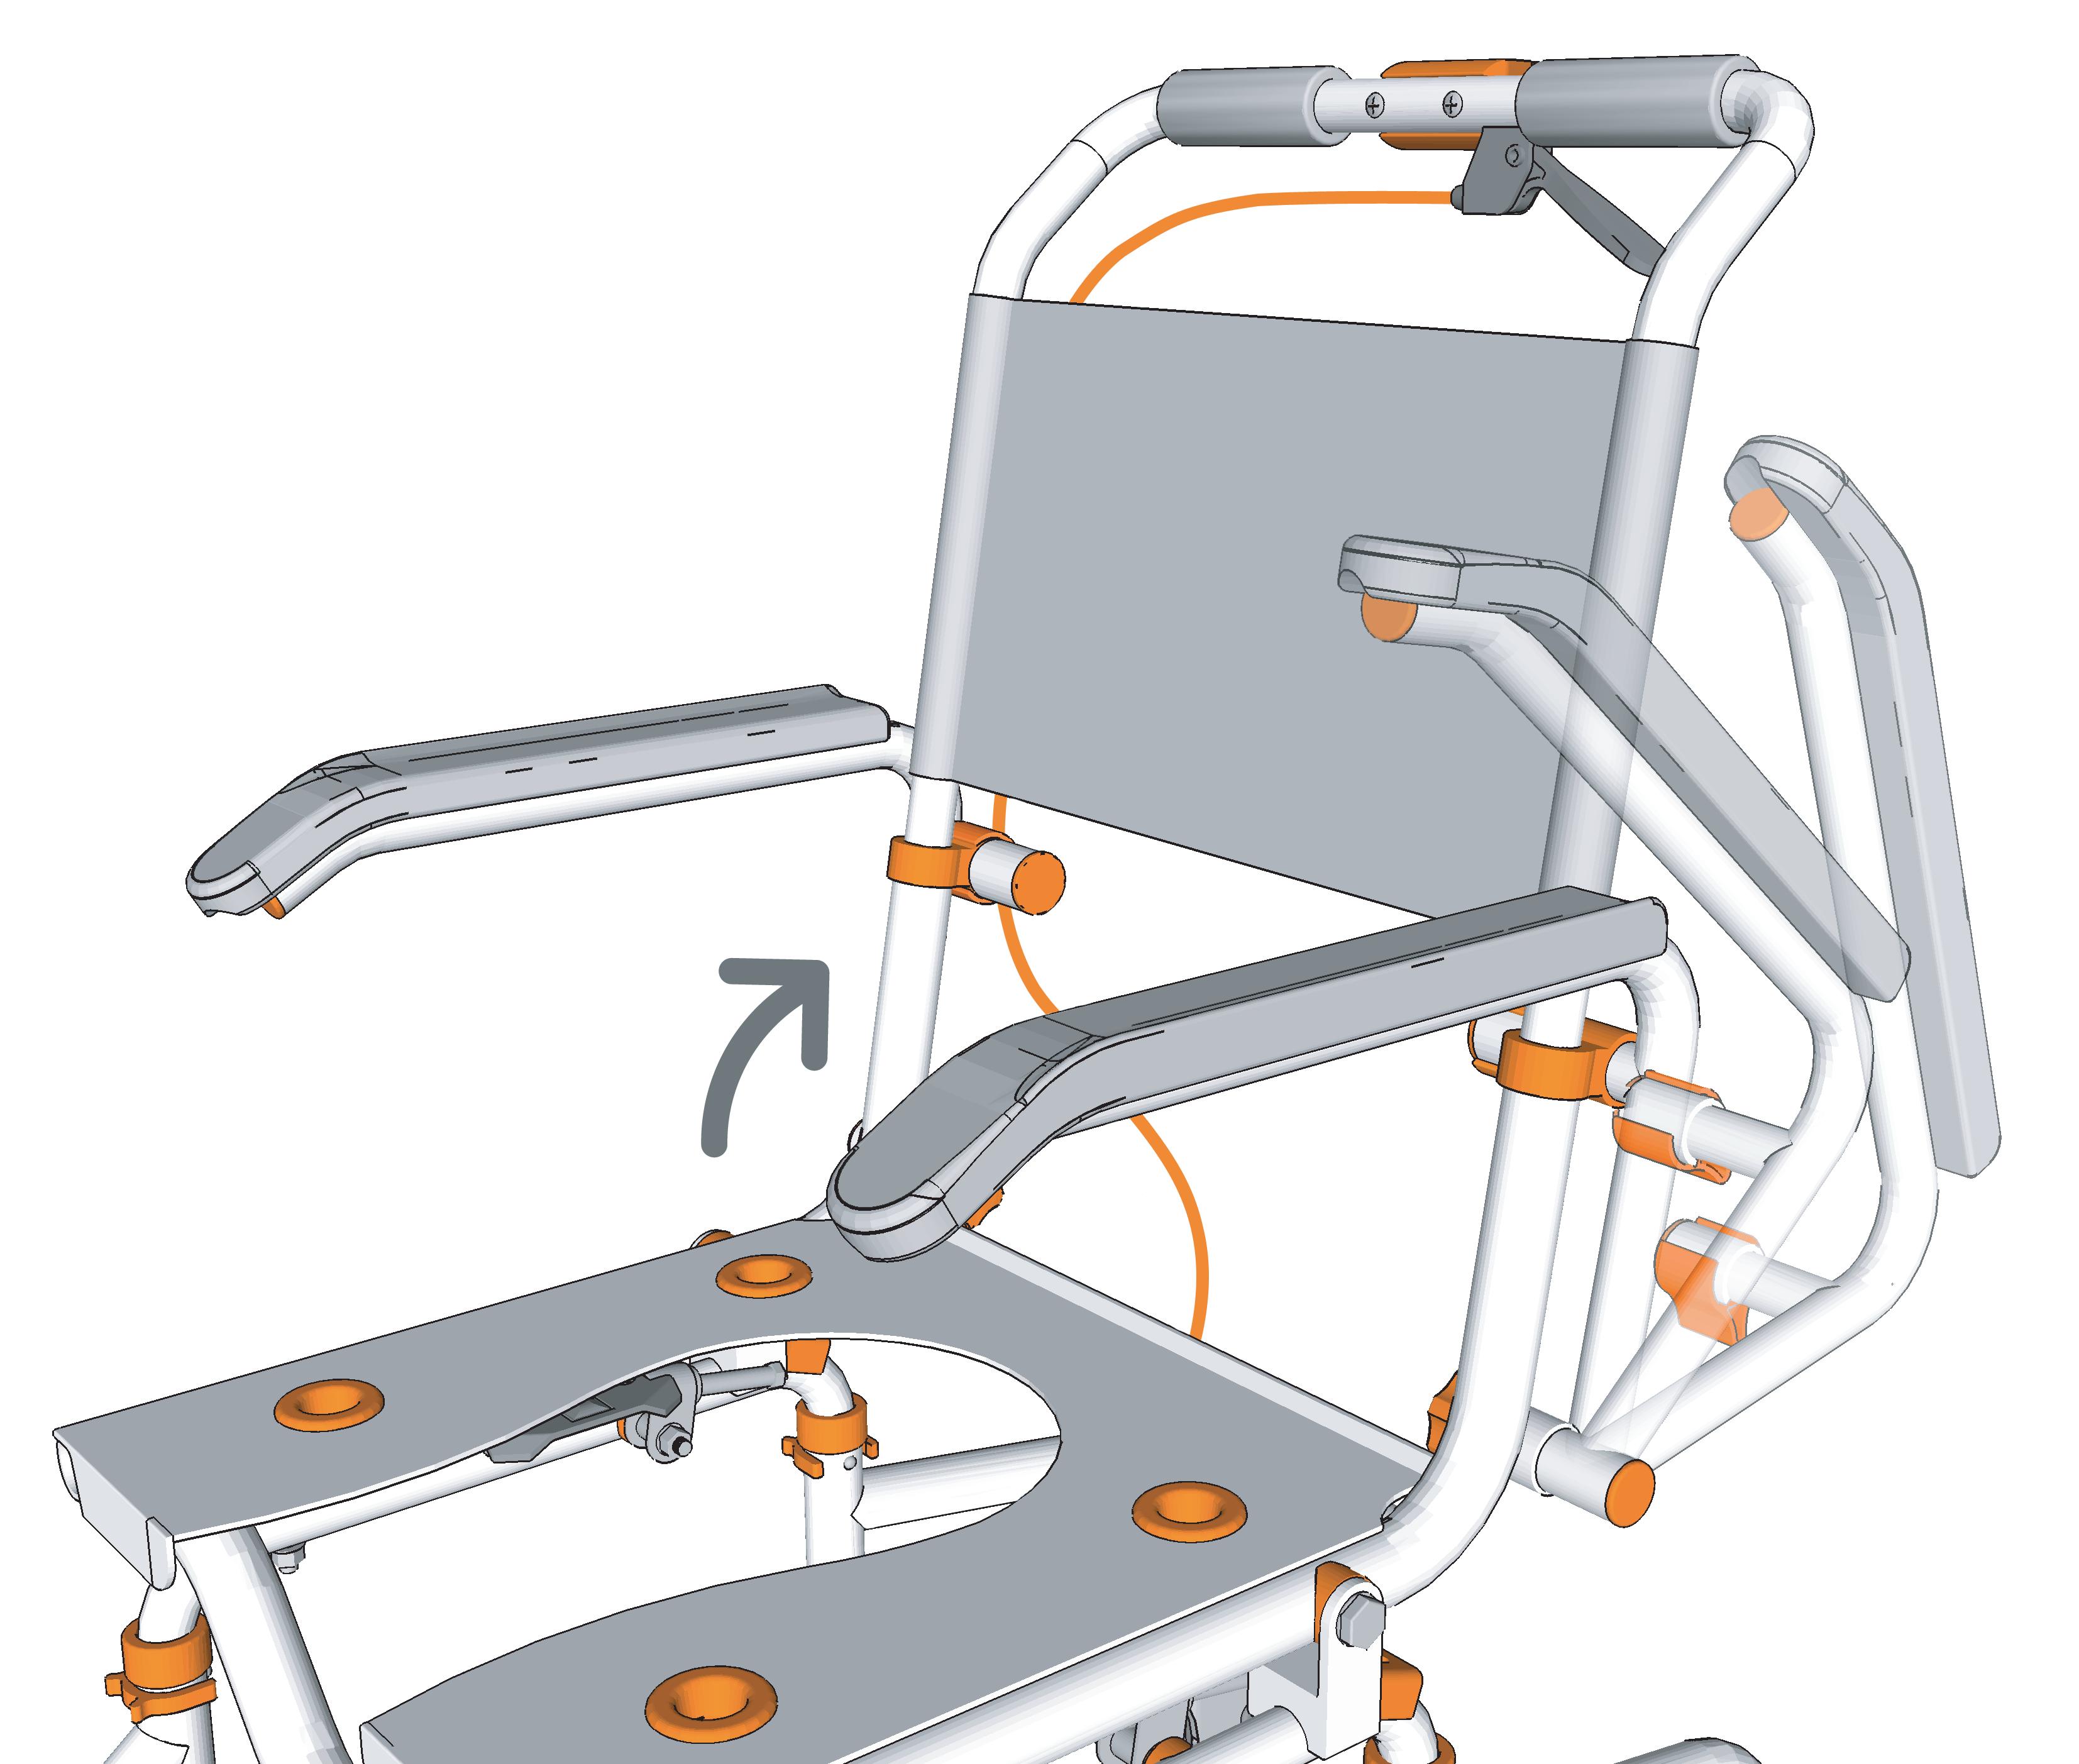
Step 2
Insert the arm rests into the sockets on the seat base until the clip pin clicks and locates the arm rests in position.
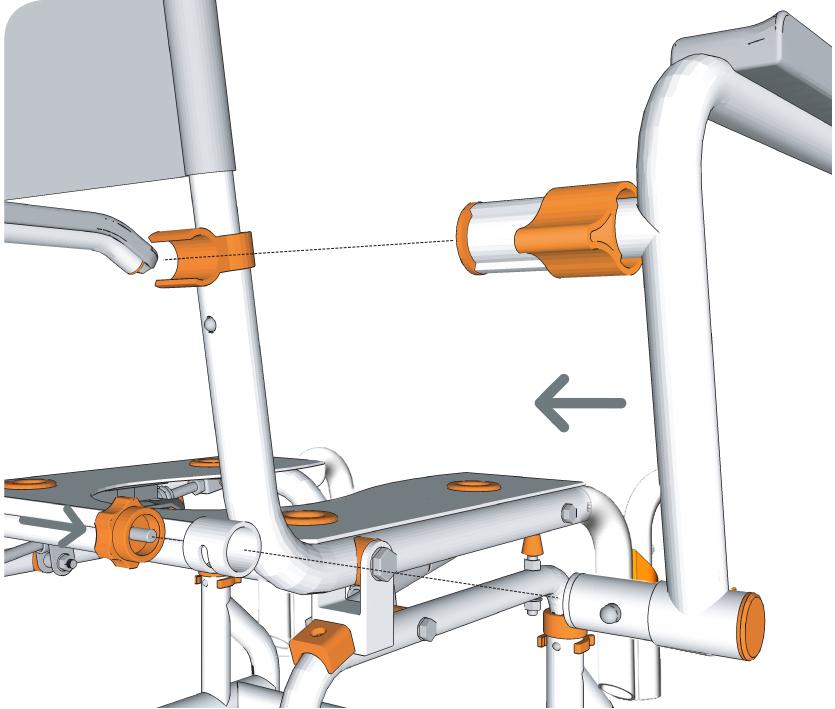
Screw the arm rest knob into the arm rest to firmly secure the arm rest in position.
Swing the arm rest forward so that it locks into position in the arm rest clip.
Slide the arm rest lock over the arm rest clip to lock the arm rest in position.
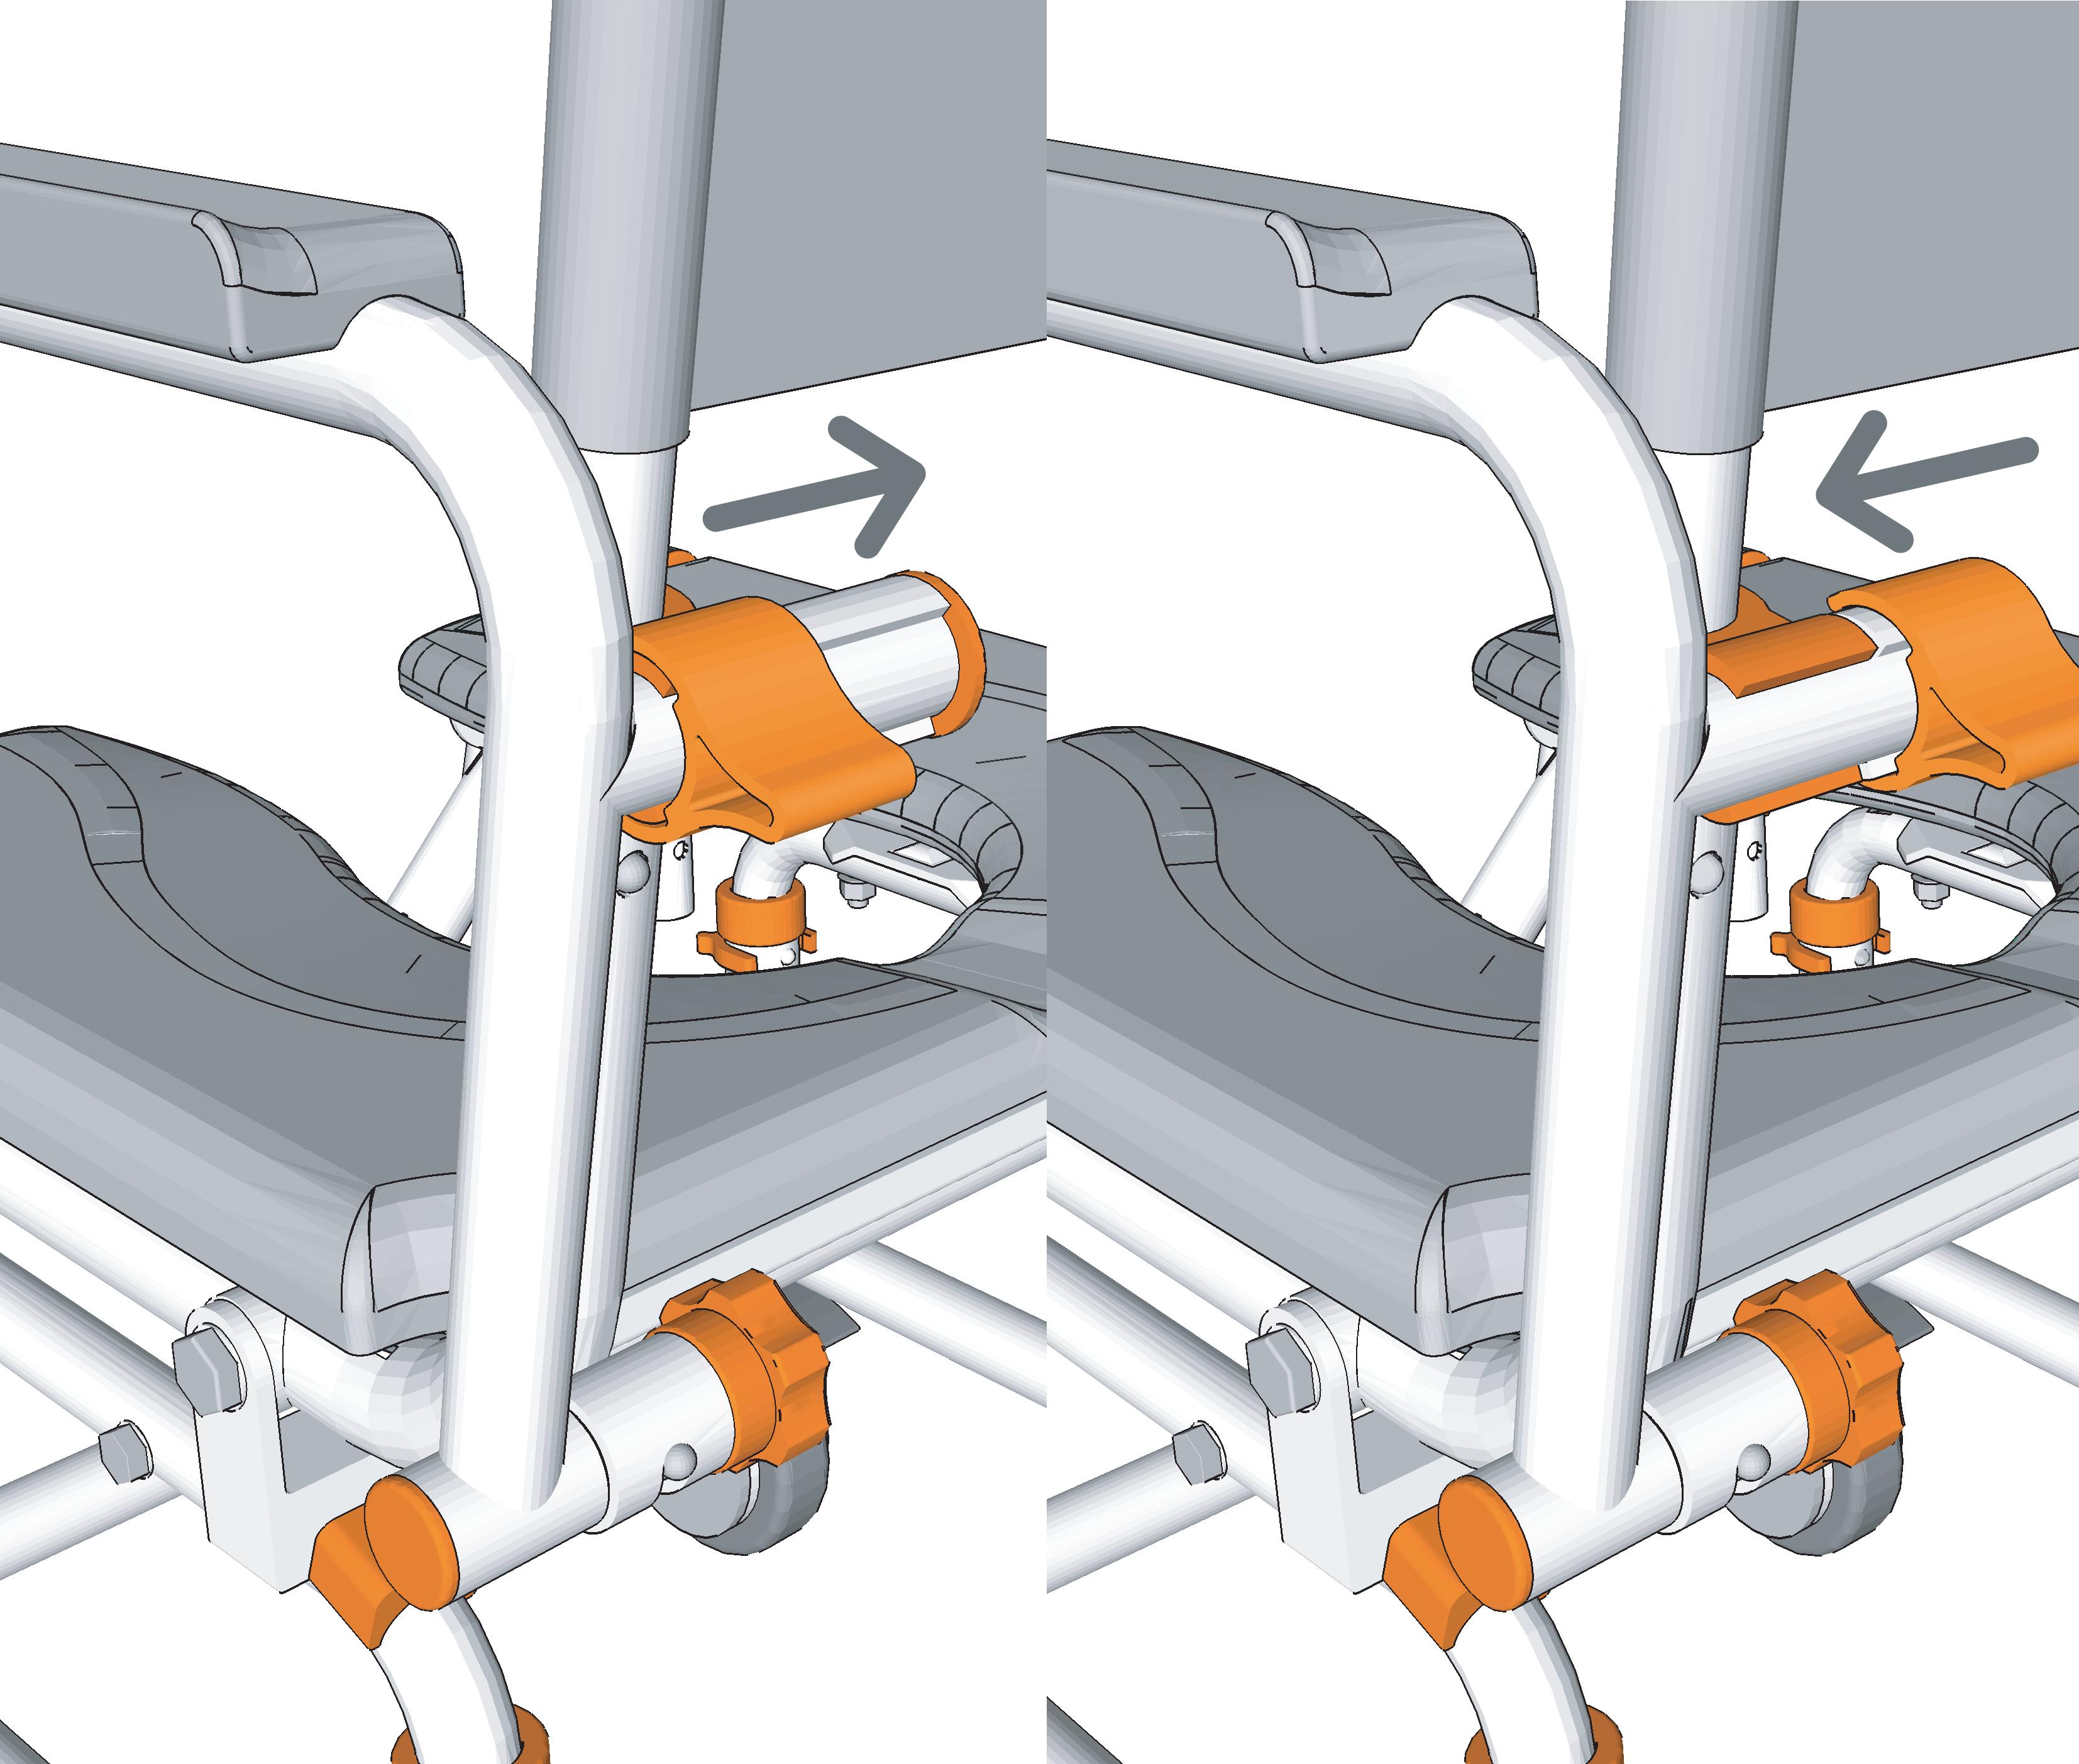
Step 3
By sliding the armrest lock you can easily swing the armrest out of the way or secure the armrest in position.
To unlock the armrest slide the armrest lock away from the armrest.
To lock the armrest slide the armrest lock towards the armrest.
Note
- The armrest locks should always be used when the armrests aren’t in the swingaway position.
Step 4
The armrests can be easily swung-away when required.
Unlock the armrest by sliding the armrest lock away from the armrest. Once this is done the armrest can be swung away. The clip pin which secures the armrest in position stops the armrest from rotating to far.
Note
- The armrest locks should always be used when the armrests aren’t in the swing-away position.
Step 5
Ensuring the correct orientation attach the seat cushion to the seat base by pushing the 4 locating lugs on the underside of the cushion into the connectors on the seat base.
Firmly press the cushion into position so that the 4 locating lugs are securely located in the connectors.

Note
- To remove the cushion, carefully remove one lug at a time from the connectors until all 4 locating lugs are removed.
Step 6
Slide the neck rest height adjustment tube into the neck rest attachment. Adjust to the required height and secure in the correct position.
By screwing the neck rest handle in a clockwise direction the neck rest attachment will tighten and secure the neck rest height adjustment tube in position.
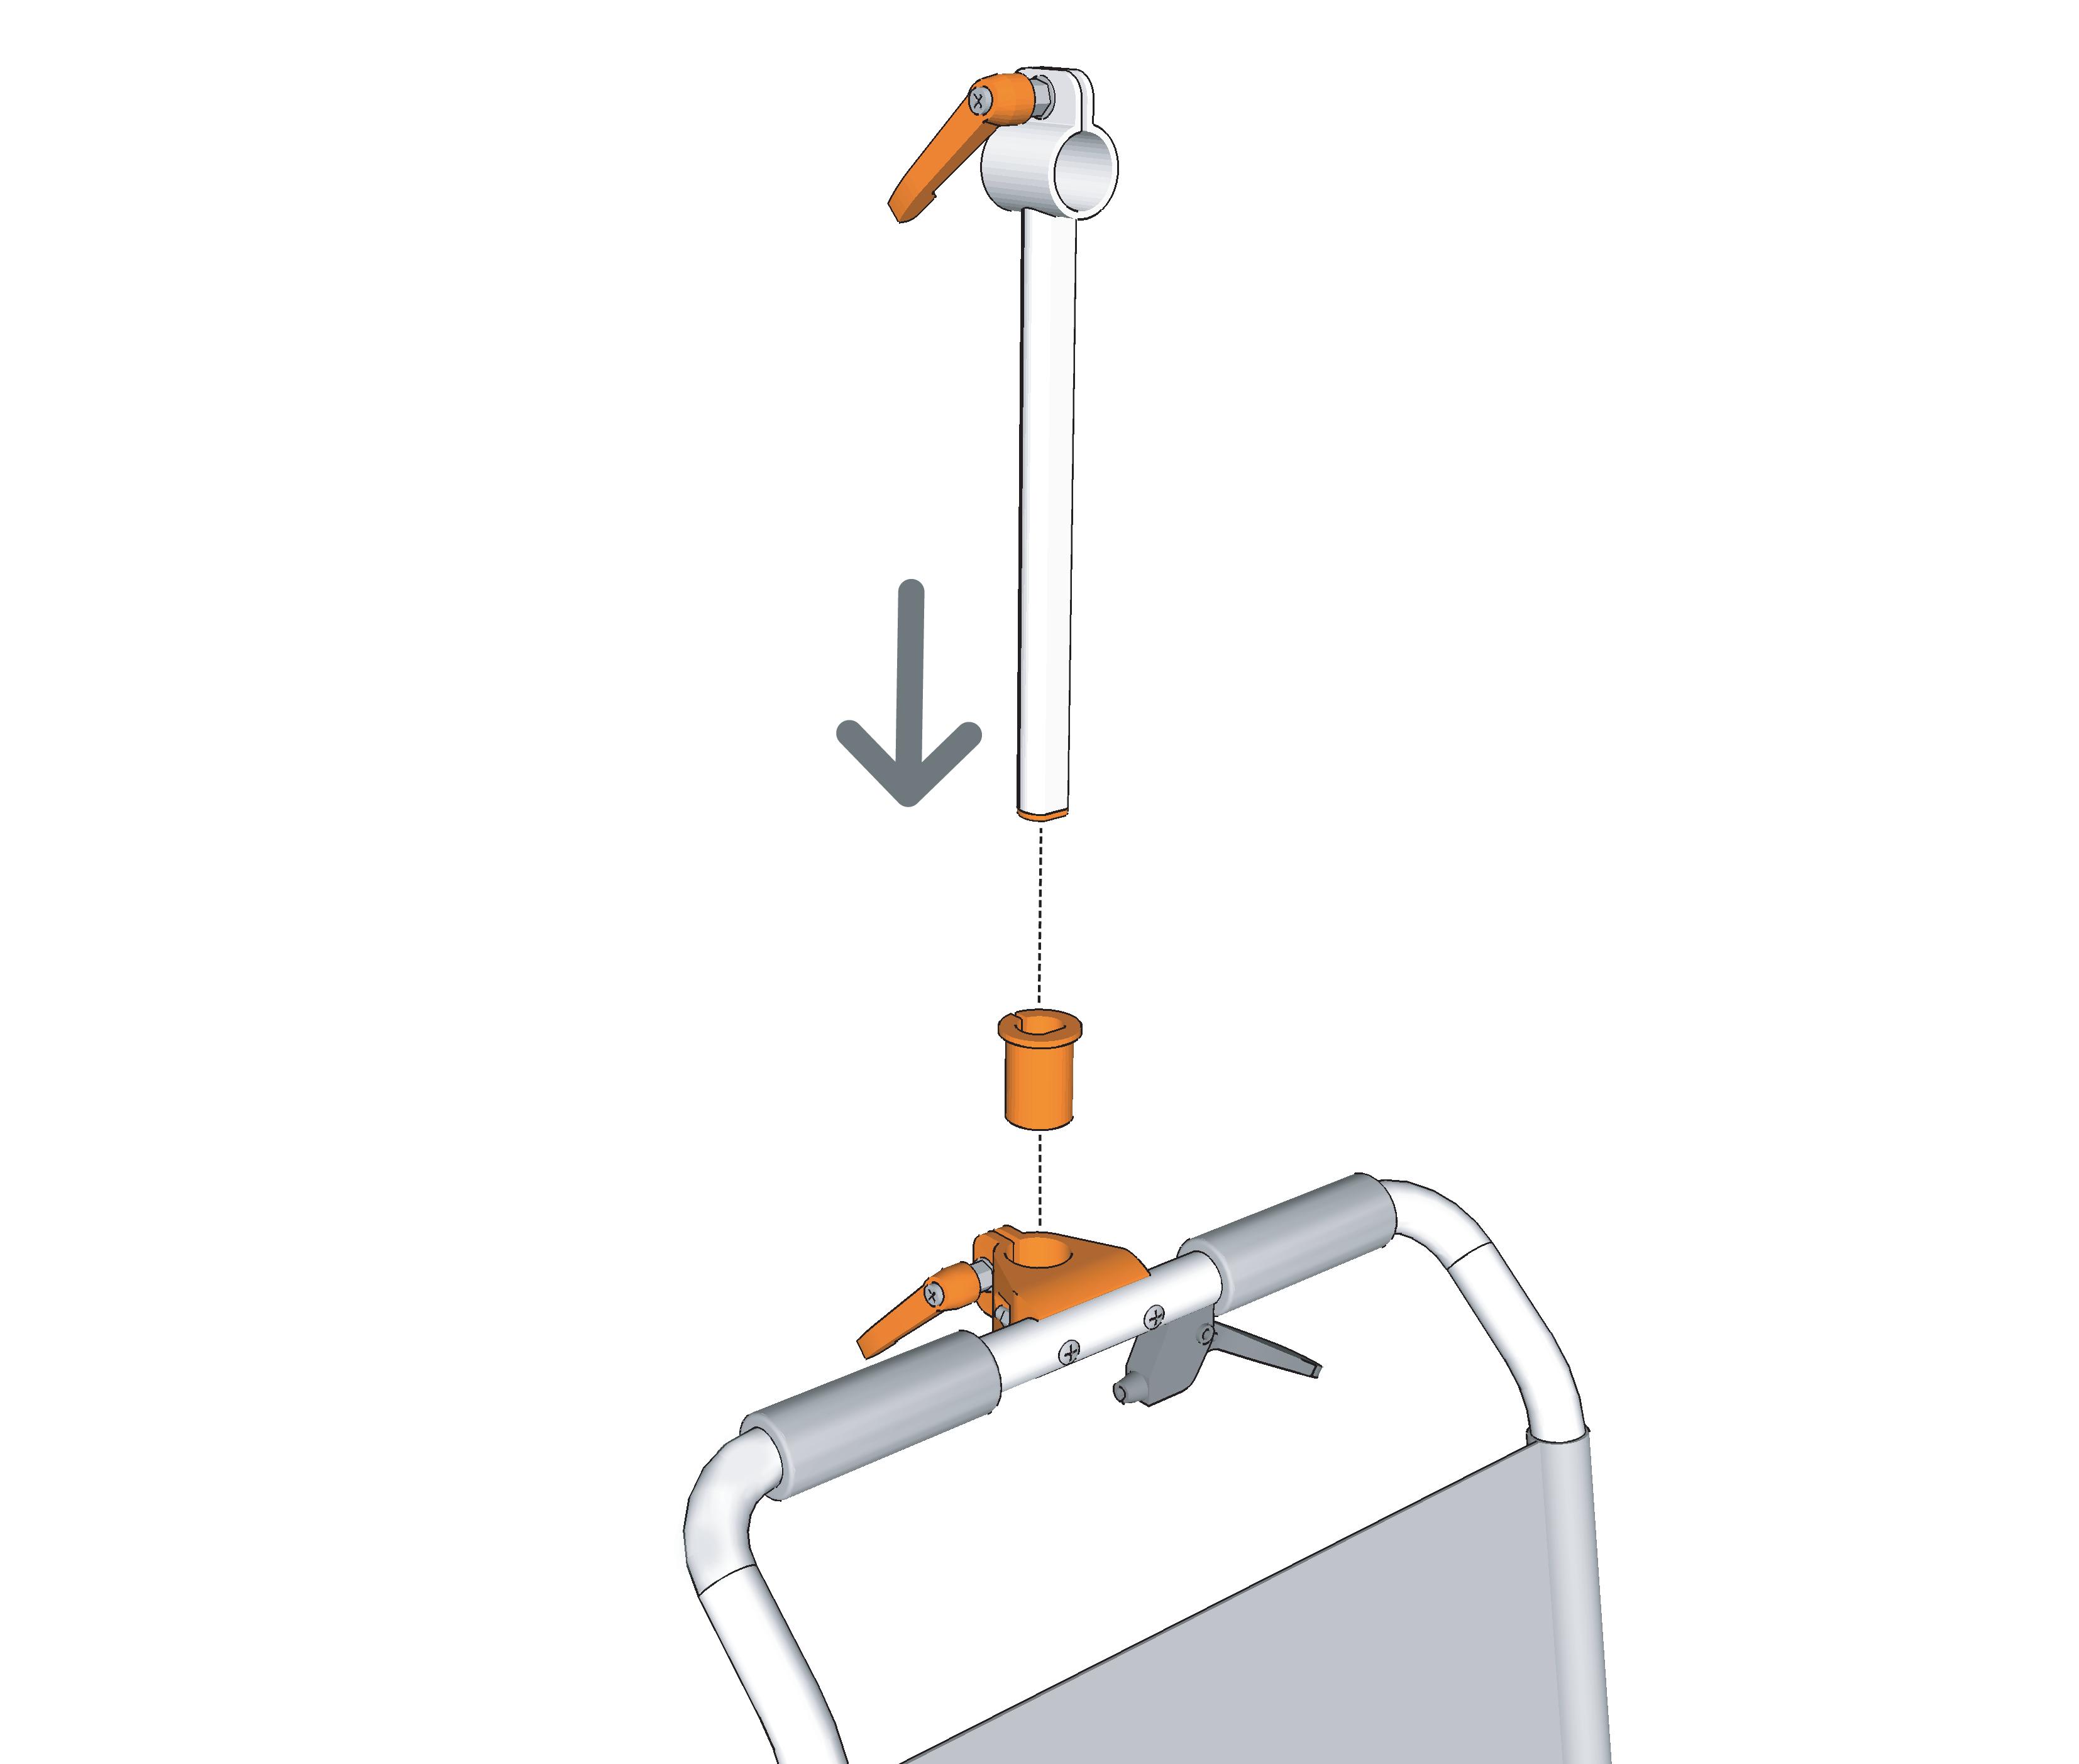
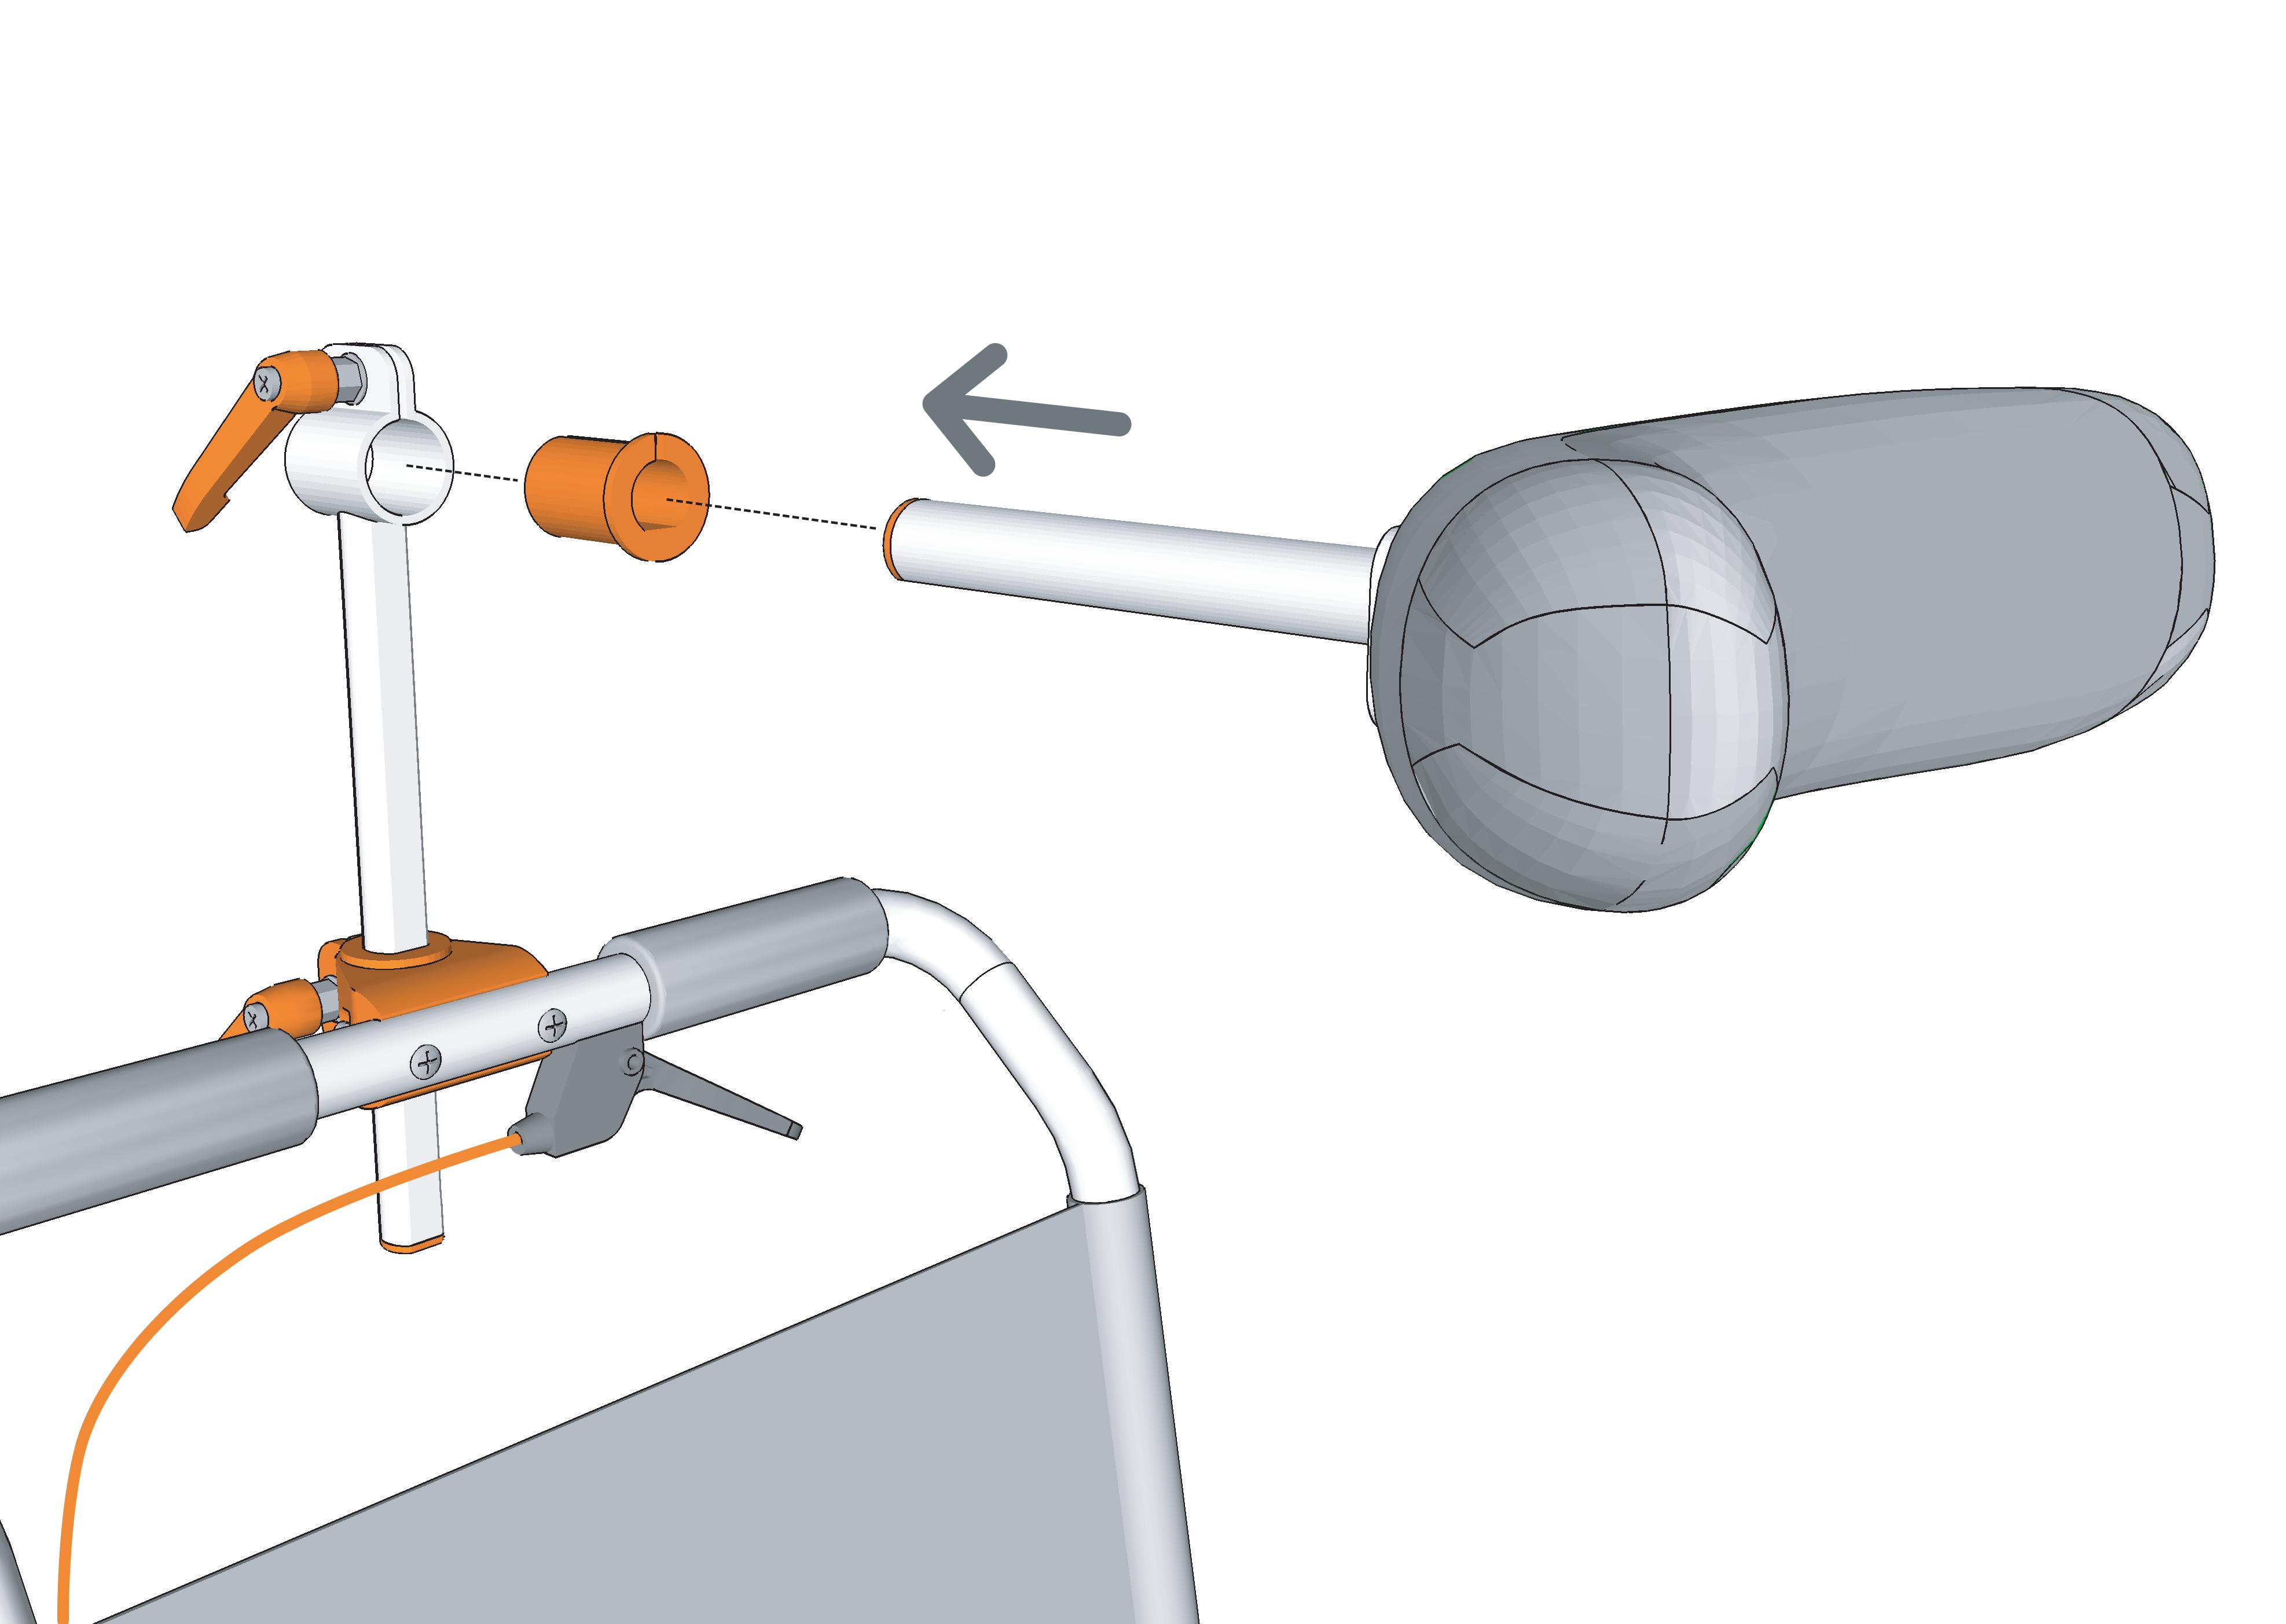
Step 7
To attach the neck rest, insert the plastic sleeve into the neck rest height adjustment tube.
Insert the neck rest into the sleeve on the neck rest height adjustment tube. Adjust to the required length and secure in the correct position. By screwing the neck rest handle in a clockwise direction the neck rest height adjustment tube connector will tighten and secure the neck rest in position.
Note
- The neck rest should always be used and adjusted to suit the specific user.
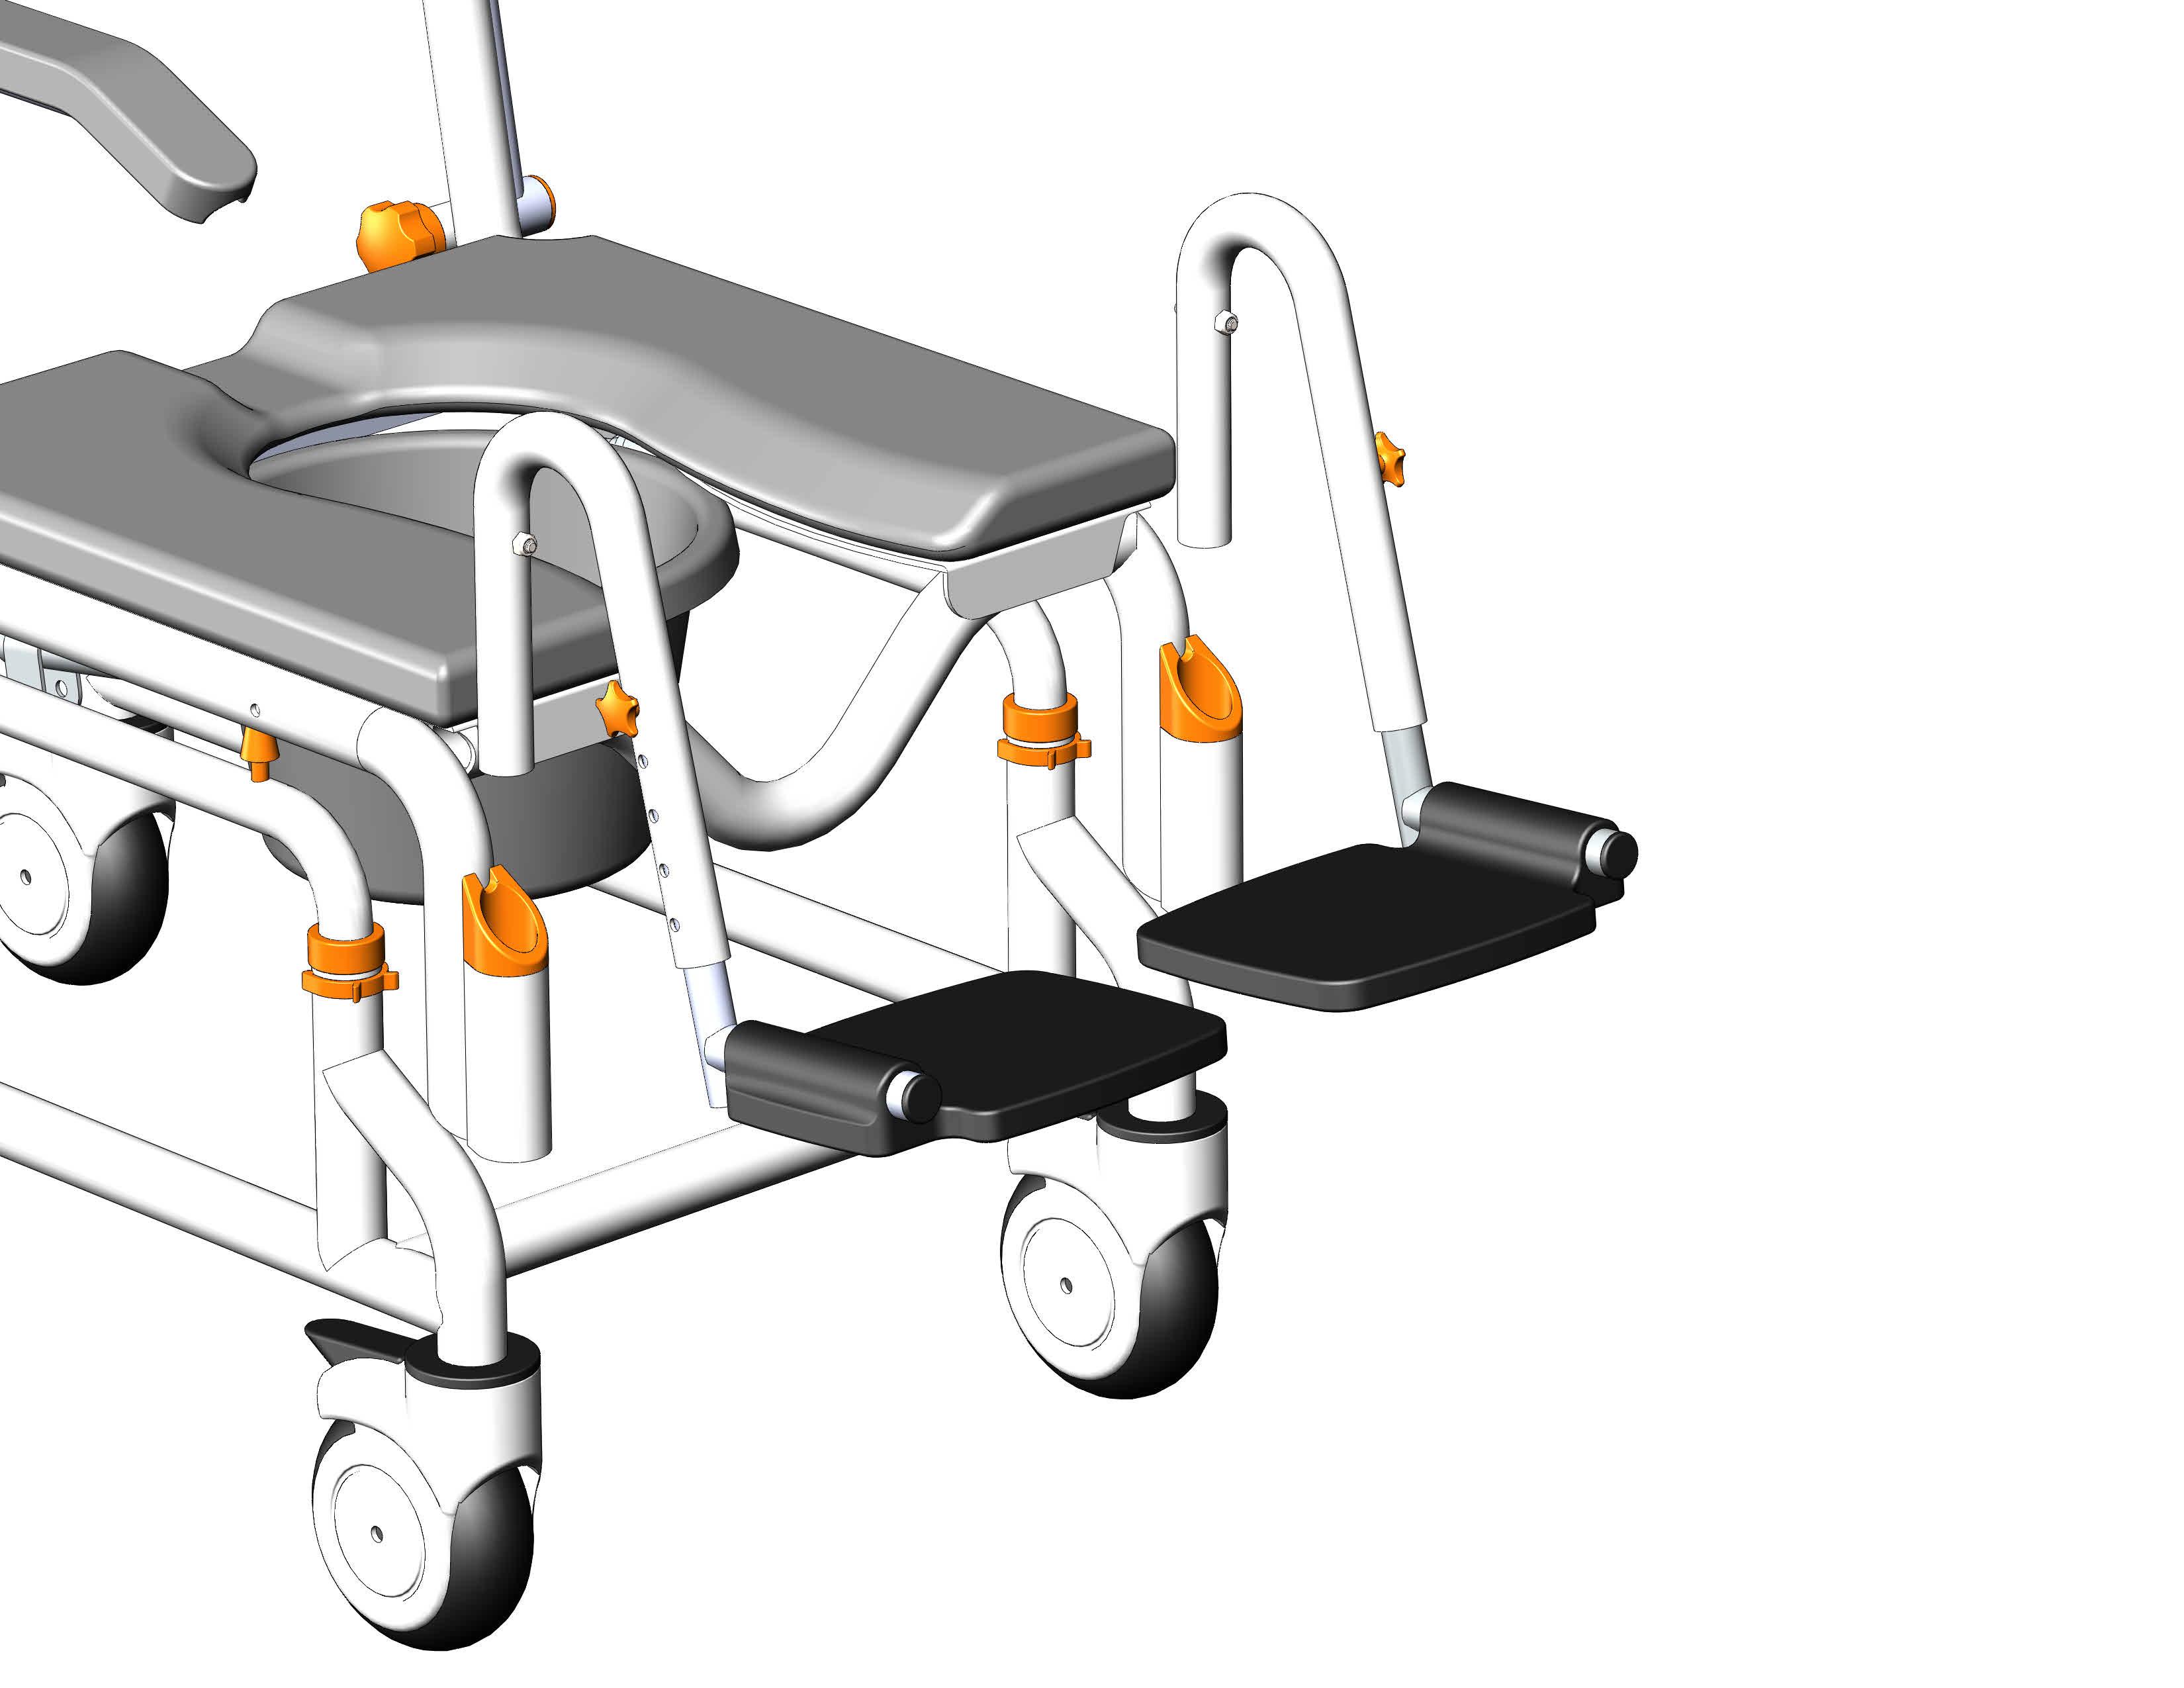
Step 8
Insert the footrests as shown by simply dropping each leg into the tube holder.
Make sure each leg is fully located in the slot at the rear to prevent the leg from roating. To rotated the leg simply lift and rotate out of the way.
Step 9
To swing the footrest out of the way simply lift the leg out of the slot and spin the leg away.
Warning
DO NOT STAND ON FOOTRESTS
Chair will be unstable and tip forward if body-weight is applied to footrests
Step 10
After unlocking the footrests rotate the footrests outwards to allow easy access to the chair.
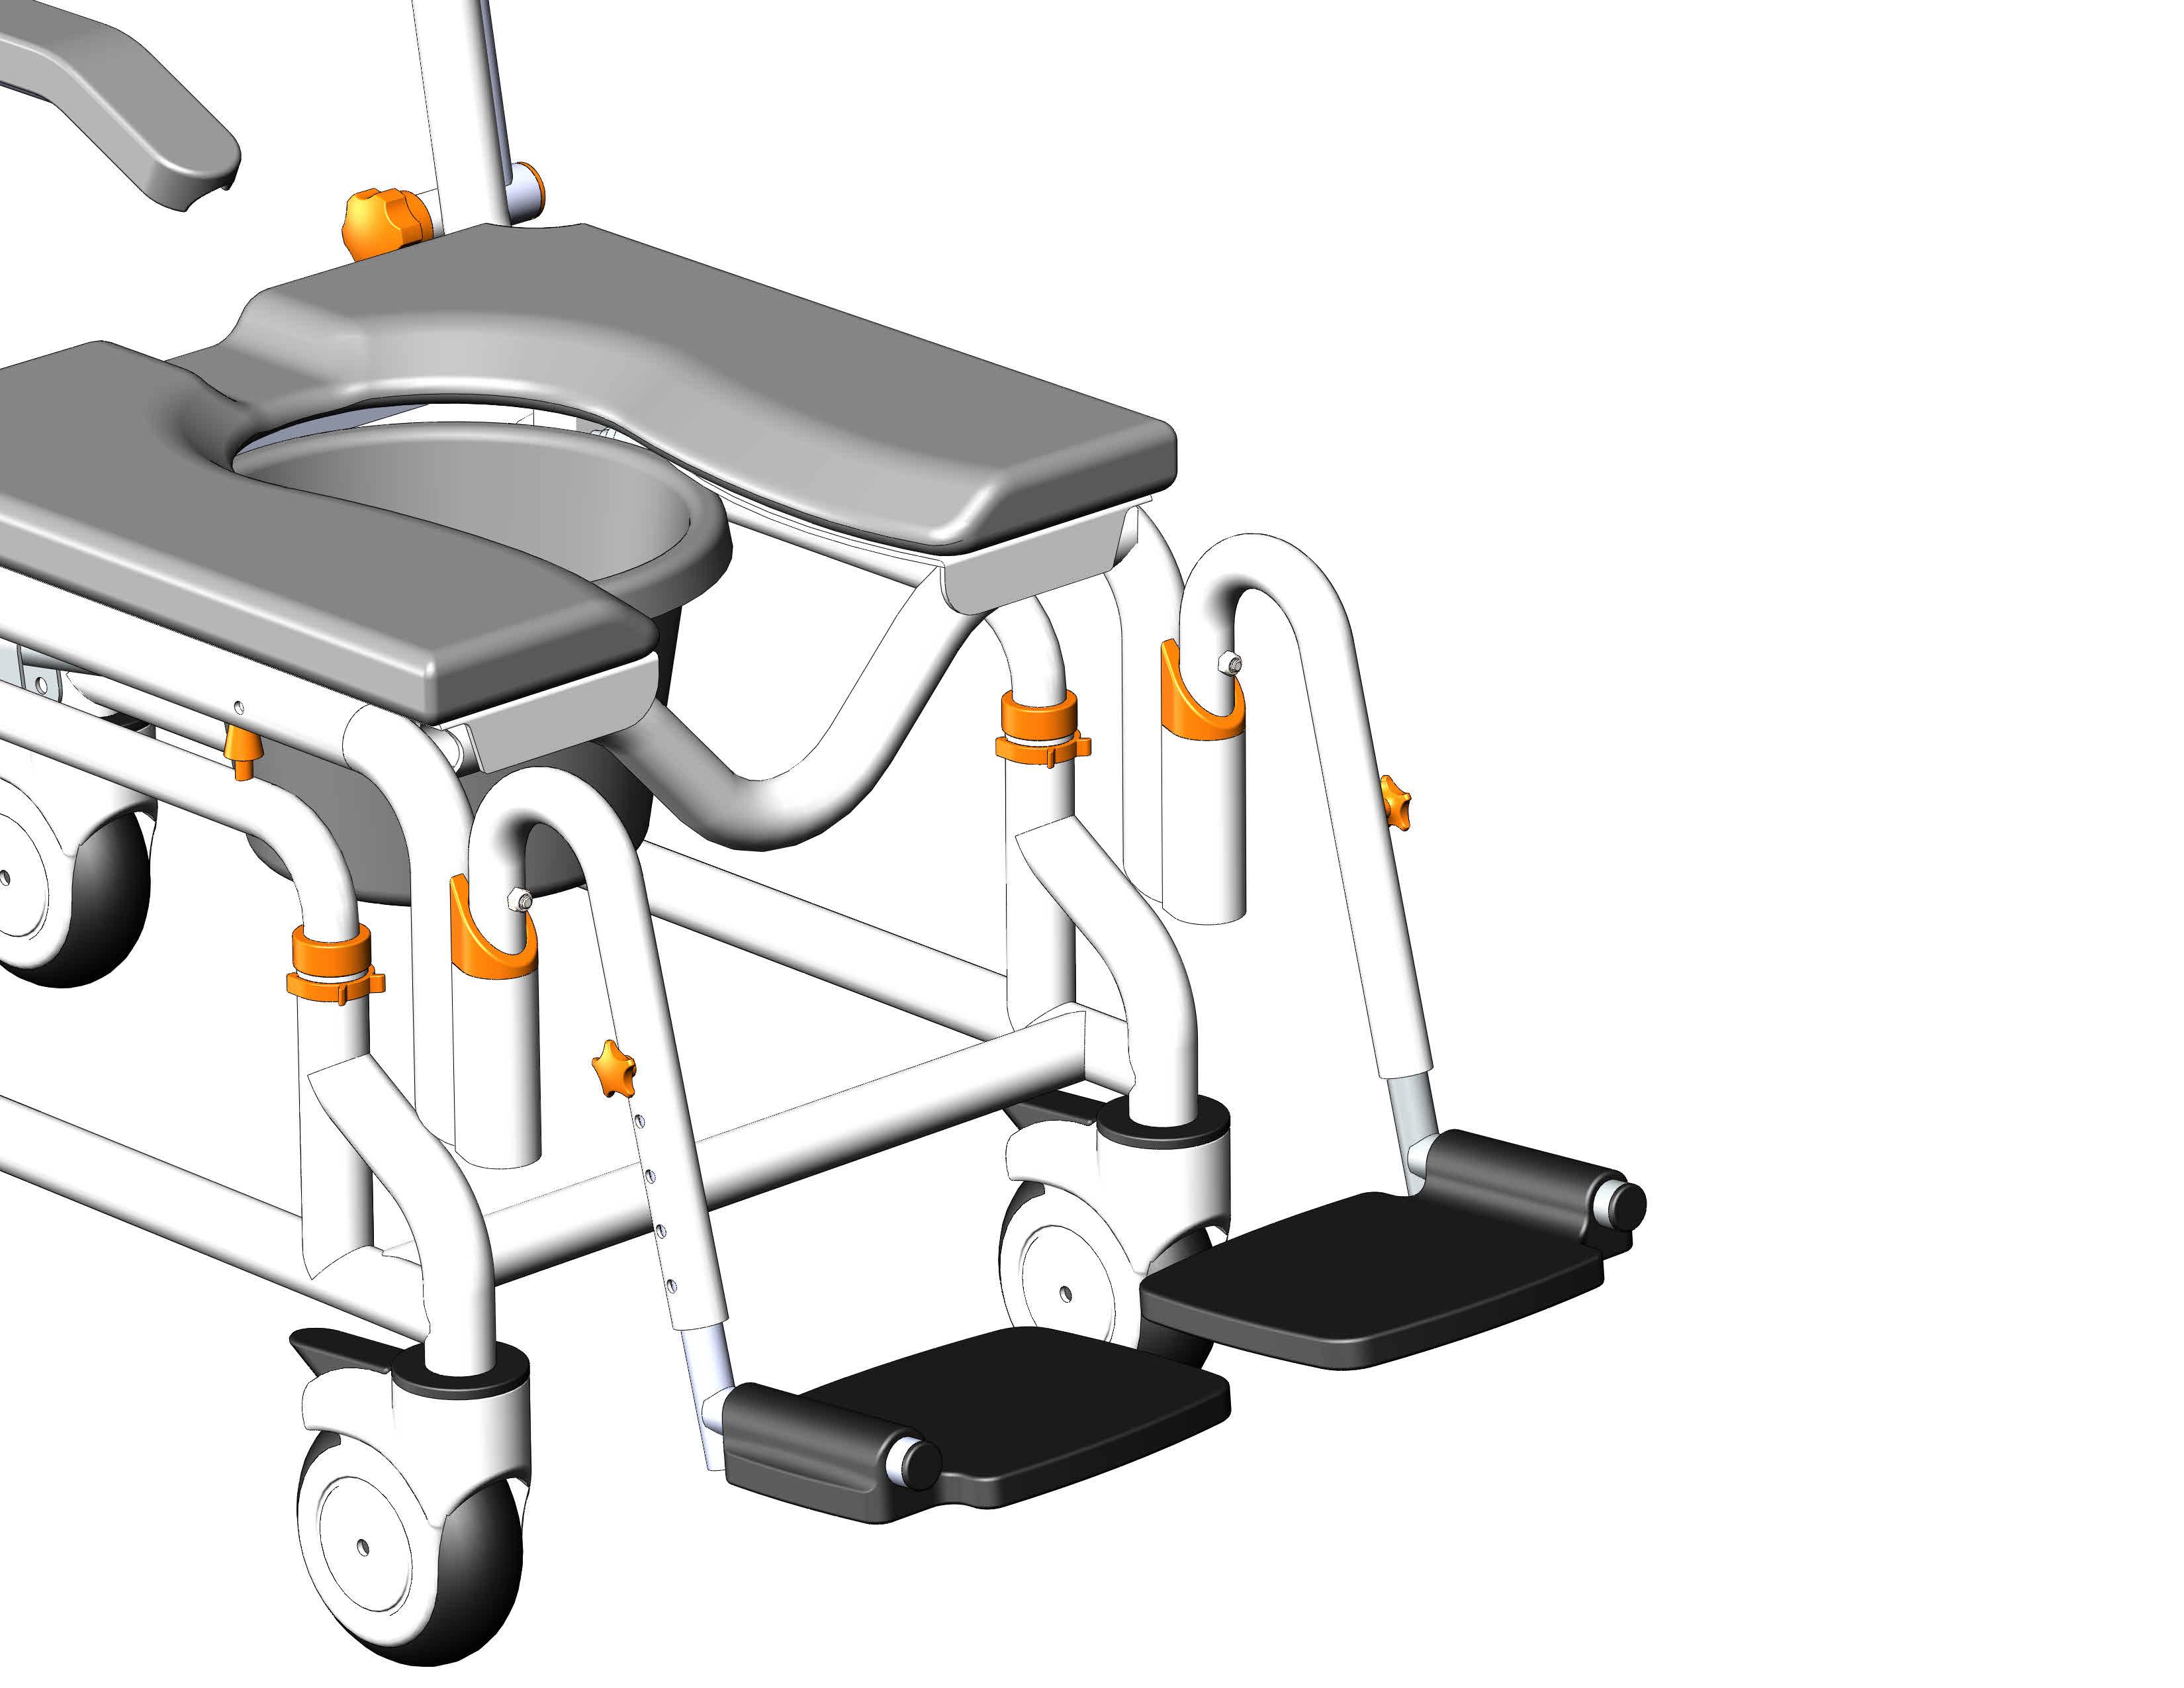
When required rotate the footrests inwards to reposition the footrests.
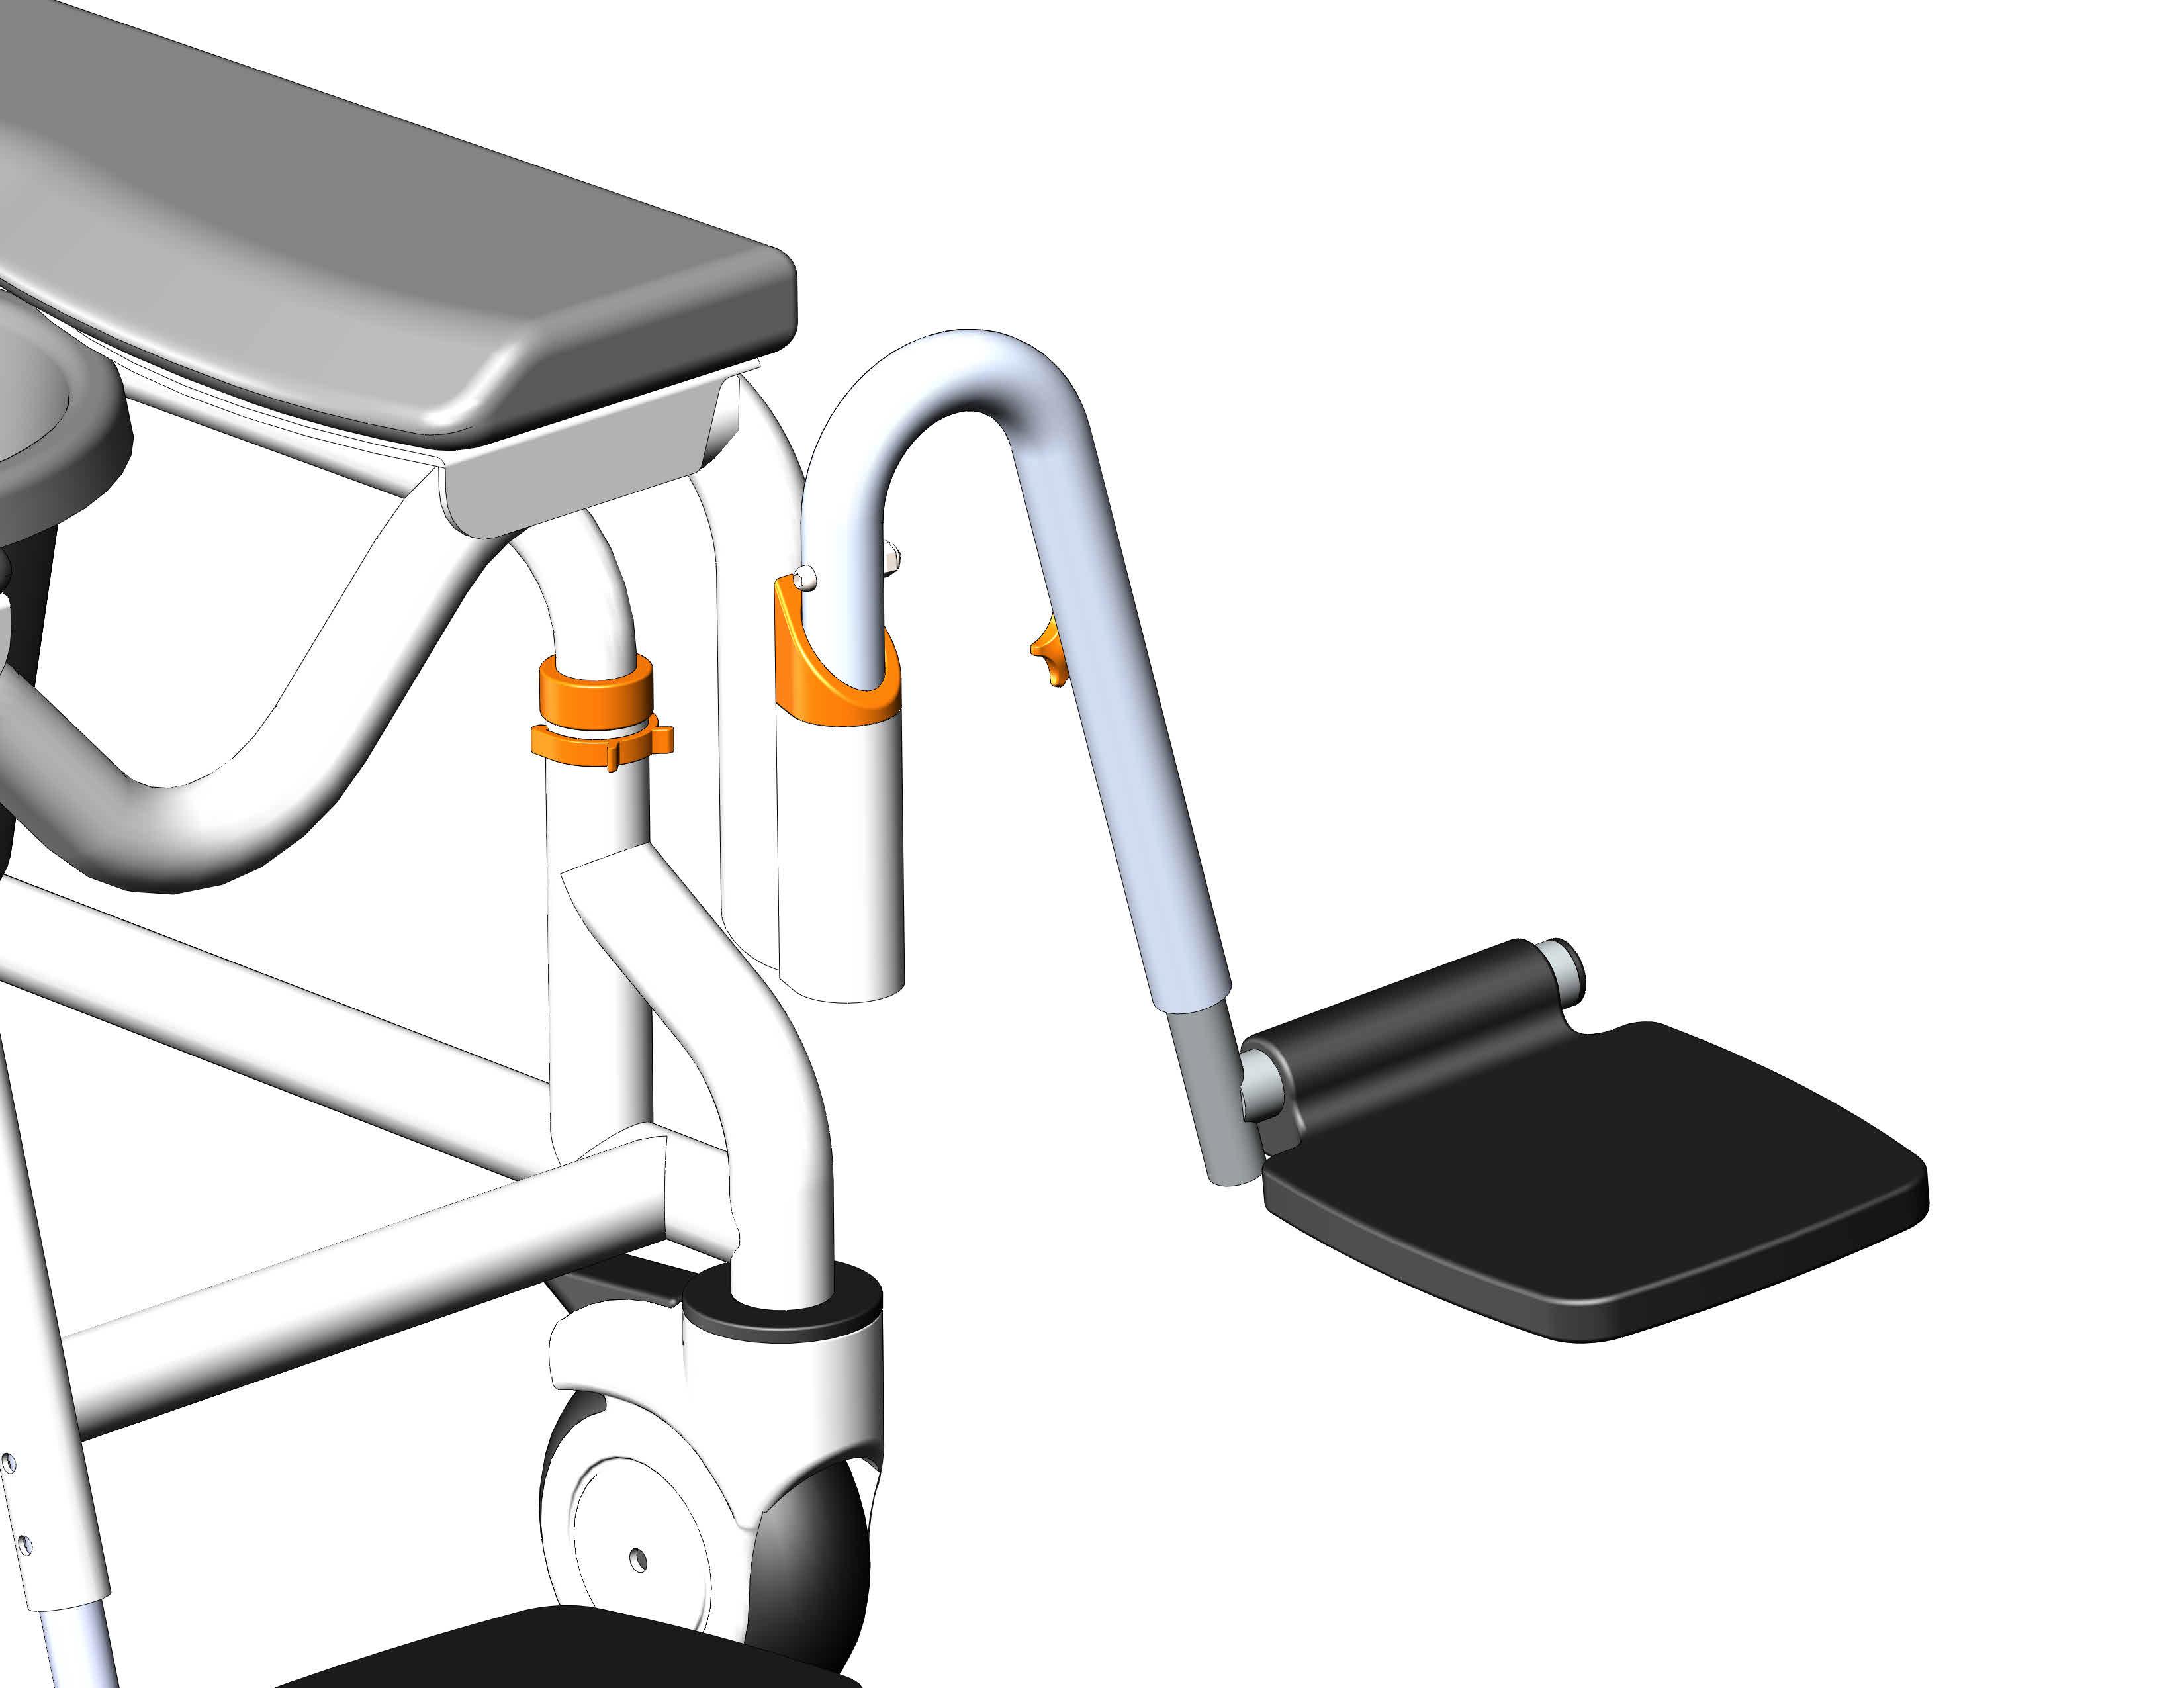
Step 11
With the footrest in the swing-away position the footrest can easily be removed.
Lift the footrest upwards to slide the footrest out of the footrest connector.
Note
- The footrests should always be used for safety, especially when the chair is being reclined.
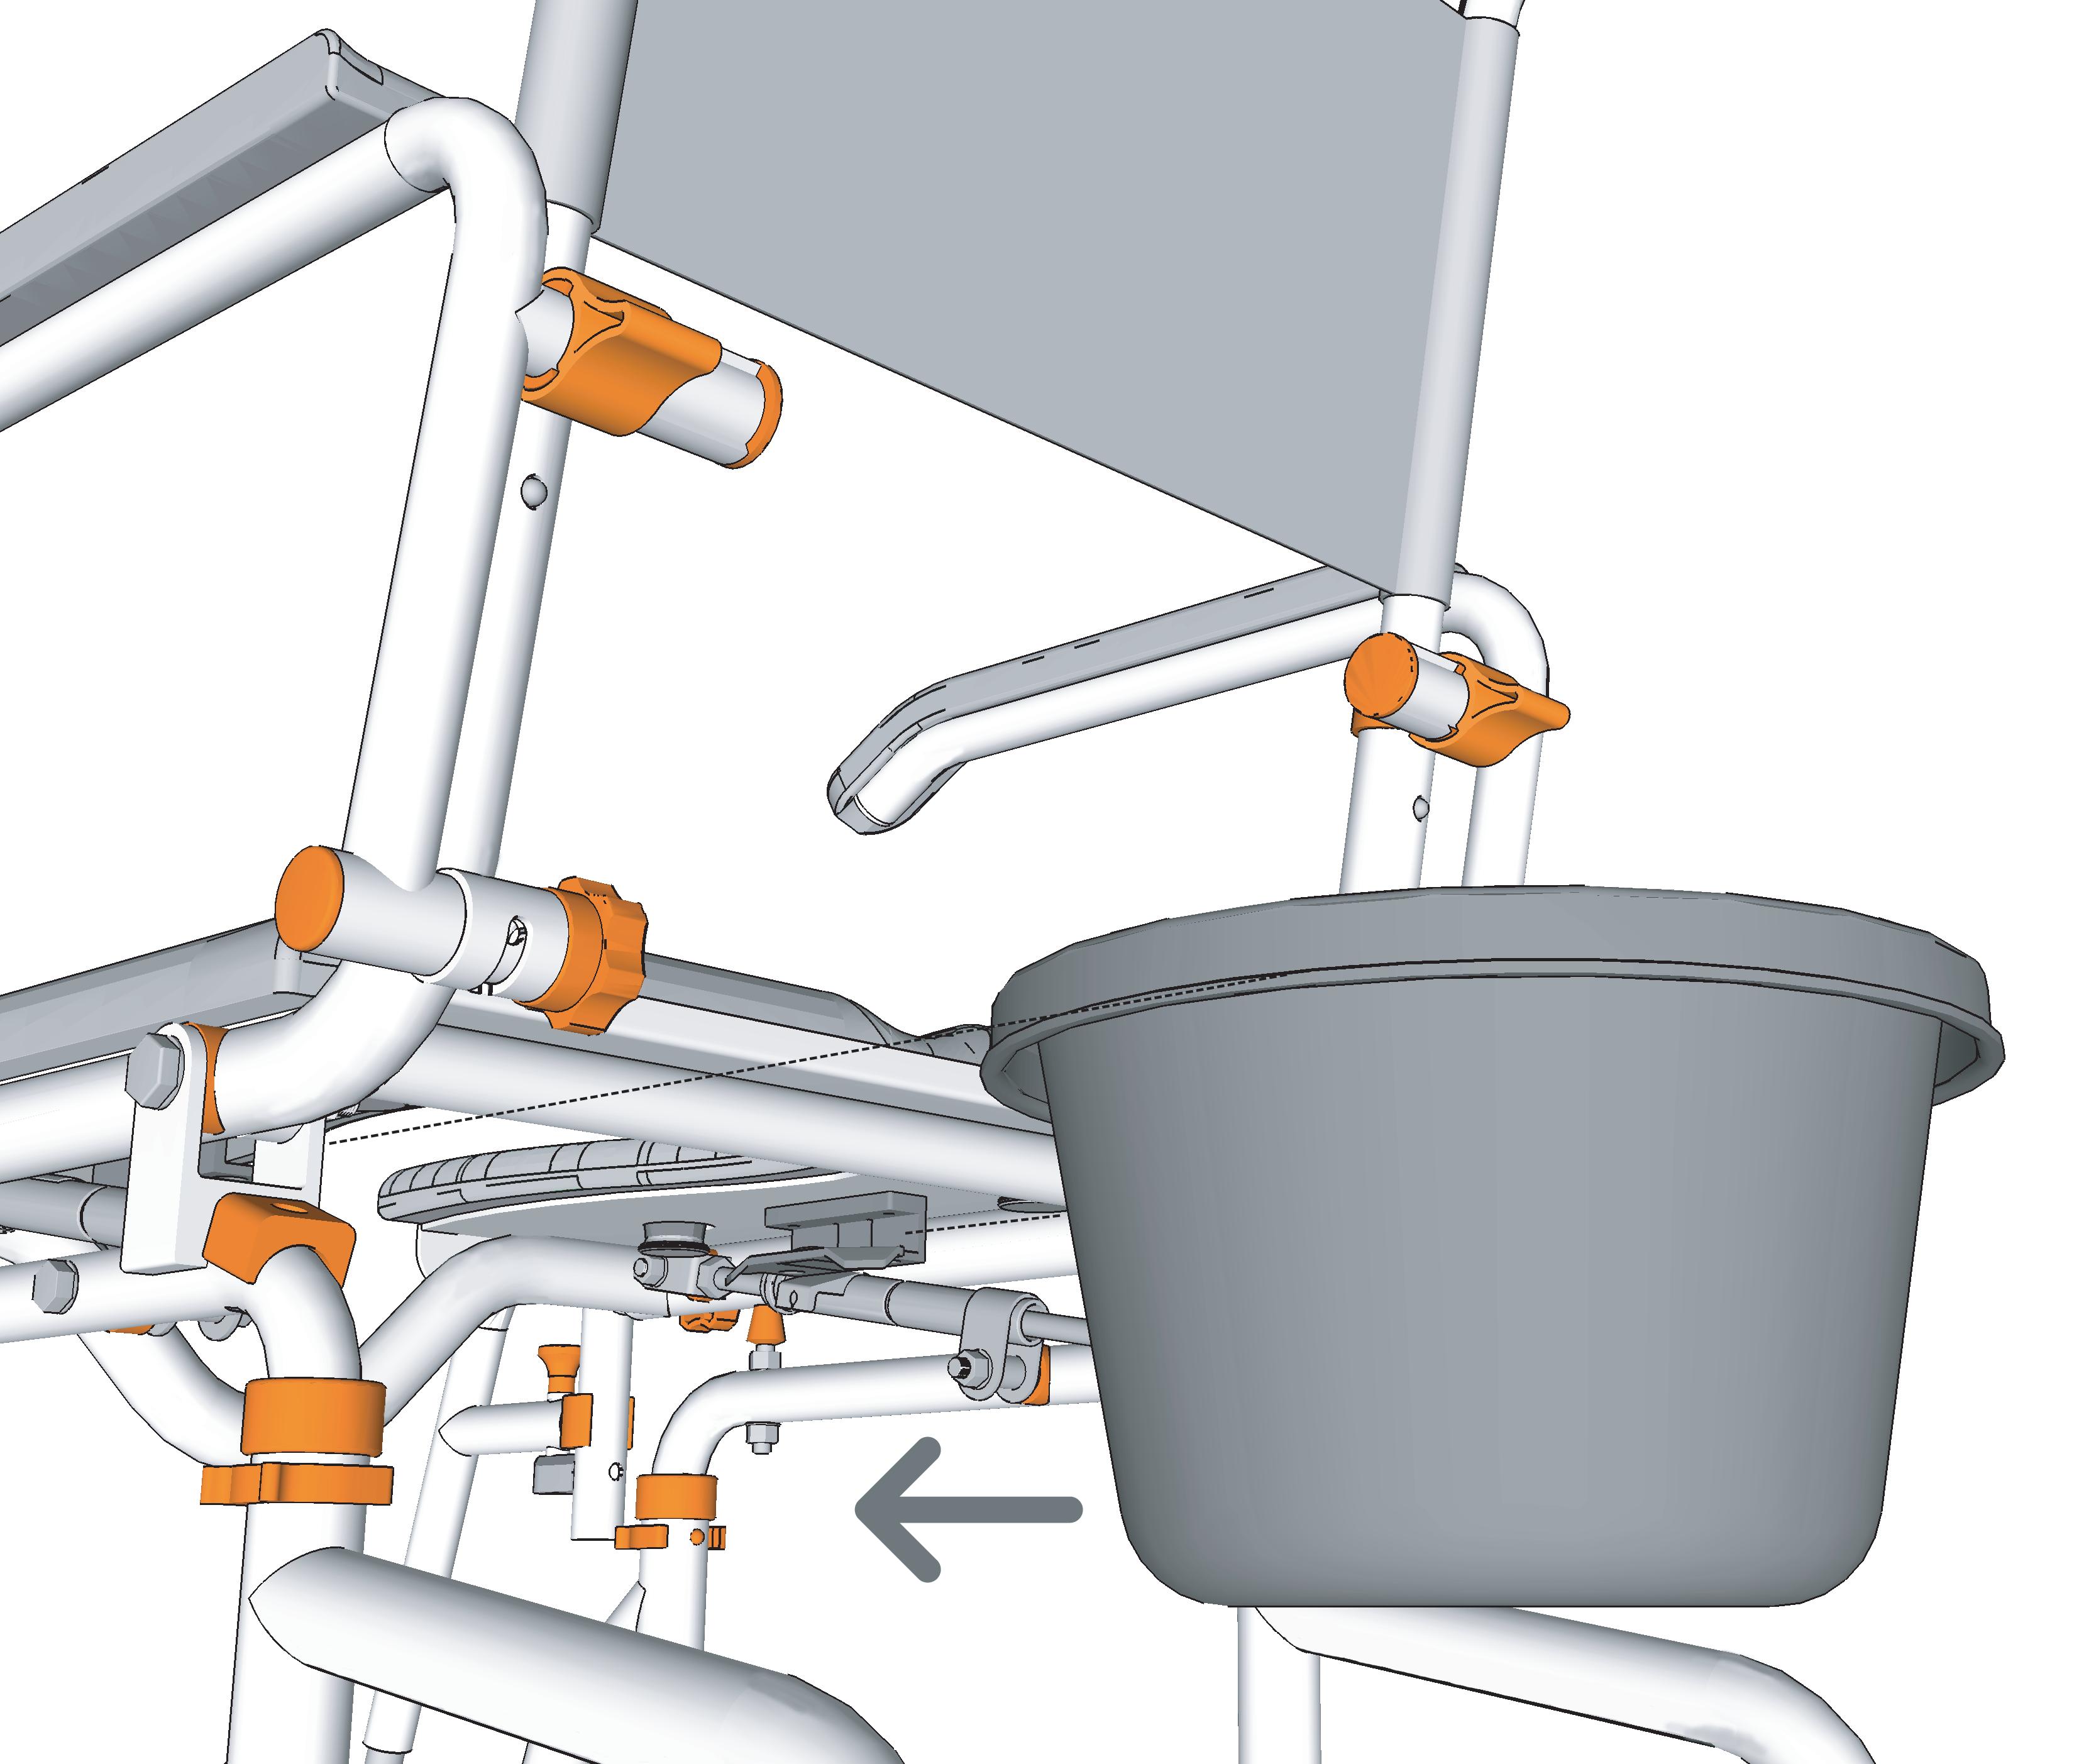
Step 12
Rotate the chair so that you have easy access to the underside of the seat base.
From the back of the slide the commode bucket into the 2 brackets on the underside of the seat base.
Ensure the commode bucket is pushed in far enough that the brackets securely hold the commode bucket in position. The commode bucket should be centred under the opening in the cushion.
Step 13
On the underside of the seat base there are 4 attachment points for the lap belt.
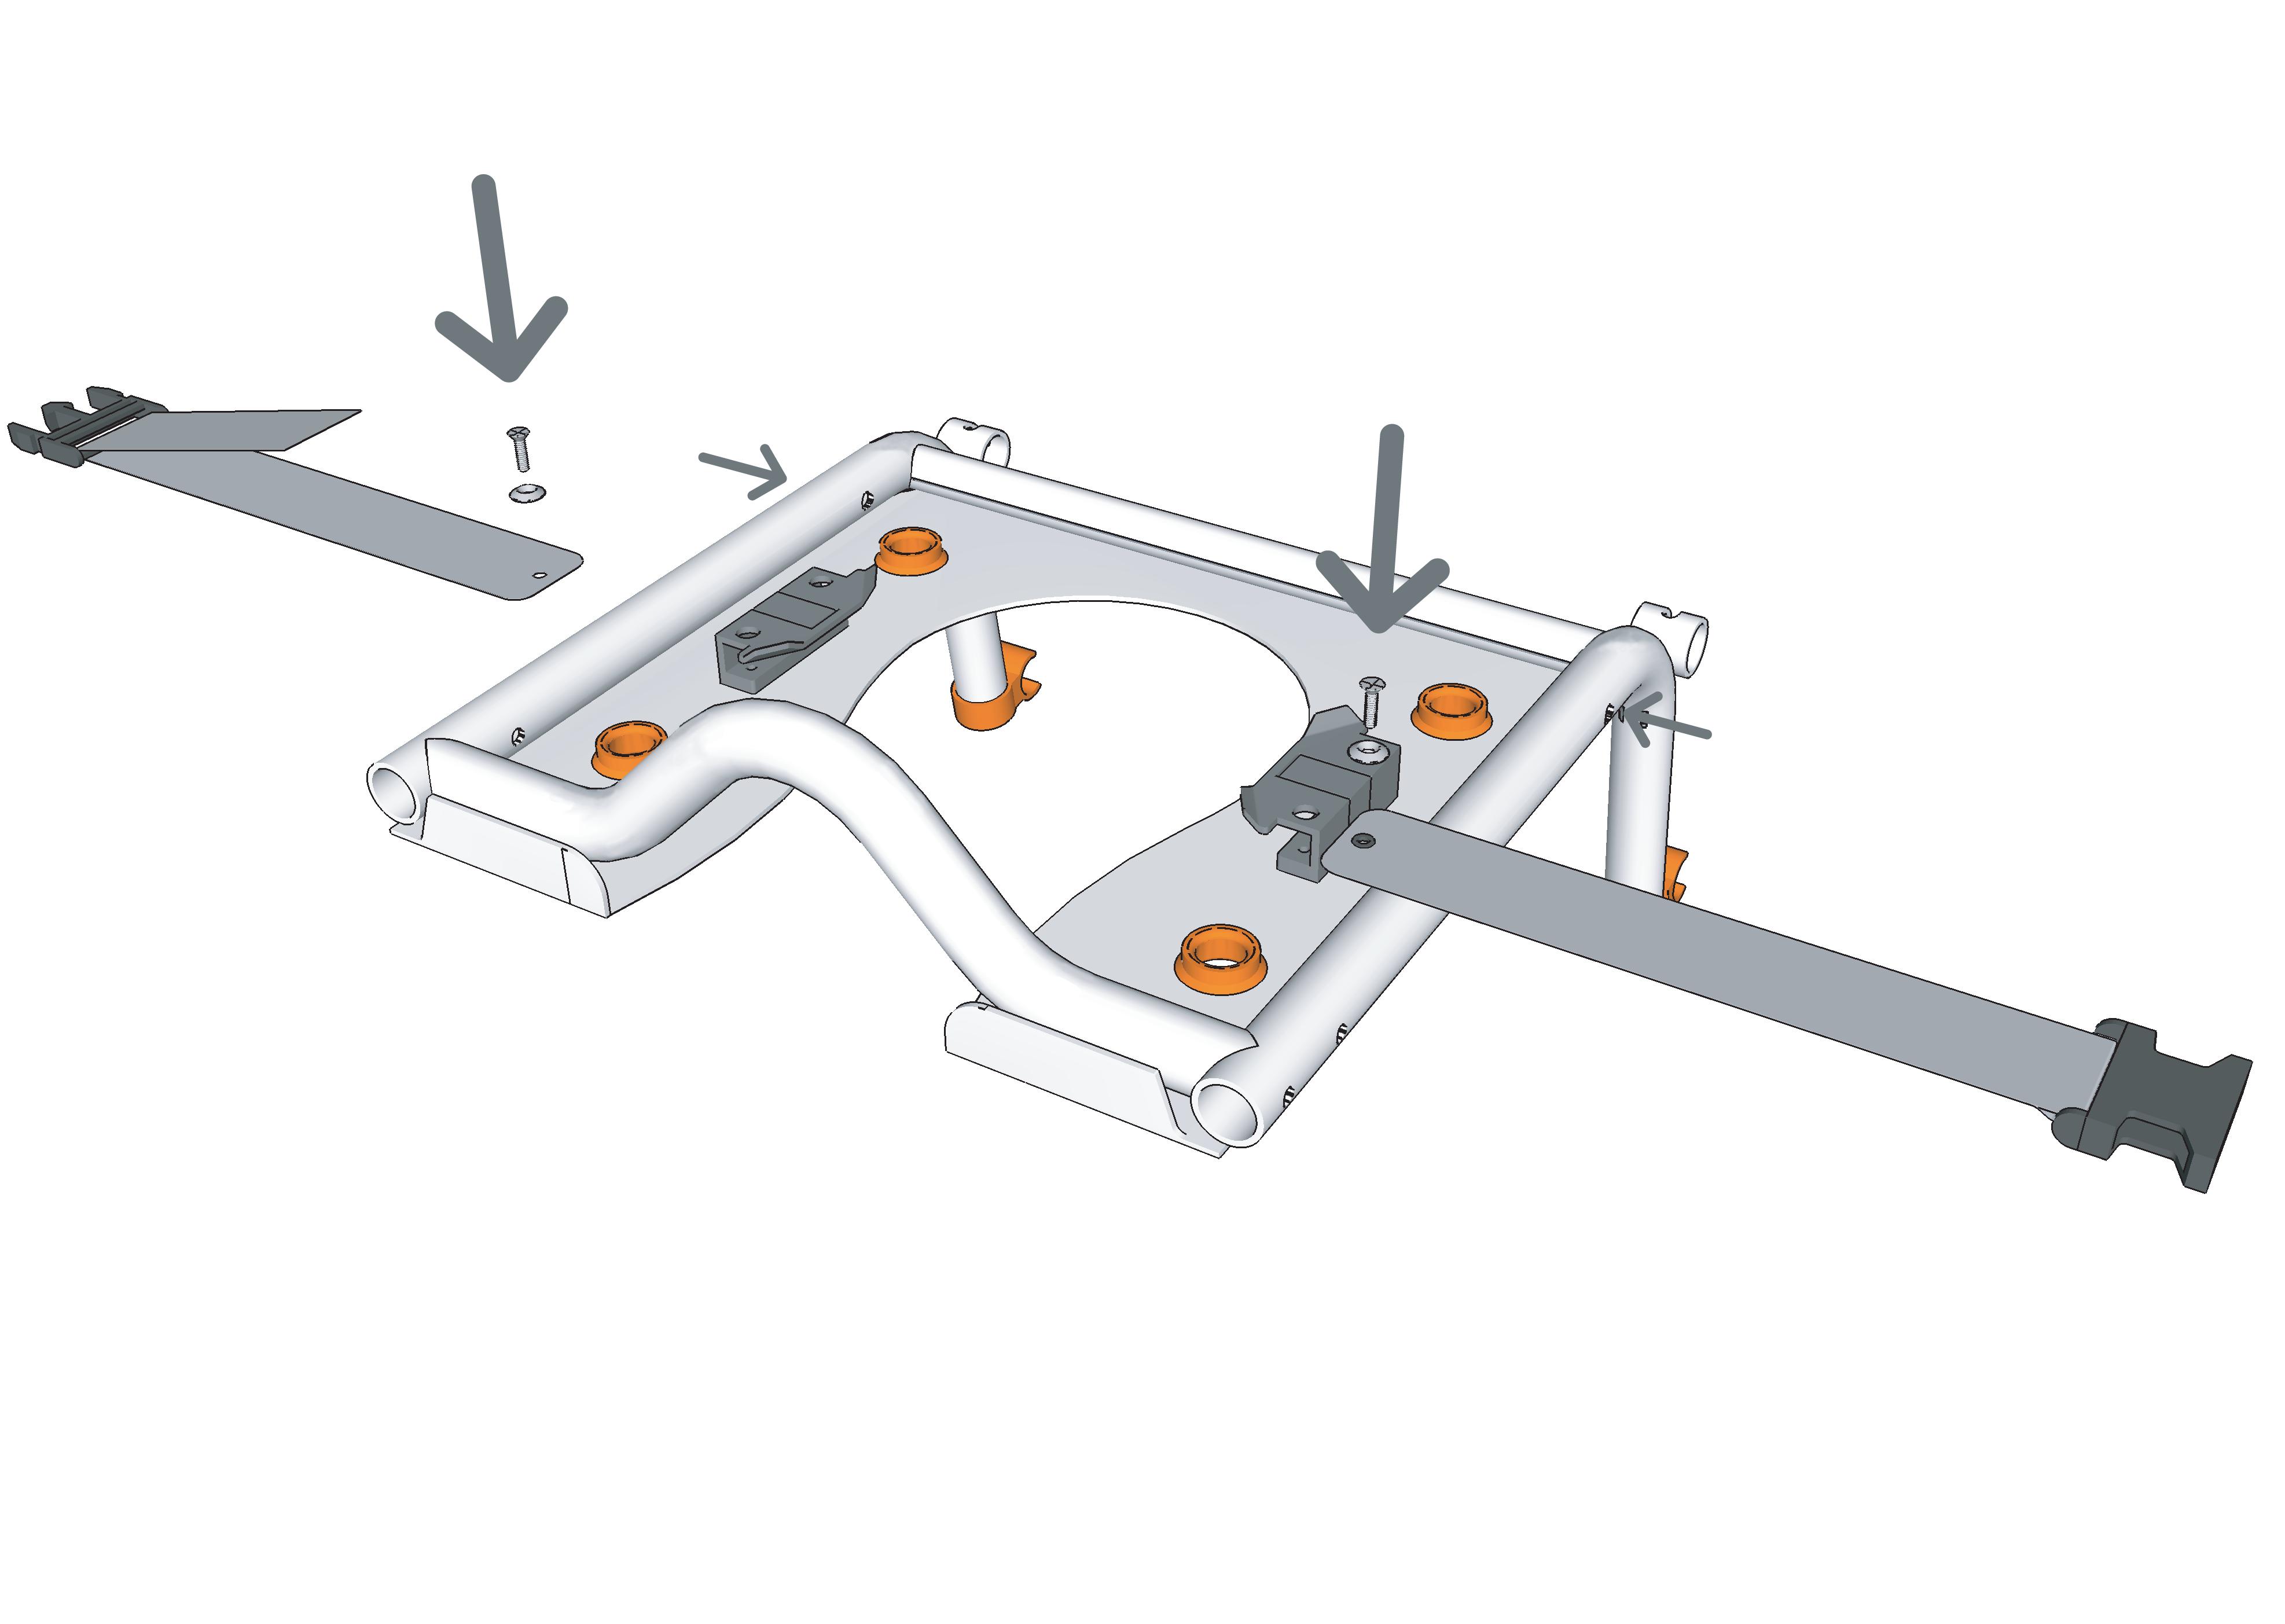
Unscrew the provided screws and washers from the front attachment points on the underside of the seat base.
Choose the attachment points you prefer for your lap belt.
Slide the washer onto the screw and then insert through the grommet in the lap belt. Screw the lap belt securely into position.
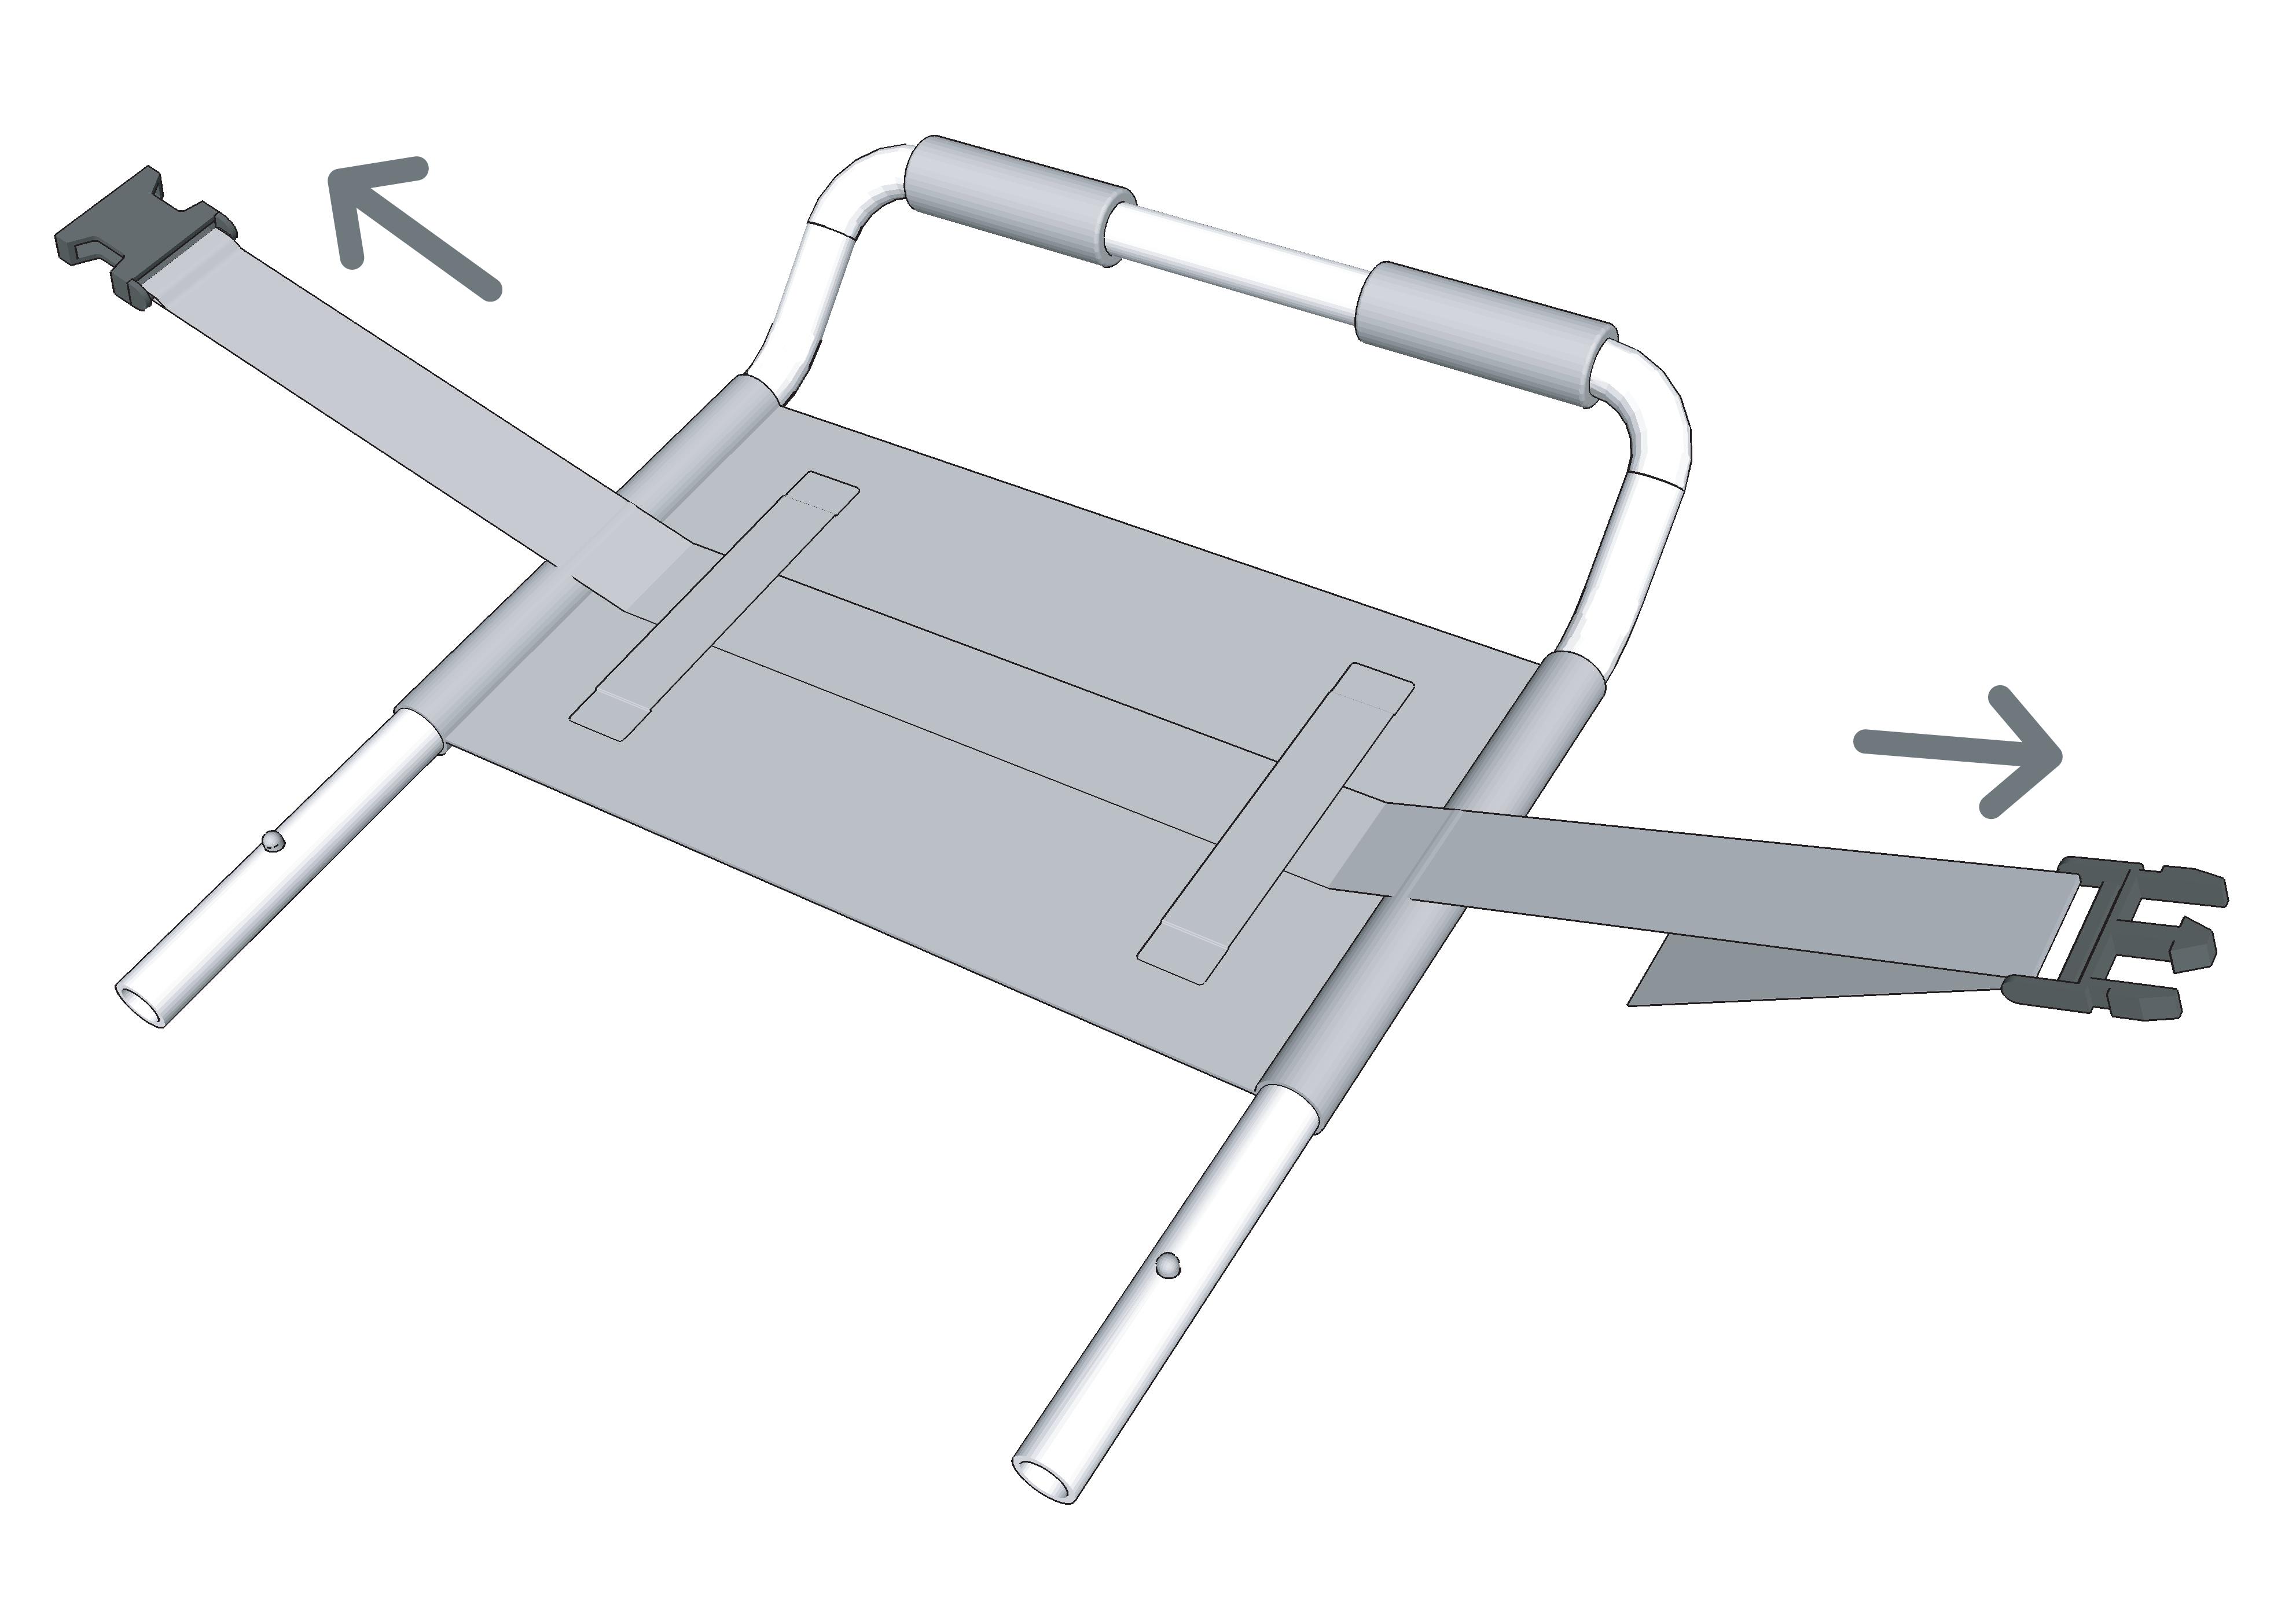
Step 14
To attach the chest belt rotate the chair so that you have easy access to the back of the back rest.
Slide the chest belt through the 2 attachment loops on the back rest.
Before use adjust the length of the chest belt to suit the user.
To adjust the seat height remove the securing clips and slide the height adjustment tubes up or down to the required height.

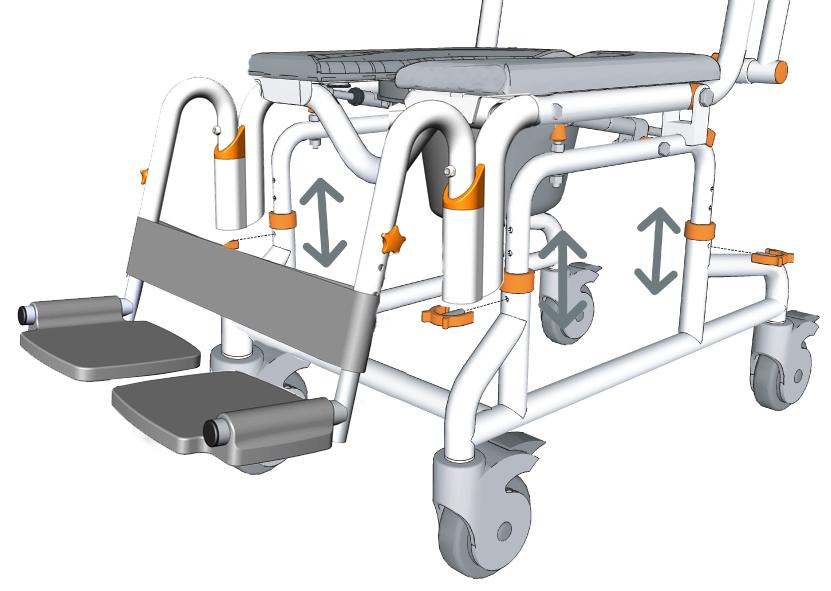
Secure both height adjustment tubes at the required height using 1 large securing clip on each base leg.
Note
- Each height adjustment hole raises the seat base 1”.
- Check to ensure all securing clips are fully inserted.
- Ensure both height adjustment tubes are aligned at the same height.
Step 2
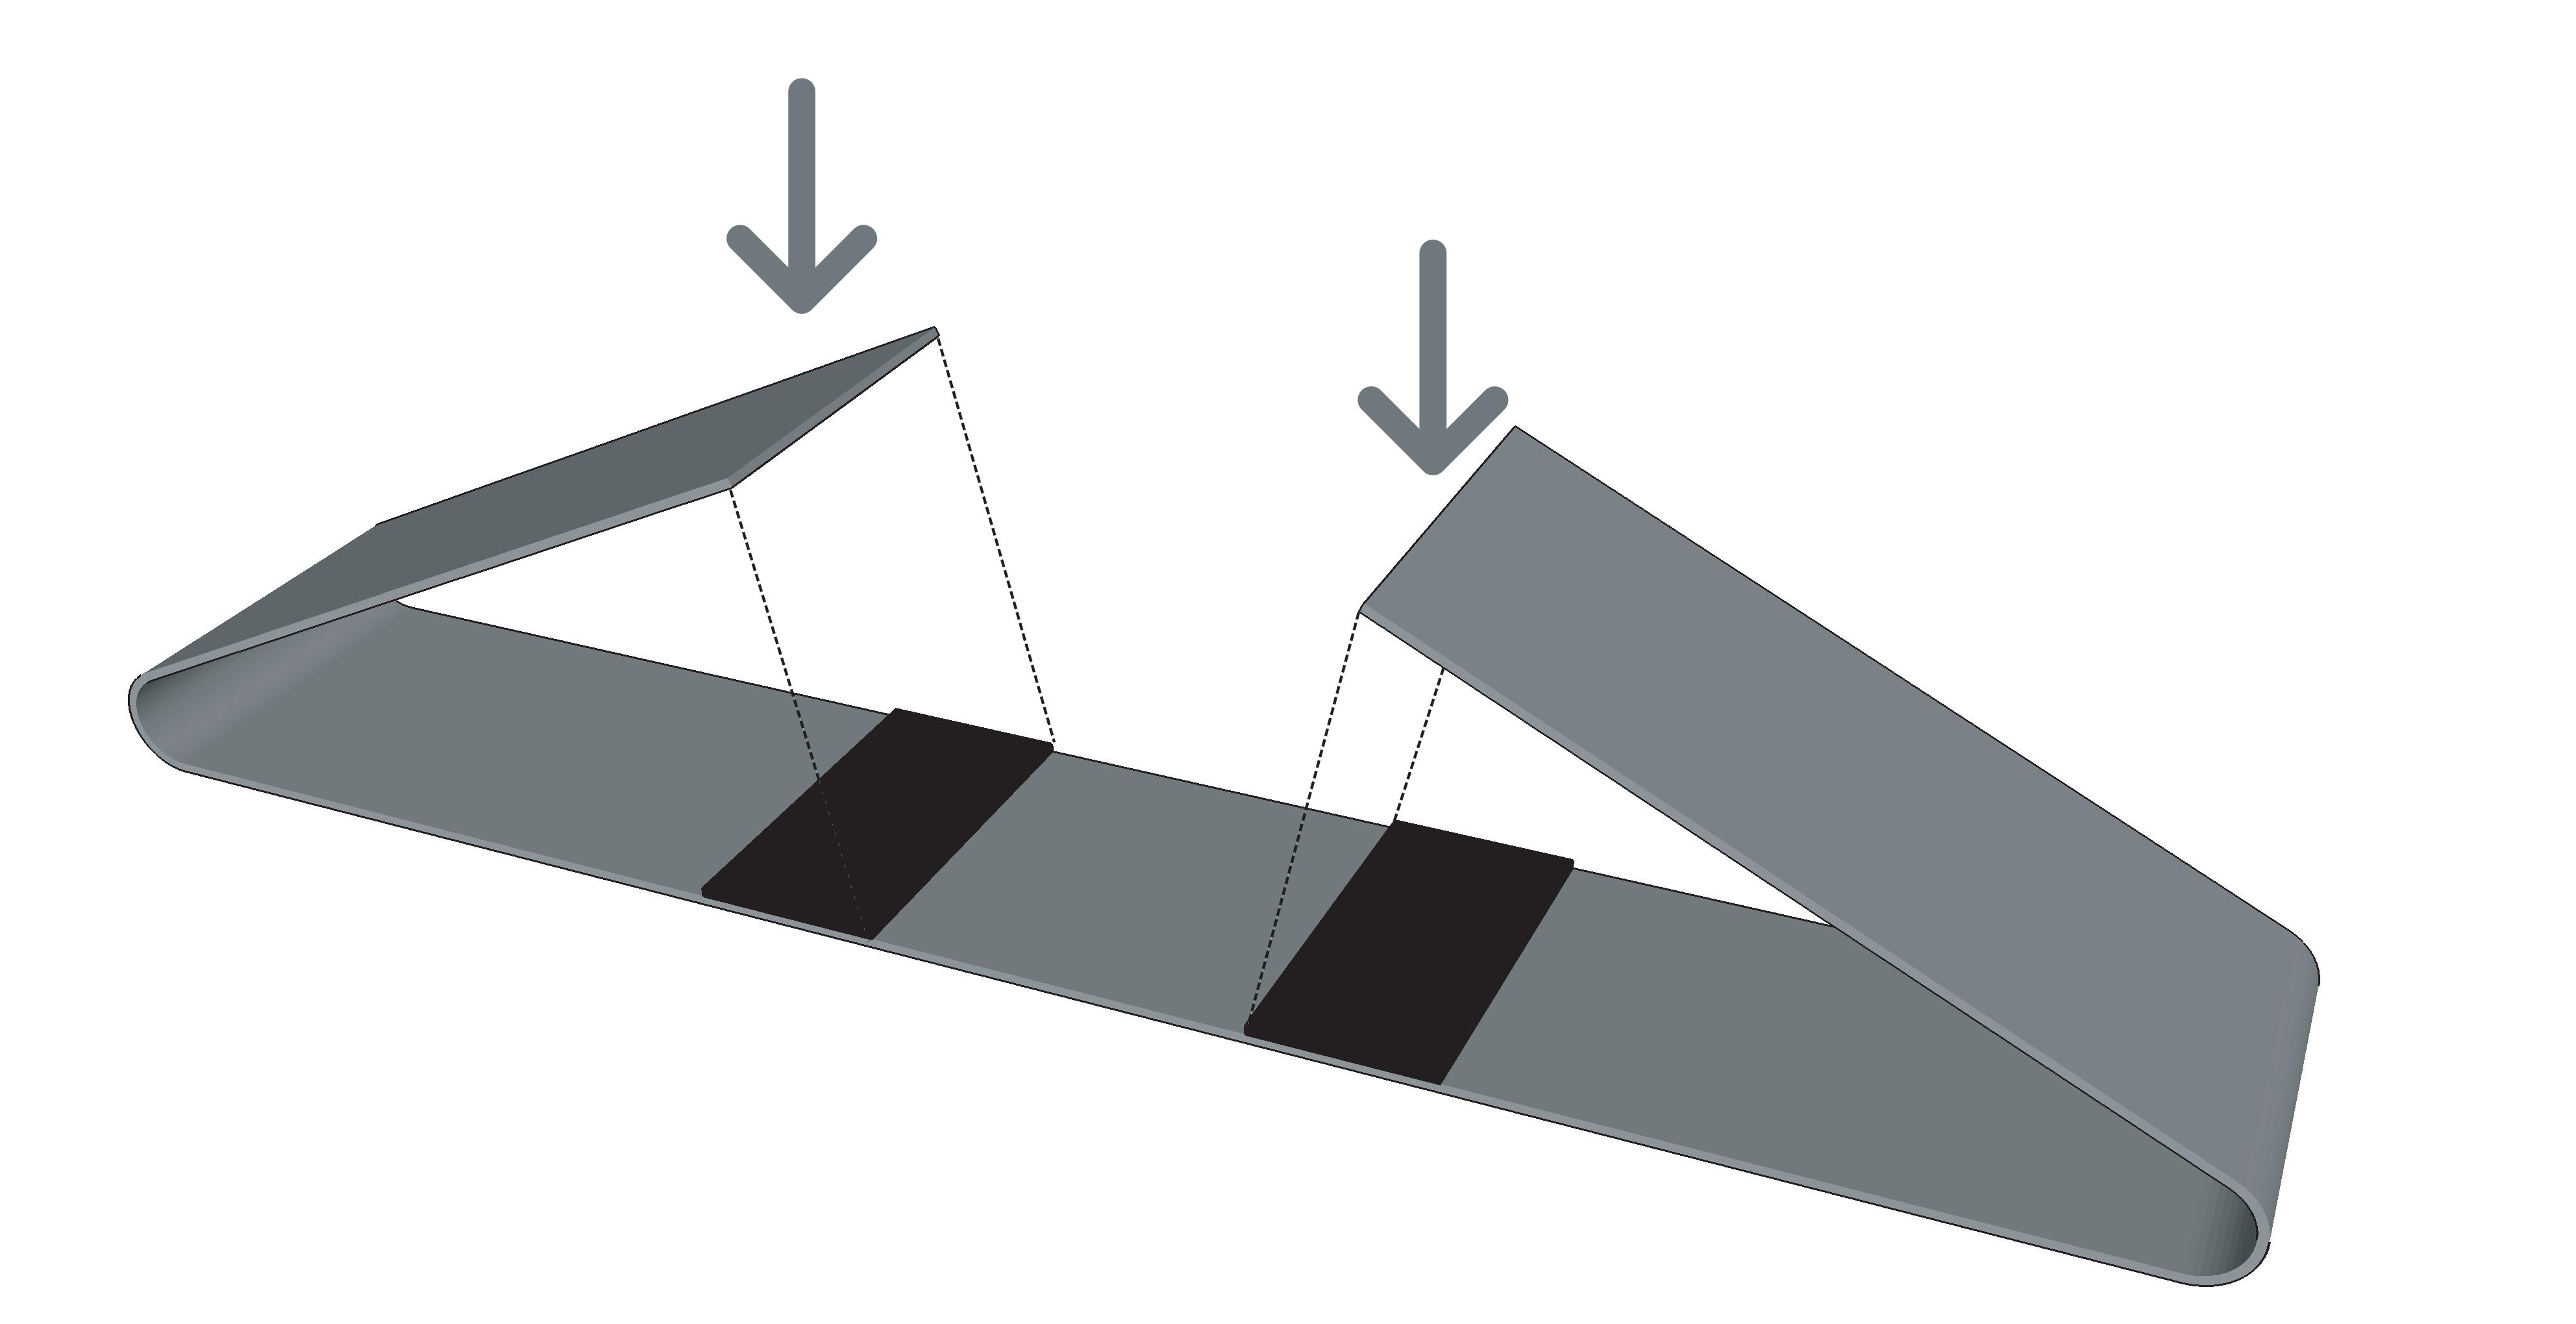
To attach the calf strap to the footrests wrap the end of the calf strap around the outside of the footrest. Connect the velcro strip which is attached to the end of the calf strap to the velcro strip in the centre. Ensure the velcro strips are on the back side of the calf strap.
Repeat this process to attach the other side of the calf strap to the footrest.
Step 3
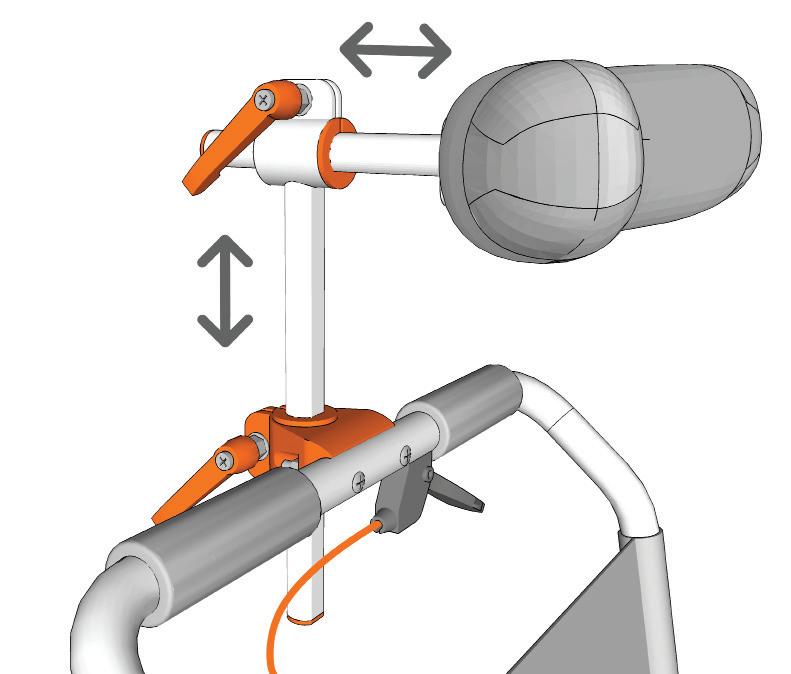
Before using the chair adjust the neck rest so that it provides the correct support for the intended user. Unscrew the neck rest handles to allow the tubes to easily slide for adjustment.
Secure the neck rest in the correct position by securely tightening the neck rest handles.
Note
- Ensure both handles are securely tightened prior to use to prevent the neck rest moving.
Step 4
After adjusting the neck rest you can adjust the position of the neck rest handle to prevent it sticking out.
To do this pull the handle to the right and then rotate. This allows the handle to be freely rotated without tightening or loosening the neck rest. The handle will then spring back into position when released.
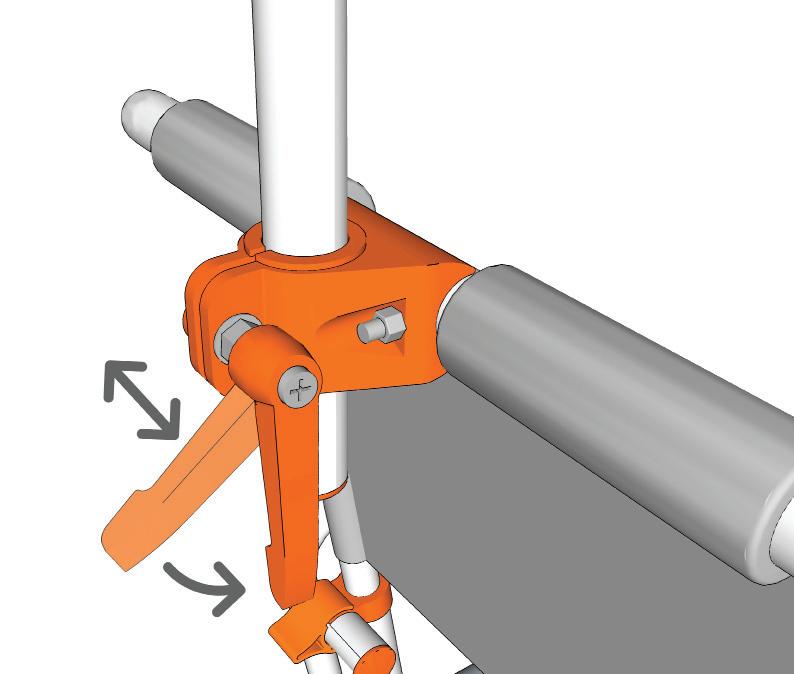
This method can also be used when tightening the neck rest .
Step 5
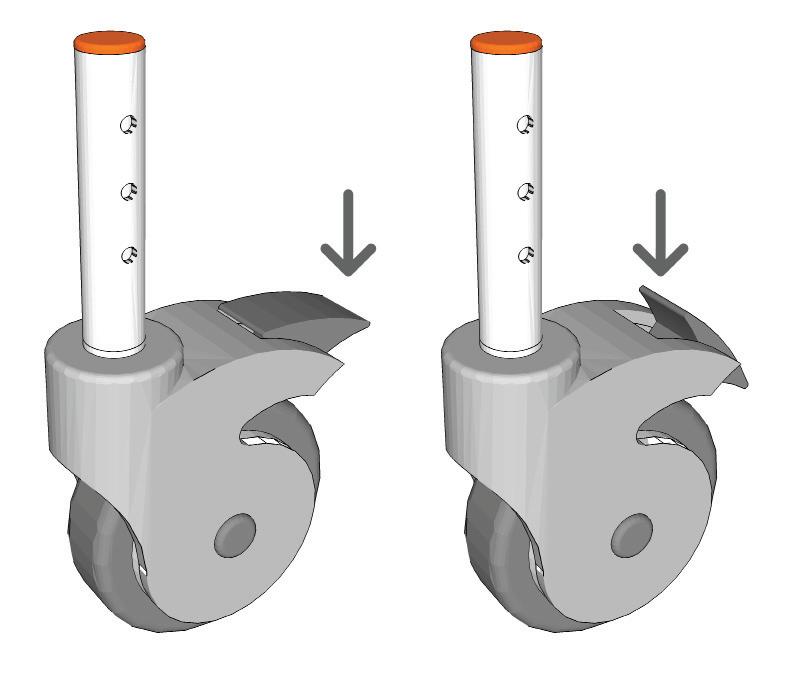
To lock the castor wheels press down firmly on the end of brake with your foot. This will lock the castor so that it will not move or rotate.
To unlock the castor wheels press down firmly on the front of the brake with your foot. This will allow the castor to move freely again.
Note
- The castor wheels should always be locked when performing transfers . The castor wheels can be rotated forward to make the chair more stable.
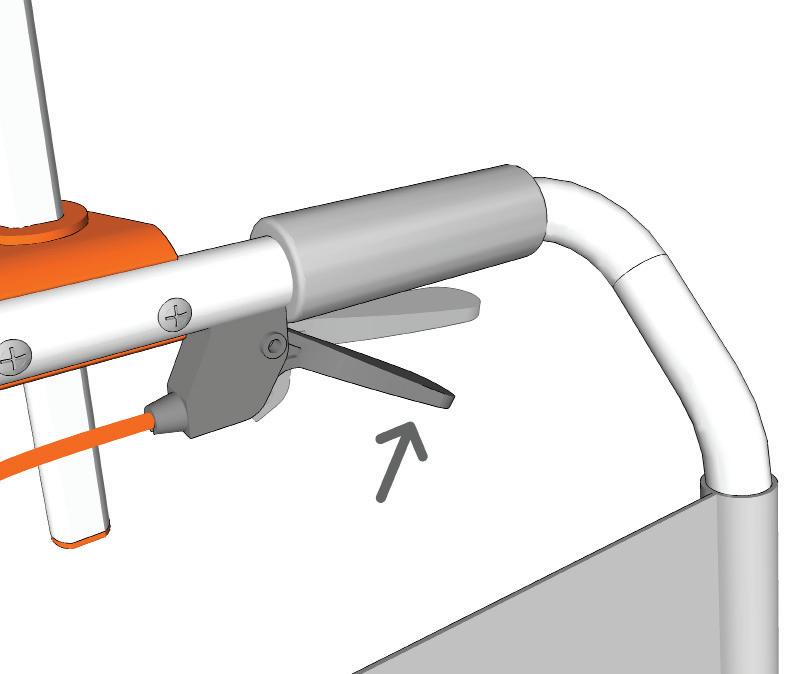
Step 6
To recline the chair squeeze the tilt handle on the back rest handle.
When you squeeze the handle both the locking struts are unlocked and the chair can be reclined. When the handle is released, the locking struts will secure the chair in that position. page 14
Step 7
While squeezing the brake handle the chair can be reclined 30° from upright.
While reclining the chair you can release the tilt handle and the locking struts will secure the chair in that position. As the chair is reclined you will need to support a small amount of the users weight.
Note
- Before reclining the chair is it important to be confident with the motion and how the chair operates.
- The chair has safety stoppers which prevent the chair reclining further than 30°.
Step 8
To return the chair to an upright position squeeze the tilt handle on the back rest.
When you squeeze the handle both the locking struts are unlocked and the chair can be repositioned. When the handle is released, the locking struts will secure the chair in position.
Step 9
While squeezing the brake handle the chair can be returned to the upright position.
After returning the chair to the up-right position release the tilt handle and the locking struts will secure the chair in position. While returning the chair to the up-right position, you will initially need to support a small amount of the users weight.
Warning
Do not place hands or fingers around the outer edge of the seat cushion when tilting or returning from tilt positions as fingers may get jammed between the seat frame and the rubber stop resulting in serious personal injury. Keep arms and hands on the armrests at all times.


