4 minute read
How to photograph smoke


By Bhupinder Ghatahora ARPS It is quite easy to take photographs of smoke. I have briefly explained the following tips as a guide to create stunning smoke images. This project taken in 2013, using a Nikon D200 with off camera flash (SB800). Equipment needed: • Compact Camera or SLR with manual focus • Off camera or 'built-in' flash • Incense sticks • Suitable plate to catch all the hot ash from the incense sticks • Black velvet or similar material (a black card will also work if you do not have any material) • Photography Gels • Black card or paper to block (flag) unwanted light Important: Take photographs indoor in a well-ventilated room (not to breezy) to avoid smoke build-up. When working with smoke, you must take regular breaks as the smoke will begin to accumulate in the room which can be a health hazard. Ensure the environment and location of the setup is SAFE. Setting up the shoot: I have used a Nikon D200 DSLR for the following shots. Pin the black backdrop on the wall or alternatively as I did, rest it against a chair’s back.
© Bhupinder Ghatahora ARPS The off-camera flash was mounted on a tripod and a sheet of black paper was wrapped around the head forming a snoot. This is to avoid light spilling on the backdrop and keeps it directed on the smoke.
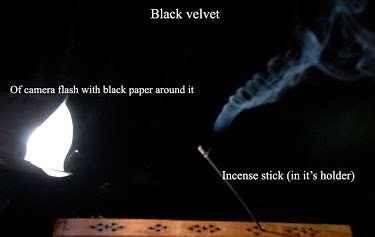
HOW TO PHOTOGRAPH SMOKE The incense stick is placed between the camera and the backdrop. The camera was mounted on a tripod. Settings:
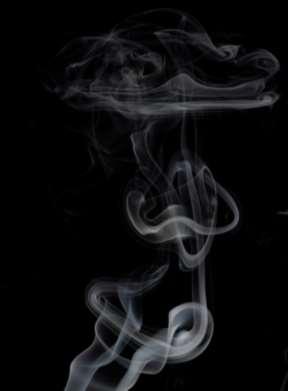
• Camera settings (fully Manual on SLR): • Set your camera on Manual mode. • Set shutter at 1/125 or 1/250, this is a common setting that will sync with your flash. • Set aperture to f8 or smaller like f16 or f22. This will maximise the depth-of-field. • Set ISO to 100 or 200. • Use Manual focus as the auto-focus function may struggle to latch onto the smoke. Tip to assist focusing. Place an object behind the incense stick (I placed a red pencil behind the incense stick), manually focus on the pencil, then removed it from behind the incense stick. Light the incense stick and place the flash close to the smoke. Keep safety in mind. Once the above setup is complete, take the photographs. Adjust the flash accordingly to see where it gives the best result. Tip: Do not look through the viewfinder because you will not see the full length of the smoke patterns. Follow the smoke with your camera and try to capture the interesting shapes. If you do not have manual settings on the camera, set the camera on Shutter Mode ‘S’ or ‘Tv' and increase the ISO to 320 or 400, this will give you an aperture nearer to f8. The following photographs were taken by manual focusing on the smoke. The camera was set on Manual Mode, Aperture f10 and Shutter Speed 1/125.
© Bhupinder Ghatahora ARPS
HOW TO PHOTOGRAPH SMOKE Too much smoke can create messy photographs. The key is to slowly follow the smoke / shape to take the photographs. At this point I took off the camera from the tripod and sat on the chair in-front of the smoke. I handheld the remaining photographs. This gave me flexibility to follow the smoke. My camera setting remained the same throughout the shoot.
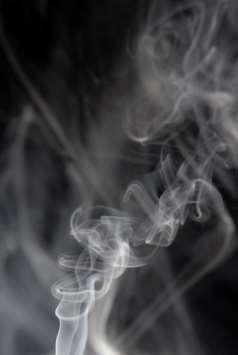
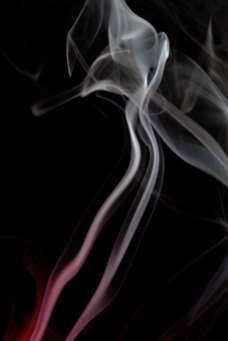
© Bhupinder Ghatahora ARPS For the next photograph, I added another Nikon flash SB800 with gels and snoot on one of the flash heads. The camera settings have remained the same. I used, red, blue and green gels either individually or as combination of two coloured gels placed on each flash head.
© Bhupinder Ghatahora ARPS
HOW TO PHOTOGRAPH SMOKE
For the next few photographs, I added another Nikon flash SB800 added gels and snoot on one of the flash heads. The camera settings have remained the same.
© Bhupinder Ghatahora ARPS
I hope this article inspires you all to explore your creativity and your skills as a photographer. Till we meet face to face, stay safe and enjoy your photography. Thank you. Regional Organiser: Bhupinder Ghatahora ARPS southern@rps.org
07798913218

USEFUL LINKS
Southern Region Events
https://rps.org/regions/southern/southern-region-events-page/
Distinctions Qualifications
https://rps.org/qualifications/
Licentiate Assessment
• Dates: https://rps.org/qualifications/lrps/licentiate-assessment-dates/ • How to apply: https://rps.org/media/murnekmk/dg001-a-guide-on-how-to-applyjanuary-2021.pdf • Requirements: https://rps.org/media/andlqgih/dg002-lrps-requirements-january2021_v3.pdf • Panel Members: https://rps.org/qualifications/lrps/licentiate-panel-member-list/
Associate Assessment
Fellowship Assessment
1:1 Portfolio Reviews:
https://rps.org/advice
Lockdown & photography guidance
https://rps.org/news/bristol/2021/january/lockdown-and-photography-guidance/
