17 minute read
Open-source post-processing Paul Herbert ARPS


Open-source post-processing
So many of us are used to using commercial software for processing our images, it’s easy to overlook the alternatives. PAUL HERBERT ARPS discovered some open-source products which offer familiar post-processing functionality.
Why on earth would anyone decide not to use software from the market leader (Adobe) for their image post-processing? It’s a good question. In my case, eleven years ago I bought a ‘proper’ digital SLR camera and restarted photography as a hobby. For several years my images were mostly holiday snaps and editing was limited to cropping and basic adjustments of JPG files using Google Picasa. The camera saved images in both RAW and JPG format, but I had no idea what the RAW files were for. Only when I joined the Jersey Photographic Club (JPC) seven years ago and started entering club competitions did I realise that I needed to find out more about ‘post-processing’. Most JPC members used Adobe Lightroom and Photoshop, but because I wasn’t sure how much post-processing I would actually do, I didn’t want to buy anything without knowing more. I decided to look at open-source alternatives. This approach meant I could try different packages for as long as I wanted for free, until I knew that post-processing was going to be part of my photography. I found two open source applications that seemed to have features similar to Adobe Photoshop and Lightroom. These were the GIMP (GNU Image Manipulation Program, from www.gimp.org), and darktable (from www.darktable.org), both licensed under the GNU General Public License for free use. GIMP was first publicly released (for Linux operating system) in February 1996 as an open-source alternative to Photoshop - it is now available for use on Linux, Apple Mac, and Windows operating systems. It was easy to install on my Windows laptop and there was documentation to help with editing images. I had already downloaded Google’s Nik Collection software (when it was freely available) and discovered I could use GIMP as an interface for the individual programs (Colour Efex 4, Silver Efex Pro 2, Sharpener Pro 3). I use GIMP with the working image in a central window and two floating windows displaying the tools I use most (screenshot 1). If I need to work on fine details I expand the image to fill my main screen and move the tool windows to a second screen. I use GIMP for detailed cloning, editing that involves multiple layers, final adjustments to contrast, conversion to black and white, and final sharpening before printing using Nik Collection programs, and resizing images. I also use the G’Mic-Qt plugin for GIMP to do black and white

Screenshot 1
conversions.
However, darktable is the application I use for RAW file post-processing. To quote from its website, ‘darktable is an open source photography workflow application and raw developer. A virtual lighttable and darkroom for photographers. It manages your digital negatives in a database, lets you view them through a zoomable lighttable and enables you to develop raw images and enhance them’. Darktable is fully colour managed and includes built-in ICC profile support for sRGB, Adobe RGB, XYZ and linear RGB colour spaces and offers similar functions to those available in Lightroom. Darktable was first released in 2009. When I started using darktable in late 2013 it wasn’t available as a ‘native’ Windows version. I needed to use my IT knowledge to install it on a Linux ‘virtual machine’ on my Windows laptop and create file shares which allowed the program to read RAW files from, and write back processed images to, the laptop’s file system. I enjoyed this challenge, but a native Windows version of darktable is now available making things much easier. I processed my first competition entries for the JPC in February 2014: within a few months I had achieved several commended / highly commended awards in JPC Projected Digital Image competitions. I felt that I was on the right track and decided to continue with my opensource trial. Like any new software program there was a learning curve. I found navigating the layout of the main views straightforward. I used the darktable manual for the basics, supplemented by Youtube videos for detail about the ‘how to’. I


Waiting for the tide
started with those by Robert Hutton but I now use Bruce Williams’ comprehensive library of videos. I find it relatively easy to transfer principles from Photoshop / Lightroom tutorials to the GIMP / darktable environment. There is an ‘unofficial’ darktable Facebook group for discussions about techniques and overcoming specific issues, and a dedicated section on pixls.us where developers share ideas. For example, darktable developer Aurélien Pierre described in some detail his rational for darktable using a ‘scene-referred’ workflow, which does as much processing as possible using linear RGB operations before compression. It’s the place to discover the mathematical concepts behind the ‘pixelpipe’! As a novice post-processor, darktable’s nondestructive editing feature appealed to me as the RAW file remains untouched. A record of all edits is recorded in a combination of a ‘sidecar’ file (.xmp) and the darktable database, so different edits on virtual copies of the RAW file have minimal storage overhead, with no risk of messing up the original! Darktable has two main ‘views’ which mimic analogue photography; the ‘lighttable’ view for viewing, managing, and cataloguing images; the ‘darkroom’ view where the processing is done. These views - which look similar to those in Adobe Lightroom - can be configured by the user in terms of the appearance (themes), width of the side panels, and keyboard shortcuts. The panels can be hidden to just display the visible image(s). The lighttable (see screenshot 2) is used to import / export images, manage image collections using star / colour ratings, manage image metadata and tags, view detailed image information, manage styles, and also to copy an image’s ‘processing history’ to one or more others. A chart at the bottom of the view allows further refinement of displayed images by date. From the lighttable you can select an image to process in the ‘darkroom’. There are also options to view images in map view, as a slideshow, and also to use a tethered camera (although this has limited camera support and is not available on Windows). The darkroom (see screenshot 3) is used to process a single image. As well as showing the editing ‘modules’ it is used to display and manage: the edit history stack, history ‘snapshots’, image duplicates / virtual copies (see screenshot 4), EXIF information, the colour picker, tags, and
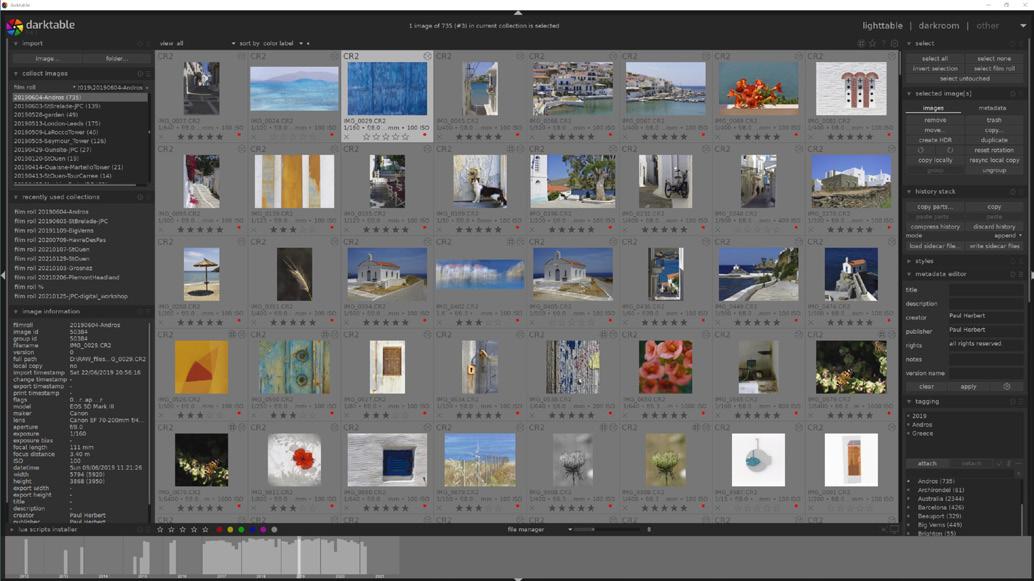
Screenshot 2 masks used by ‘multiply’, ‘overlay’, ‘screen’ and so on, which the processing affect the mix between a module’s input values modules. It and its output. These blend modes can be includes options applied either to an entire image or selectively in to toggle focus combination with drawn and/or parametric masks. peaking mode, These features offer a powerful way to make ISO 12646 colour adjustments to specific parts of an image. assessment conditions (a white border around the image), RAW overexposed indicator, clipping indicator, and soft proofing. A row of images at the bottom of the view allows singleclick selection of a different image to In 2014 darktable had support for my camera’s White Balance presets and Noise profile, but no lens correction profile for its lens. I addressed this by taking images at different apertures / focal lengths and getting them added to the open-source Lensfun database used by darktable for lens distortion data. Later I bought another camera and got its White Balance presets included in darktable by providing RAW files to the developers. As well as fixing my problems, this also benefits other darktable users with the same kit. Screenshot 4 process. There are some things that darktable doesn’t The basic element of image processing in darktable is the processing ‘module’. If you use Adobe Photoshop, the idea of a processing module in darktable is like an adjustment layer in Photoshop - both make an incremental adjustment to the image, building on top of the previous offer. While it does have a print option, this isn’t available in Windows: instead I use Canon Digital Photo Professional 4 software to print. I did try using GIMP to print but the Canon software has more options. Some proprietary RAW file formats are not yet supported directly. adjustments. The modules act on the input RAW Having invested time in learning how to use this image in a default sequence (the ‘pixelpipe’) to open source software I have no regrets about process it, each performing a different operation trying it out, and I will continue to use darktable - on the image data: changing the sequence in alongside GIMP - to process my images. I’m happy which the modules are applied affects the final to be doing something a bit different, ploughing output. my own furrow as it were: in fact, darktable’s From the outset I was impressed by the comprehensive masking and blend mode processing options might allow me to produce images with that unknown ‘edge’ – who knows? capability available in most of darkroom modules. I am very pleased with the results that I get from There is a choice of drawn masks such as ‘brush’, the combination of darktable and GIMP and have ‘circle’, ‘path’, ‘gradient’ etc.; parametric masks had several relatively successful images, including which allow a mask to be constructed using ‘Patched up’ (see page 23) and ‘Symmetric various data channels such as Lab, RGB, hue, shadows’ (see next page). I’m particularly proud of saturation etc.; and blend modes such as ‘normal’, my Fine Art print panel which was recommended


Screenshot 3
for an ARPS Distinction in March 2020 and being awarded a Selector’s Ribbon by Martin Addison FRPS in the DIG 2021 Print Exhibition. In the future I want to learn more about the many processing options in darktable and in particular to develop my approach for making monochrome images. Although darktable is free to use under a GNU licence, I now make a small voluntary donation to support the ongoing development of the software. I always look forward to the major releases of darktable which are traditionally scheduled for Christmas Day (a nice present), there are also perhaps one or two smaller / maintenance releases during the year. Seven years after first installing darktable, I am still the only member of the JPC to use it for post-processing (some people have expressed mild interest). This may be partly because darktable isn’t a mainstream product and there are fewer people around to provide specific advice on its use. But for any photographer dipping their toe into the post-processing world, especially those on a budget or wanting to be different - darktable / GIMP open-source software offers some great opportunities.
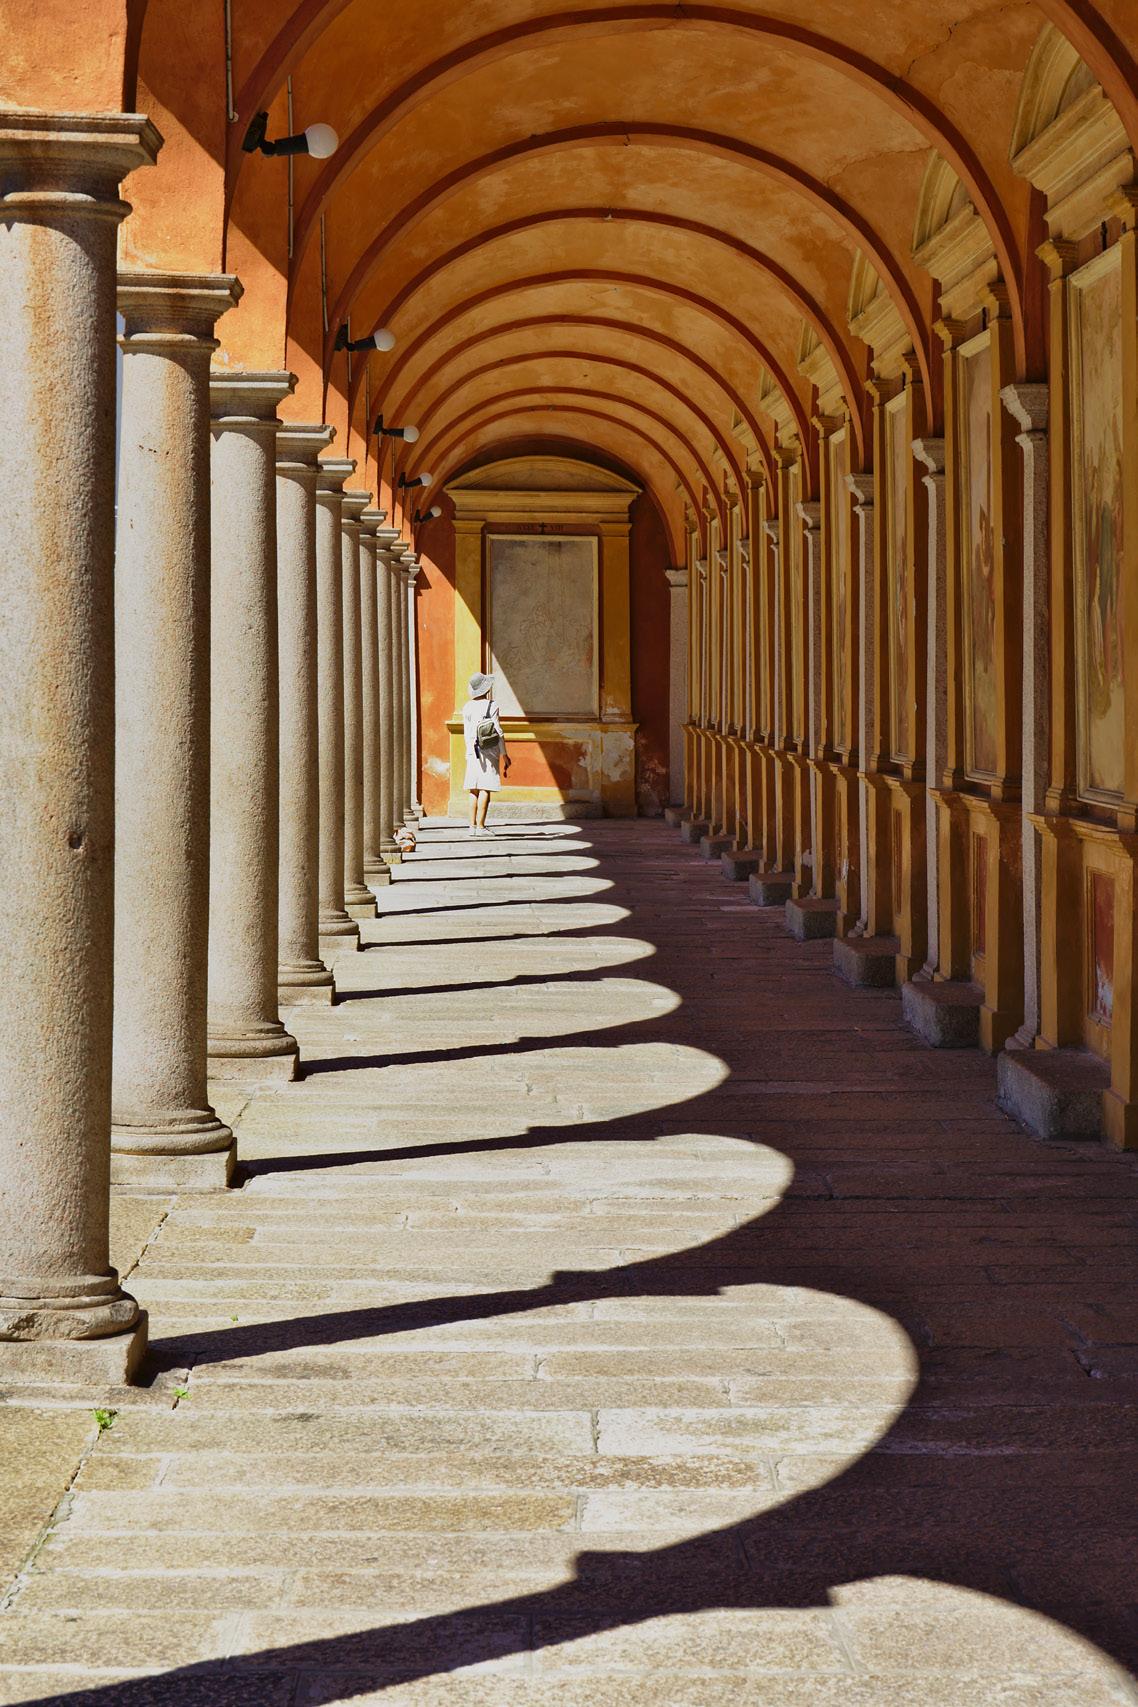
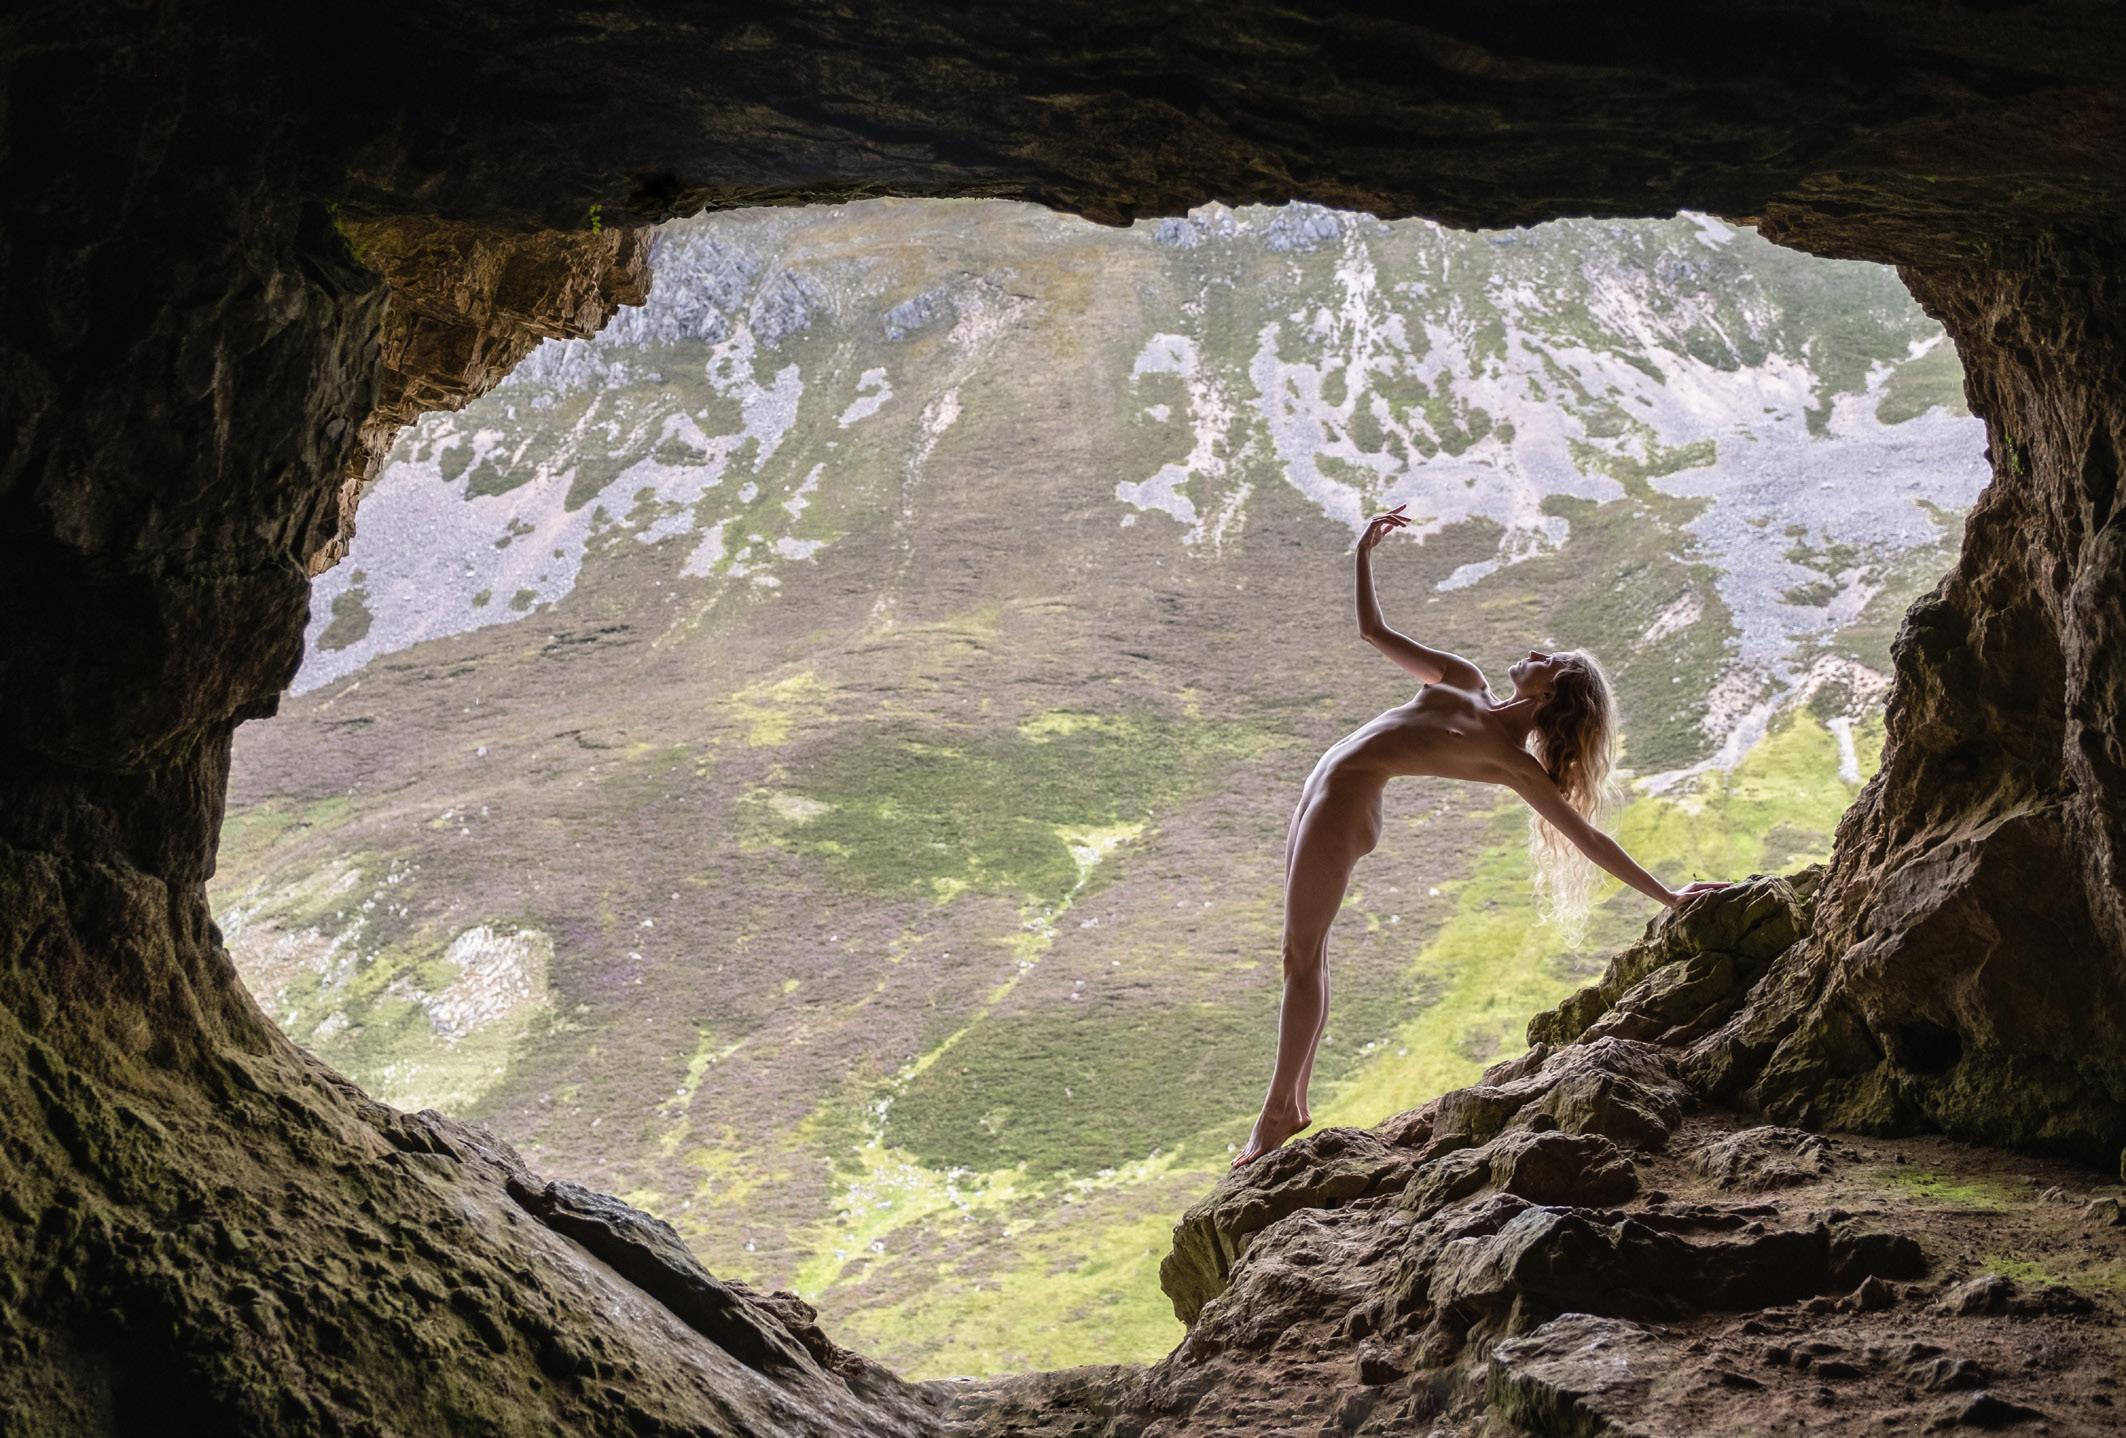
Symmetric shadows


Lulu - a modern muse
Over the last seven years, TIM PILE has developed a close working relationship with model Lulu. Their collaborative working methods deliver a unique style and helped Tim to achieve a number of photographic distinctions. He is currently working towards an FRPS submission with images they have produced.
As somebody with a degree in mathematics and a long career in information technology, who only had a passing interest in art, nobody is more surprised than me of my artistic journey. My proudest achievement was being invited to become a member of the London Salon of Photography, whose history dates back to 1892, their motto says that they seek ‘distinct evidence of artistic feeling and execution’ in imagery. I began digital photography in 2008, and joined Smethwick Photography Society with the intention of improving my photography. I met and worked quite a lot with Dinah Jayes ARPS, a friendship and working relationship that continues to the present day, and was introduced into the world of model photography. I soon realised that I didn’t have the patience or

skill to learn studio lighting, plus in a studio you are usually starting with a blank canvas so have to bring new ideas and props along every time, to put together to create images. Conversely, if you photograph on location, the world is your oyster in terms of where to shoot, and instead of posing against a plain white background a model can integrate or juxtapose herself with various elements in the environment, making for much more interesting images.
A chance encounter
I enjoy sharing my images with others, and regularly give talks to camera clubs and to RPS special interest groups. Camera club talks are held in the evenings, so after giving a talk I would sometimes have a long journey home, and would often take the opportunity to instead stay locally overnight, which would then give me the opportunity to photograph in a new area, and also seek out new models in that area. In April 2014 I gave a talk to Bognor Regis Camera Club, and the day after I had booked a model who I knew of, but had not worked with before; her name was Lulu Lockhart. We got on very well together, and it soon became obvious that we shared the same creative goals in terms of the types of images we wanted to produce. So began a long and creatively productive working relationship, and a majority of my photography nowadays is with Lulu.
Working collaboratively
There is a viewpoint, which I do not subscribe to, that a model is there to be photographed, and that their role is to pose in the manner prescribed by the photographer. The view is that this is how models posed for artists in the past, so that’s how it should be done now. History does not support this view. Elizabeth Siddal, the muse of Dante Gabriel Rossetti, is a classic example of this. She was, like many muses, also a talented artist, but not fully acknowledged during her lifetime. The other extreme is where a photographer hires a professional model, who goes through a series of well rehearsed poses. This is a good option for beginner photographers, who have enough to think about with their camera settings, lighting and composition, but can obviously lead to different photographers having very similar images if they work with the same model. Our working method is a different approach. Lulu, like many of the models I have worked with, is an extremely creative young woman, and so it makes sense to pool our skills and create the best images we can between us. Sometimes the pose or composition will be her idea, and sometimes mine.

Working on location
First I have to find suitable locations. As many of our images are thought of as ‘nudes in the landscape’ I will get some location ideas from landscape photographers, as well as using search engines, websites and the many photographers’ guide books that are available. Once we arrive at a location we look at where the public could appear from. We don’t wish to offend anybody or have onlookers. The public are not expecting to come across us, but we are constantly looking out for and listening for them,
which reduces the chance of being surprised by a member of the public. It is not an offence to be naked in public in England and Wales, where it does become an offence is if it can be proved that there is an intention to upset or shock. Given that we would immediately cover up if we became aware of a member of the public, then there is obviously no intent.
We only work in western European countries, as they are more likely to have a similar attitude to nudity as the UK. Places we have worked together include all the UK countries, Ireland, Iceland, France, Corsica, Canary Islands, Sicily, Tuscany and Cyprus. We will look for potential image compositions, bearing in mind that some of these may only work if the sun is out or behind clouds, so if the light is variable we know which area to work in with different lighting conditions. Once I’ve taken test shots of various compositions we will discuss which ones work best, vertical or horizontal, wide or a closer shot, and also where Lulu will be placed in the image and the type of poses that will work best. The first thing we consider with a pose is safety. Were she to lose her balance or slip we want to make sure she wouldn’t be injured. We also decide whether a natural or more abstract shape pose works best, if we can’t decide at the time then Lulu will do a mixture of poses. Generally we are looking for Lulu to integrate into the environment, although sometimes we are looking for the reverse with a juxtaposition. Integration can be achieved by fitting into some natural frame, mimicking a shape in the environment, or with her limbs touching various elements within the scene. If I feel that a pose needs to be slightly different with a limb moved I will obviously tell her, but as you can see from some of our images we are sometimes quite a distance away from each other. In the past we have used walkie-talkies to communicate, but as I keep forgetting to bring them we usually rely on a series of hand signals that we have developed. Once Lulu is nude we work very quickly through our pre-planned images. This is for various reasons, some of the places Lulu poses on are not very comfortable, it’s often not very warm, and we want to minimise the chances of being seen.

Tim’s successful Master of the Fédération Internationale de l’Art Photographique panel

Variety is the spice of life
Photography is often difficult as you need good subject matter, and also to be able to lead the viewers eye through the image. This is the reason why many landscape photographers photograph the iconic locations. I am fortunate in that I know what the main subject of the image will be, as the brain will always lead the eye to a nude human form in an image, so I can take scenes that could otherwise be overlooked as lacking a focal point and create a picture. I generally just shoot model photography, and I’ve been photographing Lulu for seven years now, in a wide variety of interesting locations, she is as much a friend now as a model. Our collaborative approach means we’re unlikely to run out of ideas anytime soon, and as well as finding new locations we are trying different techniques, such as using a drone to get a different viewpoint. We’ve also started running a series of location workshops, as we are known as a successful team and photographers wish to produce images like ours. While our work is varied, I’ve been told many times that people can instantly recognise one of our images, before even seeing it up close. We produce images for ourselves because we enjoy producing them, but it’s always nice when others appreciate them as well.
Distinction success
I was once given some advice that I should not have more than three or four images of the same model in a distinction panel, as otherwise it could be classed as repetition. Photographers often have a fine balancing act trying to get cohesion in a panel, without it becoming repetitive. I choose not to work with a great number of models so I turned that warning of repetition into a challenge, and decided to do a distinction panel with 20 images of the same model, Lulu. Then instead of the use of the same model being repetition she instead became a cohesive element of the panel. I did have to ensure that all of the poses were different, but given that we adapt the poses to the environment that wasn’t a problem. I was very pleased to gain a Fellowship of the Irish Photographic Federation (FIPF) in November 2016 with a panel of prints of Lulu, and the masters distinction MFIAP from FIAP in May 2019 with a different panel of prints of Lulu.
You can see more images from Tim and Lulu at www.timpile.co.uk.