9 minute read
Shortening a piece of music


Malcolm Imhoff FRPS FACI(M)
Very rarely would I use a piece of music "as is". I suspect that when a lot of people, even judges, hear my soundtracks they believe I have used a single piece of music straight off a CD. That to me seems to be a measure of success. If you were aware of the "joins" it would not have worked.
In the next few articles in the series we'll have a look at some of the basic techniques in editing music.

Rule number 1, always use a WAV le for editing. WAV les are a "lossless" format and so can be edited and resaved without loss of quality.

MP3 les on the other hand are a "lossy" format and information is discarded when compressed and saved. If all you have is an MP3 le, downloaded from the internet from Amazon Music, i-Tunes etc., the rst thing you should do is immediately save it as a WAV le for all subsequent editing.
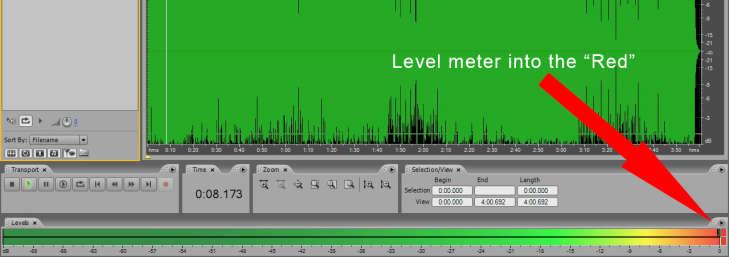
The next thing to do is examine it. Fig.1 (below left) shows an MP3 le. It's obviously very loud, you can see the classic "clipped hedge" shape, all the peaks are bang up against the edges of the window, and the level meter is already in the "red". This sound will certainly be distorted and I would not use it.
OK, let's say we have a suitable piece of music at reasonable quality but it's too long. We need to shorten it. Do not be tempted to fade the music out before the end. This almost never feels right, and gives a bad impression. Of course your piece of recorded music might already feature a denite fade out ending, such as in The Beatles' "Let it Be". In a case like this you might want to make a feature of it with matching images and transitions and maybe even make the fade curve a little steeper. With "Let it Be" you could end it anywhere to suit the length you want. But it's usually much better to use the start of a piece of music and the end, and cut a bit out of the middle. Here's how to do it.
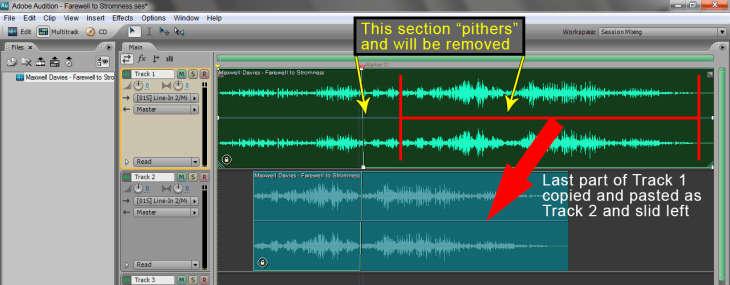
In this example, "Farewell to Stromness" there is a section in the middle which "pithers" to use Maggie's phrase, in other words it meanders aimlessly (apologies to Maxwell Davies). In my AV I wanted to get rid of this section and make the whole thing shorter, but still ow seamlessly.
Fig.2 (above) shows the Session le in Audition. The top green track is the complete waveform. The section between the yellow arrows is the bit we want to remove. What I have done is select and copy the part of the original waveform between the red bars, and paste it to a new Track 2 below, coloured blue. I have then slid the copy to the left. The trick is to align Tracks 1 and 2 so you can cross-fade from one to the other.
Shortening a Piece of Music continued ...
Fig.3 shows a close-up of the point where this cross-fade occurs. Track 1 is faded down to zero while Track 2 is faded up. I have done it by listening and matching a phrase in the music and positioning a note in Track 1 with the same note in Track 2, so that when it is played back you will not hear the join.
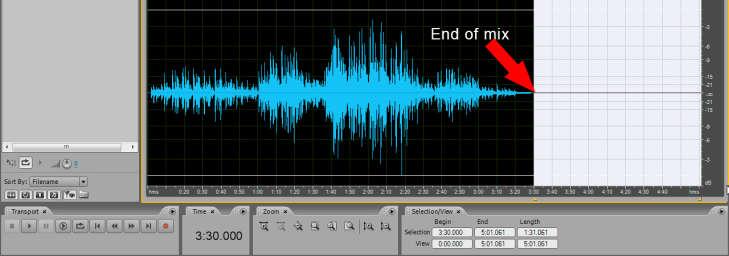
The last step is to mix down the tracks to a single stereo waveform (Fig.3) of the required length. It then only remains to remove the unwanted silence after the music ends and save it as a new WAV le. The 5 minute piece has been reduced to 3' 21".


Keith Scott FRPS DPAGB AV-AFIAP
Although you’re probably reading this in the May 2019 edition of AV News this article was written during October 2018, immediately after Adobe released their Photoshop update to version 20 i.e. Photoshop 2019. Why the long delay you may wonder? The delay is because I sometimes write articles many months in advance of their publication date, occasionally up to nine months in advance. This is done to help our Editor plan space and magazine layout, consequently he was already in receipt of Photoshop articles for the November 2018 and February 2019 issues before Adobe announced this update. For many years Adobe Photoshop has been the industry standard photographic editing software, simply because it’s so comprehensive with its powerful features and functions, no other software quite equals it.
Certainly, there is a multitude of other image editing software available including Photoshop’s smaller brother `Photoshop Elements’. Such software ranges from free to expensive and some are actually very good, but none can quite match the overall functionality and exibility of Photoshop. With each new release I’m always astounded that Adobe manage to add or improve functions to this already powerful software. It is reassuring to know that Adobe Corporation listen to and act wherever possible to develop suggestions submitted by its many users.
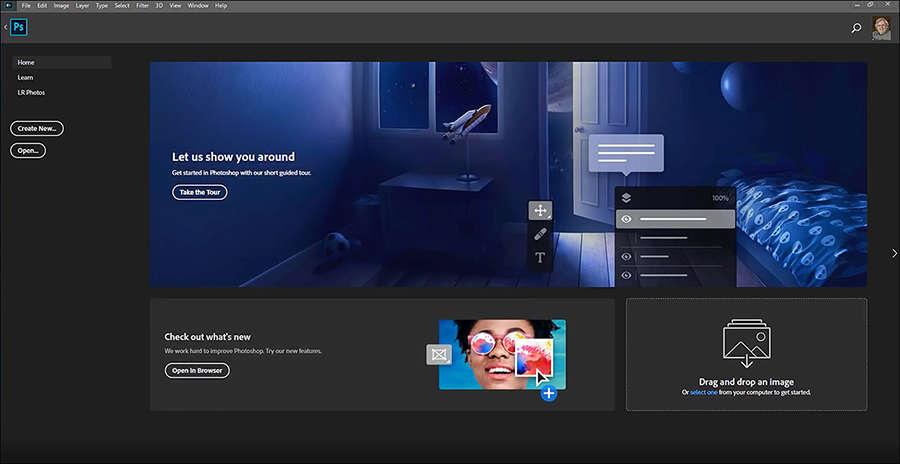
One of the rst noticeable changes to this update is the new ‘Home Screen’.
Photoshop – v20 Updated for 2019 continued …
When launching Photoshop 2019 for the rst time this new and rather dark screen springs into view, offering various options (see page 43). At the left side ve options are available. From the top these are; `Home’, `Learn’, `LR Photos’, ` Create New’, and `Open’. By the nature of their titles these are selfdescriptive perhaps with exception of `LR Photos’, clicking this option takes you to your Lightroom images stored on the `Cloud’, always assuming of course that you have images on the `Cloud’. In the centre there is an option to `Take the Tour’, which as you might expect takes you on an informative tour of Photoshop’s new features. Below this is an option button to `check out online what’s new in your web browser’, again this is self-explanatory. Towards the bottom right is a sensitive rectangle where you can simply and conveniently drag and drop an image to start editing without the need to open an image from within your workspace.
Some users may nd this new Home page useful, but it can be turned off in the preferences if like me you nd this new Home page irritating and prefer the traditional opening of Photoshop. To turn off click on `Edit’ then `Preferences’ (Ctrl+K) then on the `General tab’ place a tick in the small square indicated by the red arrow on the left adjacent image. Thereafter each time Photoshop opens it will default to your usual workspace setting i.e. Essentials, 3D, Graphic & Web, Motion, Painting or Photography.

Your work space can be changed to whatever mode suits your preferred workow by clicking on the drop-down menu next to the spyglass icon at the top right corner of the workspace, mine is normally set to Photography.
For those using blending modes an interesting and most useful new feature is the `live preview’ of blending modes and their effects. Simply by clicking on the blending mode drop down menu within the Layers Palette, (this is usually set to normal) then by moving your mouse or pen up and down the various blending mode titles an instantaneous pre-view is shown on your image without rst having to commit any change.
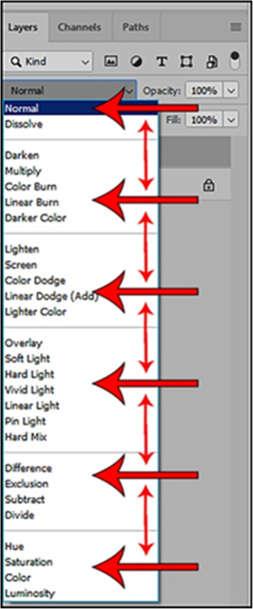
This makes choosing the correct blend mode very quick and simple. Blending modes are powerful tools that can be used to create or change image properties, they can also be used in conjunction with other effects including `High Pass Filter’ `Calculations’ and `Apply Image’.
Blending modes as a subject could easily form the basis of a future Photoshop article.
The `Text Tool’ has also received a major update, now when clicking on the document to start typing an automatic `Lorem Ipsum’ is inserted. This is a small piece of dummy text indicating the style and size of font currently selected. In publishing circles Lorem Ipsum is a placeholder text commonly used to demonstrate the visual form without relying on meaningful content. This dummy text can of course be fully edited to suit your requirements i.e. font, size, attributes, colour etc.
Although Content Aware Fill has been with us for some time Photoshop version 20 (2019) includes a completely new and far more controllable Content Aware Fill tool. The old version of content aware ll is still available for those that wish to use it (Shift+F5) then choose content aware ll from the options box drop down menu. However, the new Content Aware Fill has its own listing on the Edit Menu. As shipped, it does not have its own shortcut key, but a shortcut can be easily created if required.
Photoshop – v20 Updated for 2019 continued …
To create your own shortcut key, select ‘Keyboard Shortcuts’ from the Edit menu (Alt+Shift+Ctrl+K) then in the preferences box choose and expand ‘Edit’, then scroll down until Content Aware Fill is shown on the list. Select this line by clicking with your mouse, whereupon a small white box will appear for you to enter your chosen shortcut. Ensure to use a conguration of keys not already allocated to another function.

If you enter something already in use Photoshop will instantly give you a warning message to this effect. May I suggest (Ctrl+*) this works and is not already allocated. After adding your shortcut, you need to click on the `Accept’ button towards the top right indicated above by the top arrow.
The image (above) showing a farmer herding his cows back to the farm for milking, was taken near Gillside just above Glenridding in the Lake District. It includes two unwanted distractions, a tourist’s silver car on the right and an unsightly wooden structure on the left edge. This image could be improved without such distractions and it is here that the new Content Aware Fill comes into its own, especially as the older version could not adequately handle the area occupied by the car, although it handled the wood structure perfectly.
The new Content Aware Fill has a completely different workspace offering both work and preview windows indicating the effect of adding or removing a green mask using the brush tool. The mask is initially applied by Photoshop automatically, then areas are brushed away to suit. This mask is used to select or deselect areas to be used as reference data for the ll.
By choosing different masked areas the various effect can be seen in the preview window (Centre) before committing, thereby providing opportunities to edit the mask as required to achieve the most appropriate ll.
Note that the Content Aware Fill on the `Edit’ menu will be greyed out until an area to be lled is selected. I normally use the Lasso tool for this purpose because it allows a close selection around uneven shaped objects. In the control panel at the top right side select `Output to New Layer’, this will leave the original image layer untouched.
This maintains the concept of non-destructive editing and it also allows for the lled area to have other subtle edits applied without affecting the original image i.e. colour, density, contrast, saturation, sharpness etc. (See right hand image below )
Version 20 (2019) of Photoshop also has many other improved functions which may be the subject of future articles in AV News.
May 2019
17 - 18 May
PAGB APM for AV Wilmslow Guild, Wilmslow, Cheshire
Contact: pagb-av@gnfestival.org.uk
25 May
RPS Multi Media Advisory Day
Smethwick PS Clubrooms, Oldbury, West Midlands B69 2AS
Contact : howard,bagshaw@ntlworld.com
June 2019
1 June Trophee de Paris
Contact: trophee.paris@orange.fr
6 - 8 June
7th Garda International
Jury: Howard Bagshaw, Lorenzo de Francesco, Fulvio Merlak
Contact: garda2013@gmail.com
9 June
North Wales & Wirral AV Group Challenge321 Judging
Contact: Marion Waine
NWAWAVG@chasingthelight.co.uk
5 - 6 October RPS National AV Competition Leeds Trinity University
29 November to 1 December Great Northern AV Festival
Hough End Centre, Mauldeth Road West, Chorlton, Manchester Contact: info@gnfestival.org.uk
16 December AV Makers South Africa
Themed Competition - Celebration
Contact: Jeff Morris avmakerssouthafrica@gmail.com
Publication Information
AV News is published quarterly by the AV Group of the Royal Photographic Society. It is distributed free to Group members and is available to others for an Annual Subscription of £22 in the UK, £25 in Europe and £27 elsewhere – contact David Neal at: davidneal@talktalk.net
Copy Deadlines
27th September
27th December
27th March
27th June
Publication Dates
1st November
1st February
1st May
1st August
Please note that the copy deadlines are the absolute latest. To ensure publication in the next issue please send copy as early as possible.
Any items concerning Audio Visual and Multimedia are welcome, including reviews, technical details, events, photographs, letters and queries. All contributions should be submitted to the Editors at: magazine@avnews.org.uk

The views expressed are solely those of the contributor and not necessarily those of either the Editors or the RPS AV Group.
Distribution: AV News is forwarded to RPS AV Group members using the labels produced by the RPS Membership Department in Bath. Any member not receiving their copy should contact Bath. However, the Secretary will be pleased to post single copies to those members who have failed to receive them.
Copyright: All rights reserved. No part of this publication may be reproduced, stored in a retrieval system or transmitted in any form or by any means without prior permission of the copyright holder.
Printed By Mensa Printers, Arundel Lane, Shefeld. S1 4RF


