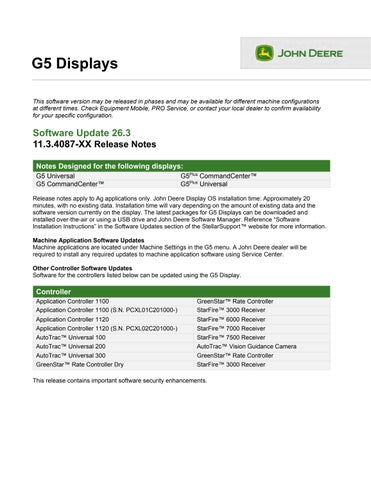
G5 Displays This software version may be released in phases and may be available for different machine configurations at different times. Check Equipment Mobile, PRO Service, or contact your local dealer to confirm availability for your specific configuration.
Software Update 26.3 11.3.4087-XX Release Notes Notes Designed for the following displays: G5 Universal G5 CommandCenter™
G5Plus CommandCenter™ G5Plus Universal
Release notes apply to Ag applications only. John Deere Display OS installation time: Approximately 20 minutes, with no existing data. Installation time will vary depending on the amount of existing data and the software version currently on the display. The latest packages for G5 Displays can be downloaded and installed over-the-air or using a USB drive and John Deere Software Manager. Reference “Software Installation Instructions” in the Software Updates section of the StellarSupport™ website for more information. Machine Application Software Updates Machine applications are located under Machine Settings in the G5 menu. A John Deere dealer will be required to install any required updates to machine application software using Service Center. Other Controller Software Updates Software for the controllers listed below can be updated using the G5 Display.
Controller Application Controller 1100 Application Controller 1100 (S.N. PCXL01C201000-)
GreenStar™ Rate Controller StarFire™ 3000 Receiver
Application Controller 1120 Application Controller 1120 (S.N. PCXL02C201000-) AutoTrac™ Universal 100 AutoTrac™ Universal 200
StarFire™ 6000 Receiver StarFire™ 7000 Receiver StarFire™ 7500 Receiver AutoTrac™ Vision Guidance Camera
AutoTrac™ Universal 300 GreenStar™ Rate Controller GreenStar™ Rate Controller Dry StarFire™ 3000 Receiver .. This release contains important software security enhancements.
Resolved Issues The following key issues have been resolved in this release to improve system reliability, guidance performance, and overall user experience: Improved Display Stability – Multiple causes of display freezing, sluggishness, or unexpected restarts have been addressed, reducing downtime and improving operator confidence during field operations. – Camera and video improvements: Addressed problems with camera feeds freezing, not displaying, or causing display crashes, especially after power cycles or when switching between video sources. – Enhanced system performance and reliability, which will make precision harvesting features, specifically, work more smoothly and help prevent unexpected downtime in the field. Guidance and AutoTrac Enhancements – Fixed issues where guidance lines or AutoPath tracks could disappear, fail to generate, or not be selectable after certain operations or field changes. – Improved AutoTrac and AutoPath performance, including more reliable engagement, better handling of headland turns, and reduced off-track errors. – Addressed problems with track selection, swapping, and visibility, ensuring smoother transitions and more predictable guidance behavior. Machine Sync – Resolved cases where Machine Sync would disengage unexpectedly or fail to maintain proper speed matching between leader and follower machines. – Improved speed control logic to prevent tractors from slowing down or failing to resume to the correct field speed after turns. Work Planner and Documentation – Improved reliability of work data export and synchronization with Operations Center. – Improve documentation with Bale Doc Section Control, Coverage Mapping, and In-Field Data Sharing – Resolved issues with incorrect or missing coverage mapping, including gaps in coverage, double coverage, and section control not responding as expected. – Improved IFDS performance and response times.
Notes added 7/13/2026: AutoTrac Implement Guidance (ATIG) –
Resolved an issue that could cause implement guidance performance to vary between passes or after a machine restart, even when accurate receiver dimensions were configured. This update improves how implement offsets are applied and maintained, resulting in more consistent implement tracking and guidance performance.
–
Improved implement offset handling within ATIG. Implement lateral offsets configured in the implement profile are now properly applied during guidance calculations, helping maintain consistent implement alignment and reducing uneven guess rows caused by implement offset conditions.
Data Sync Setup – Displays that are enrolled in Data Sync Setup, and the organization has opted in to sync implements, will begin or resume implement sync once display software has been updated.
New Features and Improvements Note: Some Combine specific features included below were released in GenOS 26.2 release.
G5 Displays Menu Favorites for G5 Displays What’s new: Operators can now mark commonly used menus as favorites on G5 displays. Favorited items appear in dedicated, easy-to-access list, reducing the need to dig through menus during operation. Note: Available on supported platforms in 26.3; tractor availability planned for a future release. Why you’ll love it: Less time searching through menus means faster adjustments in the cab. Menu Favorites help streamline daily workflows and make the display easier to use, especially for features repeated throughout the day. Bottom line: Your most-used apps, right where you need them. ---------------------------------------------------------------------------------------------------------------------------------
Multi-Display Sync for G5 Displays What’s new: G5 displays can now sync settings and key data across multiple displays on the same machine or within a fleet. Updates made on one G5 display are automatically reflected on the others, helping ensure every display stays aligned and up to date. Why you’ll love it: Managing multiple displays no longer means repeating the same setup steps. With synchronized settings and data, operators and managers can spend less time configuring displays and more time getting work done, while reducing the risk of mismatched settings. Bottom line: One update, everywhere, consistent display settings across all G5 displays. ---------------------------------------------------------------------------------------------------------------------------------
Dual Terminal view on a single G5 screen What’s new: Two ISOBUS Virtual Terminals (VTs) can be displayed side by side on a single G5 layout page. The VT windows are slightly reduced in size to enable more flexible layout options, such as combining implement control with a larger guidance map. This eliminates the need to switch between screens during operation.
Why you’ll love it: – More flexibility when running complex setups with multiple ISOBUS implements, no more running out of screen space or constantly rearranging layouts. – A larger guidance map is available when only ISOBUS VT is used, avoiding a cramped map when the second VT space is not needed. – Better overview so operators no longer have to remember or search for ISOBUS information across multiple screens. – Improved ergonomics by keeping important controls in reach, reducing screen switching and operator distraction. Bottom line: Run two ISOBUS VTs or one VT with a larger guidance map on a single G5 screen. Note: Ability to change Shortcut Buttons from right side to left side will be available with 26.4 software release.
---------------------------------------------------------------------------------------------------------------------------------
Use of manual tramline preview together with automatic tramline mode What is new: Operators can now use Manual Preview with Auto Mode. Previously, these modes could not be used together. Now, tramlines can be previewed before starting while the implement still manages tramline control automatically. Why you’ll love it: You no longer have to start seeding in Auto Mode without knowing where tramlines will be placed, as you can now preview them upfront. This helps avoid incorrect tram spacing settings and prevents costly mistakes. Bottom line: Preview your expected tramlines upfront with Manual Tramline Mode, then let Auto Mode handle consistent placement during operation.
---------------------------------------------------------------------------------------------------------------------------------
Enhanced Variety Documentation for Cotton Module and Bale Events What’s new: Variety information is now documented directly on-board module events, just like Bale Events, and stored as part of the recorded data. Why you’ll love it: – Correct variety is captured even when multiple varieties are used – Eliminates errors caused by defaulting to the first available variety – Improves consistency across different event types – No change to operator workflow Bottom line: More reliable variety tracking, better data accuracy, and consistent behavior across events, without changing how you work. ---------------------------------------------------------------------------------------------------------------------------------
Dry Matter Load Totals for Better Harvest Decisions – on Self-Propelled Forage Harvesters What’s new: Dry Matter (%) is now available as a selectable and visible column in Load Totals, alongside Moisture. This gives operators clear per-load Dry Matter insights, not just field-level totals. Why you’ll love it: – See Dry Matter (%) per load, not just across the entire field – Make better, faster decisions during harvest with more actionable data – Support silage payment, documentation, and operational assessment needs – Moisture and Dry Matter are now available together for easier comparisons – Uses existing data, no changes to how you harvest or document loads Bottom line: You get greater visibility into Dry Matter at the load level, helping improve documentation accuracy and confidence in harvest decisions, right when it matters most.
Machine Sync Maximum Automation Set Speed What’s new: Machine Sync now includes Maximum Automation Set Speed that helps your grain cart tractor automatically match speed changes from the combine during unloading on the go for peak performance. The system is preset to 15 MPH, so you don’t have to worry about your tractor’s set speed holding you back or constantly adjusting it as you work. Why you’ll love it: This update solves a common issue: if the follower set speed is too low, or the operator forgets to raise it before engaging Machine Sync, the follower becomes speed-limited and can’t respond quickly enough to the leader’s commands. By removing manual speed management, the system can smoothly and quickly adjust as the combine speeds up, slows down, or commands follower speed changes. This helps machines stay in sync, keeps grain flowing into the cart, and reduces the risk of spills during unloading.
Maximum Automation Set Speed is found in the follower advanced settings Feature Dependencies: Updated tractor controller software is also required, which will be available with the 26.5 tractor software release. Once both software requirements are installed, Machine Sync can automatically manage tractor speeds up to 15 MPH on compatible tractors. -----------------------------------------------------------------------------------------------------------
Machine Sync Engagement Runway What’s new: The new Engagement Runway gives you a clear visual guide to line up your grain cart for Machine Sync when pulling up to the combine to unload on-the-go. The runway icon shows your alignment and distance to the homepoint, helping you know exactly when and where to press the AutoTrac resume button. It works alongside the familiar pink operational zone to make engagement even easier, more accurate and instantaneous. Why you’ll love it: The Engagement Runway takes the guesswork out of getting synced and helps reduce training time. Simply drive onto the runway, engage AutoTrac, and let Machine Sync handle a smooth, confident unload. -----------------------------------------------------------------------------------------------------------
In-Field Data Sharing Automatic Enablement with Machine Sync What’s new: When Machine Sync is turned on, In-Field Data Sharing is now enabled automatically, so your harvest crew stays connected from the start, without extra setup. In-Field Data Sharing powers key Machine Sync functionality, including: –
Automatically selecting correct combine in the work group when the grain cart is ready to Machine Sync
–
Sharing combine locations, grain tank fill levels, unloading status, and coverage maps for better visibility across the crew
Why you’ll love it: With In-Field Data Sharing enabled automatically, everyone on the crew has a clear view of what’s happening in the field; who’s unloading, where machines are, and what’s coming next. That shared visibility helps reduce confusion, speeds up coordination, and keeps harvest moving, all without extra buttons or setup.
-----------------------------------------------------------------------------------------------------------
Operating Map Updates for In-Field Data Sharing and Machine Sync What’s new: The operating maps have been updated to provide a more consistent and intuitive view when using In-Field Data Sharing and Machine Sync together. All leaders and followers in the work group are now displayed more clearly, making it easier to see who’s who and what’s happening in the field at a glance. – – –
In perspective view, all leaders and followers are shown as black dots, while your own machine appears as an icon In overhead view, all machines are displayed as icons instead of dots Operator names are shown with each machine, so it’s always clear who’s running what in the field and where they’re located
Why you’ll love it: These map updates make it quicker and easier to understand your harvest operation. Clear, consistent machine icons and operator names reduce confusion, improve awareness across the crew, and help everyone stay coordinated, especially when multiple machines are working together in the same field.
View from the follower – Grain Cart 2
View from the leader – Combine 1 -----------------------------------------------------------------------------------------------------------
Guidance Line Shifts Now Enabled During Machine Sync Operation What’s new: Machine Sync now supports small guidance line adjustments (up to 1 inch) while in an acquiring or tracking state. This gives operators more flexibility to stay aligned with the crop rows (especially when harvesting corn without RowSense) without needing to disengage Machine Sync or guidance. Adjustments are intentionally limited to 1 inch to maintain safe, stable operation. If you try to change the shift increment while Machine Sync is active, a message will appear on the display letting you know the adjustment isn’t available at that time. Once Machine Sync is no longer actively acquiring or tracking, the system automatically restores the previously selected shift-increment value, allowing it to be adjusted again if needed. – – –
Designed for combine leader machines No changes to the follower machine experience or RowSense behavior Only relevant to manual line shifts (on-screen button or handle-initiated)
Why you’ll love it: Guidance line shifts let you make precise adjustments to stay on the rows and accurately feed the combine, without disengaging guidance or Machine Sync, while unloading on the go. That means fewer interruptions and a less stressful, smoother transfer of grain.
-----------------------------------------------------------------------------------------------------------
Machine Sync Controlled Traffic Improvements What’s new: Machine Sync behavior in Controlled Traffic mode has been improved so the follower machine can transition into and out of ‘Tracking’ more reliably and seamlessly. This improvement helps even when the Home Point isn’t perfectly centered on the guidance line, such as after small guidance line adjustments. Why you’ll love it: Less frustration, smoother tracking, and more confident unloads. With this improvement, Controlled Traffic works the way operators expect, helping crews realize the full value of Machine Sync during harvest. Bottom line: When it’s time to go, now you’re ready. New settings, more automation, and clearer visual cues help even new operators keep your harvest moving, boosting productivity by up to 8.3%* while unloading onthe-go with Machine Sync.
AutoPathTM Improved Guidance Line Extension Visualization What’s new: Guidance line extensions allow hands-free work to continue past the end of a guidance line, helping operators finish a pass cleanly and line up for the next one with less guesswork. While guidance line extensions have been available for some time, the visualization has been improved so it’s now clear where the guidance line ends and the extension begins. The guidance line appears as a solid line, while any extension is shown as dashed, making guidance behavior easier to understand when using AutoPath (Rows), AutoPath (Boundaries), Boundary Track, or Adaptive Curves. Why you’ll love it: Clearer visuals remove uncertainty at the end of each pass. By clearly seeing where guidance ends and extensions begin, operators can finish passes more confidently and better anticipate AutoTrac behavior when working on guidance lines versus extensions.
Before: The extended lines are solid.
After: The extended lines are dashed. -----------------------------------------------------------------------------------------------------------
AutoPath (Rows) Guidance Line Planning Improvements in Passable Field Areas What’s new: Have you ever crossed a passable field boundary while using AutoPath, only to find your guidance line wasn’t where you expected it to be on the other side? With recent improvements to AutoPath planning, guidance lines now carry smoothly across passable areas, like waterways, keeping lines continuous and exactly where you expect them throughout the field. Why you’ll love it: More continuous and predictable guidance means less guessing when you’re working through areas of the field marked with passable boundaries. Operators can keep moving with confidence, reduce manual corrections, and stay focused on the job.
Before: Guidance lines across passable boundaries are slightly misaligned.
After: Guidance lines across passable boundaries are aligned. ------------------------------------------------------------------------------------------------------------------------
AutoPath (Rows) Operation Expansion What’s new: When AutoPath (Rows) launched in 2020, it supported a defined set of secondary operations, including tillage, planting and seeding, application, and harvesting. While this covered many core farming operations, customers asked for more versatility. With this update, AutoPath (Rows) can now create guidance plans for any secondary operation that has a completed source operation, extending row-based precision across more fieldwork scenarios. Feature Dependencies: To create AutoPath (rows) plans for secondary operations of any kind, you must have a documented source operation (row map) from one of the following: – Tillage – Planting – Seeding – Application - completed with an implement + implement receiver Why you’ll love it: This expansion brings the accuracy of row-based guidance to more jobs across the season. By building on a documented source operation, AutoPath (Rows) helps reduce manual steering, overlap, and guesswork, so every pass stays consistent, even as the job changes. The result is smoother fieldwork, less operator stress, and more confidence from one operation to the next. Bottom line: Clearer guidance, smoother planning, and broader AutoPath (Rows) support means more confident, efficient passes all season long. ---------------------------------------------------------------------------------------------------------------------
AutoTracTM Adaptive Curve Guidance Line Selector What’s new: A new Guidance Line Selection element has been added to the display, giving operators a clearer and more intuitive way to identify the correct Adaptive Curve guidance line while running AutoTrac. Why you’ll love it: Cleaner visuals and a more organized layout make it easier to see which guidance line the system is highlighting, especially in fields with multiple curved passes. Operators can quickly lock onto the correct pass, stay oriented in fast-moving conditions, and maintain precision without extra effort, reducing confusion and missed lines.
Bottom line: This update streamlines Adaptive Curve guidance line selection and creates a more confident operating experience. With greater clarity and fewer chances for mistakes, operators benefit from a smoother workflow when timing and accuracy matter most.
-----------------------------------------------------------------------------------------------------------------------AutoTrac Steering Performance Insights What’s new: Introduces a new visual comparison in AutoTrac Diagnostics that displays what AutoTrac is commanding alongside how the machine is responding in real time. Why you’ll love it: – Quickly see what’s happening: Instantly compare AutoTrac steering commands to the machine’s real-time response. – Diagnose issues faster: Clearly identify whether performance concerns are related to sensors or steering response. – Increase uptime: Faster troubleshooting helps avoid unnecessary repairs and gets you back to work sooner. Bottom line: It gives you a fast, visual way to understand why AutoTrac isn’t performing as expected, so you can pinpoint issues quicker, avoid unnecessary repairs, and get back to work with less downtime. ---------------------------------------------------------------------------------------------------------------------------------
Boundaries Error Estimate Shown as a Measurement Instead of a Percentage What’s new: When recording a boundary, you now have visibility to a new measurement referred to as Horizontal Error Estimate. This is replacing the Boundary Recording Accuracy percentage that was previously highlighted before, during, and after recording. Why you’ll love it: This new level of granularity makes understanding the accuracy of your boundary placement more relatable. A centimeter or inch value is showcased along the bottom of the recording screen to highlight the possible distance from your perceived GPS location at each moment of recording. Horizontal Error Estimate can also be viewed through the Details page to ensure that Autonomy Requirements are met. To record an Autonomy Boundary, the Horizontal Error Estimate must be less than or equal to 50 centimeters (19.6 inches) for the entire boundary before saving.
Bottom line: Visualize an actual measurement to understand the impact that larger Horizontal Error Estimates may have on the placement of a recorded boundary. The Horizontal Error Estimate can be affected by: – Shading – A TCM Calibration that has not been performed on the receiver – Inadequate receiver signal acquisition time o This is the amount of time it takes for the receiver to reach full signal accuracy. This can be verified by going to the StarFire page in the display menu. – Any changes made to the receiver o Some examples include changing mounting direction, installing a new receiver, reconnecting a receiver, changing receiver offset dimensions. If changes have been made, the operator should drive a short distance to collect some GPS points prior to recording.
---------------------------------------------------------------------------------------------------------------------------------
Boundary Qualities and Colors are Further Classified What’s new: Not Autonomy boundaries have been further classified based on the method and correction mode used to create the boundary. The new Advanced and Basic Qualities are visible on the recording map and on the Details page. –
Advanced: Orange Boundaries that have been driven using SF3, RTK, mRTK, or SF-RTK. These boundaries offer a level of accuracy which is recommended for use with advanced guidance and machine automation technology.
–
Basic: Red Boundaries that have been driven using SF1 or SF2 correction mode, created from previous coverage, hand drawn in Operations Center, or imported through a shape file. These boundaries do not include the level of accuracy recommended for use with most precision technology products but can be used for more basic mapping, tracking, and reporting needs.
These qualities are in addition to the existing Autonomy Quality. Note: On the Details page, Unknown or “---” represents boundaries that were created or imported from a competitive system or any display that failed to record a correction mode. Why you’ll love it: Managing an operation requires significant effort, so understanding and optimizing boundary accuracy with clear insights makes a difference when preparing for the season ahead. Boundary quality is directly tied to recommended use cases and visualizing quality changes on the map can help you quickly decide when to undo and rerecord segments to achieve the desired quality that matches the work and technology you plan to use this season. Bottom line: Increase confidence knowing whether you are setup for the technology you plan to use this season. Save time and increase confidence with visual cues that drive awareness. ---------------------------------------------------------------------------------------------------------------------------------
Boundary Correction Mode Included on the Details Page What’s new: View the boundary correction mode and easily leverage that detail when getting set up to complete work. Why you’ll love it: No longer rely on written notes or the use of boundary naming to track what correction mode was used for each field boundary. Instead, confidently refer to the Details page at any time to review correction mode, saving time and increasing overall precision of technology in season. Bottom line: This one small detail is critical. What correction mode is used when recording the boundary and when the equipment returns to the field multiple times to prepare the soil, plant the seed, apply the chemical, and harvest the crop? The answer to all these questions should be the same to ensure the greatest level of accuracy with technology performance and reporting.
Flags Add, Edit, and Sync Flag Colors What’s new: Point, line, and area icons for flags now appear on the display map in color. Flag color is showcased and able to be edited from the flag category list in Flags. A new category and color can also be created. Transfer flag categories and colors through Data Sync Setup, Work Plans, or Setup Files. Why you’ll love it: Flags drive operator awareness and attentiveness to points of interest in the field. In the past they were all showcased in white but now flag colors will heighten operator awareness of specific points, lines, or areas to pay closer attention to. Additionally, the experience of adding or editing flags is now the same whether using a display or Operations Center. This alignment drives overall work efficiency.
Bottom line: Completing work during a busy season can be overwhelming in the cab. Now, customizable color cues can focus the operator’s attention to further avoid potential obstacles or better understand the surroundings.
Work Planner Keeping Existing Coverage When Starting a Harvest Work Plan What’s new: When a harvest operation is started in a field and a harvest work plan is later initiated for the same field and crop, the system now preserves and merges any previously recorded coverage instead of removing it. Please note that this behavior does not apply if the work plan is started with a different virtual implement profile than the one currently selected in the Work Setup Application. In that case, the existing coverage is not reused. Why you’ll love it: You no longer have to worry about losing coverage data when a work plan is started after work in a field has begun. The system smoothly connects your current job to the work plan and applies the latest work plan settings to the ongoing operation, delivering a smooth and continuous workflow for operators. Bottom line: Use your harvest works plans whenever you need to. Your coverage stays put when a matching work plan is added later, helping you maintain accurate records and a smoother workflow. ---------------------------------------------------------------------------------------------------------------------------------
Remove Work Plans from the Work List is No Longer Available What’s new: The Remove Work Plan option is no longer available in the Work List. If you wish to delete your Work Plan from the display, you can do so by removing the machine assigned to the Work Plan directly in Operations Center™ mobile or web. Additionally, the Full Map button has been renamed to Map, with the same functionality. Why you’ll love it: Managing Work Plans in one place helps prevent mismatches between what is planned and what is executed. This change keeps Displays and John Deere Operations Center ™ synchronized, so everyone sees the same work information. Bottom line: Work Plans are now managed directly in Operations Center, giving you better consistency across systems and fewer surprises in the field.
---------------------------------------------------------------------------------------------------------------------------------
Improved Crop, Variety, and Variety Locator details with Work Plans What’s new: Work Details and the Planned Work Map now show clearer crop and variety information for Harvest and Application Work Plans. –
–
For harvest, the Variety Locator is displayed alongside the variety name, or the number of varieties when multiple varieties were seeded. For application, the selected crop now appears together with the applied product.
Why you’ll love it: Seeing crop and variety details directly in Work Details makes it easier to understand what’s in the field without digging for information. Operators get clearer context while working, helping reduce guesswork and confusion. Bottom line: Improved visibility into crop and variety details gives operators the right information at the right time so they can stay focused and confident in the field.
Additional Information and Training Resources Operator’s Manual A copy of the G5 Operator’s Manual is available within the Help Center application on the display with JD Display OS software version 10.20.258-7 and newer. This content is updated with software updates as needed. Always read the latest Operator’s Manual prior to operation. To obtain a copy of the Operator’s Manual, see your dealer or visit techpubs.deere.com.
Onscreen Help Onscreen help supplements the information found in the Operator’s Manual. The onscreen help can be referenced by opening the Help Center application on the display or by pressing the Information icon at the top of any page to view relevant help information for that page. G5 Display Onscreen Help is also available for reference at displaysimulator.deere.com.
Training Simulators To learn more about the G5 Displays, there is an online training simulator available at displaysimulator.deere.com.
Release Notice These are the JD Display OS software update release notes for the G5 Displays. Release notes can be found on http://www.stellarsupport.com/. Note: Your use of the software is governed by the End User License Agreement included with the software. Copyright © 1996-2026 Deere & Company