RURAL DRYLAND COMPOSTING Aerated Static Piles and Worm Composting
Layout and Design by
Workbook developed by
Jessica Brothers, Earth Hands Consulting, LLC based on original layout by www.nicktramontina.com Cover Compost produced at Polk’s Folly Farm being delivered to Sol Ranch for rangeland restoration. Photo by Quivira Coalition First edition Juliana Ciano and Trevor Ortiz, Reunity Resources Eva Stricker, Linden Schneider, and CJ Ames, Quivira Coalition
2022 Text
Acknowledgments Thanks to the Town of Edgewood, Edgewood Soil Water Conservation District, and Healthy Soil Working Group for supporting this work.
This work is licensed under the Creative Commons Attribution 4.0 International License.
Funding support provided by
To view a copy of this license, visit http://creativecommons.org/licenses/by/4.0/
USDA Rural Utilities Solid Waste Management Grants Stranahan Foundation
or send a letter to: Thornburg Foundation Creative Commons PO Box 1866 Mountain View, CA 94042
Turner Foundation
Photography Photos in this publication are not included in this Creative Commons license and require permission to be used or reproduced in any way. Each organization or business should be contacted for permission to use these images. All other photos are copyright © Quivira Coalition 2021
We have done our best to attribute material correctly and check facts but we may have missed things. We urge you to reach out with corrections, and we will update as quickly as possible.
2
Table of Contents Key Terms . . . . . . . . . . . . . . . . . . . . . . . . . . . . . . . . 5 Purpose of This Workbook . . . . . . . . . . . . . . . . . . . . . . 6 Knowledge Inventory . . . . . . . . . . . . . . . . . . . . . . . . . 7
1. Introduction to Composting
. . . . . . . . . . . . . . . . 9
Compost Versus Soil . . . . . . . . . . . . . . . . . . . . . . . . 9 Activity – Components of soil versus compost . . . . . . . . . 11 Activity – Hydrogen peroxide addition to soil and compost . . 13 Compost is Part of the Carbon Cycle . . . . . . . . . . . . . . 15 Compost Production in Rural Dryland Communities . . . . . . 17 General Compost Production Concepts . . . . . . . . . . . . . 21 What Kinds of Composting Systems Are Out There? . . . . . . 25
2. Compost, Healthy Soil, Climate Change, and Food Systems . . . . . . . . . . . . . . . . . . . . . . . . 29 Compost and Healthy Soil . . . . . . . . . . . . . . . . . . . . 30 Healthy Soil Principles . . . . . . . . . . . . . . . . . . . . . . . 30 Compost in a Garden, Farm, or Rangeland . . . . . . . . . . . 33 Compost and Climate Change . . . . . . . . . . . . . . . . . . 35 Compost and Food Systems . . . . . . . . . . . . . . . . . . . 36
3. Compost and Water . . . . . . . . . . . . . . . . . . . . . . 37 Compost and the Water Cycle . . . . . . . . . . . . . . . . . . 38 Compost and Water Quantity . . . . . . . . . . . . . . . . . . 38 Activity – Do a squeeze test . . . . . . . . . . . . . . . . . . . 40 Compost and Water Quality . . . . . . . . . . . . . . . . . . . 46 Activity – Grow test . . . . . . . . . . . . . . . . . . . . . . . . 49
4. Worm Composting . . . . . . . . . . . . . . . . . . . . . . . 51 Set-up . . . . . . . . . . . . . . . . . . . . . . . . . . . . . . . 53 Maintenance . . . . . . . . . . . . . . . . . . . . . . . . . . . . 57 Harvest . . . . . . . . . . . . . . . . . . . . . . . . . . . . . . . 60 3
5. Aerated Static Piles
. . . . . . . . . . . . . . . . . . . . . . 62
Set-up . . . . . . . . . . . . . . . . . . . . . . . . . . . . . . . 64 Maintenance . . . . . . . . . . . . . . . . . . . . . . . . . . . . 74 Harvest . . . . . . . . . . . . . . . . . . . . . . . . . . . . . . . 77
Aerated Static Pile Data Collection Sheet . . . . . . . . . . . . 79 Aerated Static Pile Temperature Records . . . . . . . . . . . . 80 Knowledge Inventory Answers . . . . . . . . . . . . . . . . . . . 81 References . . . . . . . . . . . . . . . . . . . . . . . . . . . . . . . 82
4
Key Terms Compost – a soil amendment made from organic matter Composting – the biological process of breaking down organic matter into a stable, long term fertilizer Feedstock – the organic matter we put into the compost pile Organic matter – anything that used to be alive or derived from living things. E.g. leaves, watermelon rind, pizza crust, manure Browns – carbon-rich feedstocks like hay, dry leaves, or paper which contain relatively little nitrogen Greens – relatively nitrogen-rich feedstocks like food waste, fresh grass clippings, or manure they still contain considerable amounts of carbon Composting system – the infrastructure and design used to turn organic matter into compost Worm composting – a type of composting that works with red wiggler worms and generally maintains temperatures under 80°F Aerated static pile composting – a type of aerobic composting that heats up to a minimum of 130°F for a minimum of three consecutive days and is not turned Plenum Layer – A bed of wood mulch under an aerated static pile Soil – the combined air, water, and mineral and organic components that support plant growth at the Earth’s surface Fertilizer – specific nutrients added to soil as grains, powders, or liquids Soil organic matter – biological material from plants and animals at various stages of decomposition combined with the cells and tissues of living soil organisms and the substances produced by soil organisms; up to approximately five percent of an average soil Organic – containing carbon (not to be confused with USDA certified organic) USDA certified organic – a certification affirming adoption of farming practices that do not employ certain harmful chemicals Approved for use on certified organic farms – an available certification for compost, if intended for use on a certified organic farm and/or sale to certified organic farmers
5
Purpose of this workbook This workbook is a living document. Please make it your own!
•
Write in it.
•
Get it dirty.
•
Keep it in your truck or greenhouse or kitchen.
•
If you are desperate for brown material, you could use it in your compost system :)
•
Use it to help you execute at least one appropriate, prioritized change in your operation or business in line with diverting organic waste from the landfill!
If you get it too dirty, coffee-stained, muddy, wet, or composted, you can download and print copies of all or part of it for free: quiviracoalition.org/techguides
Questions to consider: Please spend some time thinking about your goals, interests, and context. We find it helpful to write things down, so we are giving you some space to put your thoughts to paper. 1. What are your expectations about composting?
2. What are your individual goals related to composting?
3. What are some key questions that you have about composting?
4. What concerns do you have about adopting composting practices?
6
Knowledge Inventory We recommend that you answer these questions before and after reading the book or attending a workshop to help you understand what you have learned and what you might need to go back and reread for clarification. If you are at a workshop, the results of this quiz may help the teacher/ facilitator decide what information to focus on when everyone has a range of existing knowledge and experience! Answers can be found at the back of the book. 1. Circle the items that should not be included in cold or worm-based compost piles because they may create odors that attract pests, may deter worm activity, or may not break down fully, causing biological hazards or incomplete compost.
•
Fallen leaves
•
Vegetable stems
•
Bacon
•
Chicken bones
•
Pet waste
•
Grass clippings
•
Sawdust
•
Fruit rinds
•
Pesticides
•
Eggshells
•
Newspapers
2. True or False: Composting is a physical process that occurs without biological activity. 3. Circle one answer. What is one way that composting contributes to reductions in greenhouse gas emissions?
•
Composting organic waste creates a less potent greenhouse gas than the same waste breaking down in a landfill.
•
Composting prevents oxygen from entering the atmosphere.
•
Composting generates heat to power homes.
•
Composting turns plastic into a usable soil amendment.
4. Identify key differences between cool/worm composting and hot/aerated static composting by labeling each point with one of the following: Worms, Aerated Static, Both, Neither Can break down meat scraps: Requires moisture: Requires electricity: Finished compost in 3–6 months: Finished compost in 30–60 days: Process kills weed seeds: Best kept under a thick layer of high-carbon materials:
7
8
1. Introduction to Composting Our goal is to help rural communities efficiently use waste products to improve food production and soil health. There are many resources available for backyard composting (check out county extension websites!); here, we focus on methods for rural communities and agricultural operations. We assume that you already know what compost is; there are other great resources to review basics.
Learning Outcomes After completing this section you will be able to:
•
Discuss how compost differs from soil or mulch
•
Discuss how compost fits into the carbon cycle
•
Describe the physical, chemical, and biological characteristics of compost production systems.
•
Discuss with a friend, neighbor, or colleague what composting system might be right for them considering their access to space, infrastructure, and machinery and the type and amount of waste they generate.
Compost versus Soil A common misconception is that compost is the same as “dirt.” As you will see, organic matter such as compost makes up a small fraction of soil, but it has different physical and chemical properties due to how it was formed, and these properties affect plant growth. To understand these differences, we’ll consider a few extremes for growing: in only sand, in only compost, or in soil mixed with raw feedstocks. We will use two activities to demonstrate the different properties of soil and compost.
9
1. Introduction to Composting
Would you plant your seedlings into a child’s sandbox?
Intuitively, we know that sand isn’t great for growing plants. That’s because sand lacks organic material. Sand is the largest class of the mineral part of the soil. Silt is the medium-size, and clay is the smallest mineral particle. The mineral part of soil is important to soil function and provides soil with structure (as well as other things!). The relatively large size of sand particles mean that nutrients are not held tightly and the particles do not compress tightly together, meaning that in sandy soils, there can be large pores, or spaces, that water drains through quickly. In silty soils, there are more small particles to fill in the spaces, and with a lot of clay, there are yet smaller particles to fill in the pores. Clay particles collectively have a large surface area: the surface area of one spoonful of clay is equivalent to the surface area of a football field. Broadly, you can think of the mineral components as non-organic material. The mineral component makes up roughly forty-five percent of the volume of soil! You can learn so much more about this from our Soil Health Workbook: quiviracoalition.org/soilhealth-workbook
10
Activity – Components of soil versus compost Supplies
□ □ □ □
2 glasses or clear plastic jars with lids Water Small shovel or other tool to dig up your soil and compost samples Compost and “regular soil” from the ground
Instructions 1. Pour a hefty scoop of soil into one clear plastic jar and a hefty scoop of compost into the other jar. 2. Fill the jars with water. Put the lids on and shake well. Let both jars sit. 3. Check the jar every several hours and then over the next few days. 4. Record your observations and the relative amounts of material settling, remaining suspended in the water, and floating.
Observations Soil:
Compost:
Interpretation The many kinds of soil particles swirl in the water when you shake the jars. They eventually settle according to their size and weight.
•
Larger, heavier particles settle first (pebbles and sand).
•
Smaller, lighter particles settle last (fine silt).
•
Clay particles and small organic materials will not settle, and this causes the water to remain cloudy.
•
Sticks and bits of leaf matter float.
11
1. Introduction to Composting
If compost is so great, should I plant my flowers directly into a pot filled with pure compost? No! If you know the fairy tale of Goldilocks and the Three Bears, plants also like things “juuust right”—enough mineral soil and enough organic matter. Since compost is lighter than most soils, it doesn’t offer the necessary structure for strong root systems. It can compact over time with watering, which is especially bad for container growing. For containers, compost and topsoil blends that contain coconut coir, rice hulls, pumice, and vermiculite are best. For in-ground planting, one to six inches of compost amended into your beds or top-dressed around trees and on cover crops is sufficient to reap all the benefits for your plants and the planet. Additionally, excess nutrients can be bad for plants. Planting seeds or seedlings directly into 100 percent compost can result in root burn from too much of a given nutrient, such as phosphorus, or from the heat generated by unfinished compost. Depending on your feedstocks, your compost may also have high levels of ammonia toxicity or excessive salinity. It’s best to run small tests with your finished compost and the various compost blends you make before applying it to a large plot. Alternately, you can get your compost tested at a soil lab to be more aware of what it offers your soils. Attempting to grow plants in 100 percent compost can also cause problems with water retention. When mixed with topsoil, compost works wonders with water, as it allows good drainage through heavy clay soil while helping to retain water near root systems in sandy soil. Used on its own, however, compost can be hydrophobic, drain quickly, and promptly dry out. Compost-soil mixes can be much more effective for growing plants over small scales than either alone. Check out Chapter 2 for more information on mixes. Finally, biological activity differs strongly between predominantly mineral soils and compost. We can observe that with the following demonstration.
12
Activity – Hydrogen peroxide addition to soil and compost Supplies
□ □ □ □
2 glasses or clear plastic jars with lids 6 percent hydrogen peroxide (available at any drug store) Small shovel or other tool to dig up your samples Compost and “regular soil” from the ground
Instructions 1. Pour a hefty scoop of soil into one clear plastic jar and a hefty scoop of compost into the other jar. 2. Add three to four tablespoons of hydrogen peroxide. 3. Record your observations of the two samples.
Observations Soil:
Compost:
Interpretation When you combine hydrogen peroxide with soils or compost, it mainly reacts with the organic matter. The reaction results in a visible fizzing. This fizzing is due to the hydrogen peroxide resting with the organic matter and, in the process, producing carbon dioxide bubbles. The more organic matter in a sample, the more fizzing you will observe.
13
1. Introduction to Composting
If we are ultimately putting the compost onto the soil, why can’t we mix feedstocks directly into the soil? When you add feedstocks (garden waste, food waste, manure) directly onto or into the soil, the additions will likely not be well mixed and may be large chunks of different materials. This means that the nutrients in these feedstocks will also be patchy. At a microbial scale, the distance between those patches of resources can be huge, so instead of getting a well-balanced diet, there will be some areas with microbes that can slowly eat wood chips, and other areas with microbes that rapidly eat sugary waste like an apple slice. In a composting system, the feedstocks are small and well-mixed, so the waste products from each of those microbes will mix and create new food sources for other microbes, and it is a much more efficient—and quicker—way to break down all the waste. Another consideration is that you are not controlling the air (nor the water, depending on your irrigation and watering system) in the soil, so conditions will not be ideal for microbes and worms to start decomposing your feedstock additions. Microbes feeding on browns only (like wood chips in the soil) can “steal” the other nutrients, especially nitrogen, from the soil, and as a consequence, that nitrogen is not available to your plants. This competition for nutrients defeats the purpose of providing a soil amendment. Don’t worry— wood mulch is still a valuable management tool, but you have to be mindful of when and where you use it. Mulch is meant to protect the top of the soil and not be incorporated into the soil. We will discuss more about protecting the soil in Chapter 2 when we discuss the Healthy Soil Principles.
14
Compost is Part of the Carbon Cycle You will often hear the carbon cycle analogized to breathing; the analogy is not perfect, but it can help simplify a complex pathway. Plant leaves take up carbon dioxide (CO2) and release oxygen (O2) through the process of photosynthesis that uses light energy to transform carbon dioxide and other elements into structural and energy molecules called carbohydrates (sugars). Plant tissues also release carbon dioxide into the air as they break apart carbon compounds (including carbohydrates) to give their cells energy through the process of respiration. Worms, cows, and humans all breathe in oxygen and breathe out carbon dioxide, again because they are breaking apart carbon compounds in their food to drive their cells’ activities. Many microbes also take up oxygen and release carbon dioxide. Some microbes do very different “breathing” when there is no available oxygen in the environment, such as in soil saturated with water or deep in a landfill that has compressed material; they might take up solid things like metals found in rocks or gases and release methane, metals, or other gases.
15
1. Introduction to Composting
Decomposition in the Soil Through photosynthesis, plants take up carbon dioxide from the atmosphere to make sugars, and they combine those sugars with other nutrients they take up through their roots to build their leaves, stems, roots, and fruits. Some of these carbohydrates, known as exudates, are also released into the soil through the plants’ roots. This transition of carbon dioxide from the atmosphere through plants and into soil as carbohydrates is the basic process to create organic material. This is important because carbon dioxide in the atmosphere is a damaging contributor to climate destabilization, whereas carbohydrates in our soil are beneficial. The role of compost in climate change is discussed further in Chapter 2. Plants can be consumed by animals such as cows or insects, and plant tissues are then transformed into the bodies of animals, animal waste, and carbon dioxide. When plants die, microbes or invertebrates can break them down. During this process, microbes grow, reproduce, and die, and some of the carbon is returned to the atmosphere as carbon dioxide while some is transformed into complex organic material in the soil. The bodies of dead animals and animal waste will also be broken down by microbes and transformed into carbon dioxide and complex organic material. The consumption and processing of plant and animal materials by microbes in the soil is the process that creates soil organic matter.
Decomposition in the Compost Pile Composting takes advantage of the natural processes that are performed by microbes and larger organisms like nematodes, worms, mites, sowbugs, springtails, ants, and beetles. Special techniques for feedstocks, water, and air help the decomposition process along. We also make the process occur above the soil at an accelerated rate so we can get a useful soil amendment quickly and put it where it is needed most! Between 50-75 percent of the carbon in the feedstocks put into the compost pile is lost to carbon dioxide, but all other nutrients remain—along with things that you may not want (see discussion on following pages on weeds, pathogens, parasites, and synthetic chemicals)—making the compost enriched in nutrients compared to the plant and animal material that went into it. This is what makes compost a really good, stable, long-term fertilizer.
16
Compost Production in Rural Dryland Communities When thinking about starting to produce compost, consider this question: You’re not adopting a puppy, but are you ready to take care of a hamster? Compost is not a new member of your household that needs to be trained, petted, taken to the vet, and fed and walked daily, but it does need to be fed, monitored, and cared for a little bit! When you compost, you are maintaining a microbial ecosystem so that it will do some valuable work for you, and in that sense it is much like farming: you will have to invest time and infrastructure in this effort to be successful.
Space
Climate
All composting efforts take up space, some more so, some less so, depending on the quantity of feedstocks you are processing. It is important to think about where the compost pile should go, such that it works well in the overall flow of materials in your operation. Also, consider the location of buildings and the topography of a site. A flat area is critical for a larger compost system. If one area gets much more sun than others, the compost there will dry out more quickly. Overhead clearance might be a consideration for moving materials. As we go through each composting system in subsequent chapters, we will describe the space and infrastructure needed for each particular composting system, keeping in mind common constraints posed by the arid environment of New Mexico.
New Mexico is a land of weather extremes that need to be considered when establishing and maintaining a successful compost system. Wind: Heavy and persistent winds may blow certain feedstocks away and dry out your compost pile. You will also need to consider the wind when applying compost to crops. Temperature: If it can get very cold where you live, you will need to consider how to keep the microbes and larger organisms functioning under cold conditions. New Mexico’s generally warm climate may also contribute to drying out the feedstocks and drying the compost pile. This is of concern as most of the organisms we want in our compost system need water.
17
1. Introduction to Composting Water: You will need access to a stable water source for a successful compost system. Large monsoon rains, while potentially beneficial, can create runoff of liquids and solids from the active composting piles, so it’s important to have a diversion or retention plan in place.
the communities of microbes and larger organisms. Food waste, green/yard waste, and manures are all considered feedstocks. Where will you be getting feedstock? Will community members be bringing waste to you? Will you be generating most of the feedstocks on-site from your ranch or farm operation? Evaluate the waste generation network and regulation/ permitting around you, and reach out to other community members or agencies. If it is important to you, you will also need to consider the use of antibiotics or pesticides and insecticides in or on the feedstocks (think manure or plant residues).
Time Managing a compost system takes time, from one to ten hours a week, depending on the scale of your composting system. It is important to evaluate how much time you are able to commit to it and scale accordingly. It is also worth considering the time you’re saving by not taking trips to the dump or spreading fertilizers. Also, think creatively: do you have friends, neighbors, or coworkers who would be willing to contribute time in exchange for some of the compost produced?
Weed Seeds, Pathogens, Parasites, Chemicals, and Biodegradable Plastics in Feedstocks You will likely be using feedstocks containing various “contaminants”—be it weed seeds in green waste, E. coli bacteria in manure, or synthetic chemicals like pesticides or antibiotics. If you are concerned about these things, find feedstocks that you know do not contain them in the first place. This is easier to do with chemicals and biodegradable plastics; it is more difficult to control weed seeds, pathogens, and parasites in the initial feedstock.
Tools and Equipment You will need some tools and equipment for your composting system. We will go into specifics when we discuss the different types of composting systems in upcoming chapters. You will need to consider the cost of getting the tools and the knowledge required for their operation and maintenance. You may consider borrowing tools or co-purchasing with other community members. Soil and Water Conservation Districts also may have tools and knowledge of how to use them that could be helpful! To find your local district contact, search New Mexico Association of Conservation Districts.
Weed seeds, pathogens, and parasites: Living things can be affected by different composting methods based on the temperature of the pile. In a hot composting system, you will be getting rid of weed seeds and pathogens; in a worm composting system, you will not! Aerated static piles that reach a minimum of 131˚F for three consecutive days create conditions that inactivate pathogens and weed seeds. Worms live at ambient temperatures, and
Feedstock availability To process waste organic matter into compost, you need to consider what you put into the compost pile that will nourish
18
pathogens and seeds can survive in these same conditions, so they will still be present in your finished compost. Therefore for cool/ worm composting, you will need to carefully consider what feedstocks you use!
These changes can result in reduced or even eliminated concentrations of synthetic chemicals, but outcomes are highly variable. The transformation of synthetic chemicals in compost is an area of ongoing research (See Büyüksönmez et al., 1999).
Pesticides, insecticides, herbicides, hormones, antibiotics: Synthetic chemicals can be found on crops or green waste where pesticides, insecticides, or herbicides have been applied. Hormones and antibiotics are most often found in livestock manure or bedding.
Another option to address chemicals in compost is to apply compost to the soil well in advance of planting. These synthetic chemicals can, to different extents, break down in the soil through the same process as in the compost pile, and the extra time allows for further degradation.
It is important to note that this is a huge group of extremely different chemical compounds. What is true for one pesticide is not necessarily true for another, let alone for antibiotics or growth hormones. Some of these compounds can undergo changes in a hot composting process when they are exposed to microbial activity, heat, sunlight, and water. Synthetic chemicals can have several fates when entering the compost pile:
•
Absorption: association with other compounds and particles such that they become somewhat unable to move or could be inaccessible to plants and microbes
•
Leaching: moving into water and leaving the pile
•
Volatilization: turning from a solid to a gas and releasing into the atmosphere
•
Non-biological and biological conversions: ultimately being consumed and completely broken down into carbon dioxide and water
Biodegradable plastics: There are many products labeled “biodegradable”, and others labeled “compostable.” These general terms are not verified in any way, and they don’t mention how long the product will take to degrade or in what conditions it may compost. Usually, none of these materials compost in a worm composting system, and most often only those labeled “BPI Certified Compostable” will compost in a commercialscale aerated static pile. Depending on the density of the product, it may take several cycles through your piles. For instance, a thin bin liner may mostly compost in one 30 day cycle, whereas a coffee cup may take three cycles to fully break down.
19
1. Introduction to Composting
Access to Disposal
Compost sales: If you intend to sell your compost, you will need to be registered with the New Mexico Department of Agriculture for compost sales.
Composting takes time and effort, but so does waste disposal in rural communities. Torrance County alone reported approximately eight hundred tons, or four thousand cubic yards, of brush and green waste disposed in 2019. Most households and businesses that generate waste in rural areas do not have access to curbside trash, green waste, or recycling pickup. This lack of access puts the responsibility for diversion of organic waste from landfills squarely on the shoulders of the waste generators. Transporting waste long distances to disposal facilities can be costly in time, fuel, and wear-and-tear on vehicles. Smaller scale neighborhood or regional composting hubs provide the opportunity for rural communities to supply agricultural producers with organic material to compost. A rancher or farmer can produce a beneficial product for their agricultural operation, and possibly create a value added product through the sale of compost to neighbors.
Where the rural meets urban: If you are located in an area where zoning or homeowners associations are active, you may need to consider corresponding ordinances and covenants.
Wildlife Keeping wildlife out of your compost system will be important so as not to vector disease. Wildlife can usually be controlled through management of your compost and fencing.
Permitting and Regulations Composting all on-ranch or on-farm: Any farm or ranch using on-ranch or on-farm feedstocks for compost does not need to be registered as a compost facility with the New Mexico Environment Department Solid Waste Bureau and therefore is not required to be a state-certified compost facility operator. You will also not be required to have a permit to use this compost on your ranch or farm. Outside feedstocks: If you are bringing in outside feedstocks for your compost system, state certification is required. New Mexico Recycling Coalition has details on getting state certification for your compost system.
20
General Compost Production Concepts Feedstock mixes
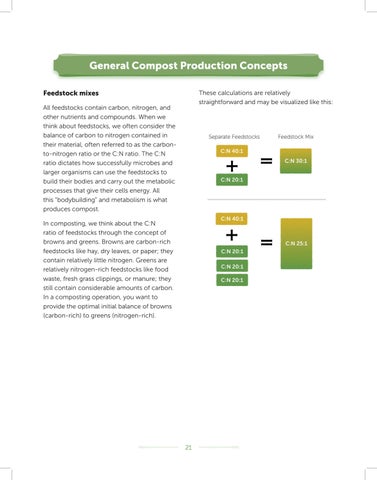
These calculations are relatively straightforward and may be visualized like this:
All feedstocks contain carbon, nitrogen, and other nutrients and compounds. When we think about feedstocks, we often consider the balance of carbon to nitrogen contained in their material, often referred to as the carbonto-nitrogen ratio or the C:N ratio. The C:N ratio dictates how successfully microbes and larger organisms can use the feedstocks to build their bodies and carry out the metabolic processes that give their cells energy. All this “bodybuilding” and metabolism is what produces compost. In composting, we think about the C:N ratio of feedstocks through the concept of browns and greens. Browns are carbon-rich feedstocks like hay, dry leaves, or paper; they contain relatively little nitrogen. Greens are relatively nitrogen-rich feedstocks like food waste, fresh grass clippings, or manure; they still contain considerable amounts of carbon. In a composting operation, you want to provide the optimal initial balance of browns (carbon-rich) to greens (nitrogen-rich).
21
1. Introduction to Composting
For composting, the initial desirable C:N ratio is between 20:1 and 30:1. A general guideline for mixing browns and greens is to use about twice as much to two and a half times as much browns as greens. For example, for every five gallon bucket of food scraps, you should also add about two or two and a half five gallon buckets of woody chips.
will break down into compost more quickly than larger pieces because microbes can access more of the surface area of the feedstock. It is similar to cooking a potato: small cubes will cook more quickly than the whole potato. Creating generally homogeneous particle size (say between one to three cubic inches) will allow your feedstocks to compost at a similar rate and ensure that healthy air flow, moisture retention, and microbial activity occur. Smaller particle size can be achieved in a number of ways, from chopping kitchen waste before composting to feeding food scraps to animals and letting them tear apart or stomp what they do not eat to using a commercial chipper for woody materials. If particles are too small, you will have issues with airflow.
Remember, decomposition processes mean that carbon dioxide is lost, so the finished compost will have a lower C:N ratio than what you started with because you will have less carbon—but the same amount of nitrogen— remaining in the pile. Feedstocks have different shapes, sizes, compositions, and densities and can break down on different time scales because of these factors. Smaller pieces of a feedstock
22
Air
Temperature
Composting requires oxygen. As we described above, it is the living and breathing of microbes and larger organisms that produces compost! This means that you need to keep your compost pile aerated (for example, mechanically turning it, forcing air through, or adding fluffy feedstocks to keep the pile from compressing). If there is not enough aeration, a slower decomposition process—one that does not require oxygen—will take over, and you will get a stinky, undesirable compost pile that composts very slowly. Keeping the pile oxygenated takes advantage of the speed of aerobic decomposition to produce the valuable compost end product most quickly.
You will want to consider what temperatures will help the organisms in the compost ecosystem thrive. For larger organisms such as worms, this is always around 70˚F. The story gets more complicated for microbes as they have such diverse life strategies. When composting in hot systems, the pile should reach a temperature of 131˚F for a few days so the microbes can digest some of the more resistant compounds in the feedstocks. Luckily, the activity of the microbes actually heats the pile of organic matter! There is a feedback between temperature and the growth of these heat-loving organisms, which are naturally present in the feedstocks: growth increases as the temperature increases, which increases the temperature, which increases growth. Once their preferred food source is consumed, the heat-loving microbes slow down, and the pile temperature will decrease.
Water Water is essential for the microbes and larger organisms that live in the compost pile and help decompose the feedstocks. As with soil, you want the right balance of moisture: not too little and not too much. Too little and the organisms will die, too much and the ecology of your compost pile will change. With too much water, a slower decomposition process becomes dominant as air flow is restricted or completely cut off, and this process causes incomplete or slow, stinky composting.
Common compost thermometers are 20 inches long and read up to 200˚F.
Organisms We focus on two types of composting systems that take advantage of different dominant organisms: (1) worm composting, or vermicomposting, using the organism the red wiggler worm (Eisenia fetida) and (2) aerated static pile composting that relies on a community of microbes that are naturally occurring in the compost feedstocks. Because these systems use living organisms to do the composting, it is important to understand what they need to thrive and maintain the compost pile accordingly. We will go into more detail in subsequent chapters.
Water in arid environments such as New Mexico can have high salt concentrations as well as be high pH (basic). A good rule of thumb is that if salinity is an issue in your irrigation water for your crops, it will also be an issue in your composting system. Whatever remediation approach you take to address salinity in your irrigation water can also be used for the water for your compost.
23
1. Introduction to Composting
Time for Finishing
Here, the “finishing stage” is when you stop feeding the bin, allowing any remaining undigested organic material to be consumed, and move the worms to a new area in the composting system so they can keep working for you!
Finished compost is compost that you can sell or apply to your land. To get finished compost from aerated static piles, you often have to put it through a curing process. The curing process is a period during which the active composting process is slowed down and the compost is allowed to sit for weeks to months. For compost created through an active heatcentered composting process, like aerated static piles, the curing process changes the microbial community quite a bit, allowing ambient temperature soil microbes and fungi to populate the pile and further break down and enrich the final compost. Immature or uncured compost that is still hotter than ambient air temperatures can potentially contain high levels of organic acids, a high C:N ratio, and other characteristics which can be damaging to plants.
In finished compost, the C:N ratio stabilizes somewhere between 10:1 and 30:1. This allows you to apply the compost as a soil amendment and not have any adverse effects on soil health or plant productivity due to a nutrient imbalance. Compost can be tested in the lab for things like percent dry matter, pH, electrical conductivity (salts), organic matter, ammonium, nitrate, total nitrogen, C:N ratio, total phosphorus, and total potassium. If you are really curious, feedstocks can also be tested, but most people use the guidelines that we have described. For details in sampling and prices, contact labs such as Colorado State University Soils lab.
For cool compost with worms doing the active composting, there is no curing process.
24
What Kinds of Composting Systems Are Out There? Turned Windrows
In this workbook, we highlight two systems: (1) worm composting and (2) aerated static pile composting. These two systems serve different needs for producers and rural communities depending on the amount and type of waste, available space and time, and access to equipment. We have chosen to highlight these two systems because they are resource efficient in terms of time, space, and money, and they have time-tested, successful composting results in varying dryland settings. There are a few other composting methods well-suited for rural, dryland communities that we will briefly introduce here in the event you would like to further explore your options.
Aeration accomplished though mechanized turning Pros
• Cons
Compost Tumblers Aeration accomplished through manual spinning Pros
•
Nearly no space needed
•
Great air flow (especially important in damp/rainy/cool environments)
Cons
•
Low volume
•
Difficult to retain moisture to keep microorganisms alive in hot sun
Less infrastructure than aerated static pile composting
25
•
Need for more space and machinery and fuel (costly)
•
Need more time to turn
•
Can be slower than aerated static pile composting by several months to years
1. Introduction to Composting
Johnson-Su Bioreactors
Offal compost
Vertical, cylindrical compost pile with built-in aeration so no turning is needed
While we’d hate to lead you down the path toward awful compost, offal compost can be a helpful way to handle the circle of life on farms and ranches. Composting animals requires slightly different methods, and resources for this can be found here: extension.colostate.edu/docs/pubs/ag/ compostmanual.pdf
Pros
•
Not as space intensive as turned windrows
•
Not as time intensive as turned windrows
•
Excellent micro-fungi in finished compost
Cons
•
Very specific feedstock ratio
•
Very specific infrastructure set up including watering system needed for daily one to two minute watering.
•
Low volume
•
Twelve months to create finished compost
Compost tea Compost tea is another way to use your finished compost and add microbial life to your soils. Teas can be made simply in a five gallon bucket or with more complex equipment including aeration and fermentation systems. The benefits can include reduction in plant disease, increase in nutrients and increased microbial diversity in the soil. Every compost tea will have a unique chemical and biological profile. In most cases in the high desert, soils need the organic matter that complete compost can provide which also offers these benefits, and making teas is more for community scientists who like experimentation.
26
Considerations for Full Cost Accounting of Compost Operations When considering on-site composting, it’s helpful to assess your current costs to discard food waste, manure, and green waste. These include tipping fees, fuel costs for driving to a transfer station, and your time. In addition, consider how much you will save on soil amendment costs if you are producing your own compost. Then, look at start-up costs for the composting systems and estimate ongoing maintenance time and machinery or tool use. Finally, if you plan to sell the compost, considering your market is important. For a straw-bale worm composting system, 14 bales of straw could cost around $150 (straw prices are changing and vary depending on location, volume purchased, and whether they are certified organic). For an aerated static pile composting system, your initial investment could be around $700. Generally, straw bales will degrade in three to five years in a worm composting system, becoming part of the carbon for your compost. They will then need to be replaced. In an aerated static pile system, segments of tubing may get cracked by a tractor or machine and need replacing, but generally the infrastructure will last for years. Most people find that composting on-site is either cost-neutral or cost-beneficial, while also benefiting farm productivity and the planet.
27
1. Introduction to Composting
28
2. Compost, Healthy Soil, Climate Change, and Food Systems Learning Outcomes
Making and using compost from organic waste is a great opportunity for dryland agricultural producers. Dryland soils are typically low in soil organic matter, partially because plant productivity is low due to limited water. Soils may also have other nutrient deficiencies, such as low levels of nitrogen and phosphorus. Compost additions can boost organic matter and serve as slowrelease fertilizers of nitrogen, phosphorus, and micronutrients to increase productivity. Additionally, compost can provide improved soil structure, water-holding capacity, and soil microbial ecology. Thus, diverting organic waste from landfills, turning it into compost, and putting it to work on agricultural drylands is particularly valuable! You can learn much more about dryland soils from Quivira’s Soil Health Workbook: quiviracoalition.org/soilhealth-workbook
After completing this section you will be able to:
•
Describe how compost fits into the Healthy Soil Principles.
•
Be able to incorporate compost additions or compost addition trials into pots, gardens, fields, or rangeland.
•
Describe how composting compares with other waste management in terms of greenhouse gas emissions.
•
Describe how compost relates to other needs in the food recovery hierarchy.
Organic waste diversion by the numbers Think back to the Torrance County report of approximately 4000 cubic yards of brush and green waste disposed of in 2019 (page 20). Assuming this refers to the carbon-rich materials known as browns, you would be able to combine all the brush and green waste generated by Torrance County in 2019 with 2000 cubic yards of manure or food waste for a total diversion of 6000 cubic yards of waste from the landfill! If you are running an aerated static composting system, which takes about a month to compost, it would take you between 2.5 and 3.5 years to compost all of this brush and green waste. Combined with manure or food waste, this amount of green waste could produce around 2000 cubic yards of compost, resulting in 2260 metric tons of carbon dioxide emissions avoided. That’s equivalent to removing the average activity of 491 passenger cars for one year.
29
2. Compost, Healthy Soil, Climate Change, and Food Systems
Compost and Healthy Soil Using compost on working lands can align with the Healthy Soil Principles. The Healthy Soil Principles are non-prescriptive guidelines to focus management on ways to improve soil health.
Healthy Soil Principles 1. Keep soil covered/maximize cover 2. Minimize soil disturbance and external inputs 3. Maximize biodiversity 4. Maintain a living root 5. Integrate animals into land management, including grazing animals, birds, and beneficial invertebrates
The first two principles help protect the soil from wind, water, and solar radiation and the last three principles help feed the soil biota and improve the functioning of microbes processing organic material. Compost applications address several of the Healthy Soil Principles. Compost can cover the soil, especially if some of the larger pieces of wood are not screened out. Compost is a slow-release fertilizer, so fewer additional disturbances and inputs are needed than with inorganic fertilizers. Compost increases the biodiversity of the microbial community. Compost increases the soil’s ability to support life by improving its physical, chemical, and biological properties.
30
Physical
•
Physical support for plants
•
Aeration
•
Soil water storage and movement
•
Resistance to soil erosion
Chemical
•
Nutrient storage and release
•
Carbon storage
Biological
•
Root proliferation
•
Organism movement and connectivity
•
Pest suppression
•
Nitrogen mineralization
•
Organic matter decomposition
For agricultural producers who wish to work with Natural Resources Conservation Service (NRCS) for cost-share of projects, there are several practices that may be relevant: NRCS Practice 317 – Composting Facility is approved and can be used to reduce water pollution potential and improve characteristics of organic waste. NRCS Practice 384 – Woody Residue Treatment is approved and is used to address management of woody plant residues. NRCS Interim Practice 808 – Soil Carbon Amendment is approved in some states, and can be used to improve soil health. NRCS Practice 848 – Mulching is approved and has been used to support compost applications. We encourage you to reach out to your local NRCS office to discuss what will work best for you and your specific resource concerns.
31
2. Compost, Healthy Soil, Climate Change, and Food Systems
Discussion – Fertilizer, Compost, Mulching, and the Healthy Soil Principles Given what you learned, you can evaluate different management practices for a field in light of the healthy soil principles. First, evaluate which fundamental physical, chemical, or biological characteristic(s) of the soil are affected by the management activity. Then, evaluate which soil health principle or principles apply to the situation. 1. Inorganic nitrogen fertilizer addition (synthetic fertilizers rarely contain balanced blends of all plant nutrients) Characteristic(s)
Principle(s)
_________________________
_________________________
_________________________
_________________________
2. Mulching with wood chips Characteristic(s)
Principle(s)
_________________________
_________________________
_________________________
_________________________
3. Compost application Characteristic(s)
Principle(s)
_________________________
_________________________
_________________________
_________________________
Additional activities for evaluating the impact of compost applications: See Soil Health Workbook activities “Bulk Density” and “Water Infiltration” to assess whether long-term compost additions have changed the physical properties of your soil compared to nearby areas without compost. Soil samples can be sent to labs for nutrient availability and biological activity.
32
Compost in a Garden, Farm, or Rangeland Benefits of Compost in Croplands and Gardens
•
Helps with soil increasing aggregation, building soil capacity to hold more air, moisture, and nutrients, and reducing the potential for erosion
•
Contains all essential plant nutrients and releases them slowly, over months or years, unlike synthetic fertilizers
•
Brings diverse life to soil, including bacteria, fungi, insects, and worms
Potting Mix Blend On page 12, we discussed why plants cannot be planted directly into 100 percent compost. Now let’s look at how to make a soil blend from your compost for raised garden beds or large pots. Commonly, planting mixes contain topsoil (largely clay/sand in New Mexico and light brown in color); something to encourage drainage, such as pumice, perlite, or vermiculite; something fluffy for porosity and moisture regulation, such as coconut coir or peat moss (peat moss is not recommended due to the damaging harvesting methods used, but we mention it here since it is common in commercial soil blends); and then of course the compost. You can begin with one part each in your blend as a base, and experiment with different ratios and ingredients to find what best suits your situation. Batches can be made in any size, from a wheelbarrow to a several cubic yards!
Note: Depending on your feedstocks and composting process, a high rate of manure and compost application can cause salt accumulation and therefore have negative effects on crop production. If in doubt, it’s best to test your compost before heavy applications.
The next time you work on raised beds, add potted plants to your porch, or set up a row of vegetables, trying mixing up different ratios of compost, coconut coir or peat moss, pumice or vermiculite, and sand/clay from elsewhere on your property. Be sure to write down what the ratios were and how the plants did, and evaluate what worked best for your plants!
33
2. Compost, Healthy Soil, Climate Change, and Food Systems
Compost Application to Rangeland
Soil Remediation Application – Disturbed Sites
Usually amendments are used in farm settings, but over the past decade researchers have been exploring application of compost to rangelands as a way to potentially increase forage production, soil carbon storage, and water retention. Several researchers and organizations are currently researching how compost applications can affect forage production and soil health in arid and semiarid rangelands in the Southwest.
There has been some research on using compost for roadside stabilization, mine reclamation, and other remediation activities. This work is outside the scope of this manual.
How to Distribute Compost of the Land •
Shovel, rake, bucket and wheelbarrow: This low cost, low tech, time-consuming method gives you lots of control over spacing and depth.
•
Manure spreader: There are a variety of sizes available that can be pulled by hand or behind a riding lawnmower or tractor. Cost will vary depending on the size and model.
•
Blower services or blower trucks can be used to distribute compost across extensive croplands and broader landscapes. This method is more costly and technically complicated than the other two, but it can be used to cover a large area.
34
Compost and Climate Change Carbon-rich gases in the atmosphere, such as carbon dioxide and methane, absorb heat from the sun and keep it from escaping out into space. You can think of the amount and accumulation of these gases like a warm blanket—the more blankets on the bed, the more heat is kept inside. As more carbon is emitted into the atmosphere, more of these “blankets” are layered around the earth, trapping more and more heat inside.
improved water availability, and improved nutrient availability. These improvements made through the application of compost can be long-term (Ryals et al., 2014). Although organic material breaks down in both landfills and composting processes, the effect on the atmosphere is dramatically different. In landfills, the practice of packing in waste of all kinds—for instance, plastic bags of yard waste packed in with building refuse and food waste—leads to conditions where atmospheric oxygen can not penetrate into the pile. As a result, many areas packed with organic waste are not exposed to oxygen. These organic wastes get broken down by the kinds of microbes that generate methane as a byproduct of their activity instead of microbes that use oxygen to generate carbon dioxide. Although carbon dioxide is a harmful greenhouse gas, methane is much more potent, and thus is a thicker “blanket” than carbon dioxide. By composting these wastes instead of landfilling them, you ensure that oxygen is available to the microbes, so that they can prevent methane production while making a valuable soil amendment!
Food production is intimately tied to the carbon cycle and therefore with climate change. For example, in 2009, emissions associated with food production, processing, transport, and disposal accounted for 13 percent of US greenhouse gas emissions. Approximately 42 percent of US greenhouse gas emissions are associated with the energy used to produce, process, transport, and dispose of the food we eat and the goods we use (Opportunities to Reduce Greenhouse Gas Emissions through Materials and Land Management Practices, 2009). Sending organic waste to landfills results in the highest greenhouse gas emissions scenario when compared to composting and anaerobic digestion with gas or heat capture (Nordahl et al., 2020). Moreover, diversion of organic waste to compost and application of that compost to agricultural lands results in the uptake of greenhouse gases because soil health improves. In turn, healthy soil leads to healthier, more productive plants. Specifically, applying compost increases plant productivity due to improved soil structure,
An additional benefit of composting is the reduced need for inorganic fertilizers. Nitrogen fertilizer production is an extremely energy-intensive process. Phosphorus and other minerals require mining and transport costs. By reusing the waste material in food production, the nutrients from the browns and greens stay on the land to be taken up by the next generation of plants and animals.
35
2. Compost, Healthy Soil, Climate Change, and Food Systems
Compost and Food Systems One type of waste used in composting is food waste. Food waste is generated directly by producers and subsequently by processors (such as green chile processing plants), distributors (such as restaurant and grocery stores), and consumers. An important goal of a food system is to minimize waste, and this goal is conceptualized through the Food Recovery Hierarchy. The preferred outcome of any food system is to feed hungry people; the next best outcome is to feed animals. As you move down the hierarchy, you will notice that composting is second to last in the preferred use for extra food and food waste.
Remember that compost is not made entirely of excess edible food! We discussed composting with manure, green waste, and other non-edible organic materials in both worm and aerated static pile systems. In the case of non-edible organic materials, compost is the most desirable use of these excess materials.
36
3. Compost and Water Water is essential to life on earth, and because the composting process requires living microbes, compost piles are no exception. But there is also a two way street here: water doesn’t only impact compost production; the whole water cycle can be affected by compost use as well. In this chapter, we introduce the water cycle and how concepts of water quantity and quality relate to compost production and application.
•
Describe the role of water in compost production
•
Differentiate between water management requirements for two composting methods
•
Describe how to conserve water while composting
•
Describe the role of compost in soil’s water holding capacity
Learning Outcomes
•
Discuss the impact of compostamended soils on watershed health
•
Describe the visible and invisible contaminants that may be present in feedstocks and what happens to them in compost.
After completing this section you will be able to:
•
Explain the water cycle and its significance
“Rain Barrel” by CityofStPete on Flickr
37
3. Compost and Water
Compost and the Water Cycle The water cycle consists of many processes that are always going on all over the earth: these include precipitation (rain, snow, hail, etc.), runoff (streams, rivers, etc.), infiltration (seeping into groundwater), evaporation (water moving from the ground or surface water into the gas form of water vapor in the air), transpiration (water moving from plants into the gas form of water vapor in the air), and condensation (cloud formation). The image below shows how these many processes can all occur at once and still be part of the same cycle. The same water that falls as rain on your pasture eventually becomes part of rivers and oceans, water for drinking or irrigating, and in its gaseous form in the air we breathe. The way that water is constantly moving through this global cycle will come up again when we dive into the way compost impacts water quality later in this chapter.
Reflect What are the ways that compost might affect the water cycle? What are the ways that are most important to you?
You may have reached this chapter and felt unsurprised that water is an important component of the composting process; maybe you even knew that already. It might be a touch more surprising though, that compost can also significantly impact water- not just the water you intentionally irrigate with, but whole watersheds. This is because water is constantly moving on, under, and above the surface of the earth in what is described as the hydrologic cycle or water cycle.
Compost and Water Quantity Now that we know that water is essential to the composting process, we will take a look at the water requirements for two composting systems: aerated static piles and worm composting.
Reflect Given what you’ve just read about compost and the water cycle, in what ways can you imagine compost affecting the amount of water available in an ecosystem?
38
Compost Production and Water Conservation
this handbook, we focus on Aerated Static Piles and worm composting (See details in chapters 4 and 5).
Managing moisture content and air flow are critical factors in a successful composting operation. When conditions are too dry, the decomposition rate will slow down and feedstocks will essentially dehydrate rather than compost. When conditions are too wet, water fills the pores needed for air flow and anaerobic conditions can result- leading to rot (and methane production!) rather than compost. Additionally, excess water can lead to run-off of nutrients that may be damaging to adjacent waterways.
While concerns of excess moisture are low in the desert, we should still consider the potential impact of run-off from the composting site in the overall design. If working on a slope, windrows should be oriented parallel to the slope, so that precipitation landing between the windrows can move freely off the composting area and are less likely to carry away partially composted feedstocks as runoff. The downslope perimeter of the composting area can also be safeguarded with a vegetative filter strip: an intentional planting of a native perennial grass or wildflower that will take up the runoff water. Piles made of compost or wood chips can also be effective at controlling runoff from sloped areas (also see image on page 45).
In the high desert, we are working with environmental factors such as high winds, low ambient humidity, intense sun/altitude, and lack of consistent precipitation. Due to these factors, we’ve selected composting techniques that reduce evaporation and moderate air flow to conserve water. In
Condensation
Precipitation Transpiration Evaporation
Compost Piles
Water Holding
‘The Water Cycle’ with compost piles incorporated for improved water holding and infiltration.
Infiltration
Pond Groundwater Flow
Graphic by Jessica Brothers
39
Activity – Do a squeeze test Supplies
□
a handful of your feedstocks
Instructions When mixing feedstocks, performing a squeeze test is the most practical method for estimating moisture content. To do a squeeze test, simply reach 18-24 inches into your feedstock mixture and grab a handful of your feedstocks. If a tight squeeze yields a drop or two of liquid, the mixture is in the 70% moisture vicinity. If no liquid drops from a tight squeeze and it appears dry and crumbly, add water and continue mixing. If the mixture is too damp, add more dry highcarbon feedstocks like dried leaves, straw or wood chips and mix in.
Observations
Hand squeeze test observation key
% moisture
Material is crumbly; doesn’t stick together
42 or less
Material feels mostly dry but a hint of moisture to it; material feels tacky, material feels moist
42-58
Material sticks together; glove glistens or has a wet sheen; squeezing releases 1-2 drops of water
58-68
Squeezing releases many drops or a stream of water
40
68 or higher
Compost and Water Quantity
Aerated Static Pile water needs
with at least 6 inches of either finished composted mulch from prior batches, or raw wood mulch. This layer acts to slow evaporation of the moisture in the feedstock mixture as it composts, similar to mulching around trees and plants to conserve water!
Creating optimal moisture content in this first mix is key to a successful batch of compost and ultimately saves water over the life cycle of the batch. The ideal moisture content for the feedstock mixture when building an aerated static pile is 70%, with a functional range existing from 40%-90% throughout the compost cycle depending on the feedstocks used. 70% moisture content is likened to freshly brewed coffee grounds or a wrung-out sponge: damp, but not dripping. Depending on the nature of your component feedstocks, you may need to add water to the initial mixture. Fruit and vegetable scraps and fresh manures are often over 80% moisture content, whereas high carbon materials like dried leaves, wood chips and straw are often 15% or less. It follows that the wetter the feedstocks, the less added water will be necessary.
Beyond simply adding this layer of mulch, adjusting the shape of your windrow can help to catch moisture if rains do come. As shown below, a concave shape will help catch and retain precipitation in your pile, whereas a round, peaked shape will shed water. This shaping can be done entirely with the mulch
For maximum water efficiency, composting facilities can use greywater- water captured from other farm operations ranging from vegetable washing to rinsing feedstock containers. The high heat stage of aerated static pile composting (minimum of 131 degrees Fahrenheit for a minimum of 72 consecutive hours) kills potential pathogens. However, this heat does not denature all chemicals such as persistent herbicides (further information on this later in the chapter), so be mindful of your greywater source. When greywater is not an option, add water with a garden hose or fire hose depending on the pile size.
cover if desired, and thus allows flexibility for changes throughout the composting process as weather and compost conditions dictate. As your feedstocks “cook” on the aeration system for the first month, some moisture will evaporate. How much evaporation occurs depends on many factors within the system itself and the surrounding environment.
Once the feedstock mixture is near 70% moisture content, it can be moved onto the mulch bed/plenum layer over the aeration system. Then, very importantly, it is covered
41
Therefore, during your first months of composting, repeating a weekly squeeze test throughout the composting process will give you the specific information you need for your feedstocks and location.
composting feedstocks to accommodate the greater evaporation rate and minimize the need to add water later in the cooking stage.
Worm Compost water needs A worm compost system follows the same water conservation principles and techniques as the aerated static piles. A straw bale perimeter minimizes the drying effects of high winds, and the high-carbon cover layer, whether straw, leaves, wood chips, or other, reduces evaporation from the actively composting food scraps. The small size of the system makes placement flexible, and this can be considered for both temperature and water regulation. Can the bin be somewhere shaded, or where it can easily catch rainwater or greywater?
If you find the composting feedstocks are very dry, you may need to add some water during the active composting process. This is a less efficient method, as the water needs to go through the mulch cover and some will be absorbed and quickly evaporate from the mulch. Therefore, if after multiple observations you conclude that your feedstock mixture and climate are consistently too dry before the end of the compost process, you can begin subsequent piles with greater moisture content (70%+) and/or a thicker layer of mulch on top of the actively
Bale worm compost heap. Photo by Vivian Evans via Flickr
42
Compost and Water Quantity
The key consideration in worm-composting is that you are maintaining a healthy environment for the red wiggler worms. They need a balance of airflow and water to survive and thrive as they turn food scraps into nutrient-dense compost. Like aerated static piles, they also need approximately 70% moisture. A general moisture content guideline is to rinse your feedstock container once and add this water to the compost to maintain your pile in the 70% range. It is also important to ensure that greywater that you may want to use doesn’t contain any soaps or additives that could harm the worms.
whether more straw, a piece of corrugated cardboard, a tarp or a reused carpet scrap can help hold in moisture and warmth during cold spells. If your summer extremes are consistently 100 degrees and higher, you may need to consider shade options for your compost system, from a tree to an umbrella to a piece of cardboard. Naturally, higher heat leads to faster evaporation, so working with shade is an important water conservation strategy. The scale of a straw bale worm compost system makes adjustments quick and easy. If your pile becomes too wet, adding more high-carbon material and giving it a gentle fluff with a pitchfork can reintroduce the essential porosity needed for healthy airflow, and if it becomes too dry, an additional rinse and empty of the feedstock container or additional water from another source will remedy the issue quickly.
Contrary to aerated static piles, vermicompost is NOT a high-heat process, and you must maintain a temperature range between 32 Fahrenheit and approximately 100 degrees. The insulative design of the straw bale pile maintains this range in most moderate climates. If you live in a place where winter temperatures are consistently in the teens or below, additional top cover insulation,
43
3. Compost and Water
Compost Application and Water Quantity When we amend soils with compost we increase the soil’s capacity to hold water because adding compost increases soil organic matter (see page 10). Dryland soils are often close to 1 - 2% organic matter and organic matter breaks down rapidly in dryland soils, such that getting above 2 or 3 percent can be difficult to do. However, even 1 percentage point increase in organic matter has major positive impacts on water conservation for crops and on native plants. Soil scientists report that for every 1 percent of organic matter content added per acre in the top foot, the soil can hold 16,500 gallons of plant-available water (Sullivan, 2002)
soil-building, minimal to no tillage is recommended for field maintenance (think about the Healthy Soil Principles on page 30). However, when a desertified soil must be transitioned into a fertile, productive crop plot in a single season, an initial till to incorporate a volume of compost and increase organic matter throughout the rooting zone of the soil and porosity is one approach that has shown success. How effective is compost amendment at holding water? A 1994 study by A. Maynard found that a 3 inch layer of leaf compost rototilled to a 6 inch depth increased water holding capacity to 2.5 times that of a native sandy soil. In a 2000 study, Maynard found that increasing the water holding capacity of the soil by adding compost helped all crops during summer droughts by reducing periods of water stress. The amount of water in a plow layer (8 inches) of the compost amended soil increased to 1.9 inches compared with 1.3 inches in unamended soil. Since vegetables require 1 inch of water a week, at field capacity, the compost-amended soil holds a 2-week supply of water.
Compost holds 3-5 times its own weight in water, so adding compost to soil can increase water retention in the resulting amended soil! The exact amount of water retained will depend on factors such as soil composition, compost composition, compost application rate, water delivery method and rate, and environmental characteristics. These complex factors result in high variability in the amount of water retained in various studies of compost application. Even so, all recent studies indicate that in general, compost addition increases soil water retention.
Ultimately, these studies illustrate that amending dryland soils with compost reduces the need for water application. Beyond the increased water holding capacities illustrated, compost reduces soil physical crusting, which helps with water absorption and penetration into the soil. Recent research suggests that the addition of compost in dryland soils can facilitate moisture dispersion by allowing
Compost can be added to soils as a top dressing, that is, simply scattered across the soil in the desired quantity and incorporated into the soil passively through rain absorption and rooting action of seeds and transplants. Alternatively, compost can be tilled into a crop plot to the depth desired. For overarching
44
water to more readily move laterally from its point of application (US Compost Council 2008).
After adding compost, you may notice that the compost visibly decreases through time, but it doesn’t mean that the effect of the addition is gone - in fact, one publication suggested that a single application of compost may stimulate decades of carbon sequestration (Ryals et al. 2015). Microbial activity and physical and chemical processes may slowly decompose compost over time, incorporating what was compost into the soil’s organic matter. Microbial processing can contribute to slowrelease of fertilizing nutrients and some of the carbon compounds can be processed into stable forms deep in the soil. This organic material continues to help the soil act as a sponge, taking up water when available and holding it for the plant roots.
Research is emerging regarding the benefits and constraints of compost amendments in rangelands. Initial results from ¼”-1” compost top dressing in rangelands suggest 0-30% increase in aggregate stability and over a 5 minute decrease in infiltration time (lower infiltration time means faster infiltration!). While total costs and implications for compost amendments in rangelands are still emerging, the initial results suggest that there are benefits to water retention in non-crop soils also.
Image adapted from “Innovative Uses of Compost Erosion Control, Turf Remediation, and Landscaping” EPA530-F-97-043 October 1997 www.epa.gov
45
3. Compost and Water
Compost and Water Quality thus composting methods must be carefully managed to reduce those risks. In hot composting systems like aerated static piles, there is no concern of pathogens surviving the process. However, in a worm compost system, awareness of potential pathogens is important since they could both harm the worms and survive/proliferate in the moderate temperatures of the worm composting environment.
Reflect How will you mitigate pathogenrelated risks in the way you compost at your home, farm, or ranch?
Water running off of compost production systems may contain some microbes and other chemicals that affect water quality. This section addresses the different types of contaminants that might be found in feedstocks and whether they can survive the composting process or be chemically transformed.
There is growing interest in composting feedstocks such as human waste, but from a safety and regulations perspective, composting these wastes is a different category than animal manure and food scraps. There are ways to compost these products safely and effectively as well, but we are not covering them in detail here. The Humanure Handbook: Shit in a Nutshell by Joseph Jenkins is a good starting place.
Disease Some feedstocks such as meat, dog poop, or certain greywater may contain microbes that can cause disease (“pathogens”) in humans, plants, or other organisms, and
46
Visible Contamination
E CL Y C
REG EN ER
REDU
O SE URP P RE
E AT
RE
Visible contamination is inevitable. Many people have questions about potential physical contaminants in their compost piles. In this case, a contaminant is anything that is not compostable. Plastic fruit stickers are common contaminants, or anything that is made from conventional plastic or metals. These contaminants are not just concerning in our compost piles, but throughout our whole ecosystem: plastic contamination has been found in the deepest parts of the ocean and outer space. Addressing this is beyond the scope of this handbook, but the contaminants that show up in our compost piles can be sobering reminders of the need for broad scale changes and production changes. The key to reducing contamination is prevention through education. Reduced levels of contamination are found in the wheel of Reduce, Reuse, Repurpose, Recycle, Regenerate.
CE
REUSE ‘The 5Rs’ Graphic by Jessica Brothers
47
3. Compost and Water
Sometimes unwanted chemical compounds leave during the composting process or when compost is added to soils in ways that are undesirable. One way is volatilization, or the act of a compound moving into the air as vapor. And the other is as leachate or runoff. Leaching is rare given our arid environment, but possible. Especially with respect to water quality, awareness of potential contaminants that could run off is an important consideration in the location of your compost pile with respect to your watershed.
As you source your feedstocks, endeavor to educate and eliminate unwanted visible contaminant materials. Educate anyone contributing feedstocks to your compost to remove as much visible contamination as possible before composting. However, at the end of the composting process, visible contaminants can be removed through manual and/or mechanical labor.
Invisible Contamination Invisible contamination can take many forms, from microplastics in polyester-type fabrics to pharmaceuticals to chemicals sprayed onto pasture and passed through an animal’s digestive system and into their manure.
There is a small percentage of invisible contaminants that may not transfer or transform in the composting process, and these could remain in your finished product. Most worrisome are chemicals in the picolinic acid family, or what are commonly known as persistent herbicides. These are most used for weed control in pastures, hay fields and golf courses. They break down more slowly and reluctantly than other chemicals, and most notably are NOT broken down in animal digestion. That means that the manure of animals eating grasses, hay, etc. still contains these chemicals. If these persistent herbicides end up in your compost feedstocks, they will likely end up in your finished compost. While lab tests exist to test the presence of these chemicals, they can be time consuming and expensive. If you are concerned about your compost, an athome grow test is a great way to check your compost before widespread use.
Generally speaking, the composting process can be a healthy way to reduce and render inert many invisible contaminants. At its core, the process of composting, or decomposing, is one of degradation followed by regeneration, either with macro-organisms (eg. worms), micro-organisms, or both. Through decomposition, the structure of the feedstock changes entirely: one cannot see the apple core in the handful of finished compost. Through regeneration, the apple core manifests as compost. The majority of invisible contaminants are transformed through composting. The original unwanted material (waste) is broken apart and changes form to a wanted material (compost). Transformation occurs through the processes of mineralization and humification. These processes result in compounds that are available to vegetation and the formation of humic acid (humus), both necessary for healthy soil.
48
Activity – Grow test
Instructions and Observation When soils are amended with compost containing persistent herbicides, you’re likely to see stunted growth and reduced fruit crops, failure of secondary leaf sets and/or compound leaves staying single. The most vulnerable plant families where these impacts will be evident are legumes, nightshades, cucurbits and composites. Therefore, performing a grow test using seeds from one of these plant families can provide compost users with important information. To perform a grow test, sow a small amount of bean or other (nightshade, cucurbit, or composite) seed in the compost you want to test. The first leaves to emerge upon germination are the cotyledons, and true leaves emerge shortly after. The true leaves will reveal either healthy or compromised leaf growth. Tomato plant affected by aminopyralid herbicide residue from contaminated manure, grown July 2008, Cheshire, UK. Note tightly curled leaves, which is a symptom of aminopyralid contamination.
49
3. Compost and Water
Compost Use and Water Quality Healthy soil ecosystems relate directly to healthy watersheds. Because compost amendments positively impact soil ecosystems they also lead to improvements in system-level water quality.
1. Compost acts as a replacement for many synthetic fertilizers, reducing the need for chemical inputs and therefore indirectly decreasing the amount of excess fertilizers that run off from fields into streams and down through watersheds. The nutrients provided by compost are stable and released over time at rates that allow plants to take up what they need without excess nutrients running off and contaminating local watersheds. 2. Compost acts as both a sponge and a filter, so it can address the substantial pollution that urban stormwater runoff poses to receiving surface waters. By amending soil with compost, land stewards are placing a filter into the local water cycle, providing an opportunity for pollutants to be immobilized and degraded before the water they are in continues into the local watershed. According to the Institute of Local Self-Reliance, compost amended soils can filter out 60-95% of urban stormwater pollutants. 3. Because compost can hold 3 to 5 times its weight in water, rainwater that would normally be lost through evaporation or runoff is able to remain in and replenish ecosystems when it falls on compost-amended soils. Compost’s capacity for water retention is what makes contaminant immobilization possible, allowing time for the pollutants to degrade. 4. Compost directly improves soil quality in the form of structure, pH, stability, and support of beneficial microbial and plant communities. These characteristics all impact the local water cycle and therefore, the local watershed.
Conclusion We cannot discuss composting without examining the role water plays in the process; from its importance in supporting the micro- and macro-organisms that turn waste materials into compost to considerations to minimize runoff, water is always a factor. Additionally, the worldwide water cycle is impacted by compost applications, whether in your backyard garden or across southwest rangelands. As land stewards at any scale, we can all benefit from reminding ourselves of compost’s capacity to significantly impact water, which then impacts all life on Earth.
50
4. Worm Composting Learning Outcomes
How it Works Worm composting, or vermiculture, uses the red wiggler worm (Eisenia fetida) to process feedstocks into compost. You may notice that the term vermiculture is not dissimilar to the term agriculture; indeed, what you are doing is growing worms. You will need to provide the right food, moisture, and air for this worm community to grow. Keep in mind that you will need to constantly feed your worms to keep them alive. A one-week break is okay, but not feeding them for a whole month could cause them to die.
After completing this section you will be able to:
51
•
Describe how to set up the infrastructure and feedstocks of worm composting.
•
Describe the ecology of a worm composting system.
•
Discuss the maintenance requirements and troubleshooting of a worm composting system.
4. Worm Composting
Site Analysis Worm composting systems are great for smaller scale composting. You may think about starting a worm composting system for an office building, school garden, or your kitchen green waste. The worm composting system that we describe on the next page is good for one to three households’ worth of organic waste generation—think about four to twelve people. When thinking about location, the main considerations for a worm composting system are: 1. Space for the structure You will need approximately a twenty-foot by ten-foot area to accommodate the three-bay strawbale worm composting system we describe here. We recommend choosing an area easily accessible from your kitchen or where you will be generating food waste, and with access to water. 2. Temperature of the worms’ habitat It is optimal to maintain a temperature of 40–90˚F within the worm composting system. Here are some ways to accomplish this: Summer:
•
Natural shade source, like a deciduous tree
•
Umbrella in worm composting system
•
Cool wet food, like watermelon pieces or cucumber
•
Thick bedding/insulation on the bottom with straw and browns to cover the top
Winter:
•
An old window or piece of plexiglass to let sunlight warm the worms
•
A “lid” made of a tarp, old carpet, or plywood, or a thicker mulch layer
•
Thick bedding/insulation on the bottom with straw and browns to cover the top
The worst-case scenario in an extreme temperature fluctuation would be a worm migration or worm death. In either of these instances, don’t give up. Get more red wigglers!
52
Set-up Here we provide a materials list for creating a three-bay worm composting system. Three bays are beneficial as you can have all three stages of the worm composting cycle active at any given time (active/feeding, finishing, and harvesting). A single- or double-bay system can also function well; it’s just a matter of how much feedstock you have.
□ □ □ □ □ □ □ □
14 straw bales to construct 3 adjacent cubes with all four sides enclosed Note: Bays could also be constructed with other materials, like pallets, repurposed lumber, or cinder blocks. We recommend straw bales because no other tools or construction experience are required, and they have excellent insulating properties. They also provide easy access to browns (the straw!) if needed. We do not recommend hay, which may lead to livestock or wildlife coming in and eating the bins. 4 to 10 gallons of browns for bedding, cover, and feedstock 1 gallon of greens such as food waste 2 cups of red wiggler worms Water source for moistening Tarp, lumber, old carpet swatch, or repurposed storm door for covering active/feeding bin during deep cold spells Pitchfork or shovel Optional: a screen for the finished compost (See page 60 for discussion on harvesting methods.)
Containment To construct a worm bin, place straw bales horizontally on the ground, with two bales side-by-side and one perpendicular to these. Finish the rectangle with two more bales parallel to the first side and a final bale perpendicular to that.
Scaling Up or Down Scaling up: build more bays to accommodate the greens that you need to process. Scaling down: A single bay can be sufficient if your feedstock volumes are low. You can feed the compost bin in different quadrants. This allows for some parts of the bay to be in each of the three stages: active/feeding, finishing, and harvesting. This is most often seen in urban backyards.
53
4. Worm Composting
Aerial Overview of Three Bay Worm Composting System
Worm Composing System Cross Section
54
Start-up Procedures You can start with just one bay. You will get the other ones up and running at staggered intervals so that you will have each bay running in a different stage (active/feeding bay, finishing bay, and harvesting bay) at any given time. The time frame of a single bay, from start to finish, will depend on factors including climate and weather, amount and frequency of feeding, types of feedstocks, particle size, and moisture. Most worm compost bays could be complete within three to six months. Once you have your first bay full, you can start your second bay.
1. Bedding Bedding material should be from the browns category. You will want enough bedding material to fill the bin three-quarters full, so we recommend ten gallons of bedding. Bedding can be any combination of the items below:
•
Straw
•
Hay
•
Dead plants
•
Dried grass clippings
•
Shredded newspapers (non-glossy)
•
Shredded computer paper
•
Shredded cardboard
•
Shredded leaves
Once you acquire your bedding, wet it so that it is about as moist as a damp sponge. You may want to do this day before adding worms so the material has time to absorb the moisture. When the bedding is moist, create a nest or base layer on the bottom of your first bay, big enough to easily contain the amount of green waste you’ll be adding. You will use about half of your browns for this bottom layer. This establishes a moist, aerated environment for the worms to be introduced to.
2. Worms Add the worms right on top of the moist bedding. They will wiggle down into the bedding and away from the light.
55
4. Worm Composting
3. Feedstocks Now, you’ll add food waste, about a gallon’s worth of greens. You will add this to the nest of bedding where you have introduced the worms, and then cover the food scraps with the other half of your browns, this will be your cover. Greens
•
Fruit and vegetable trimmings
•
Starches like bread and potatoes must be less in quantity than the fruit and vegetable trimmings)
Particle Size It is helpful to the worms to have food scraps in smaller pieces as they can break down these smaller chunks into compost faster. This is because worms do not have teeth; they have a gizzard and use the solid soil particles to process their food. Larger items take more time and must be buried well in the bedding.
Things to avoid in your feedstocks for cold/worm composting
•
Poop: Do not add pet waste, manure from large animals, or dirty diapers to your bin. Worms do not want to eat your poop, your dog’s poop, or even your sweet baby’s poop on a certified compostable diaper.
•
Large wood debris: Worms will simply not break this down as it is not porous/aerated enough for them to eat.
•
Dairy, bones, meats: Odors can attract larger animals.
•
Too much citrus, spicy foods: Worms just don’t like to eat these.
•
Biodegradable plastics: Biodegradable plastics will not break down in cold/worm composting; they are intended to break down in commercial composting facilities only. Compostable fiber products, such as a paper or palm-leaf plate, can be added in small amounts if shredded very finely first.
•
Poisonous plants: Worms are alive, and they eat much of what you feed them, so don’t feed them poisonous plants.
56
Maintenance Feeding stage You will consistently repeat the pattern of adding food scraps and covering with browns. As your first bin is being filled with your (and your neighbors’) compostable materials, you can build the second bay adjacent to it, using additional straw bales or whatever building material you have chosen. Browns Initially, you will not need to add any additional browns, but as time goes on the worms will consume your browns and you will need to increase the supply. The browns maintain a good aerated environment for the worms to travel through to find the food, moisture, and temperature pockets they prefer. By always topping your compost bay with browns, you will also be reducing odors and the potential for attracting other critters that may want to eat your food waste. This top layer of browns can be thought of as a lid: lift it each time and bury your fresh food scraps and additional browns under it, then place it back on top. You should keep a layer of straw cover two to four inches deep, and even deeper in the winter. Greens When going to feed your worms, gently lift the straw cover on top with your hand or a pitchfork or shovel. Bury food at least four inches under the straw cover and in a different location each time. You will want to feed your worms anywhere from one to seven times a week and anywhere from a cup to a gallon per feeding from the greens category. If a lot of food scraps are accumulating in the bin from previous feeding(s), wait a day or two before adding additional food. You might also add additional high-carbon bedding material to ensure that air, moisture, and food are well-distributed for the worms. In this dryland climate, maintaining moisture is important for your worm composting system and needs special consideration. Generally rinsing your food scraps collection container once and emptying the liquid into the worm composting system with each feeding will be sufficient. Watch, feel, and smell your worm composting system. Notice what its unique ecosystem is digesting quickly and what seems to just be sitting in the bin, and adjust your feedings accordingly. With worm composting, the worms are handling the aeration and turning from within. Regular, vigorous turnings are not necessary and can even be damaging to the worms’ process.
57
4. Worm Composting
Finishing Stage When the first bay reaches capacity, simply top it off with a nice thick layer of browns to insulate and minimize evaporation, and make sure it is at the ideal moisture of about 50 percent water content, or about as moist inside as freshly brewed coffee grounds. Let that first bay compost with no new feedstocks added for several weeks. Periodically check to see if your feedstocks have fully broken down and ensure the bay is maintaining moisture and activity. When you no longer have visible feedstocks, the process is complete and your compost is ready for harvest.
Maintaining Optimal Conditions Moisture To assess moisture, reach into the worm composting system and feel the contents where the worms are living, under the straw cover. The contents should be about as moist as a wrung-out sponge or freshly brewed coffee grounds (these are common ways to assess 50 percent moisture content). If it is too dry, you may need to increase water addition or increase the depth of straw cover for more insulation. Other Organisms You can largely control unwanted organisms of all sizes by making sure your worms are efficiently digesting the feedstocks that are being buried under the straw cover. If you notice food molding or maggots colonizing the food scraps, you may want to feed the worms less; this means they are taking too long to get to it and need a chance to catch up. You may also notice soil mites, small red mites, pill bugs (roly-polies), and other invertebrates in the worm composting system. They are not detrimental as they are also decomposers. Larger mammals are also unlikely to take interest in your pile if the food waste is well-buried and worm activity is processing it consistently to prevent odors. Do I Need to Add More Worms? Usually, nope! If you are successfully maintaining your worm composting system, the worms are growing and reproducing, so they should maintain and expand their population with time. The only time you might need to add more worms is if you remove a lot of them when you harvest your compost (see page 60 on harvesting methods to avoid this) or if there has been worm death due to a particularly harsh sustained freeze, a flood, or the introduction of something toxic to the worm composting system. If you are adding feedstocks but not seeing changes in the bay after some days or weeks, you may want to troubleshoot your worm composting system. Gently reach your hands, pitchfork, or shovel into the bay in multiple places and lift up the bedding and feedstocks to see if you find worm activity deep inside the bay.
58
Salts/pH These are advanced maneuvers; there’s no need to worry about this unless you notice something that you don’t like about your compost. Refrain from high salt content materials as feed stocks so that salt will not be an issue in your finished worm compost. Use the same remediation approach you take to address salinity in your irrigation water with the water used for your worm compost. Too acidic, too low: Adding lots of coffee grounds (more than a cup or two’s worth of coffee grounds per day) or citrus will cause issues for the worms as these materials are too acidic. As a general rule, avoid too much of these things. If you add too much, you can sprinkle a handful or so of crushed eggshells on top of the straw cover about once a week. Eggshells counter the acidity in food scraps and provide grit for the worms’ digestive systems. Too basic, too high: If you want to reduce the pH, you can add aluminum sulfate, sulfur, or coffee grounds. You will know that the pH is too high if you smell a lot of ammonia in the worm compost. You will want to remove any undigested food. Mix a little elemental sulfur in with the straw cover and spread on top. This can be a relevant concern if you have high pH water.
Troubleshooting Problem: Unwanted visitors, from fruit flies to raccoons
Problem: Strong, unpleasant odors from the compost bin
Solution: Most visitors are here to help in one way or another, but that doesn’t mean we want to welcome them all in our backyards. Bury food waste more deeply in the bedding and be sure you aren’t overloading your worms with too much food. Take a break from feeding for a few days, maintaining food scraps in the freezer if you choose. You can also try keeping a plastic sheet, a piece of old carpet, or a heavy burlap sack on the surface of the compost bin. If there was a particularly pungent recent addition, take note and avoid it in the future. If your worms are consistently not keeping up with your food scrap production, purchase more red wigglers to add to your bin.
Solutions: Most likely the odor is from rotting food because the volume of food waste is greater than the worms can consume daily or you have added something they did not want to eat. The solution is to stop adding food waste until the worms have broken down what they have. Also, avoid meat and other greasy food which can cause odor problems. Gently stir and fluff your bin with your pitchfork, adding a couple handfuls more of straw, eggshells, and wood chips to increase carbon content and air pockets. While you stir, notice if there is any standing liquid at the bottom, and move the bales slightly to let it run out.
59
4. Worm Composting
Problem: Worms crawling out of the bedding or straw cover and onto the sides or lid of the bin
Problem: Lots of uncomposted food in the bin Solutions: Take a break from feeding while the worms catch up. Purchase more red wigglers to add to your bay. Remove large items and chop into quarters to provide more organic-matter surface area for the worms to have access too. Add a few handfuls of straw bedding, dried leaves, or shredded paper in the uncomposted pockets and lightly mix with your pitchfork to add carbon and air.
Solutions: The worm habitat can become too acidic if you add too many acidic food scraps, such as orange peels. Try reducing the amount of acidic organic matter that you’re putting into the bay, or add crushed eggshells or two tablespoons of agricultural lime once a week until the issue is corrected, which usually takes one to two weeks.
Harvest Within three to six months of starting your bin, you will have beautiful worm castings ready to harvest and feed to your garden, orchard, or crops. The goal of harvesting is to harvest the worm castings, but leave the worms in the worm composting system! Physical Appearance: Worm castings (or worm poop/finished worm compost) are very dark brown, almost black, and fine—similar to coffee grounds. Chemical Characteristics: They will be cool or ambient in temperature, moist but not dripping, and smell sweet. Biological Characteristics: Worm castings have a higher saturation of water-soluble nutrients. Microbial (both bacterial and fungal) communities are prolific in healthy worm composting systems.
60
There are several methods for harvesting. Method 1: Move the worms with food This is the easiest method! Feed the worms on one side of the bin for one to two weeks. You can use your new active bin for the majority of your food waste, and strategically feed the bay that is in the finishing stage so the worms move to one side. Once the worms have moved over to the food source, remove the castings from the vacated area. Replace the castings with fresh straw bedding. Wait a week or two, then repeat the process in the opposite direction, herding the worms into the new bedding.
Method 2: Use a screen to remove the worms Screens let small particles fall through while capturing the larger particles on top. There are many designs for basic screens online using scrap wood, hardware cloth, cylindrical concrete forms, and other materials. Scoot the straw cover aside and use a shovel, your hands, or a bucket to scoop up the worm castings. Position a screen over a bucket or collection sheet. Dump the worm castings onto the screen and allow the worm castings to pass through. The worms will remain on the screen, and you can put back them into your active bin in the worm composting system.
Use Worm castings (their poop) are a great, stable slow-release fertilizer. Worm castings have a lower C:N ratio than the feedstocks you give them, so are more favorable to plant and soil organisms’ growth. Your finished worm compost is a nutrient-rich soil amendment for your flowers and vegetables. You can mix it into potting soil blends 30-50 percent for containers, or spread it as a top dressing for landscaping and larger gardens. Top dressing simply means layering finished compost lightly around the bases of the plants you’d like to nourish. Water it in, and let the beneficial microbiology get to work making your plants healthier, heartier, and more drought-resistant!
61
5. Aerated Static Piles
5. Aerated Static Piles Learning Outcomes
How it Works Aerated static piles are composting systems that use the naturally occurring microbial population in the feedstocks along with the appropriate oxygen supply and moisture to produce what is called a hot composting system. Hot composting refers to the fact that the composting system, with the right feedstock mix, moisture, and aeration, will eventually reach a stage in which the pile temperature is 131˚F for three consecutive days. The advantage of maintaining this temperature for three consecutive days is that it will kill weed seeds, parasites, and pathogens that may have been in the feedstocks. The heat also helps degrade some synthetic chemicals and biodegradable plastics. Heat is produced through the activity of the microbes decomposing the feedstocks. So as long as they have the right feedstock mix with the right moisture and enough oxygen, heat will be generated.
After completing this section you will be able to:
Another important element of this composting system is the static nature. Some compost systems (referred to as turned windrows) introduce oxygen through turning, which is labor-intensive and also incurs machinery and fuel costs. With the static pile, aeration occurs through a pipe and blower system.
62
•
Describe how to set up the infrastructure and feedstocks for an aerated static pile composting system.
•
Describe the ecology of an aerated static pile.
•
Discuss the maintenance requirements and troubleshoot aerated static pile.
•
Describe the changes over time that happen in an aerated static pile.
•
Describe the role that temperature plays in the composting process and why it allows for more variable feedstocks to be used than in other composting systems.
Site Analysis In general, a flat and cleared site, away from waterways and with access to power and water, is ideal. For a small two-pile system, you will need, at minimum, a fifty-foot by fifty-foot area with overhead clearance and adequate driving/turning radius for your machine on all sides. For an aerated static pile, it is recommended that a piece of machinery be used to make the initial compost pile and move the finished piles. Depending on the machine that you will be using (a bobcat, a tractor, a front loader), your site parameters may differ slightly. If you need to get a bobcat or tractor in, you can make the two piles farther apart, but the benefit of locating them close together is that they have more mass and less surface area, leading to less water loss and more heat maintenance.
Aerial Overview of Two Pile Aerated Static Pile System
63
5. Aerated Static Piles
Set-up Here we provide the set-up for a small two-pile system. Having two piles is useful so that one can be actively composting while the other is being fed. From start to finish, an aerated static pile takes about one month. Such a system is capable of composting up to 100 cubic yards of material per run when two piles are running, so you can compost about 50 cubic yards per pile.
Blower System
□ □ □ □ □
6-inch x 4-inch Cantex Adapter (comes with hose clamps) This connects the 6-inch COEX cellular core PVC pipe to the blower; see figure 1. Blower We utilize a B-Air Koala 1 HP Bounce House Blower; see figure 1. Waterproof blower cover Hand-made, Rubbermaid plastic container, or otherwise; see figure 2. Outdoor timer We utilize an ART-DNe adjustable interval timer controller; see figure 3. The timer will connect directly to the power outlet. Outdoor extension cord for blower to connect to timer Measure the distance from your electrical outlet to where the blower will be to determine what length you need.
64
Pipe System
□
80 feet of 4-inch perforated pipe (sold in 10 foot lengths) This will be the aeration pipe that lies under the aerated static pile. You will use 40 feet for each of the two aerated static piles. The perforated pipe pieces will be connected to reach the 40 foot length without couplers as the ends of it are beveled.
□ □ □ □ □ □
Note: position the pipe so that holes face down into the ground; this helps prevent material from falling in and clogging the holes. 20 feet of 4-inch COEX cellular core PVC pipe This provides for extension sections on both ends of the 4-inch perforated pipe. These sections extend the active composting area away from the manifold as well as from the capped end, preventing the composting material from covering the manifold and capped ends. You will need about 16 feet total, but they are sold in 20-foot lengths. 20 feet of 6-inch COEX cellular core PVC pipe This connects tees and elbows to create the air supply manifold. You will also use it for the extension sections from the elbows of the manifold that connect, through 6-inch to 4-inch reducers, to the 4-inch COEX cellular core PVC. It also connects the tee on the air supply manifold to the 6-inch x 4-inch Cantex Adapter. You will need about 16 feet total, but they are sold in 20-foot lengths. Four 4-inch couplers These connect the 4-inch COEX cellular core PVC on the manifold and cap ends to the perforated pipe. To connect the 4-inch perforated pipe to the 4-inch COEX cellular core PVC using the coupler, you will have to trim the beveled ends off the 4-inch perforated pipe. One 6-inch tee This connects the 6-inch COEX cellular core PVC that creates the air supply manifold to 6-inch x 4-inch Cantex Adapter. Two 6-inch 90 degree elbows This connects the 6-inch COEX cellular core PVC that creates the air supply manifold to the 6-inch COEX cellular core PVC that will extend to the 4-inch perforated pipe. Two 6-inch to 4-inch reducers This connects the 6-inch COEX cellular core PVC to the - inch COEX cellular core PVC that will connect to the 4-inch perforated pipe. Piping set-up continued on next page 65
5. Aerated Static Piles
□ □ □
Two 4-inch PVC Endcaps These will cover the ends of the 4-inch COEX cellular core PVC extension off the perforated pipe, and are necessary to force the air through the holes in the perforated pipe and into your compost pile. Hacksaw Use this to cut the PVC. Stakes, stones or other bracing material These will keep the manifold from shifting. We’ve used old railroad ties; see figure 7.
All piping is connected using dry fittings. Refer to the aerated static pile piping diagram and figures 4 through 7 for approximate lengths and how to set up the piping. Dry fittings allow the piping to be easily disassembled when you harvest the finished compost; you do not want to be driving over the pipes. It is nice to have a easily disassemblable system to replace broken parts. Over time, pipes wear and can collapse due to the heat and weight of the compost pile.
Sample costs for piping for a two pile system
Quantity
Description
Unit price ($)
80
4 inch perforated pipe
1.25
each
100.00
20
6 inch COEX cellular core PVC pipe
4.75
foot
95.00
20
4 inch COEX cellular core PVC pipe
2.50
foot
50.00
4
4 inch coupler
7.25
each
29.00
1
6 inch tee
71.00
each
71.00
2
6 inch 90 degree elbow
54.75
each
109.50
2
6 inch to 4 inch reducer
25.00
each
50.00
2
4 inch PVC endcap
10.50
each
21.00
1
6 inch x 4 inch Cantex adapter
16.50
each
16.50
Total
542.00
66
Unit of Material
Extended Price ($)
67
5. Aerated Static Piles
68
Aerated Static Pile Piping Diagram
Scaling Up or Down Scaling up: If you’d like to scale up your operations, replicate this set-up to build additional piles. Scaling down: If there isn’t enough volume for the full length of one of the perforated pipes, cut and cap the pipe. You need to cap it so that there is sufficient pressure to force the air through the pile. When you want to extend the pile with more material, you’ll need to uncap the pipe, add a pipe extension, and cap it again.
69
5. Aerated Static Piles
Start-up Procedure 1. Feedstocks
of manure, which is nitrogen-rich, you will need to obtain carbon-rich feedstocks like paper, straw, or wood chips. Knowing the general C:N ratio of your manure will help you determine how much carbon-rich feedstock you’ll need.
It may take some time to acquire a sufficient amount of feedstock to begin the aerated static pile composting process. Storing manure and browns without aeration does not create odors or change the composition of the material dramatically, so these can be built up over time and let sit. However, piling and storing food waste will start the rotting process and likely attract a lot of pests. If you cannot start your aerated static pile immediately because you are waiting to acquire more feedstocks, within two days of acquiring the food waste it must be mixed with browns and put on aeration until you can start your pile. Browns 24 total cubic yards of wood chips for plenum layer and cover
•
8 cubic yards for the plenum layer
•
16 cubic yards for the initial cover layer as you cover all sides of the pile
•
8–10 cubic yards for the second pile cover layer as the second pile will be touching the first on one side. Here are two example mixes - you can add one or the both depending on your feedstock.
32 cubic yards of wood chips for the feedstock mix (may be supplemented with old, dried-out yard waste)
14 cubic yards of food waste. You will be mixing this at a ratio of 2.5 browns:1 greens
Greens
16 cubic yards of manure. You will be mixing this at a ratio of 2 browns:1 greens
Unlike in worm compost, aerated static pile composting can use manure as a feedstock. If you are a livestock producer with a lot
70
2. Mix and wet the feedstocks
□
The right range of particle sizes is also important: smaller particles break down faster, so keeping your feedstocks in the range of one to three inches is ideal. If the particles are too large it will take a long time to compost, but if they are too small, air will struggle to circulate in the pile.
Bobcat/Tractor
Feedstocks must be in the right ratios: High-nitrogen feedstocks like manure and food scraps will be 30-40 percent of your mix. Carbon-rich material like wood chips and dried leaves will be 60-70 percent of your mix (remember: 2-2.5:1 browns to greens!). If your mix is too rich in browns, the composting process will be slow and it may not reach the hot phase temperature of 131˚F that kills pathogens and weed seeds. If your mix is too rich in greens, you will release a lot of the nitrogen from the feedstocks in the form of soluble nitrate or as a gas ammonia. In short, if the pile is not hot enough, too many browns may be the cause, and if it has an unpleasant smell, too many greens may be the issue. Re-mixing to add what you are missing and carrying on is always an option.
Wet the feed stock mix: Once you have mixed your feedstocks in the proper ratios, add water to achieve a moisture content of 60-70 percent (see figure 8) and mix well. Using the squeeze test, take a handful of the wet material and squeeze.
•
Too much water = drips
•
Too little water = dry/flaky
•
Optimal water = clumping and a wet sheen left on your hand.
Once you add feedstocks to the pile an initial mixing and wetting is essential. You will not touch the pile until it is in the finished stage, so you must mix and wet well initially to have uniform airflow, moisture, and feedstock distribution. It is difficult to re-wet the pile later.
Mixing the combination of feedstocks thoroughly for uniform distribution is key. The microbes don’t move around well at the scale of the particles of feedstocks. So you need to make sure they have a balanced meal all in the immediate vicinity of each other.
71
5. Aerated Static Piles
3. Building the Pile You can expect to apply eight to twelve cubic yards of feedstock material for each ten foot section of perforated pipe. The initial height of the feedstock should fall between five and eight feet. Spacing between the perforated pipe should be similar to your pile height. Spread the plenum layer: Create a bed of wood mulch over each pipe, approximately six inches deep. The width of this bed of mulch will vary based on your set-up. Extend it as far as necessary to accommodate your raw material without going into the area where the next row of perforated pipe will be placed. The plenum layer of mulch extends approximately four feet from each row. A small percentage of thin branches is fine. Things to keep in mind with branches is that they will remain intact for periods over one year and can potentially interfere with a screening process. See figure 6. Construct the pile: Place feedstock over the plenum layer along the length of the pipe in a five to eight ft mound, depending on your mix and volume. Cover the pile: Cover initially with uncomposted mulch. In the future, once you are producing compost, you can cover it with previously composted material. A cover over the feedstock is necessary to help retain moisture, odors, and ammonia; to insulate; and to discourage flies and other wildlife. See figures 9 and 10.
72
Aerated Static Pile Cross Section
4. Blower Check your lines: Make sure all lines are capped. A tight fitting cap ensures that the air pushed by the blower is forced up through the pile instead of leaking out the other side. Turn on the blower: Set your timer to run the blower for approximately 15-30 seconds every 30 minutes. You may need to adjust the air flow according to the needs of your composting material and varying weather conditions. Generally speaking, if you are finding your piles to be too low in temperature, start by running more frequent bursts of air. Try 15-30 seconds every 20 minutes, or even as frequently as every 10 minutes. It may take 24-72 hours to see temperatures and potential odors correcting with adjustments. As air frequency increases, moisture loss rates also increase. As such, it is recommended that you scale frequency back down to the 15-30 seconds every 30 minutes after optimum temperatures have been achieved.
73
5. Aerated Static Piles
Maintenance Allow the composting materials to remain on the aeration for at least two weeks, but generally not longer than 30 days. Always write down what you did and what issues or success you had for your next round. It is key to monitor the temperature to understand the progress. To monitor the temperature you should sample at three levels within the pile - bottom, middle, and top - along the length of the pile about every ten feet. This means a total of twelve temperature readings. You will want to monitor the temperature daily for about one to two weeks. Once it is heating up and maintaining temperature you don’t have to monitor as closely; it is recommended to monitor every other day of week three and four is sufficient to know when the curing phase begins. Temperature is one of the key indicators of how your compost system is working. When it is your first time or when you change things (feedstock mix, aeration frequency for example) use temperature to get a sense of the process. Here is what you should expect over a few weeks to a month.
•
Initial cool phase: Once you build the pile it takes some time, about two to three days, for it to heat up. During this phase the microbes that thrive at ambient temperatures dominate. The first day or two the pile may smell strange, if by day three it is not smelling good and it is not heating up refer to the troubleshooting section.
•
Cooking phase: In order to achieve pathogen and weed seed inactivation, the pile must reach 131˚F for three consecutive days. Depending on the scale and mixture of the pile, it may maintain this temperature for much longer—up to about four weeks. After a few days the pile will heat up if you have provided the right feedstock ratio, air and moisture. It will stay in this stage, where heat loving microbes dominate for one to two weeks. During this phase, plant sugars that are harder to digest (like cellulose) and more resistant compounds are degraded. When the feedstocks are largely composted, heat loving microbial activity will drop and along with that, temperatures.
•
Curing phase: Essentially, the pile will begin to cure naturally when the active/hot composting phase is complete, and the curing phase can be done off the aeration. Once the main food source (cellulose) for the heat loving microbes is gone, the temperature drops, and the ambient temperature microbes recolonize the pile. With these ambient temperature microbes thriving, they will out compete any pathogens that may try to colonize the pile. They also break down some compounds like methane or acetic acid that were produced during the hot phase that you will not want in your finished compost. The pile is also colonized by fungi at this time which go to work on the harder to digest structural materials in the plant tissues (lignin).
74
Observing the Aerated Static Pile In Progress Physical Appearance: Appears static, and to the observer, seeing the capped pipe on one side and the pipe and fan manifold on the other, with a mound five to seven feet high covered in mulch/ green waste. Chemical Characteristics: Many food based feedstocks are very high in water content, and this mitigates the need to add much water. When piles are made according to these instructions, the only potential chemical indicator of a successfully composting pile may be steam rising (only visible when outdoor temperatures are at 32˚F or below). During the process of composting, all of the individual feedstocks with their individual pH levels will be undergoing a complete transformation and transitioning to a more homogeneous pH that will be seen in the finished compost. Biological Characteristics: While we can’t see the microbial activity, the heat the pile is producing is the evidence of highly active heat loving bacteria breaking down our feedstocks. A healthy, active pile should range from 130-160˚F and will cook comfortably at this temperature for anywhere from a few days to a few weeks, depending on your volumes and specific conditions. In cooler weather, steam will visibly rise from the active piles. As these microbes are ‘breathing,’ you may see condensation on the pile from their ‘breath’. A properly made and composting pile should smell lightly sweet but not smell of specific foods in such a way that would attract pests, but crows or mice may find a snack leftover from the feedstocks and learn it is a good place to visit.
75
5. Aerated Static Piles
Maintaining Optimal Conditions Moisture If you notice liquid run-off
•
Too much water: You may have added too much water at one time. Integrate water slowly while mixing initial feedstock to prevent run-off. If all the mechanics are working well, you’ll need to mix additional dry material to reduce moisture in your feedstock mix.
•
Blower system not functioning: If run-off is coming from the aerated static pile once it is constructed check that the blower system is functioning. Check to make sure the perforated pipes are clear of any debris that would prevent air flow.
Other Organisms Larger mammals are also unlikely to take interest in your pile if the food waste is well-buried by the wood chip layer. Salts/pH These are advanced maneuvers; there’s no need to worry about this unless you notice something that you don’t like about your compost. Refrain from high salt content materials as feed stocks so that salt will not be an issue in your finished worm compost. Use the same remediation approach you take to address salinity in your irrigation water with the water used for your worm compost.
Troubleshooting Problem: Odors from the pile
•
Rancid/anaerobic odor: Mix may be too wet and bulk density too high. Add additional dry/fluffy material such as dried leaves, wood chips, straw cover, shredded paper, etc. to allow for greater porosity.
•
Ensure proper aeration: There may not be enough oxygen getting into the mix. Check that the blower system is functioning properly and increase air flow if necessary.
Solutions: Start with minimizing odors by composting materials as soon as possible and keep them from rotting.
•
Pungent ammonia odor: Add additional browns to the feedstock mix. You will need to move your mix off the plenum layer, remix with the additional browns, and then restart by putting it back on the plenum layer and covering.
76
Problem: Below Target Temperatures in the Compost Pile
more heat. Ensure adequate cover for the pile with the wood chip layer or finished compost.
If your pile isn’t reaching the target minimum cooking temperature of 131˚F after 3-4 days, it’s time for troubleshooting.
•
Solutions:
•
Too much airflow: The blower may be running too long causing too much air flow. Reduce duration and/ or frequency you are running your blower.
•
Cold weather: When the weather is cold it can increase heat loss from your composting system. You can combine or enlarge your piles to retain
Compacted feedstocks: If you experimented with a higher than recommended ratio of greens to browns, it’s possible that the total feedstock mix is too dense and lacks the internal surface area and space between particles needed for oxygen flow to support microbial activity. In this case, move your material off the air flow system with your tractor, integrate more carbon-rich material, mix well, and then return to the air flow system on the plenum layer and with cover.
Harvest Observing the finished compost
•
Physical appearance: Your finished compost will have reduced dramatically in volume from your initial feedstocks to approximately one-third! It will be dark brown in color, homogeneous in particle size and texture, at ambient temperature, and have a sweet, earthy smell.
•
Chemical characteristics: Finished compost will have a stable carbon to nitrogen ratio ranging anywhere from 10:1-30:1. It will be slightly moist, but drier than the 50 percent moisture during active composting because of the air, heat, and microbial activity that caused the water to evaporate as the steam you observed. The finished pH of your compost should be in a neutral to acidic range from 5.5 to 8.
•
Biological characteristics: Healthy finished compost is teeming with life. Microbes including bacteria, fungi, and nematodes are living in the compost, ready to boost soil’s ability to nourish plant roots, sequester carbon, and use water efficiently.
When your compost is finished, you have choices about screening. Screening is a simple process that sifts the larger particles from the smaller. This can be achieved with a homemade screen over a wheelbarrow as shown in the worm composting section. However for the quantity of compost
77
5. Aerated Static Piles
you will be producing using this aerated static pile system this may not be efficient. It also may not be appropriate depending on what you will be using your compost for. Commercial screeners— trommel screeners, deck screeners and orbit screens—are very costly. You can construct a trommel screener yourself and it would be the most efficient choice if you decide screening is necessary for your applications.
Use Depending on your exact feedstocks, particle sizes and applications, you may be able to use your finished compost as is. Moving volumes with a tractor or machine as available and then spreading in a more detailed manner with shovels and rakes, you can incorporate into planting beds before you sow, top dress current plantings of annuals, trees or pasture, and use it thickly as a mulch.
78
Aerated Static Pile Data Collection Sheet Feedstock Mix Greens
•
Approximate quantity of greens:
•
Type (for example food waste or chicken manure):
•
Age:
•
Moisture content:
•
Size of particles:
Browns
•
Approximate quantity of browns:
•
Type (for example wood chips):
•
Age:
•
Moisture content:
•
Size of particles:
Feedstock mix ratio browns to greens: Moisture content: Other observations:
Composting Blower settings
•
Interval length (for example every 30 minutes):
•
Duration (for example 15 seconds):
Start date: End date: Observations:
79
5. Aerated Static Piles
Aerated Static Pile Temperature Records Date:
Date:
Date:
Observations:
80
Knowledge Inventory Answers 1. These items that should not be included in worm-based compost piles because they may create odors that attract pests, deter worm activity and may not break down fully, causing biological hazards or incomplete compost.
•
Pet waste
•
Pesticides
•
Chicken bones
•
Bacon
•
Sawdust (a little bit is okay!)
2. “Composting is a physical process without input from biological activity.” is FALSE. Worms or microbes drive the decomposition process. 3. What is one way that composting contributes to reductions in greenhouse gas emissions? Composting organic waste creates a less potent greenhouse gas than the same waste breaking down in a landfill. Additionally:
•
Diverts food waste from the landfill where it would be creating planet-warming methane gas.
•
Compost supports healthy soil and plants that take up carbon dioxide from the atmosphere, where it is harmful in excess amounts, and sequester it in the soil, where it is beneficial.
•
Inorganic fertilizers create a lot of greenhouse gases during production; using compost reduces the need for these inorganic fertilizers.
4. What are some key differences between cool/worm composting and hot/aerated static composting? Aerated static piles can break down meat scraps, kill weed seeds, requires electricity, and produces finished compost in 30–60 days. Worm composting produces finished compost in 3–6 months. Both require moisture and should be kept under a thick layer of high-carbon materials.
81
References
References Büyüksönmez, F., Rynk, R., Hess, T. F., & Bechinski, E. (1999). Occurrence, Degradation and Fate of Pesticides During Composting: Part I: Composting, Pesticides, and Pesticide Degradation. Compost Science & Utilization, 7(4), 66–82. doi.org/10.1080/1065657X.1999.10701986 Healthy Soil Act, 204, New Mexico, First Session 2019. Nordahl, S. L., Devkota, J. P., Amirebrahimi, J., Smith, S. J., Breunig, H. M., Preble, C. V., Satchwell, A. J., Jin, L., Brown, N. J., Kirchstetter, T. W., & Scown, C. D. (2020). Life-Cycle Greenhouse Gas Emissions and Human Health Trade-Offs of Organic Waste Management Strategies. Environmental Science & Technology, 54(15). doi.org/10.1021/acs.est.0c00364 Opportunities to Reduce Greenhouse Gas Emissions through Materials and Land Management Practices. (2009). U.S. Environmental Protection Agency Office of Solid Waste and Emergency Response. Ryals, R., Kaiser, M., Torn, M. S., Berhe, A. A., & Silver, W. L. (2014). Impacts of organic matter amendments on carbon and nitrogen dynamics in grassland soils. Soil Biology and Biochemistry, 68, 52–61. doi.org/10.1016/j.soilbio.2013.09.011
References for ‘Compost and Water’ Chapter: Desert Composting Recommendations, Bernalillo County Extension Master Composters: https:// bernalilloextension.nmsu.edu/mastercomposter/desert-composting.html George Barkley Taylor, Experiments on Determination of Cow Manure in Milk; Moisture Content and Solubility of Cow Manure1, Journal of Dairy Science, Volume 1, Issue 4, 1917, Pages 303-312 Popkin, Barry M et al. “Water, hydration, and health.” Nutrition reviews vol. 68,8 (2010): 439-58. doi:10.1111/j.1753-4887.2010.00304.x L. Brewer, N. Andrews, D. Sullivan, and W. Gehr, “Agricultural Composting and Water Quality” June 2013, Extension Service, Oregon State University
82
Campbell, Gaylon S., “How to Measure Water Content of Compost Successfully” Water, Tom Richard, Cornell Cooperative Extension, Operator’s Fact Sheet #3 of 10 Ryals et al. “Long-term climate change mitigation potential with organic matter management on grasslands” Ecological Applications, 25(2), 2015, pp. 531–545 Gould, M. Charles, “Compost Increases the Water Holding Capacity of Droughty Soils” Michigan State University Extension, October 16, 2015 United States Department of Agriculture, Natural Resources Conservation Service Agronomy Technical Note No. 4, January 2011 Trautmann, Nancy and Richard, Tom, Moisture Content. Cornell Waste Management Institute, Cornell University, 1996 Institute for Local Self Reliance infographic: https://www.yourgreenpal.com/blog/how-compostingenhances-soil-and-protects-watersheds#:~:text=This%20is%20surprising%2C%20but%20 compost,the%20water%20is%20crystal%20clear Bell, Bobby and Platt, Brenda, “Building Healthy Soils with Compost to Protect Watersheds” Institute for Local Self Reliance, June 2014 https://pubmed.ncbi.nlm.nih.gov/24175410/ Rain barrel image: “Rain Barrel” by CityofStPete on Flickr. https://flickr.com/photos/ cityofstpete/51731117390/. Photo is marked with NoDerivs 2.0 Generic (CC BY-ND 2.0). To view the terms, visit https://creativecommons.org/licenses/ Cattle and Water Quality photo by USDA NRCS South Dakota on Flickr. https://flickr.com/photos/ nrcs_south_dakota/50724496012/. Photo is marked with ShareAlike 2.0 Generic (CC BY-SA 2.0) To view the terms, visit https://creativecommons.org/licenses/ Tomato image: https://en.wikipedia.org/wiki/Aminopyralid#/media/File:Tomato_plant_affected_by_ aminopyralid_herbicide.jpg Worm Compost Heap image: https://www.flickr.com/photos/vivevans/5053509620
Quivira Coalition 1413 Second Street, Suite 1 Santa Fe, New Mexico 87505 505-820-2544
www.quiviracoalition.org