Procedure for Administration of Regular Medicines
Preparation
• Gain the service users consent before proceeding (see Refusals)
• Minimise disruptions and distractions
• Adhere to PROVIDE Hand washing guidelines (IPPOL03 Infection Prevention and Control Hand Hygiene Policy)
• Adhere to Provide Personal Protective Equipment (PPE) (IPGUI02 Infection Prevention & Control Community Guidelines
• Refer to the current Medicines Administration Record (MAR) chart and the service users care plan. If there are multiple MAR charts in use, remember to check all
• Check which medicines are due
• Check whether the care plan has specific recommendations regarding medicines administration (e.g. religious or ethnic issues such as acceptance of medicines during Ramadan)
• Retrieve medicines from where they are stored, remembering that they may be in different places (e.g. fridge)
• Check the medicine labels against the MAR chart
• Administer medicines only from containers that are clearly labelled by the pharmacy
• Ensure you have the correct equipment to administer the medication
Administration
• For warfarin and insulin see checklist below
• For medicines other than tablets and capsules, refer to the Checklist for administering medicines in different dosage forms
• Check the expiry date on the container
• Check any special administration instructions on the medicines label including whether it should be taken before or after food or separately from food and drink. (Refer to the Checklist for medicines where timing in relation to food is important)
• Encourage the service user to sit upright to prevent medicines becoming lodged in the oesophagus
• Using a ‘no touch’ technique, push tablets from the original container into a clean and dry container, not into the service user’s hand
• Put a dot on the MAR chart to remind you that you have put that dose into the container (this is part of the ‘dot and pot’ technique)
• If the medicine is soluble or dispersible, place it into a small glass of water (as directed) and allow it to dissolve
• Do not crush tablets or empty capsules (this may alter the therapeutic effect) unless a GP/pharmacist has advised that this can be done and it is documented in the service users care plan
• Do not mix medication with thickening agents as this is unlicensed use, unless advised by the service users GP and it is documented in the service users care plan
• If service user has difficulty in swallowing refer to GP or pharmacist for alternative forms available
• If a medicine is dropped on the floor, dispose of it according to (MMPOL37 Managing Medicines in Provide Group Care Home Services)
• Hand the container to the service user
• Offer the service user water to help with swallowing (no hot drinks – these may scald the service user and can affect stability of medicines; no grapefruit or cranberry juices – these can interact with medicines)
• Stay with the service user until you are sure the medicines have been swallowed
• Return medicine containers to their original storage place.
Dealing with Refusals and Omissions
Service users have the legal right to refuse medicines unless assessed to lack capacity. All refusals must be documented and escalated. Covert administration must only occur under formal best interest decision-making with full MDT and family involvement.
• Check that service user consent to assistance with medicines administration has been documented in the care plan
• Service users have the right to accept or refuse a medicine on each occasion it is offered
• If medicines are refused, wait for a short time and offer them again
• If the service user refuses a second time, do not force him or her to take them. Medicines must not be disguised in food or drink (covert administration, see MMPOL37 for difference between overt and covert administration)
• If the service user is competent, confirm the reason for refusal
• Record the reason for refusal or omission on the MAR chart and in the service-user held record and electronic record
• If medicines were spat out or taken from the original containers and then refused, dispose of them promptly according to (MMPOL37 Managing Medicines in Provide Group Care Home Services)
• Persistent refusal to take a medication should be reported to a senior member of staff and investigated. The service users GP will need to be contacted within working hours or NHS 111 for ‘out of hours’ If there are any difficulties administrating the prescribed medicine e.g. service user has swallowing problems, the care home should advise the prescriber so that an alternative preparation can be sort
• Care staff must not take the decision to stop offering medication by themselves
Records
• After each medicine is administered or taken, sign and date the MAR chart clearly where you have put the dot (this is part of the ‘dot and pot’ technique)
• If doses are omitted or refused (e.g. service user cannot swallow or is vomiting), record the omission on the MAR chart using the appropriate code’, together with the reason
Reporting suspected Adverse Events
• If you suspect that a service user has experienced a possible adverse reaction to a medicine or an allergy, take immediate action to alleviate any suffering or distress
• Inform care home manager and service users GP or NHS 111 if out-of-hours
• If the service users condition deteriorates, e.g. develops breathing difficulties, call 999 for an ambulance
• Record this in the service user held records and electronic record and care plan
• Complete a PROVIDE Incident Report via Datix and Yellow Card (electronically https://yellowcard.mhra.gov.uk/
Or using the yellow card App or form located at the back of the BNF
Registered managers should decide when appropriate for families to be informed in line with CQC Regulation and local guidance (see QSPOL03 Being Open and Duty of Candour Policy).
Care home staff administering medicines should consider the following in a medicines administration process:
Safety Checks
Right Service User
✓ If the service user is competent, ask them to confirm name and date of birth and check against MAR chart
✓ Check the name on the MAR chart against the medicine containers
Right Medicine
Remember the names and packaging of many medicines can be similar.
✓ Read the name of the medicine on the label and double check against the MAR chart
✓ Check MAR chart and care plan for any known medicine allergies/sensitivities
✓ When removing blister strips of medicines from the original container, check that the medicine name on the back of the blister strip is the same as that on the container and label
✓ Return the blister strip to the same container after removing the prescribed dose, checking the labels as you go
Right Time
Remember mornings and evenings are the most common times for taking medicines.
✓ Check when medicines were last administered
✓ Check that the medicines you intend to administer are due at this particular time of day
✓ Check service user has not already taken or been given their medicines
✓ For medicines taken weekly (e.g. methotrexate, alendronate), double check the MAR chart to verify the correct day of the week for administration
✓ Check the label for information on whether the medicines should be taken before or after food. (Refer to Checklist for medicines where timing in relation to food is important)
✓ Double check dose intervals for medicines that are not given every day, and to verify dose intervals for modified release medicines, against the medicine label
Right Dose
✓ Check the number of tablets/capsules (or the number of mls of liquid) needed to give the correct dosage
✓ Check this matches the instructions on the medicine container (e.g. take two tablets, or take one 5ml spoonful)
Right To Refuse
✓ Service users have the right to refuse their medicines if they have the capacity to do so
✓ If a refusal occurs, do not force or persuade record the refusal on the eMAR and inform the appropriate person in line with the care plan
Checklist for Medicines Where Timing in Relation to Food Is Important
This is not an exhaustive list (Refer to the online BNF, office copy for further information or patient information leaflet (PIL))
Commonly used medicines that should be taken with or after food:
Allopurinol
Aspirin (including low dose 75mg)
Azathioprine
Betahistine
Bezafibrate
Cefuroxime
Clarithromycin
Co-Dydramol
Diclofenac
Dihydrocodeine
Dipyridamole modified-release
Galantamine
Ibuprofen
Labetalol
Mesalazine
Metformin
Metformin with pioglitazone (Competact)
Metformin with rosiglitazone (Avandamet)
Metronidazole
Naproxen
Nifedipine modified-release (some brands)
Olsalazine
Omacor (Omega 3)
Paroxetine
Potassium effervescent (Sando-K)
Rivaroxaban
Ropinirole
Spironolactone
Theophylline
Commonly used medicines that should be taken half to one hour before food:
Lansoprazole
Lercandipine
Levothyroxine
Risedronate sodium
Commonly used medicines that should be taken an hour before food or on an empty stomach:
Ibandronic acid
Flucloxacillin
Montelukast
Tacrolimus
Quetiapine
Zafirlukast
7. Administering Liquid Formulations
Liquids
1. For liquid medicines, shake the bottle well and remove the cap
2. Measure out the correct amount using a 5ml medicine spoon (not a teaspoon), an oral syringe or measuring pot
3. If using an oral syringe, use the correct size syringe to ensure accurate dosing. (NEVER use an injection syringe)
4. Wipe the top of the bottle to prevent sticking and replace the cap
5. Bring the spoon or measure to the service users’ mouth for swallowing and watch for signs of gagging or drooling
6. Ensure liquids have date opened dates recorded on the bottle. Some pharmacy suppliers may be able to supply date open stickers, check with pharmacy provider
8. Application of Patches
Definition
A transdermal patch is a medicated adhesive patch that is placed on the skin to deliver a specific dose of medication through the skin and into the bloodstream.
Patches
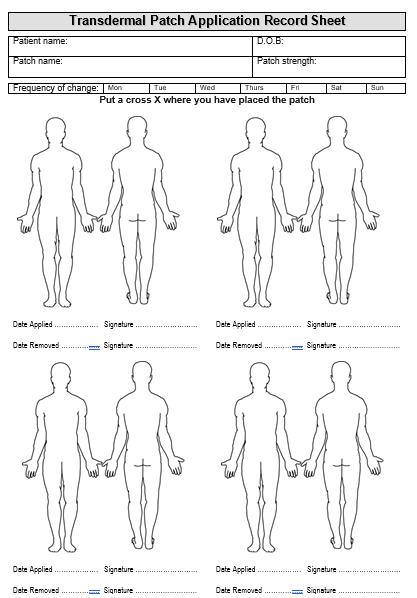
1. Locate and remove old patch first (transparent patches can be difficult to see check MAR chart/ patch sheet for current location see Appendix 1 for Patch Sheet)
2. If the service user is using more than one type of patch (e.g. nicotine replacement plus analgesic), take care to remove and replace the correct patch. Most patches have the name of the medicine printed on the surface
3. Remember, patches are often changed infrequently, two or three times a week –check the patch is due to be changed at this time
4. Fold the old patch in on itself for disposal
5. Ensure that the application site is rotated to avoid skin irritation
6. Remove the new patch from its protective pouch and check for damage
7. Some patches have the facility to record the date of application on
8. Remove the backing paper without touching the sticky side of the patch
9. Apply the patch to a clean, dry, smooth area of skin. Choose an area that is free from spots, cuts and, if possible, body hair. Do not apply patches to areas where they may chafe or catch on clothing, e.g. inside of the arm or under a waistband. If the service user is likely to remove the patch, choose a difficult to reach area e.g. upper back
10. Smooth the patch down to ensure adherence to the skin and hold in place for 30 seconds
11. In general, never apply more than one patch at a time
12. Never cut a patch to halve the dose
Recommendations
• The service users care plan should contain a clear indication for treatment and intended outcomes
• Use a personalised patch application record sheet for all patches. This should be kept with the service users current MAR chart
• MAR charts need to be clearly annotated to highlight when the next patch change is due. The days when a patch change is not required should be clearly crossed through on the MAR sheet
• If a service user is transferred to another care setting (e.g. hospital) communicate information of the patch, when it was last changed, the current location and when the next patch change is due
• When applying a patch for a service user, gloves should be worn. If applicable, remove the old patch and dispose of it first before applying a new one
• It is good practice to write the date the new patch has been applied on the patch itself, so that it is visible to all care staff involved
• Apply patch to clean dry, non-inflamed, non- irritated, hairless skin on upper arm or trunks. Body hair may be clipped, but do not shave. If the site needs to be cleaned before application, use only clear water and let the skin dry completely
• In cases where more than one patch is required, these should be placed on the same area of the body however it needs to be ensured that these do not overlap
• Bathing, showering or swimming should not affect the patch, but water should not be too hot. Avoid hot baths
• If a patch falls off, it must be documented and signed by a witness in the care plan and behind the MAR chart. A new patch should be applied and removed at the correct duration. An interim prescription may be needed or a discussion with the GP regarding early ordering of the patch for the next medication cycle
• The patches are waterproof but avoid soaking in a hot bath, saunas or sunbathing. Heat increases the rate of transdermal drug absorption and can cause toxicity – avoid direct contact with heat (e.g. hot water bottle, heat pad)
• If a service user has missed or has been non-compliant to their opioid (e.g. Fentanyl or Buprenorphine) patch, then you need to check with the GP before applying the next patch
• If the service user has an elevated temperature, inform the GP as the patch dose may need to be reviewed. Note: Drug concentrations from opioid patches may increase if the skin temperature increases to 40°C such as with Fentanyl patches. Used patches still contain active drug
• After removal fold the patch in half over on itself so that the adhesive side sticks together. Dispose of this in a controlled drugs waste bin if it’s a CD or sharps container Care homes should dispose of these bins via their usual pharmaceutical waste arrangements
• If the brand of a patch is changed to another by the prescriber, in particular with controlled drugs such as Fentanyl patches, counselling should be sought from your GP or community pharmacist. Drug concentration may vary between different brands
9. Topical Preparations – Eye/Ear/Nose Drops
Topical preparations – eye/ear/nose drops
1. If opening eye/ear/nose drops for the first time, write the expiry date on the label (using a calendar, count forward 28 days and write ‘Do not use after…………’). Some pharmacy suppliers may be able to supply date open stickers, check with pharmacy provider
2. If using drops that have already been opened, check they have not been in use for more than 28 days
3. Read the MAR chart and double check the route – are drops to be used in the eye, ear or nose?
4. Check which eye or ear the drops are intended for. Confirm with service user
5. Check the label for any special administration instructions and read the PIL
Eye drops/ointment
1. Ask the service user to tilt the head back slightly and ensure it is supported e.g. by a cushion
2. Remove the cap and place on a hard surface being careful not to place it face down or contaminate it
3. If necessary, wipe the closed eye with a clean tissue to remove discharge
4. Stand to the side of the service user to minimise the chances of blinking
5. Squeeze one drop into the pocket formed by gently pulling down the lower eyelid and release the eyelid. (If the drops were refrigerated, warm the bottle between your hands for a few moments only before administering – to aid comfort)
6. To minimise systemic absorption of the drops, ask the service user to close their eyes and apply pressure at the inner corner of the eye over the upper and lower puncti (punctual occlusion) for one minute
7. If two drops need to be administered, wait a few moments before administering the second drop
8. Do not touch the eye with the tip of the dropper bottle
9. Replace the cap, being careful not to touch the tip of the dropper bottle
10. Allow at least 5 minutes between different types of eye preparation to avoid washout
11. If the service user needs different types of eye preparations, administer in the following order:
a. Simple aqueous eye drops
b. Gels or suspensions
c. Eye ointments
12. An autodrop is available to purchase from pharmacy to support with service user self-administering eye drops
Ear drops
1. Ask the service user to lie with the head on one side and ensure it is supported e.g. by a cushion
2. Warm the bottle in your hands for a couple of minutes
3. Remove the cap and place it on a hard surface
4. Place the tip of the bottle near the entrance of the ear canal, being careful not to touch the ear with the tip of the dropper bottle
5. If necessary, squeeze the bottle gently to allow a drop to form
6. Administer the correct number of drops
7. Ask the service user to keep the head tilted for at least 3 minutes to allow the drops to penetrate
Nose drops
1. Ask the service user to tilt the head back slightly and ensure it is supported e.g. by a cushion
2. Remove the cap and place it on a hard surface
3. Place the tip of the bottle near the entrance of the nostril, being careful not to touch the nose with the tip of the dropper bottle
4. If necessary, squeeze the bottle gently to allow the drop to form
5. Administer the correct number of drops
6. Ask the service user to sniff and keep the head tilted for a minute to allow the drops to penetrate
10.Topical Preparations – Creams/Ointments/Gels
Topical preparations – creams/ointments/gels
1. Check which area of the body the topical preparation should be applied to
2. Check that the skin is not broken. If it is, refer to the prescribing clinician
3. Remember to respect the service user’s dignity if clothing needs to be removed
4. Check the container for expiry date or date of opening
5. Check the label for any special administration instructions including limits on duration of use (e.g. do not use for more than seven days) and read the PIL
6. If instructions are unclear (e.g. ‘use as directed’), refer to the prescribing clinician, before proceeding
7. Put on disposable gloves
8. Remove top from the container and apply onto your fingers before applying to the skin. Do not apply directly to the skin from the container to avoid contamination of the tube
9. ‘Use sparingly’ means that only a small amount should be used
10. For topical steroid creams, use “Fingertip Units” (FTUs). The amount of cream applied to the tip of one finger, from the top to the first crease is one FTU (about 0.5g) and is sufficient to cover an area of skin roughly equivalent to the size of two adult hands with fingers together. See chart below.
Area of skin to be treated FTUs per dose
A hand and fingers (front and back)
Back and buttocks
Face and neck
Arm and hand
Leg and foot
1 FTU
7 FTUs
2.5 FTUs
4 FTUs
8 FTUs
11. Emollients should be applied more generously, and in the direction of hair growth
12. Rub preparation into the skin gently until it disappears
13. Wipe rim of container and replace top
14. Do not put any unused cream/ointment back into the container
15. Remove and dispose of gloves and wash your hands
16. Record administration of topical preparations in the usual way
11.Subcutaneous and Intramuscular Injections
Subcutaneous and Intramuscular injections
1. Wash and dry hands
2. Gather together injecting device/syringe/needle, cartridge/ampoule/vial and sharps container
3. A number of injection sites can be used: abdomen, upper outer thighs or buttocks (avoid arms unless main injection sites have been over-used)
4. Check selected injection site for signs of injection site reactions i.e. lumps, scars or nodules. Avoid injecting areas with injection site reactions
5. Rotate injection sites at every injection
6. Do not inject through service users’ clothing.
7. If administering insulin, refer to Checklist for Insulin Administration and MMSOP51 Standard Operating Procedure for the Safer Administration of Insulin in Adults
8. If the injection has been stored in the fridge, allow it to come up to room temperature before administration, rolling it in your hands if necessary
9. If using dry powder injections, reconstitute the powder with the diluent provided with the injection
10. If using ampoules, snap the top along the score line and dispose of in the sharps bin
11. Check the appearance of the liquid in the vial/ampoule/cartridge and discard if particles present
12. Draw up the correct amount from the vial or ampoule using a drawing up needle
13. Double check the dose against the MAR chart
a. Do not draw up insulin from cartridges intended for use in a pen device
b. Dispose of the needle used to draw up the injection in the sharps bin. Do not attempt to re-sheath the needle
c. Attach a fresh needle of the appropriate length and width to administer the injection
d. For SC injections, the usual length is 6mm. Obese service users may require 8mm, thin service users may require 5mm
e. For IM injections, the usual length is 25mm and usual gauge is 21G, 23G or 25G.
14. If necessary, pinch the skin by squeezing between thumb and two fingers prior to insertion of needle
15. Insert the needle at an angle of 90°. Push the needle all the way in and depress the plunger
16. Leave the needle in place for 5 – 10 seconds
17. If administering the first dose of any injection, observe the service user for 10 minutes for signs of anaphylaxis
18. Dispose of the needle or entire syringe/needle as appropriate in the sharps bin. Never attempt to re-sheath a used needle
Hypoglycaemia (Hypo’s)
Hypoglycaemia means low blood sugar levels less than 4mmol/ll. Hypo’s are part of living with diabetes and need to be managed correctly. Most people will feel the effects of a low blood sugar level. The symptoms can include the following:
Mild
• Tingling lips
• Feeling hot and sweaty
• Lightheaded
• Changes in vision such blurred vision
• Hunger
• Dizziness
• Feeling hungry
• Feeling weak or tired
• shaking
Moderate
• Disorientated
• Lack of concentration
• Change in personality or irritability
• Confusion
Severe
• Unconsciousness
Most service users may know what a hypo feels like for them, but some may be unaware and may need support recognising the symptoms, and symptoms should never be ignored. It is common for people who have had diabetes for a long time to become less aware or have no symptoms of a hypo. This is why regular testing of r blood sugars is important.
Hypo’s can occur due to a variety of reasons. The most common are:
• Taking too much insulin
• Not having regular meals
• Not eating enough
• Excess exercise
• Stress
• Alcohol
• Recreational drugs
• Hot weather
How to Treat a Hypo
If a service user has diabetes and gets symptoms of low blood sugar (a hypo) or blood sugar is below 4mmol/L: They should have a clear management plan as part of their care plan.
1. Encourage them to eat or drink something that will raise their blood sugar quickly, such as a small glass of fruit juice or sugary fizzy drink, 5 glucose or dextrose tablets, 4 large jelly babies, or 2 tubes of glucose gel.
2. Check their blood sugar after 10 to 15 minutes.
3. If blood sugar is still below 4mmol/L, give another sugary drink or snack, and check again after 10 minutes.
4. Once the symptoms have improved and the blood sugar is above 4mmol/L, encourage them to eat something that will keep their blood sugar up for longer, such as some biscuits, a sandwich, or their next meal if it's due.
How to treat severe low blood sugar
If someone has very low blood sugar (a severe hypo) and becomes unconscious:
1. Do not give them any food or drink as they will not be able to swallow safely.
2. Put them into the recovery position and call 999 immediately.
All service users who are diabetic and being treated with insulin should have management of a hypo included as part of their care plan and this should be individualised to them, the care home should also keep stock of what they like in case of a hypo such astheir preferred sugary drink or snack.
Insulin Administration Checklist
If you have any queries or you identify any concerns as you follow the steps below, contact the prescribing clinician or GP.
Patient Safety Checks Prior To Administration
Step 1 – Confirm that the service user is not showing signs or symptoms of hypoglycaemia (see previous charts) treat as per protocol.
Prescription Safety Checks Prior To Administration
Step 2 - Check MAR chart – confirm the following:
• Which insulin preparation (e.g. Novorapid / Lantus etc.) and presentation (i.e. vials, cartridges, disposable pens etc.) is to be administered
• How many units to be administered
• That the preparation and dose has been administered previously
• That the time for insulin administration fits in with the patient’s usual mealtimes if appropriate (see Table 1)
Table 1: Timing of insulin administration in relation to meals:
Duration of action of insulin
Rapid Acting Analogues e.g. Novarapid, Humalog, Apidra
Short acting insulins e.g. Actrapid; Humulin S
Intermediate acting insulins e.g. Insulatard; Humulin I
Long-acting analogue insulins e.g. Levemir; Lantus; Insulatard
Pre-mixed insulins - NovoMix 30; Humalog Mix 25 or 50
Timing of administration in relation to meals
Inject immediately before meal
Inject half an hour before a meal
Does not need to be injected with a meal
Does not need to be injected with a meal
Inject immediately before a meal or up to 15 minutes after a meal
Step 4 - Make sure storage of insulin has been appropriate
• Unopened vials, cartridges and disposable pens should be stored in the main body of the fridge at 2-8oC. Insulin stored in this way remains usable up to expiry date.
• Store vials, cartridges and disposable pens that are in use at room temperature. See specific manufacturers’ product advice sheet to confirm how long insulin stored in this way will remain stable.
• PARTLY USED CARTRIDGES SHOULD NEVER BE RETURNED TO THE FRIDGE TO BE RE-USED. THEY MUST BE DISCARDED.
Step 5 – Check Insulin
• Make sure insulin to be administered matches insulin on MAR chart in terms of preparation and presentation
• Check the expiry date of the insulin and date of opening – is it still appropriate to administer the used insulin product? For Shelf life of used insulin products See Table 2 (end of Checklist)
• Check the insulin for discolouring, freezing, formation of a white layer, or clumping. Discard if these occur and use a new insulin vial / cartridge or disposable pen
• When opening / using a new insulin vial / cartridge / pen write ‘date opened:’ and complete with the date of opening
• For vials do not discard the outer carton, vials should be kept in the carton to protect them from the light. Write date opened details on sticky label and attach to device
• For insulin devices, make sure the pen / needle / insulin is compatible
• For cartridges ensure there is a pen device available to use
• STOCK CHECK: Ensure there is enough insulin in the preparation to administer. Nurses should carry out a weekly check on insulin to ensure there is sufficient insulin to administer to correct dose. Does the patient have at least 7 days’ worth of insulin in possession? If not prompt patient/relative to order insulin. This will ensure there is ample time for a prescription to be prescribed, dispensed and delivered/collected by patient/relative
Administration Process
Step 6 - Prepare yourself for administration
• Wash and dry hands / Gather insulin device / needles or vial / insulin international unit syringe and Sharps container (which must be kept close by during administration)
• Check insulin dose against prescription chart
Step 7 – Select an appropriate injection site
• A number of injection sites can be used: abdomen, upper outer thighs or buttocks (avoid arms unless long term disease and main injection sites over-used).
• Check selected injection site for signs of injection site reactions i.e. lumps, scars or nodules. Avoid injecting areas with injection site reactions
• Injection sites must be rotated at every injection
DO NOT INJECT INSULIN THROUGH SERVICE USER CLOTHING
Step 8 – Prepare insulin and insulin device prior to administration
• Make sure insulin to be administered matches insulin on MAR chart in terms of preparation and presentation and re-check dose to be given.
• Check the expiry date of the insulin and date of opening – is it still appropriate to administer the used insulin product?
• Check the insulin for discolouring, freezing, formation of a white layer, or clumping. Discard if these occur and use a new insulin vial / cartridge or disposable pen.
• When opening / using a new insulin vial / cartridge / pen write ‘date opened’ and complete with the date of opening.
• For vials do not discard the outer carton, vials should be kept in the carton to protect them from the light. Write date opened details on sticky label and attach to device
• For insulin devices, make sure the pen / needle / insulin are compatible
• Make sure the insulin is at room temperature prior to administration - roll in hands if required
• If the insulin is cloudy, it will require mixing – roll or invert insulin in hands at least ten times
• Make sure a new needle is being used to inject insulin
• Make sure needle size is appropriate - 8mm, 6mm or 5mm
• For thin service users a 5mm / 6mm needle is recommended
• Prime the device by doing a two-unit air shot to make sure all the air bubbles have been removed from the pen / syringe. Ensure that insulin has been expelled from the needle to establish whether the needle has been correctly applied to the pen
Note: IF PARTLY USED CARTRIDGES DO NOT CONTAIN THE PRESCRIBED DOSE THESE CARTIDGES SHOULD NEVER BE RETURNED TO THE FRIDGE TO BE RE-USED. THEY MUST BE DISCARDED AND A NEW CARTIRDGE SHOULD BE USED
Step 9 – Inject insulin
• If you are injecting a device, you are not familiar with, read manufacturer’s information leaflet prior to administration; never draw up insulin from cartridges intended for use in a pen device. The drawing up of insulin from a pen cartridge or prefilled pen to an insulin syringe is NOT a practice that is endorsed by any of the insulin manufacturers and is an unlicensed activity. Cartridges are not pressurised and are designed not for insulin to be drawn out but rather for it to be
pushed out by the pen plunger. When air is injected into the cartridge, this can cause dosing errors
• Insert the needle at an angle of 90 Push the needle all the way in.
• Push the button to inject the insulin.
• Leave the needle in place for 5 – 10 seconds.
If administering service users first dose of insulin, consider the following:
• Risk of anaphylactic reaction to insulin
• Service users blood sugar levels and overall blood sugar profile (check individual care plan)
If there is anything you are unsure about contact the prescribing clinician or GP
• Risk of anaphylactic reaction to insulin (very rare).
• Patients’ blood sugar glucose and overall blood glucose profile (check patients’ care plan)
Step 10 – Dispose of sharps
• Remove needle from device and dispose in sharps container. If syringe used put whole syringe into sharps container
Documentation Process Following Medicines Administration
Step 11 – Document details of insulin administration
• Document administration of insulin including site of administration, on MAR chart
• If for any reason the dose of insulin is not administered contact the prescribing clinician or GP
Step 12– Action if any error occurs
Action if any error occurs, document as follows:
• Incorrect service user
• Omitted dose
• Incorrect dose
• Incorrect insulin
Record in service user held record, on SystmOne, MAR chart and report to Care Home Manager/on call manager immediately. Escalate to medical/emergency services if required. Complete a Datix.
Patient Counselling
Step 13– Remind patient to have suitable meals
• Remind patient to have suitable meals at the appropriate time in relation to the insulin you have just administered
Table 2: Shelf life of open / used Insulin Vials / Cartridges / Pen Devices Please Note: The expiry date of Insulin is NOT extended once opened
Name of
Approved Manufacturers Information: Period after which open vial / cartridge should be discarded Actrapid Vial 6 weeks NovoRapid Vial / Cartridge / FlexPen 4 weeks
Levemir Cartridge / FlexPen / InnoLet 6 weeks Insulatard Vial / Cartridge / InnoLet 6 weeks
Humulin S Vial / Cartridge 4 weeks Humulin I Vial /Cartridge / Pen 4
Humulin M3 Vial /Cartridge / Pen 4
NovoMix 30 Cartridge / Prefilled pen 4 weeks
Humalog Vial / Cartridge / KwikPen 4 weeks
Humalog Mix25 Vial / Cartridge / KwikPen 4 weeks
Humalog Mix50 Vial / Cartridge / KwikPen 4 weeks
Apidra Vial / SoloStar Penfill / Clikstar 4 weeks
Vials: Keep vial in outer carton to protect from light. Cartridges or pens: Pens in use must not be stored in the refrigerator. The pen cap must be put back on the pen after each injection in order to protect from light
Lantus Vial / Cartridge / Clikstar / SoloStar 4 weeks
Vials: Keep vial in outer carton to protect from light. Cartridges or pens: Pens in use must not be stored in the refrigerator. The pen cap must be put back on the pen after each injection in order to protect from light
Insuman Rapid – Cartridge / OptiSet 4 weeks.
Cartridges or OptiSet Pens: Pens in use must not be stored in the refrigerator. The pen cap must be put back on the pen after each injection in order to protect from light.
Insuman Basal – Vial / Cartridge / OptiSet 4 weeks.
Cartridges or OptiSet Pens: Pens in use must not be stored in the refrigerator. The pen cap must be put back on the pen after each injection in order to protect from light.
Insuman Comb 15 – OptiSet 4 weeks.
OptiSet Pens: Pens in use must not be stored in the refrigerator. The pen cap must be put back on the pen after each injection in order to protect from light.
Insuman Comb 25 – Vial / Cartridge / OptiSet 4 weeks.
Vials: Keep vial in outer carton to protect from light. Cartridges or OptiSet Pens: Pens in use must not be stored in the refrigerator. The pen cap must be put back on the pen after each injection in order to protect from light.
Insuman Comb 50 – Cartridge / OptiSet 4 weeks.
Cartridges or OptiSet Pens: Pens in use must not be stored in the refrigerator. The pen cap must be put back on the pen after each injection in order to protect from light.
Abasaglar 4 weeks
The medicinal product may be stored for a maximum of 28 days up to 30°C and away from direct heat or direct light.
Pens in use must not be stored in the refrigerator.
The pen cap must be put back on the pen after each injection in order to protect from light.
Tresiba
Tresiba 100 units/mL and 200 units/mL solution for injection in pre-filled pen
After first opening or carried as a spare, the medicinal product may be stored for a maximum of 8 weeks.
Do not store above 30°C.
Can be stored in a refrigerator (2°C – 8°C).
Keep the cap on the pen in order to protect from light.
Tresiba 100 units/mL solution for injection in cartridge
After first opening or carried as a spare, the medicinal product may be stored for a maximum of 8 weeks.
Do not store above 30°C.
Do not refrigerate.
Keep cartridges in the outer carton in order to protect from light.
Ref: Various Insulin Product Summary of Product Characteristics. Note: This list is not intended to be exhaustive
12. When Required Medications
Medications prescribed ‘when required’ (PRN)
‘When Required’ (PRN) medication is that which is not required by the service user on a regular basis. It is usually prescribed to treat short term or intermittent medical conditions, sometimes with varying dosages e.g. 1 or 2 tablets every 4 to 6 hours.
Checks prior to administration
• Check service users care plan to identify if relative/service user is responsible for administering PRN medicines
• Check whether the service user is showing signs or symptoms that indicate a ‘when required’ medicine may be needed. (For individual medicines, refer to the checklist below)
• Check whether the service user is showing obvious signs or symptoms of toxicity from
• the ‘when required’ medicine. (For individual medicines, refer to the checklists below)
• Check that the administration record and care plan specify:
➢ Indication (what the medicine is used to treat)
➢ Instructions for use (when the service user should take it)
➢ Dose range and frequency
➢ What action to take if the ‘when required’ medicine is not working
➢ Refer to the MAR chart to check when the service user last took a dose of the medicine
➢ Check whether the service user has the capacity to refuse or indicate the need for the medicine
• Check the service user’s awareness of symptoms
• The service user’s capacity to request medication
• The service user’s capacity to request or refuse the medication
• Symptoms to look for, e.g. non-verbal expressions of distress
• State clearly in which order medications are to be administered when there is more than one option and time interval in between them e.g. multiple painkillers, or seizure medicines e.g. diazepam, midazolam)
• Note: For Provide Care Homes some PRN medications should be offered routinely throughout the day and not only at medication rounds
• PRN medication should not be offered more frequently than prescribed. It is important to note the minimum interval between doses and the maximum dose in 24 hours
• It is good practice to record at each medication round/visit that the service user has been offered the medication. If the PRN medication is given, the following details should be recorded to prevent incident or accidental overdose:
➢ Number of tablets/ dosesgiven especially when there is a varying dose (e.g. 1-2 tablets)
➢ The exact time of administration to make sure the required time interval has passed before administering the next dose
• Monitor the service user and record the service user’s response to the medicine. Contact the GP for advice or review if the service user(s):
➢ Appears to be experiencing side effects
➢ Appears not to benefit from the medication
➢ Requests it more frequently than usual
➢ Requests the PRN medication more frequently than prescribed
➢ Medical condition has deteriorated
➢ Rarely requests or regularly declines the PRN medication
• PRN medicines should be stored securely and accessible on request. They should be kept in original packaging with pharmacy label on the medicine
• Keep appropriate stock levels to meet the service users changing needs
• Provide Care Homes: If PRN medication is left over at the end of the monthly cycle and it is still in date then this should be ‘Carried forward’ from one month to the next. This will avoid unnecessary medicines waste. Refer to CCG Guidance: Reducing Medicines Waste in Care Homes
• The quantity of PRN medicines ‘carried forward’ should be recorded on the new MAR chart so there is an accurate record of the stock level which will help when undertaking audits
• The PRN medication should be reviewed routinely by service users GP and the review date clearly stated
• Record PRN medication administration in care plan
Safety Checks
RIGHT MEDICINE
✓ Check MAR chart and care plan for medicine’s indication and instructions for use.
RIGHT TIME
✓ Check when dose was last administered.
✓ Check service user has not already taken or been given a dose (e.g. by another care worker)
✓ Check that the service user is not showing signs of toxicity or overdose.
RIGHT INDICATION
✓ If indication and instructions for use are unclear, contact the prescribing clinician or GP
RIGHT DOSE
✓ Check that the dose range is clear (e.g. 5-10mg or 1-2 tablets)
Checklists for Assessing Whether A ‘When Required’ Medicine Is Needed
Medications prescribed ‘when required’ (PRN)
‘When Required’ (PRN) medication is that which is not required by the service user on a regular basis. It is usually prescribed to treat short term or intermittent medical conditions, sometimes with varying dosages e.g. 1 or 2 tablets every 4 to 6 hours.
Checks prior to administration
• Check service users care plan to identify if relative/service user is responsible for administering PRN medicines
• Check whether the service user is showing signs or symptoms that indicate a ‘when required’ medicine may be needed. (For individual medicines, refer to the checklist below)
• Check whether the service user is showing obvious signs or symptoms of toxicity from
• the ‘when required’ medicine. (For individual medicines, refer to the checklists below)
• Check that the administration record and care plan specify:
➢ Indication (what the medicine is used to treat)
➢ Instructions for use (when the service user should take it)
➢ Dose range and frequency
➢ What action to take if the ‘when required’ medicine is not working
➢ Refer to the MAR chart to check when the service user last took a dose of the medicine
➢ Check whether the service user has the capacity to refuse or indicate the need for the medicine
• Check the service user’s awareness of symptoms
• The service user’s capacity to request medication
• The service user’s capacity to request or refuse the medication
• Symptoms to look for, e.g. non-verbal expressions of distress
• State clearly in which order medications are to be administered when there is more than one option and time interval in between them e.g. multiple painkillers, or seizure medicines e.g. diazepam, midazolam)
• Note: For Provide Care Homes some PRN medications should be offered routinely throughout the day and not only at medication rounds
• PRN medication should not be offered more frequently than prescribed. It is important to note the minimum interval between doses and the maximum dose in 24 hours
• It is good practice to record at each medication round/visit that the service user has been offered the medication. If the PRN medication is given, the following details should be recorded to prevent incident or accidental overdose:
➢ Number of tablets/ dosesgiven especially when there is a varying dose (e.g. 1-2 tablets)
➢ The exact time of administration to make sure the required time interval has passed before administering the next dose
• Monitor the service user and record the service user’s response to the medicine. Contact the GP for advice or review if the service user(s):
➢ Appears to be experiencing side effects
➢ Appears not to benefit from the medication
➢ Requests it more frequently than usual
➢ Requests the PRN medication more frequently than prescribed
➢ Medical condition has deteriorated
➢ Rarely requests or regularly declines the PRN medication
• PRN medicines should be stored securely and accessible on request. They should be kept in original packaging with pharmacy label on the medicine
• Keep appropriate stock levels to meet the service users changing needs
• Provide Care Homes: If PRN medication is left over at the end of the monthly cycle and it is still in date then this should be ‘Carried forward’ from one month to the next. This will avoid unnecessary medicines waste. Refer to CCG Guidance: Reducing Medicines Waste in Care Homes
• The quantity of PRN medicines ‘carried forward’ should be recorded on the new MAR chart so there is an accurate record of the stock level which will help when undertaking audits
• The PRN medication should be reviewed routinely by service users GP and the review date clearly stated
• Record PRN medication administration in care plan
SAFETY CHECKS
RIGHT MEDICINE
✓ Check MAR chart and care plan for medicine’s indication and instructions for use.
RIGHT TIME
✓ Check when dose was last administered.
✓ Check service user has not already taken or been given a dose (e.g. by another care worker)
✓ Check that the service user is not showing signs of toxicity or overdose.
RIGHT INDICATION
✓ If indication and instructions for use are unclear, contact the prescribing clinician or GP
RIGHT DOSE
✓ Check that the dose range is clear (e.g. 5-10mg or 1-2 tablets)
Checklists for Assessing Whether A ‘When Required’ Medicine Is Needed
Analgesics
• Check which pain score tool has been chosen
• Check whether the care plan details when and where the patient reports experiencing pain
• For opioid analgesics, check for signs or symptoms of toxicity, for example, dizziness, drowsiness, fixed pupils or bradypnea (abnormal slow breathing)
• For Non-Steroidal Anti-inflammatory Drug (NSAIDs), check for signs or symptoms of toxicity, for example, dyspepsia, bleeding or bruising
• Paracetamol-based analgesics must not be given more frequently than every four hours
• A maximum of 8 x 500mg paracetamol-based analgesics may be given in any 24hour period dependent on patient weight
• If pain does not subside report, it to the prescribing clinician or GP
Indigestion remedies
Check for the following signs and symptoms that may indicate indigestion:
• Belching, burping, flatulence etc.
• Pain, fullness or discomfort in the upper abdomen
• Loss of appetite
• Nausea
Laxatives
• If the service user is competent, ask whether they have had a bowel movement recently
• Check service user’s bowel chart
• Check for any of the following signs and symptoms that may indicate constipation:
• Abdominal pain
• Nausea/vomiting
• Bloating or flatulence
• Loss of appetite
Anti-diarrhoeals
• Check for the following signs and symptoms that may be associated with diarrhoea:
• Lower abdominal pain
• Nausea and vomiting
• Loss of appetite
• Check for signs of dehydration
• Remember, constipation can cause overflow diarrhoea
• Check for signs or symptoms of toxicity, for example, dizziness, drowsiness, fixed pupils or bradypnea (abnormal slow breathing)
Anti-emetics (sickness/nausea)
• Check for the following signs and symptoms that may indicate nausea:
• Refusal of food or drink
• Dizziness
• Upper abdominal pain
• Sweating
• Remember nausea may be a symptom of other conditions such as constipation, pain etc
• Buccal tablets must be administered in the buccal cavity (under the top lip)
• Check for signs or symptoms of toxicity, for example, excessive drowsiness, dizziness, confusion, urinary retention, blurred vision, dystonia, oculogyric crisis (upward deviation of eyes) or torticollis (twisting of neck to an add angle)
GTN spray (or tablets)
• Ask whether the service user is about to exert themselves (e.g. walk upstairs)
• Check for the following signs and symptoms that may indicate need for GTN: ➢ Pain, tightness, pressure or discomfort across the front of the chest, arm, jaw or neck
➢ Breathlessness
• Angina may also be caused by fear, strong emotions, heavy meals, exposure to cold etc.
• Sit the service user down
• Administer spray or tablets sublingually (under the tongue) and wait 5 minutes
• If needed, administer a second time and wait another 5 minutes
• If needed, administer a third time and wait another 5 minutes
• If the pain has not been relieved in 15 minutes in total, call for an ambulance
• Check for signs or symptoms of toxicity, for example, throbbing headache, tachycardia, dizziness or hypotension
• Check date (on label) when tablet container was opened. If more than eight weeks ago, the tablets may be less effective – order new prescription, and if necessary, obtain an emergency supply from the pharmacy
Short-acting reliever inhalers
• Check for the following signs and symptoms that may indicate need for short-acting reliever inhaler: ➢ Cough
➢ Wheeze
• Check whether the service user is able to talk
• Check for signs or symptoms of toxicity, for example, fine tremor, headache, tachycardia or hyperactivity
• If symptoms are not relieved by the usual dose of inhaler, or if symptoms are worsening and the inhaler is needed more often, contact the GP or asthma nurse
• In an emergency call for an ambulance. Inability to complete sentences in one breath, and/or fast respiration rate more than 25 breaths per minute, may indicate severe acute asthma
13. Controlled Drugs
Refer to MMPOL37 Managing Medicines in Provide Groups Care Home Service
References
1. Anticoagulants: advice for social care providers – National Service user Safety Agency 2007 http://www.nrls.npsa.nhs.uk/resources/?entryid45=59814
2. BTS/SIGN Asthma quick reference guidelines 2019
3. NICE asthma guidance
4. NICE COPD guidance
5. RPS. Professional guidance on the safe and secure handling of medicines 2018 https://www.rpharms.com/recognition/setting-professional-standards/safe-andsecure-handling-of-medicines/professional-guidance-on-the-safe-and-securehandling-of-medicines
6. NHS HEE. Advisory Guidance. Administration of Medicines by Nursing Associates https://www.hee.nhs.uk/sites/default/files/documents/Advisory%20guidance%20%20administration%20of%20medicines%20by%20nursing%20associates.pdf
7. Professional Advice: Medicine Administration Records in Care Homes and Domiciliary Care. Care Quality Commission, 2010 http://www.cqc.org.uk/
8. Professional Advice: Safe management of Controlled Drugs in care homes. Care Quality Commission, 2010 https://www.cqc.org.uk/guidance-providers/adultsocial-care/storing-controlled-drugs-care-homes
9. Pharmacy Tip: Medication Prescribed to be taken when required. Care Quality Commission, 2018 https://www.cqc.org.uk/guidance-providers/adult-socialcare/when-required-prn-medicines
10. Handling of Medicines in Social Care. Royal Pharmaceutical Society of Great Britain, 2007 http://www.npc.nhs.uk/publications_resources.php
11. Seven steps to patient safety for primary care. National Patient Safety Agency 2009. http://www.nrls.npsa.nhs.uk/resources/collections/seven-steps-to-patientsafety/?entryid45=59804
12. Actions that can make Anticoagulant Therapy Safer. National Patient Safety Agency Alert 18. 2007 http://www.nrls.npsa.nhs.uk/resources/?entryid45=59814
13. Summaries of product characteristics and patient information leaflets (for a range of insulins, opioids and warfarin). Datapharm Communications Ltd 2009. http://emc.medicines.org.uk/
14. Fentanyl preparations for breakthrough pain. London New Drugs Group APC/DTC Briefing Document. August 2009
15. NHS low bloods sugar (hypoglycemia) https://www.nhs.uk/conditions/low-bloodsugar-hypoglycaemia/
Appendix 1: Transdermal Patch Application Record Sheet