18 minute read
3 Bluetooth function

Android Car Navigation User Manual
Foreword: we are very glad that you have chosen this vehicle navigation video and audio product. This description will systematically introduce the basic functions, skills and matters needing attention of the car. Let new users get up quickly, please read it in detail before use, thank you!
Advertisement
Contents
First module : Basic common sense of car machine
1.1 Power on and off
1.2 Screen function key
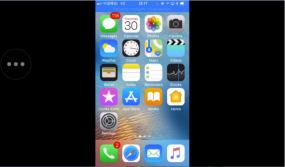
1.3 Home and Application interface
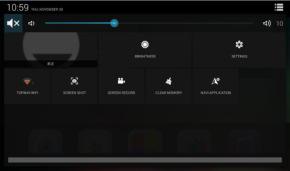
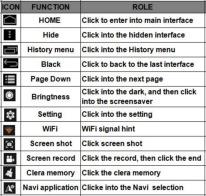
1.4 Drop-down menu and status bar
1.5 Setting Wallpaper
1.6 Setting Boot animation
1.7 Setting Boot logo
2.1 Navigation function
2.1.1 Use of maps 2.1.2 Copy of map off-line data and APK installation 2.1.3 Choice the navi application 2.1.4 Navi auto start
2.2 Radio function
2.3 Bluetooth function
2.3.1 Pairing equipment
2.3.2 Bluetooth music 2.3.3 BTConact 2.3.4 Dial and Call 2.3.4.1 Dialing function 2.3.4.2 Caller function 2.3.4.3 Call record 2.3.5 Selection of Bluetooth module
2.4 Music Player
2.5 Video Player
2.6 EQ
2.7 AUX IN
2.8 Recorder
2.9 Third party application—— EasyConnection
2.9.1 EasyConnection → Android USB 2.9.2 EasyConnection → Android WiFi 2.9.3 EasyConnection → iPhone WiFi
Third module : Set up common sense
3.1 Setting WiFi
3.2 Setting Sound
3.2.1 Rverser mute 3.2.2 Navi audio channel 3.2.3 Navi volume 3.2.4 Device ringtone
3.3 Setting Date & time
3.4 Switching input method
3.5 Steering wheel learning
3.6 Related issues of upgrading
3.6.1 MCU update 3.6.2 System update
Warning: Before using this device, please read the manual safety and law information.
1.1 Power on and off
Power on
Power off When you plug in the car keys,open the car’s ACC power,the device will be automatically power on,displaying the boot animation LOGO.
When you take off the key ,power off the car’s ACC power,the device will be automatically be shut down.
1.2 Screen function key
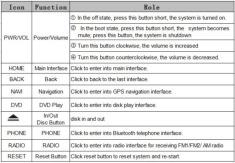
Remark:
All long press means press time at least lasting 3 seconds; Button and socket is different according to different car types, please take real type as standard.
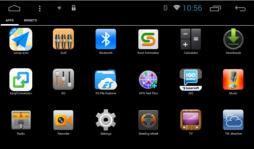
1.3 Home and Application interface
①You can use the various functions of the device through the operation of the touch screen.The device has a multi page screen, sliding to the left or right to switch each other.Click the HOME keyon the screen on the non main interface to enter the main interface ②Click the application function into the application interface in the main interface

Drop-down menu and status bar functional icon indication:
Note: The device software is under upgrading, the status indicator may be different with your device; please refer to the actual device software.
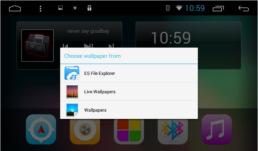
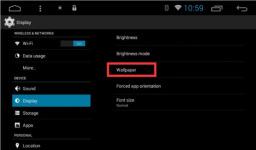
1.5 Setting Wallpaper
There are two ways to setting wallpaper: ①In the blank space of the main interface, the "choose wallpaper from" box will be popped out to choose the source according to personal preferences. ②Setting →Display →Wallpaper ,choose wallpaper source according to personal hobbies
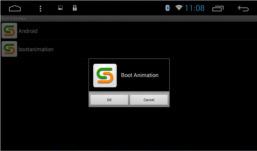
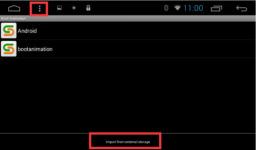
1.6 Setting Boot animation
There are two ways to setting boot animation: ①After clicking on the starting animation function in the application interface, choose an animated
animation as the boot animation ②Custom animation: will make a good boot animation built-in car Scard or copy in the U disk directory,click on the three point function bar on the status bar to pop up: "import from external storage", click on it, pop up the password box, input : Topway , you can display the custom animation in the built-in or U disk, select it.
1.7 Setting Boot logo
There are two ways to setting boot logo: ①Setting →General or Car settings →Extra settings,input password:123456 →LOGO settings ② Custom boot logo: logo logo picture resolution PNG built-in corresponding bus format or copy machine in the root directory of U,into Extra settings →LOGO settings,Slide to the back you can see the custom logo, click OK

2.1 Navigation function
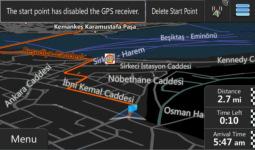
2.1.1 Use of maps
Click on the navigation icon in the main interface or the application interface to click on the navigation function to enter the map interface

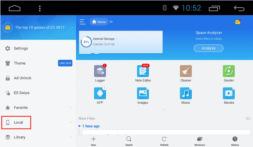
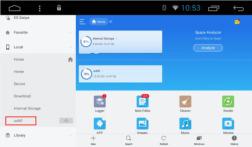
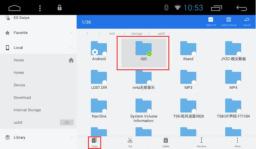
How do you copy and install when the car doesn't have a map? Exemplified by the IGO map ①Copy the IGO map offline packet and map APK into the SD card or the U disk.(Example is a copy of the U disk) ② Click the application icon to enter the application interface. After you find the ES file explorer function and click on it, click the local directory on the left side of the ES file explorer to see the U disk path
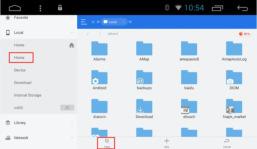
③Enter USB0, that is, U disk, long map map packet and APK can be selected, at the same time, the copy key will be displayed below. Click Copy to paste key, then click the main directory on the left directory, then click Paste after entering the main directory.The copy is estimated for 10~20 minutes. After the copy is completed, click the install map APK

2.1.3 Choice the navi application
After copying the offline map data and installing the map APK, how do you associate the navigation icons of the main interface? There are two ways to relate the navigation function of the main interface: ①Drop-down menu →NAVI APPLICATION,Click to enter, find the IGO map, select ②Setting →General or Car settings →Navi application,Click to enter, find the IGO map, select
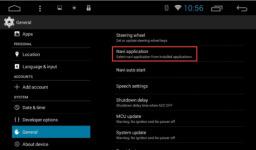

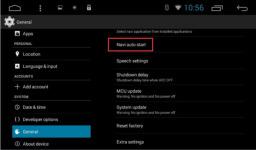
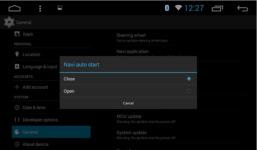
2.1.4 Navi auto start
How do you let the boot display on the map interface? ①Setting →General or Car settings →Navi auto start,the default is closed, set to open ②You must break ACC at the map interface, that is, pull the key, or the next boot will not start the navigation.
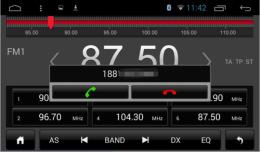
①In the main interface or the application interface, click the audio function to enter the audio interface. The functions of Icons in the radio interface are described below:

② RDS

2.3 Bluetooth function
The Bluetooth interface can be entered by the main interface or the application interface by clicking on the Bluetooth function.
2.3.1 Pairing equipment
①When the machine has not yet matched the equipment, it can only enter the setting and search interface, and the other interface can not be entered. ②Search interface, click search key to find nearby Bluetooth device. When selecting Bluetooth that needs matching, the phone will pop up into the PIN code box and input can be paired successfully.
After the pairing is successful, the Bluetooth icon will be displayed behind the device

2.3.2 Bluetooth music
In the Bluetooth interface, the click icon can enter the Bluetooth music playback interface and can be played / pause / top / down function after connecting with the Bluetooth mobile phone.
Note: Some kind of mobile phones need to start playing music player for bluetooth music when using bluetooth music function.
2.3.3 BTConact
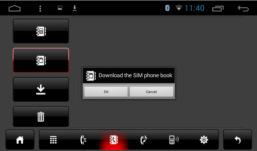
①Access to the phone interface: the Bluetooth interface clicks the icons of the address book into the Bluetooth address book interface

②Download the phone book: Click on the download key in the phone book or SIM card interface of the phone
③Find contacts: in the mobile address book interface, click the phone phone book icon or in the SIM card address book interface, click the SIM card phone book icon, the contact interface will pop up the search box, enter the name and phone to find the contact.


2.3.4 Dial and Call
In the Bluetooth interface, click dialing icons to enter into the Bluetooth Dial interface.
①Click numbers on the interface, if the input is wrong, click to delete
entering phone number.
②Enter phone number,Click Click to end up the call.
Are on a call, press the switch to the phone call.

2.3.4.1 Dialing function
①When a mobile phone or SIM card phone book has not been downloaded, the phone number in the cell phone or SIM card phone can only show the phone number. If the phone is downloaded, the name of the contact is displayed. ②There is another situation: when a strange number is called, it is only a phone number.
Note: when the key is answered a call is answered, the button or the end of the phone is suspended, and the small window will disappear automatically.
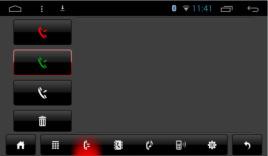
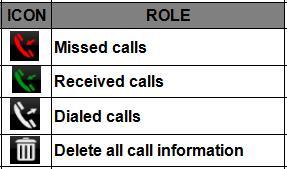
2.3.4.3 Call record
①In the Bluetooth interface, click “ ” to enter into bluetooth call history interface.only synchronize
the call record of the incoming / off power. ②Call record interface, the contacts in the click list can also be dialed.
2.3.5 Selection of Bluetooth module
When the Bluetooth settings interface has no device name and PIN code display, it shows that the Bluetooth module has no choice. How to choose the correct Bluetooth module? First of all, you have to figure out what the Bluetooth module is ① Setting → General or Car settings → Extra settings → Config info,check the corresponding BC5/BC6/BC8
②The Bluetooth module is selected for the corresponding Bluetooth Name: BC5: both BC6 and BC8 are not selected in the configuration information, and restart the machine BC6: the configuration information only checks the BC6 and restarts the machine BC8: the configuration information only checks the BC8 and restarts the machine
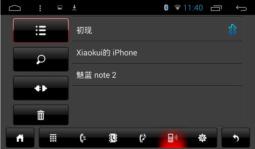
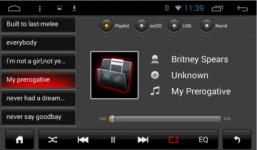
2.4 Music Player
Click on the music function at the main interface or the application interface to enter the music playback interface.the audio player supports the format as follows:MP3/MP2/WMA/APE/FLAC/ AAC/WAV/OGG and so on.

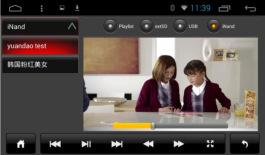
2.5 Video Player
The video play interface can be entered by clicking on the video function at the main interface or application interface The format of the video player is as follows: MP4/AVI/WMV//MOV/MKV/MPEG/RMVB and so on
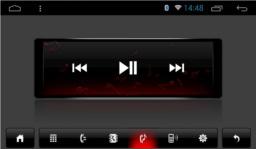
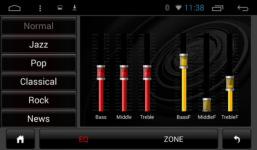
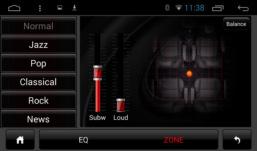
2.6 EQ
2.6.1 There are two ways to enter the EQ interface:
①The main interface or application interface clicks on the equalizer application function and enters the equalizer settings interface ②Or click EQ in some functions, such as audio and music, to enter the equalizer settings interface
①In the equalizer settings interface provides 8 kinds of audio playback mode choose: ②In a field setting interface the user can freely adjust the bass and loudness of the contrast, the user can also on the front left, front right, left, right after the four angularly audio settings, as shown below:
Note: in the custom mode, the user can customize the effect mode by the effect regulator and reset the bass. It is effective only when the external 5.1 amplifier is connected.
2.7 AUX IN
Click on the AUX function on the main interface or application interface to enter the AUX IN interface: ①When the video input signal is not yet received, the AUX IN interface displays: no video signal ②When the signal is connected, the AUX interface displays the video screen, returns to the upper interface, returns to the main interface, and hides out of time.


2.8 Recorder
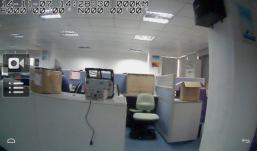
USB interface: we have different platforms, and the access interface of the train recorder is different,the R16/R33/T8 platform's recorder is only supported on the USB1 interface; the T3 platform is supported by two USB interfaces. ①Vehicle traveling data recorder USB connected directly to the machine,can normal display images,the following figure.
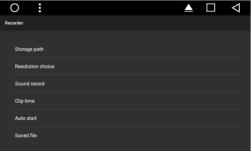
②Click on the menu icon vehincle traveling data recorder set into the interface
③Storage pathes set up is completed,backe to the video interface,click on the video icon
④Enter the vehicle traveling data recorder>setting records,can play back recorded video files
Note : 1.Vehicle traveling date recorder to record the image stored in the usb driver,use this feature,please bring your own a U disk, according to the above instructions for storage path settings 2.Video in the process of recording,banned plug usb drive or SD card 3.If U disk cannot be read or video cannot play, please lighter boot again
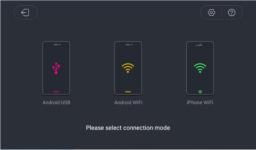
2.9 Third party application —— EasyConnection
Four functions of EasyConnection: Android USB/ Android WiFi/iPhone USB/iPhone WiFi;IPhone USB only supports Android 6 to 7.1 of the car. Note: it is necessary to activate it before the use of a billion company, otherwise it can not be used, The phone download the EasyConnection app.
Turn on the EasyConnected:In the application interface,Click the EasyConnected,You can get into the EasyConnection.

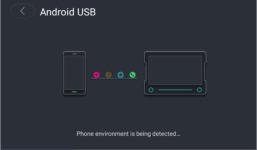
(1)Mobile Bluetooth:The mobile phone needs to open Bluetooth and pair the car machine, because the sound is Bluetooth channel, it must be paired bluetooth, otherwise the sound will be exported from the cell phone. (2)Phone debugging:The USB debug is opened in the mobile developer option, and the data line is connected to the car (3)Phone EasyConnection:Start the phone EasyConnection,and keep in it’s Interface. (4)Car connection:Select the connection mode interface - click "Android USB". Access to the detection interface, if the mobile terminal environment is normal, instantly enter the billion company, at this time the mobile phone will automatically start the Easyconnection.
(5)Screen projection:After the screen is successful, you want to cut to the other interface of mobile phone. click the HOME button of phone to quit EasyConnection,and you can't directly click the exit button, otherwise it will cause the car to quit.
2.9.2 EasyConnection → Android WiFi
(1)Mobile Bluetooth:The mobile phone needs to open Bluetooth and pair the car machine, because the sound is Bluetooth channel, it must be paired bluetooth, otherwise the sound will be exported from the cell phone. (2)Phone debugging:In the first connection, you need to open the USB debug of the mobile phone and connect the data line to the car. (3)Phone hotspot:start phone hotspot,the car links to mobile phone hotspots (4)Phone EasyConnection:Start the phone EasyConnection,and keep in it’s Interface. (5)Car connection:Select the connection mode interface - click "Android USB". Access to the detection interface, if the mobile terminal environment is normal, instantly enter the billion company, at this time the mobile phone will automatically start the Easyconnection.

(6)Screen projection:After the screen is successful, you want to cut to the other interface of mobile phone. click the HOME button of phone to quit EasyConnection,and you can't directly click the exit button, otherwise it will cause the car to quit. (7)Pull out the USB debug line:Successfully entered the billion even after the bottom of the screen will prompt "unplug the cable", then unplug the mobile phone data line after dual interaction
2.9.3 EasyConnection → iPhone WiFi
(1)iPhone hotspot:start iPhone hotspot,the car links to iPhone hotspots (2)Car connection: entering the interface of the connection mode - click "iPhone WiFi" into the detection interface (3)iPhone Airplay:Slide up on the phone screen to start the control bar, click Airplay and select EC-Mirror.immediately get into the EasyConnection.
(4)Screen projection:iPhone WiFi only support in billion even driving interface dual interaction for display in the mobile phone is not only the other interface, click on the need to operate in the mobile phone terminal.
5、Exception handling: (1)EasyConnection:If your phone doesn't download Easyconnection,need scavenging two-dimensional code or Google play download.Otherwise, the connection is not up (2)Android Phone:If the USB debug is not opened,It is also not connected. (3)Android Phone:If your phone already downloaded and the USB debug has been opened,still not connected,check the permission of the mobile phone when the phone is connected to the connection.If there is, then click allow

3.1 Setting WiFi
There are two ways to open and close WiFi: ①The drop-down interface has a WLAN function, and click it to set ②Settings →WLAN or Wi-Fi,and click it to set
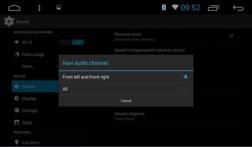
3.2 Setting Sound
Voice settings mainly talk about four common functions: Reverse mute, Navi audio channel,Navi volume, and Device ringtone:
3.2.1:Reverse mute:When sorting, any mode of reversing, the car has no sound output; when you do not check, there is a sound output.
3.2.2:Navi audio channel: Precondition: bound navigation, that is, the navigation software interface selected map APK ①Front left and front right: navigation, non system sources, such as audio /AUX/DVD/TV/ external Bluetooth mode, and so on,the Navi is only left and right before and before, and the back and rear right hold the sound of the current source. ②All: navigation, four sound channels have the sound of navigation.
3.2.3 Navi volume: ①Navigation: the volume of the volume of the navigation can be adjusted when the slider is slid, and the effect is not effective until the navigation is set. ② Background music: when slipping progress bar, it can adjust the size of the current source, reduce the number of current sources, and reduce the current source voice when navigating. To tune in to 0, to plug in when navigating, that is, when the navigation is broadcast, the current source has no voice output. When the navigation is broadcasts, the current source voice is not depressed.
3.2.4 Device ringtone:In fact, it is the sound of the phone when the car calls, after setting, the sound of the ring sounds when the Bluetooth calls.

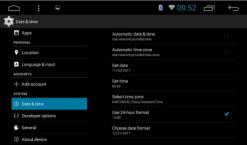
3.3 Setting Date & time
The device automatically calibrates the current time function, but requires your GPS to be activated,

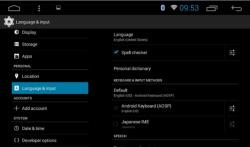
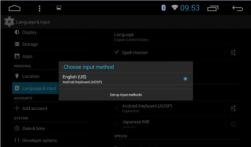
3.4 Switching input method
①Settings →Language & input →Check the input" required by the user ②After selecting the input method, the input method can be selected in the default.
3.5 Steering wheel learning
Settings →General or Car setting→Steering wheel,the user can set the steering wheel according to the prompt.Not only for the party control interface with CAN protocol models, with the car by parsing the CAN original car side control, without manual learning.
①First click【start】the function button. ②Click the key that you need to learn on the square control interface. ③Press the corresponding button on the steering wheel of your car. If you are successful, the ④buttons on the square control interface will have a corresponding color change. Repeat②and③two steps,until you finish the setting of all the buttons on the steering wheel. ⑤Point by 【End】, the process of the square control is finished.

Note: if you want to re - learn the button on the steering wheel,Point according to【clear】,repeat ①, ② and ③ three steps.
3.6 Related issues of upgrading
3.6.1 MCU update
The difference between a single MCU and a MCU package
Name Size Upgrades
Single MCU 128K Settings→General or Car settings→MCU update
MCU package 16or32M Settings→General or Car settings→System update, after the update,into Exrra settings → Model choose,then select the corresponding model according to the actual vehicle model, that is, the MCU upgrade
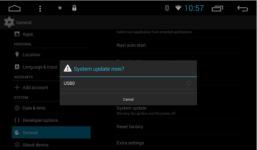
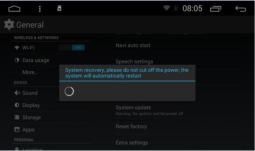
3.6.2 System update
Note: we will give an example of the R33 platform system software of our company
(1)Downloading system software compression packages
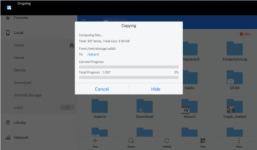
( 2 ) After the compression package is unpacked, the two files inside are copied to the U root directory.Note: the number of files after different platform decompression is different. There are two files, some are three, and others are four. After that, how many copies are there?


(3)System update :
Settings→General or Car settings→System upadate,t323he U disk will pop up and click.