15 minute read
Hold still for a stretch for 25 seconds. Rest 5 seconds and then repeat for another 25 second hold. This stretches the cervical spine’s suboccipital and paraspinal muscles which commonly cause tension headaches


Stretch #2 - Upper Trap Stretch
1.
Advertisement
2.
3.
4.
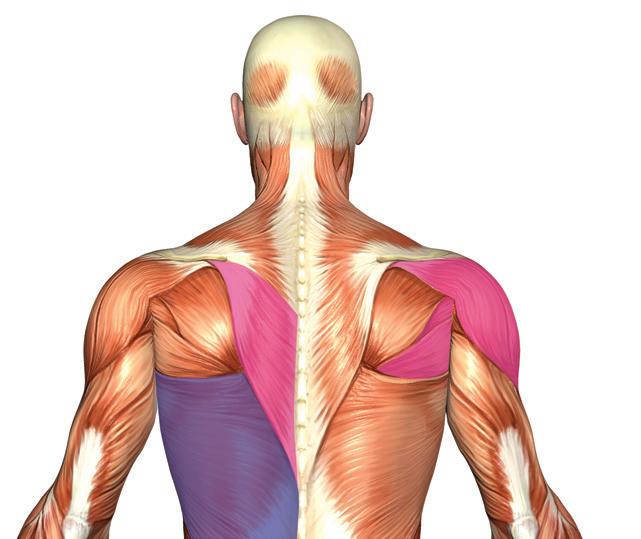
5. 1. 2. 3. 4. 5. Start by holding one handle of the Posture Medic in your right hand while standing with the feet hip distance apart. Place the other handle under your right foot and stand upright with the right arm straight at your side. The Posture Medic is now being used as an anchor to anchor down your right shoulder. With the left hand, grab the back of your head and pull your head toward your left armpit. Hold still for a stretch for 30 seconds. The purpose of this exercise is to stretch the upper trapezius muscles that run from the neck down toward the shoulders.
TIPS
• Do notengage yourneckmuscles to resistthe movement. • Allowthe Posture Medic to pullthe shoulderdown andavoidletting it raise up towardyourear.

Stretch #3 - Side Neck Stretch
Relax and repeat on the other side. Start by holding one handle of the Posture Medic in your right hand while standing with the feet hip distance apart. Place the other handle under your right foot and stand upright with the right arm straight at your side. The Posture Medic is now being used as an anchor to anchor down your right shoulder. With the left hand, grab the right side of your head and pull your head toward your left shoulder. Hold still for a stretch for 30 seconds before relaxing. The purpose of this exercise is to stretch the scalenes and slightly the sternocleidomastoid (SCOM) muscles on the sides and front of the neck. You can look up slightly to target the SCOM muscle more. The SCOM muscles can often cause jaw pain, so this stretch can help reduce or prevent TMJ symptoms also and not just help posture.. Repeat on the other side.
• Do notengage yourneckmuscles to resistthe movement. • Allowthe Posture Medic to pullthe shoulderdown andavoidletting it raise up towardyourear.


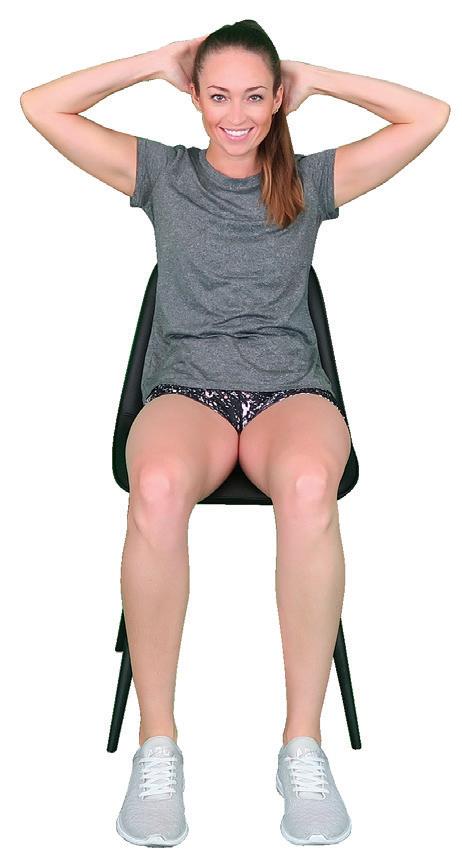
Stretch #4 - Chair Thoracic Extension
Begin by sitting in a chair that has a low back on it or move your buttocks about halfway to the front of the chair seat if your chair has a very low back. Have the legs bent in front of you and a tall posture and the feet hip distance apart. Place both hands behind the head with the elbows outward. Gently lean back over the back of the chair to extend the spine for 2 seconds. Return to the starting position. Repeat for 15 repetitions. With each repetition, you may be able to go farther as mobility and flexibility improves. The purpose of this exercise is to mobilize the thoracic spine and briefly stretch the pectoralis muscles. When the thoracic spine doesn’t move well, the cervical spine and the lumbar spine have to compensate to make up for it which can lead to many different spine and muscular dysfunctions.
1
2
• Have the elbows angledoutwardas opposedto forwardin frontofyou. • As you lean backoverthe chair, allowthe elbows to drop as gravity pushes them downward.
2
1. 2. 3. 4. 5. 6.
Stretch #5 - Chest and Shoulder Stretch
1.
2.
3. While standing, begin by holding both Posture Medic handles directly behind your hips with your palms facing forward and elbows straight. Have the feet hip distance apart. Slowly raise your hands toward the ceiling while pushing the shoulders back and the chest forward. Hold for 25 seconds. Rest for 5 seconds and then repeat again for 25 seconds. The purpose of this exercise is to stretch the pectoralis muscles, the anterior deltoids, and the biceps. If the chest muscles are shortened, they cause the shoulders to round forward, so it’s crucial they be stretched to allow for
TIPS
• Be sure to go slowwhile raising the arms andonlyliftthem within a comfortable range ofmotion foryou. • Keep yourtorso uprightandavoidrounding.
Stretch #6 - Mermaid Side Bend Stretch
proper shoulder range of motion. Sit in a chair with an upright posture, legs bent, and feet hip distance apart. Place your right hand on the chair to the outside of your thigh. Reach your left arm overhead with a slight bend in the elbow as you bend your entire upper body and torso to the right. Hold for a 30 second stretch. The purpose of this exercise is to stretch the latissimus dorsi muscles and the quadratus lumborum muscles in the low back. These muscles love to spasm and tighten up due to our daily activities and lifestyles which can lead to low back pain and poor posture. Keeping them mobile, along with learning to lift heavy objects with the legs instead of the back, can be monumentally helpful. Return to the starting position. Repeat on the other side.
• Be sure to keep yourhips plantedon the chair. • Take deep breaths into the ribs fora deeperstretch. • Please note: This exercise mayalternativelybe performedin standing.
TIPS

Strengthen #1 - Isometric Chin Tuck
1.
2. 3.
4. 5.
2
In sitting, hold the Posture Medic out in front of you by the handles - shoulder width apart. Have the legs bent and feet hip distance apart on the ground. Raise your arms overhead to rest the stabilizer on the back of your head. With your palms facing each other, pull the hands forward with the elbows bent at your side until the Posture Medic is secure and there is resistance on the band and it is trying to pull the head forward. Instead of allowing your head to move, keep your head still in a neutral position for a 5-second isometric contraction. The purpose of this exercise is to strengthen the deep cervical flexors (front of the neck) and stretch the back of the neck. Having strong neck flexors can prevent a forward head posture which then leads to muscle imbalances, pain, and spine dysfunction. After 5-seconds, release your pull on the band to rest.
• Keep yourelbows in frontofyou nearyourchestas opposedto outward. • Keep yourshoulders relaxedanddown awayfrom the ears. • Keep in mindthis exercise mayalso be performedstanding.
Perform 10 repetitions.
Strengthen #2 - 1-arm Scapular Depression
1.
2.
3.
4.
5.
6. Stand with one handle of the Posture Medic around your right shoulder like it’s a backpack strap so the stabilizer is under the armpit. Have the feet hip distance apart. Hold the other handle in your right hand with your right arm straight at your side. Press your right hand toward the ground against the resistance of the Posture Medic band. Your right shoulder should drop down and move away from your ear. This is essentially the opposite of a shrug. Then, relax as you allow the right shoulder to raise back up to a natural position. Perform 12 repetitions. This exercise primarily strengthens the latissimus dorsi muscles in the back, but it also strengthens the serratus anterior, pecs, and traps. Repeat on the other side.
• Pretendas though there is a pencilunderneath yourarmpitthatyou’re squeezing forbetterlatengagement. • Avoidflexing the elbowas this is nota bicep ortricep exercise. Instead, the movementshouldbe initiatedfrom the shoulderblade andbackregion.

TIPS
1 2 2
1. 2. 3. 4. 5. 6.

Strengthen #3 - Pull-apart
1.
2.
3.
4.
5. Begin with the feet hip distance apart. Hold the Posture Medic handles in each hand. Hold the Posture Medic out in front of you at shoulder height with the palms facing in toward each other. Squeeze your shoulder blades together and spread your arms apart and out into a “T” position at shoulder height. Hold for a second before slowly returning the arms to the starting position. This exercise strengthens the posterior deltoids (which are also called the rear delts) as well as the rhomboids and traps which Perform 15 repetitions.

• Be sure to keep yourwrists straightandin a neutralposition andkeep your elbows straight. The focus ofthis exercise shouldbe on the shouldermuscles insteadofthe wrists orelbows. • Ifyou have anyshoulderdiscomfort, you can alternativelyperform this exercise with the palms up in a supinatedposition. • This exercise can also be performedsitting in a chair.
Strengthen #4 - Bent Over Row
stabilize the scapula. Sit in a chair with both legs bent and place the stabilizer of the Posture Medic underneath both feet so the handles are on the outside of each foot. Hold a handle in each hand with the palms facing in and stay bent forward at about a 45-degree angle. Have both arms straight down, perpendicular to the ground with the elbows straight. Squeeze your shoulder blades together and bend your elbows as you pull the handles up and back for a row motion. Hold for one second and then relax as you slowly return to the starting position. Perform 20 repetitions. This exercise strengthens the rhomboids, mid and lower traps, latissimus dorsi, and arms.
• Keep yourgaze down atyourfeetso thatyourcervicalspine remains in a neutralposition. • Pretendas though you’re squeezinga pennybetween yourshoulderblades. • Thisexercise mayalternativelybe performedstandingin a bentoverposition.
Strengthen #5 - “W”
1.
2.
3.
4. 1. 2. 3. 4. 5. 6. Stand with your feet hip distance apart and both arms up in the air at shoulder height with a 90-degree bend in the elbows. Squeeze the shoulder blades down and back as you draw your elbows down toward your rib cage or torso. You’re now making a “W” with your arms. Hold for 10 seconds before relaxing and returning the arms to the start position. Perform for 10 repetitions. This is another great exercise for
TIPS
• Avoidrounding the shoulders during this exercise. Instead, pullthem backand push the chestforwardthe entire time. A goodwayto understandthis movement is to thinkabouttrying to putyourshoulderblades in yourbackpockets. • As you holdfora 10-secondisometric contraction, pretendas though there is a towelbetween the elbows andyourtorso thatyou have to squeeze andnotlet drop to the ground. • This exercise mayalternativelybe performedin sitting.
Strengthen #6 - Shoulder External Rotation
scapular stabilization. Stand with the feet hip distance apart while holding the Posture Medic handles in each hand. Bend the elbows to 90-degrees at your sides with the palms facing in. Keep the elbows tucked at your sides as you slowly squeeze your shoulder blades back together and rotate your hands outward so your palms are now facing forward. Go as far as you are able to while keeping the elbows tucked at your side. Hold for one second. Slowly return the hands to the starting position. Perform 15 repetitions. This exercise strengthens some of the rotator cuff muscles in the shoulders. These muscles are crucial for optimal shoulder mechanics.
• Trynotto letthe elbows floatawayfrom yourtorso. Ifneeded, you can place a towelundereach elbowas a reminderto keep the elbows tuckedin. • The shoulders can move betterwhen posture is uprightversus rounded, so remain in a tall, uprightposture the entire time. • You can alternativelydo this exercise in sitting.

Now that you plan to stretch, strengthen and stabilize yourself to better posture, here are some important things to keep in mind.
Extended Standing
Standing still for over 20 minutes at a time can can have a negative impact on your musculoskeletal system. Standing properly to balance and distribute your weight evenly begins with your feet. Proper footwear is key. You should find shoes that support your feet properly while still being safe and/or work appropriate. Make sure that your shoes fit properly, have a soft sole and provide good arch support. You can also modify your existing shoes by adding a custom orthotic or over the counter arch supporting insole.

If your job requires you to stand all day, ideally it is not on a hard surface. Using an “anti-fatigue mat” can reduce the strain.
While standing, pull your navel towards the back of your spine and tuck your hips under. Stand tall and keep your chin tucked in - do not stick it forward.
Be sure to shift your position regularly so that your muscles do not get stiff. It may also be helpful to occasionally stand with one foot on a stool to relieve the pressure on your back.
Prolonged Sitting
Whether it’s at a desk, on a couch or in a vehicle, we often spend too many hours sitting continuously throughout the day. In addition, most of these seats are not designed to support our neck and back correctly for such extended periods.
Driving Posture
Allowing your car’s seat to properly support you can greatly reduce the stress on your spine.
• Recline the seat back 10-15 degrees from the vertical. Add a lumbar cushion if required. • Tilt the seat to as near to horizontal as possible. • Slide the seat forward so you can comfortably press the foot pedals and reach the steering wheel. • Relax your shoulders and avoid gripping the steering wheel too tightly.
For proper alignment, there are three main points: • Spine: Line up your hips with your shoulders, and your shoulders with your ears • Shoulders: Keep your upper arms relaxed and close to your body • Wrists: Keep in line with your lower arms
The back of your knees should rest 2-3 finger widths from the seat cushion. Your elbows should be bent at a 90 degree angle with your arms supported and your wrists resting comfortably on your keyboard.
1. Screen slightly below eye level 2. Body centered to both the monitor and keyboard 3. Forearms level or tilted up slightly 4. Lower back support by chair or lumbar cushion 5. Wrist should not rest when you type 6. Legs horizontal to the floor 7. Feet flat on the floor or resting on footrest
Laptops
By their very design, laptops pose unique problems. Either your neck has to remain bent in order to see the screen, or your wrists sit at an awkward angle for typing.

If your primary computer is a laptop, add an external monitor and keyboard where you use it the most often.
Video Games
Enthusiastic gamers often have even more destructive posture practices than computer users.

Ideally gamers should follow the same seating principles outlined for computers, however if that is not practical, sitting in a recliner in front of the television with your legs up is more ergonomic.

Sleeping is often overlooked as part of postural health. We spend about a third of our lives sleeping and our sleep posture can put a lot of strain on our back and neck. A supportive mattress and pillow will improve the quality of your sleep and allow you to wake pain free. There are three main sleep postures:
Back Sleepers
To create proper support for back sleepers, you will need a pillow that offers firm support at the neck but allows the back of your head to drop back.
Orthopedic pillows often have divots or contours in the centre for this purpose. Soft, fluffy pillows do not provide any cervical support. The fill simply moves away from the area or is compressed when pressure is applied.

To relieve tension in your lower back, back sleepers should try putting a pillow under their knees.
Side Sleepers
Side sleepers need to accommodate the gap between your head and shoulder. Your neck should remain at a 90 degree angle from the line of your shoulder (as depicted above). If you typically need to put your arm under your head or use two pillows, its time to get a new pillow. For side sleepers size really matters. The pillow should not allow your neck to flex up or tilt down.
When sleeping on your side, your knees should be aligned with one another to keep your hips straight. If you are slim, try putting a small pillow between your knees to space them apart.
Stomach Sleepers
There is really no correct way to sleep on your stomach, so it should be avoided if at all possible. If an injury prevents you from sleeping in another position, then the trick will be to keep your neck aligned with your spine as much as possible. Try not using a pillow at all.

Pillow Test With the pillowcase off, fold your pillow in half. If it does not spring back into shape instantly, its time for a new pillow.
Improve Your Posture. Improve Your Health.

www.posturemedic.com
Original Strength LIGHT BLUE X-Small RED Small GREEN Medium YELLOW Large BLACK X-Large
PLUS Strength PURPLE Small BLUE Medium SILVER Large ORANGE X-Large

Size chart does not factor in oversized chest girth.
Original Strength Posture Medic is recommended for most individuals. PLUS Strength is recommended for athletes or those individuals who are regularly engaged in strength training.
A healthcare provider should be consulted before you begin any exercise or stretching regimen. Safety Precautions: The Posture Medic is not a toy. Keep away from children under the age of 12 years old. The Posture Medic is designed to be used ONLY as detailed in this instruction manual. Store your Posture Medic out of direct sunlight, and avoid extreme temperatures. Check your Posture Medic at regular intervals. If there is any sign of wear or damage to the coloured tubing, the device should be replaced