
7 minute read
Winter camping: how to build an igloo

By Chantal Macartney — Illustrations by William Jessup
FOR THOUSANDS OF YEARS, Inuit native hunters have constructed igloos as hunting and winter survival shelters on the Arctic tundra. For a wonderful outdoor experience and an exercise in precision and patience, try making one this winter.
Advertisement
Igloos are warm and easy to build, and they can protect campers from winter elements better than any tent. There is a similar winter shelter called a quinzhee (pronounced quin-zee), which is little more than a hollowed-out pile of snow. (For the scoop on how to build a quinzhee, see the Winter 2002 issue of Ottawa Outdoors Magazine.)
The secret to igloo and quinzhee warmth is the snow. It is naturally thick, and makes great insulation. When camping, you can stay warm and cozy in an igloo or quinzhee even when the outside temperature plunges well below freezing.
Quinzhees are easier to make than igloos, and take less time to create. They are much more efficient if you have young children with you and need to make a quick, sturdy snow shelter. However, if you plan to stay in the same place for more than one night, an igloo is best because it’s stronger and will last longer.
Regardless of the type of shelter you plan to build, start by finding flat terrain with no rocks, long grass or underbrush. These will weaken your structure and make construction difficult.
Building an igloo
To build an igloo, you will need two or three saws and several shovels. (It’s more fun with a team of builders.)
Pack down the snow well where you plan to build your igloo. Before you start construction, the snow base should be at least half a metre thick.
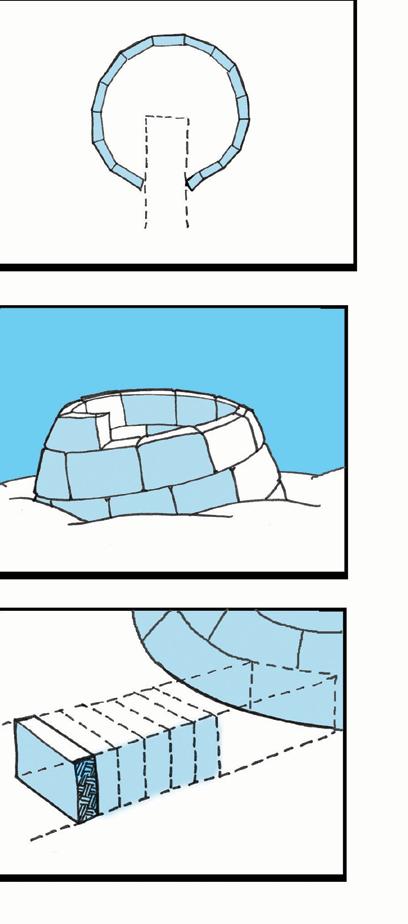
For a two-person igloo, trace a 2.5-metre circle in the snow. For a fourperson igloo, trace 3.5 metres. Indicate
where your entrance trench will be; it should be a little wider than a metre and two metres long. When you dig out the entrance trench, you can use the excess snow to make blocks for building the actual igloo.
To start, clear away any snow from the front of the trench. Cut along the edges, allowing at least ten centimetres between each block. After sawing across the bottom of each block, lift it out carefully. Repeat this action for each block, until you have completely dug out the trench, and you have a hefty quantity of snow blocks.
Now you can start your igloo! Set the first row of blocks around the circle you traced in the snow before. By sloping the blocks slightly inwards, you can start to create the characteristic dome shape of an igloo.
Because an igloo is built with spiralling rows of snow blocks, you will have to cut the first four or five blocks into wedge shapes, gradually getting bigger. (See diagram) To create the spiral effect, add square-cut blocks on top of these first wedge-shaped ones.
Continue building from the interior of your igloo by placing blocks in rows on top of the ones already in place. Angle the blocks slightly inward to form a round, domed roof. Finish the structure by placing the last (top) key block in the centre of the igloo. Do this with great care!
Warm in any temperature
Before rolling out sleeping bags inside your new home, lay out a tarpaulin or plastic sheet over the snow floor. Next, place sleeping mats over the plastic sheet. The double thickness will increase your comfort and keep you warmer.
Find an object to block any drafts from the entrance hole, like a large pack and a tarpaulin. If you have a pair of large snowshoes, you can put those in the


door as well. For air ventilation, make two small holes in the side or top of your snow house; be sure nothing is blocking them. Since your door is going to leak some air, you will have sufficient flow. Invisible holes will also let in air.
Never cook inside an igloo. Firing up a stove and cooking builds up carbon dioxide, eats up the oxygen, and pollutes the air. Very dangerous!
It’s easy enough to raise the temperature once you’ve settled inside your igloo. Just light one or two candles or candle lanterns. They give off a surprising amount of heat. With two large candles burning inside, a properly built igloo should be no colder then 3º C, even when the outside temperature is around -25º C.
Before bed, have a good supper, and make sure you wear a toque when you sleep. Avoid drinking liquids three hours
up your internal furnace a bit. It makes a significant difference. Following this advice will make you more comfortable and cozy all night.

Customized housing


It’s often best to make your first igloo a very humble dwelling in your backyard — nothing too elaborate. By becoming familiar with the building techniques before heading out on the trail, your confidence and skill will or so before going to bed. It’s awful to increase. When you have built a few wake up and find that you have to leave igloos, plan a real outing in Gatineau your warm sleeping bag to empty your Park during a snowy weekend to try out bladder. Going for a short hike before your handiwork. bed will warm up your body. Don’t make Some people make elaborate igloos, it strenuous enough to sweat, just stoke complete with several rooms (e.g. sleeping area, storage IGLOO WARNINGS area, and even a partly open u Don’t construct your igloo under trees or other large cooking shelter). objects. They might deposit a load of snow unexpectedly on your shelter in the middle of the night, and col lapse your shelter.
These types of igloos can take one or more entire days to build. Try cutting u Never build your snow house beside a road shelves into the snow or a snowmobile trail. It might be mistaken for boots, snowshoes, and for a pile of snow, and lead to disaster. packs. Hang wet mittens u Be sure to supervise children when they are helping you and socks on a clothes line.
Dry winter air will remove a lot of the moisture from the make an igloo, and ensure cloth. no one walks on the Once settled inside a well-built walls when anyone is igloo, the first thing most people inside. Smothering notice is the almost absolute silence. accidents can Even with a howling blizzard raging happen. outside, the insulating snow of your igloo will erase the sound. It’s the perfect inducement for sleep. Pleasant dreams. — Chantal Macartney is an avid camper, skier and backpacker.
FRONTENAC PARK WINTER CAMPING COURSES

On Saturday January 24, 2005, Frontenac Provincial Park will offer a course on Winter Camping Trip Planning.
This presentation will help any camper, regardless of expertise, to develop vital winter camping skills. It will provide fast and easy pre-trip planning advice to reduce many of the discomforts associated with wilderness winter treks. Also, it will be an excellent opportunity to share ideas and concerns that you may have about winter excursions. Specifically, this course will cover topics like: selecting your route, equipment, menu, safety, and discuss diverse forms of winter travel. Part of the presentation will be held outside, so make sure you are dressed appropriately for the trail and weather conditions.
The weekend of Saturday February 7 to Sunday February 8 is a weekend intended to introduce people to tents, snow shelters and general winter camping skills. You’ll learn how to stay warm, prepare meals and navigate using a map and compass. This instruction will be repeated on the following weekend (February 14-15). The cost for the weekend: $55 per person, food included.
For information on these programs offered at Frontenac Provincial Park, or to register, please call (613) 376-3489.


