
12 minute read
The beginner’s guide to face exercise


THE BEGINNER’S GUIDE TO
FACE EXERCISE
Advertisement
BY SUZANNE BECHARD
Ever look in the mirror and wonder why no matter how much rest you’ve had, you still look tired? Where did all those droops and sags come from? Your sobering reflection may send you in search of the latest anti-aging miracle cream. After trying expensive moisturizers and serums, you watch helplessly as Father Time wreaks havoc with your jawline. What’s next? Botox? Injectable dermal fillers? Surgery? These days, media is filled with ads for injectable cosmetic treatments to reduce facial wrinkles and restore skin. This is no accident: the global facial injectable market size was valued at $13.4 billion US in 2020 and is expected to expand. COVID-19 has increased time spent on video calls, known as “Zoom Boom.” This has made us more aware of our appearance, which fuels demand for cosmetic procedures. Do you want to hop on this beauty bandwagon? Are you willing to commit to a lifetime where you entrust someone to re-engineer your face in pursuit of fuller lips and more sculpted cheekbones? Imagine how a muscle that has been repeatedly paralyzed “wears” on the face years later. Or the unnatural pouches that remain after years of injecting dermal fillers. Not to mention the expense. As a passionate fitness instructor, the concept of injecting or paralyzing a muscle to smooth out a wrinkle never made sense to me. I have spent years studying and testing how facial muscles respond to exercise. I’m in my early fifties. When someone meets me, I frequently watch them puzzle over my age or try to spot cosmetic work. Through experience, I can confirm that enlarging a facial muscle through exercise will smooth the skin that lies over the muscle, reducing or eliminating wrinkles and restoring a youthful contour. While there’s still little clinical research, a 2017 study conducted by Dr. Murad Alam, professor of dermatology at Northwestern University Feinberg School of Medicine, showed how a 30-minute facial exercise program sustained over 20 weeks improved the appearance of selected middleaged women. Participants notes significant improvement in many facial features. Besides a healthy diet, no smoking, and regular use of sunscreen, exercising the face is now clinically proven to be a natural way to correct droopy facial features.
I designed the following face strengthening program as an essential workout for anyone new to face exercises. I hope you will find this to be confidence-boosting and effective. In the privacy of your home, in just eight to 20 weeks you can preserve your natural beauty and restore your face to the toned and lifted look you had when you were younger.
You have to do some work, but like anything worthwhile in life, you get out of it what you put into it.
Shall we begin?
HOW TO PROCEED
1. Until you get used to exercising the face, exercise in front of a mirror to ensure you are activating only the desired muscles and relaxing the rest of the face.
2. Use a straight-backed chair to help you achieve healthy posture. 3. Exercise with a clean face and hands.
4. Be precise, concentrated, and methodical in your execution of each exercise.
SCHEDULE
Perform this workout daily for eight weeks. During weeks nine to 20, practice the exercises every other day (three to four times per week).
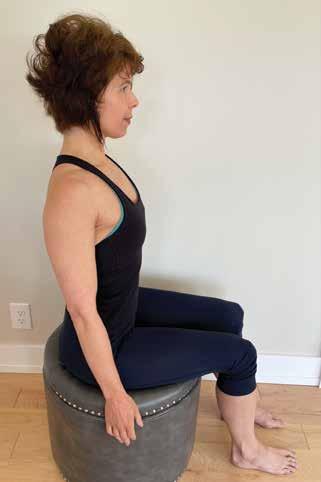
BODY ALIGNMENT
1. Sit up straight and place feet flat on the floor and parallel to each other. 2. Lengthen through the back of your neck, lifting the back of your head.
Allow your chin to recede slightly so that your head is balanced on top of your spine. 3. Find and maintain a central line through your face so that the center of your forehead, nose, mouth and chin line up with the notch at the middle of your collarbones. 4. Place your tongue flat along the roof of your mouth, trying to lift the back one-third of your tongue to your palate. Breathe in and out through your nose and become aware of the sensation of aliveness in your face, releasing any tension or stuck stress. 5. Exercise the entire face to produce a wellbalanced facial contour, rather than just focusing on problem areas. 6. Allow one to two seconds between each repetition. 7. Follow the recommended number of repetitions and try to feel the burn or muscle exhaustion in the working muscles.
WARM UP
This prevents fascia (connective tissue) from becoming glued to the skin or muscles it covers. Improving the elasticity and resiliency of the facial fascia will enhance its ability to adapt to both concentric (shortening) and eccentric (lengthening) contractions in the workout routine. 1. Vigorously rub the palms of your hands together to generate heat and energy. 2. Place palms on both sides of your face, fingers up. 3. Press palms tightly into your face with enough force to press into the third layer of your skin. 4. Move your hands vertically up and down in a small range of motion several times. 5. Move your palms to a new location on the face and repeat until the entire face is treated (approximately five different locations).

FOREHEAD
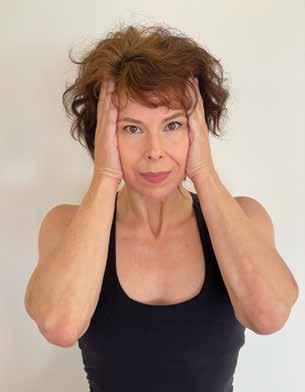
As our eye muscles weaken with age, we increasingly shorten and overwork the forehead muscles to open our eyes wider. This exercise will lengthen and strengthen the overworked forehead and lift hanging eyebrows while decreasing horizontal forehead lines.
1. Place the pads of your fingertips at the top of your head, fanning across the hairline. Relax your shoulders down and away from your ears. 2. Press firmly into your scalp and pull your fingertips back. Hold. 3. Without using your forehead, open your eyes wide.
4. With your head erect, use five slow incremental movements to look down with your eyes. Your eyes should almost close. 5. Really feel a strong pull down with brows, eyes, and nose, stretching from your hairline to your lash line for a count of five, then slowly release. 6. Do this three to five times.
EYES
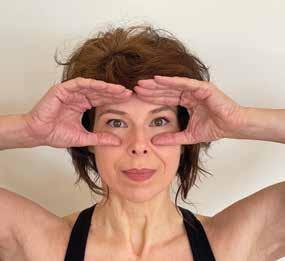
The sides of your fingers and thumbs will encircle your eyes like eyeglasses. Contracting the circular eye muscles against the resistance provided by the hands will strengthen the entire eye area without wrinkling or creasing. This exercise has the added benefit of increasing bone density of the orbital bones.
1. Place the sides of your index fingers above each eyebrow along the upper orbital bones and the sides of your thumbs above the height of your nostrils along the lower orbital bones, so that your hands make an open circle around your eyes. Keep your head erect and your shoulders relaxed, and press your hands into your orbital bones. 2. Open your eyes wide with the help of your fingers but without using your forehead. Hold for five seconds.
3. Using the pressure of your hands as resistance, slowly close your eyes to a count of five.
4. Really feel your eye muscles tightening for a count of five, then slowly release. 5. Do this three to five times.
UPPER CHEEKS

This exercise will lift the middle portion of your face by recreating the apples of your cheeks, which tend to flatten with age. To develop awareness of the cheek muscles, you may find it useful to touch your face very lightly with your fingertips throughout the exercise. The goal is to pull the corners of your mouth up towards the outer corners of your eyes so that you feel your cheek muscles pulling up at a 45-degree angle from your mouth’s corners. 1. In five slow, incremental movements, use your cheek muscles to pull the corners of your mouth towards the outer corners of your eye in a strong, upward smile, making sure both corners of your mouth are level. Your upper lip should raise, showing as many upper teeth as possible. 2. Pause for a count of five after each lift and feel your cheek muscles simultaneously pulling your mouth’s corners higher with each lift. 3. When your cheek muscles are maximally contracted, tuck your lower lip over your bottom teeth to avoid tension in your lower mouth and jaw. Relax around your eyes. 4. Really feel your cheek muscles pulling your mouth’s corners up to a count of 10, then slowly release. 5. Do this three to five times.

LOWER CHEEKS
To slim and shape your lower cheeks: 1. Firmly press the first three fingers of each hand flat on either side of your jawline in front of your ears and gently pull towards the back of your head. Hold. 2. Slightly lift your chin up and out until you feel moderate tension along your lower face. 3. Use your cheek muscles to suck your cheeks into your teeth for a count of 10.
4. Use your cheek muscles to pout your lips forward. 5. Really feel your cheek muscles as you make six to 10 exaggerated kissing movements, then slowly release. 6. Do this two to three times.

LOWER LIP
Plump your lips and diminish lines around your mouth by using the pressure of your palms on the side of your face to provide extra resistance to make your mouth muscles work harder. 1. Place both palms firmly on the sides of your lower face and pull your hands towards your ears. 2. Use your mouth muscles to pull your lips flat against your teeth and press together. Hold your lips in this position so they are firm, full, together, and smiling slightly. 3. Hold your lower lip in position as the tip of your tongue presses firmly down in front of the lower teeth.
4. Really feel your lower lip and tongue in resistance for a count of five, then slowly release. 5. Do this three to five times.

UPPER LIP
1. Repeat steps 1 and 2 for Lower lip. 2. Position the tip of your tongue IN BETWEEN your lips. 3. Press your upper lip downward against your tongue while stiffening your tongue so that it does not move. 4. Really feel your upper lip and tongue in resistance for a count of five, then slowly release. 5. Do this three to five times.

JAWLINE
The added resistance of your hands, which anchor the base of your neck just above your collarbone, make the muscles of both your neck and jawline work harder. 1. Cross your arms at the wrist and firmly press your hands around the base of your neck. Hold firmly. 2. Open your mouth slightly and smile, making sure to lift both mouth corners evenly. 3. Wrap your lower lip over your lower teeth and press your upper lip flat and full against your upper teeth. 4. Without unwrapping your lower teeth, drop your jaw open as far as possible. 5. Lift your jaw outward, then upward in a slow scooping motion as if trying to touch your nose with your bottom lip. 6. Really feel the upward pull against your hands and hold for a count of five and then slowly release. 7. Do this three to five times.
NECK


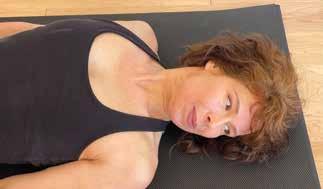
The signs of aging often appear first in the neck area so strengthening your neck can lessen the appearance of lines in your neck and reduce double chins.
1. Lie on a flat surface, either the floor or a bed, with arms relaxed by your sides.
Straighten one leg and bend the other to keep the pelvis in a neutral alignment. 2. Pull your lips flat against your teeth with a tight, close-lipped smile. Lift your tongue high inside your mouth and press it tightly against the top and back of your palate. 3. Look at the ceiling and keep your chin retracted as you gently raise your head approximately half an inch off the floor. 4. Really feel the muscles of your neck and jawline working as you extend your jaw forward against the resistance of your tightly closed lips, for a count of 10. 5. Do as many head lifts as comfortable or until your muscles feel the burn. 6. Repeat steps 1-3, except turn your head from side-to-side, looking far left, then far right with your eyes. 7. Rhythmically lift and turn your head for a count of 40.

COOL DOWN
This tapping technique not only relaxes your face by helping to release stuck stress and tension, but also increases circulation. Remember to breathe.
1. With the pads of your middle fingers, tap 10 times. Make sharp, light, quick taps — like testing a hot iron. 2. Start just above your eyebrows, near the inner edge. 3. Move to your cheekbones (not in your eye sockets). 4. Tap up from your mouth’s corners to the sides of your nostrils. 5. Tap up from your chin to your ear lobes. 6. Do not tap on your jawbone but slightly above, on the fleshy area. 7. Close your eyes and take three deep breaths through your nose. 8. Enjoy the sensation of aliveness and vitality in your face.

NEXT STEPS
To keep your muscles challenged and learn new workout routines, check out my classes on Facebook at Body by Suzanne, Face Toning. I offer tested techniques which build balanced facial muscles, release habitual facial tension, improve facial symmetry, strengthen and remodel facial bone, and rejuvenate the skin on the face and neck at a cellular level.
Suzanne Bechard, BPR, has studied extensively with advanced practitioners in movement therapy, stretch therapy, posture and various forms of dance. As a dance and fitness instructor, she has spent over 20 years practicing and refining techniques that enhance natural beauty, grace, and quality of life.


