
7 minute read
Tech Talk


Tech Talk
Shelley Martin-Young
Advertisement
Teaching Digitally (or From Anywhere)
I, like many others, am once again teaching face-to-face. However, with COVID-19 numbers still high, I often find that I am doing double duty with some students face-to-face, while others join us on Zoom. Because of this and the fact that I simply enjoyed the infusion of technology into my online teaching, I continue to use online tools to instruct my students whether they are in my classroom in real time or in my classroom virtually. In this article, I share how to create and use a digital, interactive notebooks.
Why Digital Interactive Notebooks?
I attended a workshop on using digital notebooks and I fell in love with them. At the time my classes were completely digital, so I was looking for a way to be able to interact with my students and also see the writing they were doing, even if I could not be in the same room with them, so digital notebooks made sense to me. Despite going back face-to-face, I have continued using digital notebooks in my classroom.
There are some great benefits to using digital notebooks. First, incorporating digital notebooks gets you one step closer to being a paperless classroom. A paperless classroom saves you time and energy by allowing you to provide feedback quickly and efficiently for your students, keep track of students’ works easily, and save time communicating with parents. A paperless classroom also helps to reduce waste and reduce your carbon footprint. Going digital also allows you to reclaim precious space in your classroom that is often overrun with textbooks, folders, and notebooks. Having a digital classroom also improves document security by storing your students work electronically. It is also great for helping you to be more organized.
Second, a digital notebook is always available to you and your students. Students will be able to easily access their notebooks if they are home sick, on vacation, or just working on their assignments at home. They can read directions, watch videos, or interact with you or other students simply by accessing their digital notebooks. As the teacher, you always have access to your students’ work. You can quickly see the progress your students are making and leave them feedback in real-time. You can access digital notebooks from phones, iPads, or the computer.

Third, grading is so much easier with a digital notebook. In the past, I had to lug 30 writer’s notebooks home with me. With a digital notebook, all I need is my phone. How many times have you had to wait somewhere and wished you could get some of your grading
completed? With a digital notebook, simply pull out your phone and you can get a few graded while you wait.
Fourth, you can also easily differentiate your lessons. There is no limit to what you can put in a digital notebook. You can add videos to assist in teaching hard topics. Students can watch the videos over and over to help them grasp a concept. You can add links with extra practice or enrichment opportunities. With Google Classroom you can also give students different versions of the same interactive notebook. The possibilities really are endless.
Where to Begin
Start small. You may want to begin with using a digital notebook in only one subject. I teach Teaching Writing at OSU, so my students have a digital Writer’s Notebook. The first thing you need to do is pick your notebook. You can have all sizes and shapes. I like the notebook that is landscape because there is more room to write, but you can also choose portrait. I get my templates from Slidesmania. They have mini notebooks, notebooks with tabs and stickers, notebooks with calendars, and bullet notebooks. These templates work with both Google Slide and PowerPoint. You can find other templates at Slidesgo, Engageducate, and Ditch That Textbook. Finding the perfect notebook is the hardest part. Watch this video for a beginner digital interactive notebook tutorial.
Make your notebook
After you have chosen your notebook, you need to create a Master Notebook. This is your copy of the notebook that you will be able to add to easily. Students will not be able to write in the Master Notebook. When you create your Master Notebook and are ready to share follow these steps: 1. Click Share 2. Click anyone with the link can view 3. Copy the link 4. Highlight the word edit and everything after it in the URL 5. Replace those words with the word “copy” This forces your students to make a copy of the digital notebook so each student will have their own copy. You can also watch this video to learn how to do this.
Next you will need to decide how often you share slides with your students. If you are new and want to start slowly you can add a page a day to the Master Slide. If you are super organized and have your entire year planned out, you can share the whole notebook with them up front. You might just want to start with your cover. Share the cover and let the students decorate it (Figure 1). They can easily add photographs, images, or videos to make their notebooks unique. Also decide if you want a table of contents to help your students stay organized. I share my notebooks weekly and have a weekly table of contents. Here is an example of Week 3 in my Master Writer’s Notebook.
Figure 1
A Cat-Obsessed Student’s Writer’s Notebook Cover

In the Week 3 Writer’s Notebook, you can see that I have added graphics to each slide. You can do that, leave them plain, or let your students decorate their own pages. The great thing about digital notebooks is that there are so many options.
Accessing your Student’s Notebooks
To have access to your student’s notebooks simply have them share the link to their writer’s notebook with you. I ask them to share with the can edit setting on their slides. I like to be able to add comments, questions, stickers, or other things to their notebook. I simply create a list with all my students’ names and the link to their notebooks. Now I have easy access to their work from anywhere.
Uses for Your Digital Notebook
Digital notebooks are used to support lessons, to continue student learning, and to assess student learning. Digital notebooks are great for reading responses, taking notes, and sharing resources. You can easily add graphic organizers to your digital notebook. Students can work together in a shared digital notebook. Annotating is easy with a digital notebook. Students can annotate articles or pictures simply by adding them to their notebook (Figure 2). Creating lab reports in a digital notebook is easy. Students can write the steps to an experiment and add photographs. Reflections in a writer’s notebook are simple and if you want to hear and see your students simply add a Flipgrid response. You can also include any of the great apps you are already using in your classroom. Add vocabulary quizzes in the notebooks using Quizlet, allow students to interact with videos in Edpuzzle, create mind maps using Popplet, and share entire lessons with Nearpod. Your imagination is the limit.
Figure 2
Example of Annotation
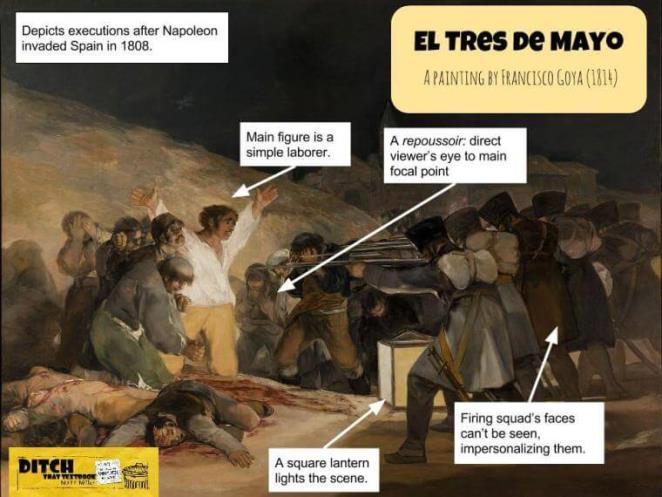
Note. From Ditch that Textbook
Incorporating technology into our classrooms is not always an easy task. Knowing what technology to use and when to use it can be daunting. Incorporating digital writer’s notebooks into my classroom was revolutionary. They saved me time, they were easy to access, and grading was a breeze. With a digital notebook you can get rid of worksheets and add color, photographs, and media to your lessons. You can make lessons interesting and interactive all at the same time. We live in a world full of technology and finding ways to harness this in our classroom is powerful. Give a digital notebook a try. If you have questions or just want to share your notebook with me, do not hesitate to reach out.
Shelley Martin-Young recently completed her doctoral program at Oklahoma State University. She can be reached at dawn.martinyoung@okstate.edu.


