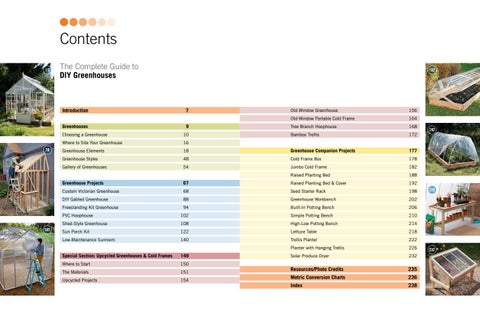
Contents 11
The Complete Guide to DIYÂ Greenhouses
182
Introduction 7
78
101
Old-Window Greenhouse
156
Old-Window Portable Cold Frame
164
Greenhouses 9
Tree Branch Hoophouse
168
Choosing a Greenhouse
10
Bamboo Trellis
172
Where to Site Your Greenhouse
16
Greenhouse Elements
18
Greenhouse Companion Projects
177
Greenhouse Styles
48
Cold Frame Box
178
Gallery of Greenhouses
54
Jumbo Cold Frame
182
Raised Planting Bed
188
Greenhouse Projects
67
Raised Planting Bed & Cover
192
Custom Victorian Greenhouse
68
Seed Starter Rack
198
DIY Gabled Greenhouse
88
Greenhouse Workbench
202
Freestanding Kit Greenhouse
94
Built-In Potting Bench
206
PVC Hoophouse
102
Simple Potting Bench
210
Shed-Style Greenhouse
108
High-Low Potting Bench
214
Sun Porch Kit
122
Lettuce Table
218
Low-Maintenance Sunroom
140
Trellis Planter
222
Planter with Hanging Trellis
226
Solar Produce Dryer
232
Resources/Photo Credits
235
Metric Conversion Charts
236
Special Section: Upcycled Greenhouses & Cold Frames
149
Where to Start
150
The Materials
151
Upcycled Projects
154
Index 238
192
210
232
Introduction A
greenhouse may seem like a luxury, because that’s exactly what it is—an everyday luxury. It is an extraordinary structure that can, if used correctly, pay for itself. A greenhouse allows you to grow exactly the ornamentals and edibles you want, rather than settling for those that you find in local nurseries and home centers. More than that, the right greenhouse in the right location is a gardener’s getaway, a tiny slice of tropical paradise that makes bitter winter cold disappear (if only for an hour or so) and provides a lush vacation spot steps from your back door.
Small home “hobby” greenhouses for the masses are a relatively recent historical phenomenon; the evolution of the greenhouse is grounded in the whims of the wealthy. The first recorded use of hotbeds and cold frames was ensuring Roman emperors had cucumbers in winter. The English greenhouse culture that is so pervasive in the United Kingdom today began on the estates of the landed gentry—aristocrats who wanted fresh citrus and pineapples without the bother of importing those delicacies. Ultimately, however, the idea of growing crops out of season or out of locality was far too appealing to be confined to the rich. Home gardeners of more modest means soon adopted simpler greenhouses so that they could have fresh vegetables all year round, or get a jump on flowers for their gardens, and that promise is still what draws home gardeners to greenhouses today. Wonder if a greenhouse would be right for you? Ask yourself a few basic questions: Are you ready to start your own flower-bed showoffs rather than buying flat after flat at the local nursery each spring? Would you like the satisfaction and flavor of growing your own super-healthy greens, fruits, and vegetables? Would you like to experiment with crops that normally would not grow in your zone, including tropical plants like orchids, avocadoes, and
pineapples? If the answer to any of these is yes, it’s time to consider which greenhouse is best for you. Before taking the plunge, you’ll need to consider the many factors and options that go into setting up a greenhouse. No worries: we’ve covered all those basics in the pages that follow, leading you to choices based on what you want to grow and how you want to grow it. Fortunately, a greenhouse need not break the bank. You can find an entire spectrum of prefabricated types, from zip-up plastic covers over hutch-sized metal frames all the way up to housesized “conservatories” that can dominate a large property. The range of available prefabricated sizes, materials, and technologies ensures that there is a greenhouse for everyone—and if you can’t find exactly what you want from a manufacturer, you can build your own. You’ll find many wonderful possibilities in the project section of this book. A greenhouse is even more productive and rewarding when coupled with features such as seedstarter racks, custom workbenches, and cost-saving graywater systems. You can also supplement the bounty of the greenhouse with structures such as covered raised beds and portable cold frames that help keep plants warm and protected in garden beds. You’ll find a wealth of these “greenhouse complements” in the projects section as well. INTRODUCTION
7
Choosing a Greenhouse
G
reenhouses can take many forms, from simple, three-season A-frame structures to elaborate buildings the size of a small backyard. They can be custom designed or built from a kit, freestanding or attached, framed in metal or wood, glazed with plastic or glass. Spend a little time researching online greenhouse suppliers and you’ll discover almost unlimited options. Although it’s important to choose a design that appeals to you and complements your house and yard, you’ll need to consider many other factors when making a decision. Answering the following questions will help you determine the type, style, and size of greenhouse that suits your needs.
How Will the Greenhouse Be Used? What do you plan to grow in your greenhouse? Are you mostly interested in extending the growing season—seeding flats of bedding plants early in the spring and protecting them from frost in the fall? Or do you want to grow flowers and tropical plants year‑round? Your intentions will determine whether you need a heated greenhouse. Unheated greenhouses, which depend solely on solar heat, are used primarily to advance or extend the growing season of hardy and half-hardy plants and vegetables. Although an unheated greenhouse offers some frost protection, it is useful only during spring, summer, and fall, unless you live in a warm climate. A heated greenhouse is far more versatile and allows you to grow a greater variety of plants. By installing equipment for heating, ventilation, shading, and watering, you can provide the perfect environment for tender plants that would never survive freezing weather.
10
THE COMPLETE GUIDE TO DIY GREENHOUSES
THE COST QUESTION The cost of a basic freestanding greenhouse can range from the very economical (plastic sheeting and PVC hoop frame) to the surprisingly expensive (customdesigned and built). It all depends on your tastes and aspirations, and on your budget. The following real-life samples will give you a sense of the cost variations (remember, though, that prices can vary widely, depending on features and accessories you choose to include): • A 5 × 5' pop-up mini greenhouse from one mail order source sold for around $125. • A small, 6 × 8' greenhouse with rigid polycarbonate panels sold for around $400. • A more spacious 8 × 17' rigid panel kit with motorized windows sold for around $5,000. • The most elaborate polycarbonate kit greenhouses we found, available by mail order, sold for around $7,500 for an 11 × 24' structure. • For a custom-designed and built greenhouse of the same size (11 × 24'), one homeowner recently spent $23,000—a price that could have been much higher for a greenhouse designed with ornamental metalwork or stone foundations. • A 20 × 30' hoop kit using plastic sheeting and PVC tubing was recently available for around $1,500.
How you plan to use the greenhouse will also determine its size, type, and location. If you only want to harden off seedlings or extend the growing season for lettuce plants and geraniums, a small, unheated structure covered with polyvinyl chloride (PVC) sheeting or even a cold frame—a glass- or plastictopped box on the ground—might be all you need. If your intentions are more serious, consider a larger, more permanent building. A three-season greenhouse can be placed anywhere on your property and might even be dismantled in the winter, whereas year-round use calls for a location near the house, where utilities are convenient and you don’t have to trek a long way in inclement weather.
There are many different reasons to choose a given greenhouse. The owner of this yard opted for a traditional crested, aluminumframed, glass-enclosed model. The use of clear glass instead of semiopaque plastic allows the greenhouse to be used for meals and relaxing (thus, the table) as well as growing favorite plants.
GREENHOUSES
11
9
10
Tack the posts in the standoff post bases with a couple of deck screws, making sure they are resting cleanly on the standoff pads. Also brace the posts with 2 × 4 braces so they are plumb. Tack all the posts in position and plumb them and then mark level cutting heights using a laser level or level for reference.
11
Cut the 2 × 4 endwall cap plates to length and screw them to the tops of the corner posts with 3" deck screws. Test frequently to make sure the corners are square and the edges are flush with the post edges.
76
THE COMPLETE GUIDE TO DIY GREENHOUSES
Remove the posts for trimming to final height, making sure to note which post belongs in which base. Marking and cutting in this manner ensures that the tops of all posts will be level even though the slab slopes away from the house. Precutting posts to the same length will result in a roof structure that is not flat. Reinstall the posts in the anchors and fasten with joist hanger nails or 16d galvanized nails.
12
Clamp the doubled front and back wall cap plates together so the top plate overhangs the lower plate by 3½" on each end. Screw the top plates to the endwall cap plates and then fasten the front and back wall plates together with 2½" deck screws. Fasten the top cap plate on each end.
13 Build stud walls for the kneewalls between posts. Space the kneewall studs so they will be positioned beneath the intermediate posts. Attach cap plate to the tops of the studs.
15
Add intermediate 4 × 4 posts between the sills and the undersides of the doubled cap plates. These posts should be situated directly above kneewall studs. The posts are spaced so the distances between posts will create uniform-width bays for the windows.
14 Add 1 × 6 sills to the tops of the 2 × 4 kneewalls. The sills will cover the edges of the exterior siding, so make the interior edges flush with interior wall studs and cap plate.
16
Install back wall studs between the back sill plate and the back cap plates, spaced 16" on center. Do not attach these studs to the house—they must remain isolated from it structurally.
17
Construct and attach the roof ridge support wall, featuring a 2 × 6 on edge at the top of the wall. It is easiest to build this wall on the ground and then erect it as a unit. Use a pair of 2 × 4 braces to keep the support wall stable while you attach the rafters. (continued) GREENHOUSE PROJECTS
77
Side braces
Roof window support
13 With at least one helper, lift the roof into place onto the wall frames. The gable end studs should meet the outside edges of the crown beams, and the ends of the crown beams rest on the outer edge of the corner bracket. Fasten in place with the provided nuts and bolts.
14 Attach the side braces and the roof-window support beams to the underside of the roof rafters, as specified by the manufacturer’s instructions.
17 Install the panels one by one, using panel clips. Begin with the large wall panels. Position each panel and secure it by snapping a clip into the frame, at the intervals specified by the manufacturer’s instructions.
15
18 Add the upper panels. At the gable ends, the upper panels will be supported by panel connectors that allow the top panel to be supported by the bottom panel. The lower panels should be installed already.
20
16 Build the roof windows by first connecting the two side window frames to the top window frame. Slide the window panel into the frame; then secure it by attaching the bottom window frame. Slide the window into the slot at the top of the roof crown; then gradually lower it in place. Attach the window stop to the window support beam. 100
THE COMPLETE GUIDE TO DIY GREENHOUSES
Assemble the doors, making sure the top slider/roller bar and the bottom slider bar are correctly positioned. Lift the door panels up into place onto the top and bottom wall plates.
19 Install the roof panels and roof-window panels so that the top edges fit up under the edge of the crown or window support and the bottom edges align over the gutters.
Test the door and window operation, and make any necessary adjustments so they open and close smoothly.
GREENHOUSE PROJECTS
101
Variation: How to Build a Raised Planting Bed with a Kit
1
2
Raised garden bed kits come in many styles. Some have modular plastic or composite panels that fit together with grooves or with hardware. Others feature wood panels and metal corner hardware. Most kits can be stacked to increase bed height.
3
Set the box down, experimenting with exact positioning until you find just the spot and angle you like. Be sure to observe the sun over an entire day when choosing the sunniest spot you can for growing vegetables. Cut around the edges of the planting bed box with a square-nose spade, move the box and then slice off the sod in the bed area.
190
THE COMPLETE GUIDE TO DIY GREENHOUSES
PLANT COMPATIBILITY
On a flat surface, assemble the panels and corner brackets (or hinge brackets) using the included hardware. Follow the kit instructions, making sure all corners are square.
VEGETABLE
LOVES
Asparagus
Tomatoes, parsley, basil
Beans (bush)
Beets, carrots, cucumbers, potatoes
Fennel, garlic, onions
Spring
Cabbage & broccoli
Beets, celery, corn, dill, onions, oregano, sage
Fennel, pole beans, strawberries, tomatoes
Spring
Cantaloupe
Corn
Potatoes
Early summer
Carrots
Chives, leaf lettuce, onion, parsley, peas, rosemary, sage, tomatoes
Dill
Early spring
Celery
Beans, cabbage, cauliflower, leeks, tomatoes
Early summer
Corn
Beans, cucumbers, peas, potatoes, pumpkins, squash
Spring
Cucumbers
Beans, cabbages, corn, peas, radishes
Aromatic herbs, potatoes
Early summer
Eggplant
Beans
Potatoes
Spring
Lettuce
Carrots, cucumbers, onions, radishes, strawberries
Onions & garlic
Beets, broccoli, cabbages, eggplant, lettuce, strawberries, tomatoes
Peas, beans
Early spring
Peas
Beans, carrots, corn, cucumbers, radishes, turnips
Chives, garlic, onions
Early spring
Potatoes
Beans, cabbage, corn, eggplant, peas
Cucumber, tomatoes, raspberries
Early spring
Pumpkins
Corn
Potatoes
Early summer
Radishes
Beans, beets, carrots, cucumbers, lettuce, peas, spinach, tomatoes
Squash
Radishes
Potatoes
Early summer
Tomatoes
Asparagus, basil, carrots, chive, garlic, onions, parsley
Cabbages, fennel, potatoes
Dependent on the variety
Turnips
Beans, peas
4
Set the bed box onto the installation site and check it for level. Add or remove soil as needed until it is level. Stake the box to the ground with the provided hardware. Add additional box kits on top of or next to the first box. Follow the manufacturer’s suggestion for connecting the modular units. Line the bed or beds with landscape fabric and fill with soil to within 2" or so of the top box.
DOES NOT GET ALONG WITH
PLANTING SEASON
Early spring
Early spring
Early spring
Early spring
GREENHOUSE COMPANION PROJECTS
191
RAISED PLANTING BED & COVER
Covered
¾" PVC pipe
Raised Planting Bed & Cover
R
aised planting beds solve a number of gardening challenges. A raised bed is much like a container garden in that it offers total control over the soil content and quality, without the worry of compaction from walking through the garden. Containment of the soil also prevents erosion, helps with weed encroachment, and improves water drainage. For many urban gardeners, a raised bed is the best—and often only—way to grow vegetables and other crop plants in tight spaces. Another advantage of a raised bed is that the frame around the bed provides a structure for adding covers to protect plants from cold, wind, and snow, or to erect netting to keep out pests. The simple cover frame shown here is much like a hoophouse
structure used by farmers to shelter rows of crops on a temporary basis. Ours is made with PVC pipe and is easy to disassemble for storage at the end of the season. The lightweight frame is perfect for a canopy of plastic sheeting (for warmth in colder weather), spun fleece (for insect protection), or deer netting (to deter deer or any other hungry critters). The raised bed frame is made with a single course of 2 × 10 lumber. You can use smaller lumber for a shallower bed, or go higher with more courses and taller corner posts. Unless your bed will be used strictly for ornamental plants (not food), don’t use pressure-treated lumber, due to the risk of chemical contamination. Instead, choose a naturally decay-resistant species such as all-heart redwood, cedar, cypress, or Douglas fir.
Uncovered
Filled with carefully prepared soil, a raised bed offers high yields in a relatively small space. This simple, inexpensive bed design includes wood cleats installed along its top edges—a handy feature for clamping down covers of all types.
2 × 10
2×4
4×4
TOOLS & MATERIALS Tape measure Hammer Circular saw Square or straightedge Drill and countersink bit and 3 ⁄16" twist bit Reciprocating saw or handsaw Hand sledge
192
THE COMPLETE GUIDE TO DIY GREENHOUSES
¾ × ¾" trim
Level Permanent marker Hacksaw or pipe cutter Eye and ear protection Work gloves (2) 10' 2 × 10 (1) 8' 2 × 10 Deck screws (3½", 1¼")
(1) 8' 4 × 4 (1) 8' 2 × 4 (1) 8' 1 × 4 (7) ¾"-dia. × 10' PVC pipe (6) 1½" #8 stainless-steel machine bolts and wing nuts Cover material (8 × 14') (12) spring clamps