001-036_02321_layout 12/28/10 4:56 PM Page 5
CONTENTS
Contents
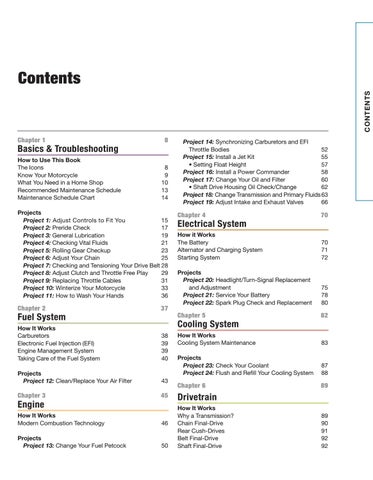
Chapter 1
8
Basics & Troubleshooting How to Use This Book The Icons Know Your Motorcycle What You Need in a Home Shop Recommended Maintenance Schedule Maintenance Schedule Chart
8 9 10 13 14
Projects Project 1: Adjust Controls to Fit You 15 Project 2: Preride Check 17 Project 3: General Lubrication 19 Project 4: Checking Vital Fluids 21 Project 5: Rolling Gear Checkup 23 Project 6: Adjust Your Chain 25 Project 7: Checking and Tensioning Your Drive Belt 28 Project 8: Adjust Clutch and Throttle Free Play 29 Project 9: Replacing Throttle Cables 31 Project 10: Winterize Your Motorcycle 33 Project 11: How to Wash Your Hands 36
Chapter 2
37
Fuel System
Project 14: Synchronizing Carburetors and EFI Throttle Bodies 52 Project 15: Install a Jet Kit 55 • Setting Float Height 57 Project 16: Install a Power Commander 58 Project 17: Change Your Oil and Filter 60 • Shaft Drive Housing Oil Check/Change 62 Project 18: Change Transmission and Primary Fluids 63 Project 19: Adjust Intake and Exhaust Valves 66
Chapter 4
70
Electrical System How it Works The Battery Alternator and Charging System Starting System
70 71 72
Projects Project 20: Headlight/Turn-Signal Replacement and Adjustment Project 21: Service Your Battery Project 22: Spark Plug Check and Replacement
75 78 80
Chapter 5
82
Cooling System
How It Works Carburetors Electronic Fuel Injection (EFI) Engine Management System Taking Care of the Fuel System
38 39 39 40
Projects Project 12: Clean/Replace Your Air Filter
43
Chapter 3
45
Engine How It Works Modern Combustion Technology
46
Projects Project 13: Change Your Fuel Petcock
50
Text
How It Works Cooling System Maintenance
83
Projects Project 23: Check Your Coolant Project 24: Flush and Refill Your Cooling System
87 88
Chapter 6
89
Drivetrain How It Works Why a Transmission? Chain Final-Drive Rear Cush-Drives Belt Final-Drive Shaft Final-Drive
89 90 91 92 92
Job:02321 Title:How To Repair Your Motorcycle (2007) Page:5
001-036_02321_layout 12/28/10 4:56 PM Page 6
Chapter 10
Projects Project 25: Chain and Sprocket Replacement Project 26: Drive Belt Replacement
94 98
Chapter 7
99
Suspension How It Works Springs & Dampers Shock Absorbers & Rear Suspensions Suspension Tuning
99 102 103
Projects Project 27: Measure Sag and Adjust Preload: Front 106 Project 28: Measure Sag and Adjust Preload: Rear 109 Project 29: Adjust Damping Settings 111 • Suspension Troubleshooting Symptoms 113 Project 30: Adjust Ride Height 114 • Lowering Cautions 116 Project 31: Change Your Fork Oil 117 Project 32: Change Fork Springs 120 Project 33: Install Aftermarket Shocks 122
Chapter 8
124
Frame
153
Brakes How it Works Hydraulic Brakes Why Hydraulics? Mechanical Drum Brakes How to Detect Worn Pads Brake Pads: How to Pick Mr. Right Warning Signs of the Need to Bleed Choosing the Right Brake Fluid Braided Brake Lines Aftermarket Brakes’ Advantages ABS and LBS
153 153 154 154 155 156 156 157 157 157
Projects Project 42: Caliper and Disc Service Project 43: Brake Pad Change • Brake Pad Break-In Project 44: Changing Hydraulic Fluid Project 45: Drum Brake Maintenance Project 46: Installing Stainless-Steel Brake Lines
159 161 161 163 165 169
Chapter 11
172
Exhaust
How it Works Steel vs. Aluminum Steel Tube Frames Pressed Steel Frames Aluminum Frames
124 124 126 126
Projects Project 34: Check Steering Head Bearings 128 Project 35: Repack or Replace Steering Head Bearings 130 Project 36: Swingarm Pivot Bearing Replacement 133
Chapter 9
135
Tires and Wheels How it Works Tire Construction Bias-Ply Construction Radial Construction Tire Choices, and How to Make Smart Ones Sidewall Hieroglyphics and How to Decipher Them Tires: Buy ’em Local or From the Web? The Great Mount & Balance Act: What to Expect Tire Pressure Aftermarket Wheels: Carbon Fiber, Magnesium and Aluminum! Oh, My! Caring for Bearings Projects Project 37: Check Tire Pressure Project 38: Flat Fix Project 39: Removing Wheels Project 40: Tire Change Project 41: Valve Stem Replacement
Text
135 135 136 136 137 138 138 138
How it Works Oxygen Sensor Aftermarket Exhausts
172 174
Projects Project 47: Installing a Slip-On Exhaust Project 48: Installing a Full Exhaust System
175 178
Chapter 12
182
Keeping It Clean How it Works Bike Wash 101 Polish and Wax Polishing Your Bike Beginners’ Detailing Tips
182 182 183 183
Projects Project 49: How to Touch Up Paint Scratches and Chips 185 Project 50: How to Clean Your Bike 189 Index
190
139 139
141 142 145 148 152
Job:02321 Title:How To Repair Your Motorcycle (2007) Page:6
INTRODUCTION
001-036_02321_layout 12/28/10 4:56 PM Page 7
Introduction
W
hen it comes to learning how to repair or maintain your motorcycle, everybody has to start somewhere. No one is born with a complete working knowledge of a motorcycle’s seemingly infinite complexities and peculiarities, no more than they’re born with a similar knowledge of all algorithms, the final digit of pi, or how cats purr. For the first quandary, How to Repair Your Motorcycle is a good place to start. Why? Largely because it was written as a ground-level entry into how a motorcycle’s various systems work. Selfishly, I also hoped that by writing this book it might also foster a deeper connection between you and your motorcycle, whether it was an intellectual one because of your greater understanding of how things work, or an emotional one because the book provided you with a measure of self-sufficiency. You’ll find far more technical, scholarly tomes available, and if after reading How to Repair Your Motorcycle they pique your interest, I heartily recommend them. They’ll further your understanding of what is, to many of us, a life’s work in progress. Of course, if there’s simply no connection, intellectual or emotional, between you and your motorcycle, then by all means save your money.
However you connect with your machine, this book will be of value to you because it offers a multitude of ways to keep your scoot in absolute A-1 running order and condition. Perhaps, in lieu of emotional or intellectual rewards, simply saving money will do. Whatever your reasons for picking up this book, it will function best as a companion to your bike’s service manual. How to Repair Your Motorcycle covers the generalities of procedure; the service manual covers the specifics. It’s not that all motorcycles are so terribly different. It’s just that each manufacturer has its own way of doing things (such as building motorcycles) and of wanting them done (such as maintenance and repair). As I mentioned earlier, my fondest hope for this book is that it helps make your motorcycle riding and ownership more complete and more enjoyable through better understanding. I also hope it helps you see that your motorcycle is an incredible technological marvel—compared to a family sedan, your bike is pure Space Shuttle tech. And, lastly, I hope this book makes owning, riding, and caring for your bike—essentially, the journey of really becoming a motorcyclist—as rich and rewarding as it has been for me.
7
Text
Job:02321 Title:How To Repair Your Motorcycle (2007) Page:7
001-036_02321_layout 12/28/10 4:56 PM Page 8
Chapter 1
Basics and Troubleshooting WARNING!
KEY CONCEPT
OLD SCHOOL TECH
MAINTENANCE TIP
TOMORROW’S TECH
MONEY-SAVING TIP
How to Use This Book The Icons Know Your Motorcycle What You Need in a Home Shop Recommended Maintenance Schedule Maintenance Schedule Chart Projects Project 1: Adjust Controls to Fit You Project 2: Preride Check Project 3: General Lubrication Project 4: Checking Vital Fluids Project 5: Rolling Gear Checkup Project 6: Adjust Your Chain Project 7: Checking and Tensioning Your Drive Belt Project 8: Adjust Clutch and Throttle Free Play Project 9: Replacing Throttle Cables Project 10: Winterize Your Motorcycle Project 11: How to Wash Your Hands
M
8
odern motorcycles’ sheer sophistication has given them near-telepathic handling, phenomenal speed, and mind-bending acceleration that enthralls riders with the merest whiff of throttle. Such sophistication and capabilities can intimidate new riders when it comes to the simplest of maintenance procedures. The fundamental purpose of this book is to assist such riders, as well as those returning to motorcycling, to learn how to maintain their bikes with a measure of confidence, rather than regard their two-wheeled rocket with the same uncomprehending gaze of a seagull staring at a Saturn V. As high-tech as today’s motorcycles are, they still have two wheels and tires, an engine and transmission, plus suspension, brake, and steering systems. If you can invest roughly half as much time as your nephew spends playing on his Wii, you’ll learn how each of your bike’s systems work, as well as how to diagnose and troubleshoot problems with each of those systems. No, this book won’t make you a master mechanic, but you’ll be able to communicate with two-wheel professionals and not sound like a rookie. Plus—should you choose to—you’ll be able to maintain, service, and repair many of these systems. Each chapter deals with a major system in depth, and the troubleshooting guides help you identify and confirm specific problems. If your motorcycle starts to behave differently, recognize that could be the start of something big—as in expensive to repair. Use your eyes, ears, nose, and hands to identify what’s happening, whether it’s
Text
potentially serious, what might be the cause, how to confirm the diagnosis, how to fix the problem—and whether to fix it yourself or take it to a pro. Hopefully this book will take the question marks out of motorcycle ownership. By using this book as a dynamic reference, you’ll know how to identify what might be wrong, what needs to be done to fix it, and how much it will cost. It might help to view this book as you would a savings account: Invest your time and energy toward understanding your motorcycle, and the return on that investment will not only be significant savings, but potentially far more fun. And in today’s world, we can certainly all use more of that.
The Icons This book uses six different icons to call attention to important parts of the text and to make it easier for you to find the information you need to get your motorcycle back on the road. The icons are as follows:
Warning! This is to alert you to dangerous chemicals or practices that you need to know about while doing a procedure.
Job:02321 Title:How To Repair Your Motorcycle (2007) Page:8
Old School Tech Technical information that concerns older bikes is flagged with this icon. If you are a bottom-line person, you can probably skip past this. If you are interested in history or have an older motorcycle, this information is for you.
Tomorrow’s Tech There is also information on emerging technologies. This probably won’t apply to your bike today, but it might down the road.
Key Concept Bottom-line explanations of how things work or how to fix things. If you want to quickly understand a system or process, turn to these.
Maintenance Tip Tips on maintaining your bike’s systems are marked with this icon. But you probably already figured that out.
is to perform (Talent), what tools and parts you’ll need, the benefit, and a relative cost rating, with one dollar sign roughly equaling $100. Note that a few of the projects are Harley-Davidsonspecific, as they apply particularly well to those motorcycles.
The Troubleshooting Charts These simple charts will give you some basic guidelines to follow if you have trouble with your motorcycle. These were put together to give you enough information to maybe try some simple fixes at home and, once you’ve done what most people can do at home, you can take it to your mechanic and have an idea what’s going wrong.
Know Your Motorcycle Before you get to start twirling wrenches around your bike, you might want to expend a little time and energy to get to know your bike—how it operates, what it needs in terms of maintenance, and how to deal with any problems that arise. The easiest way to find all this information is in the owner’s manual that comes with every new bike.
These tips deal with shifting your money from motorcycle maintenance to more worthy causes.
The Projects This book contains 50 projects that most mechanically minded people can do at home. Some are very simple and can be done by most anyone, while others are a little more complex. You’ll find step-by-step photographs of each, along with a chart that tells you how hard the task
Text
1
Money-Saving Tip
BASICS AND TROUBLESHOOTING
001-036_02321_layout 12/28/10 4:56 PM Page 9
Truth is, reading the owner’s manual is one of the most important things you can bring to the bike ownership experience. And it’s one of the best ways to throw a rope around the expenses associated with owning and maintaining a motorcycle. What’s more, the getting-to-know-you procedure is worthwhile, whether it’s your first motorcycle or your 101st. Almost every manufacturer has its own design conventions—or idiosyncratic quirks—such as Honda’s insistence on using a dipstick to check engine oil level after other makers had gone to the arguably more convenient sight glass. Overall, though, for the most basic information—tire pressures; maximum weight capacity; location of important items, such as fluid reservoirs, suspension adjustments, the toolkit, etc.; how to fix a flat—the owner’s manual provides you with almost every piece of information you’ll need to be a happy owner. In addition to all the useful operating tips to help you get the most from your motorcycle, this little bible also covers all the maintenance requirements and intervals, identifies other owner-accessible components, and explains the myriad warning lights and what you should do if they come on while you’re riding. What’s more, the manual can give you crucial detail information into many of the procedures presented here,
Job:02321 Title:How To Repair Your Motorcycle (2007) Page:9
9
001-036_02321_layout 12/28/10 4:57 PM Page 23
Y
our brakes, suspension, and tires keep you on the road and deserve extra attention. You should make a rolling-gear inspection at least once a week. Begin your brake check by looking at all the pads. To view the pads, try using a flashlight to sight along the disc. Some people resort to removing the calipers or covers. You want to look at the pads on both sides of the caliper. While you’re down on your hands and knees, give the rubber brake and clutch lines a quick flex to see if they’re beginning to crack. You can use this low-angle view of your bike to make a couple of other quick inspections. While manufacturers do a good job of protecting the delicate parts of the fork, the sliders occasionally get
TOOLS:
Flashlight and optional front/rear stands
TALENT:
1
COST:
None
PARTS:
None
TIP:
Make this part of your weekly routine and you’ll minimize surprises
BENEFIT: Knowing the exact
condition of your brakes and tires can help keep you from getting in over your head
dinged. Over time, the rough part on the slider will eat away at the fork’s seal, leading to fork oil seepage. In its most minor form, a weeping fork seal is nothing more than a messy nuisance, but it can quickly develop into a hazardous mess—particularly in the traditional fork arrangement, where the oil can contaminate the brake disc surface and brake pads. The shock can also develop its own leaks. A quick glance at the shock shaft with a flashlight will reveal whether it’s time for a rebuild. The final stop in the tour of your bike’s rolling gear is the tires. You can make a complete inspection by rolling the bike forward a couple of feet at a time. You’re looking for any foreign objects that may be lodged in the tire. If you If you’re going to get a glimpse of the brake pads, don’t be afraid to get personal with your tires. You need a minimum pad material of 2 to 3 mm. If you’ve let the pads get down to 1 mm, you’re skating on dangerously thin ice. Once they arrive at the bitter end, brake pads have difficulty shedding heat and may fade on you when you need them most. Have the pads worn evenly? If not, you may have a problem with the caliper. If you see any fluid seepage around the calipers, one of the pistons may need its seals replaced. Don’t forget to check the rear brake pads, too.
Text
Job:02321 Title:How To Repair Your Motorcycle (2007) Page:23
5
Rolling Gear Checkup
2 minutes
ROLLING GEAR CHECKUP
Project 5
TIME:
001-036_02321_layout 12/28/10 4:57 PM Page 24
Wide rear wheels make the task of checking the pads a bit difficult. Get
Give the rubber portions of the hydraulic lines a bend to see if they’re still
creative with your viewing angle.
flexible. If you notice any cracks, consider replacing them with shiny new
ROLLING GEAR CHECKUP
5
braided stainless-steel ones.
find something, carefully pull it out. Check to see if the hole is leaking by rubbing a little saliva or soapy water over the opening. If it bubbles, repair or replace the tire. If it doesn’t bubble, check the tire before each ride to see if it’s losing air. You may also find cuts in the tread caused by running over road debris. Closely inspect the depth of the slice to make sure it doesn’t go deep enough to expose the cords. Slices on the sidewall are particularly dangerous. If you have any, have a professional look at the tire. Finally, look inside the tread grooves, or sipes, at the “wear bars” crossing through them. The tread depth is acceptable only when the wear bars lie below the tread surface. As soon as the bars start to wear, the tread is too shallow to provide adequate traction and channel water out from under the bike to avoid hydroplaning.
A new, just-scuffed-in tire will look like this. Note how deep into the sipe the wear bar lives.
While you try to find the wear bar, consider why this tire was on an F3 in a salvage yard. The center of the tread is worn down to the bottom of the sipes, giving the tire a square profile that could unsettle the bike when leaned over. Even a tire with adequate tread may have diminished grip if the tire is many years old, such that the rubber has hardened. Dry rot— small cracks—can also weaken a tire, particularly when combined with
24
underinflation. If you ride two-up, be even more critical of wear and damage and err on the side of caution. Extra weight means extra stress—and that’s two lives the tires are supporting.
Text
Job:02321 Title:How To Repair Your Motorcycle (2007) Page:24
037-081_02321_layout 12/28/10 5:13 PM Page 75
A
motorcycle’s headlight not only allows you to see, it helps others to see you—even in daylight. The Motorcycle Safety Foundation recommends that riders use the high beam during daylight riding. If you discover that your headlight isn’t working on high or low beam, check that the bulb is properly seated in its plug. On some bikes you may have to remove bodywork to get in there. With others you only need to peel off the detachable rubber dust seal. To check the bulb, you don’t have to remove it completely unless you are con-
TOOLS:
Screwdrivers, possibly sockets, continuity tester, tape measure, dielectric grease, a willing assistant
TALENT:
1
COST:
$
PARTS:
Headlight or turn-signal bulb(s)
TIP:
Adjusting your headlight for the load you’re carrying will enable you to actually see where you’re going after dark
BENEFIT: You will make yourself
more visible to other road users
ducting a visual inspection. A bulb that appears to be normal may have an internal problem—which a continuity tester will reveal. Remove the plug to expose the prongs on the back of the bulb. Using a continuity tester, press one electrode onto two of the prongs extending from the back of the bulb. Now, touch the other probe to one of the remaining prongs. Repeat with the two other possible pairings. If you don’t get continuity on at least two pairs of the prongs, the bulb is bad. If you get continuity on both filaments, you Inspect the bulb’s connectors for signs of moisture or corrosion. The tabs sticking out of the side of this headlight bulb key it into the proper position in the housing.
Text
Job:02321 Title:How To Repair Your Motorcycle (2007) Page:75
20
Headlight/ Turn-Signal Replacement and Adjustment
30 minutes
HEADLIGHT/TURN-SIGNAL REPLACEMENT AND ADJUSTMENT
Project 20
TIME:
037-081_02321_layout 12/28/10 5:13 PM Page 76
Note how the tester’s probe is being held against the side of this turn-signal bulb. This is where it makes the negative contact with the socket. The buttons on the bottom are the positive contacts for the filaments. If the bulb is OK, clean the contacts before reinstalling it.
Turn-signal bulbs either pop out easily or they take some elbow grease. If you find yourself exerting more than minimal effort, use a rag or a pair of gloves to protect yourself from acci-
20
dental bulb breakage. If the socket is corroded, a dab of dielectric grease will prevent the
HEADLIGHT/TURN-SIGNAL REPLACEMENT AND ADJUSTMENT
parts from sticking in the future.
76
may have a blown headlight fuse or a short somewhere in the electrical system. Also check the plug for corrosion. If you need a new headlight, be sure to replace a blown bulb with a similar type. The bulbs are keyed so that they will only fit in the housing in the proper orientation. Avoid touching the bulb itself with your bare fingers. Check to make sure the light works before completely assembling the housing. Make sure the rubber cover is snugly in place over the headlight housing. The process of checking a dual-filament bulb, like a front-turn-signal or brake-light bulb, is almost identical to the headlight. Remove the bulb from the turn-signal stalk. If you have trouble removing the bulb, use a rag or gloves to get a safer grip on the glass. Bulbs that have
Text
corroded into position may break before you’re able to remove them. If this happens, a little WD-40 and needlenose pliers will help. Then clean up the corrosion to get good contacts before fitting the new bulb. Hold one probe of the continuity tester on the outside metal edge of the bulb. Now, check the continuity on each of the two little buttons on the bottom of the bulb. Again, don’t trust a visual inspection unless it shows an obviously blown filament. Before you screw the cover back on, check to be sure the new bulb works. Many riders never consider the load a bike carries and its effect on the headlight aim. Yes, the headlight angle is set at the factory, but it is set based on some average—the age-old compromise. What if you’re
Job:02321 Title:How To Repair Your Motorcycle (2007) Page:76
124-152_02321_layout 12/28/10 6:18 PM Page 152
TIME:
30 minutes
TOOLS:
Valve stem tool, openend wrenches, pliers, contact cleaner or organic cleaner, nonhardening silicone sealer
TALENT:
1
COST:
$
PARTS:
Metal valve stems
TIP:
Angled valve stems can ease tire inflation with some bikes
Project 41
Valve Stem Replacement
BENEFIT: Tires that don’t lose pres-
VALVE STEM REPLACEMENT
41
sure at high speeds
With the tires off your wheels, begin by simply pulling the rubber valve
Once you’re satisfied with the location, remove the stem and apply non-
stem out of the wheel. Clean the mounting surface with contact cleaner
hardening silicone to the inner surface of the stem where it will contact
or your favorite nontoxic cleaner. After drying the wheel’s orifice, check
the inside of the wheel. Similarly, apply a small amount to the gasket
for proper fit of the new valve stem, particularly angled ones.
that will be held in place by the exterior washer and nut. Insert the stem and rotate it into position. Snug the nut down finger tight. Use an open-
An angled valve stem can
end wrench to finish the tightening, but not so tight as to distort the deli-
make the job of checking
cate threads on the stem. Wipe off the excess sealant, and you’re ready
air pressure easier.
to mount your tires. Once the tires are inflated, spread a soapy water solution around the base of the valve stem to make sure that the seal is
C
onsider how the valve actually works inside the stem. The air chuck presses the valve down toward the tire to allow air to flow. Let your mind wander a bit further to what happens to your wheel as you travel at the hypersonic velocities of which your sportbike is capable. The centrifugal forces want to fling the wheel components toward the outside of the wheel. The forces of high-speed riding could, conceivably, force the valve into releasing pressure. Metal valve stem assemblies usually sport a metal cap with a rubber O-ring to help
Text
airtight. Now, you can break the sound barrier without worrying about your valve stems letting you down.
seal the valve closed, thus preventing high-speed air loss. Even though this scenario is unlikely—and applicable only to track-speed riding—swapping out your rubber stems for metal ones also ensures that dry rot never strikes them, and allows you to fit bent stems if that would make access, and regular inflation maintenance, easier.
Job:02321 Title:How To Repair Your Motorcycle (2007) Page:152
153-192_02321_layout 12/28/10 6:46 PM Page 153
How it Works Hydraulic Brakes Why Hydraulics? Mechanical Drum Brakes How to Detect Worn Pads Brake Pads: How to Pick Mr. Right Warning Signs of the Need to Bleed Choosing the Right Brake Fluid Braided Brake Lines Aftermarket Brakes’ Advantages ABS and LBS
Chapter 10
Brakes WARNING!
KEY CONCEPT
OLD SCHOOL TECH
MAINTENANCE TIP
TOMORROW’S TECH
MONEY-SAVING TIP
Projects Project 42: Service Caliper and Disc Project 43: Brake Pad Change • Brake Pad Break-In Project 44: Changing Hydraulic Fluid Project 45: Drum Brake Maintenance Project 46: Stainless-Steel Brake Line Installation
W
hen it comes to brakes, it seems too many motorcyclists tend to reflect the view of famous carmaker Ettore Bugatti, who responded to criticism of his cars’ lack of braking ability with the line, “I build my cars to go, not stop.” Considered rationally, though, the brake system on your motorcycle has to work properly and stop you quickly and safely every single time you need it to, or you will be in a world of hurt. How do they work? Think of the brake assembly on each wheel as a small engine, but in reverse. Your bike’s powerplant converts fuel’s energy into heat by combustion, and then converts that heat into mechanical work to propel the bike, right? Well, each brake assembly is an engine that just happens to work backward—so to speak—through friction. The brakes convert the energy of motion into heat, and dissipate that heat into the atmosphere.
Hydraulic Brakes Honda’s revolutionary CB750 was the first mass-produced motorcycle to have a hydraulic disc brake, a single-rotor unit on the front wheel. Such a system remains the foundation of brake technology on today’s motorcycles. Even with the application of anti-lock brakes (ABS), and/or linked brakes, the fundamental basics of hydraulic brake systems have not changed over the decades.
Text
FORK
BRAKE LINE
ROTOR
BLEEDER VALVE
CALIPER BRAKE PADS
PISTONS
Why Hydraulics? Physics says a fundamental property of liquids—in this case hydraulic fluid or oil—is that they are not compressible. When you apply pressure to the brake lever or pedal, a mechanical linkage moves a pushrod in the master cylinder (which is filled with hydraulic fluid) that forces a piston down the bore of that cylinder. The piston’s movement generates hydraulic pressure, which is transmitted through an interconnected series of brake lines to the individual brake assembly at each wheel. The
Job:02321 Title:How To Repair Your Motorcycle (2007) Page:153
153