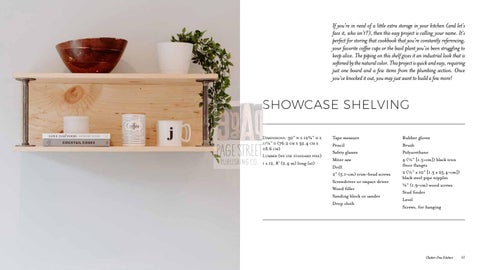
If you’re in need of a little extra storage in your kitchen (and let’s face it, who isn’t?), then this easy project is calling your name. It’s perfect for storing that cookbook that you’re constantly referencing, your favorite coffee cups or the basil plant you’ve been struggling to keep alive. The piping on this shelf gives it an industrial look that is softened by the natural color. This project is quick and easy, requiring just one board and a few items from the plumbing section. Once you’ve knocked it out, you may just want to build a few more!
SHOWCASE SHELVING Dimensions: 30" w x 12¾" h x 11¼" d (76.2 cm x 32.4 cm x 28.6 cm) Lumber (we use standard pine) 1 x 12, 8' (2.4 m) long (x1)
Tape measure Pencil Safety glasses Miter saw Drill 2" (5.1-cm) trim-head screws Screwdriver or impact driver Wood filler Sanding block or sander Drop cloth
Rubber gloves Brush Polyurethane 4 (½" [1.3-cm]) black iron floor flanges 2 (½" x 10" [1.3 x 25.4-cm]) black steel pipe nipples ¾" (1.9-cm) wood screws Stud finder Level Screws, for hanging
Clutter-Free Kitchen 41
Chapter 2
CLUTTER-FREE KITCHEN The kitchen is the heart of the home and its natural gathering place. You could have the most spacious, beautiful living room, but host a party and you’ll quickly notice everyone eventually makes their way into the kitchen. We kept this in mind when designing pieces for this chapter. We wanted to create functional organization as well as an inviting area for everybody to come together. The biggest project in this chapter is the Oasis Kitchen Island (page 47). To keep this project suitable for beginners, we nixed the traditional cabinetry in favor of open storage. You still get the additional counter space and can store some fun, colorful accessories on the bottom. This adjustment makes it possible for this to be a oneday, easy DIY project. The towel bar gives it a little extra character and adds to the functionality. Once completed, you’ll wonder how you ever lived without an island in your kitchen! Another standout piece in this chapter is the Napa Valley Wine Rack (page 59). We designed this to store several bottles of wine, obvi, but we also decided to take it a step further with additional storage on top for your glassware, corkscrew and decanter. We round out the kitchen builds with a new barstool (page 53). Once you start building this, you’ll realize that you need at least three more! Lucky for you, the simple design makes it a quick project.
39
STEP 1
STEP 2
STEP 5
Grab your tape measure and pencil and mark off the cuts of lumber you’ll need for this project as described below. Make sure to put on your safety glasses and use your miter saw to make the necessary cuts. If you don’t have a miter saw, many larger home improvement stores will cut the pieces for you.
Take your 1 x 4 pieces and lay them out in a figure eight pattern so that your three 25½" (64.8-cm) pieces are spread evenly between your two 47¼" (1.2-m) pieces. There should be 22½" (57.2 cm) of space between each 25½" (64.8-cm) piece.
Lay your three 1 x 10 pieces across the top of your framework so there is 3⁄8" (1 cm) of overhang on each of the four sides.
Cut the 2 x 12 into two 45¾" (1.2-m)-long pieces. Cut the 1 x 10 into three 48" (1.2-m)-long pieces. Cut the 2 x 4s into four 35¼" (89.5-cm)-long pieces and two 22½" (57.2-cm)-long pieces. Cut the 1 x 4s into two 47¼" (1.2-m)-long pieces and three 25½" (64.8-cm)-long pieces.
1
STEP 3
Predrill two holes about 2½" (6 cm) apart into each 47¼" (1.2-m) piece wherever it meets a 25½" (64.8-cm) piece (twelve holes total). Secure the figure eight framework together with a 2" (5.1-cm) trim-head screw in each predrilled hole. STEP 4
Spread a small bead of wood glue (about 1⁄8" [3 mm] wide) around the top edge of your framework. Be careful about putting too much on; you don’t want it running down the sides.
2
5
STEP 6
Predrill six holes (two at each end of the board and two in the middle) into each 1 x 10 where it matches up with the 1 x 4 framework underneath. Place a trim-head screw in each predrilled hole to secure the boards to your framework. 6
STEP 7
Flip your framework over so the figure 8 side is facing up. Place a 35¼" (89.5-cm) piece of 2 x 4 in each corner. The 2" (5.1-cm) side of the 2 x 4 should line up with the 25½" (64.8-cm) side and the 4" (10.2-cm) side should line up with the 47¼" (1.2-m) side. These will be the legs of your island. Secure the legs to your framework by putting four trim-head screws through the framework into each leg (two on each side).
7
STEP 8
3
48 One-Day DIY: Modern Farmhouse Furniture
4
Turn your island back over so it’s standing upright. Take your two 22½" (57.2-cm) pieces of 2 x 4 and place them in between your island legs at each end. They should be placed 4" (10.2 cm) up from the ground. Secure these pieces to your island legs with your trim-head screws (four screws in each piece, two per side spaced about 2½" [6 cm] apart).
8
Clutter-Free Kitchen 49
Wine. Who doesn’t love it? Well, JP doesn’t love it, but he says toasting marshmallows instead of roasting marshmallows, so his opinion doesn’t count. From the perfect food pairing to fueling a good girl’s night, wine is as versatile as it is abundant. The United States produces hundreds of millions of gallons of wine each year! Given this info, it’s likely that you have a few extra bottles (or six, in this case) on hand in your home. We have designed a perfect place to store them, as well as your glassware and decanter. Read on and get excited to display everything from your two-buck chuck to that extra special bottle you’ve been saving!
NAPA VALLEY WINE RACK Dimensions: 26¼" w x 11¼" h x 12" d (66.7 cm x 28.6 cm x 30.5 cm) Lumber (we use standard pine) 1 x 12, 8' (2.4 m) long (x1) 1 x 2, 4' (1.2 m) long (x1) 1 x 1, 3' (91.4 cm) long (x2)
Tape measure Pencil Safety glasses Miter saw Drill 1¼" (3.2-cm) trim-head screws Screwdriver or impact driver Wood filler (to match your stain color)
Sanding block or sander Drop cloth Rubber gloves Rag Stain Brush Polyurethane Stud finder Level Screws, for hanging
Clutter-Free Kitchen 59
STEP 1
STEP 2
Grab your tape measure and pencil and mark off the cuts of lumber you’ll need for this project as described below. Make sure to put on your safety glasses and use your miter saw to make the necessary cuts. If you don’t have a miter saw, many larger home improvement stores will cut the pieces for you.
Arrange your two pieces of 2 x 2 side by side with enough room to place one 2 x 6 in between them at the top and another at the bottom. Place the last piece of 2 x 6 in the middle so the three 2 x 6s are evenly spaced; it should look like a giant “8”.
Cut the 1 x 3s into two 37" (94-cm)-long pieces and two 58" (1.5-m)-long pieces. Cut the 1 x 10s into four 56½" (1.4-m)-long pieces.
4
5
6
7
STEP 3
Predrill six holes down the side of each 2 x 2 so that two holes go into each 2 x 6. Secure this framework together using your 2" (5.1-cm) trimhead screws.
Cut the 2 x 2 into two 56½" (1.4-m)-long pieces. Cut the 2 x 6 into three 34" (86.4-cm)-long pieces.
1
2
STEP 4
STEP 6
Spread wood glue around your framework so it covers the top of your 2 x 2s and 2 x 6s. You don’t need to glop it on, just a bead about 1⁄8" (3 mm) wide will do. Now take your four 1 x 10s and lay them flush across the top of your framework so that it’s completely covered.
Flip your tabletop over so the underside is facing up. Make a complete border around your tabletop with your 1 x 3s.
STEP 5 3
68 One-Day DIY: Modern Farmhouse Furniture
Predrill four holes about 1½" (4 cm) deep in a square pattern through each 1 x 10 to match up with each of the three 2 x 6s underneath (twelve holes total). Predrill another six evenly spaced holes about 1½" (4 cm) deep down each 58" (1.5-m) side of your table into the the 2 x 2s underneath. Secure your 1 x 10s to the framework using your trim-head screws.
STEP 7
Predrill six holes down each 57" (1.5-m) side border piece and four holes down each 37" (94-cm) end border piece, about 9" (23 cm) apart. Secure your border to the framework with your trim-head screws.
Simply Stylish Dining Room 69