
Tenant OBSI Training Manual Project Discipline Contractor Document Rev International Tower Sydney Open System Integration (OBSI) Oberix Group BIOZIM0400026 003
Revision
01
Mitchell
Tenancy Training Manual – Accessing the OBSI, Altering a Tenant’s OBSI login, Viewing Services, Viewing Trend Logs, Viewing Meter Displays and Trend logs in Optergy, Creating AHAC schedules, Viewing AHAC schedules, Reporting
The scope of this project is for Basement, C3 Tower, C4 Tower and C5 Tower of Barangaroo South, or also known as International Towers Sydney.
The OBSI package is an acronym for Open Building System Integration. It is the bringing together of multiple traditional trade services.
The consolidated integration of these systems into a single platform allows for the information from each of these services to be visualised, analysed and acted on through a single web browser based system. The actions taken can also be automated via the use of workflows to streamline building
The OBSI is designed to integrate the following ELV systems across the basement and three commercial towers:
- Building Management Control System (BMCS)
- Energy Management System (EMS)
- Electronic Access Control System (EACS)
- Closed Circuit Television (CCTV)
- General Lighting and Emergency/Exit Lighting
To login into the OBSI system, enter the following web URL into the browser (preferably Google Chrome) obsi.sydney
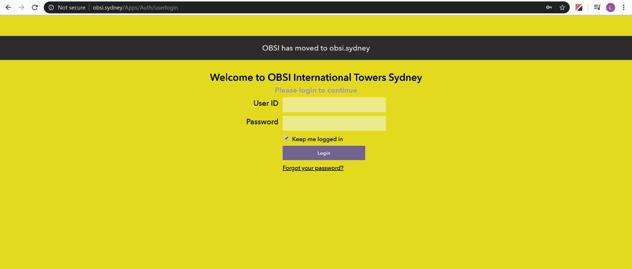
NOTE: Please do not place “.com” behind the above-mentioned URL


NOTE: Contact JLL Operation Team for required VPN login details.
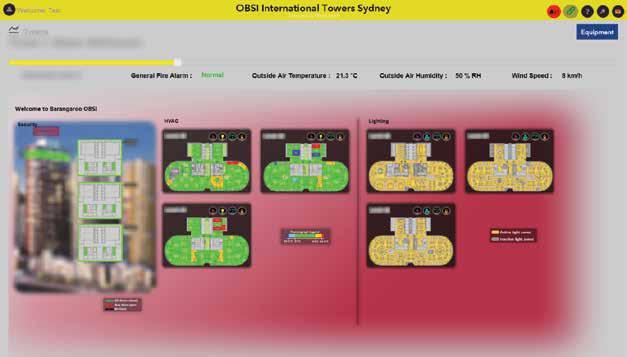
Once successfully logged in, the user will land on either their ‘Dashboard’ or ‘Landing Page’, depending on which they prefer (please see the below ‘Landing Page’ example):
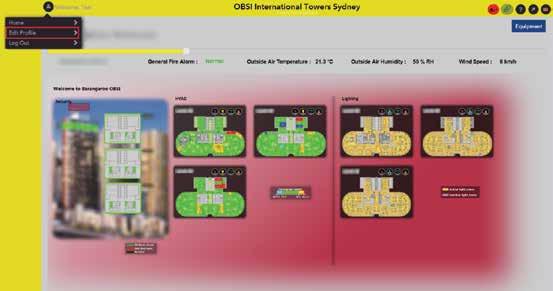
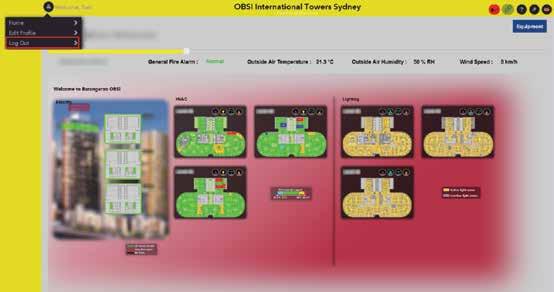
To logout of the system from any page, select the “User” icon at the top left side of the page,



One can change their password themselves from any screen by simply clicking the “User” icon in the top left-hand corner and selecting “Edit Profile” from the drop-down menu.
This will land on the ‘User Profile’ settings page. Ensure that you select the ‘Security’ tab at the top of the page, and then click on ‘Change your Password’ on the far right of the page:

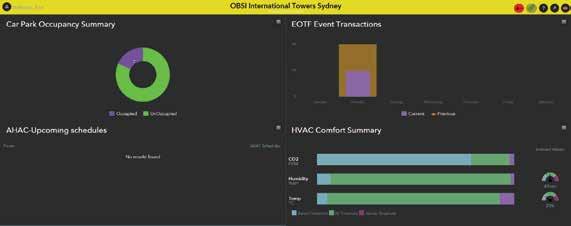
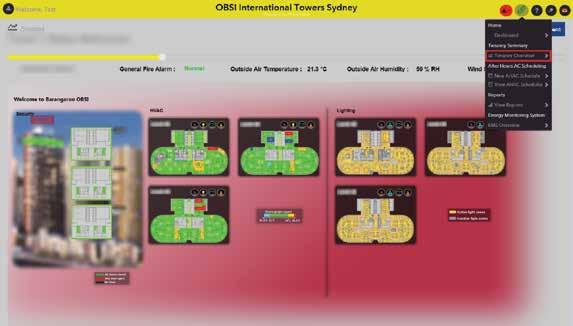
To traverse through the ‘Dashboard’ screen - simply click the ‘Dashboard’ link in the quick-link menu:
NOTE: All Dashboards are preconfigured per user profile by the JLL Operational Team.

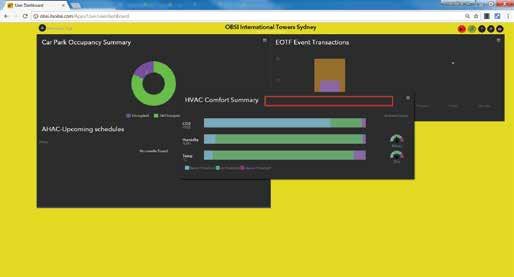
Each weblet has its own filter that is set to only display data pertaining to the tenant’s equipment or location.

Weblets can be rearranged in position by clicking on the top part of the weblet and dragging it to a newer location (the area has been highlighted with a red bovx below):


The tenant landing page will be the first page seen on login; however, this can also be arrived at by clicking the ‘Tenancy Overview’ link in the quick link menu. Landing pages are produced according to the number of levels occupied by a tenant. The examples of multi-level and single-level tenants are provided below:
Multi-Level Tenant
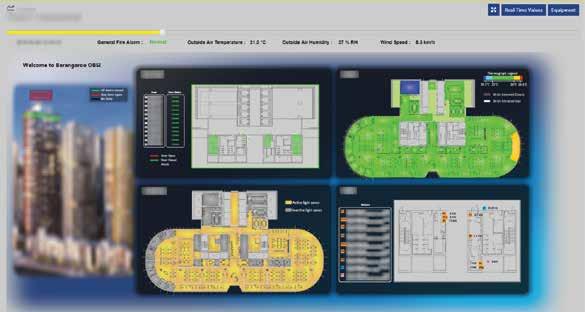

Note: Levels with multiple tenants will be able to view the ‘single-level’ tenant overview, however all asset real-time data and control pertinent to that single-level tenancy will be hidden from them.
The tenant landing page either consists of, or provides links to four of the most common services related to a tenancy – HVAC, Security, Lighting and EMS.
To navigate to each service, you simply need to click on the service that you would like to view in more detail, or alternatively click on the small circular icons (on the left in the image below) used for lighting, HVAC, security or EMS.

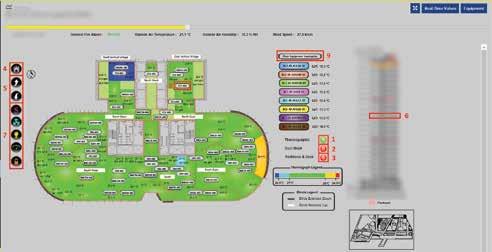
The “Floor Layout HVAC” page presents the user with an overview of the floor zone temperatures, humidity levels, CO2 levels and blind status’ as shown in the figure below.
The user can display/hide thermographs (#1), duct work (#2) and partitions/desks (#3) on the graphic.
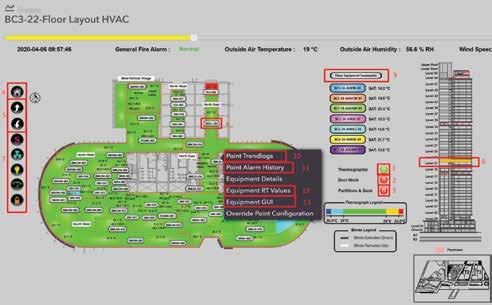
From the floor layout graphic for each service, the user can navigate to the home (#4), down or up a level (#5) or to a specific level (#6). Quick links on the left-hand side of the screen (#7) can be used to navigate to other services on the same level.
To view a specific piece of equipment, the user can click on the equipment button on the floor layout (#8) or right-click on the point and select “Equipment GUI button” (#13), ref. section 4.2.1
To view equipment summaries, the user can click on the “Floor Equipment Summaries” button (#9), ref. section 4.2.2
To view a point trendlog, the user can right-click on the point and select “Point Trendlogs” button (#10) ref. section 4.2.3
To view a point alarm history, the user can right-click on the point and select “Point Alarm History” button (#11) ref. section 4.2.4
NOTE: Button (#8), (#12) and (#13) is only available for fit-out and integrated equipment and not available for base building equipment.

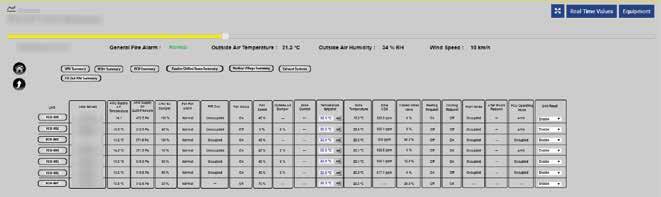
The user can view critical parameters for a chosen piece of equipment from this page. To view trend logs for trended points within the equipment, click on the equipment name at the top-left of the page.
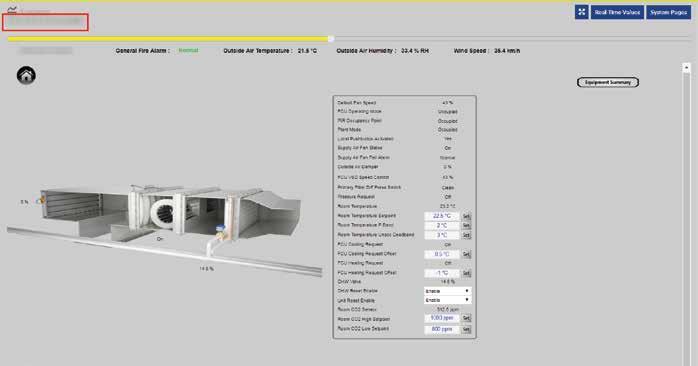
From the trend log page, the user can view the trend over a specific date range selected via the filter icon.
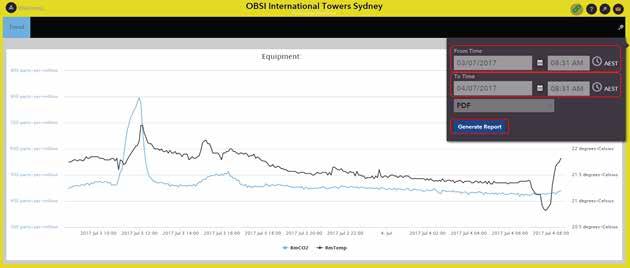
The data from trend logs can be exported in PDF, Word, Excel and ExcelRaw formats by clicking on the “Generate Report” button.


Equipment summary tables have been created to view specific predefined data for groups of equipment relevant to a tenancy. All equipment or pages not pertinent to a tenant will either be restricted or hidden.
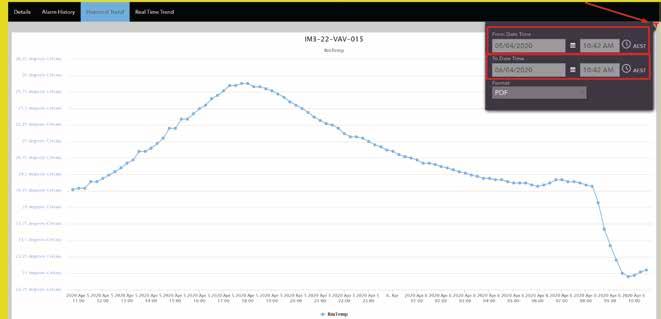
Point Trendlog allows the user to view all trends of the chosen point in the past. User can specify the time length over which the trends need to be visible, by clicking the red filter button on the top right corner of the screen. The user can then proceed to changing the time range in the “From Date Time” and “To Date Time” fields as shown in the image below:
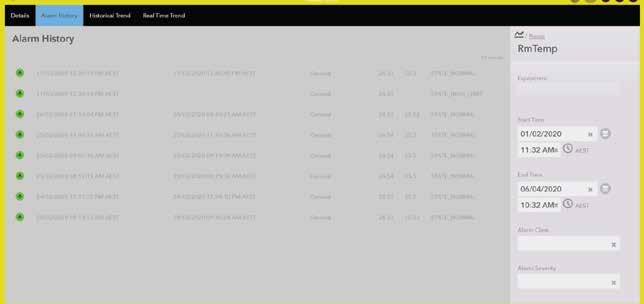
Point Alarm History allows the user to view all the alarms for that point over a specified time period.




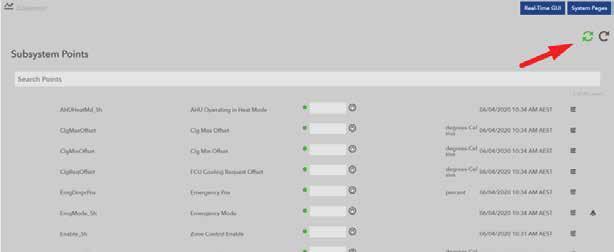
Equipment Real Time Value Page allows user to view the all the points associated with a particular equipment. Please be reminded to toggle the green refresh button to view the most up to date point values as shown below:
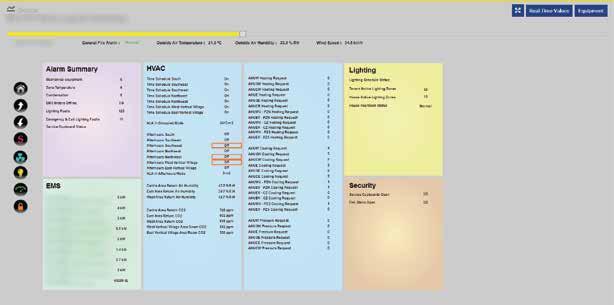
The “Floor Layout Summary” page shows an Alarm Summary as well as a summary of each system on a per-floor basis. You can click on any of these coloured boxes and they will link you to the associated system of that level.

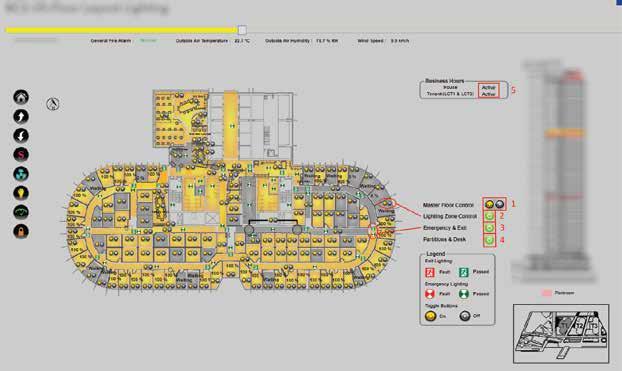
The “Floor Layout Lighting” page presents the users with the status and control of all lighting points associated with their tenancy, such as the on/off status and brightness value of individual lighting points. This page’s functionality includes:
1
A master button to turn off all lights on the floor (#1).
NOTE: that you will be prompted with a safety ‘comment box’ to ensure this doesn’t get clicked by accident. Also, should there be anyone still on the floor, safety procedures will be in place to turn lights on if movement is detected.
Control via individual buttons (#2) for individual lighting points.
Display of emergency and exit lights and their physical locations (#3)
Partition and desk schematic overlay (#4)
A display to highlight whether ‘Business Hours’ (a procedure that locks lights ‘On’ during the day after the first activation of these lights once Business Hours has
NOTE: that the ‘Business Hours’ times are determined by Property Management – JLL.
The “Floor Layout EMS” page presents the user with an overview of floor utility metering as shown in the figure below. The user can click on each meter by clicking on either (#1) or (#2) to view additional parameters of the meter in the energy management portal - Optergy. The user can also view Electrical, Hydraulic and
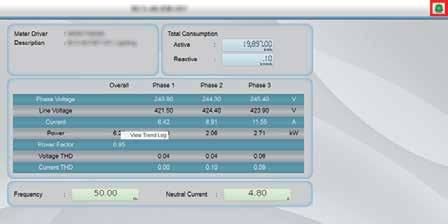
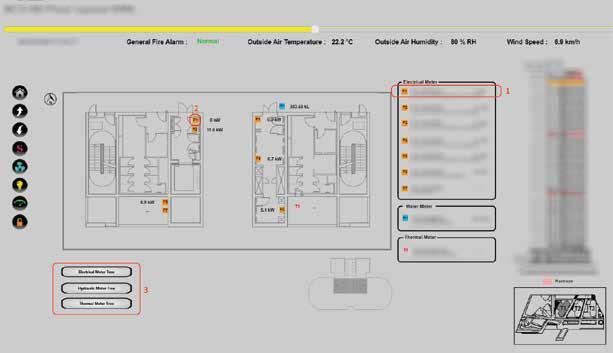

Clicking on each meter will navigate the user to the meter display in Optergy. The indicator in top right-hand corner displays whether this meter is online (green icon), offline (red icon) or disabled (grey icon).
Right-click and select “View Trend Log” as shown above, to view trend logs for the selected parameter, as shown below.

At the bottom of the screen, there are options to display a rolling average (not available for Binary Trendlogs), altering the intervals between data points, showing minimum and maxmum values as well as placing targets on the graph.
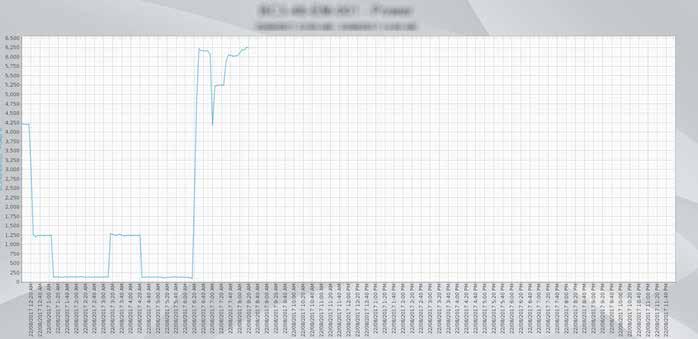
On the left-hand side of the screen options are provided to return to the previous screen, change the time scale, export as PDF or csv, and obtain a link for the image shown on screen.


The “Floor Layout Security” page presents the user with the status of each door on the floor as Open, Closed or Alarm.
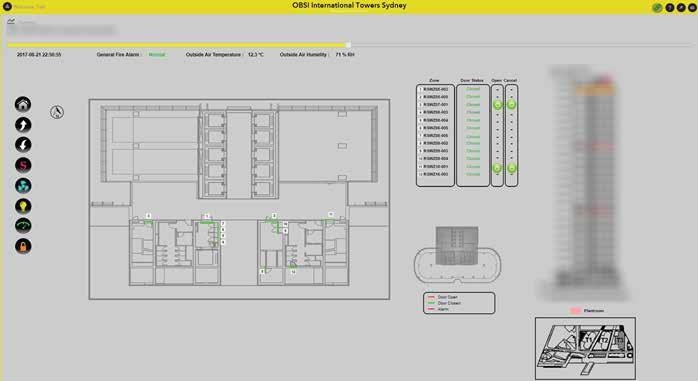
The Door Status allows the users to view the status of security doors.

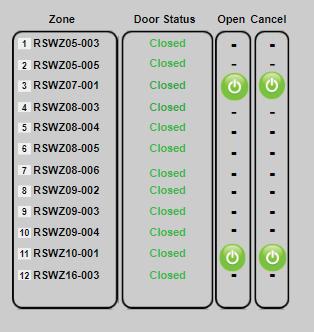

NOTE: Users are not allowed to open/lock doors on OBSI.
•
The scope of this workflow is to provide an interface to tenant users such that they can efficiently schedule AC equipment to run during non-working hours without the dependency on email/ phone-based requests.
• •
Based on the schedules created, the A/C equipment automatically turns on and off as controlled by the OBSI.
Tenant OBSI How-To Training Manual BIOZIM0400027 – (Rev 003) – 29/09/2022
•
The OBSI also employs a predefined formula to estimate the costs for
To create an AHAC schedule, please do the following:
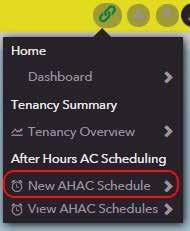
Click the chain icon from the homepage
From the menu shown below, select “New AHAC Schedule”.
5
When registering a new After-Hours A/C Schedule, fill-in the details and click “Create”.
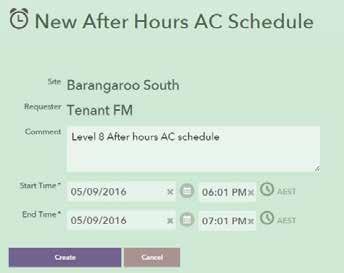
The request is now saved.
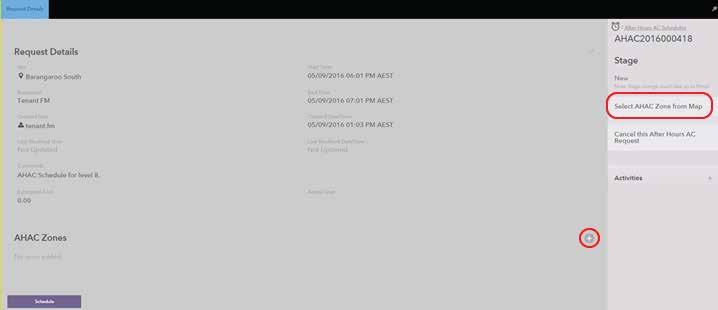
After creating the schedule as above, the AHAC zones can now be added by: Clicking the sign in the AHAC section of the page (please go to step 5)
By clicking “Select AHAC Zone from Map” from the ‘Request Details’ screen (please proceed to step 6)
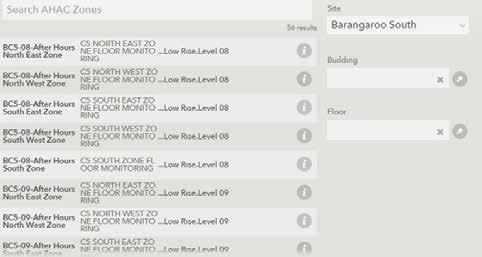
The screen below is displayed to select a zone for the AHAC request, based on the Site, Building and Floor. This can be accessed by clicking the sign on the screen shown earlier.



Click on the desired zone and it will be added in the list of zones for the AHAC request. Please proceed to Step 8.
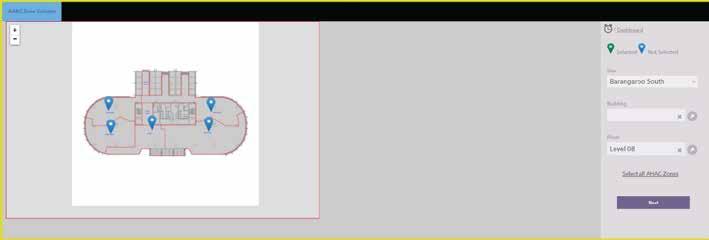
Display a map by selecting Site, Building and Floor. By default, all AHAC zones are not selected.
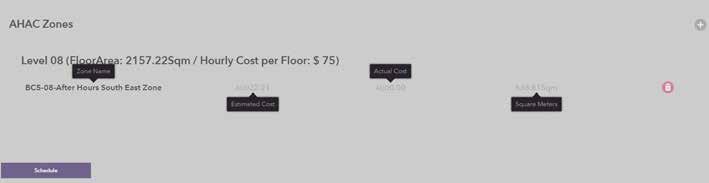
a.

To select all zones, click on “Select all AHAC zones”. To select/unselect a particular zone, please click on the marker for the zone to toggle selection. A green marker implies that the AHAC zone has been selected, otherwise blue by default (e.g. ‘unselected’).
Click “Next” to add the marked zones in the AHAC request.7
Click “Schedule” to schedule the AHAC request on the Request Details screen.
The stages of an AHAC schedule are:
New – The initial stage of a request

•
Scheduled – When the request has been scheduled (‘Schedule’ button below the AHAC zones list has been clicked)
In Progress – The request is currently running as scheduled
Completed – The request ran and has been completed
Cancelled – The request has been cancelled
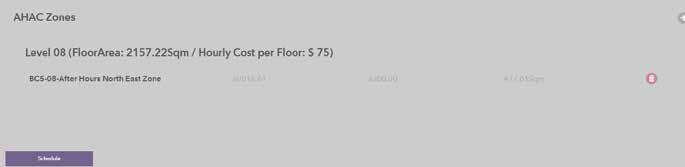
The estimated cost for the request is shown in the “Details” screen, with the individual cost for each selected AHAC zone reflected in the AHAC zones section.
The estimated cost for a request is based on the floor area of the selected zones in relation to the total floor area and estimated hourly AHAC cost. A minimum AHAC cost of $25/hr is applied for every AHAC schedule that is entered into the system.
The Recurrent AHAC functionality allows user to repeat the same AHAC schedule at the same time on different days without having to create/re-create a separate AHAC schedule.
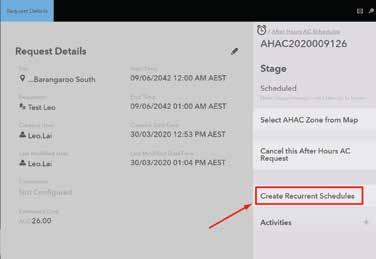
After the initial AHAC schedule is created, you can repeat the same AHAC schedule by pressing the “Create Recurrent Schedules” button on the right corner of the screen.
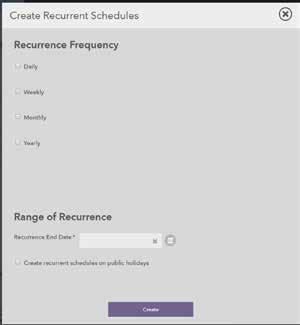
You can choose to repeat the AHAC schedule on a daily/ weekly/ monthly/ yearly basis.
Once the settings for recurrence are logged in, proceed to insert the “Recurrence End Date” on the bottom of the selection screen.
If you would like for the schedule to reoccur on a public holiday, check the box “Create recurrent schedules on public holidays”
Press the “Create” button to create recurrent schedule.6


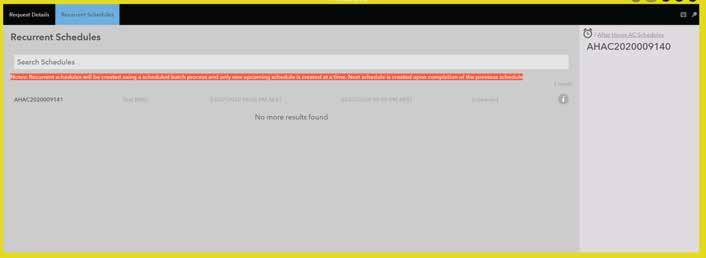
Once the recurrent AHAC schedule is created, you will be able to see it on the “Recurrent Schedules tab”
NOTE: When a recurrent schedule is created, it is considered a child schedule with the parent schedule being the originally created schedule.
Please note that only one “Recurrent Schedule” will be created after the last AHAC schedule has been completed. Hence, even when there are multiple recurrent schedules that need to be created in the future, only the upcoming one will be shown on the Recurrent Schedules tab.
To view an AHAC schedule, please do the following:
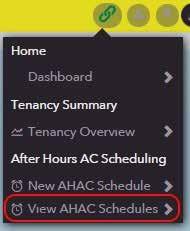
Click the chain icon from the homepage.
From the menu shown below, please click on “View AHAC Schedules”.
By default, all AHAC requests against your tenancy are displayed.


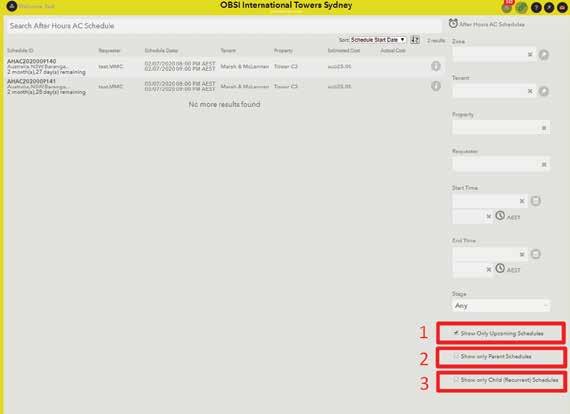
When viewing After-Hours A/C Schedule, schedules can be filtered by4
•
• • • •
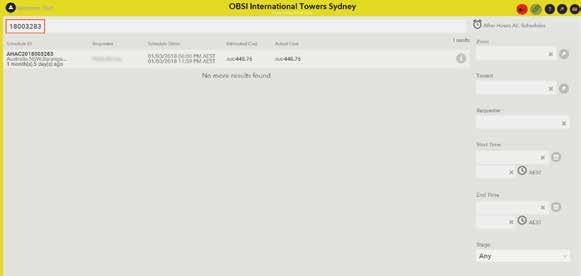
Entering a search string (please go to step 5).


By specifying the zone, tenant, requester, start time, end time and stage (please go to step 6).
Showing Only Upcoming Schedules (#1)
Showing only Parent Schedule (#2)
Showing only Child (Recurrent) Schedule (#3)
Enter a string to search and display requests based on the entered text.5
(please proceed to step 8)
Specify either a:
Zone
Tenant
Requester
Start Time
End Time
Stage
Or a combination of these to view AHAC schedules.
Schedules with no selected zones, hence with zero estimated cost, have its schedule dates in a red colour.
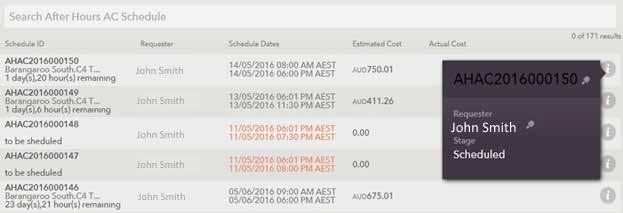
8


•
Click on an AHAC schedule to view and/or edit the details.
If the stage is “New”, comments and dates can be edited, AHAC zones can be changed and the request can be cancelled or scheduled
•
•
•
If the stage is “Scheduled”, comments and dates can be edited, AHAC zones can be changed and the requests can be cancelled
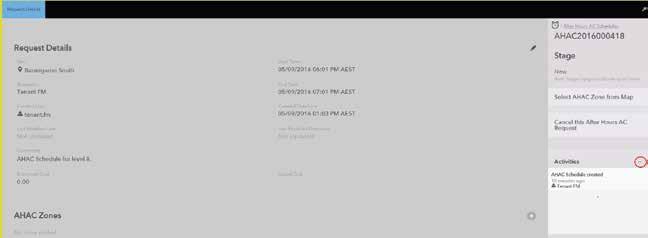
If the stage is “Completed”, only the Actual Cost can be edited.
If the stage is “Cancelled”, all details are read only.
From the Request Details screen:
Click on the sign in the Activities section, to view the log for the AHAC request
NOTE: Click the pencil icon to update the comment, start time and end time of the request.
Click “Save” to retain changes made.
Click on the trash icon to remove a selected zone from the AHAC request.


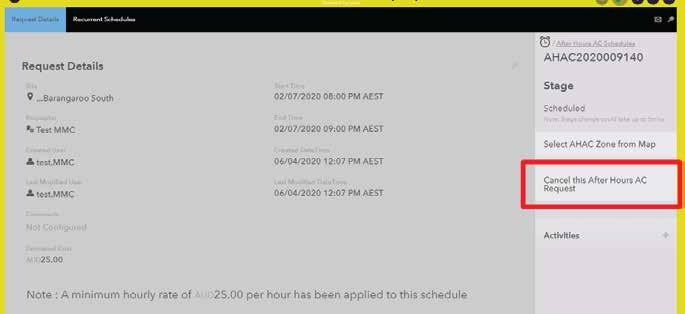
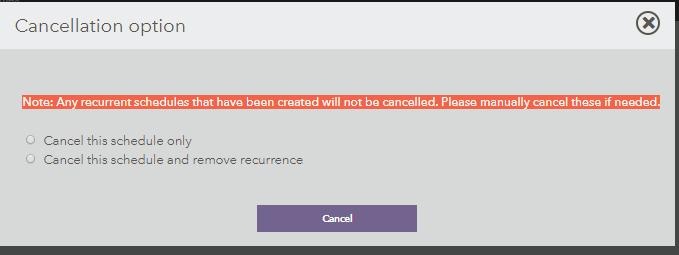
Once you have clicked on an AHAC schedule (for either parent or child schedule), you can choose the “Cancel this After Hours AC Request” for deleting the same.
NOTE: When deleting a parent schedule with a child(recurrent) schedule, the user will be prompted as shown below:
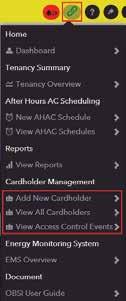
From the quick links menu, Cardholder Management section covers three options available for tenant usage. These options provide the ability to:
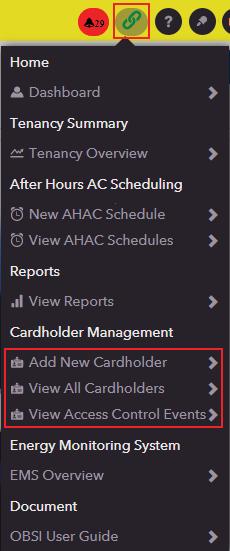
Create a new cardholder for a tenancy – “Add New Cardholder”
•
•
See existing cardholders against a tenancy – “View All Cardholders”
See all access control events against a tenancy – “View Access Control
To create a new cardholder, select “Add New Cardholder” option from the quick links.

The screen shown below is for a tenant with the UniqueID pre-configured by the management team. Any fields marked with a star are required to be entered by a user.

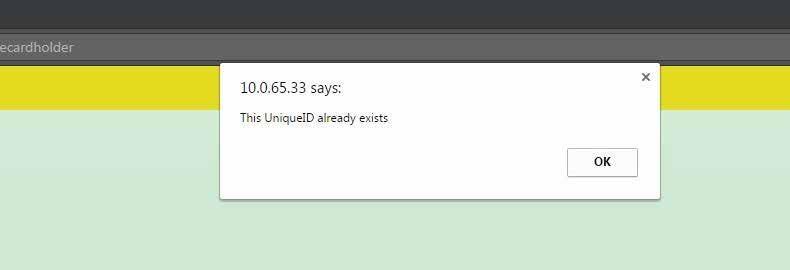
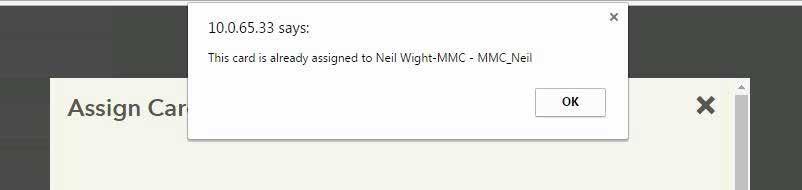
The UniqueID prefix is populated with the prefix already recorded for the configured tenant. UniqueIDs should not be duplicated. The OBSI will warn users if they are attempting to reuse a UniqueID similar to below:



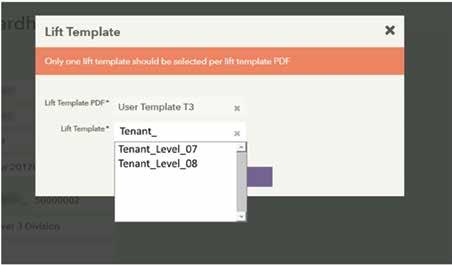
Access to lifts is defined in the “Lift Template” option. For tenants, the Lift Template list is fixed and displays options for the various areas necessary for the tenant to access.
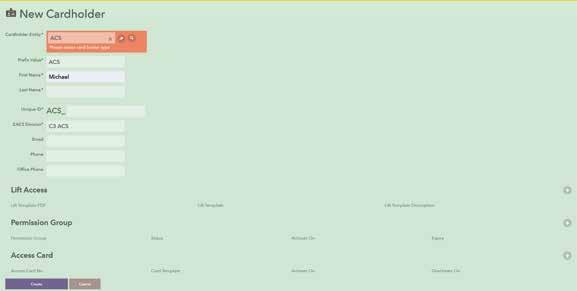
Access groups are defined in the “Permission Group” tab. These groups will provide a cardholder with access to a set list of areas related to their tenancy.
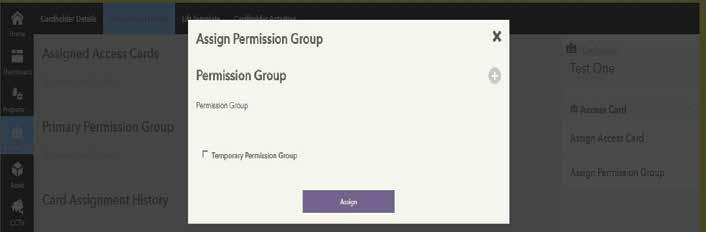
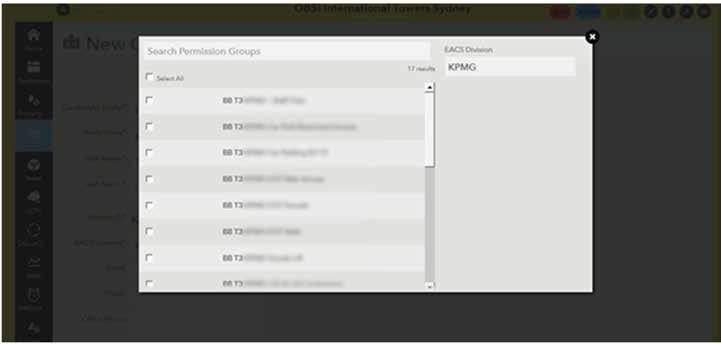
Note: Ensure that if an employee is provided with access to an area using a Permission Group, they still require a specific Lift Template assigned to them to use a lift from that area. E.g., If an end-user has access to basement area doors, they will also require a Lift Template with access to


After choosing the access groups, press Assign. If the cardholder needs to have a mix of permanent and temporary access groups, this must be done in two operations.
First add one type by selecting them from the list. After defining the time range, press Assign to confirm this action. The other type of permission would need to be done as a second operation.
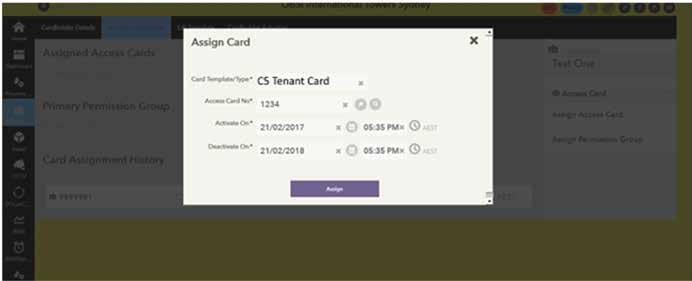
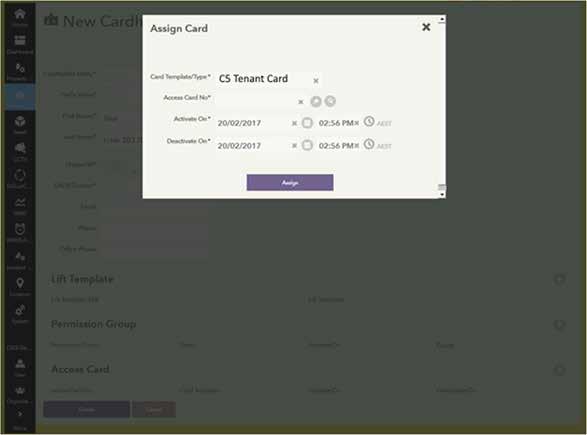
Access cards are assigned from the Access Card option at the bottom of the screen. The card type is defined against the tenant but does allow for multiple card types as needed. The card number can be chosen from a list, or manually inputted if the card does not exist on OBSI. Activation times cannot be in the past, and a deactivation time can be at any duration.
The prefix for the UniqueID is required to ensure that all cardholders are uniquely identified across the precinct. For this reason, it is not possible to add a duplicate UniqueID across the precinct. OBSI will validate against internally stored cardholders to determine if the UniqueID
Finally, choose the “Create” button at the bottom of the page for the details to be pushed to the Gallagher System (the access control system at Barangaroo).

From the Quick Links menu, the “View All Cardholders” option is visible from the settings menu. Choosing this will present the user with a list of cardholders attached to their tenancy.

Selecting any of the cardholders from the list will bring up the details for that cardholder:
On the tabs at the top of the screen, access card details will show the cards and permission groups assigned to the cardholder.
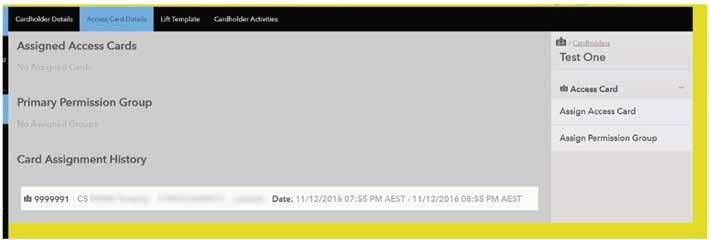

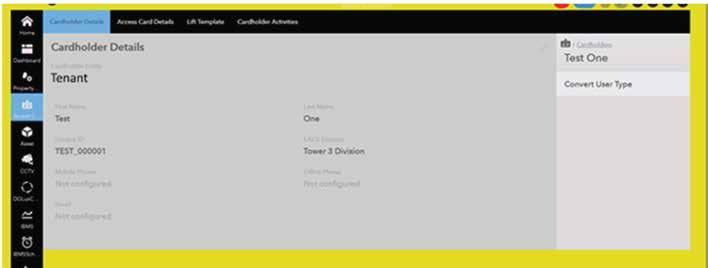

Users need to have a permission group associated with them before an access card can be

Permission groups are assigned in the same manner as when creating a new cardholder. This is shown above. The list of permission groups requires additional privileges to assign to users.
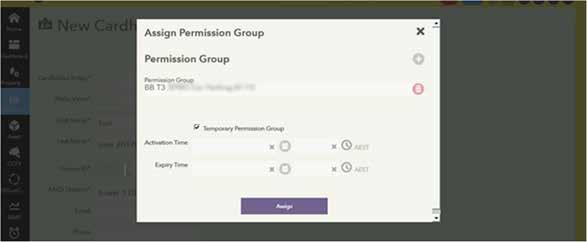
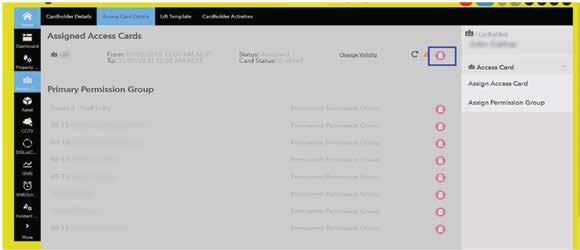
To remove a group, select the bin icon against the groups as shown below:
The security system requires all users to have at least one access group assigned to them. Removal of all access groups will have unexpected outcomes.
The OBSI will present a screen similar to the one shown below when a user attempts to remove the last permission group.
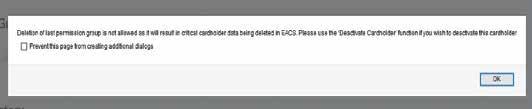

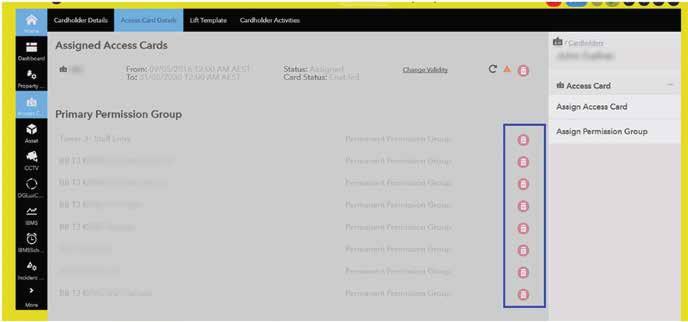

Access cards are assigned in a similar manner. By selecting “Assign Access Card” from the right-hand side of the screen the user is shown the below screen. The activation time and deactivation times are set to the present time when the window is opened.

Access cards can be removed by clicking on the bin icon next to the access card number.
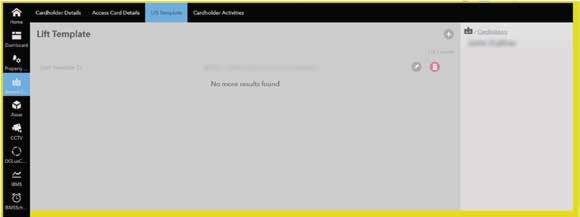



When the user clicks on any options to make a change to the cardholder, the changes are automatically pushed to the security system.
Lift access, including home floors, is accessible from the Lift Template tab:
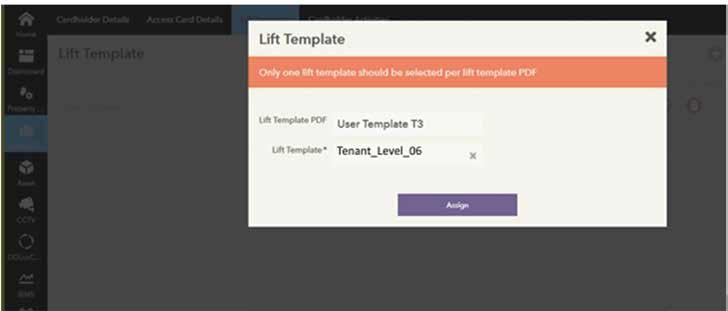
Only one Lift Template can be given to a cardholder at one time:
The dropdown list shows the lift access as assigned to the tenant by the management team. It is not possible to modify the list from the screen above and requires an elevated login to change. When the user clicks on the assign option, the changes are pushed to the security system automatically.


Removing or deactivating a cardholder from OBSI will also result in the cardholder being removed from the access control system. Whilst the cardholder is still in possession of the access card, the preferred method is to alter the valid period of the access card to prevent their access onto site. Using this method, the access control system will log their attempts, indicating that their access has been declined..
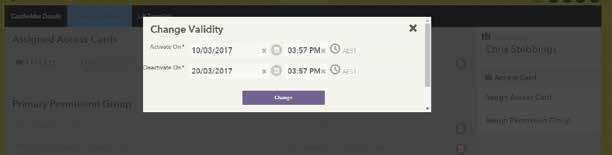
To alter the valid period for the card, choose the Change Validity option:
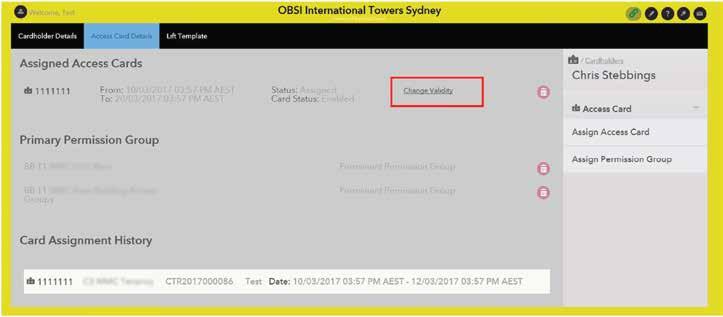
This presents the user with the start and end times for a card to be valid:

Altering the “Deactivate On” time will render the card invalid when presented on any readers on site if that time is before the present time.


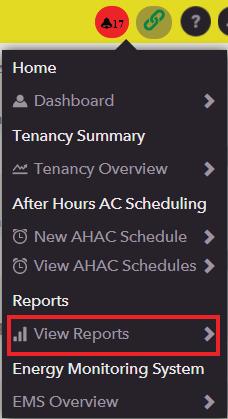
To generate a report: Navigate to the “View Reports” quick link:
1
2
Select the report you would like to generate and enter the date and time period you would like the report to detail.
3
4

Select the format in which you would like to export the report (e.g. PDF, Word, Excel or ExcelRaw).
Select ‘Generate Report’ button for obtaining the report
NOTE: The OBSI is set with specific permission schemes that allow a tenant to only view and manage systems pertaining to their tenancy. This protects the privacy of the tenant and limits other tenancies from altering services on one another’s floor/s. For this reason, you may encounter links that are blocked to stop tenants from traversing through areas beyond their scope.