
SURFACE MOUNTED PIR SENSOR INSTRUCTIONS
Issue 02 July 2026
Thank you for your purchase
For best results, have this sensor unit installed by a qualified electrician, following these instructions. Keep this leaflet for future reference.
Safety
• Mains powered – installation must comply with building and electrical regulations.
• Always switch off and isolate the power before installation or maintenance.
Need Help?

For advice or accessories, contact us at the address above. Please have the product name, model, and purchase details ready.
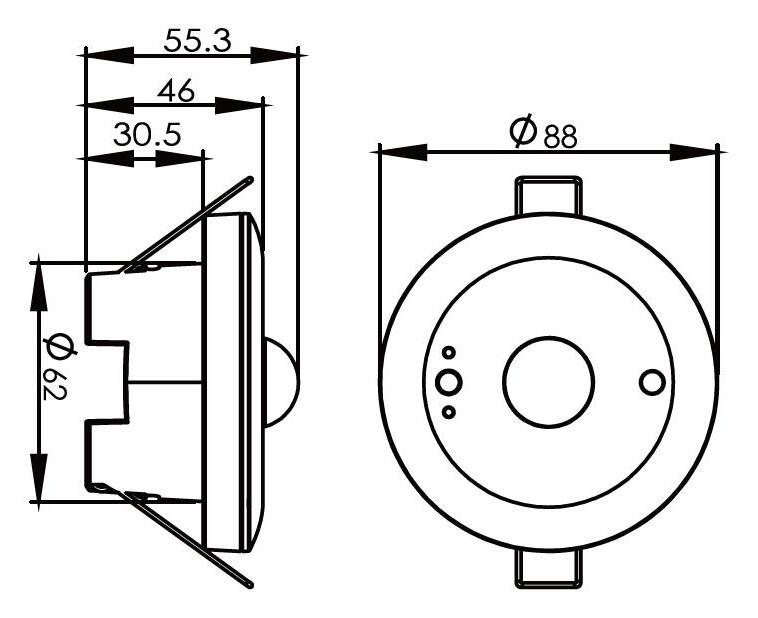
DIMENSION DRAWING
INSTALLATION
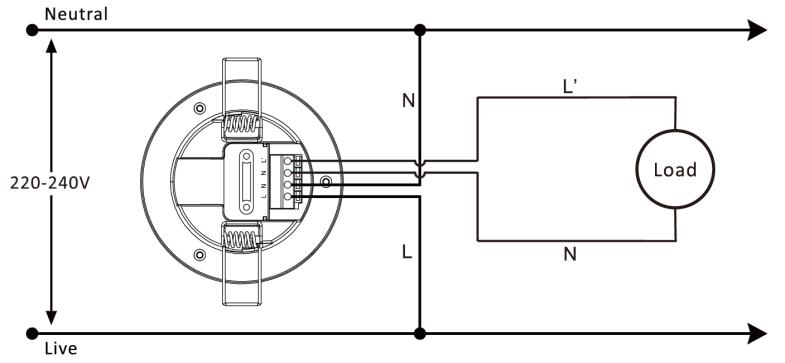
WIRING DIAGRAM
1. Rotate sensor outer surface housing to loosen and remove from front sensor section
2. Attach sensor surface housing component to ceiling cutouts in back of sensor housing
3. Connect supply cables (observing correct polarity according to wiring diagram above), DO NOT apply power to device during installation
4. Apply front of sensor to the surface housing and twist to lock in place. Orientate the indents over the two tabs on the inside of the surface housing.
FAULT FINDING
If you experiencing a problem please check through the following before making contact with NVC:
Fault - Load does not come on
1.Check to see if the live supply to the circuit is good.
2.If the supply & wiring are good, check the LUX setting. Increase the LUX level setting to allow the sensor to turn on at a higher ambient light level.
Fault - Lights do not go off
1.Ensure that the area is left unoccupied for longer than the selected timer setting.
2.Make sure that the sensor is not adjacent to circulating air, heaters or lamps.
3.Ensure luminaire is not connected in parallel with other luminaires containing sensors
SPECIFICATIONS
TIME SETTING
– 60MINUTES (ADJUSTABLE) LIGHT CONTROL
/ 300LUX / 500LUX / DISABLE

REMOTE PROGRAMMING FUNCTIONS
Default Settings:
10 second hold time
10M detection range
2000LUX light level
OFF = manual off, turns to AUTO mode after 6 hours
ON = Manual on, turns to AUTO mode after 6 hours
10SEC / 90SEC / 5MIN / 10MIN / 15MIN / 20MIN / 30MIN / 60MIN = Hold Time
Setting
2M / 4M / 6M / 8M / 10M / MAX = Detection Range
Setting
10LUX / 50LUX / 100LUX / 200LUX / 500LUX / 1000LUX / 2000LUX = Light
Level
AUTO = Sets the sensor to work with all parameters set prior to test mode or manual on/off pressing
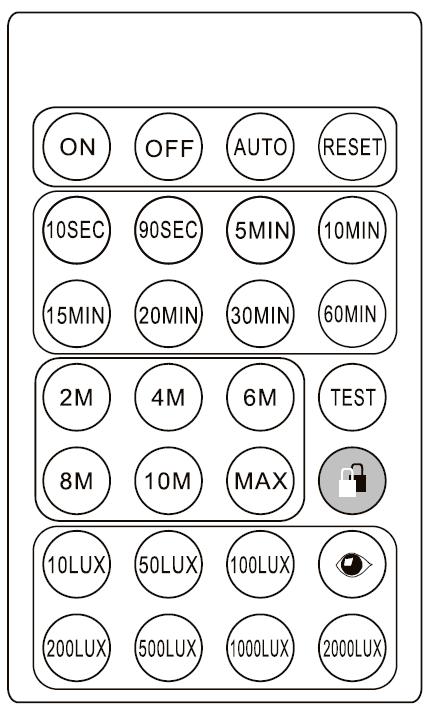
RESET = Resets all functions back to default settings
TEST = In test mode, hold time is set to 2seconds and standby time and daylight sensor are disabled.
To end test mode, press AUTO button
Lock/Unlock = Permanent tamper protection toggle on/off When On, only the ON/OFF functions are available. Latest surrounding lux level learned, and set to the daylight threshold level.
The surrounding lux level is learned and the daylight threshold level is set to the same value