

SYRACUSE LIFE LED EMERGENCY DOWNLIGHT INSTRUCTIONS
Issue 02 4th September 2024
THANK YOU for buying this product. To help ensure itgivescomplete satisfaction please install it according to theseinstructions and then pass the instructionsto the appropriate person for retention and futurereference.
SAFETY This is a mains powered product. Itis designed to be installed by suitably qualified personnel only and in accordance with the applicable building and electrical regulations. Before installation or maintenance the electrical supply to the product must be isolated.

INSTALLATION SUPPORT If installation advice or accessories are required please contact us at the above address. We will do our best to help. When reporting a suspected fault orseeking installation support the problem is likely to be resolved most quickly if you have full product details to-hand, as well as details of when and where it was purchased.
LUMINAIRE INSTALLATION
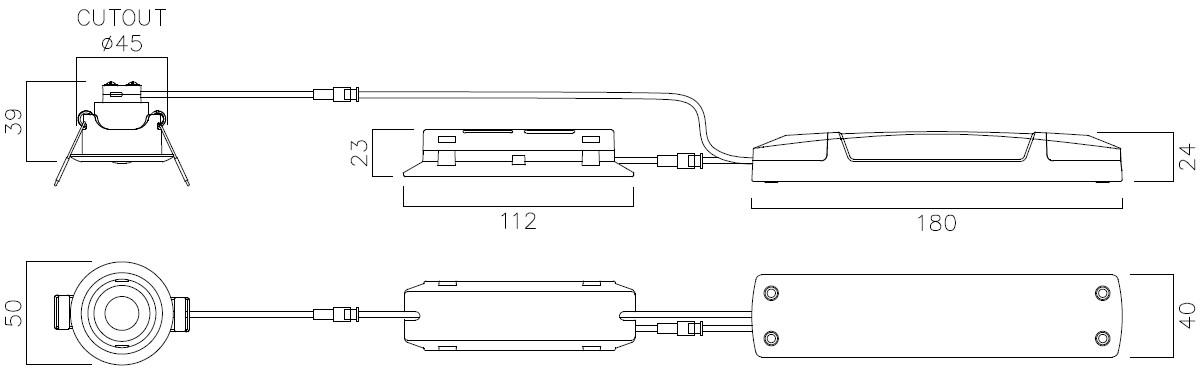
1. Decide mounting position in ceiling & cut 45mm diameter hole. Care should be taken to:
o avoid structures, wiring orpipe work that may be in the ceiling void
o not exceed the specified cutting diameter so as not to expose the cut edge
o remove any thermal insulationfrom the area, so the luminaire is not covered
2. Pass the mains supply cable down through the hole& route to the remote module unit. This luminaire requires an UNSWITCHED live supply.
3. Unclip the terminal cover marked “AC Input” from the module unit.
4. Terminatethe mains supply cable ensuring correct polarity is observed. This is a Class 1 fitting, so needs to be earthed.
5. Fit the outer sleeving of the cable into the moulded cable restraint & refit the termination cover.
6. Connect the battery pack using the large opal connectors.
7. Enter the “Installation Date” inthe appropriate place on the battery pack label.
8. Connect the LED lamp head using the smallwhiteconnectors.
9. Fit the luminaire into the ceiling by:
o Inserting the module unit into the ceiling void by passing it through the hole& laying it in position, ensuring stable location onto the ceiling.
o Inserting the battery pack into the ceiling void by passing it through the hole & laying it in position,ensuring stable location onto the ceiling.
o Squeeze the springs on the lamp head into a vertical position, then insert into thehole & release to allow the springs pull the lamp up & retain it in position.
10. Reconnect the power supply & check the green indicator LED illuminates.
11. The batteries shouldbe allowed to charge forat least 24 hours before carrying out a full discharge test to check batteries are charging correctly & the maintained duration is being achieved.
LENS SELECTION
The luminaire comes fittedwith a wide symmetrical distribution lens as standard. There is an option to change to the oval corridor distribution lens (supplied loose with lamp head unit)by following the below steps:
1. Remove the wide distribution lens by inserting a small flat head screw driver into one of thetwo the recessed slots on the edge of the inner white disc. This will unclip the lens & the white moulded holder.
2. Off the oval corridordistribution lens with its white moulded holderup to thefront of the head unit, aligning the small notch with the slot (to ensure correct alignment), then press to clip it inposition.


IMPORTANT WARNING ****************************
The luminaire uses Lithium Iron Phosphate cells (LiFeP04) in itsbatterypack. These batteries include overcharge protection circuitry and a Negative Temperature Co-efficient (NTC) third lead to control thermal runaway. When the battery is no longer able to provide its full rated duration, itmust be replaced with an identical type. Please consult the manufacturer if in doubt.
OPERATION / MAINTENANCE
Nominal battery life is designed to be at least 4 years. They should be replaced when theyno longerachieve the 3 hour full duration.
This luminaire MUST be disconnected before the circuit it is installed on is subjected to any high voltage orinsulation resistance testing, otherwise irreparable damage will occur toluminaire components.
Ensure cleanliness of luminaires is maintained so as not to affect performance.
TESTING FOR EMERGENCY LUMINAIRES
Recommended routine test procedures in line with BS 5266 & BS EN 50172:
Monthly Functional Test
Simulate a mains supply failure by:
o isolating the circuit (ensuring ifit is safe to do so)
o way of a test key switch if fitted into the circuit
o by pressing the test button next to the lens on the head unit
Do this for a period of time sufficient to check that the light source illuminates from the battery supply.
Once complete, ensure the normal supply is restored & that the green LED charge indicatorilluminates.
Log result/comments in the Testing Log Book (below).
Annual Discharge Test
Simulate a mains supply failure by isolating the circuit(ensuring if it is safe to do so) orby way of a test key switch if fitted into the circuit.
This should be for the full 3-hour rated duration.
Check thatthe light source illuminates & remains illuminated for the full rated duration period.
Once complete, ensure the normal supply is restored & that the green LED charge indicatorilluminates.
Log result/comments in the Testing Log Book (below).
TESTING LOG BOOK
Luminaire