SATURN LED RECTANGULAR HIGHBAY INSTRUCTIONS Issue 03 - July 2026 Thank you for your purchase For best results, have this light fitting installed by a qualified electrician, following these instructions. Keep this leaflet for future reference. Safety Mains powered – installation must comply with building and electrical regulations. Always switch off and isolate the power before installation or maintenance.
• •
Need Help? For advice or accessories, contact us at the address above. Please have the product name, model, and purchase details ready.
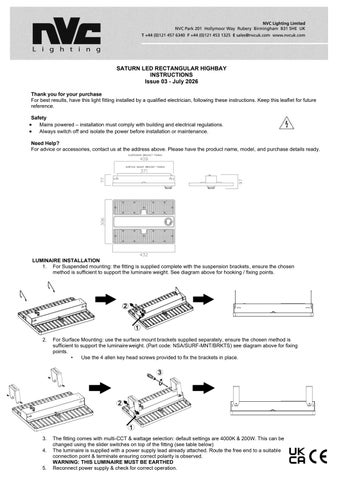
LUMINAIRE INSTALLATION 1. For Suspended mounting: the fitting is supplied complete with the suspension brackets, ensure the chosen method is sufficient to support the luminaire weight. See diagram above for hooking / fixing points.
2.
For Surface Mounting: use the surface mount brackets supplied separately, ensure the chosen method is sufficient to support the luminaire weight. (Part code: NSA/SURF-MNT/BRKTS) see diagram above for fixing points. • Use the 4 allen key head screws provided to fix the brackets in place.
3.
The fitting comes with multi-CCT & wattage selection: default settings are 4000K & 200W. This can be changed using the slider switches on top of the fitting (see table below) The luminaire is supplied with a power supply lead already attached. Route the free end to a suitable connection point & terminate ensuring correct polarity is observed. WARNING: THIS LUMINAIRE MUST BE EARTHED Reconnect power supply & check for correct operation.
4. 5.