
DALLASWIRE SUSPENSION KIT INSTRUCTIONS
Issue 03 on 24th November 2021
THANK YOU for buying this product. To help ensure itgives complete satisfaction please install it according to these instructions and then pass theinstructions to the appropriate person for retention and futurereference. These instructions are designed to be used alongside the instructions supplied with the main DALLAS LED luminaire.
INSTALLATION SUPPORT If installation advice or accessories are required please contact us at the above address. We will do our best to help. When reporting asuspected fault orseeking installation support the problem is likely to be resolved most quickly if you have full product details to-hand, as well as details of when and where it was purchased.
NVC Code - NDL/WSK


INSTALLATION –
Standalone versions:
1. Mark the fixing centres on the mounting surface using the line diagram shown above.
2. Unscrew the male part of the finial at the end of the suspension wire assembly & screw fix it to the mounting surface.

Note! Care should be taken to ensure the fixingmethod can support the weight of the luminaire.
3. Pass allof the suspension wire through the hole in the female part of the finial until the locating lug seats in place.
4. Screw the female part of the surface finial back on to the male part, so the wire assembly is now suspended.
5. On the back of the Dallas LEDLuminaire mounting plate there are wire suspension fixing points at each end.


a. Secure the white brackets as shown using the M3x6 pozi pan head screws supplied Fig 1.
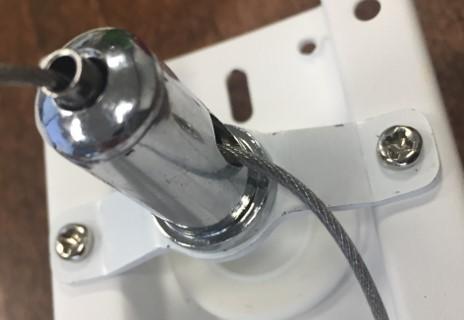
6. Remove the clutch mechanism by unscrewing it from the main body section.
7. Fix the mainbody section to the fixing point on the white bracket using the M4x10 pozi pan head screw Fig 2.
8. Pass the suspension wire through the clutch mechanism by pressing downon it and feeding it through the oblong slot on the fixed main body section. With the wirenow showing, screw the clutch mechanism back on to the main body section. Fig 3.
9. Adjust theheight of the luminaire using theadjustment feature on the clutch mechanism. Locate the small cable clamp supplied at a suitable point along the excess cable (as close as possibleto the mainbody section) and secure in place.Fig 4.Any excess wire should bekept tidy &located on the rear of the Luminaire to remain unseen.
Multi-Connection (Linked) Installations:
1. The wire suspension installation is done in exactly the sameway as above.