COLUMBUS LED IP65 NON-CORROSIVE LUMINAIRE INSTRUCTIONS
Issue 07 July 2025
THANK YOU for purchasing this product. To help ensure it gives complete satisfaction please install it according to these instructions, and then pass the instructions to the appropriate person for retention and future reference.
SAFETY This is a mains voltage powered product. It is designed to be installed by suitably qualified personnel only and in accordance with the applicable building and electrical regulations. Before installation or maintenance, the electrical supply to the product must be isolated.
INSTALLATION SUPPORT If installation advice or accessories are required, please contact us at the above address. We will do our best to help. When reporting a suspected fault or seeking installation support, the problem is likely to be resolved most quickly if you have full product details to-hand, as well as details of when and where it was purchased.
LUMINAIRE INSTALLATION
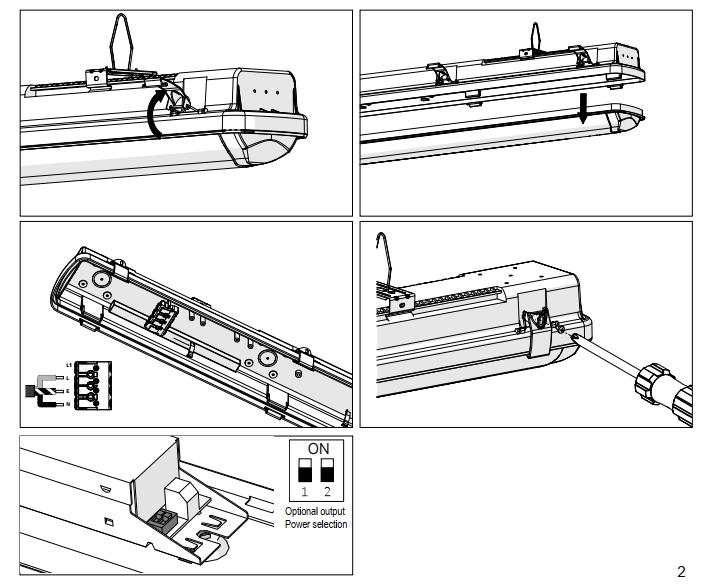
1. This luminaire comes with plug, connectors and power selection switches located on the driver assembly. Supplied preconnected for standard operation.
2. Undo the clips on each side & open the gear tray diffuser assembly If you need to fully remove from the body, then disconnect the retaining straps
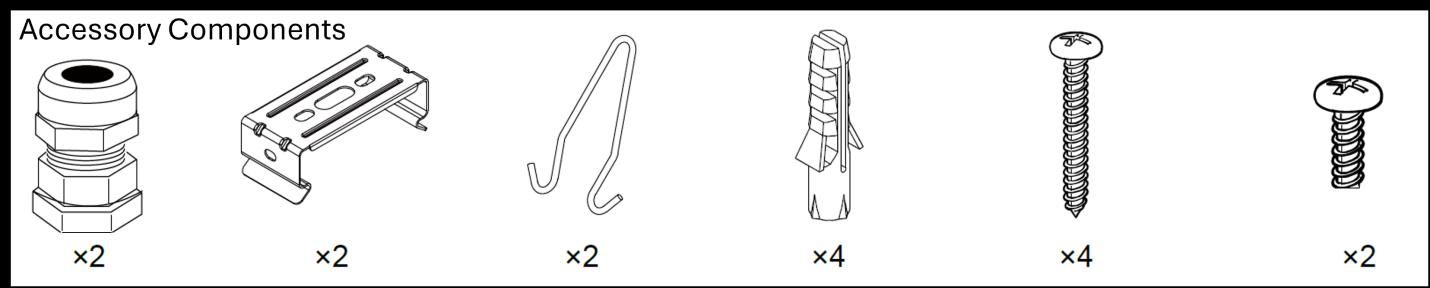
3. Provide mains supply cable & decide best entry position on the base. Drill points are provided at various points (base & ends). IP65 gland is provided
4. Fix the base. The base is able to be fixed via the following methods; once chosen, prepare the ceiling/mounting points ensuring the fixing surface/mechanism is sufficient to support the luminaire weight
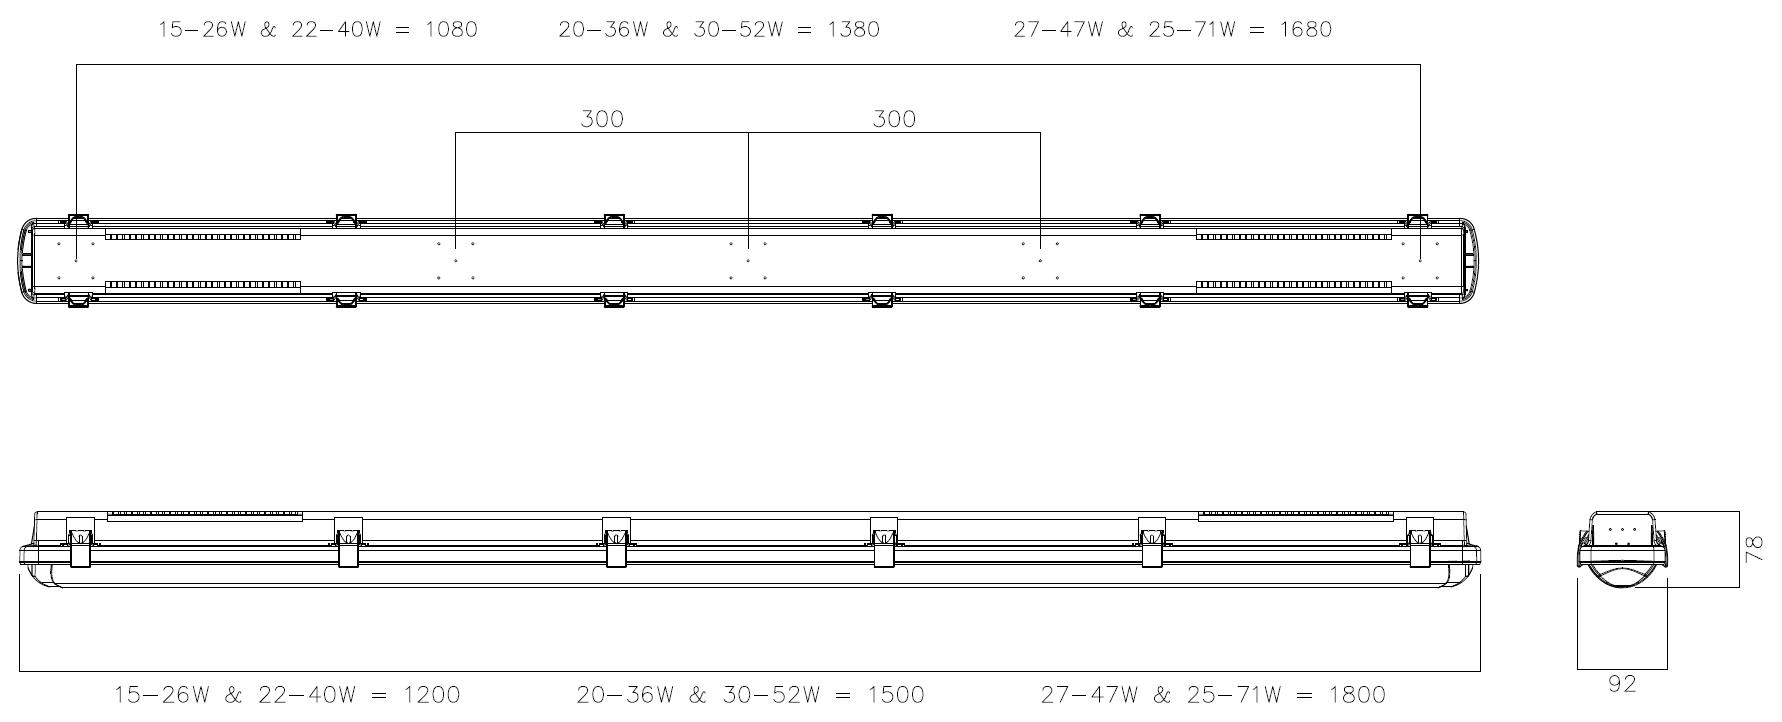
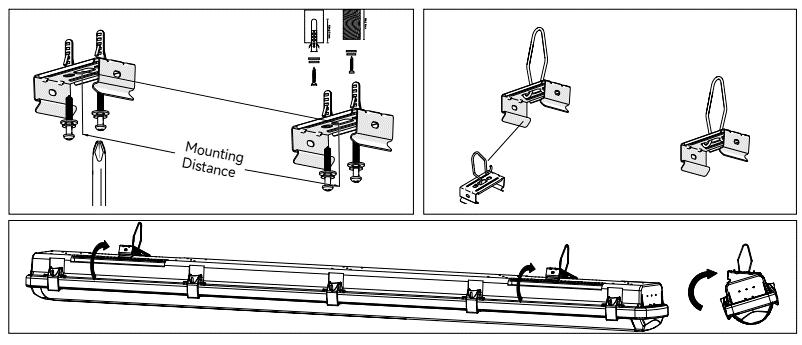
Surface fixing (using mounting clips*): Mount the two stainless steel surface mount fixing clips provided (in accessory pack) to the ceiling at the specified fixing centres (see diagram). Offer the base up to the clips & push to snap fit.
Surface fixing (without mounting clips): As the base is PC then it is possible to drill through the base & fix directly to the mounting surface. Only use the pre-moulded strengthened fixing points & care must be taken to drill a clean hole so as to not remove any of the reinforced wall around the hole.
Chain or Wire suspension: Mount the two stainless steel surface mount fixing clips to the base. Then add a V hook (provided in the accessory pack) to each of the surface mount clips. This will provide connection points for chain or wire suspension at the specified fixing centres (see diagram)
Conduit Suspension*: The base comes with specific 20mm diameter drill out points at various centres (see diagram above). These points are reinforced for conduit suspension purposes Care must be taken to drill a clean hole & not to remove any of the reinforced wall around the hole. We recommend the following combination of parts for connection to the base (see assembly diagram to right) These parts will be available from your electrical wholesaler.
5. Route the mains supply cable into the base It is the installer’s responsibility to ensure the IP65 rating is maintained An IP65 cable gland is provided and should be tightened to sufficient torque so as to allow no ingress of moisture.
6. If the gear tray diffuser assembly has been fully removed, refit on to the retaining straps in the base
7. Route the mains supply cable to the terminal block & terminate, ensuring correct polarity is observed. NOTE! THIS LUMINAIRE MUST BE EARTHED
8. The luminaire has wattage selectable DIP switches, which can be changed. The default power settings are:
High Output: 4Ft=40W, 5Ft=52W & 6Ft=71W Low Output: 4Ft=26W, 5Ft=36W & 6Ft=47W
9. Fit the gear tray diffuser assembly back into position & secure using the snap-fit clips. N.B Clips will need to be fully snapped in.
10. If the clips need to be removed use a suitable flat blade screw driver.
11. Reconnect power supply & check for correct operation.
Note! Luminaires fitted with electronic drivers are exempt from insulation resistance tests, as this may cause irreparable damage & would void warranty
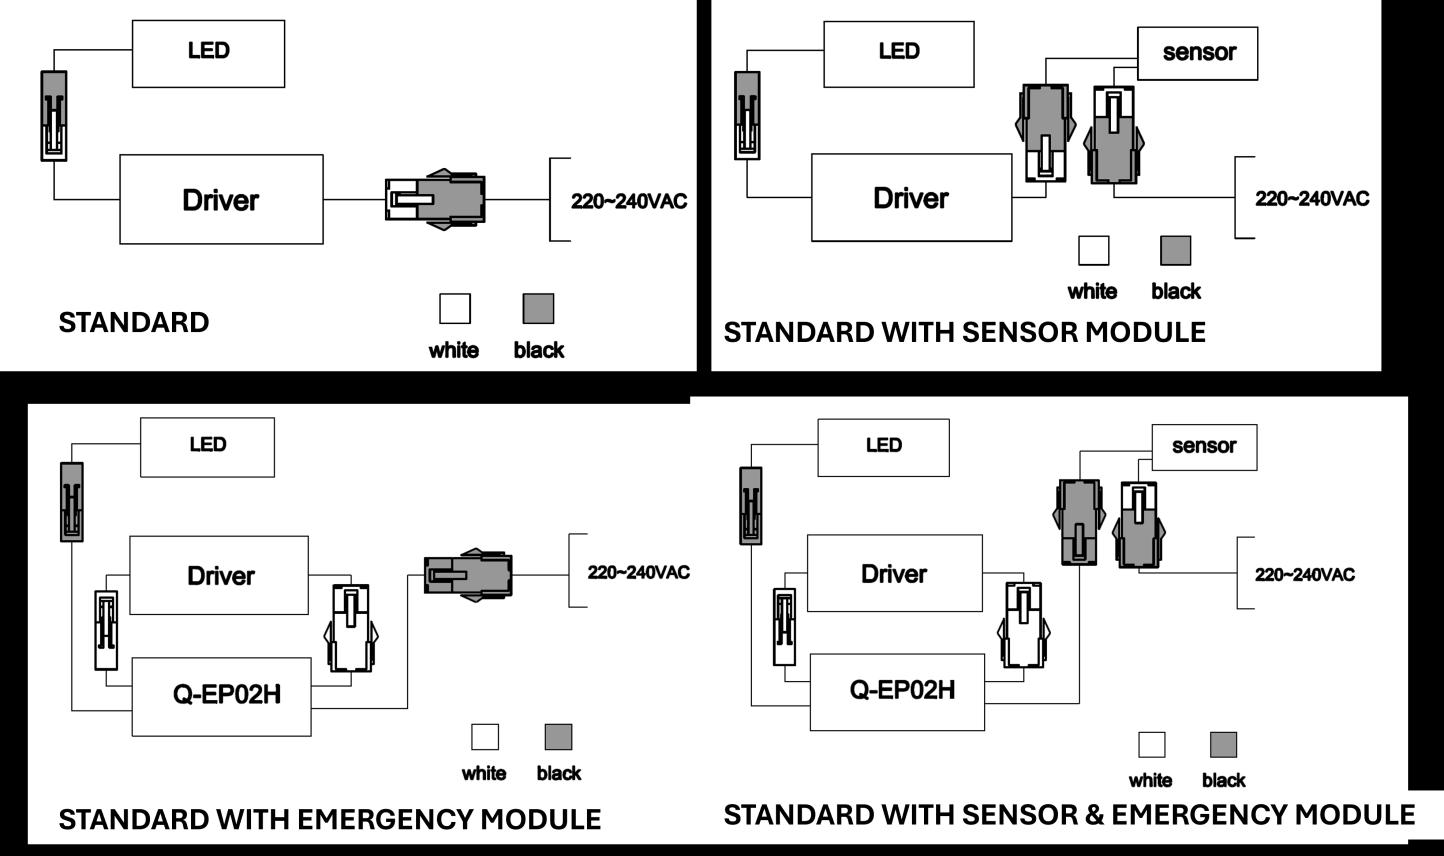
12. Optional Linear plug and play M3 & STM3 Packs are available, for further details contact NVC Lighting Ltd.
MAINTENANCE
Cleaning should be carried out at regular intervals so as to not impair photometric performance or thermal safety of the luminaire.
WIRING INFORMATION
Wiring Guide For M3 Pack & MW Sensor Options
GENERAL MAINTAINED EMERGENCY LUMINAIRE INSTRUCTIONS
These instructions should be followed in conjunction with the standard luminaire instructions. Please read carefully and pass to the end user/responsible person for retention and future reference.
INSTALLATION
1. Following the installation of the luminaire in accordance with the standard luminaire installation instructions, a separate permanent live supply should be terminated in the incoming supply terminal block in the luminaire, in the connection marked ‘L PERM’. The permanent supply MUST be taken from the same phase as the corresponding switched supply and MUST be wired at the switchboard so that upon instances of tests, it is isolated at the same time as the switched supply.
2. Once the permanent live supply is connected, connect the battery to the module via the ‘plug and mate’ connector, ensuring correct polarity is observed. Failure to observe correct battery polarity will result in permanent damage to the emergency module/driver.
3. N.B. to avoid potential damage to the battery please ensure the permanent live is energized as soon as possible following connection of the battery to the module.
4. Upon restoration of the power supply to the luminaire, check that the indicator LED fitted within the luminaire illuminates green. This indicates that the batteries are charging and that the charging circuit is healthy.
5. Allow the battery to charge for an uninterrupted period of not less than 24 hours prior to carrying out a full discharge test
MAINTENANCE
6. The battery pack in this luminaire must be replaced when it is no longer able to satisfy its full rated duration.
7. In emergency mode the light level of the luminaire will be at a reduced output. Regular maintenance and gentle cleaning are recommended so as to ensure that the Emergency Output Factor (E.O.F) remains at specified levels.
8. Isolate the supply before servicing.
9. Please ensure that the emergency flux is not compromised at any time throughout the design life of the luminaire
10. DO NOT INSULATION TEST
Caution:
The battery pack in this luminaire is a Lithium Iron Phosphate (LiFePO4) type which includes a dedicated protection circuit. If replacing the battery pack, the specification and chemistry must be identical to that detailed on the battery label.
TESTING OF EMERGENCY LUMINAIRES:
Recommended routine test procedures in line with BS 5266-1:2016 & BS EN 50172:2004.
For Self-test Versions see below:
Self-Test Operation: On connection of a permanent live supply, the unit will enter an automatic commissioning cycle as detailed in the table below. During this cycle, the permanent live supply should not be interrupted as this will result in the charging timer resetting to zero and restarting the commissioning process. Following successful completion of the commissioning cycle, in line with BS EN 62034 and BS EN 50172:2004, the unit will perform a 30 second function test automatically at monthly intervals for 11 months, and in the 12th month, a full rated duration test will be performed.
LED Status Indicator during commissioning:
LED Indication Stage / Period Status
Green Permanently On 1 – 24h
Initial Battery Charge
Green Slow Flash (2s on / 2s off) 2 – Rated Duration Duration Test
Green Slow Flash (4s on / 1s off) 3 – 24h
Battery Recharge and test passed
Green Permanently On 4 – Normal Operation Commissioning Complete
LED Status Indicator following commissioning:
LED Indication Status
Green Permanently On
Green Slow Flash (2s on / 2s off)
Green Slow Flash (4s on / 1s off)
Red Fast Flash (0.5s on / 0.5s off)
Notes on Fault Code:
Normal, Commissioned, Standby Mode
Function Or Duration Self-Test in Progress
Battery Recharge (24h Following Duration Test) and test passed
Battery Disconnected, Battery Duration Fault, Lamp Fault
The unit monitors health/status in both standby (charging), and self-test modes. If the battery is disconnected in standby mode, the LED indicator will ‘fast flash red’, as in the table above. On re-connection of the battery, the LED indicator will revert to green. If the unit detects a fault to either the battery or lamp head during a test, it will ‘fast flash red’, and remain in this status until the fault is fixed and the unit has completed a further successful test.
Note: In order to maintain compliance of the self-test system, the unit is factory set to undertake tests randomly. Because of this, tests may occur at any time in the 30-day interval period. Caution should be exercised where this may be inconvenient, or cause disturbance, such as in hospitals, nursing homes and other premises with sleeping accommodation