
3 minute read
Styles of Photography


HDR together and churns out a final, processed image that you can see right away. However, most cameras cannot do this internally and require you to download the photos first and then use a program like Photoshop or Photomatix software on your computer. Usually, these programs give you far more flexibility and produce a better result, but the downside is that you have to wait until you can spend some time on the computer to enjoy the fruits of your labor.
The basic gist is that HDR photography automatically takes bits and pieces of all lighting levels to produce a photo that is very evenly lit. Some believe this is more like what your eye actually sees—with a higher dynamic range than just a single shot.
Peoples’ reactions to HDR photographs often vary considerably. Some people view them as incredibly beautiful, for they show iconic scenes with near-perfect lighting and captivating luminescence. However, sometimes people look at them as a bit “too digital,” almost as if it’s a video game image…just a bit too “altered.” I feel that these polar reactions often have to do with how HDR photos are processed and how much discretion the artist uses when processing them. See, all photo programs have numerous settings and sliders that let you increase the intensity of the “HDR effect,” just as if you’re editing a photo for saturation, contrast, sharpness, etc. In other words, HDR editing can be overdone.
At the end of the day, I do recommend that you at least learn about HDR photography, because in certain cases it can produce show-stopping photos. If you try it and don’t like it, well, you are still a more versed photographer for knowing this widely-followed technique.
Steps For Taking Hdr Photographs
1. Set your camera to a -1, 0, +1 bracketing mode. Fortunately, most cameras are capable of bracketing photos, as it’s just an automated way of taking three photos in somewhat quick succession. However, because all cameras have different manufacturers and menu settings, you should consult your camera’s manual to determine how to do this. Simply search for the term “exposure bracketing” and set it to -1, 0, +1.
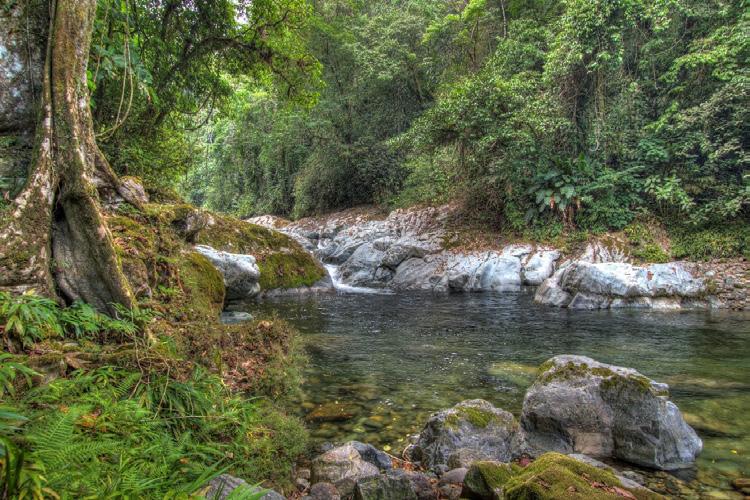
Above, the shaded Mermaid Falls in Honduras is a great choice for experimenting with HDR. With even lighting, you can let the HDR software do the work to even out the subtle shadows created by all the jungle foliage.
2. Get your camera on a tripod
Because you are merging three photos into one, it’s imperative that the camera not move even a fraction of an inch between physically shooting these three photos. Otherwise, you’ll get a weird “ghosting” effect, where plants, rocks or trees have moved, leaving only a ghostly image in their place.
3. Look for the right scene
In my opinion, this is the most crucial step as not all scenes lend themselves to great HDR photography. While HDR is intended to help with scenes that have really dark shadows and/or bright highlights, it isn’t a panacea for plain old bad lighting. The best even lighting still produces the best HDR photographs, so make sure that you photograph early in the day, late in the evening, in the shade or during cloudy intervals so that you don’t have harsh shadows sweeping across your scene.
4. Go ultra-wide
Like I advise with night photography, go extra wide with your shot. That is, try and incorporate as much of the scene as possible, so you can afford to crop it later. Sometimes clouds produce incredible HDR effects, and sometimes they don’t. Best to include them, with the later option to crop them out if you’d rather minimize their emphasis in your photo.
Sunsets and sunrises make for potentially interesting HDR opportunities. Because lighting is almost always mixed at these times of day, using HDR processing can help illuminate dim foregrounds and temper the overlybright sky.

5. Get an HDR program and experiment!
Chances are if you’ve paid for a photo processing program, like Photoshop, Lightroom, or similar, it comes with an HDR editor. Some versions are easier than others, and they use different algorithms, so the quality can also differ. And last but not least, the amount of “customization” that different HDR programs offer varies as well. Thus, if you are ready to jump head first into this, you may wish to research some of the programs out there. However, if you’re like most and want to try this out before you go full steam ahead, HDR Efex Pro is a free program from Google that is the best of all worlds. It’s comprehensive, free and pretty darn good.
And the unofficial step #6 is to go out and practice with this. It takes some getting used to, especially on the computer end of things. But equally important is the setup of the photo. The more you try, the better your results will be.
Recap
• Be sure to use a tripod for best results, as the three photos you take need to be identical in framing.
• Try both in-camera HDR processing as well as computer post processing to understand the range of effects you can create
• Use HDR techniques judiciously. Even the most well-thought-out HDR shots will often have “that look” of HDR. In some cases, it turns an otherwise dull photo into something truly magical, but in other cases, it can be a little surreal.
• With practice, you’ll begin to train your photographic eye to identify the best opportunities for HDR. These generally include scenes with medium contrast (soft shade and clouded sun) as opposed to intensely high contrast (full sun and full shade).


