
7 minute read
It’s Grow Time


With summer here and holiday options limited, many of us will be looking for more ways to draw the kids outside for a break from the everincreasing screen time.
If that’s familiar, then look no further than The Little Grower’s Cookbook by Ghillie James and Julia Parker, a fabulous book full of inventive and educational projects that encourages children to discover the joy of growing and using vegetables and flowers.
Advertisement
This book of simple and sustainable gardening activities, recipes and weekend fun for every season, brings nature closer to home. With warm thanks to Ghillie and Julia, they’ve shared a wonderful growing project along with a tasty recipe from the book with us to get your budding gardeners and cooks started!

More about The Little Grower’s Cookbook

The Little Grower’s Cookbook uses repurposed and recycled materials and all the activities are environmentally friendly.
The weekend fun projects include innovative ideas like creating little pots of sunshine (planting flower seeds in homemade pots); magical flower potions (creating your own flower-scented water); hosting a butterfly banquet to planting your own packed lunch or building a bug hotel. Little Grower’s facts are scattered throughout the book with ideas like growing your own pizza box. There are simple step-by-step instructions and the book is packed with charming photography.
You don’t need a big garden or a big budget. All of these projects will teach and inspire children to look at what’s around them in the natural world.

LITTLE ’ GROWERS COOKBOOK the
“This lovely book brings the joy of the outdoors back home.”
Olivia Colman
Projects for Every Season Ghillie James & Julia Parker cooking + Growing + activities
Tumble Tots member's can claim a 20% discount by using the code Tumbletots20 at the checkout ONLY at www.lettucepublishing.com
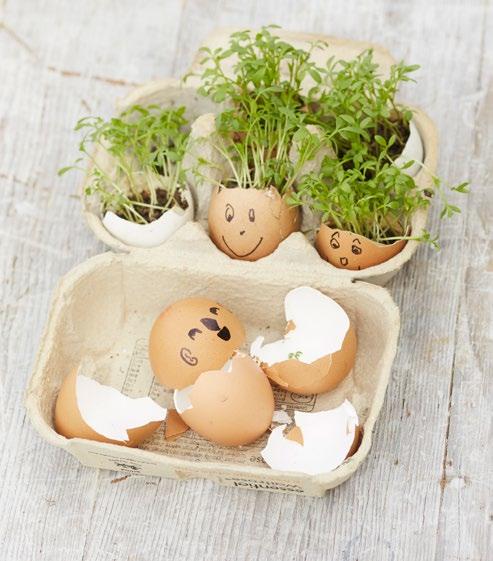
Making these funny little people with their crazy hair is a fun activity for all ages and all times of the year, as they can be grown inside. Garden cress is a herb used in recipes but it is also eaten as a medicine in some countries. The edible shoots have a mild, peppery taste similar to watercress (not surprising considering the two are botanically related and are from the same plant family). Be careful when handling the shells as they are very fragile. THE BASICS When to grow Egg friends can be grown all year round, and your egg friend cress ‘hair’ will appear within 3–4 days. Just keep watering them so they don’t dry out. You will need Empty eggshells in halves, preferably large Cotton wool to stand eggshells up Cardboard egg box Multi-purpose or potting compost Cress seeds (sometimes called mustard and cress) Water sprayer (use an old cleaning spray bottle, once washed out) Waterproof felt tip pens or paints Kitchen towel
PREPARATION Choose your container Egg friends are grown in eggshell halves – you should end up with two halves any time you crack an egg. Carefully wash used eggshells in some warm soapy water and let them fully dry out on some kitchen paper. When you have about 6 halves, you will have enough to make an eggshell family. Be soil ready You need to fill the eggshells with soil before you decorate them, otherwise they will be too fragile.
Stand the halved eggshells in an old egg box, and using a teaspoon, carefully fill each one half way with multi-purpose or potting compost. Pat the soil down lightly and spray with a little water to make them damp, but not soaked. Alternatively, fold up a piece of kitchen paper and tuck that inside the eggshell, then spray with water. The cress will also grow happily on the wet paper.
Wipe the outside of the shells to remove any dirt, then use your felt tips or paints to gently draw some faces on the shells. The cress will be the hair!
Put the eggshells back in the box, making sure you can see their faces (a bit of cotton wool in the bottom will help them stand a bit taller if you need it). HOW TO GROW Sowing For each egg friend (half eggshell) carefully tip about ¼ teaspoon of cress seeds into your hand. Sprinkle onto the damp soil or wet paper, and repeat for the rest of your egg friends. Watering and growing Don’t let the soil or paper in your eggshells dry out. Spray it lightly every time it feels dry. It’s useful to set a time of day to check the soil (after breakfast for example) so you don’t forget.
Place your egg box in a light place such as a windowsill or kitchen table. In 3–4 days you will see tiny green leaves appear and these will continue to grow until they are about 4cm long and ready to cut. Harvesting Carefully use a pair of scissors to snip the cress leaves and their stems – make sure you ask for some adult help if you need it. Make your own lunch! Why not try an egg and cress sandwich? Mash a chopped up peeled hardboiled egg with 1 heaped teaspoon of mayonnaise and a pinch of salt. Thickly spread onto sliced buttered bread and top with some snipped cress ‘hair’. Top with another slice of buttered bread and cut into quarters. Delicious!
Extracted from: The Little Grower’s Cookbook by Ghillie James & Julia Parker (Lettuce Publishing) £20 Hardback. Photography by Ali Allen. Widely available including at Amazon, Waterstones and WH Smith.
Rice paper wrappers start off crisp, but as soon as you dip them in water they soften. You can fill the soaked wrappers with all of your favourite veggies and herbs, and if you like, add some thin cooked rice noodles, chopped chicken, sausage or prawns. Be as adventurous as you dare! They are great for packed lunches. Just place them in a container between lettuce leaves to stop them sticking or drying out. Plastic wrap is not planet friendly and will also stick to the rolls.
Makes 6 long rolls, which you can cut in half You will need 25g rice vermicelli noodles (optional) 6 spring roll rice wrappers such as Blue Dragon, found in larger supermarkets, oriental shops or online. A selection of your favourite veggies cut into fine strips or grated, such as cucumber, carrot, red pepper, apple, avocado, sweetcorn, tomato, lettuce or radish, plus, if you like, finely shredded chicken or sliced cooked prawns 1 tablespoon fresh mint and/or coriander, roughly chopped 1 tablespoon chopped roasted peanuts, optional
For the mild chilli dipping sauce 1 lime, juiced 3 teaspoons mild runny honey 1½ tablespoons rice wine vinegar 1 tablespoon fish sauce 1 garlic clove, crushed ½ red chilli, deseeded and finely chopped (optional)
For the peanut dipping sauce 90g crunchy peanut butter 2 tablespoons rice wine vinegar 1½ tablespoons soy sauce ½ garlic clove, crushed ½ teaspoon grated ginger 3 tablespoons coconut milk or water 1 tablespoon runny honey ½ lime, juice only Preparation 1. Form a line of little bowls containing the filling ingredients you have chosen. If you are using noodles, put them into a bowl and cover with boiling water, leave for 4 minutes, then drain, before cutting with scissors into easy to pick up clumps. 2. Follow the instructions on the packet for soaking the wrappers. Usually this is just dipping the wrapper in a shallow bowl of warm water. Once soft, place the wrapper on a board in front of you. Choose from the ingredients, placing small mounds onto the wrapper in a line. Once you have filled the rolls (enough to make a sausage shape as in the photo on page 125), just pull up each side to cover each end and roll the wrapper and its fillings very tightly.
Cut each roll in half and store between lettuce leaves until ready to eat. 3. For the dipping sauces – choose both or just one. Simply stir the ingredients together in a small bowl. For the peanut sauce, add 1–2 tsp water so that the sauce isn’t too thick. The sauces will keep in the fridge for up to a week. 4. To serve, place the rolls on a big plate with the sauces on the side for dipping.

Extracted from: The Little Grower’s Cookbook by Ghillie James & Julia Parker (Lettuce Publishing) £20 Hardback. Photography by Ali Allen. Widely available including at Amazon, Waterstones and WH Smith.


