18
INSTRUCCIONES DE ENSAMBLE
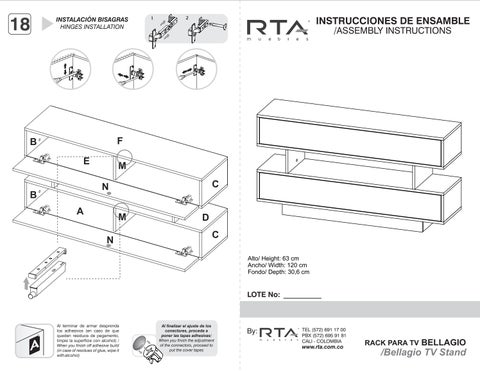
INSTALACIÓN BISAGRAS HINGES INSTALLATION
/ASSEMBLY INSTRUCTIONS
F
B E
M C
N
B A
M N
D C Alto/ Height: 63 cm Ancho/ Width: 120 cm Fondo/ Depth: 30,6 cm
LOTE No:
By:
TEL (572) 691 17 00 PBX (572) 695 91 81 CALI - COLOMBIA
www.rta.com.co
RACK PARA TV BELLAGIO
/Bellagio TV Stand
17
L
“ ea muy bien el instructivo antes de armar el producto , ármelo en un lugar limpio y preferiblemente en una superficie plana.”
“Read the instructions well before assembling the product, assemble it in a clean and preferably on a flat surface”
RECOMENDACIONES IMPORTANTES KEY RECOMMENDATIONS
O
NO pinte el mueble/
Do not paint the furniture.
a la intemperie/ Don’t expose to rain or direct sun.
NO lavar las manijas o
NO sobrecargue el mueble.
tiraderas con jabones o
no exceda el peso de 30 kilos
O
elementos abrasivos/
para gabinetes de cocina/
Don’t wash handles
Do not overload the cabinet.
or dumps with soap or
Weight not exceeding 66LB
abrasives.
NO golpear ni martillar
NO permita que los niños manipulen el mueble, puede
donde se indique) /
voltearse y lastimarlos/
Don’t hit or hammer
Do not allow children to
the furniture (just do it where indicated).
SIEMPRE levante el mueble
P
entre dos personas, NO lo arrastre/ Do not drag the furniture. Lift it between two people.
handle the cabinets or drawers.
O
lustrador de muebles, vida del mueble/Clean with a dry cloth. Polishing wax for furniture can be use.
O P
MUEBLES MODULARES, CONSTRUYENDO HOGARES /READY TO ASSEMBLE FURNITURE, BUILDING HOMES
J
L
K
B A
K
Limpie con paño seco y de esta forma alarga la
O P
for kitchen cabinets.
el mueble (hágalo sólo
O
O
NO mojar o ubicar
I
B
15
B
RTA FURNITURE HARDWARE (ready to assemble) Siga las siguientes instrucciones: 1. Abrir la caja del mueble y buscar la bolsa con los herrajes. 2. Abrir el paquete de herrajes y comprobar que el contenido de las piezas es correcto. 3. Separe los herrajes para facilitar su identificación durante el armado. 4. Arme el mueble en un lugar limpio y en una superficie plana.
M C
G
E
B
A continuación verá una breve explicación de cada herraje y su función principal. Below you can see a explanation of each hardware and its main function.
CONECTORESPERNOS/CONNECTOR SPREADING BOLTS
D A
Es un herraje de unión, la cabeza esférica del perno se ubica en el centro de la caja embutida en forma de copa desde cualquier ángulo y luego se sujeta firmemente. Este permite un arme y desarme repetidamente y una unión firme que no se afloja. It is a hardware union, spherical head of the pin is located in the center of the box embossed in the form of glass from any angle and then subject firmly. This allows for arming and disarming repeatedly and a strong union that is not loosened.
H
M
C
K
-
Girar 180° / Rotate 180°
TARUGO DE MADERA/WOODEN PIN Es un pedazo de madera corto y grueso, aprox. de 3cm a 10cm, que sirve para amarrar el mueble y darle resistencia. It is a piece of wood short and thick, aprox. 5cm to 10cm, which serves to tie the cabinet and give it strength.
16 F
RECOMENDACIONES DE ARMADO ASSEMBLY RECOMENDATIONS El buen funcionamiento del mueble depende de su correcto armado.
B
Armed with a suitable furniture depends on its smooth functioning.
M G
MINIFIX
E
B
C
3
D A
M K
TAQUETE
1
H C
2
x
HERRAJES PARA ARMADO ASSEMBLY HARDWARE x28
x30
x30
13
x52
G
x32
L H D
B Tornillo lamina/ Sheet Metal Screw
x26
Minifix/ Minifix Cams
Perno minifix/ Spreading Bolt
x8
Tarugo/ Wooden Pin
x2
x2
Bisagra Interior 35mm/ Inset Hinge
Tapa Minifix Adhesiva -Siena-/ Cover caps
Deslizador 15mm/ Plastic Glide
Bisagra Push Interior 35mm/ Push Inset Hinge
x4
x1
x2
A
Puntilla/ Panel Pin
M C
K
Girar 180° / Rotate 180°
14
E Pasacable Redondo Tapa Minifix Adhesiva -Wengue-/ (Gris)/ Hole Cover Cover caps
L
G
Sistema Apertura Push/ Push to Open -Incluye Tornillos-
D
B A TENER PRECAUCIÓN AL ABRIR LA BOLSA DE HERRAJES PARA NO EXTRAVIAR NINGUNO. COMPRUEBE QUE EL CONTENIDO DE LAS PIEZAS SEA EL CORRECTO. EN CASO QUE FALTE ALGUNA PIEZA O ESTE DEFECTUOSA DEVUELVA LAS PIEZAS AL ALMACÉN CON SU FACTURA PARA EFECTUAR EL CAMBIO DE LAS PIEZAS Y/O LOS HERRAJES LO MÁS PRONTO POSIBLE./ PLEASE BE CAUTIOUS WHEN OPENING THE HARDWARE BAG TO NOT LOSE ANY. CHECK THE CONTENTS OF THE PARTS ARE CORRECT. IF ANY PART IS MISSING OR DEFECTIVE PLEASE RETURN THE PARTS TO THE STORE WITH THE PRODUCT INVOICE ATTACHED TO MAKE EFECTIVE THE REPLACEMENT OF THE DEFECTIVE PIECES OR WARDWARE AS SOON AS POSSIBLE.
M K
H C
11
PIEZAS DE ARMADO ASSEMBLY PARTS
Bx2
A
Cx2
D B
D
G
M A K
12
H E
C
Mx2 J
F
Girar 180° / Rotate 180°
I Nx2 L
Kx2 G
O
L
P H ANTES DE EMPEZAR A ARMAR EL MUEBLE LEA DETENIDAMENTE LAS INSTRUCCIONES. SE RECOMIENDA ARMAR EL MUEBLE SOBRE LA CAJA O SOBRE UNA SUPERFICIE LISA Y CUBIERTA, PARA NO RAYARLO / BEFORE STARTING TO ASSEMBLE THE FURNITURE, CAREFULLY READ THE INSTRUCTIONS. IT IS RECOMMENDED TO ASSEMBLE THE FURNITURE ON THE BOX OR ON A FLAT AND COVERED SURFACE IN ORDER TO NOT SCRATCH THE PRODUCT.
*
9
*(Herramientas NO incluidas) *Tools NOT Included
I K K J
F B M
A
O C E
N G
L
B
M
10
H
D
I
Girar 180° / Rotate 180°
P C
B
A
N
M
K
J
C
K
A K
7
SE RECOMIENDA ARMAR EL MUEBLE ENTRE DOS PERSONAS / IT IS RECOMMENDED TO ASSEMBLE THE PRODUCT BETWEEN TWO PEOPLE
L
1
A
Kx2 VOLTEAR
FRENTE
A
8
2
Girar 180° / Rotate 180°
Bx2
K
I
Cx2 K
J
I
J
5
3 Soporte Sistema PUSH FRE
NTE
FRE
NTE
Soporte Sistema PUSH
F D
VOLTEAR
D
G H
6
4 E VOLTEAR
Mx2
FRENTE
E
Nx2 Bisagra PUSH Push
Bisagra SIN PUSH