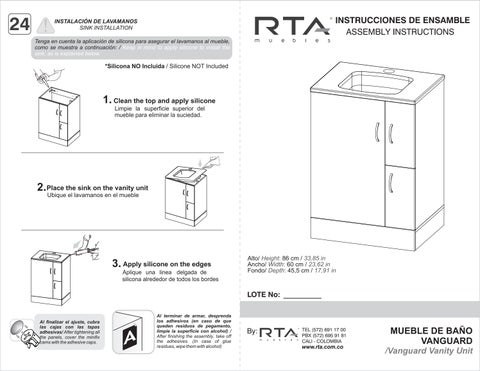
INSTALACIÓN DE LAVAMANOS SINK INSTALLATION
Tenga en cuenta la aplicación de silicona para asegurar el lavamanos al mueble, como se muestra a continuación: / Keep in mind to apply silicone to install the sink, as is explained below:
*Silicona NO Incluida / Silicone NOT Included
1.
Clean the top and apply silicone
Limpie la superficie superior del mueble para eliminar la suciedad.
2.
Place the sink on the vanity unit
Ubique el lavamanos en el mueble
Al finalizar el ajuste, cubra las cajas con las tapas adhesivas/ After tightening all the panels, cover the minifix camswiththeadhesivecaps.
3. Apply silicone on the edges
Aplique una linea delgada de silicona alrededor de todos los bordes
Al terminar de armar, desprenda los adhesivos (en caso de que queden residuos de pegamento, limpie la superficie con alcohol) / After finishing the assembly, take off the adhesives. (In case of glue residues,wipethemwithalcohol)
Alto/ 86 cm / Height: 33,85 in Ancho/ 60 cm / Width: 23,62 in Fondo/ 45,5 cm / Depth: 17,91 in
(572) 691 17 00
RECOMENDACIONES IMPORTANTES
KEY RECOMMENDATIONS
NO pinte el mueble / Do not paint the furniture.
NO lavar las manijas o tiraderas con jabones o elementos abrasivos / Do not wash handles or dumps with soap or abrasives.
NO mojar o ubicar a la intemperie / Do not expose to rain or direct sun.
NO sobrecargue el mueble. no exceda el peso de 30 kilos para gabinetes de cocina / Do not overload the cabinet. Weight max. 66lbs for kitchen cabinets. O O O O O O
NO golpear ni martillar el mueble (hágalo sólo donde se indique) / Do not hit or hammer the furniture (just do it where is indicated).
NO permita que los niños manipulen el mueble, puede voltearse y lastimarlos / Do not allow children to handle the cabinets or drawers, they could get hurt.
SIEMPRE levante el mueble entre dos personas, NO lo arrastre / Do not drag thefurniture Lift it between two people.
Limpie con paño seco , / Clean with a dry cloth.
HERRAJES BÁSICOS PARA MUEBLES RTA
BASIC HARDWARE FOR RTA FURNITURE
1.Abrir la caja del mueble y buscar la bolsa con los herrajes / Open the box and look for the hardware bag.
P2.Abrir el paquete y comprobar que el contenido de las piezas es correcto / Open the package and verify that the content of the pieces is correct.
3. Separe los herrajes para facilitar su identificación durante el armado / Separate hardware for easy identification during assembly.
4.Arme el mueble en un lugar limpio y en una superficie plana / RTAfurniture must be assembled in a clean place and on a flat surface.
* Herramientas NO incluidas/ Tools not included
Utilizar una broca de 5/16" para hacer las perforaciones en el muro/ Use a 5/16" drill bit to drill the wall.
Manija/ Handle
Deslice los cajones dentro del mueble/ Slide the drawers inside the cabinet C B H I M O N D A G
AJUSTE DE ALTURA / HEIGHT ADJUSTMENT AJUSTE DE PROFUNDIDAD / DEPTH ADJUSTMENT
AJUSTE LATERAL / LATERAL ADJUSTMENT
* Centímetros / Inches
Manija/ Handle Manija/ Handle
El buen funcionamiento del mueble depende de un adecuado ensamblaje An excellent furniture´s performance relies on a solid and a suitable assembly. RECOMENDACIONES DE ENSAMBLE / ASSEMBLYRECOMENDATIONS
MINIFIX / CONNECTOR - DOWELS
1 2 3 A B
Sistemadeunióncompuestoporunperno(A)yunacajaminifix(B).
(1)Seinsertalacajaminifixdentrodelaperforaciónubicadaenlacaradelapieza,laflechadebeapuntarsiemprea ladireccióndelaperforaciónpordondeentraráelperno.
(2)Sedebeinsertarelpernoporsuparteplásticaenlasperforacionesqueseindiquen,luegoseinsertalapunta metálicaenlaperforaciónparaquesucabezaquedealinteriordelacajaminifix.
(3)Girarlacajaminifix180°paraapretarlasdospiezas.
It´safittingsystemmadeofaspreadingbolt(A)andaminifixcam(B).
(1)Inserttheminifixcamintheholeplacedinthefaceofthepanelwiththearrowpontingtowardstheholewheretheboltwill fit.
(2)Inserttheboltwithitsplasticbaseintheshownholes,theninsertthemetallicboltheadintheholessoitfitsinsidethe minifixcam.
(3)Tightthepanelsbyturningtheminifixcam180°.
TARUGOS O TAQUETES / FLUTED DOWELPIN
1 caja minifix / dowels hole
Esunpedazodemaderacortoygrueso,deaproximadamente3a10cmdelargo,quesirveparaamarrarelmuebley darleresistencia.
It´s ashortandthickpieceofwood,1,18to3,9inchesaproximately,whichisusedtotiethecabinetandgiveitresistence.
VOLTEAR TURN OVER
Se recomienda armar el mueble sobre la caja o una superficie lisa para no rayarlo. It is recommended to assemble the product on the box or on a flat surface to not scratch it.
Voltear el mueble cuidadosamente para ensamblar los fondos. Carefully turn over the cabinet to assemble the back panels.
PESO MAX. SUGERIDO EN MUEBLE (Kg) / MAX SUGGESTED LOAD (Kg)
NOTA: La resistencia a las cargas puede variar dependiendo si es una carga distribuida o una carga puntual, las grácas corresponden a cargas puntuales, NO exceder los pesos sugeridos / NOTE: The load capacity depends if it is a point load or if it is an uniform distributed load, do not exceed the suggested loads.
Girar 180° / Rotate 180° x2