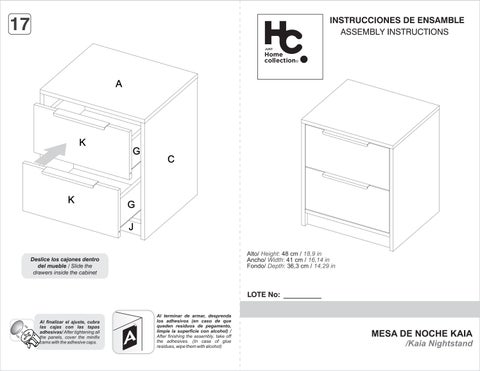
Deslice los cajones dentro del mueble / Slide the drawers inside the cabinet
INSTRUCCIONES
Fondo/ 36,3 cm / Depth: 14,29 in K K A C G
Alto/ 48 cm / Height: 18,9 in
Ancho/ 41 cm / Width: 16,14 in
Al finalizar el ajuste, cubra las cajas con las tapas adhesivas/ After tightening all the panels, cover the minifix camswiththeadhesivecaps.
Al terminar de armar, desprenda los adhesivos (en caso de que queden residuos de pegamento, limpie la superficie con alcohol) / After finishing the assembly, take off the adhesives. (In case of glue residues,wipethemwithalcohol)
LOTE No:
DE NOCHE KAIA /Kaia Nightstand
RECOMENDACIONES
IMPORTANTES
No pintar el mueble.
El mueble debe ser usado únicamente en interiores, no exponer al sol directo
Limpiar los herrajes metálicos con un paño seco
NO sobrecargar el mueble (ver las cargas sugeridas).
No golpear ni martillar el mueble (solo cuando se indique).
Limpiar con un paño ligeramente húmedo, usar jabones suaves.
No arrastre el mueble, levántelo entre dos personas.
Evite el contacto directo con el agua, el fuego o la exposición a fuentes de calor
IMPORTANT
RECOMMENDATIONS
Do not paint the cabinet.
The cabinet MUST be used exclusively indoors, do not expose to direct sun.
Clean metallic hardware with a dry cloth.
Do NOT overload the cabinet (see suggested loads).
Do not hit or hammer the cabinet (just when indicated).
Clean with a slightly damp cloth, use gentle soaps.
Do not drag, lift and move between two people
Avoid direct contact with water, fire or exposureto heat sources.
ADVERTENCIA
Nunca permita que los niños escalen o manipulen el mueble, la caída de este puede provocar lesiones graves o la muerte
Never allow children to climb or manipulate the cabinet, furniture tip over can cause serious injuries or death.
El buen funcionamiento del mueble depende de un adecuado ensamblaje An excellent furniture´s performance relies on a solid and a suitable assembly. RECOMENDACIONES DE ENSAMBLE / ASSEMBLYRECOMENDATIONS
MINIFIX / CONNECTOR - DOWELS
1 2 3 A B
Sistemadeunióncompuestoporunperno(A)yunacajaminifix(B).
(1)Seinsertalacajaminifixdentrodelaperforaciónubicadaenlacaradelapieza,laflechadebeapuntarsiemprea ladireccióndelaperforaciónpordondeentraráelperno.
(2)Sedebeinsertarelpernoporsuparteplásticaenlasperforacionesqueseindiquen,luegoseinsertalapunta metálicaenlaperforaciónparaquesucabezaquedealinteriordelacajaminifix.
(3)Girarlacajaminifix180°paraapretarlasdospiezas.
It´safittingsystemmadeofaspreadingbolt(A)andaminifixcam(B).
(1)Inserttheminifixcamintheholeplacedinthefaceofthepanelwiththearrowpontingtowardstheholewheretheboltwill fit.
(2)Inserttheboltwithitsplasticbaseintheshownholes,theninsertthemetallicboltheadintheholessoitfitsinsidethe minifixcam.
(3)Tightthepanelsbyturningtheminifixcam180°.
TARUGOS O TAQUETES / FLUTED DOWELPIN
1 caja minifix / dowels hole
Esunpedazodemaderacortoygrueso,deaproximadamente5a10cmdelargo,quesirveparaamarrarelmuebley darleresistencia.
It´s ashortandthickpieceofwood,1,9to3,9inchesaproximately,whichisusedtotiethecabinetandgiveitresistence. 180° x 2