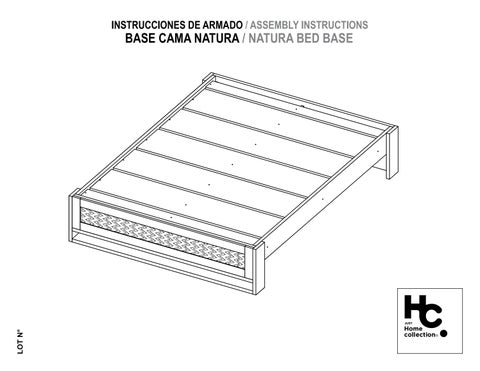
BASECAMANATURA/NATURABEDBASE
¡ATENCIÓN!/ATTENTION!
Enlaspróximaspáginasestáelcontenidodelaspiezasyherrajesdel mueble.Asegúratedequelacantidaddeherrajesypiezasquehayenla cajasealacorrectaytodoestéenbuenestado.aquecuandoelmueble Y estéarmadonopodrásrealizarningunareposición.
Onthenextpagesisthecontentofthepiecesandofthefurniture. hardware Makesurethenumberofhardwareandpartsintheoxiscorrectand b everythingisingoodcondition.Whenthefurnitureisassembledyouwillnot beabletomakeanyreplacement
RecomendacionesImportantes/
KeyRecommendations
•Ensambleelmuebleentredospersonas./Assemblethecabinet betweentwopeople.
•Ensambleelmueble ementesobreunasuperficieplanaylisa,preferibl sobreuntapeteoelcartóndelacaja./Assemblethecabinetonaflat smoothsurface,preferablyonacaretedfloorortheboxcarton.
•Serecomendiautilizarundestornilladoreléctricoparafacilitael ensamble/Itisrecommendedtouseanelectricscrewdriverto facilitateassembly.
HerramientasNecesarias/
RequiredTools
Destornillador deestrella Destornillador depala Martillo
Aplicaestasinstruccionescadavezquevayasautilizarunodeestosherrajes duranteel.armado/Applytheseinstructionseverytimeyou’reusingoneof theseconnectorsduringtheassembly.
TarugosWoodDowels /
1.Insertaeltarugoenlaperforación indicadaygolpéalosuavementehasta quelleguehastaelfinaldela perforación./Putinthedowelinside theindicatedholeandsoftlyhitituntil it’sfullyinside
2.VerificaqueNOseinserteeltarugo enlaperforacióndelacajaminifix./ VerifythatthedowelisNOTinserted intotheperforationoftheminifixcam.
MinifixyPernos/
pequeñaflecha smallarrow
MinifixCam&SpreadingBolt
1.Latcajaminifixieneunapequeña flechaensupartesuperior,sedebe insertarlascajasminifixconlaflecha apuntandohacialaperforacinque ó hayenelbordedelapieza./The Minifixcamhasalittlearrowonits uppersurfaceoushouldinsertthese y camswiththelittlearrowpointing towardsthedrillingonthepanel’s edge
2.Sedebeinsertarelpernoconla parteplástica/haciaabajo.The spreadingboltshouldputwiththe be blackplasticpartfacingdown.edge.
3. senLuegodeunirlaspiezas,debe girar180°lascajasminifixconun destornilladordeestrellaparaajustary asegurarelensamble./Afterjoining twopanelstogetheryoushouldturn thecams180°withaphillipshead screwdrivertoadjustandsecurethe joint. 1 2 3
Tarugo/ Wooddowel
Tornillocabeza sombrilla11/2+tuerca +arandela5/16" Headscrewumbrella 11/2+nut +washer5/16"
PernoMinifix/ SpreadingBolt x72
x27
Tornillocabeza ranurada21/2+tuerca +arandela3/16" Headscrewslotted 21/2+nut +washer3/16"
x8x6
CajaMinifix/ MinifixCam x27
TapaMinifix/ CoverCaps
x16 x29
Tornillocabeza ranurada11/2+tuerca +arandela3/16" Headscrewslotted 11/2+nut +washer3/16" x8
Tornillo ensamble2"/ Drywall screw2" x25
Tornillo ensamble13/4"/ Drywall screw13/4"
Tejido/ Fabric x1
Tornillo ensamble1"/ Drywall screw1" x8
x4
Ángulochapeta/ Angle
Tornillo ensamble11/2"/ Drywall screw11/2" x4
Deslizador puntilla/ Nail-onglide x20
*PesoenKg/WeightinKg.
*PesoenLibras/WeightinLb
L-x1
M2 -x
N1 -x
O1 -x
P1 -x
Q5 -x
R2 -x
S2 -x
AssemblyParts
Hapresiónsobreel z fondoelytextil
Pressonthebottom andthefabric
Retiraelprotectordelacinta Removethetapeprotector.
Deslizaelfondo dentrodelasranuras
Eltextildebequedarhaciaellado contrariodelascajasminifix.
Slidethebackpanel insidethegrooves
Thetextileshouldbefacing awayfromthe. minifixcam
Despuésdeajustartodaslas cajasminifix, ylostornillos cúbralasconlastapasadhesivas.
Afteryoufinishtheadjustment ofthecamsandscrews, coverthemwiththe covercaps.
Alterminardearmar, desprendalasletras adhesivas.
Afteryoufinish assemblingthecabinet, takeofftheadhesive letters.