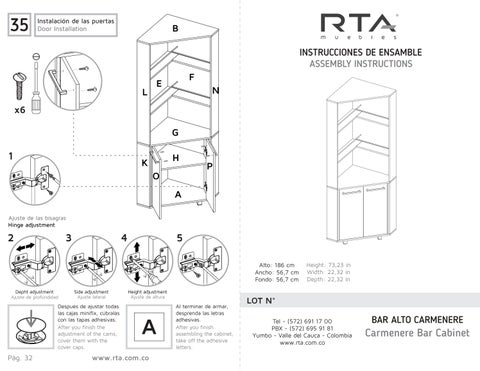
Instalación de las puertas
Door Installation
Ajuste de las bisagras 1 x6
Hinge adjustment
2
3 Depht adjustment Ajuste de profundidad
Después de ajustar todas las cajas minifix, cúbralas con las tapas adhesivas.
After you finish the adjustment of the cams, cover them with the cover caps.
4
Al terminar de armar, desprenda las letras adhesivas.
After you finish assembling the cabinet, take off the adhesive letters.
INSTRUCCIONES DE ENSAMBLE ASSEMBLY INSTRUCTIONS Alto: 186 cm
Ancho: 56,7 cm
Fondo: 56,7 cm
Height: 73,23 in
Width: 22,32 in
Depth: 22,32 in
Tel - (572) 691 17 00 PBX - (572) 695 91 81 Yumbo - Valle del Cauca - Colombia www.rta.com.co
RECOMENDACIONES IMPORTANTES No pintar el mueble.
El mueble debe ser usado únicamente en interiores, no exponer al sol directo
Limpiar los herrajes metálicos con un paño seco
NO sobrecargar el mueble (ver las cargas sugeridas).
No golpear ni martillar el mueble (solo cuando se indique).
Limpiar con un paño ligeramente húmedo, usar jabones suaves.
No arrastre el mueble, levántelo entre dos personas.
Evite el contacto directo con el agua, el fuego o la exposición a fuentes de calor
IMPORTANT RECOMMENDATIONS Do not paint the cabinet.
The cabinet MUST be used exclusively indoors, do not expose to direct sun.
Clean metallic hardware with a dry cloth.
Do NOT overload the cabinet (see suggested loads).
Do not hit or hammer the cabinet (just when indicated).
Clean with a slightly damp cloth, use gentle soaps.
Do not drag, lift and move between two people
Avoid direct contact with water, fire or exposureto heat sources.
ADVERTENCIA Nunca permita que los niños escalen o manipulen el mueble, la caída de este puede provocar lesiones graves o la muerte
Never allow children to climb or manipulate the cabinet, furniture tip over can cause serious injuries or death.
Instalación de las Entrepaño
Shelf Installation
Ajuste la altura del entrepaño según su necesidad Adjust the heigth of the shelf acording to yor need
Fixing the cabinet to the wall
*Centímetros / Inches *VISTA FRONTAL / FRONT VIEW
NECESARIAS* REQUIRED TOOLS* *No incluidas y no se muestran en tamaño real.
*Not included, and not shown actual size
5/16 Drill bit.
Broca de 5/16".
Chazo Mariposa + Tornillo Ensamble Wall Anchor + Drywall Screw
HERRAJES PARA ARMADO ASSEMBLY HARDWARE Compruebe que el contenido de los herrajes sea el correcto. En caso de que falte alguna pieza, por favor llame a nuestra línea de atención al cliente x52
Please check that the hardware content is correct. If any item is missing, please call to our customer service line
Perno Minifix Spreading Bolt x44
Tarugo Wood Dowel x44
Minifix Minifix Cams
Minifix Color 1 Cover Caps Color 1 x50
Tapa Adhesiva
Tapa Adhesiva
Minifix Color 2 Cover Caps Color 2 x10
Bisagra Interior (Incluye Tornillos) Inset Hinge (Screws included) x4 x8 Tornillo de Ensamble 2" 2" Drywall Screw
HERRAJES PARA ARMADO ASSEMBLY HARDWARE Compruebe que el contenido de los herrajes sea el correcto. En caso de que falte alguna pieza, por favor llame a nuestra línea de atención al cliente
Please check that the hardware content is correct. If any item is missing, please call to our customer service line
Tornillo Lámina Flat Head Screw x23
Chazo Mariposa+ Tornillo Ensamble Drywall Screw+ Wall Anchor x4 x2 Manija Handle x5
Pata Steel Leg
de Copas Wine Glass Rack x1
de botellas Bottle Support x2
Entrepaño Shelf support x4
Colgador
Soporte
Soporte
PIEZAS DE ARMADO ASSEMBLY PARTS Rotate to tighten. Gire para apretar. 2 1
Rotate to tighten. Gire para apretar.
RECOMENDACIONES DE ENSAMBLE ASSEMBLY RECOMMENDATIONS Ensamble el mueble entre dos personas.
Ensamble el mueble sobre una superficie plana y lisa, preferiblemente sobre un tapete o el cartón de la caja
Lea cuidadosamente las instrucciones e identifique todas las piezas y herrajes antes de empezar a armar el mueble.
Assemble the cabinet between two people.
Assemble the cabinet on a flat, smooth surface, preferably on a carpeted floor or the box carton.
Carefully read all the steps and identify all the wood parts and hardware before assembling the cabinet.
Cubra las cabezas de los tornillos con las tapas adhesivas Cover the screw heads with the adhesive caps
Voltear Rotate Tornillo de Ensamble 2" 2" Drywall Screw
Gire para apretar 2 1
Rotate to tighten.
Gire para apretar
Rotate to tighten.
Gire para apretar.
Rotate to tighten.
Gire para apretar
Rotate to tighten.
Gire para apretar.
Rotate to tighten.
Voltear
Rotate
Voltear
Rotate
Voltear Rotate
Rotate to tighten.
Gire para apretar
Voltear Rotate
Rotate to tighten.
Gire para apretar