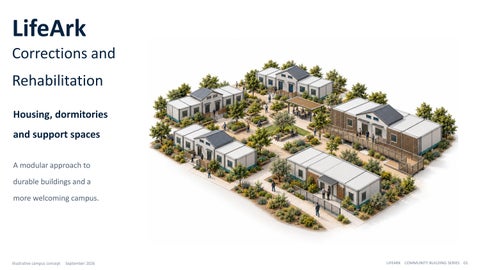
LifeArk Corrections and Rehabilitation Housing, dormitories and support spaces A modular approach to durable buildings and a more welcoming campus.
Illustrative campus concept
September 2026
LIFEARK COMMUNITY BUILDING SERIES 01
LifeArk Rehabilitation R02 ONE SYSTEM, MANY BUILDING USES
HOUSING
DORMITORIES
SUPPORT SPACES
Individual rooms, shared living areas and reentry housing with a domestic character.
Shared sleeping rooms and residential clusters with coordinated bathrooms and services.
Classrooms, counseling, dining and staff rooms can use the same family of building parts.
REPEATABLE MODULES CAN SERVE A BROAD CAMPUS PROGRAM. Room sizes, accessibility, occupancy and support services follow the selected program. Concept program studies. Configurations shown are illustrative.
LIFEARK COMMUNITY BUILDING SERIES 02
LifeArk Rehabilitation R03 A CAMPUS THAT SUPPORTS REHABILITATION
A familiar place to live and learn
Molded forms
Shared outdoor rooms
Rounded contours and warm finishes give the buildings a softer visual character.
Courtyards create places for conversation, classes and everyday social contact.
Shade and planting Trees, canopies and planted edges help make outdoor spaces comfortable and inviting.
CDCR's California Model values an environment closer to life in the community. Residential character can work together with the required operational controls.
Human scale and warm materials create a welcoming setting. Molded contours, daylight and shared outdoor spaces offer a softer architectural character. Concept illustration. Architectural alignment does not imply measured rehabilitation outcomes.
LIFEARK COMMUNITY BUILDING SERIES 03
LifeArk Rehabilitation R04 SECURITY TAILORED TO THE PROGRAM Staff observation Locate staff near shared circulation to support visibility and everyday contact.
Secure fixings Specify tamper-resistant hardware and protected panel interfaces for the intended use.
Controlled entry Coordinate access control, door hardware and emergency egress as one design.
Room fittings Select furniture and fixtures for resident needs, durability and the custody level.
Protected services Keep utility routes and vulnerable connections outside resident access where required.
Maintenance access Use secured service points so routine maintenance can follow an organized access plan.
Security begins with the building layout and its daily operation. Select doors, glazing, hardware and finishes for the required custody level and resident needs. Concept features for review. Custody-specific performance requires testing and approval.
LIFEARK COMMUNITY BUILDING SERIES 04
LifeArk Rehabilitation R05 HYGIENE AND EFFICIENT MAINTENANCE Exposed polymer Smooth exposed surfaces permit routine washing with compatible cleaning products.
Sealed joints Detail panel seams and penetrations to keep wash water out of the assembly.
Routine washing Confirm spray pressure, nozzle distance and runoff control for each surface.
Interior finishes Select durable wall and floor finishes that tolerate the planned cleaning routine.
Coved floor edges Specify smooth floor-to-wall transitions to reduce dirtcatching corners.
Floor drainage Coordinate drainage, floor slopes and slip resistance in designated wet areas.
Washable surfaces and accessible services simplify upkeep. Use power washing on approved exposed polymer areas. Match interior cleaning to the specified finish. Confirm pressure, detergents, sealed joints, equipment protection and runoff controls.
LIFEARK COMMUNITY BUILDING SERIES 05
LifeArk Rehabilitation R06 EARTHQUAKE AND DISASTER RESILIENCE Connected bays Engineer the connections so the modules act together under project design loads.
Lightweight shell Lower structural mass reduces inertial forces at the same earthquake acceleration.
Base anchorage Connect the structure to a foundation designed for the site's soil and hazards.
Roof protection Coordinate roof finishes, edge details and wind resistance for local exposure.
Protected openings Detail windows, doors and joints to manage wind-driven rain and weather exposure.
Site drainage Plan finished grades and water routes to protect access and the building base.
A lightweight system with an engineered path to the ground. Coordinate seismic connections, wind anchorage, weather protection and site drainage for each location. ER-560 recognizes seismic use subject to its conditions. Flood adaptation requires separate design.
LIFEARK COMMUNITY BUILDING SERIES 06
LifeArk Rehabilitation R07 FIRE PROTECTION THROUGH TESTED ASSEMBLIES Rated wall layers Use the listed facings and installation details wherever a rated wall is required.
Exterior finish Choose the exterior surface as part of the specified wall construction.
Composite shell The insulated polymer shell works within a complete protective assembly.
Roof assembly Maintain the roof build-up covered by the listed classification.
Interior lining Required protective wall and ceiling linings remain part of the occupied space.
Life safety design Coordinate exits, detection and required suppression with the complete building plan.
Fire performance depends on the complete specified assembly. ER-560 includes a Class A roof classification and specified one-hour wall assemblies. Listed ratings require the prescribed facings and details. The illustrated layers are schematic.
LIFEARK COMMUNITY BUILDING SERIES 07
LifeArk Rehabilitation R08 THERMAL COMFORT IN EVERY SEASON Slower heat gain Insulation limits heat entering through the opaque enclosure during hot weather.
SUMMER
Insulated walls A continuous thermal enclosure supports comfortable occupied spaces.
Insulated floor Include the floor when coordinating the building's thermal protection.
WINTER
Slower heat loss The same insulated enclosure helps retain indoor warmth in colder weather.
Insulated roof Roof insulation limits heat transfer above sleeping and activity spaces.
Climate control Pair the shell with suitable windows, shading, ventilation and a sized HVAC system.
The insulated shell slows heat gain and heat loss. R-35 thermal resistance for the tested opaque wall, floor and roof assemblies. Whole-building comfort also depends on windows, ventilation, shading and HVAC design.
LIFEARK COMMUNITY BUILDING SERIES 08
LifeArk Rehabilitation R09 ACOUSTIC COMFORT AND PRIVACY Activity separation Place gathering, workshop and service activities away from sleeping rooms.
Speech privacy Use tested partitions and door seals for counseling and private conversations.
Complete assembly Sound transmission depends on every layer, joint and penetration in the enclosure.
Room acoustics Select sound-absorbing finishes compatible with fire and security requirements.
Quiet rooms Organize bedrooms and circulation to reduce everyday noise at rest areas.
Sealed openings Coordinate seals at doors and windows to limit sound leakage through gaps.
Quiet rooms need a complete acoustic design. Combine the insulated enclosure with sealed openings, activity separation and selected acoustic finishes. Confirm sound performance for the complete assembly. No tested STC rating is claimed here.
LIFEARK COMMUNITY BUILDING SERIES 09
LifeArk Rehabilitation R10 ENVIRONMENTAL VALUE AND ADAPTABLE DELIVERY Factory repetition Repeatable components support quality checks and organized material use.
Approved materials Document resin and recycled content against the approved material specification.
Module transport Complete appropriate work in the factory before delivering modules to the site.
Optional solar Evaluate solar generation as part of the site's energy strategy and infrastructure.
Phased site work Prepare the next building pad while coordinating fabrication and campus operations.
Relocate and reuse Plan accessible connections, inspect reused parts and obtain approvals at the new site.
Factory production can support phased campus development. Coordinate factory and site work, plan service access, and preserve options for relocation and reuse. Recycled content follows the approved resin specification. Reuse requires inspection and new site approvals.
LIFEARK COMMUNITY BUILDING SERIES 10
LifeArk Rehabilitation R11 GEN2: A SIMPLE KIT FOR DIFFERENT MODULE TYPES Roof and floor Shared component geometry forms the top and base of each repeating bay.
Corner columns Columns establish the corners and receive the adjoining wall components.
Support legs Repeated leg components support the bay at its base connection points.
Vertical bulkheads
FROM THE ASSEMBLY ANIMATION
Upright infill pieces form wall segments and the sides of selected openings.
Horizontal bulkheads Repeat horizontal pieces to complete wall areas and frame openings to the layout.
Fit the roof, door and window
Configurable modules A consistent kit can form different wall and opening arrangements for housing or support uses.
Connect bays for larger spaces
Repeatable Gen2 parts support assembly by a team of 2 to 4. Arrange the same components for solid walls, doors, windows or open bays, then connect modules to form larger spaces. LifeArk Gen2 model and animation. Team size describes LifeArk's intended assembly method.
LIFEARK COMMUNITY BUILDING SERIES 11
LifeArk Rehabilitation R12 GEN2: STUDENTS LEARNING TO ASSEMBLE A HOME 1. Identify the kit
A home from the kit
Recognize the five component families and organize them in the planned assembly order.
Connect individual bays into a home and see how each student's work contributes to the result.
2. Learn by doing Use component samples and the assembly drawing to practice fitting and checking each connection.
3. Work in a team A team of 2 to 4 shares positioning tasks and follows the same repeatable assembly method.
4. Check each step Check orientation, alignment and component seating before proceeding with the next part.
Skills for reentry Develop plan reading, tool familiarity and teamwork through a tangible building project.
Learn practical skills. Imagine assembling a home of your own. A proposed CDCR program could teach students to assemble Gen2 components with a small team and instructor guidance. Educational concept based on the supplied Gen2 geometry. Four participants illustrate the 2-to-4-person team concept.
LIFEARK COMMUNITY BUILDING SERIES 12
LifeArk Rehabilitation R13 BUILT EXPERIENCE
Residential scale and a welcoming entrance
Daylight and comfortable shared interiors
The completed exterior shows how repeated molded bays, familiar entrances and landscape can form a residential setting.
Windows, finished interiors and common living space show the potential for comfortable places to live and gather.
Existing LifeArk housing demonstrates the residential character. LifeArk Tyler, El Monte. Permanent supportive housing for 18 residents, completed in 2022. Actual project photographs supplied by LifeArk. This is a supportive-housing example.
LIFEARK COMMUNITY BUILDING SERIES 13
LifeArk Rehabilitation R16 LIFEARK 3X2 STUDENT DORM DUPLEX PROTOTYPE (AMITY PROJECT PRECENDENT)
ONE REPEATABLE DORM PLAN SUPPORTS ANY CAMPUS PROGRAM. DORM 1
DORM 2
402 sf 6 modules 4 students
402 sf 6 modules 4 students
Four students per dorm
Bath and wash spaces
Two bunk-bed positions serve four students in each 402 sf dorm.
Toilet, sink and shower spaces sit within each dorm.
Clerestory window Window located above the upper bunk bed for natural light and ventilation
Separate entries Each dorm opens directly to the shared campus walkway.
Modular structure Six modules make one dorm. The paired plan uses 12 modules.
TYPICAL 402 SF EACH DUPLEX PAIRS TWO DORMS WITH INDIVIDUAL ENTRANCES.
LIFEARK COMMUNITY BUILDING SERIES 16