
4 minute read
Service Repair Manual Model

from Caterpillar Cat 321B LCR TRACK EXCAVATOR (Prefix KGA) Service Repair Manual Instant Download
by kmd9iso9dkk
321b Lcr Track Excavator
Previous Screen
Advertisement
Product: EXCAVATOR
Model: 321B EXCAVATOR KGA
Configuration: 321B CR EXCAVATOR KGA00001-UP (MACHINE)
Disassembly and Assembly
3064 and 3066 Engines for Caterpillar Built Machines
Fuel Priming Pump - Remove and Install
SMCS - 1258-010
Removal Procedure
Notice
Care must be taken to ensure that fluids are contained during performance of inspection, maintenance, testing, adjusting and repair of the product. Be prepared to collect the fluid with suitable containers before opening any compartment or disassembling any component containing fluids.
Refer to Special Publication, NENG2500, "Caterpillar Tools and Shop Products Guide" for tools and supplies suitable to collect and contain fluids on Caterpillar products.
Dispose of all fluids according to local regulations and mandates.
Notice
Keep all parts clean from contaminants.
Contaminants may cause rapid wear and shortened component life.
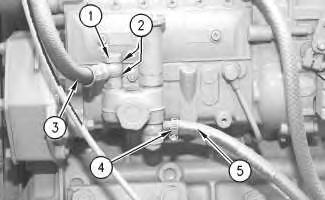
1. Remove banjo bolt (1) and washers (2) (not shown) from the fuel priming pump in order to remove fuel outlet line (3) .
Note: Cap all openings or plug all openings immediately in order to prevent contamination of the fuel system.
2. Loosen hose clamp (4) in order to remove fuel supply line (5) .
Note: Cap all openings or plug all openings immediately in order to prevent contamination of the fuel system.
3. Remove nuts (6) that secure the fuel priming pump to the fuel injection pump.
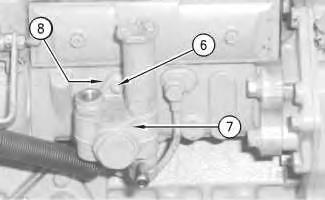
Note: Fuel will drain from the fuel priming pump during removal. Collect the fuel in a suitable container for storage or for disposal.
4. Remove fuel priming pump (7) and the O-ring (8) (not shown).
Note: Cap all openings or plug all openings immediately in order to prevent contamination of the fuel system.
Note: Check the O-ring (8) (not shown) for wear or damage. Replace a worn O-ring or a damaged O-ring with a new replacement part.
1. Place the O-ring (8) (not shown) and place the fuel priming pump (7) in position on the fuel injection pump.
2. Install nuts (6) that secure the fuel priming pump to the fuel injection pump.
3. Connect fuel supply line (5) and hose clamp (4) to the fuel priming pump.
4. Tighten the hose clamps.
Note: Check the washers (2) (not shown) for wear or damage. Replace a worn washer or a damaged washer with a new replacement part.
5. Secure the fuel outlet line (3) and the washers (2) (not shown) to the fuel priming pump with banjo bolt (1) .
6. Tighten banjo bolt (1) to a torque of 20 to 25 N·m (15 to 18 lb ft).
Previous Screen
Product: EXCAVATOR
Model: 321B EXCAVATOR KGA
Configuration: 321B CR EXCAVATOR KGA00001-UP (MACHINE)
Disassembly and Assembly
3064 and 3066 Engines for Caterpillar Built Machines
Fuel Filter Base - Remove and Install
SMCS - 1262-010
Removal Procedure Table 1
Required Tools
Tool Part Number Part Description
A 185-3630 Strap Wrench Assembly 1
NOTICE i01564836
Keep all parts clean from contaminants.
Contaminants may cause rapid wear and shortened component life.
NOTICE
Care must be taken to ensure that fluids are contained during performance of inspection, maintenance, testing, adjusting and repair of the product. Be prepared to collect the fluid with suitable containers before opening any compartment or disassembling any component containing fluids.
Refer to Special Publication, NENG2500, "Caterpillar Tools and Shop Products Guide" for tools and supplies suitable to collect and contain fluids on Caterpillar products.
Dispose of all fluids according to local regulations and mandates.
1. Use Tool (A) to remove fuel filter (3) from fuel filter base (2) .
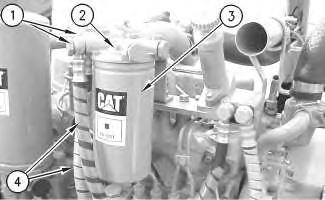
Note: It is not necessary to remove the fuel filter in order to remove the fuel filter base.
2. Remove banjo bolts (1) and copper washers in order to disconnect the fuel lines (4) from the fuel filter base (2).
Note: Cap all openings or plug all openings immediately in order to prevent contamination of the fuel system.
3. Remove two bolts (5) and the washers that secure the fuel filter base (2) to the air inlet manifold. Remove the fuel filter base (2) from the fuel filter bracket.
Installation Procedure
Keep all parts clean from contaminants.
Contaminants may cause rapid wear and shortened component life.
1. Place the fuel filter base (2) in position on the fuel filter bracket. Install the washers and two bolts (5) that secure the fuel filter base tothe fuel filter bracket.
2. Install the banjo bolts (1) and install new copper washers in order to connect the fuel lines (4) to the fuel filter base (2) .
3. If the fuel filter was removed, install the fuel filter (3) to the fuel filter base (2). Tighten the fuel filter by hand according to the instructions that are shown on the fuel filter. Do not overtighten the fuel filter.
Previous Screen
Product: EXCAVATOR
Model: 321B EXCAVATOR KGA
Configuration: 321B CR EXCAVATOR KGA00001-UP (MACHINE)
Disassembly and Assembly
3064 and 3066 Engines for Caterpillar Built Machines
Fuel Injection Lines - Remove and Install
SMCS - 1252-010
Removal Procedure
Start By:
A. Remove the fuel filter base. Refer to Disassembly and Assembly, "Fuel Filter BaseRemove and Install".
Notice
Keep all parts clean from contaminants.
Contaminants may cause rapid wear and shortened component life.
Notice
Care must be taken to ensure that fluids are contained during performance of inspection, maintenance, testing, adjusting and repair of the product. Be prepared to collect the fluid with suitable containers before opening any compartment or disassembling any component containing fluids.
Refer to Special Publication, NENG2500, "Caterpillar Tools and Shop Products Guide" for tools and supplies suitable to collect and contain fluids on Caterpillar products.
Dispose of all fluids according to local regulations and mandates.
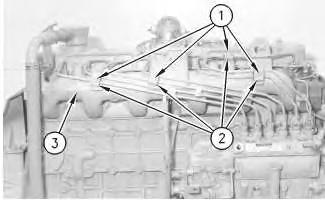
Illustration 1 g00606301
The 3066 Engine is shown.
1. Remove the bolts (1), the washers, and the clamps (2), which secure the fuel lines to the inlet manifold (3) .
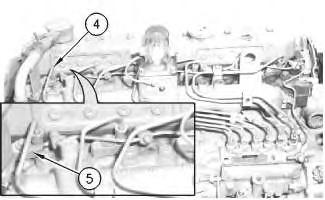
Illustration 2 g00606310
2. Disconnect the fuel injection lines (4) from the fuel injection nozzles (5) .
Note: Cap all openings or plug all openings immediately in order to prevent contamination of the fuel system.
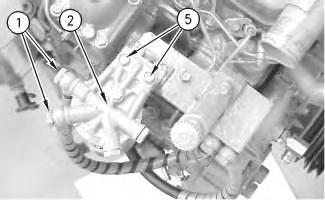
Fuel injection pump for a 3066 Engine
3. Disconnect the end of the fuel injection lines (4) from the fuel injection pump (6) .
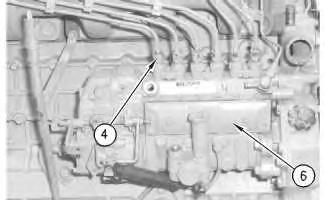
Note: Cap all openings or plug all openings immediately in order to prevent contamination of the fuel system.
4. Remove the fuel injection lines (4) from the engine.
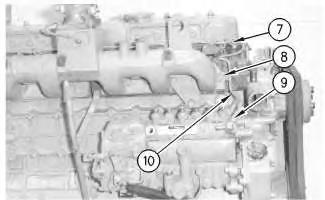
5. Loosen the acorn nuts (7), which secure the fuel return line to the fuel injection nozzles.
6. Remove one bolt (8) and the washer from the clamp that secures the fuel return line to the intake manifold.
Note: The clamp will remain with the fuel return line, when the fuel return line is removed from the engine.
7. Disconnect fitting (9). Remove fuel return line (10) from the engine.
Note: Cap all openings or plug all openings immediately in order to prevent contamination of the fuel system.
