8 minute read
HOW-TO


IN THE SWING OF THINGS
Replacing T25 rear swing arm mounts
Words and photos Mark Walker
One of the most common failure points on T25/T3 Vans is the rear swing arm mounts. Hindsight is wonderful; the design of the swing arm mounts on this era Bus from the rear suspension mounting point on a Bay Window. Like the adjacent sill panels, the mounts can rot quite badly and be quite tricky to repair; the best course of action is usually replacement and that’s what we always seemed quite curious and a step back tackled on the Van in the pictures.
NEED TO KNOW
Tools required: MIG welder; angle grinder; fi nger grinder; air cut off tool; drill/hole punch; spot weld drill; welding clamps; hammers (various); cold chisel Materials used: replacement mount; zinc primer; steel section; cavity wax; arch repair panel Skill level ............. 5 Time taken ........... 20 hours Cost DIY ............... £100 Cost pro ............... £ 750 approx labour plus parts.

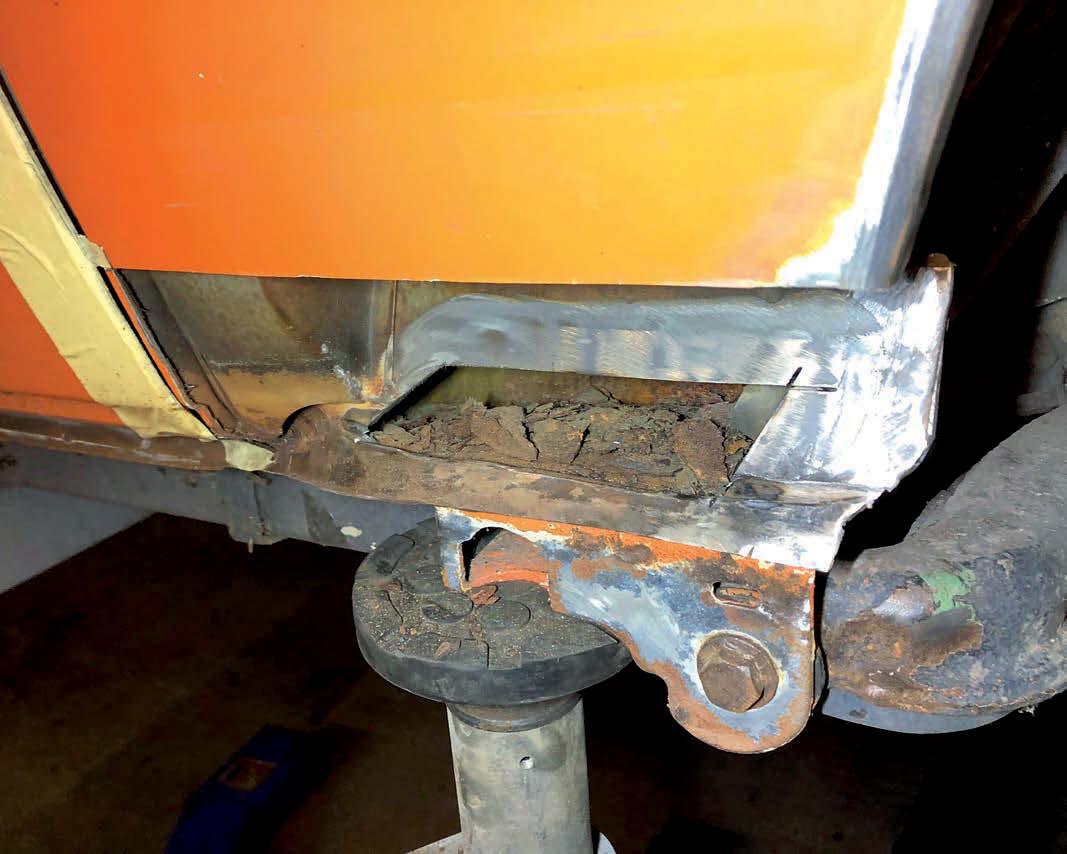
01 Get cutting Before breaking out the grinder and welder, you’ll need to assess the area to be repaired. In some cases, you may be able to get away with carrying out a localised repair with some thick steel. When we began work on the Van in the pictures it wasn’t even an MOT failure; it was a decent looking, roadworthy Bus with only a few bubbled areas around the edges. Judging by how bad the corrosion was when we began cutting, it’s safe to say a lot of T25s on the road are in a similar state.
If you’re reading this feature in anger, rather than just skim-reading, then you probably need to do the same job to your Van due to an MOT fail or visual corrosion. Unlike some other jobs, with the swing arm mounts, you really need to cut some metal away in the surrounding areas before you can get a full idea of the job at hand; we weren’t originally repairing the mount at all, but after cutting out the outer panel and centre panel we found the mount to be holed. To begin cutting, attach a 1mm cutting disc to an angle grinder and cut off the outer skin, followed by cutting a window into the centre sill as pictured. You will now see the extent of the rust above the swing arm mount.

03 Remove swing arm The swing arm is held to the mount with an M12 bolt and there’s a second one on the inner mount too; these are often stuck solid and you may have to cut through them, which is diffi cult because access with a grinder is limited. Before you can remove these bolts though, you’ll need to remove the driveshaft at one end, the lower shock absorber bolt and the coil spring. You’ll benefi t from having a helper to remove and refi t the arm too, as it’s pretty heavy. 02 Clean up area At this point it’s helpful to clean up the whole area to get the best picture of what is needed. We scraped out the rust fl akes and vacuumed it all before breaking out the small belt sander to check out the thickness of the metal, which immediately dissolved into a large hole. After quickly contemplating a localised patch repair, we looked at the condition of the rest of the mount and deemed it to be of reduced thickness in several areas. Deciding to replace rather than repair wasn’t a light one, as we knew we’d have to drop the rear suspension. This was a restoration though and we wanted it to last, as well as look right.


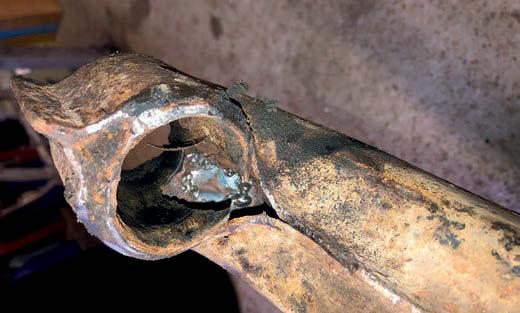
04 Check over/repair swing arm Our swing arm initially had a hole near the outer mount, which we carefully repaired in-situ when we thought it wouldn’t need to be removed. Once it was removed, however, we found that the lower spring perch was rotted out, so we drilled out the spot welds and replaced it with one from Just Kampers. It was only when we pressed out the bushes to replace them that we then realised the arm was completely shot. It seemed a shame after all this work to replace the arm with a new one, but we knew it was the safest option. Our advice: press out the bushes fi rst before deciding whether to repair or replace.

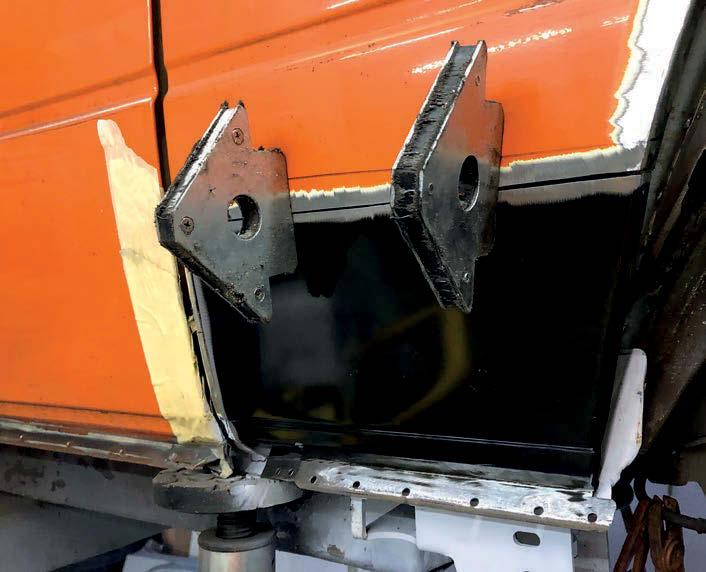
05 Cut out swing arm mount You’ll now need to do the most daunting part of the whole job – cutting out the old swing arm mount. Before you do this, it’s worth either taking some measurements or making a jig to ensure you get the new mount in exactly the right position when you weld it on. To be honest, access to cut out the old mount is a bit tricky. After trying to get in there with a standard 4.5in (115mm) grinder and failing, we decided to break out the 9in grinder with a thin cutting disc on it. This made short work of cutting out the mount and meant that we could cut really close to the original mount.
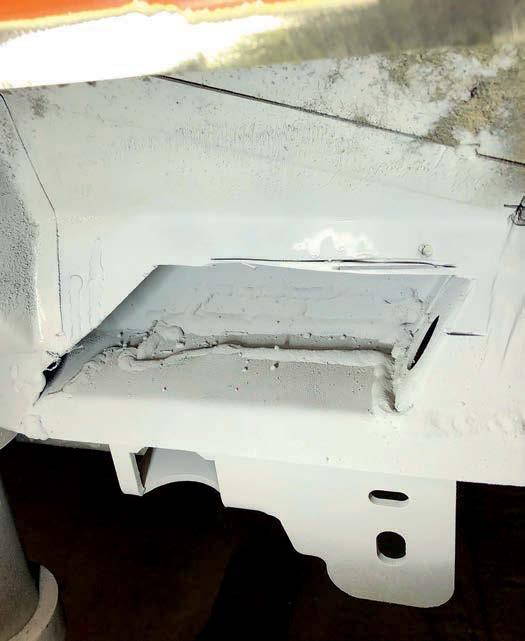
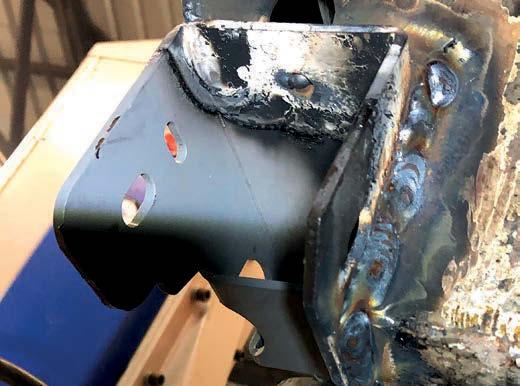
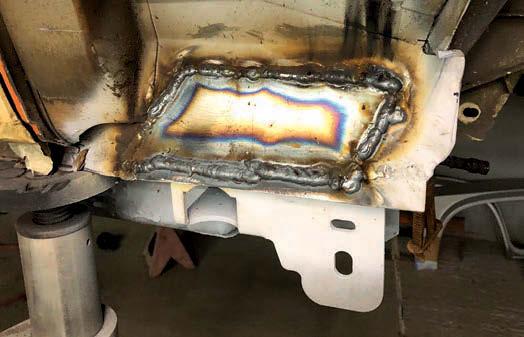
07 Prime inner repairs With everything looking dandy, you should now paint the exposed metal to seal it from the elements. We chose to use a good quality zinc primer in this case before closing up the area above the swingarm mount. We decided not to grind down the heavy structural welds securing the swingarm mount in place, as grinding would make them thinner and ultimately rob them of strength. Allow the welds to cool down for 20-30 minutes before applying a couple of coats of primer, otherwise, the primer will burn. 06 Weld on new mount With the surrounding area cleaned up so that we could get a good weld, we clamped the new mount in position and checked, then double-checked our measurements before tacking it in position and triple checking. Once you’re happy with the position you can turn up the power on the welder and make the fi rst pass. We made several passes onto the surrounding metal to ensure it would be as strong as possible. When we were happy with the welding at the top we got underneath and welded those seams; be very careful here to avoid burns. It goes without saying that if you’re a novice welder you should at least get some tuition before tackling structural areas.

08 Repair middle sill Once the primer has dried you can weld up the hole in the middle sill that you cut earlier. We used a piece of 3mm steel we had bought previously to repair some Bay Window chassis sections. Butt-weld the piece in, before welding a seam along the bottom to join it to the inner sill. We used a high power setting on this repair too, as it is still a structural area and provides much-needed strength to the suspension mounting area.

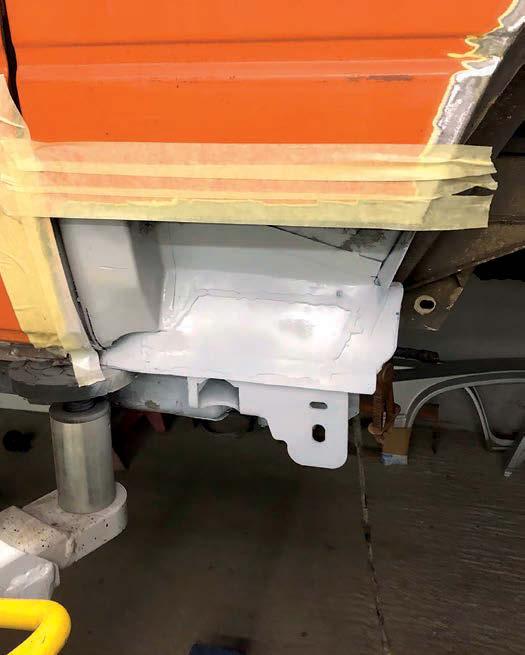
09 Grind middle sill repair You can now grind the welds down a little; we didn’t grind the welds here back so that they were metal fi nished, instead deciding to just knock them down a little, especially in the lower area where the outer panel sits against this area. Access is a little limited but you can just about get in there with an angle grinder and a fl ap disc. It’s up to you whether you metal fi nish the area like factory or just knock back the welds a little as we did. 10 Prime middle sill Once the welds had cooled, we zinc primed the area thoroughly to protect it going forwards. It’s surprising how little they protected the inner surfaces of these vans at the Hannover factory, although maybe not so surprising given how susceptible they are to body rust. If you wanted to go one further, you could use epoxy spray primer and overpaint the area with paint or UPOL Raptor; we painted the underside of the van with Raptor once we’d fi nished the whole job, but felt that zinc primer and a good cavity wax was enough for the inner surfaces.
11 Repair outer panels Not knowing just how far the rust has progressed on your particular Van, it’s diffi cult to show you the defi nitive guide to fi nishing up the repair. The Van we were working on needed absolutely everything repaired or replaced in this corner, but equally, I’ve seen Buses with a rotten swing arm mount where all of the surrounding metal is sound. One thing that you will need to do though, is to close up the outer sill area at the front of the wheelarch and the wheelarch itself.
There are two diff erent qualities of repair panels here; one that is a one-piece panel including the lower wheel arch and one that is separate to the wheel arch, which is the one that we chose to get a factory fi nish. We butt-welded this panel on, as lap welding creates a moisture trap, followed by plug welding the lower edge. Much time was taken to get the panel to line up before welding in place. As ever, when butt-welding panels in place, use a series of tacks and allow plenty of time to cool between welds.
And that’s it; apart from a whole lot more fi nishing, of course, it’s job done!