
Safetrack round US

Page 1


OS-0004-US-05

C D E F G A B H Safetrack Suspension Options

OS-0004-DK-05

Suspension type

Refer to the OC/delivery note for chosen suspension type.

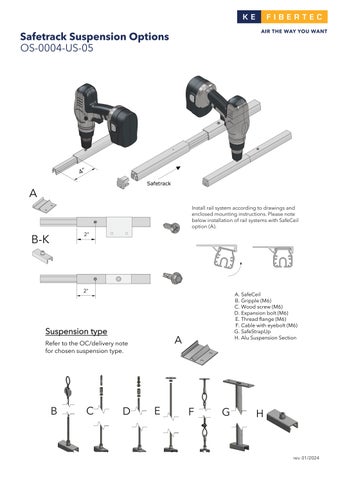
Monter skinnesystem efter tegninger og vedlagte montagevejledninger. Vær opmærksom på at hvis det er med SafeCeil(A) kan de monteres på skinne som vist herunder.

Install rail system according to drawings and enclosed mounting instructions. Please note below installation of rail systems with SafeCeil option (A).

A.SafeCeil

B.Gripple (M6)

C.Wood screw (M6)

D.Expansion bolt (M6)

E.Thread flange (M6)

F.Cable with eyebolt (M6)

G.SafeStrapUp

H.Alu Suspension Section

Safetrack

Safetrack, Single Suspension

OS-0005-DK-03

OS-0005-US-03

SafeVulst (kl.12) SafeSlider (kl.12)

SafeBulb (12 o’clock) SafeSlider (12 o’clock)

1 2 3

H=Ø/2-ø/2-mounting height

H = Ø/2-ø/2-montagehøjde Eks. Ø650/2-ø400/2-46=79 mm

L = Duct length

L = Længde kanal

Ø= Diameter

LS = Length socket

Ø = Diameter

LS = Længde Studs

H = Height

W = Width

H = Højde

W = Bredde (Width)

O = Offset

A = Distance socket 1

O = Forsætning (Offset)

A = Afstand studs 1

B = Distance socket 2

B = Afstand studs 2

Safetrack Options, Single Track

Gored Elbow 45° / Gored Elbow 90°

Gored Elbow 45° / Gored Elbow 90°

KE-Mitered Elbow (random angle) / KE-Mitered Elbow 90°

Safetrack, KE-SRD 25

OS-0013-US-03

OS-0013-DK-02

With or without zipper

Safetrack, Safe 360, Single Suspension

OS-0014-DK-02

OS-0014-US-02

Duct diameter Ring size

8” to 25”: 1/8”

Ring Dimension:

26” to 4’: 5/32”

200 - 630 = ø3

631 - 1270 = ø4

Lås ved kl 12 hvis pose over Ø399

Lock at 12 o’clock if duct diameter exceeds 15 3/4”

BPoser over Ø500 Medsendes ringene løst

If duct diameter exceeds 20” rings are included separately (to be installed on site)

1000mm
3’

Safetrack Duct Arch, Single Suspension

OS-0016-US-02

OS-0016-DK-02

Safetrack MountEasy One End

OS-0018-US-04

OS-0018-DK-04 4a) 4c) 5a) 5b)

OS-0 019-DK-04

Safetrack, SafeStretch, Single Suspension

OS-0020-EN-02

When the whole duct run has been pulled onto the track, slide the duct opening over the end of the metal duct. Fix the SafeStretch Fastener to the end of the metal duct by sliding the fastener through the slot in the fabric starting sleeve and then under the worm gear clamp. Once in place tighten worm gear clamp to hold duct and fastener in place.Then fix the SafeStretch fastener with 2 screws to the end of the track.

When the whole duct run has been pulled onto the track, slide the duct opening over the end of the metal duct. Fix the SafeStretch Fastener to the end of the metal duct by sliding the fastener through the slot in the fabric starting sleeve and then under the worm gear clamp. Once in place tighten worm gear clamp to hold duct and fastener in place.Then fix the SafeStretch fastener with 2 screws to the end of the track.

SafeStretch Fastener

Clamp

Safetrack, SafeStretch, Single Suspension (Bottom)

OS-0021-US-02

OS-0021-EN-02

Safestretch Bracket

SafeStretch Bracket

AUse the SafeStretch Bracket to stretch the fabric duct by sliding the bracket towards the end of the duct till the duct is taut. Then tighten the set screw.

Use the SafeStretch Bracket to stretch the fabric duct by sliding the bracket towards the end of the duct till the duct is taut. Then tighten the set screw.

AFor ducts larger than 24” diameter a hook is supplied to stabilize the SafeStretch Ring/Bottom.

For ducts larger than 24" diameter a hook is supplied to stabilze the safestretch ring/bottom.

Internal zip

In Zip

SafeStretch Ring

SafeStretch Ring

Bottom

Bottom

Insert the SafeStretch Ring into the SafeStretch Bottom and fix it with the push buttons (or for sizes bigger than 24”) the rubber ring.

Insert the SafeStretch ring into the SafeStretch bottom and fix it with the push buttons (or for sizes bigger than 24") the rubber ring.

At the end of the duct, lower the SafeStretch Bracket (without the set screw) over the track and into the duct through the 2 slots in the fabric duct section at 12 o’clock, until it ”snaps” onto the track. The bracket must be at an angle so one groove sits in place on the rail, and then it can be clicked on. Make sure it is placed so that it is in front of the horizontal strut. Insert the screw, but do not tighten it fully yet, as the bracket still has to be moveable/adjustable (for a more detailed view, see OS-0022-US-02).

At the end of the duct, lower the SafeStretch Bracket (without the set screw) over the track and into the duct through the 2 slots in the fabric duct section at 12 o'clock, until it "snaps" onto the track. The bracket must be at an angle so one groove sits in place on the rail, and then it can be clicked on. Make sure it is placed so that it is in front of the horizontal strut. Insert the screw, but do not tighten it fully yet, as the bracket still has to be moveable/adjustable.

- For a more detailed view, see OS-0022-EN-01

Safetrack, SafeStretch, Single Suspension

OS-0022-US-02

Turn static files into dynamic content formats.

Create a flipbook
Safetrack round US by KE Fibertec - Issuu